Search
Close
  • The Pattern Shop
  • Our Free Patterns
    • Browse All Our Free Patterns
    • Our Free Knitting Patterns
    • Our Free Crochet Patterns
  • Blog
    • All Blog Posts
    • All Free Patterns
    • Dibble Dabble Inspiration
    • Giveaways
    • Make-Alongs
    • Product Reviews
    • Roundups
    • Tips, Tricks, Techniques for Knitting and Crochet
Stylized bird with pink and gray swirling tail above elegant โ€œMarlyโ€ text, logo for crochet accessories and home decor.
  • Marly Bird House
  • Learn to Knit & Crochet
    • Newbie? Start Here
    • Video Tutorials
    • Knitting Definitions
    • Crochet Definitions
    • Common Techniques
    • Size Charts for Knitting and Crochet Projects
  • About
ร—
  • The Pattern Shop
  • Free Patterns
  • Blog
  • Marly Bird House
  • Learn to Knit & Crochet
    • Newbie? Start Here
    • Video Tutorials
    • Knitting Definitions
    • Crochet Definitions
    • Common Techniques
    • Size Charts for Knitting and Crochet Projects
  • About
Stylized bird with pink and gray swirling tail above elegant โ€œMarlyโ€ text, logo for crochet accessories and home decor.
Search
Close

New Patterns NOW Available in Ad-Free PDF! Check out The Pattern Shop

Take a Look Knit Fingerless Mittens Free Pattern

December 22, 2023 By Marly Bird 1 Comment

The Take a Look Knit Fingerless Mittens are a free cabled knit pattern featuring an intermediate cable stitch, perfect for hands that need to stay warm while fingers stay free. Designed by Marly Bird, this one-skein pattern works up fast in a single skein of worsted weight yarn and pairs beautifully with the matching Take a Look Cable Knit Hat.

โšก Quick Answer:

The Take a Look Knit Fingerless Mittens are a free intermediate-level knit pattern featuring cable stitches, worked flat then seamed. They work up in approximately one skein of worsted weight yarn and pair perfectly with the matching cabled hat โ€” get the free pattern on the blog or purchase the ad-free PDF on Etsy, Shopify, or Ravelry.

Hey, bestie ๐Ÿ’›

If you've been looking for a fingerless mitten pattern that feels both cozy and special, these take-a-look mittens are exactly what you've been searching for. With their classic cable panel running down the back, they're the kind of hand warmers that work beautifully with any winter outfit… and the best part? You can wear them while texting, which honestly wins for practicality!
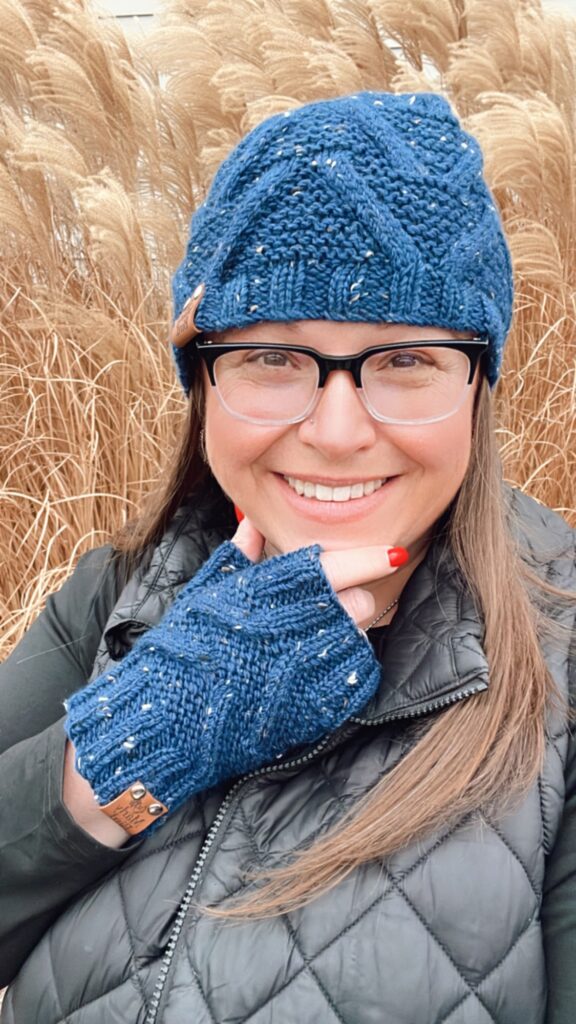
Marly Bird smiling, wearing the Take a Look Knit Cabled Fingerless Mittens and matching cable hat in rich blue tweed. The mittens feature intricate cable patterns, and the hat is topped with a fluffy pompom. She is posing against tall golden reed grass.

๐Ÿ‘‰ Jump to the pattern โ†’


๐Ÿงถ Why You'll Love This Pattern ๐Ÿ’–

These fingerless mittens are more than just hand warmers… they're a confidence builder for anyone learning cables. The pattern breaks the cable panel into manageable sections, and once you master the 3/1 right and left cables, you'll be flying through rows.

โœจ They work up FAST. From cast-on to bind-off, one skein of worsted weight yarn gets you a complete pair. That means a gift-worthy project you can finish in a weekend.

โœจ The sizing is inclusive. Worked in the round on double-pointed needles, these mittens give you a custom fit every time. No more guessing or adjusting patterns โ€” the one-size-fits-most design works for most hand circumferences.

โœจ Cable stitches aren't as hard as they look. The pattern includes a video tutorial showing you exactly how to work cables without a cable needle, plus all the foundational stitches you'll need. By the time you finish, you'll feel like a cable master.

You'll love this pattern if… you enjoy working in the round, you've mastered the basics, and you want to try your hand (literally!) at cables. You'll come away knowing how to work cables confidently, how to manage a thumb gusset, and how to finish a project with a professional-looking bind-off.


โš™๏ธ Quick Pattern Overview

โญ Intermediate ๐Ÿงถ Worsted #4 ๐Ÿ“ ~180 yds total ๐Ÿชก US 8 (5mm) DPNs โฑ 4-6 hours

These mittens are worked in the round from cuff to fingertip opening, featuring a classic cable stitch panel down the back and a comfortable garter-stitch background. The thumb is added via a gusset method, which gives you a perfectly fitted opening every time. Written instructions include charts for both left and right hand, plus the thumb โ€” so you get a complete visual guide alongside the written pattern.


๐ŸŽ“ Understanding Cable Knitting

What's a cable, anyway? A cable is created by crossing a group of stitches over another group, creating the appearance of twisted, braided fabric. The cables in these mittens use a 3/1 method (three stitches over one stitch), which creates a bold, dimensional line perfect for fingerless mittens.

โœจ Designer Tip: The secret to beautiful cables is keeping them slightly loose as you work. If you pull too tight when you slip stitches to your cable needle, you'll restrict the cable's movement and it won't drape as beautifully. Think of your cable needle as a temporary holder, not a tension tool.

These mittens are written for cables worked WITH a cable needle, but the free video tutorial shows you how to work cables without one if you prefer that method. Both techniques get you to the same beautiful result โ€” use whichever feels more comfortable in your hands.


๐Ÿงถ Yarn & Materials

Yarn

KnitPicks Woodland Tweed (80% Merino Wool, 15% Baby Alpaca, 5% Viscose; 180 yds / 165 m per 3ยฝ oz / 100 g; Worsted #4 / CYCA 4) โ€” Colorway: Plunge Pool Heather โ€” 1 skein

Yarn Substitutes:

  • KnitPicks Wool of the Andes Worsted โ€” 100% superwash wool, perfect for hand-washing, ~110 yds per 50g so you'll need 2 balls
  • Cascade 220 Superwash โ€” 100% superwash wool, machine-washable, beautiful stitch definition
  • Berroco Vintage Worsted โ€” 52% acrylic / 40% wool / 8% nylon blend, more budget-friendly while still showing cables beautifully

Needles & Notions

  • US 8 (5mm) double-pointed needle set (5 needles)
  • Stitch markers
  • Cable needle
  • Tapestry needle
  • Scrap yarn to hold stitches
โญ๏ธ Marly Bird Amazon Storefront โญ๏ธ

๐Ÿงฉ Take a Look Knit Fingerless Mittens || Pattern Details

Skill Level

Intermediate โ€” comfortable with basic stitches (knit, purl, increases) and ready to try cables

Finished Measurements

Adult One Size Fits Most โ€” approximately 8″ circumference [20 cm] and 8″ length [20 cm] when slightly stretched

Gauge

20 sts and 26.5 rounds = 4″ [10 cm] in Cable Stitch Pattern

Abbreviations

  • dec โ€” decrease
  • k โ€” knit
  • p โ€” purl
  • m1 โ€” make one increase
  • 3/1 rc โ€” 3/1 right cable
  • 3/1 lc โ€” 3/1 left cable
  • p2tog โ€” purl 2 together
  • p2tog tbl โ€” purl 2 together through back loop
  • st(s) โ€” stitch(es)
  • pm โ€” place marker
  • slm โ€” slip marker

Special Stitches

M1 (Make 1 Increase): With the tip of your left-hand needle, pick up the horizontal strand between stitches from front to back. Knit this strand through the back leg, twisting it into a loop in the process โ€” 1 st increased.

3/1 RC (Three over One Right Cable): Slip 1 stitch from left-hand needle to cable needle and hold to back, knit 3 stitches from left-hand needle, knit 1 stitch from cable needle.

3/1 LC (Three over One Left Cable): Slip 3 stitches from left-hand needle to cable needle and hold to front, knit 1 stitch from left-hand needle, knit 3 stitches from cable needle.

Notes

  • Mittens are worked in the round from cuff to fingers using double-pointed needles
  • Thumb gusset instructions are specific to left and right hand
  • Charts are given for both the full left hand and full right hand; the thumb chart works for both hands
  • Garter stitch is worked between the cables for contrast and visual interest

๐ŸŽฌ Video Tutorials

The following video tutorials will support you through every step of this pattern:

  • Watch: No Cuss Cast On to Double Pointed Needles
  • Watch: Perfect Ribbing
  • Watch: How to Cable Without a Cable Needle
  • Watch: How to Add a Lifeline
  • Watch: Bury in Ends

Affiliate Disclosure: This post contains affiliate links. To learn more please visit my privacy policy here๐Ÿ’–

๐Ÿงถ Take a Look Knit Fingerless Mittens || Pattern Instructions

Wrist Cuff (Both)

Using the No Cuss Cast-on, cast on 40 stitches.

Rounds 1-14: [k2, p2] 10 times โ€” 40 stitches.

Round 15 (increase round): [k2, p2] 5 times, [M1, k] 2 times, k4, M1, k11, M1, k, p2 โ€” 44 stitches.

Left Thumb Gusset

Round 16 (thumb gusset set-up): [k2, p2] 4 times, pm, k2, pm, p3, k3, p15, k3, p2

Round 17 (thumb gusset increase): [k2, p2] 4 times, slm, M1, k2, M1, slm, p2, k, 3/1 LC, k13, 3/1 RC, k, p โ€” 4 stitches between thumb gusset markers.

Round 18: [k2, p2] 4 times, slm, p1, k2, p1, slm, p4, k3, p13, k3, p3.

Round 19 (thumb gusset increase): [k2, p2] 4 times, slm, M1, p1, k2, p1, M1, slm, p2, k2, 3/1 LC, k11, 3/1 RC, k2, p โ€” 6 stitches between thumb gusset markers.

Round 20: [k2, p2] 4 times, slm, p2, k2, p2, slm, p5, k3, p11, k3, p4.

Round 21 (thumb gusset increase): [k2, p2] 4 times, slm, M1, p2, k2, p2, M1, slm, p2, k3, 3/1 LC, k9, 3/1 RC, k3, p โ€” 8 stitches between thumb gusset markers.

Round 22: [k2, p2] 4 times, slm, k1, p2, k2, p2, k1, slm, p6, k3, p9, k3, p5.

Round 23 (thumb gusset increase): [k2, p2] 4 times, slm, M1, k1, p2, k2, p2, k1, M1, slm, p2, k4, 3/1 LC, k7, 3/1 RC, k4, p โ€” 10 stitches between thumb gusset markers.

Round 24: [k2, p2] 4 times, slm, [k2, p2] 2 times, k2, slm, p6, [p, k3, p6] 2 times.

Round 25 (thumb gusset increase): [k2, p2] 4 times, slm, M1, [k2, p2] 2 times, k2, M1, slm, p2, k5, 3/1 LC, k5, 3/1 RC, k5, p โ€” 12 stitches between thumb gusset markers.

Round 26: [k2, p2] 4 times, slm, p1, [k2, p2] 2 times, k2, p1, slm, p8, [k3, p5] 2 times, p2.

Round 27 (thumb gusset increase): [k2, p2] 4 times, slm, M1, p1, [k2, p2] 2 times, k2, p1, M1, slm, p2, k6, 3/1 LC, k3, 3/1 RC, k6, p โ€” 14 stitches between thumb gusset markers.

Round 28: [k2, p2] 4 times, slm, p2, [k2, p2] 3 times, slm, p8, [p, k3, p2] 2 times, p6.

Round 29: [k2, p2] 4 times, remove marker, slip 14 stitches to holder or scrap yarn, remove marker, cast on 2, p2, k7, 3/1 LC, k, 3/1 RC, k7, p โ€” 44 stitches.

Right Thumb Gusset

Round 16 (thumb gusset set-up): Pm, k2, pm, [p2, k2] 4 times, p3, k3, p15, k3, p2.

Round 17 (thumb gusset increase): Slm, M1, k2, M1, slm, [p2, k2] 4 times, p2, k, 3/1 LC, k13, 3/1 RC, k, p โ€” 4 stitches between thumb gusset markers.

Round 18: Slm, p1, k2, p1, slm, [p2, k2] 4 times, p4, k3, p13, k3, p3.

Round 19 (thumb gusset increase): Slm, M1, p1, k2, p1, M1, slm, [p2, k2] 4 times, p2, k2, 3/1 LC, k11, 3/1 RC, k2, p โ€” 6 stitches between thumb gusset markers.

Round 20: slm, p2, k2, p2, slm, [p2, k2] 4 times, p5, k3, p11, k3, p4.

Round 21 (thumb gusset increase): slm, M1, p2, k2, p2, M1, slm, [p2, k2] 4 times, p2, k3, 3/1 LC, k9, 3/1 RC, k3, p โ€” 8 stitches between thumb gusset markers.

Round 22: Slm, k1, p2, k2, p2, k1, slm, [p2, k2] 4 times, p6, k3, p9, k3, p5.

Round 23 (thumb gusset increase): Slm, M1, k1, p2, k2, p2, k1, M1, slm, [p2, k2] 4 times, p2, k4, 3/1 LC, k7, 3/1 RC, k4, p โ€” 10 stitches between thumb gusset markers.

Round 24: Slm, [k2, p2] 2 times, k2, slm, [p2, k2] 4 times, p6, [p, k3, p6] 2 times.

Round 25 (thumb gusset increase): Slm, M1, [k2, p2] 2 times, k2, M1, slm, [p2, k2] 4 times, p2, k5, 3/1 LC, k5, 3/1 RC, k5, p โ€” 12 stitches between thumb gusset markers.

Round 26: Slm, p1, [k2, p2] 2 times, k2, p1, slm, [p2, k2] 4 times, p8, [k3, p5] 2 times, p2.

Round 27 (thumb gusset increase): Slm, M1, p1, [k2, p2] 2 times, k2, p1, M1, slm, [p2, k2] 4 times, p2, k6, 3/1 LC, k3, 3/1 RC, k6, p โ€” 14 stitches between thumb gusset markers.

Round 28: Slm, p2, [k2, p2] 3 times, slm, [p2, k2] 4 times, p8, [p, k3, p2] 2 times, p6.

Round 29: Remove marker, slip 14 stitches to holder or scrap yarn, remove marker, cast on 2, [p2, k2] 4 times, p2, k7, 3/1 LC, k, 3/1 RC, k7, p โ€” 44 stitches.

Body (Both)

Round 30: [k2, p2] 5 times, [p, k3, p4, k3] 2 times, p2.

Round 31: [k2, p2] 5 times, k, 3/1 LC, k13, 3/1 RC, k, p.

Round 32: [k2, p2] 5 times, p2, k3, p13, k3, p3.

Round 33: [k2, p2] 5 times, k2, 3/1 LC, k11, 3/1 RC, k2, p.

Round 34: [k2, p2] 5 times, p3, k3, p11, k3, p4.

Round 35: [k2, p2] 5 times, k3, 3/1 LC, k9, 3/1 RC, k3, p.

Round 36: [k2, p2] 5 times, p4, k3, p9, k3, p5.

Round 37: [k2, p2] 5 times, k4, 3/1 LC, k7, 3/1 RC, k4, p.

Round 38: [k2, p2] 5 times, p4, [p, k3, p6] 2 times.

Round 39: [k2, p2] 5 times, k5, 3/1 LC, k5, 3/1 RC, k5, p.

Round 40: [k2, p2] 5 times, p6, [k3, p5] 2 times, p2.

Round 41: [k2, p2] 5 times, k6, 3/1 LC, k3, 3/1 RC, k6, p.

Round 42: [k2, p2] 5 times, p6, [p, k3, p2] 2 times, p6.

Round 43: [k2, p2] 5 times, k7, 3/1 LC, k, 3/1 RC, k7, p.

Cuff at Fingers (Both)

Round 44 (decrease round): [k2, p2] 5 times, M1, k, p2, k2, p, p2tog tbl, k2, p2tog tbl, p, k2, p2tog, k2, p2tog, p (40 stitches).

Rounds 45-53: [k2, p2] 7 times, k2, p2, k2, p2, k2, p2.

Bind off in pattern.

First Finishing

Weave in all loose ends.

Thumbs (Both)

Divide the 14 sts from holder onto 3 double-pointed needles.

Round 1: Pick up and knit 2 st at cast on of round 29, [p2, k2] 3 times, p2 โ€” 16 stitches. Redistribute stitches if needed. Join round and mark first st.

Work evenly in established 2×2 ribbing pattern until thumb measures 1″ [2.54 cm] in length, or to desired length. Bind off in pattern.

Second Finishing

Fasten tail securely to wrong side of knit fingerless mittens. Use tail from thumb to close any gap or hole at the mitten join with the Duplicate Stitch technique. Weave in any remaining loose ends.

๐Ÿงถ More Cable Knit Patterns You'll Love

If you loved learning cables with the Take a Look mittens, these patterns are perfect for your next project:

  • Take a Look Cable Knit Hat โ€” the perfect matching pattern for these mittens
  • Honeycomb Cable Hat โ€” another beginner-friendly cable design
  • Dual Cable Knit Boot Toppers โ€” short and sweet cable project
  • Cable Knit Cardigans โ€” level up your cables with a full garment
  • Knit Cables for Beginners โ€” master the fundamentals

โ“ Frequently Asked Questions

Are these mittens really easy to make?

They're listed as intermediate, which means they're not for total beginners, but they're definitely doable if you're comfortable with basic knitting and ready to learn cables. The pattern includes detailed charts and a video tutorial showing you every step, so you'll have support the whole way through.

Can I make these mittens to match a hat?

Absolutely! These mittens are designed to pair perfectly with the Take a Look Cable Knit Hat, which uses the same cable pattern. Working them together as a set makes for a stunning, coordinated pair that feels extra special.

What kind of yarn should I use?

The sample uses KnitPicks Woodland Tweed, a lovely aran/heavy worsted weight with merino wool, baby alpaca, and viscose. Just make sure whatever yarn you choose is also a CYCA #4 weight so you'll get the correct gauge. Wool or wool blends work beautifully for mittens because they're naturally warm and elastic.

How long will it take to knit these mittens?

With one skein needed total, most knitters finish these in about 4-6 hours of knitting time. Of course, it depends on your knitting speed! The pattern moves pretty quickly once you get the cable rhythm down, and working in the round tends to be faster than flat knitting.

What if I don't have double-pointed needles?

You can absolutely use circular needles with the magic loop method if you prefer! Both techniques work perfectly fine for smaller circumferences like mittens. Use whichever needles help you achieve the correct gauge and feel comfortable in your hands.

Can I work the cables without a cable needle?

Yes! The free video tutorial shows you exactly how to cable without a cable needle using the dip stitch method. Some knitters find this faster and more comfortable โ€” it's totally a personal preference.


๐Ÿ’• Final Thoughts

These Take a Look Knit Fingerless Mittens are the kind of project that teaches you something new while giving you a wearable finish. Every cable crossed, every thumb gusset increased, every round completed is building your confidence as a knitter. And when you slip them on for the first time? That moment of pride is absolutely worth it.

If you make these mittens, I'd absolutely love to see them! Tag me @marlybird on Instagram or Facebook and use the hashtags #MarlyBird, #MMMDI (Marly Made Me Do It), and #TakeALookMittens so I can cheer on your cable work. ๐Ÿ’›

โค๏ธ Your BiCrafty Bestie,
Marly Bird
A cartoon avatar of a person with glasses and a brown bun smiles warmly. Their green shirt and black jacket add a stylish touch, while colorful hearts surround them like loving temperature blankets, stitching together an aura of love and positivity. -Marly Bird

Filed Under: Free Patterns, Knitting, Our Free Patterns, Pattern, Uncategorized Tagged With: badge-new-pattern

Color-Pooling Yarn For Crochet Granny Squares!ย 

December 14, 2023 By Marly Bird Leave a Comment

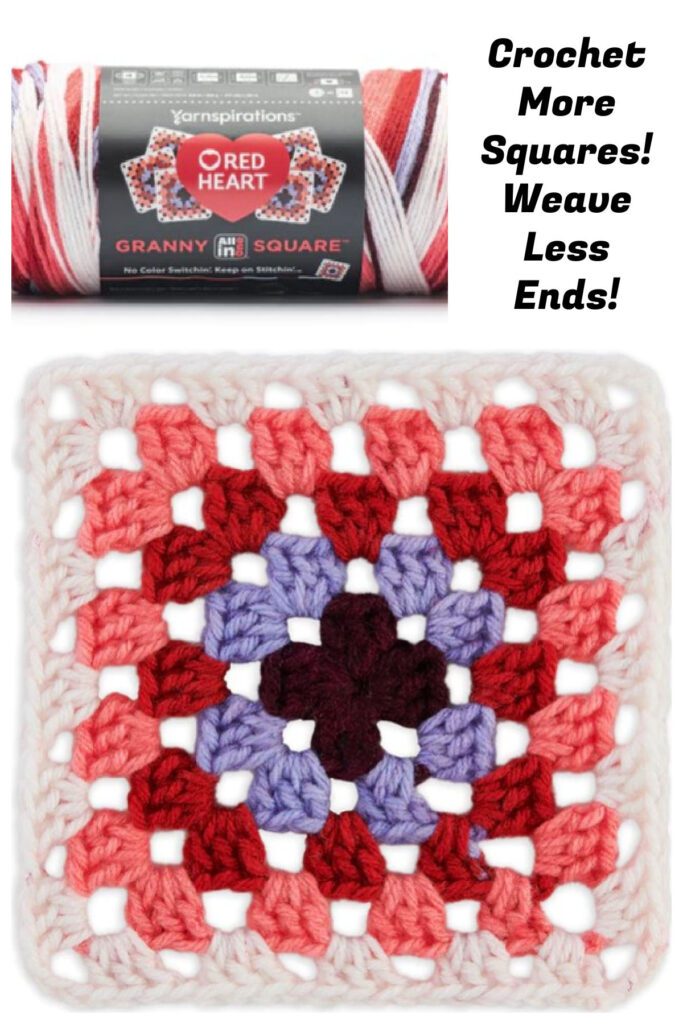
If youโ€™re a crocheter who loves making granny squares but hates weaving in ends, your life just got SO much easier! Red Heart is your life saver with their brand new yarn Red Heart All-in-one Granny Squares. Itโ€™s truly a color-pooling yarn for crochet granny squares.

Color-pooling for crochet granny squares: Red Heart All-in-one Granny Squares Yarn - Marly Bird
๐Ÿงถ Affiliate Disclosure: This post contains affiliate links. If you purchase through them I may earn a small commission at no extra cost to youโ€ฆ and it helps support free patterns and content from my yarn-loving heart ๐Ÿ’› See my privacy policy here.

Table of Contents

Toggle

  • Red Heart All-in-one Granny Squares Yarn 
  • Granny Square Color Pooling
  • Frequently Asked Questions

Let me explain. Remember when you had to change colors for every round of a crochet granny square? 

Waitโ€ฆyouโ€™re doing that now?

Let me tell youโ€ฆthose days are over!

Red Heart All-in-one Granny Squares Yarn 

Itโ€™s a new yarn designed specifically for crocheting granny squares. Each skein is designed with 5 colors that look great together in the granny square format.

All you need to do is crochet at the gauge stated on the inside ball band and follow that pattern exactly. If you do, every one of the FOURTEEN granny squares you get from ONE ball will come out perfectly. 

And youโ€™ll only have TWO ends to weave in!!! That cuts down your production time weaving in ends by 67%!!! 

BAM! 

You get to crochet more granny squares and weave in fewer ends than ever before!

It works just like color-pooling. If you havenโ€™t seen color pooling before, check it out on this link.ย 

Itโ€™s genius! 

But this yarn is specifically color-pooling yarn for crochet granny squares.

Itโ€™ll save you time and stress, and youโ€™ll be able to make more crochet granny square projects in way less time!

Granny Square Color Pooling

Hereโ€™s how it works:

  • The color lengths within the yarn are measured precisely to fit a specific gauge. 
  • Make a swatch to be certain you can get gauge consistently.
  • Stick to that gauge, and your squares will be perfect every time!
  • Then you only have 2 ends to weave in for each granny square.
  • Let the yarn do the work!

No more wrangling 5 colors!

No more color switching and loose stitches.

All the colors come from one ball of Red Heart All-in-one Granny Squares yarn, exactly when you need them.

If you struggle with gauge, this new yarn will help you become a better crocheter.

Seriously, itโ€™s a Win-Win all round.

Let me emphasize: YOU MUST GET GAUGE!!!

Here's a few things you MUST KNOW:

  • Yarn pulls from the center of the skein.
  • The image on the ball band is how each square should look.
  • You work from the center out, so be sure to start with the correct color (as shown on the band).
  • Use ONLY the pattern on the inside of the ball band to ensure success!

Click over to Yarnspirations now for this new yarn. With 16 colorways available, thereโ€™s something for everyone! 

They even have free crochet patterns ready for you to try out this genius yarn. And it pairs perfectly with Red Heart Super Saver.

Check it out now! Red Heart All-in-one Granny Squares. Itโ€™s truly a color-pooling yarn for crochet granny squares!

See some FREE patterns for this awesome yarn!

Crochet Pack-a-Bunch Backpack

Grannyโ€™s Hug Scarf

Best In Dress Crochet Shift

Frequently Asked Questions

What's this new Red Heart yarn all about?

So here's the thing… Red Heart has a brand new yarn called All-in-one Granny Squares and it's a total game-changer for us granny square lovers! It's designed specifically to color-pool for crochet granny squares, meaning you get gorgeous color changes all on their own.

How many granny squares can I get from one ball of this yarn?

Honestly… you get FOURTEEN granny squares from just ONE ball of this yarn! How amazing is that?! It's designed so that each ball perfectly creates 14 squares, cutting down on your work AND your weaving time.

Do I really have to get gauge for this yarn to work?

Yes! You absolutely MUST get gauge… like, seriously. The color lengths in the yarn are precisely measured for a specific gauge, so making sure your swatch is spot on is key to those perfect squares. Stick to that gauge, and the yarn does all the magic for you!

What's the big deal about only weaving in two ends?

Oh my goodness, it's HUGE! Instead of weaving in tons of ends from changing colors, you only have TWO ends to weave in for each granny square. That's like a 67% reduction in weaving time… BAM! More crocheting, less frustration!

Where can I find this magical yarn?

You can totally find this new yarn over on Yarnspirations! They have 16 different colorways, so there's definitely one for everyone. Plus, they've got some free patterns ready for you to try out this awesome yarn!

Filed Under: Crochet, Planned Pooling Crochet, Product Reviews, Yarn Review

5th Annual Turkey Trot Make-Along 2023

November 17, 2023 By Marly Bird Leave a Comment

๐Ÿฆƒ Looking for this year's Turkey Trot? The 8th Annual Marly Bird Turkey Trot Make-Along 2026 kicks off Thanksgiving night, Thursday, Nov 26… with a free knit or crochet poncho pattern! Grab your free supply list here, or treat yourself to the Silver Platter VIP Experience. ๐Ÿงถ

The One With All The Sweaters!

As the first whispers of autumn breezes begin to rustle the leaves, we are thrilled to unveil the 5th annual Marly Bird Turkey Trot Make-Along 2023! This event arrives perfectly timed with the seasonal transition and upcoming holiday travels, inviting you to craft cozy cover-ups that will be the envy of all. Whether you're a knitter or a crocheter, a delightful treat awaits you!

Turkey trot make-along 2023 with Marly Bird banner

Table of Contents

Toggle

  • The One With All The Sweaters!
  • ๐Ÿฆƒ Join the Marly Bird Turkey Trot Make-Along 2023 ๐Ÿงถ๐Ÿชก
  • ๐ŸŒŸ What's a Make-Along?
  • ๐Ÿ’ซ Silver Platter Experience – The VIP upgrade
  • ๐Ÿ“† Turkey Trot Make-Along 2023 Event Schedule
  • ๐ŸŽ‰ How to Join
  • ๐ŸŒˆ Get Ready for a Crafting Adventure!
  • The Marly Bird Turkey Trot Make-Along 2023 – The Materials
  • Shoop, Shoop, Shoop Knit Cardigan
  • โญ๏ธ The Marly Bird Turkey Trot Make-Along 2023 | Shoop, Shoop, Shoop Supply List โญ๏ธ
  • Trifle Crochet Sweater
  • โญ๏ธ The Marly Bird Turkey Trot Make-Along 2023 | Trifle Crochet Sweater Supply List โญ๏ธ
  • SKILL LEVEL
  • MEASUREMENTS
  • ๐Ÿฆƒ โ‡จ Instructions for Each Day Listed Below โ‡ฆ ๐Ÿฆƒ
  • Are there PRIZES?
  • Frequently Asked Questions

Crafting sweaters has always held a special place in my heart. And there's something magical about being enveloped in a self-made embrace, particularly during the crisp fall months. The alchemy of transforming textured yarn into wearable art is a journey that never ceases to amaze and inspire.

Relax – It's Therapy

During the pandemic, many of us turned to knitting and crocheting as therapeutic outlets, finding solace in the rhythm of every stitch. These crafts became more than hobbies; they were lifelines in a sea of uncertainty. Now, years post-lockdown, our community of budding artisans is yearning for fresh challenges and avenues to channel their creativity.

Whether you're looking to freshen up your own closet with unique, self-made garments or crafting gifts that carry a piece of your heart, this Make-Along caters to all your creative desires. It's more than just an event; it's a celebration of skill, community, and the joy of creation.

Join us in the annual Marly Bird Turkey Trot Make-Along 2023 and embark on a journey to craft a piece that you'll cherish and wear with pride. As the leaves turn and the air grows colder this year, let's come together to create something warm, beautiful, and uniquely ours.

[Read more…]

Filed Under: Crochet, Free Patterns, Knitting, Make-Alongs, Uncategorized

It’s Sweater Weather! Marly Bird First Fall Make-Along 2023

October 27, 2023 By Marly Bird 4 Comments

As the first whispers of autumn breeze begin to rustle the leaves, we are thrilled to unveil the Marly Bird First Fall Make-Along 2023! Perfectly timed for the seasonal transition and upcoming holiday travels, it's time to craft cozy cover-ups that'll be the envy of all. Whether you're a knitter or a crocheter, we've got a treat in store for you!

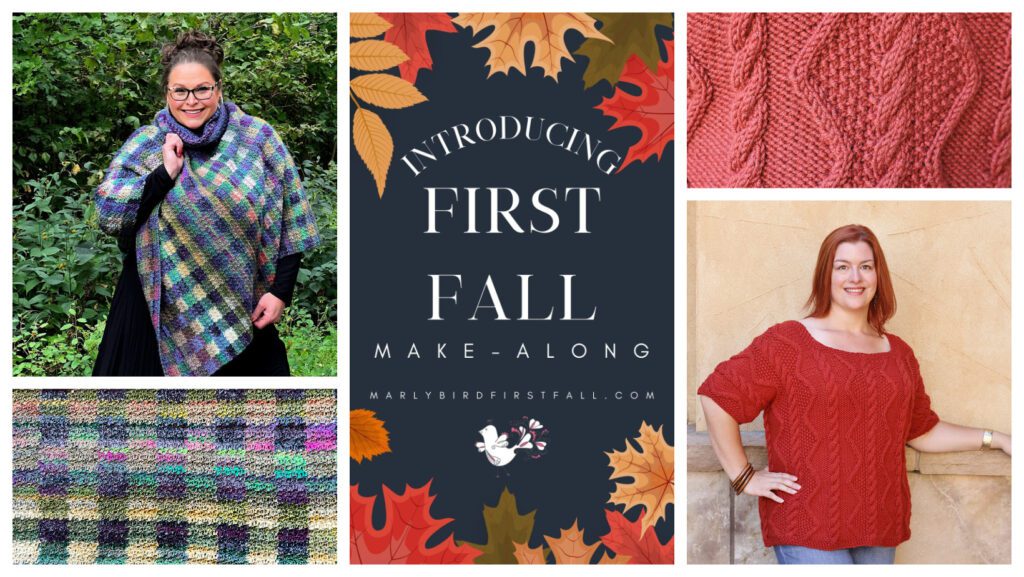
Woman wearing a colorful gingham plaid crochet poncho surrounded by lush greenery; banner showcasing autumn leaves and the text 'Introducing First Fall Make-Along 2023' with website link; close-up of intricate red knit pattern; second woman wearing a vibrant red knitted top posing against a beige background - Marly Bird

Table of Contents

Toggle

  • Is the Make-Along a Free Event?
  • That sounds great. What are we making again?
  • Marly Bird First Fall Make-Along 2023 Information
  • Important Dates of the First Fall Make-Along 2023
  • How to Participate in The First Fall Make-Along 2023 For Free
  • How Do I Get the Free Instructions For First Fall?
  • โญ๏ธ The Marly Bird First Fall Make-Along 2023 | Check Me Out Gingham Plaid Poncho Supply List โญ๏ธ
  • SKILL LEVEL
  • MEASUREMENTS
  • MATERIALS
  • โญ๏ธ The Marly Bird First Fall Make-Along 2023 | Sazerac Cabled Sweater Supply List โญ๏ธ
  • SKILL LEVEL
  • MEASUREMENTS
  • MATERIALS
  • ๐Ÿ‚ โ‡จ Instructions for Each Week Listed Below โ‡ฆ ๐Ÿ‚
  • Frequently Asked Questions

Crafting ponchos and sweaters has always held a special place in my heart. The sensation of being enveloped in a self-made embrace, especially during the crisp fall months, is unparalleled. The alchemy of transforming textured yarn into wearable art never ceases to amaze me.

During the pandemic, many embraced knitting and crocheting as therapeutic outlets, finding solace in every stitch. Now, years post-lockdown, these budding artisans are yearning for fresh challenges. Whether you're drawn to intricate crochet colorwork with a play of textures or a knit sweater adorned with mesmerizing cables and streamlined finishes, this Make-Along caters to all your creative desires.

Join the annual Marly Bird First Fall Make-Along 2023 and craft a piece you'll cherish and wear confidently!

[Read more…]

Filed Under: Crochet, Knitting, Make-Alongs, Uncategorized

30 Knit Hat Patterns For Men (Or, For You Too)

October 13, 2023 By Marly Bird Leave a Comment

Originally published October 2023 ยท Updated October 2026 with new Marly Bird pattern picks and full content refresh.

This roundup collects 30 free and paid knit hat patterns chosen for their clean lines, classic shapes, and low-frills aesthetic… perfect for the men in your life (or honestly, for you too). You'll find everything from ribbed beanies to cabled styles, plus a handful of Marly Bird's own designs that work beautifully in masculine colorways.

โšก Quick Answer:

For a fast, crowd-pleasing knit, the Ribbed Beanie or Basic Brioche are excellent starting points. For texture, try the Basketweave. And for a Marly Bird original in any masculine colorway, the Free Ribbed Knit Hat at the bottom of this post is a standout.

๐Ÿงถ Affiliate Disclosure: This post contains affiliate links. If you purchase through them I may earn a small commission at no extra cost to youโ€ฆ and it helps support free patterns and content from my yarn-loving heart ๐Ÿ’› See my privacy policy here.

When it comes to knitting for women, I think itโ€™s somewhat easy. We tend to love colors, patterns, lace, cables, and all manner of textures. But when you try to find knit hat patterns for men, itโ€™s a whole other ball of yarn. 

On the whole (and Iโ€™m making sweeping generalizations here because there are exceptions), men prefer darker colors, more subdued patterns (if any pattern at all), and basic shapes – no frills (EVER)!

So, on my mission to collect knit hat patterns suitable for the men in your life, Iโ€™ve researched those that fit into the above guidelines. Thereโ€™s always a guy you know who will break with tradition and want something completely different. So feel free to substitute colors, make brighter contrasts, and throw caution to the wind! 

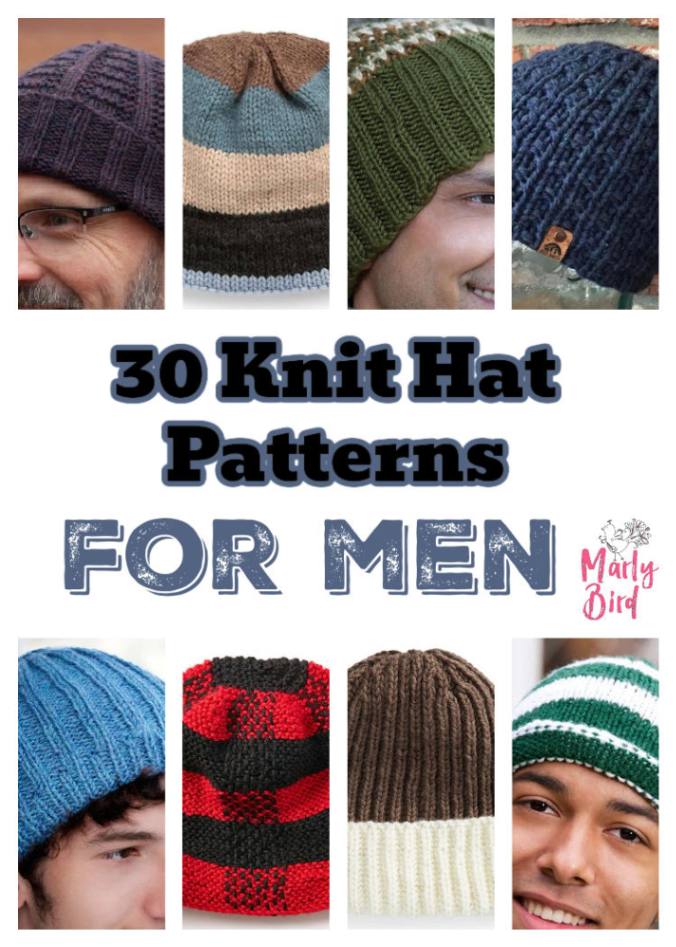
8 different hat styles to knit for men - Marly Bird

Table of Contents

Toggle

  • Free Knit Hat Patterns For The Men In Your Life!
  • Even More Hat Patterns To Go Crazy Over!
  • Check Out Even More Men's Hat Suggestions…
  • Join our Newsletter
  • Frequently Asked Questions
  • Final Thoughts ๐Ÿ’›

A word of warningโ€ฆbe sure you know what the guy youโ€™re knitting for really likes before you invest your time and effort. Otherwise, youโ€™ll have another hat for yourself!

But all of these knit hat patterns could very easily be knit in any color, so donโ€™t be afraid to climb out of the box and make one or two for your girlfriends too!

Free Knit Hat Patterns For The Men In Your Life!

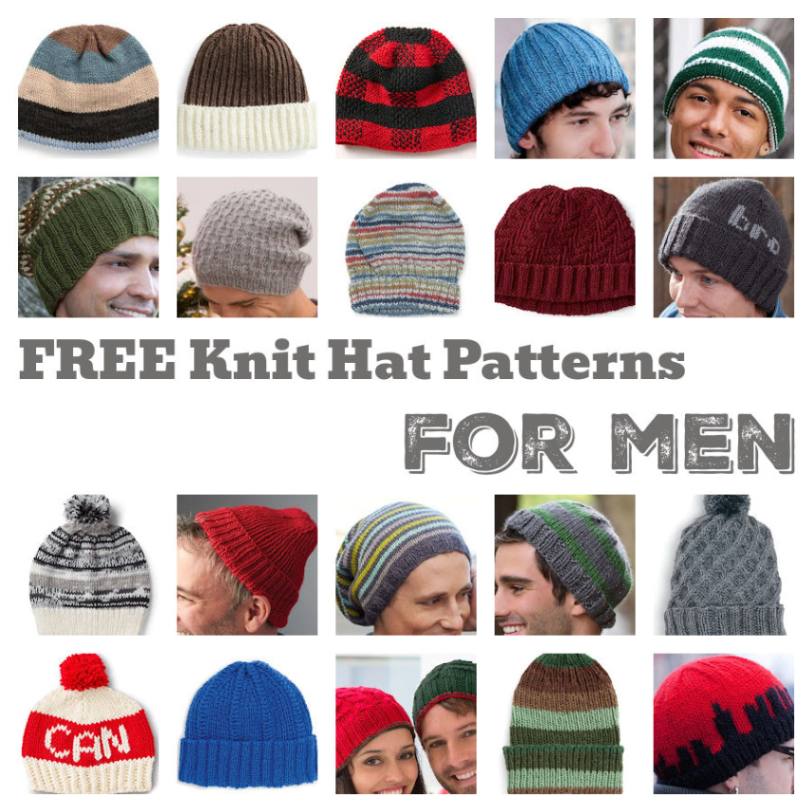
This first list of selections are free knit hat patterns. Theyโ€™re from Yarnspirations and range from simple to a little more complex to make. Thereโ€™s quite a variety. From a single color in stockinette stitch to some simple cables, itโ€™s all here. And if you need help learning how to knit hats, check out the end of this post for more details. Thereโ€™s an AWESOME free pattern where you can easily switch colors for a more masculine look!

Thereโ€™s everything from beanies to slouches and sports team colors. Of course, you can easily switch out the colors but try to stick with the yarn weight in the pattern you choose for best results. Iโ€™m sure youโ€™ll find something to satisfy the guy(s) in your life.

20 free knit hat patterns styled for men - Marly Bird

State Your Nation

Adventurous Beginner Knit Beanie

Simple Fair Isle

Ribbed Beanie

Team Pride

Super Slouchy Chic

Basketweave

Christmas Gift Beanies

NY State of Mind

Give Him A Rib

Steveโ€™s Beanie

Traveling Lines

Lumberjack Beanie

Basic Brioche

His Tricolor Hat

Unisex Slouchy Hat

Take A Shine

Hey Bro Hat

Cable & Rib

Basic Beanie

Even More Hat Patterns To Go Crazy Over!

These patterns are for purchase, but donโ€™t let that put you off. Each hat pattern can give you many, many hours of pleasurable knitting, as well as some fantastic gifts for the men in your life. Iโ€™m sure youโ€™ll find yourself making the same pattern several times over, especially if itโ€™s a fun knit that looks great.

Donโ€™t discount the fact that you might like one of these designs for yourself knit in a more feminine color choice. Or, choose one of these designs and add an awesome fur pompom you know I love in a color that you love! Thereโ€™s always a way to switch things up and make them cute enough for you. So donโ€™t just see them as they are, but put on your designerโ€™s hat and see them as they could be!

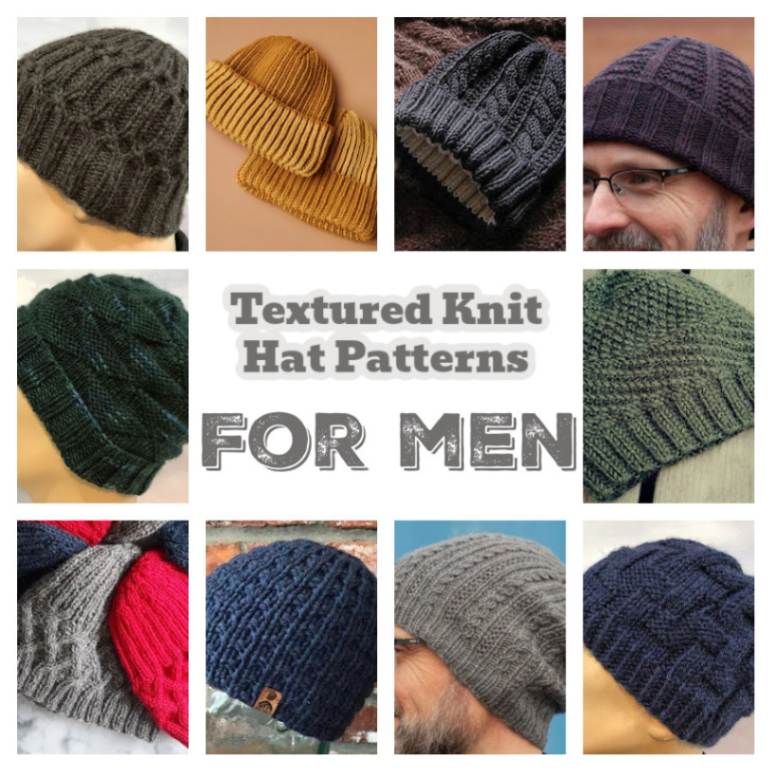
10 textured knit hat patterns designed for men - Marly Bird

Austin Cable Hat

Hunter

Taconite

Girder

Renmore

Henry

Ventura

Gemini

Polku

Gingerbread

What do you think? Did you find a knit hat pattern you just canโ€™t live without?

GREAT! As Iโ€™m sure you all know, I LOVE making hats, and I have many that are suitable for men. So thereโ€™s also a collection of my own hat patterns. 

Check Out Even More Men's Hat Suggestions…

Though most of these knit hat patterns are made in brighter colors and are modeled by women, just imagine them in darker shades, without a pompom, etc. Put your imagination to work! I hope you love these as much as I do!

Thereโ€™s plain stockinette, texture, color, stranded colorwork, stripes, entrelac, cables, color and cable, bulky, worsted, and with and without pompoms and tassels. Thereโ€™s a ton of choices!!

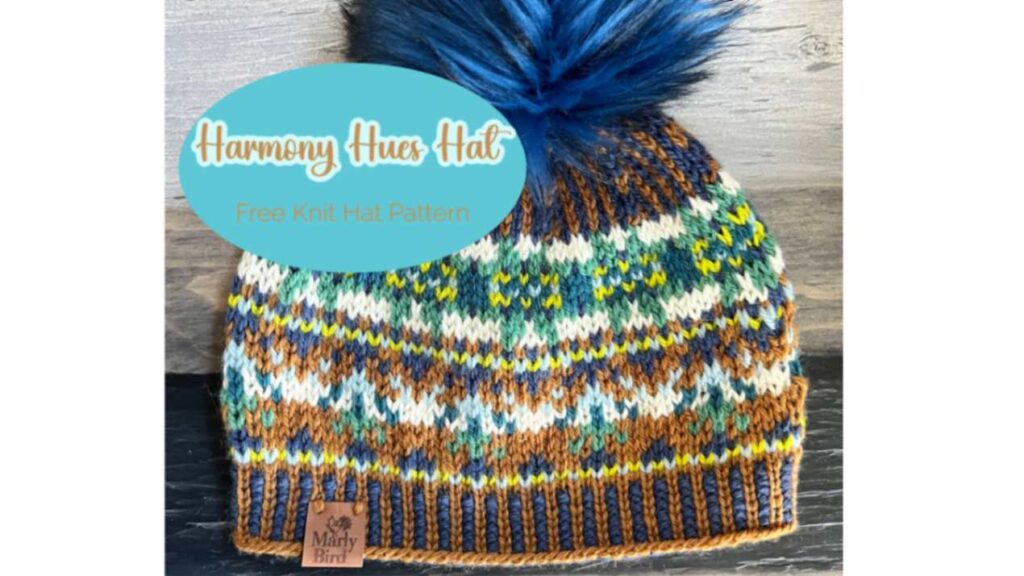
And, thereโ€™s one last hat I want to show you. Itโ€™s my latest design based on my Color Kaleidoscope Poncho, and I LOVE it!

Harmony Hues Hat Pattern - Marly Bird

Itโ€™s called the Harmony Hues Hat! You can make it with the leftover yarn from your poncho, or make your own selections in masculine colors and knit one for your man (minus the fur pompom). Think black, navy, hunter green, browns, and greys with maybe only one bold โ€˜popโ€™ color to stand out.

Have fun hat-knitting for the men in your life! Get started now so youโ€™re ready for Christmas early!

WINK!

Join our Newsletter

Get Free Crochet & Knitting
Pattern Links & Coupons!

Hand-drawn bird with curling, detailed feathers and pink accents; cheerful pose showcases fine line and texture work.
>> Become An Insider <<
A woman with glasses and curly hair models a colorful crocheted scarf, showing textured stitches and vibrant yarn.

Frequently Asked Questions

What knit hat styles do men tend to prefer?

Classic beanies and slouchy hats are always popular. Simple ribbed hats in neutral colors (grey, navy, black, forest green) are versatile and get worn a lot. Cable knit hats read as more “crafted” without being cutesy. Some men love the outdoorsy look of earflap hats or Carhartt-style chunky beanies. And honestly? A lot of men will wear whatever hat their favorite person makes for them. When in doubt, ask what style they usually reach for at the store.

What yarn colors work best for men's knit hats?

Neutrals are always a safe bet… charcoal, navy, black, camel, olive green, burgundy. But this is totally personal! Some men love bold colors and patterns. If you're knitting for someone specific, think about their wardrobe. A grey hat goes with almost everything. A colorwork hat in team colors might be the most-worn hat they own. Don't be afraid to ask what they like… most people are thrilled that someone is making them something and happy to give input.

Can men's hat patterns also be made in women's sizes?

That's literally in the title of this post! Most of these patterns work for any head in the right size range. The “for men” label is really just about style aesthetic… more classic, less frilly. The construction is the same. If you're making a hat for yourself and you like the clean, classic look of these patterns, go for it. Hat style knows no gender. Make what you love!

What yarn weight works best for men's knit hats?

Worsted weight is the sweet spot for most hat patterns… it works up quickly, creates a warm fabric, and holds its shape well. Bulky yarn makes faster, chunkier hats that have that great outdoorsy vibe. DK weight creates a slightly lighter hat that works better for spring and fall. For a textured cable or colorwork hat, worsted or DK weight with good stitch definition is ideal… the pattern details show up crisply.

How do I get the right size for a knit hat?

Measure the head circumference right above the ears with a soft tape measure. Standard adult head size is roughly 21 to 23 inches. Most hat patterns have slight negative ease built in (the hat is a bit smaller than the head so it fits snugly). Check the pattern's finished measurements and compare to your measurement. When in doubt between two sizes, go with the smaller one since knit fabric stretches. A hat that's a touch snug is way better than one that falls over someone's eyes!

Final Thoughts ๐Ÿ’›

Finding great knit hat patterns for the men in your life doesn't have to be a challenge… it just takes knowing where to look. Whether you're going for a quick ribbed beanie they'll actually wear or a showstopping colorwork hat you're proud to gift, this roundup has you covered. The best part? Most of these work beautifully in whatever yarn you already have in your stash!

If you make one (or all of them… no judgment here), I'd love to see it! Tag me @marlybird on Instagram or Facebook and use #MMMDI, #MarlyBird, or #KnitHatForMen so I can celebrate your finished hat. ๐Ÿ’›

โค๏ธ Your BiCrafty Bestie,
Marly Bird
A cartoon avatar of a person with glasses and a brown bun smiles warmly. Their green shirt and black jacket add a stylish touch, while colorful hearts surround them like loving temperature blankets, stitching together an aura of love and positivity. -Marly Bird

Filed Under: Knitting, Pattern, Round Ups

Knit 2-Color Corrugated Rib: Questions Answered

October 12, 2023 By Marly Bird Leave a Comment

I bet youโ€™ve seen a knit 2-color corrugated rib on the likes of Fair Isle sweaters. They look so cool and really add a professional feel to the knit ribbing. And, Iโ€™ll bet youโ€™re thinking, โ€œThat looks really hard!โ€ Itโ€™s actually not hard at all. But there are a few things to keep in mind, which Iโ€™ll talk about right here.

First of allโ€ฆ

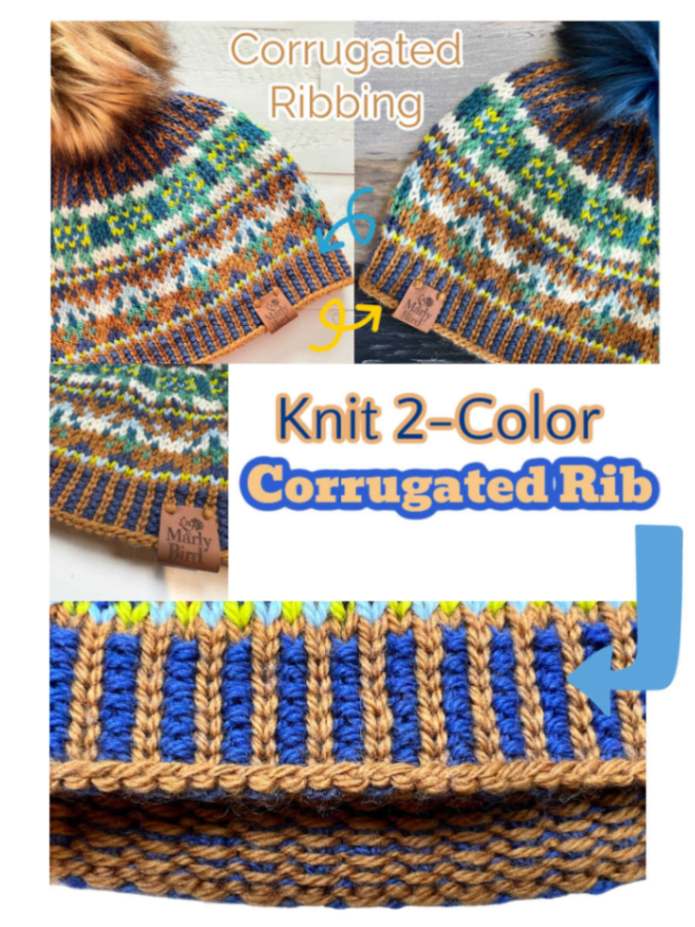
Knit beanie featuring corrugated ribbing in blue, orange, and green with a faux fur pom-pom on top.
๐Ÿงถ Affiliate Disclosure: This post contains affiliate links. If you purchase through them I may earn a small commission at no extra cost to youโ€ฆ and it helps support free patterns and content from my yarn-loving heart ๐Ÿ’› See my privacy policy here.

What Is Corrugated Knitting?

In not so many words, corrugated knitting is simply when two colors are used to knit a rib on a hat, sweater, cardigan, or other project. One color forms the columns of knit stitches, while the other color makes the columns of purls. Effectively, what youโ€™re doing is knitting ribbing as stranded colorwork.

How Do You Knit Corrugated Ribs?

Many people askโ€ฆโ€ How do you knit corrugated ribs?โ€, and the answer is reasonably simple. There are two basic methods: flat corrugated ribs, and those knit in the round. The two techniques are slightly different, so letโ€™s talk first of all about how to start, and then discover how they differ.

How To Begin Knit 2-Color Corrugated Ribbing (Flat And In The Round)

You should begin corrugated ribbing with a sturdy but somewhat stretchy cast on in the color youโ€™re using for the knit columns. The long tail cast on in a single color is a perfect choice since itโ€™s very neat and can stretch. This works particularly well for hats, socks, and other places where some stretch is needed. Weโ€™ll talk more about stretch in a little while.

Working In The Round Only

Round 1

After the cast on and join in the round, place a stitch marker to mark the beginning of your round, knit one round in your main (knit) color. This round is 99% always knit since youโ€™re working in the round (but check the pattern to absolutely certain).

Round 2

On round 2 youโ€™ll be bringing in your second color for the purl columns. But instead of going straight into 1×1 or 2×2 rib, you alternate colors the way you want them set for your rib, but in another knit-only round. So, either (1×1) *k1 in one color, k1 in contrast; rep from * around, OR, (2×2) k2 in one color, k2 in contrast; rep from * around.

Why only knit? 

Because, if you change color on a purl row, you see a purl bump on the right side of your work in the wrong (knit) color. Working a complete knit round in your chosen alternating colors before beginning your purl stitches gives you the perfect, neat-looking lower edge you see on the Harmony Hues Hat.

Round 3

Itโ€™s round 3 where you begin working (k1, p1), or (k2, p2) in your alternating colors as they're already set.

Whatโ€™s neat about knitting 2-color corrugated rib in the round, is that all of your color changing and floats go on the wrong side of your knitting. In the round, the wrong side is always facing away from you. This makes the switching of colors a little easier.

Check out this video for the visuals!

Corrugated Ribbing In The Round

Talking of switching colors on the wrong sideโ€ฆwhat about working flat?

Flat Knit Corrugated Ribbing

Knitting corrugated ribbing flat is a little more tricky, but you can still do it. You just have to think a little harder about where your yarn is and where itโ€™s going. Knitting in the round always shows you only the right side. When you knit flat youโ€™re turning your work after every row, so you also get to see the wrong side (where your floats are).

Row 1

After you cast on work one row. The stitch you work on this row depends which cast on you use and how you want your edge to look. 

If you worked a long tail cast on, youโ€™ll want to purl across in the same color as your cast on, as the back side of the long tail cast on has a natural purl bump. This gives a nice, clean look to your right side. 

Alternatively, if you want this long tail cast on line of purl bumps on the right side of your project, youโ€™d knit this first row. Just remember, until you set these first couple of rows, which side you want as your right side. It may help for you to attach a removable stitch marker to your right side.

Row 2

For simplicityโ€™s sake, letโ€™s say you did a long tail cast on and purled your first row. For row 2 your right side is facing, and itโ€™s time to introduce your second color. Just like knitting in the round, this row is all knit in alternating colors – the stitch count depends on which rib youโ€™re working.  So, either (1×1) *k1 in one color, k1 in contrast; rep from * around, OR (2×2), *k2 in one color, k2 in contrast; rep from * around. 

Row 3

When you knit a 2-color corrugated rib flat, you turn your work every row so youโ€™ll now have the wrong side facing you. This makes your yarn handling just a little harder. Though in the round you held your floats (extra yarn) to the back, you now have those floats facing you. 

So, guess what? 

Yep – you have to keep all your floats on the same side of the fabric. So for this row, youโ€™ll actually see how your floats form and you might be able to better judge how loose they should be.

Since this row is the wrong side, youโ€™ll have to work the reverse of the stitches you want to see on the right side. What this means is, that if you want the knit to show on the right side you should purl on this row. If you want purl to show on the right side you should knit on this row. 

The colors are already set, so you just need to remember how you want these colors to show on the right side. If this bothers you, work a stitch, then turn and look at it on the right side to see if itโ€™s what you want. If not, pull it back and rework it correctly. 

DONโ€™T FORGET! 

Keep your floats on the same side or you wonโ€™t see the awesome look of the knit 2-color corrugated rib!

NOTE FOR ROUND AND FLAT KNITTING: Be sure to carry your non-working yarn loosely across the wrong side of your work. Donโ€™t keep it so loose that you have loops hanging, but stretch apart your stitches a little more than usual on your right-hand needle before you work your next color. If you hold your yarn tight across the back of your work your knit rib will have zero stretch and youโ€™ll struggle to get your hat on your head or your shoulders through the bottom rib of your sweater.

Talking of stretchโ€ฆ

Is Corrugated Rib Stretchy?

Umโ€ฆnot very! It all depends on how tightly you carry your floats and the needle size you use.

Many patterns call for the use of smaller needles for ribs so the stitching looks neat and the rib is both more stretchy and grippy. Some people can knit just fine in stockinette stitch, but when it comes to switching between knit and purl stitches for ribs their ribs end up a little sloppy or misshapen since they have a looser transition than they really want. Thatโ€™s another reason designers often call for smaller needles.

Since there are floats involved in this corrugated ribbing, itโ€™s far more common to use the same needle size for this rib as is used for the rest of the project.

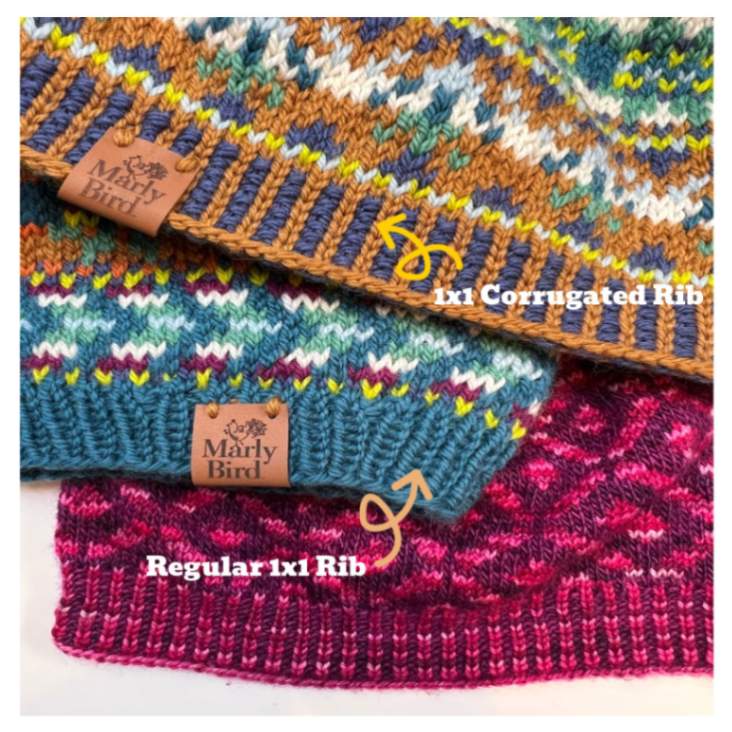
Whatโ€™s The Difference Between Regular And Corrugated Ribs?

The two main differences are the capacity to stretch and the finished look. 

Three knitted swatches showcasing 1x1 corrugated rib in orange and blue, regular 1x1 rib in teal, and pink fair isle pattern.

Knit ribs, in general, are worked in a single color so no color changing is involved. This means that there are no floats to hinder widthwise stretch. So, when knit in a single color, regular ribs have a great amount of stretch. 

1×1 ribs tend to be the most grippy with a good amount of stretch. The wider the rib wale, the more stretchy it is and it has less grip. In other words, the more stitches in each repeated knit/purl section there are, the more stretchy and looser it feels. So, a 3×3 rib will be much more stretchy than a 1×1.

With regular ribs, the purl stitches are most often hidden, since they shrink towards the back of the work. Once stretched out, they become more visible but still sit back in the shadows.

The corrugated rib shows off its purl stitches by bringing them out to the front. This is so much more striking when you see both stitch types in contrasting colors. Itโ€™s by far a more fancy and decorative look and is the perfect edging for colorwork pieces.

Well, I hope youโ€™ve learned a little after reading this post.

If youโ€™re looking for examples of knit 2-color corrugated rib, then look for the wonderful Echo Gloves here in Camp Colorwork. If youโ€™re a little nervous about trying this ribbing without some background knowledge, you can learn all about it and much, much more in Camp Colorwork.

The Harmony Hues Hat is a fantastic choice for this ribbing too, and itโ€™s right here! You can use the leftover yarn from your Color Kaleidoscope Poncho to make yourself a whole wardrobe of hats that match perfectly with your poncho!

For more colorwork discussion and a whole host of patterns, take a look at Knit Colorwork And 65 Patterns!

CROCHETERS! Donโ€™t feel left out! We have something JUST for you! The Monet Crochet Blanket Masterclass! Donโ€™t miss it!!!

Frequently Asked Questions

What is corrugated ribbing in knitting?

Corrugated ribbing is 2-color ribbing where the knit stitches and purl stitches are worked in different colors… creating that gorgeous striped, ridged look you see on the hems and cuffs of Fair Isle sweaters. Unlike regular ribbing where you alternate yarns in the same row, in corrugated rib the knit stitches stay one color and the purl stitches stay another color throughout. The result is a structured, decorative ribbing that looks super professional and polished.

Is corrugated ribbing less stretchy than regular ribbing?

Yes, and this is the main thing to know going in! Because you're carrying two yarns at once and the stitches don't have the same back-and-forth stretch as single-color ribbing, corrugated rib is stiffer. It's more of a decorative edge than a functional stretchy cuff. For this reason, many knitters work corrugated ribbing on needles a size or two larger than the body of the garment to compensate. Check your pattern for guidance on this.

How do I manage both yarns while knitting corrugated ribbing?

You carry both colors at the same time! For knit stitches, you use Color A (typically the background color). For purl stitches, you bring Color B to the front. The yarn not in use just floats behind. It's similar to stranded colorwork but simpler because you're only working one type of stitch with each color… not alternating every few stitches. Once you do a row or two, the rhythm becomes natural. A yarn guide can help keep everything tangle-free.

Can I use corrugated ribbing on any project or just Fair Isle sweaters?

Any project! It looks stunning on sweater hems, cuffs, and necklines. But it's also beautiful on colorwork hats, mittens, and accessories. If you're making something with any colorwork at all, corrugated rib at the border is a gorgeous finishing touch that ties the whole design together. You could even use it as a decorative stripe on a simple project just for visual interest.

Do I need to know Fair Isle knitting to do corrugated ribbing?

Nope! Corrugated ribbing is actually a great first step into working with two colors because it's simpler than full stranded colorwork. You're only using two stitches (knit and purl) and each color stays on one stitch type. If you can do regular ribbing and you're comfortable holding a second strand of yarn… you're ready to try corrugated rib. It's a fantastic confidence builder before tackling a full colorwork yoke.

Filed Under: Knitting, Tips, Tricks, Techniques for Knitting and Crochet

  • « Previous Page
  • 1
  • …
  • 15
  • 16
  • 17
  • 18
  • 19
  • …
  • 22
  • Next Page »

Let's Be Social

Join the Marly's Minions Facebook group to share, ask questions, or chat about all of your yarn related crafts!

Join the group(opens in new tab)
Cartoon of a smiling woman with brown hair in a bun, glasses, black jacket and green shirt, waving next to large "hi" text.

Quick Links

The Pattern Shop

Our Free Patterns

Blog

Marly Bird House

Learn to Knit & Crochet

About

Giveaway Terms and Privacy Notice

Find Us Everywhere

Join the Newsletter

YouTube Channel

Marly's Minions FB Group

Etsy Store

Ravelry Store


AN ELITE CAFEMEDIA HOME/DIY PUBLISHER

Information from your device can be used to personalize your ad experience. Do not sell or share my personal information.

Privacy Policy Terms of Use Marly Bird Legal Documents Copyright © 2026

Manage your privacy
We use technologies like cookies to store and/or access device information. We do this to improve browsing experience and to show (non-) personalized ads. Consenting to these technologies will allow us to process data such as browsing behavior or unique IDs on this site. Not consenting or withdrawing consent, may adversely affect certain features and functions.
Functional Always active
The technical storage or access is strictly necessary for the legitimate purpose of enabling the use of a specific service explicitly requested by the subscriber or user, or for the sole purpose of carrying out the transmission of a communication over an electronic communications network.
Preferences
The technical storage or access is necessary for the legitimate purpose of storing preferences that are not requested by the subscriber or user.
Statistics
The technical storage or access that is used exclusively for statistical purposes. The technical storage or access that is used exclusively for anonymous statistical purposes. Without a subpoena, voluntary compliance on the part of your Internet Service Provider, or additional records from a third party, information stored or retrieved for this purpose alone cannot usually be used to identify you.
Marketing
The technical storage or access is required to create user profiles to send advertising, or to track the user on a website or across several websites for similar marketing purposes.
  • Manage options
  • Manage services
  • Manage {vendor_count} vendors
  • Read more about these purposes
Manage options
  • {title}
  • {title}
  • {title}