Knit 2-Color Corrugated Rib: Questions Answered
I bet you’ve seen a knit 2-color corrugated rib on the likes of Fair Isle sweaters. They look so cool and really add a professional feel to the knit ribbing. And, I’ll bet you’re thinking, “That looks really hard!” It’s actually not hard at all. But there are a few things to keep in mind, which I’ll talk about right here.
First of all…
What Is Corrugated Knitting?
In not so many words, corrugated knitting is simply when two colors are used to knit a rib on a hat, sweater, cardigan, or other project. One color forms the columns of knit stitches, while the other color makes the columns of purls. Effectively, what you’re doing is knitting ribbing as stranded colorwork.
How Do You Knit Corrugated Ribs?
Many people ask…” How do you knit corrugated ribs?”, and the answer is reasonably simple. There are two basic methods: flat corrugated ribs, and those knit in the round. The two techniques are slightly different, so let’s talk first of all about how to start, and then discover how they differ.
How To Begin Knit 2-Color Corrugated Ribbing (Flat And In The Round)
You should begin corrugated ribbing with a sturdy but somewhat stretchy cast on in the color you’re using for the knit columns. The long tail cast on in a single color is a perfect choice since it’s very neat and can stretch. This works particularly well for hats, socks, and other places where some stretch is needed. We’ll talk more about stretch in a little while.
Working In The Round Only
Round 1
After the cast on and join in the round, place a stitch marker to mark the beginning of your round, knit one round in your main (knit) color. This round is 99% always knit since you’re working in the round (but check the pattern to absolutely certain).
Round 2
On round 2 you’ll be bringing in your second color for the purl columns. But instead of going straight into 1×1 or 2×2 rib, you alternate colors the way you want them set for your rib, but in another knit-only round. So, either (1×1) *k1 in one color, k1 in contrast; rep from * around, OR, (2×2) k2 in one color, k2 in contrast; rep from * around.
Why only knit?
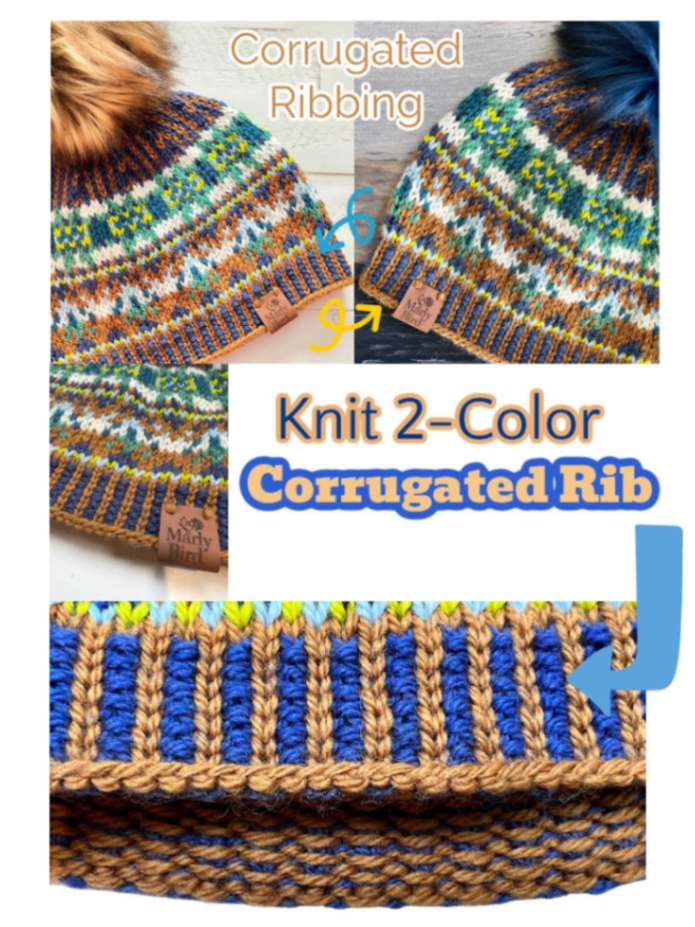
Because, if you change color on a purl row, you see a purl bump on the right side of your work in the wrong (knit) color. Working a complete knit round in your chosen alternating colors before beginning your purl stitches gives you the perfect, neat-looking lower edge you see on the Harmony Hues Hat.
Round 3
It’s round 3 where you begin working (k1, p1), or (k2, p2) in your alternating colors as they’re already set.
What’s neat about knitting 2-color corrugated rib in the round, is that all of your color changing and floats go on the wrong side of your knitting. In the round, the wrong side is always facing away from you. This makes the switching of colors a little easier.
Check out this video for the visuals!
Talking of switching colors on the wrong side…what about working flat?
Flat Knit Corrugated Ribbing
Knitting corrugated ribbing flat is a little more tricky, but you can still do it. You just have to think a little harder about where your yarn is and where it’s going. Knitting in the round always shows you only the right side. When you knit flat you’re turning your work after every row, so you also get to see the wrong side (where your floats are).
Row 1
After you cast on work one row. The stitch you work on this row depends which cast on you use and how you want your edge to look.
If you worked a long tail cast on, you’ll want to purl across in the same color as your cast on, as the back side of the long tail cast on has a natural purl bump. This gives a nice, clean look to your right side.
Alternatively, if you want this long tail cast on line of purl bumps on the right side of your project, you’d knit this first row. Just remember, until you set these first couple of rows, which side you want as your right side. It may help for you to attach a removable stitch marker to your right side.
Row 2
For simplicity’s sake, let’s say you did a long tail cast on and purled your first row. For row 2 your right side is facing, and it’s time to introduce your second color. Just like knitting in the round, this row is all knit in alternating colors – the stitch count depends on which rib you’re working. So, either (1×1) *k1 in one color, k1 in contrast; rep from * around, OR (2×2), *k2 in one color, k2 in contrast; rep from * around.
Row 3
When you knit a 2-color corrugated rib flat, you turn your work every row so you’ll now have the wrong side facing you. This makes your yarn handling just a little harder. Though in the round you held your floats (extra yarn) to the back, you now have those floats facing you.
So, guess what?
Yep – you have to keep all your floats on the same side of the fabric. So for this row, you’ll actually see how your floats form and you might be able to better judge how loose they should be.
Since this row is the wrong side, you’ll have to work the reverse of the stitches you want to see on the right side. What this means is, that if you want the knit to show on the right side you should purl on this row. If you want purl to show on the right side you should knit on this row.
The colors are already set, so you just need to remember how you want these colors to show on the right side. If this bothers you, work a stitch, then turn and look at it on the right side to see if it’s what you want. If not, pull it back and rework it correctly.
DON’T FORGET!
Keep your floats on the same side or you won’t see the awesome look of the knit 2-color corrugated rib!
NOTE FOR ROUND AND FLAT KNITTING: Be sure to carry your non-working yarn loosely across the wrong side of your work. Don’t keep it so loose that you have loops hanging, but stretch apart your stitches a little more than usual on your right-hand needle before you work your next color. If you hold your yarn tight across the back of your work your knit rib will have zero stretch and you’ll struggle to get your hat on your head or your shoulders through the bottom rib of your sweater.
Talking of stretch…
Is Corrugated Rib Stretchy?
Um…not very! It all depends on how tightly you carry your floats and the needle size you use.
Many patterns call for the use of smaller needles for ribs so the stitching looks neat and the rib is both more stretchy and grippy. Some people can knit just fine in stockinette stitch, but when it comes to switching between knit and purl stitches for ribs their ribs end up a little sloppy or misshapen since they have a looser transition than they really want. That’s another reason designers often call for smaller needles.
Since there are floats involved in this corrugated ribbing, it’s far more common to use the same needle size for this rib as is used for the rest of the project.
What’s The Difference Between Regular And Corrugated Ribs?
The two main differences are the capacity to stretch and the finished look.
Knit ribs, in general, are worked in a single color so no color changing is involved. This means that there are no floats to hinder widthwise stretch. So, when knit in a single color, regular ribs have a great amount of stretch.
1×1 ribs tend to be the most grippy with a good amount of stretch. The wider the rib wale, the more stretchy it is and it has less grip. In other words, the more stitches in each repeated knit/purl section there are, the more stretchy and looser it feels. So, a 3×3 rib will be much more stretchy than a 1×1.
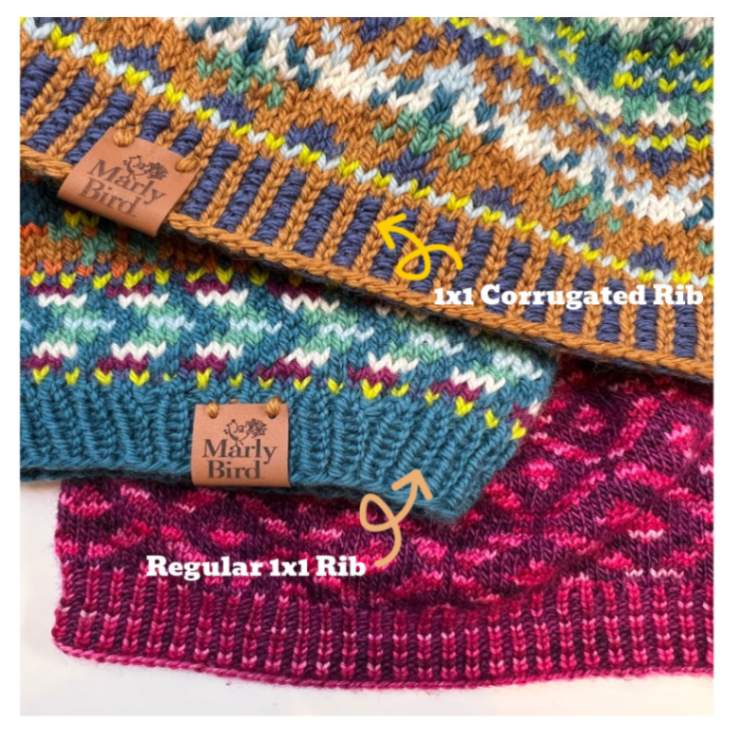
With regular ribs, the purl stitches are most often hidden, since they shrink towards the back of the work. Once stretched out, they become more visible but still sit back in the shadows.
The corrugated rib shows off its purl stitches by bringing them out to the front. This is so much more striking when you see both stitch types in contrasting colors. It’s by far a more fancy and decorative look and is the perfect edging for colorwork pieces.
Well, I hope you’ve learned a little after reading this post.
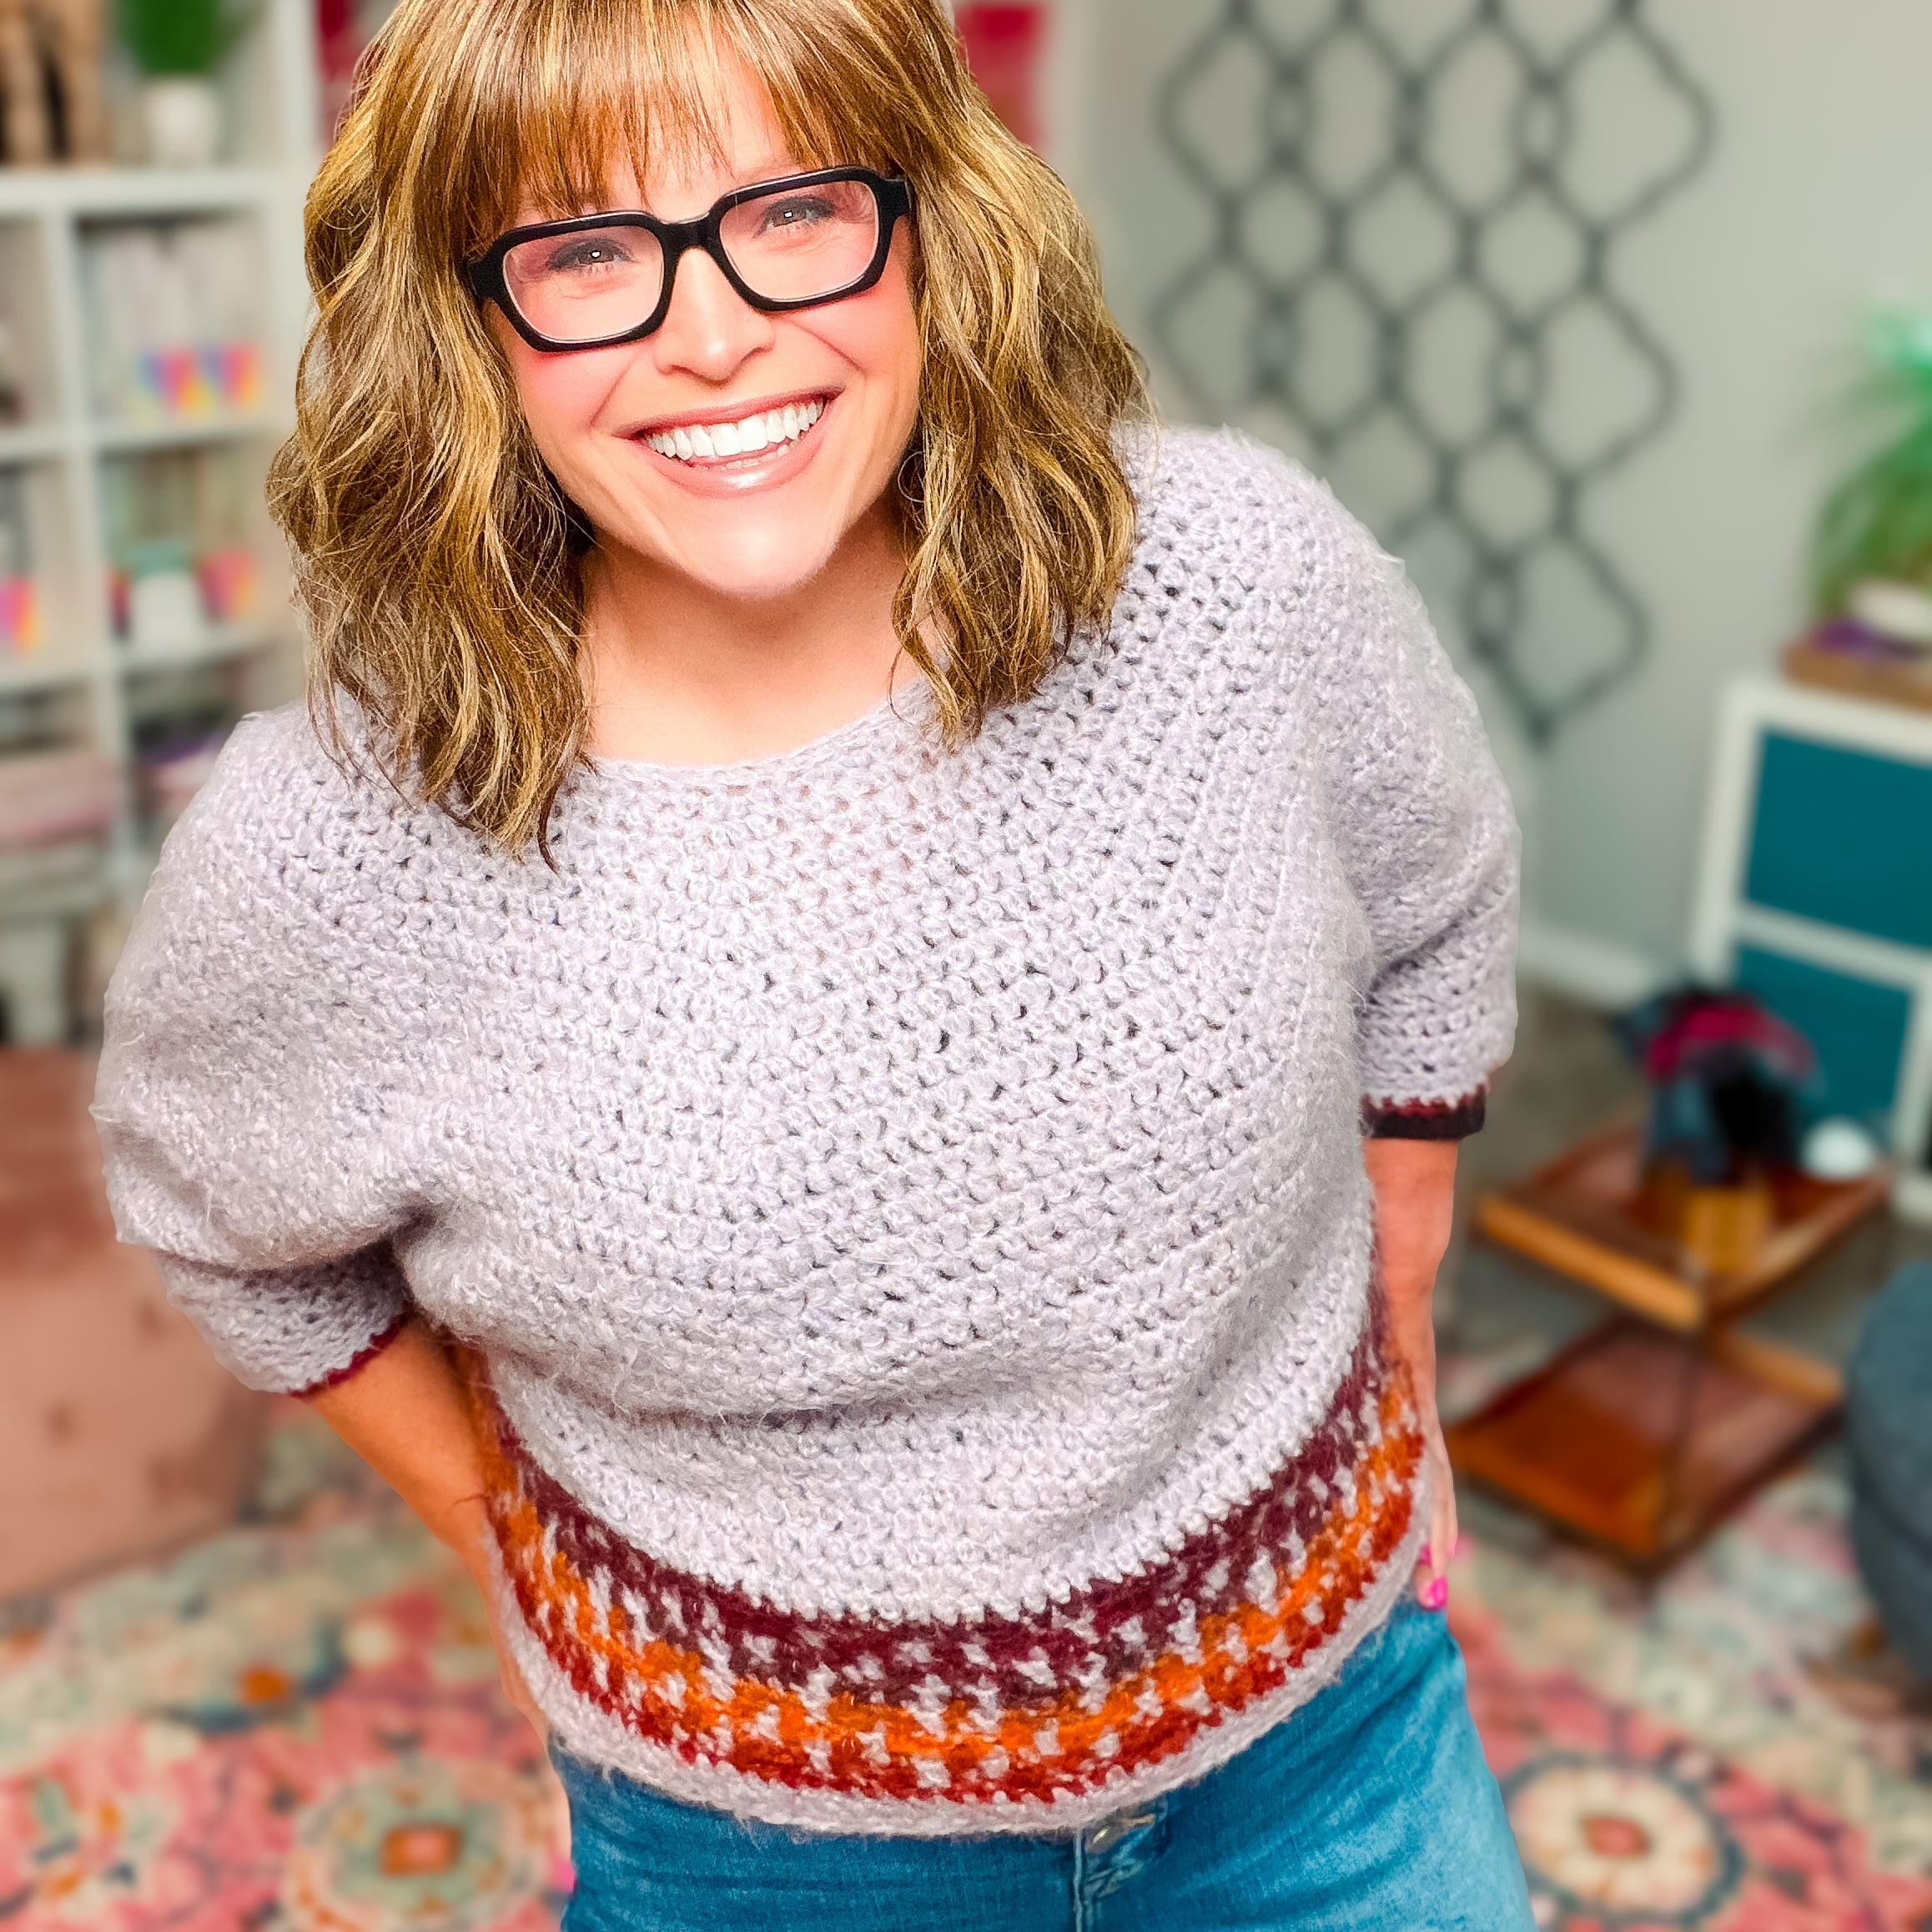
If you’re looking for examples of knit 2-color corrugated rib, then look for the wonderful Echo Gloves here in Camp Colorwork. If you’re a little nervous about trying this ribbing without some background knowledge, you can learn all about it and much, much more in Camp Colorwork.
The Harmony Hues Hat is a fantastic choice for this ribbing too, and it’s right here! You can use the leftover yarn from your Color Kaleidoscope Poncho to make yourself a whole wardrobe of hats that match perfectly with your poncho!
For more colorwork discussion and a whole host of patterns, take a look at Knit Colorwork And 65 Patterns!
CROCHETERS! Don’t feel left out! We have something JUST for you! The Monet Crochet Blanket Masterclass! Don’t miss it!!!
Frequently Asked Questions
What is corrugated ribbing in knitting?
Corrugated ribbing is 2-color ribbing where the knit stitches and purl stitches are worked in different colors… creating that gorgeous striped, ridged look you see on the hems and cuffs of Fair Isle sweaters. Unlike regular ribbing where you alternate yarns in the same row, in corrugated rib the knit stitches stay one color and the purl stitches stay another color throughout. The result is a structured, decorative ribbing that looks super professional and polished.
Is corrugated ribbing less stretchy than regular ribbing?
Yes, and this is the main thing to know going in! Because you’re carrying two yarns at once and the stitches don’t have the same back-and-forth stretch as single-color ribbing, corrugated rib is stiffer. It’s more of a decorative edge than a functional stretchy cuff. For this reason, many knitters work corrugated ribbing on needles a size or two larger than the body of the garment to compensate. Check your pattern for guidance on this.
How do I manage both yarns while knitting corrugated ribbing?
You carry both colors at the same time! For knit stitches, you use Color A (typically the background color). For purl stitches, you bring Color B to the front. The yarn not in use just floats behind. It’s similar to stranded colorwork but simpler because you’re only working one type of stitch with each color… not alternating every few stitches. Once you do a row or two, the rhythm becomes natural. A yarn guide can help keep everything tangle-free.
Can I use corrugated ribbing on any project or just Fair Isle sweaters?
Any project! It looks stunning on sweater hems, cuffs, and necklines. But it’s also beautiful on colorwork hats, mittens, and accessories. If you’re making something with any colorwork at all, corrugated rib at the border is a gorgeous finishing touch that ties the whole design together. You could even use it as a decorative stripe on a simple project just for visual interest.
Do I need to know Fair Isle knitting to do corrugated ribbing?
Nope! Corrugated ribbing is actually a great first step into working with two colors because it’s simpler than full stranded colorwork. You’re only using two stitches (knit and purl) and each color stays on one stitch type. If you can do regular ribbing and you’re comfortable holding a second strand of yarn… you’re ready to try corrugated rib. It’s a fantastic confidence builder before tackling a full colorwork yoke.