
Take a Look Knit Fingerless Mittens Free Pattern
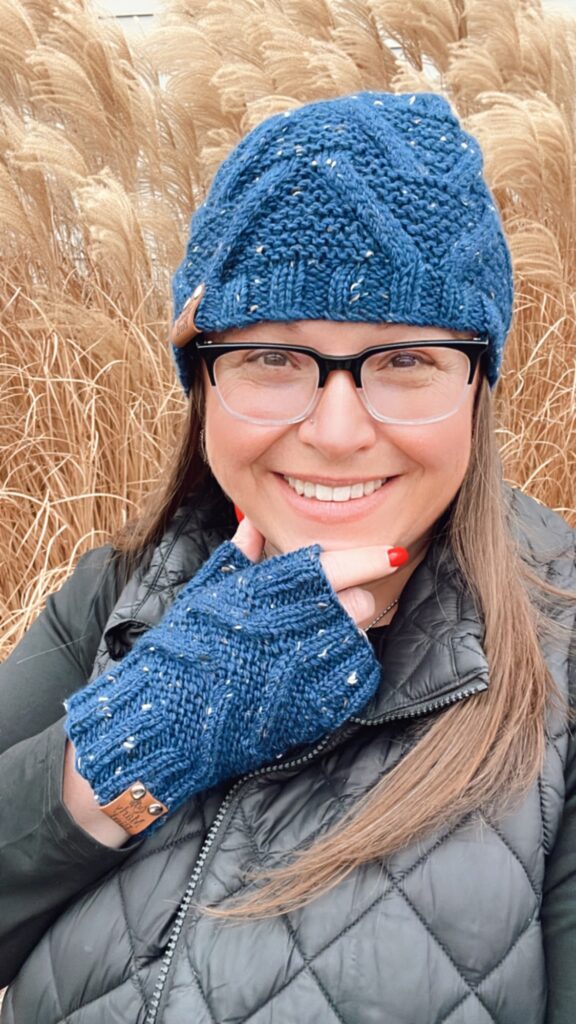
The Take a Look Knit Fingerless Mittens are a free cabled knit pattern featuring an intermediate cable stitch, perfect for hands that need to stay warm while fingers stay free. Designed by Marly Bird, this one-skein pattern works up fast in a single skein of worsted weight yarn and pairs beautifully with the matching Take a Look Cable Knit Hat.
⚡ Quick Answer:
The Take a Look Knit Fingerless Mittens are a free intermediate-level knit pattern featuring cable stitches, worked flat then seamed. They work up in approximately one skein of worsted weight yarn and pair perfectly with the matching cabled hat — get the free pattern on the blog or purchase the ad-free PDF on Etsy, Shopify, or Ravelry.
Hey, bestie 💛
If you've been looking for a fingerless mitten pattern that feels both cozy and special, these take-a-look mittens are exactly what you've been searching for. With their classic cable panel running down the back, they're the kind of hand warmers that work beautifully with any winter outfit… and the best part? You can wear them while texting, which honestly wins for practicality!
🧶 Why You'll Love This Pattern 💖
These fingerless mittens are more than just hand warmers… they're a confidence builder for anyone learning cables. The pattern breaks the cable panel into manageable sections, and once you master the 3/1 right and left cables, you'll be flying through rows.
✨ They work up FAST. From cast-on to bind-off, one skein of worsted weight yarn gets you a complete pair. That means a gift-worthy project you can finish in a weekend.
✨ The sizing is inclusive. Worked in the round on double-pointed needles, these mittens give you a custom fit every time. No more guessing or adjusting patterns — the one-size-fits-most design works for most hand circumferences.
✨ Cable stitches aren't as hard as they look. The pattern includes a video tutorial showing you exactly how to work cables without a cable needle, plus all the foundational stitches you'll need. By the time you finish, you'll feel like a cable master.
You'll love this pattern if… you enjoy working in the round, you've mastered the basics, and you want to try your hand (literally!) at cables. You'll come away knowing how to work cables confidently, how to manage a thumb gusset, and how to finish a project with a professional-looking bind-off.
⚙️ Quick Pattern Overview
These mittens are worked in the round from cuff to fingertip opening, featuring a classic cable stitch panel down the back and a comfortable garter-stitch background. The thumb is added via a gusset method, which gives you a perfectly fitted opening every time. Written instructions include charts for both left and right hand, plus the thumb — so you get a complete visual guide alongside the written pattern.
🎓 Understanding Cable Knitting
What's a cable, anyway? A cable is created by crossing a group of stitches over another group, creating the appearance of twisted, braided fabric. The cables in these mittens use a 3/1 method (three stitches over one stitch), which creates a bold, dimensional line perfect for fingerless mittens.
✨ Designer Tip: The secret to beautiful cables is keeping them slightly loose as you work. If you pull too tight when you slip stitches to your cable needle, you'll restrict the cable's movement and it won't drape as beautifully. Think of your cable needle as a temporary holder, not a tension tool.
These mittens are written for cables worked WITH a cable needle, but the free video tutorial shows you how to work cables without one if you prefer that method. Both techniques get you to the same beautiful result — use whichever feels more comfortable in your hands.
🧶 Yarn & Materials
Yarn
KnitPicks Woodland Tweed (80% Merino Wool, 15% Baby Alpaca, 5% Viscose; 180 yds / 165 m per 3½ oz / 100 g; Worsted #4 / CYCA 4) — Colorway: Plunge Pool Heather — 1 skein
Yarn Substitutes:
- KnitPicks Wool of the Andes Worsted — 100% superwash wool, perfect for hand-washing, ~110 yds per 50g so you'll need 2 balls
- Cascade 220 Superwash — 100% superwash wool, machine-washable, beautiful stitch definition
- Berroco Vintage Worsted — 52% acrylic / 40% wool / 8% nylon blend, more budget-friendly while still showing cables beautifully
Needles & Notions
- US 8 (5mm) double-pointed needle set (5 needles)
- Stitch markers
- Cable needle
- Tapestry needle
- Scrap yarn to hold stitches
🧩 Take a Look Knit Fingerless Mittens || Pattern Details
Skill Level
Intermediate — comfortable with basic stitches (knit, purl, increases) and ready to try cables
Finished Measurements
Adult One Size Fits Most — approximately 8″ circumference [20 cm] and 8″ length [20 cm] when slightly stretched
Gauge
20 sts and 26.5 rounds = 4″ [10 cm] in Cable Stitch Pattern
Abbreviations
- dec — decrease
- k — knit
- p — purl
- m1 — make one increase
- 3/1 rc — 3/1 right cable
- 3/1 lc — 3/1 left cable
- p2tog — purl 2 together
- p2tog tbl — purl 2 together through back loop
- st(s) — stitch(es)
- pm — place marker
- slm — slip marker
Special Stitches
M1 (Make 1 Increase): With the tip of your left-hand needle, pick up the horizontal strand between stitches from front to back. Knit this strand through the back leg, twisting it into a loop in the process — 1 st increased.
3/1 RC (Three over One Right Cable): Slip 1 stitch from left-hand needle to cable needle and hold to back, knit 3 stitches from left-hand needle, knit 1 stitch from cable needle.
3/1 LC (Three over One Left Cable): Slip 3 stitches from left-hand needle to cable needle and hold to front, knit 1 stitch from left-hand needle, knit 3 stitches from cable needle.
Notes
- Mittens are worked in the round from cuff to fingers using double-pointed needles
- Thumb gusset instructions are specific to left and right hand
- Charts are given for both the full left hand and full right hand; the thumb chart works for both hands
- Garter stitch is worked between the cables for contrast and visual interest
🎬 Video Tutorials
The following video tutorials will support you through every step of this pattern:
- Watch: No Cuss Cast On to Double Pointed Needles
- Watch: Perfect Ribbing
- Watch: How to Cable Without a Cable Needle
- Watch: How to Add a Lifeline
- Watch: Bury in Ends
Affiliate Disclosure: This post contains affiliate links. To learn more please visit my privacy policy here💖
🧶 Take a Look Knit Fingerless Mittens || Pattern Instructions
Wrist Cuff (Both)
Using the No Cuss Cast-on, cast on 40 stitches.
Rounds 1-14: [k2, p2] 10 times — 40 stitches.
Round 15 (increase round): [k2, p2] 5 times, [M1, k] 2 times, k4, M1, k11, M1, k, p2 — 44 stitches.
Left Thumb Gusset
Round 16 (thumb gusset set-up): [k2, p2] 4 times, pm, k2, pm, p3, k3, p15, k3, p2
Round 17 (thumb gusset increase): [k2, p2] 4 times, slm, M1, k2, M1, slm, p2, k, 3/1 LC, k13, 3/1 RC, k, p — 4 stitches between thumb gusset markers.
Round 18: [k2, p2] 4 times, slm, p1, k2, p1, slm, p4, k3, p13, k3, p3.
Round 19 (thumb gusset increase): [k2, p2] 4 times, slm, M1, p1, k2, p1, M1, slm, p2, k2, 3/1 LC, k11, 3/1 RC, k2, p — 6 stitches between thumb gusset markers.
Round 20: [k2, p2] 4 times, slm, p2, k2, p2, slm, p5, k3, p11, k3, p4.
Round 21 (thumb gusset increase): [k2, p2] 4 times, slm, M1, p2, k2, p2, M1, slm, p2, k3, 3/1 LC, k9, 3/1 RC, k3, p — 8 stitches between thumb gusset markers.
Round 22: [k2, p2] 4 times, slm, k1, p2, k2, p2, k1, slm, p6, k3, p9, k3, p5.
Round 23 (thumb gusset increase): [k2, p2] 4 times, slm, M1, k1, p2, k2, p2, k1, M1, slm, p2, k4, 3/1 LC, k7, 3/1 RC, k4, p — 10 stitches between thumb gusset markers.
Round 24: [k2, p2] 4 times, slm, [k2, p2] 2 times, k2, slm, p6, [p, k3, p6] 2 times.
Round 25 (thumb gusset increase): [k2, p2] 4 times, slm, M1, [k2, p2] 2 times, k2, M1, slm, p2, k5, 3/1 LC, k5, 3/1 RC, k5, p — 12 stitches between thumb gusset markers.
Round 26: [k2, p2] 4 times, slm, p1, [k2, p2] 2 times, k2, p1, slm, p8, [k3, p5] 2 times, p2.
Round 27 (thumb gusset increase): [k2, p2] 4 times, slm, M1, p1, [k2, p2] 2 times, k2, p1, M1, slm, p2, k6, 3/1 LC, k3, 3/1 RC, k6, p — 14 stitches between thumb gusset markers.
Round 28: [k2, p2] 4 times, slm, p2, [k2, p2] 3 times, slm, p8, [p, k3, p2] 2 times, p6.
Round 29: [k2, p2] 4 times, remove marker, slip 14 stitches to holder or scrap yarn, remove marker, cast on 2, p2, k7, 3/1 LC, k, 3/1 RC, k7, p — 44 stitches.
Right Thumb Gusset
Round 16 (thumb gusset set-up): Pm, k2, pm, [p2, k2] 4 times, p3, k3, p15, k3, p2.
Round 17 (thumb gusset increase): Slm, M1, k2, M1, slm, [p2, k2] 4 times, p2, k, 3/1 LC, k13, 3/1 RC, k, p — 4 stitches between thumb gusset markers.
Round 18: Slm, p1, k2, p1, slm, [p2, k2] 4 times, p4, k3, p13, k3, p3.
Round 19 (thumb gusset increase): Slm, M1, p1, k2, p1, M1, slm, [p2, k2] 4 times, p2, k2, 3/1 LC, k11, 3/1 RC, k2, p — 6 stitches between thumb gusset markers.
Round 20: slm, p2, k2, p2, slm, [p2, k2] 4 times, p5, k3, p11, k3, p4.
Round 21 (thumb gusset increase): slm, M1, p2, k2, p2, M1, slm, [p2, k2] 4 times, p2, k3, 3/1 LC, k9, 3/1 RC, k3, p — 8 stitches between thumb gusset markers.
Round 22: Slm, k1, p2, k2, p2, k1, slm, [p2, k2] 4 times, p6, k3, p9, k3, p5.
Round 23 (thumb gusset increase): Slm, M1, k1, p2, k2, p2, k1, M1, slm, [p2, k2] 4 times, p2, k4, 3/1 LC, k7, 3/1 RC, k4, p — 10 stitches between thumb gusset markers.
Round 24: Slm, [k2, p2] 2 times, k2, slm, [p2, k2] 4 times, p6, [p, k3, p6] 2 times.
Round 25 (thumb gusset increase): Slm, M1, [k2, p2] 2 times, k2, M1, slm, [p2, k2] 4 times, p2, k5, 3/1 LC, k5, 3/1 RC, k5, p — 12 stitches between thumb gusset markers.
Round 26: Slm, p1, [k2, p2] 2 times, k2, p1, slm, [p2, k2] 4 times, p8, [k3, p5] 2 times, p2.
Round 27 (thumb gusset increase): Slm, M1, p1, [k2, p2] 2 times, k2, p1, M1, slm, [p2, k2] 4 times, p2, k6, 3/1 LC, k3, 3/1 RC, k6, p — 14 stitches between thumb gusset markers.
Round 28: Slm, p2, [k2, p2] 3 times, slm, [p2, k2] 4 times, p8, [p, k3, p2] 2 times, p6.
Round 29: Remove marker, slip 14 stitches to holder or scrap yarn, remove marker, cast on 2, [p2, k2] 4 times, p2, k7, 3/1 LC, k, 3/1 RC, k7, p — 44 stitches.
Body (Both)
Round 30: [k2, p2] 5 times, [p, k3, p4, k3] 2 times, p2.
Round 31: [k2, p2] 5 times, k, 3/1 LC, k13, 3/1 RC, k, p.
Round 32: [k2, p2] 5 times, p2, k3, p13, k3, p3.
Round 33: [k2, p2] 5 times, k2, 3/1 LC, k11, 3/1 RC, k2, p.
Round 34: [k2, p2] 5 times, p3, k3, p11, k3, p4.
Round 35: [k2, p2] 5 times, k3, 3/1 LC, k9, 3/1 RC, k3, p.
Round 36: [k2, p2] 5 times, p4, k3, p9, k3, p5.
Round 37: [k2, p2] 5 times, k4, 3/1 LC, k7, 3/1 RC, k4, p.
Round 38: [k2, p2] 5 times, p4, [p, k3, p6] 2 times.
Round 39: [k2, p2] 5 times, k5, 3/1 LC, k5, 3/1 RC, k5, p.
Round 40: [k2, p2] 5 times, p6, [k3, p5] 2 times, p2.
Round 41: [k2, p2] 5 times, k6, 3/1 LC, k3, 3/1 RC, k6, p.
Round 42: [k2, p2] 5 times, p6, [p, k3, p2] 2 times, p6.
Round 43: [k2, p2] 5 times, k7, 3/1 LC, k, 3/1 RC, k7, p.
Cuff at Fingers (Both)
Round 44 (decrease round): [k2, p2] 5 times, M1, k, p2, k2, p, p2tog tbl, k2, p2tog tbl, p, k2, p2tog, k2, p2tog, p (40 stitches).
Rounds 45-53: [k2, p2] 7 times, k2, p2, k2, p2, k2, p2.
Bind off in pattern.
First Finishing
Weave in all loose ends.
Thumbs (Both)
Divide the 14 sts from holder onto 3 double-pointed needles.
Round 1: Pick up and knit 2 st at cast on of round 29, [p2, k2] 3 times, p2 — 16 stitches. Redistribute stitches if needed. Join round and mark first st.
Work evenly in established 2×2 ribbing pattern until thumb measures 1″ [2.54 cm] in length, or to desired length. Bind off in pattern.
Second Finishing
Fasten tail securely to wrong side of knit fingerless mittens. Use tail from thumb to close any gap or hole at the mitten join with the Duplicate Stitch technique. Weave in any remaining loose ends.
🧶 More Cable Knit Patterns You'll Love
If you loved learning cables with the Take a Look mittens, these patterns are perfect for your next project:
- Take a Look Cable Knit Hat — the perfect matching pattern for these mittens
- Honeycomb Cable Hat — another beginner-friendly cable design
- Dual Cable Knit Boot Toppers — short and sweet cable project
- Cable Knit Cardigans — level up your cables with a full garment
- Knit Cables for Beginners — master the fundamentals
❓ Frequently Asked Questions
Are these mittens really easy to make?
They're listed as intermediate, which means they're not for total beginners, but they're definitely doable if you're comfortable with basic knitting and ready to learn cables. The pattern includes detailed charts and a video tutorial showing you every step, so you'll have support the whole way through.
Can I make these mittens to match a hat?
Absolutely! These mittens are designed to pair perfectly with the Take a Look Cable Knit Hat, which uses the same cable pattern. Working them together as a set makes for a stunning, coordinated pair that feels extra special.
What kind of yarn should I use?
The sample uses KnitPicks Woodland Tweed, a lovely aran/heavy worsted weight with merino wool, baby alpaca, and viscose. Just make sure whatever yarn you choose is also a CYCA #4 weight so you'll get the correct gauge. Wool or wool blends work beautifully for mittens because they're naturally warm and elastic.
How long will it take to knit these mittens?
With one skein needed total, most knitters finish these in about 4-6 hours of knitting time. Of course, it depends on your knitting speed! The pattern moves pretty quickly once you get the cable rhythm down, and working in the round tends to be faster than flat knitting.
What if I don't have double-pointed needles?
You can absolutely use circular needles with the magic loop method if you prefer! Both techniques work perfectly fine for smaller circumferences like mittens. Use whichever needles help you achieve the correct gauge and feel comfortable in your hands.
Can I work the cables without a cable needle?
Yes! The free video tutorial shows you exactly how to cable without a cable needle using the dip stitch method. Some knitters find this faster and more comfortable — it's totally a personal preference.
💕 Final Thoughts
These Take a Look Knit Fingerless Mittens are the kind of project that teaches you something new while giving you a wearable finish. Every cable crossed, every thumb gusset increased, every round completed is building your confidence as a knitter. And when you slip them on for the first time? That moment of pride is absolutely worth it.
If you make these mittens, I'd absolutely love to see them! Tag me @marlybird on Instagram or Facebook and use the hashtags #MarlyBird, #MMMDI (Marly Made Me Do It), and #TakeALookMittens so I can cheer on your cable work. 💛
❤️ Your BiCrafty Bestie,
Marly Bird

Categories: Free Patterns, Knitting, Our Free Patterns, Pattern, Uncategorized




I missed the hat pattern. please give a link to it. thanks @marlybird