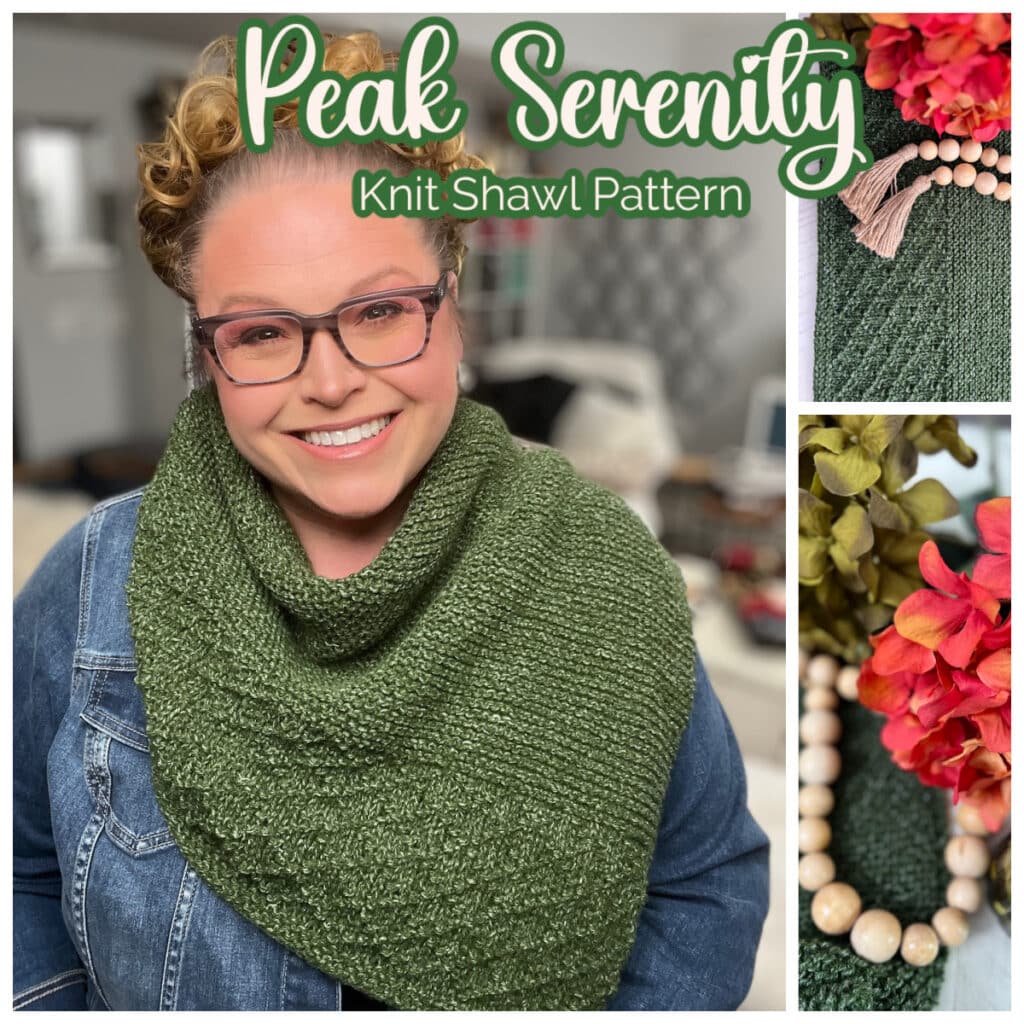
📝 Updated June 7, 2026: Framework refresh… new intro leading with the join-as-you-go magic, “Is This Shawl For You?” reader guide added, yarn update (Red Heart Unforgettable discontinued … Loops & Threads Facets is the recommended swap), crochet shawl cluster navigation, and expanded FAQ with People Also Ask coverage.
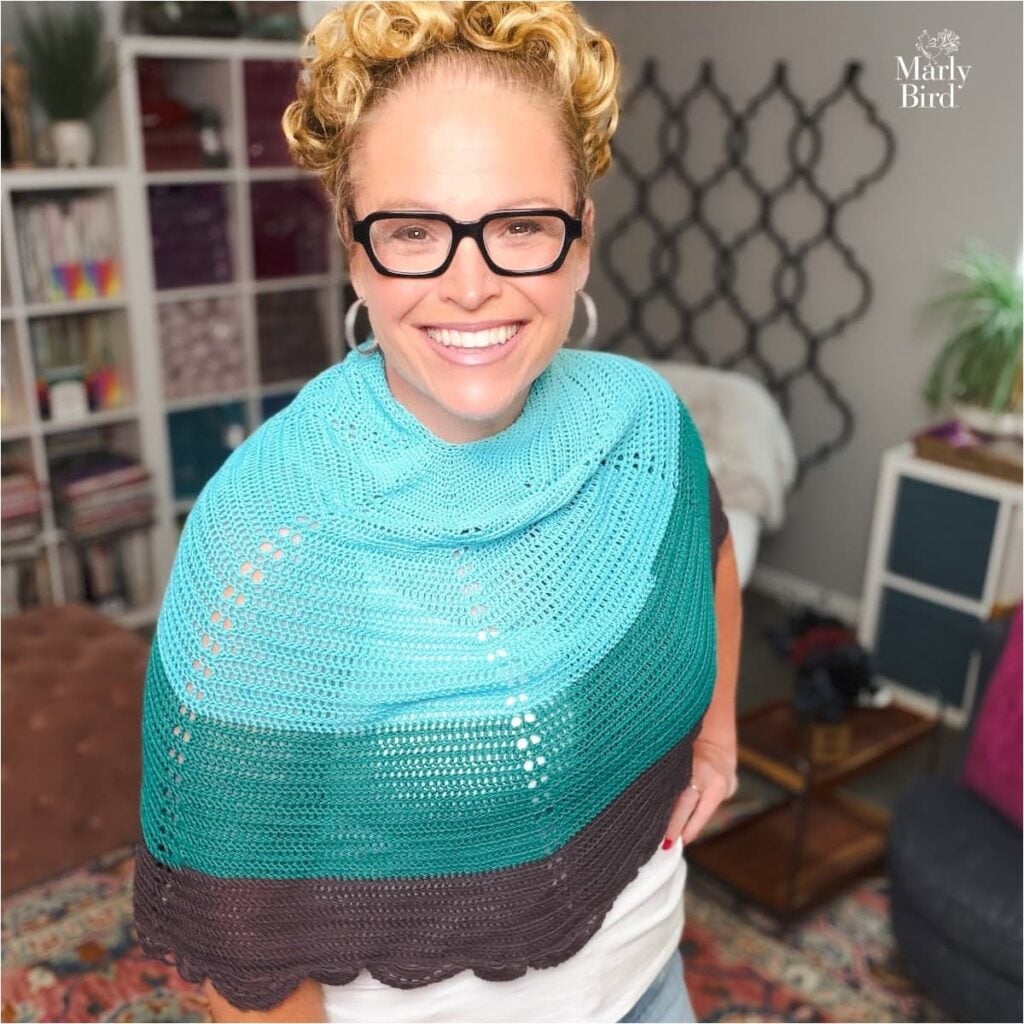
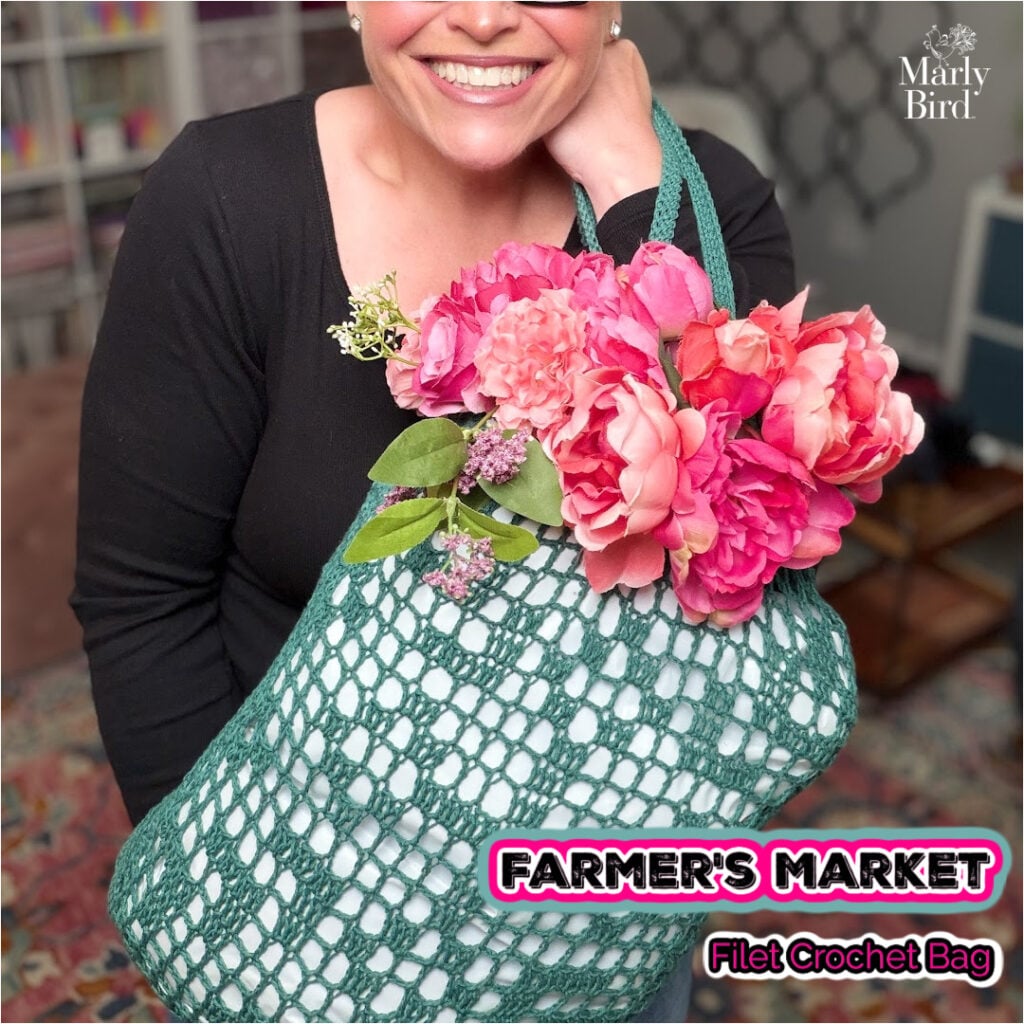
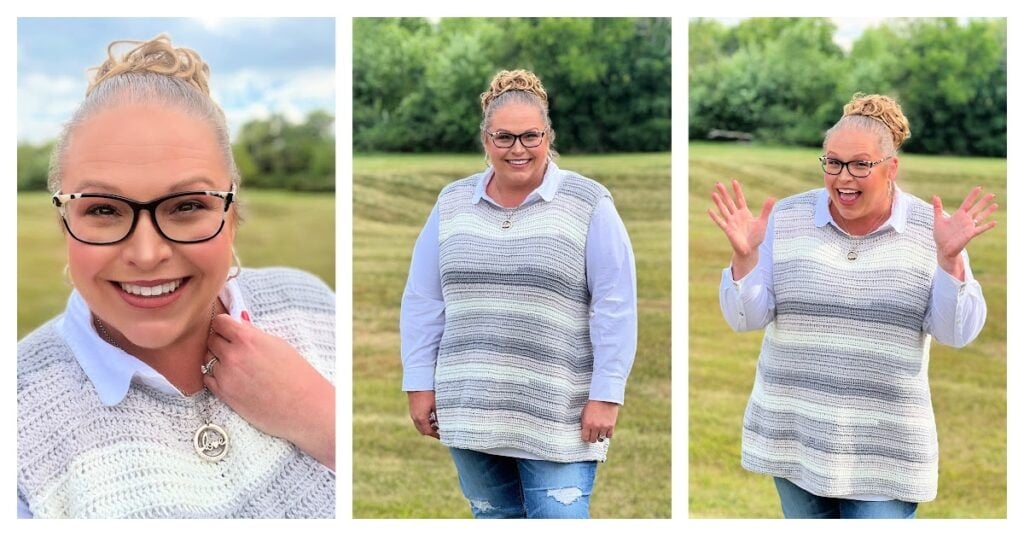
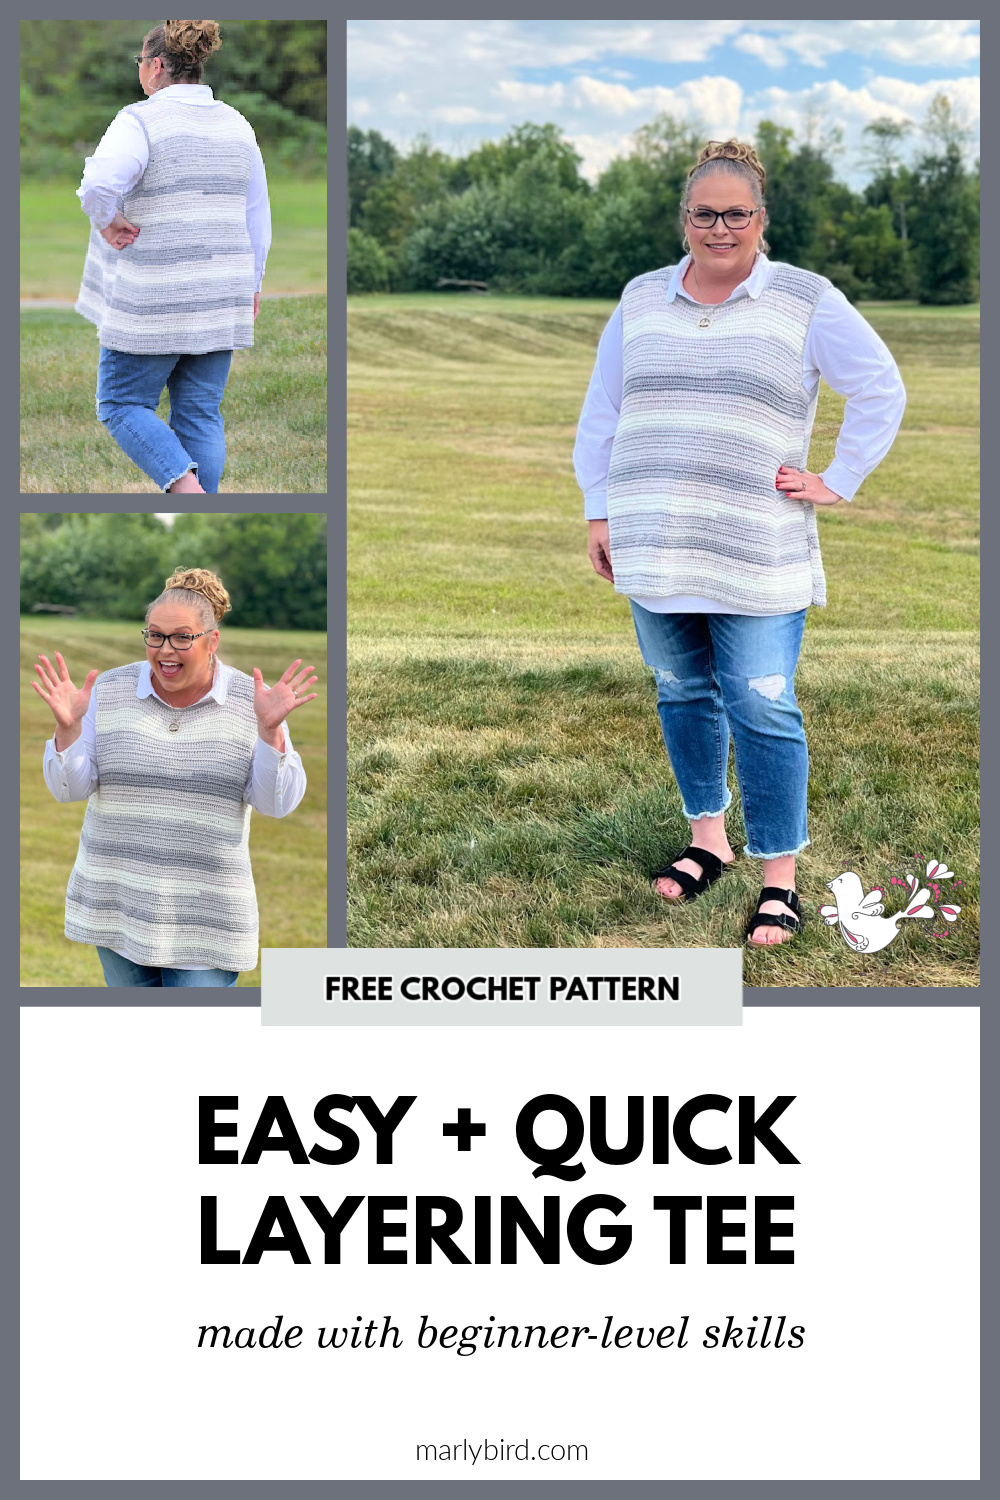
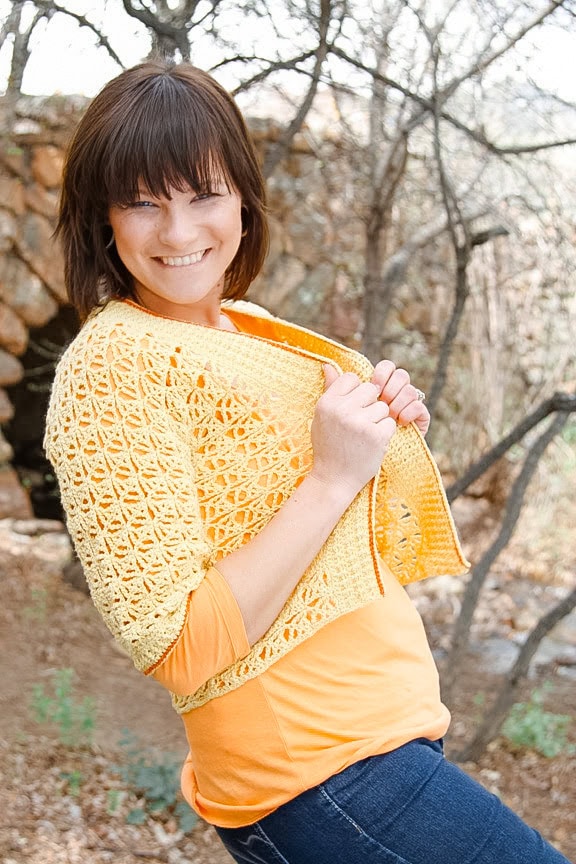
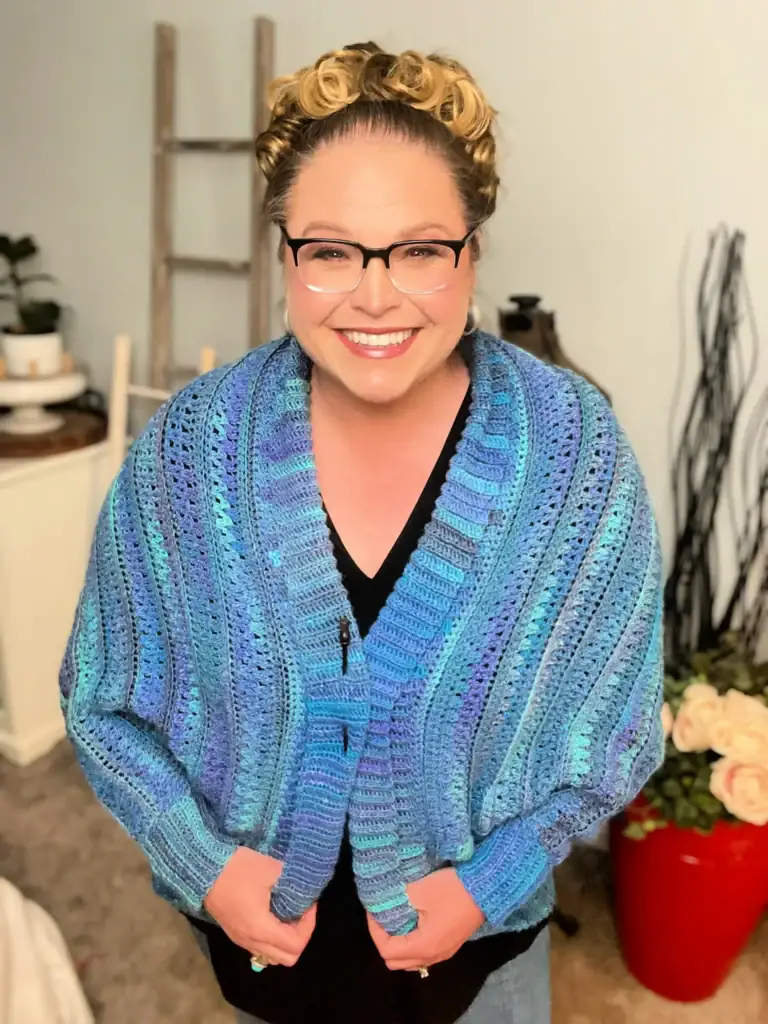
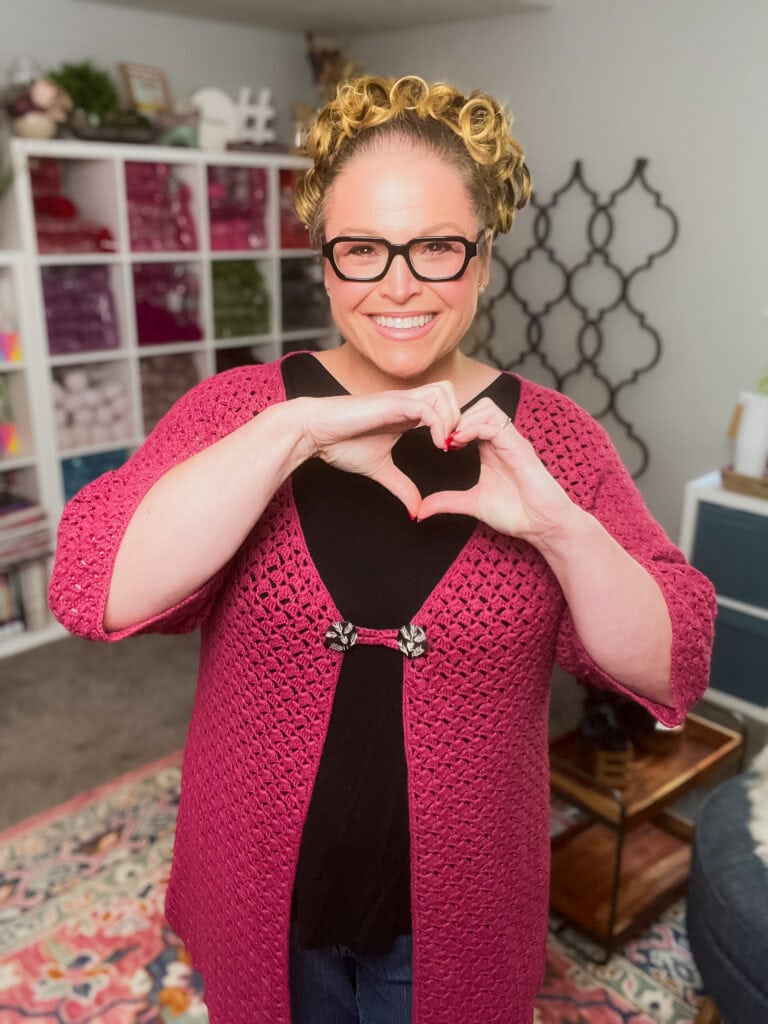
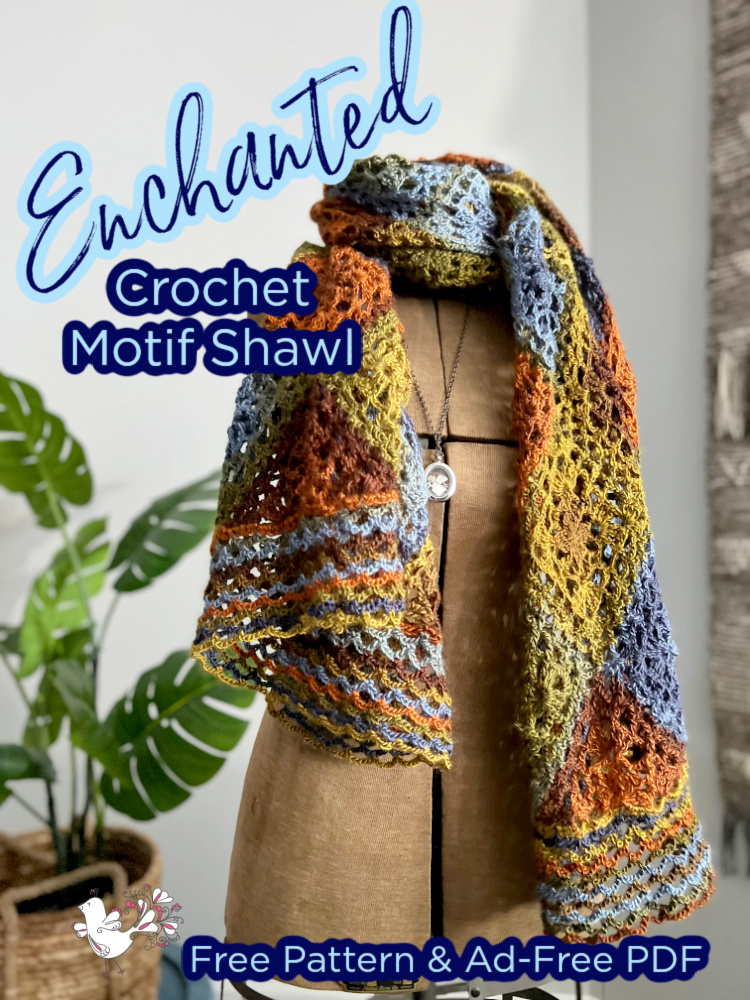
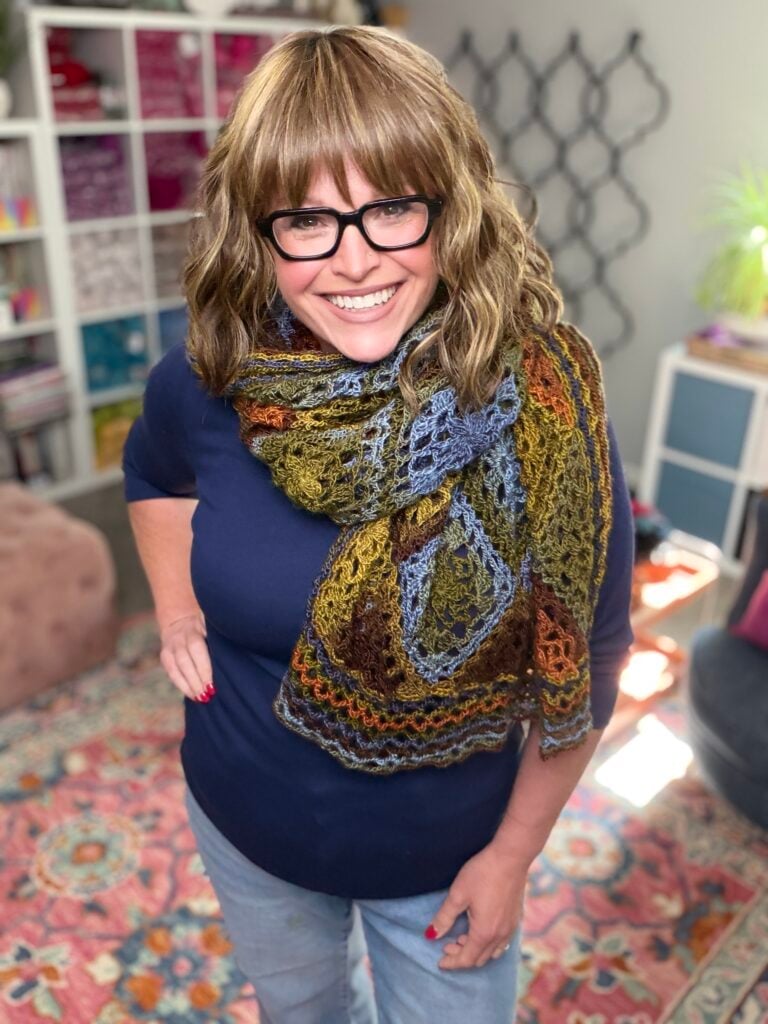
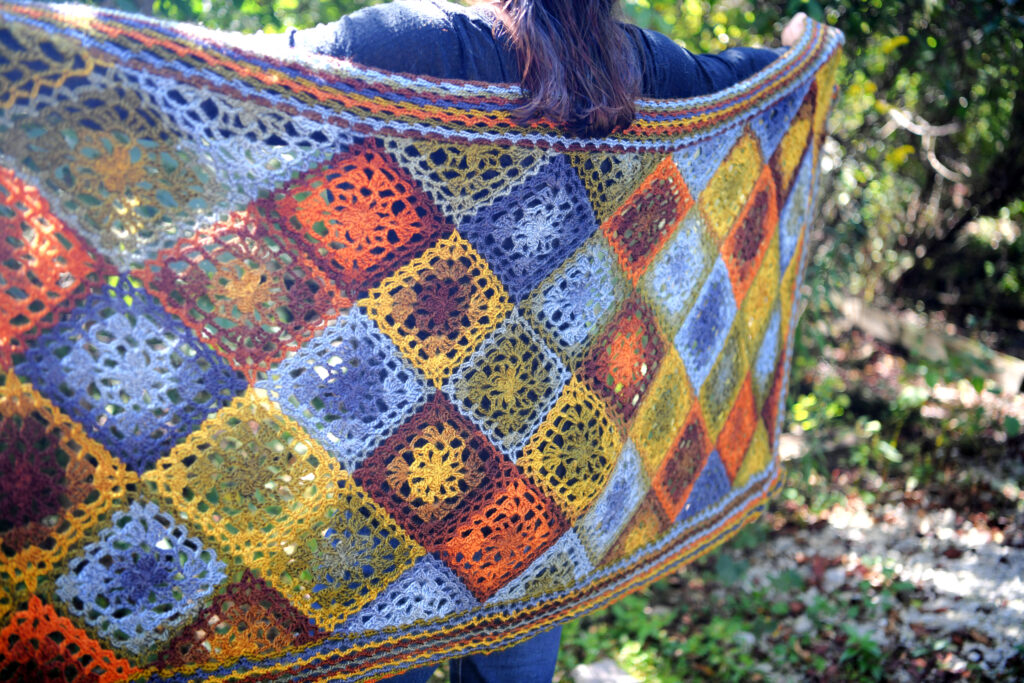
If you’re looking for the perfect accessory to finish off your wardrobe this season, look no further than our Enchanted shawl pattern! Whether you want to make a bold statement or keep things cozy and classy, there’s something in our free easy rectangular crochet shawl pattern that will be sure to add some pizzazz. With plenty of colorways available in this Unforgettable yarn, you can customize your design with ease so it matches any style or mood, making it perfect for any occasion. Keep reading to get all the details on creating one unique masterpiece of your own!
Free pattern available on this blog post, or purchase the ad-free pdf in the Marly Bird Store.
Affiliate Disclosure: This post contains affiliate links. To learn more please visit my privacy policy here💖
Is This Shawl For You?
✅ Perfect if:
- You know basic crochet stitches (chain, slip stitch, sc, dc, tr)
- You've made or are willing to try a basic granny-style motif
- You want a project that looks impressive without a lot of color-planning work
- You want a versatile wrap you'll actually wear
⚠️ Heads up:
This pattern uses join-as-you-go (JAYG) construction. If you've never done JAYG motifs, there will be a learning curve on the first few joins — but it clicks fast. Marly's video tutorial is in the pattern section below, and watching it before you start will save you a lot of confusion.

Superb Colors!
Have you noticed the way the color changes through the motifs of this shawl?
Well, there's no need to choose several colors that all go together, then weave in a ton of ends when you're finished. It's all done for you with Red Heart Unforgettable yarn. Red Heart Unforgettable is a long color-change yarn, but some color-changing yarns are variegated. Here's some information about each option so you can choose what's right for your project.
Long Color-Change Yarn vs Variegated Yarn
When it comes to choosing yarn for your crochet project, the options are endless. Two popular choices for adding color to your project are long color-changing yarn and variegated yarn. Both have their pros and cons, and it's important to understand the differences between the two before deciding which to use. Let's explore long color-changing yarn vs variegated yarn and provide some tips for working with each.
What is Long Color-Changing Yarn?
Long color-changing yarn is a type of yarn that gradually changes color as you work with it. This type of yarn is also known as gradient yarn, ombre yarn, or self-striping yarn. Long color-changing yarn comes in skeins that are usually wound in a way that allows the colors to blend together seamlessly. Some popular brands of long color-changing yarn include Unforgettable Yarn by Red Heart, Chroma Yarn by Knit Picks, and Noro Yarn.
What is Variegated Yarn?
Variegated yarn is a type of yarn that has multiple colors within the same skein. The colors are usually random or semi-random and can vary in width and placement. Variegated yarn can be hand-dyed or machine-dyed and can be made from a variety of fibers. Some popular variegated yarns include Super Saver by Red Heart, Malabrigo Yarn, and Madelinetosh Yarn.
Differences between Long Color-Changing Yarn and Variegated Yarn
The main difference between long color-changing yarn and variegated yarn is the way the colors are distributed throughout the skein. With long color-changing yarn, the colors gradually change as you work with the yarn, resulting in a smooth transition from one color to the next. With variegated yarn, the colors are more random and can vary in width and placement, resulting in a more unpredictable color pattern.

Another difference is the length of each color. With long color-changing yarn, each color usually lasts for several rows or rounds, depending on the pattern and gauge. With variegated yarn, the length of each color can vary, and some colors may only appear for a few stitches.
Tips for Working with Long Color-Changing Yarn
When working with long color-changing yarn, it's important to choose a pattern that will showcase the color changes. Simple stitch patterns, such as openwork lace motifs and easy shell stitch patterns, are great options for showing off the gradual color transitions.
Allow the yarn colors to blend naturally without trying to control their placement. Trusting the join-as-you-go motifs' yarn colors to mix and match at random creates a beautiful, unique look that can't be achieved by forcing color placement.
Exploring multiple colorways is a fabulous idea to achieve a truly unique and beautiful look. Whether opting for similar or contrasting hues, rest assured that the results will be nothing short of breathtaking.
Long Color-changing Yarn Patterns
Here are wonderful crochet patterns by Marly Bird that highlight the long color-changing yarn:
- Riverside Hat and Scarf
- Giovanni Tweed Crochet Scarf (Roll With It Tweed Melange)
- Crochet Swancho (Roll With It Tweed Melange)
- Kaleidoscope Unforgettable Shawl (by Sara Kay Hartmann)
- Petal Link (free easy rectangular crochet shawl pattern)
- Go To Baby Shower Blanket
- 3 in 1 Hand Warmer Pattern
- The Most Comfy Poncho EVER (Caron Latte Cakes)
- Pixie Dust Planned Pooling with Long Color Changing yarn
- Marly's Poncho Make-Along (so many choices for Unforgettable yarn)
Tips for Working with Variegated Yarn
When working with variegated yarn, it's important to choose a pattern that will complement the color changes. Simple stitch patterns, such as ribbing or seed stitch, are great options for allowing the colors to shine.
It's also important to be mindful of the placement of the colors when working with variegated yarn. If the colors are too busy or unpredictable, they may clash with the stitch pattern or overwhelm the overall design. It's a good idea to swatch with the yarn to see how the colors behave and adjust the pattern accordingly.
Other Color Options
Although I am not a big fan of combining two variegated yarns, I adore pairing a complementary solid or tonal yarn with a variegated one to obtain a stunning look.
Using Red Heart Unforgettable
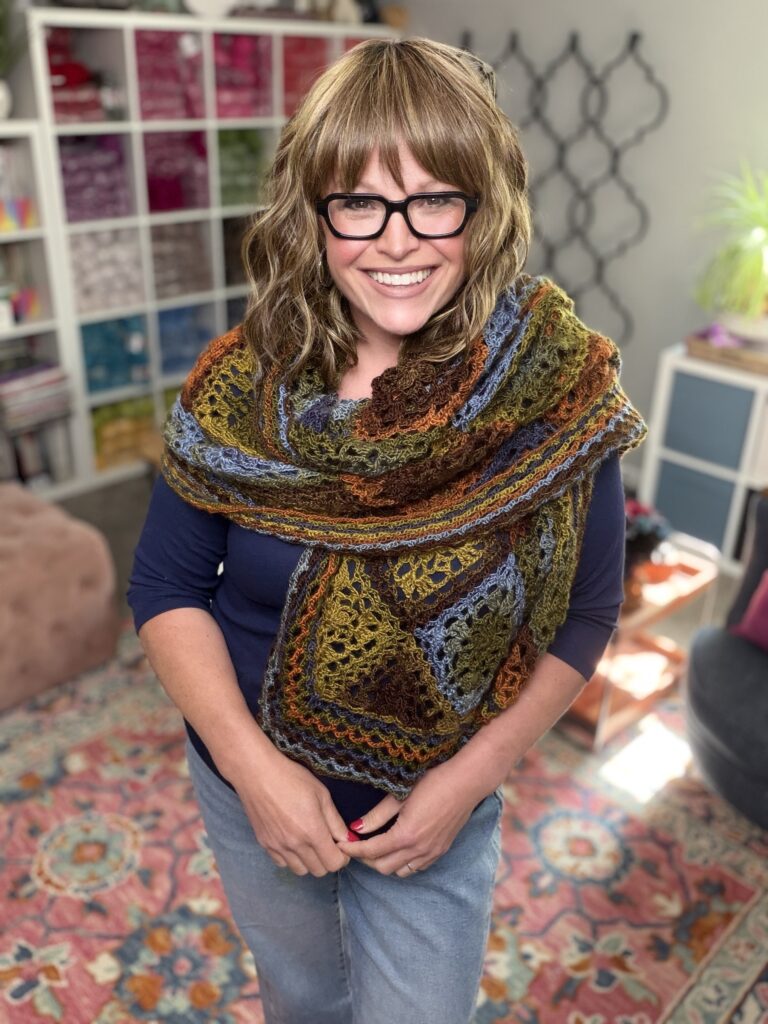
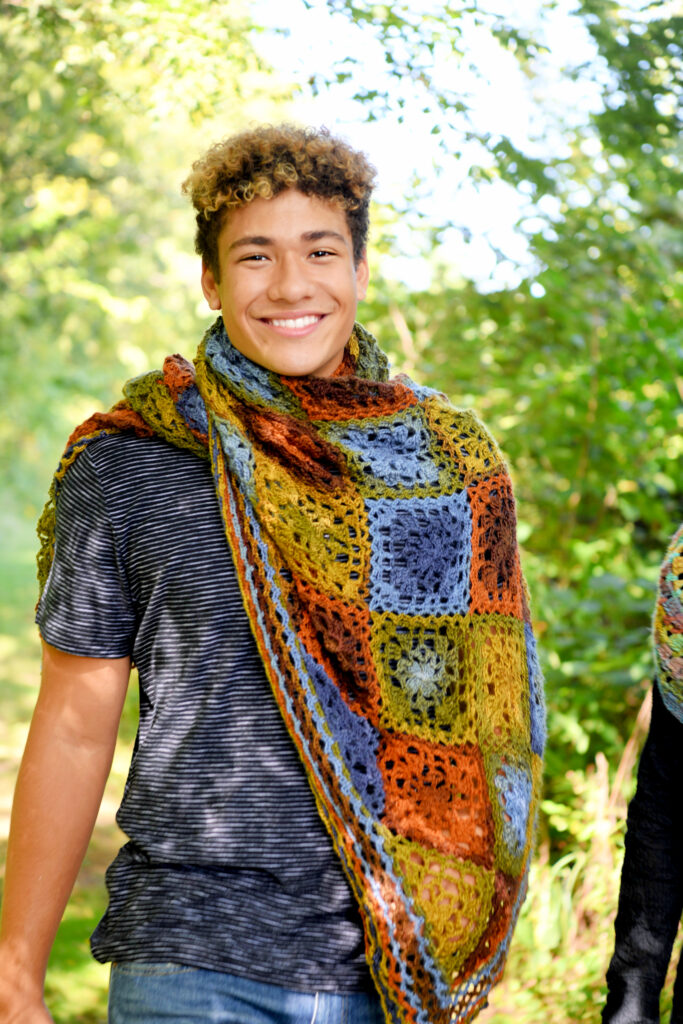
As mentioned, Unforgettable yarn is a popular long color-changing yarn sold by Red Heart. It has a soft, silky texture and a beautiful range of colors. Its unique color transitions make it an excellent choice for creating shawls and other accessories with a gradient effect. That's why I chose this spectacular yarn for the Enchanted Crochet Motif Shawl.
Unforgettable yarn is an ideal choice for creating a spectacular gradient shawl using a free crochet rectangular motif pattern like this one. Thanks to its long color repeat, soft texture, light weight, and range of eye-catching hues, this shawl will surely be a showstopper.
It Really Is Unforgettable!
Regardless of your expertise, whether you are a newbie or skilled in the craft of crocheting, Unforgettable yarn is a choice that will undoubtedly produce a stunning shawl that you will cherish and flaunt.
As you are working on your free easy rectangular crochet shawl pattern, be sure to add them to your projects on Ravelry. I’ve already listed this pattern there for your convenience.
⚠️ Note: Red Heart Unforgettable has since been discontinued… see the yarn alternatives section above for the best substitutes.
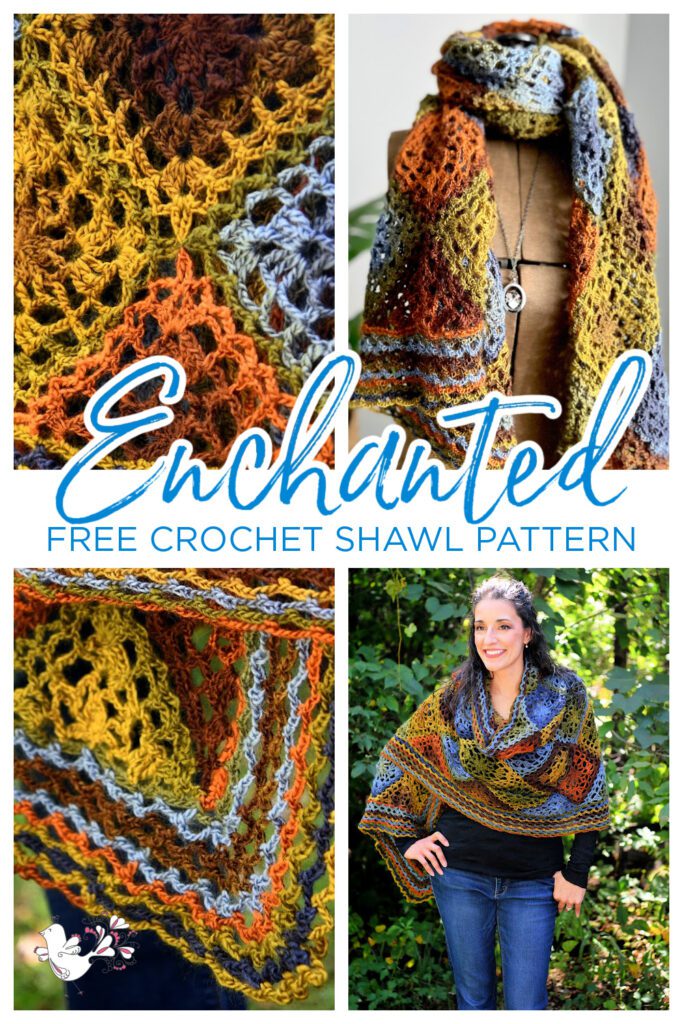
Make a Showstopping Enchanted Shawl with This Free, Easy Rectangular Crochet Shawl Pattern
Take your crochet game to the next level! Learn how to make an exquisitely beautiful, free, easy rectangular crochet shawl pattern with Red Heart Unforgettable yarn. Get creative and be inspired with this unique stitch pattern today!
SKILL LEVEL
Adventurous Beginner
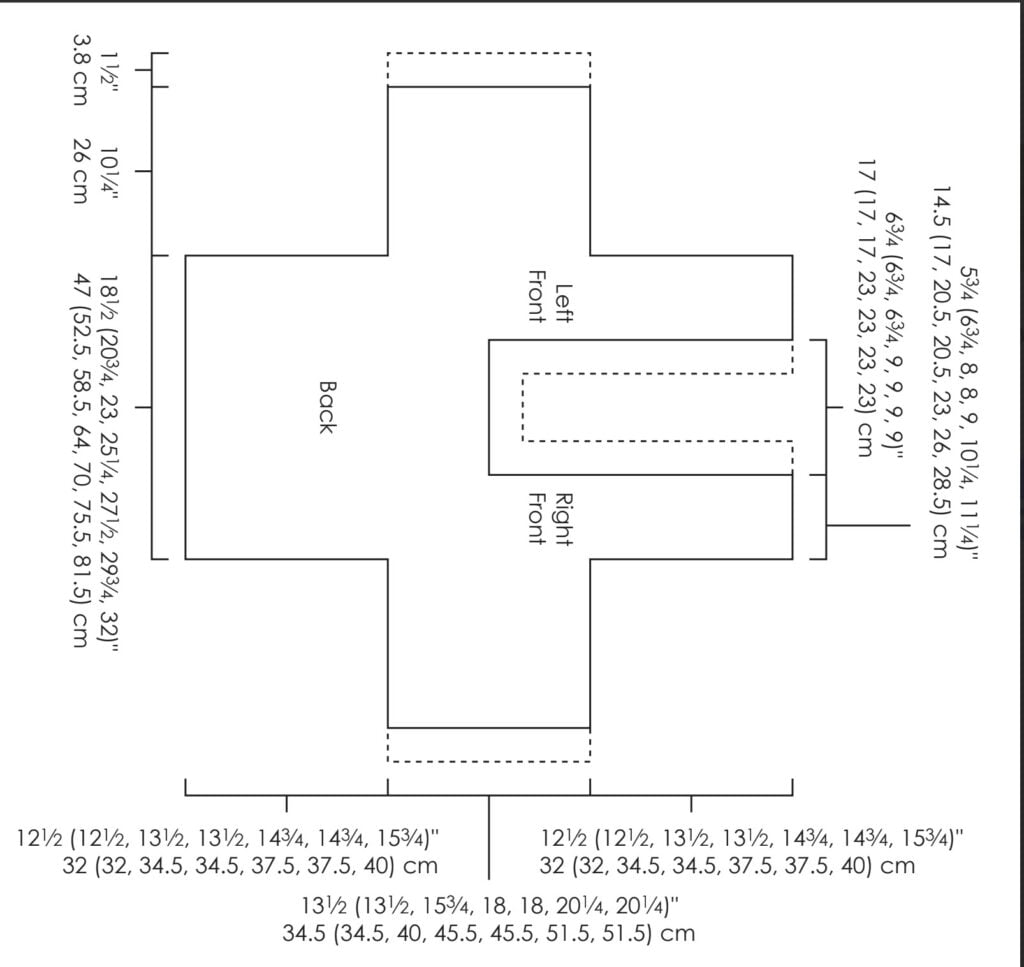
MEASUREMENTS
Finished Measurements
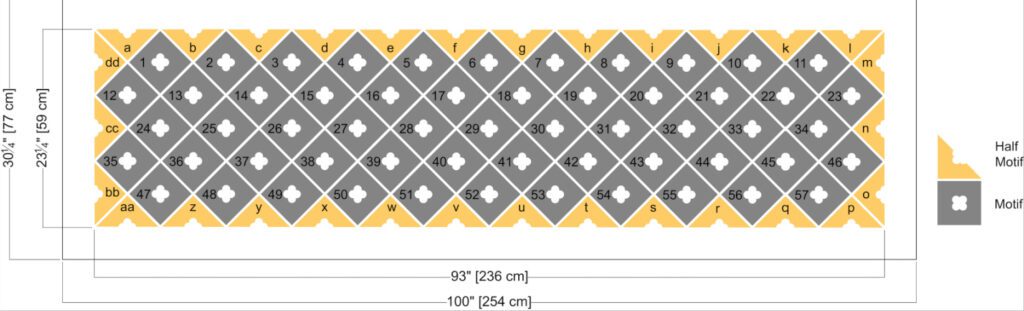
Shawl is 100” [254 cm] long by 30.25” [77 cm] wide.
Gauge
BLOCKED GAUGE: Motif = 5.5” [14 cm] x 5.5” [14 cm]; use any size hook to obtain the gauge.
MATERIALS
Yarn
Red Heart, Unforgettable (100% Acrylic; 3.5 oz/ 100 g; 270 yds/ 247 m; CYCA #4 worsted): Woodland – 5 balls
⚠️ Yarn Update:
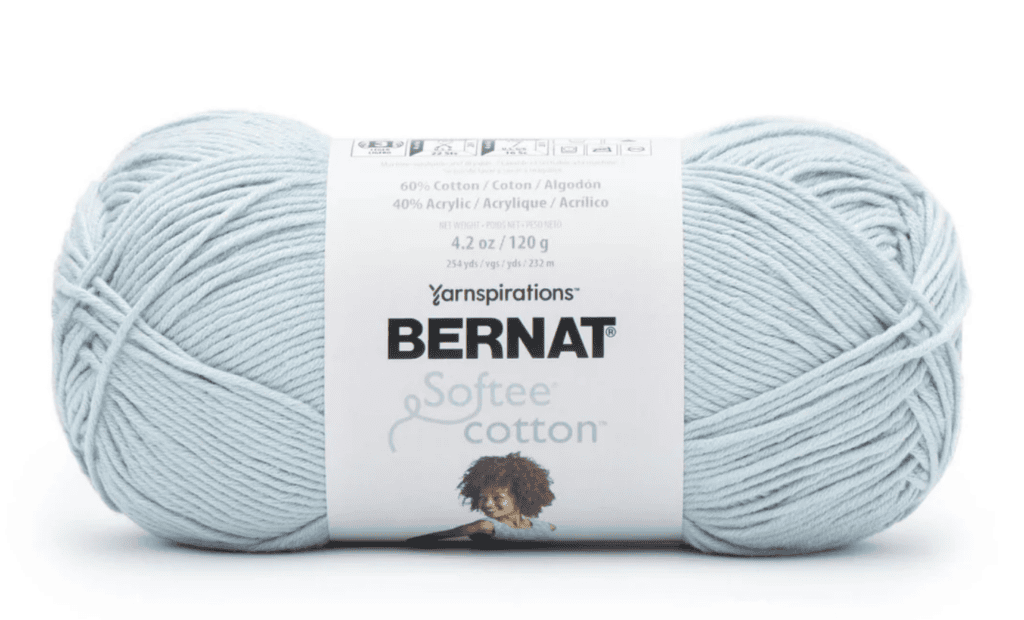
Red Heart Unforgettable has been discontinued. Great alternatives that give you the same long color-change effect: Loops & Threads Facets (at Michaels, same weight and cake construction), Knit Picks Chroma Worsted, or Knit Picks Chroma Twist Worsted. All three are widely available and give you that gorgeous gradient magic this shawl is all about. Shop Loops & Threads Facets at Michaels. Lion Brand Mandala and Caron Cakes also work beautifully. The key is to stay in worsted weight (CYCA #4) and stick with a self-striping gradient cake yarn so the color-shift effect stays intact.
Hook
Size G/6 [4.0 mm]
Notions
- Stitch markers
- Tapestry needle
- Blocking Mats and Blocking Pins
- Spray water bottle for blocking (optional)
CROCHET ABBREVIATIONS
BEG – Beginning
CH – Chain(s)
Dc – Double Crochet
DTR – Double Treble Crochet
Hdc – Half Double Crochet
RS – Right Side
Sc – Single Crochet
Sl ST – Slip Stitch
Sp(s) – Space(s)
St(s) – Stitch(es)
TR – Treble Crochet
Tch – Turning Chain
WS – Wrong Side
Yo – yarn over
SPECIAL STITCHES
⭐️ Double Treble Crochet (dtr): Yarn over hook three times, insert hook into indicated st, yarn over and pull up a loop, [yarn over and draw through 2 loops on hook] 4 times.
⭐️ 2 Treble Crochet Cluster (2 tr-cl): *yarn over twice, insert hook into stitch indicated, yarn over and pull up a loop, [yarn over and draw through 2 loops on hook] twice; repeat from * 1 more time in same stitch, yarn over and draw through all loops on hook.
⭐️ Chain 5 Join (ch-5 join): ch 2, sl st to adjoining ch-5 sp on adjacent motif, ch 2
⭐️ Chain 7 Join (ch-7 join): ch 3, sl st to adjoining ch-5 sp on adjacent motif, ch 3
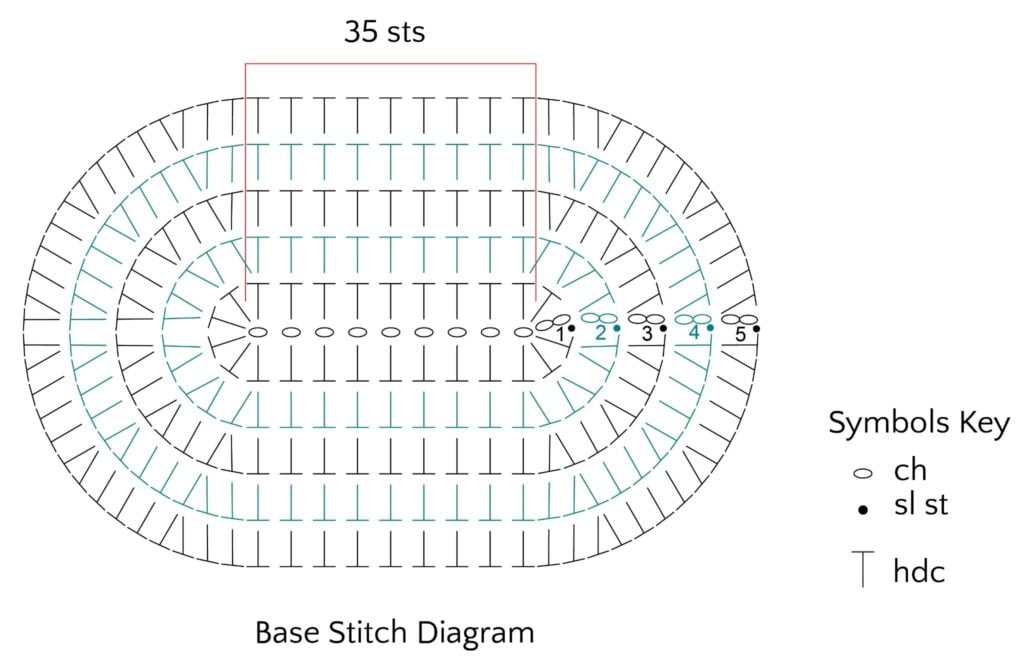
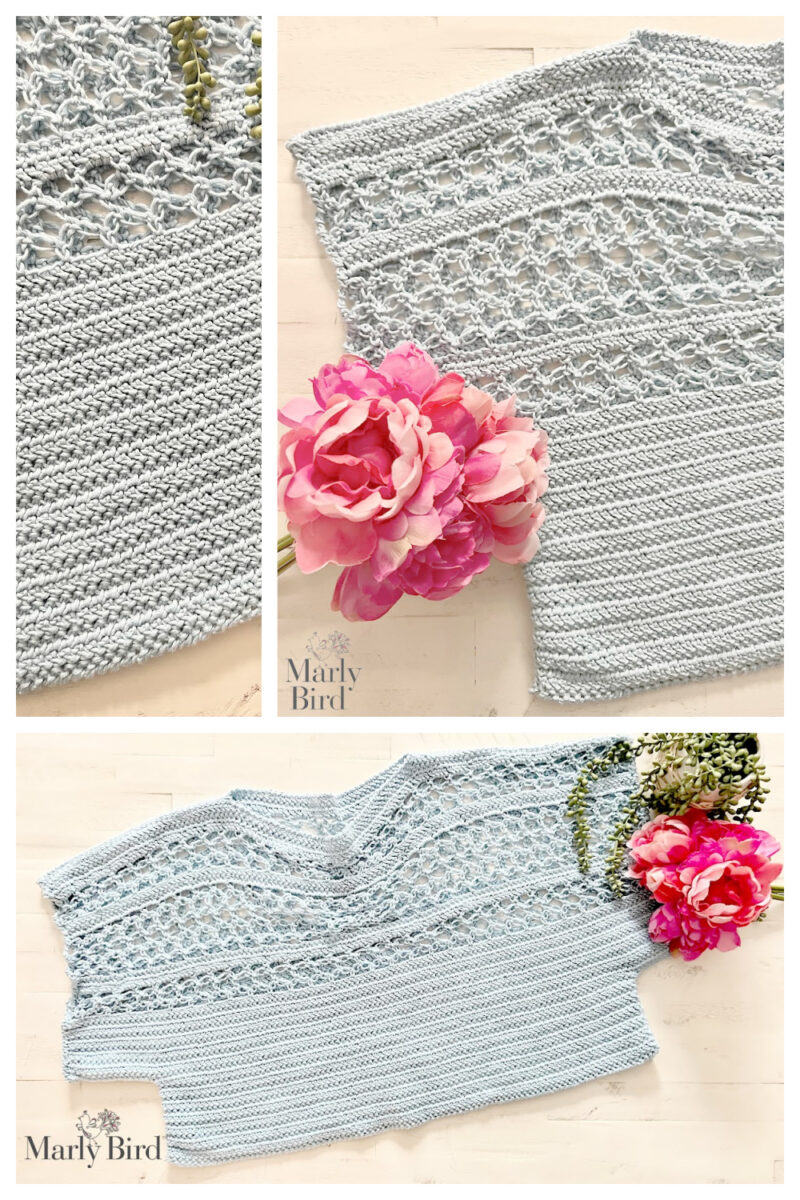
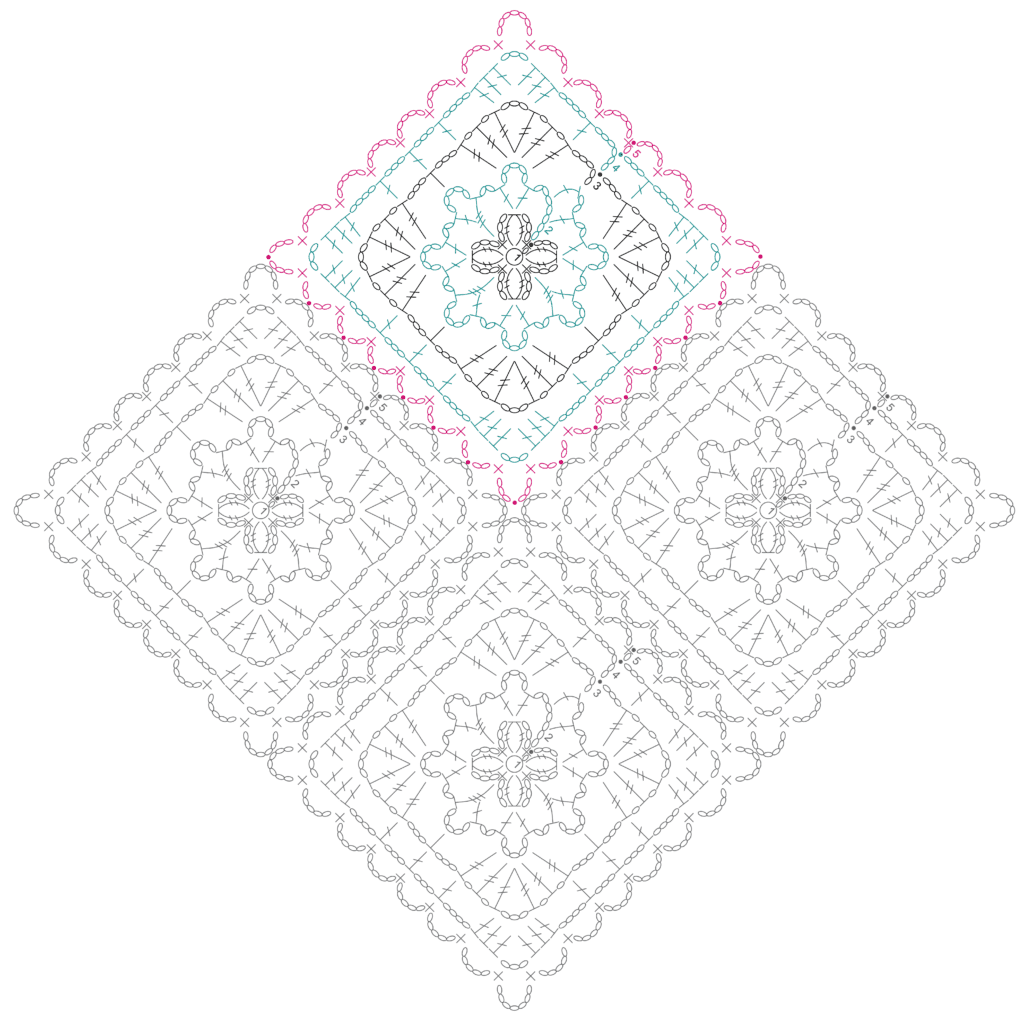
SCHEMATIC: Free Easy Rectangular Crochet Shawl Pattern
NOTES
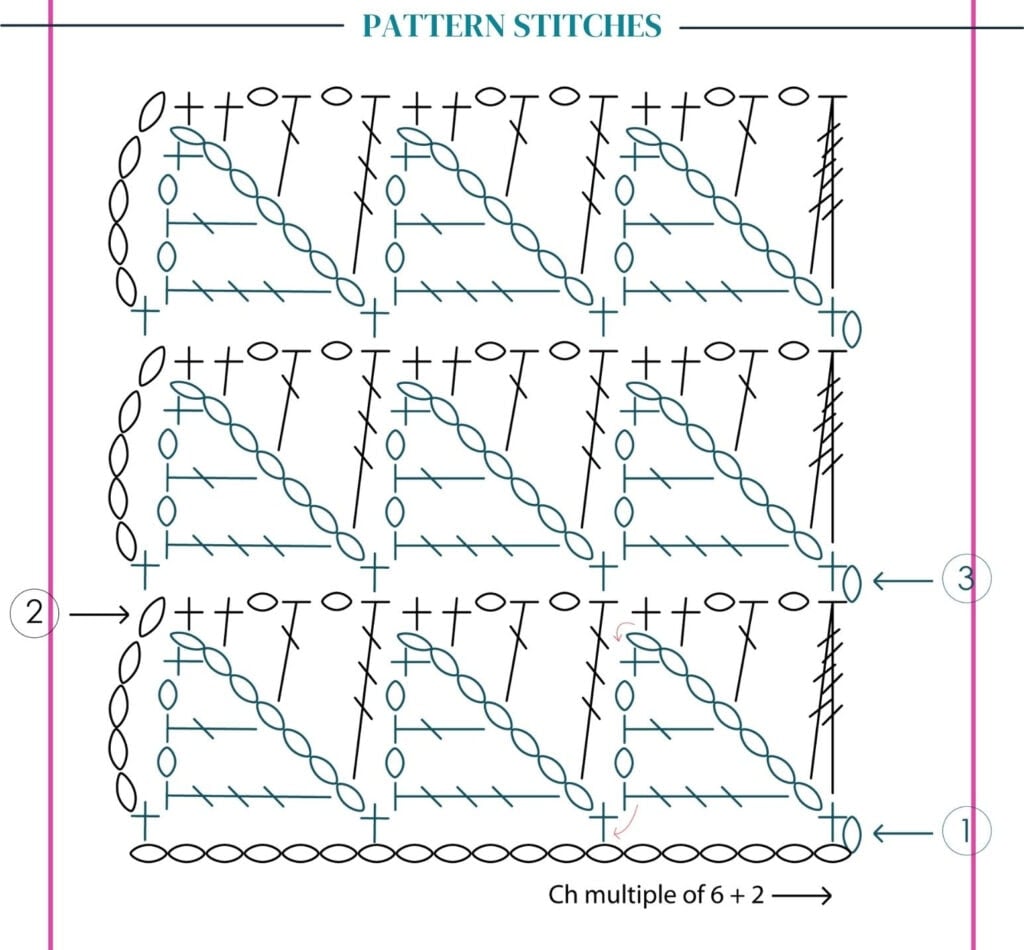
- Motifs are joined as you go. Crochet the first one then substitute the chain 5 space on the last round with a chain 5 join to any motif that will adjoin to it. Similarly substitute the chain 7 space in the corner with a chain 7 join when adjacent to an adjoining motif.
- In round 2, you will be making “Y” stitches by crocheting a double treble, then crocheting 5 chains, and finishing the stitch by placing a double crochet in the center of the double treble. You can use the 3 yarn overs in the double treble as a guide as to where to place your double crochet. You will insert your hook through the stitch at the center yarn over to secure the double crochet in place. Do not go around the post of the double treble; make sure you pierce the post instead.
- Once the motifs are all connected, finish the shawl with the 3.5” [9 cm] border.
VIDEO TUTORIALS
GROW
To Unlock Exclusive Subscriber Content click the Box below and join for free by simply adding your email and creating a password! If you are having troubles, clear your cache or reset your password or login to the Grow Publisher Portal.
>> Learn More About Grow Here <<
I'm thrilled to share this amazing pattern with you, many patterns on my blog are absolutely free! I kindly request that you don't copy and paste or distribute this pattern. Prefer an ad-free experience? Buy a digital PDF pattern for a small fee from one of my online stores for a seamless crafting journey.
I appreciate your support and readership. You are the reason I can keep doing what I love and sharing it with others. So, thank you from the bottom of my yarn-loving heart! Disclosure: This post contains affiliate links, meaning I get a commission if you decide to make a purchase through my links at no cost to you.
Enchanted Shawl Pattern || Free Easy Rectangular Crochet Shawl Pattern
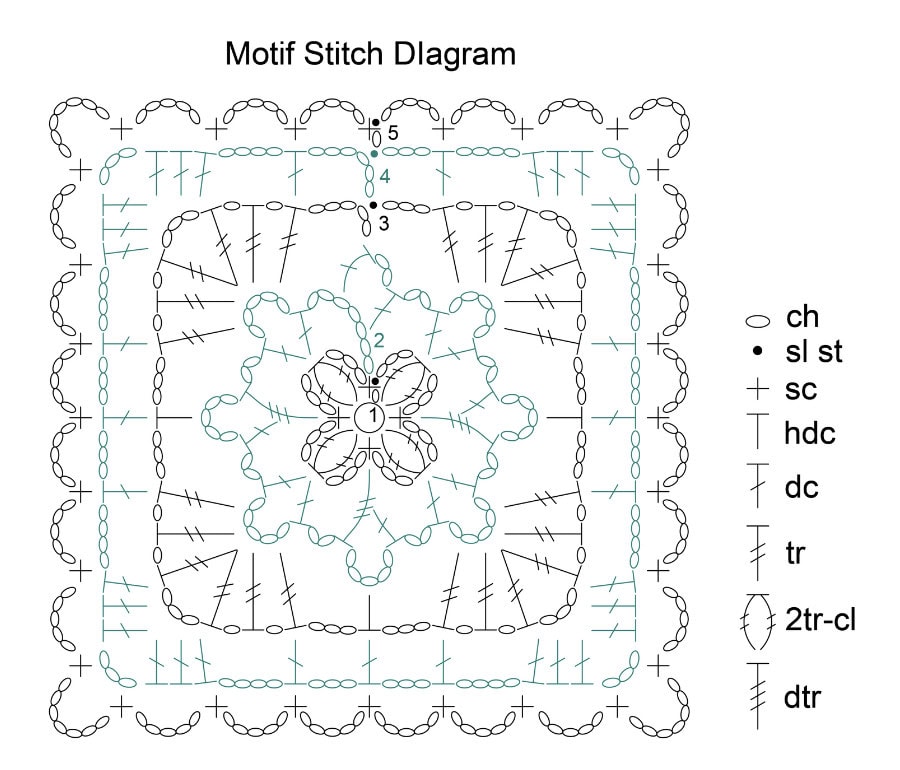
MOTIF
Make 1, join 56. See schematic for location of motifs.
Make an adjustable ring.
Round 1: Ch 1, [sc, ch 3, 2 tr-cl, ch 3] 4 times in ring, sl st to first sc, pull ring closed, do not turn. –
(4 tr-cls)
Round 2: Ch 7, *(dc, ch 5, dc) in top of tr-cl, ch 2, dtr in next sc, ch 5, dc in middle of dtr just made (insert hook into 2 strands of the post at the center yarn over of the dtr just made), ch 2; repeat from * 2 more times, (dc, ch 5, dc) in top of tr-cl, ch 2, dc in 3rd ch of beg ch, ch 2, dc in 5th ch of beg ch (counts as ch-5 sp), do not turn.- (8 ch-5 sps)
Round 3: Ch 5 (counts as hdc + ch-3 sp), *[(tr, ch 1) twice, tr, ch 3, (tr, ch 1) twice, tr] in next ch-5 sp, ch 3**, hdc in next ch-5 sp, ch 3; repeat from * around ending at **, sl st to 2nd ch of beg ch, do not turn.- (24 tr)
Round 4: Ch 6 (counts as dc, ch-3 sp), *dc in next tr, ch 4, skip both ch-1 sps, (3 dc, ch 3, 3 dc) in ch-3 sp, ch 4, skip 2 tr, dc in next tr, ch 3**, dc in next hdc, ch 3; repeat from * around ending at **, sl st to 3rd ch of beg ch, do not turn.- (20 ch-sps)
Round 5: Ch 1, sc in same ch as join, *ch 5, sc in next dc, ch 5, sc in ch-4 sp, ch 5, (sc, ch 7, sc) in ch-3 sp, ch 5, sc in ch-4 sp, [ch 5, sc in next dc] twice; repeat from * around, sl st to first sc, fasten off.- (28 ch-sps)
Joining: When joining motifs, substitute a ch-5 join for a ch-5 sp and a ch-7 join for a ch-7 sp on Round 5 when adjacent to an adjoining motif. See next section for specific directions to join motifs.
JOINING FULL MOTIFS
Motifs can be joined in any order. Follow the layout for placement of motifs.
1-Side Join
Round 5: Ch 1, sc in same ch as join, ch 5, sc in next dc, ch 5, sc in ch-4 sp, ch 5, *(sc, ch 7, sc) in ch-3 sp, ch 5, sc in ch-4 sp, [ch 5, sc in next dc] 3 times, ch 5, sc in next ch-4 sp, ch 5; repeat from * once more, (sc, ch-7 join, sc) in ch-3 sp, ch-5 join, sc in ch-4 sp, [ch-5 join, sc in next dc] 3 times, ch-5 join, sc in next ch-4 sp, ch-5 join, (sc, ch-7 join, sc) in ch-3 sp, ch 5, sc in next ch-4 sp, ch 5, sc in next dc, ch 5, sl st to first sc, fasten off.- (28 ch-sps)
2-Side Join
Round 5: Ch 1, sc in same ch as join, ch 5, sc in next dc, ch 5, sc in ch-4 sp, ch 5, (sc, ch 7, sc) in ch-3 sp, ch 5, sc in ch-4 sp, [ch 5, sc in next dc] 3 times, ch 5, sc in next ch-4 sp, ch 5, *(sc, ch-7 join, sc) in ch-3 sp, ch-5 join, sc in ch-4 sp, [ch-5 join, sc in next dc] 3 times, ch-5 join, sc in next ch-4 sp, ch-5 join; repeat from * once more, (sc, ch-7 join, sc) in ch-3 sp, ch 5, sc in next ch-4 sp, ch 5, sc in next dc, ch 5, sl st to first sc, fasten off.- (28 ch-sps)

HALF MOTIF
Join 30
Make an adjustable ring.
Round 1: Ch 3, tr in ring, [ch 3, sc, ch 3, 2 tr-cl] twice in ring, pull ring closed, turn.- (2 tr-cls)
Round 2: Ch 7, dc in top of tr-cl, ch 2, dtr in next sc, ch 5, dc in middle of dtr just made, ch 2, (dc, ch 5, dc) in top of tr-cl, ch 2, dtr in next sc, ch 5, dc in middle of dtr just made, ch 2, (dc, ch 2, dtr) in tr, turn.- (3 ch-5 sps)
Round 3: Ch 6 (counts as dtr + ch-1 sp), [(tr, ch 1) twice, tr] in ch-2 sp, ch 3, hdc in next ch-5 sp, ch 3, [(tr, ch 1) twice, tr, ch 3, (tr, ch 1) twice, tr] in next ch-5 sp, ch 3, hdc in next ch-5 sp, ch 3, [(tr, ch 1) 3 times, dtr] in beg ch-sp, turn.- (12 tr)
Round 4: Ch 5 (counts as tr + ch-1 sp), 3 dc in first ch-1 sp, ch 4, skip 2 tr, dc in next tr, ch 3, dc in hdc, ch 3, dc in next tr, ch 4, skip both ch-1 sps, (3 dc, ch 3, 3 dc) in ch-3 sp, ch 4, skip 2 tr, dc in next tr, ch 3, dc in next hdc, ch 3, dc in next tr, ch 4, skip both ch-1 sps, (3 dc, ch 1, tr) in beg ch-sp, turn.- (11 ch-sps)
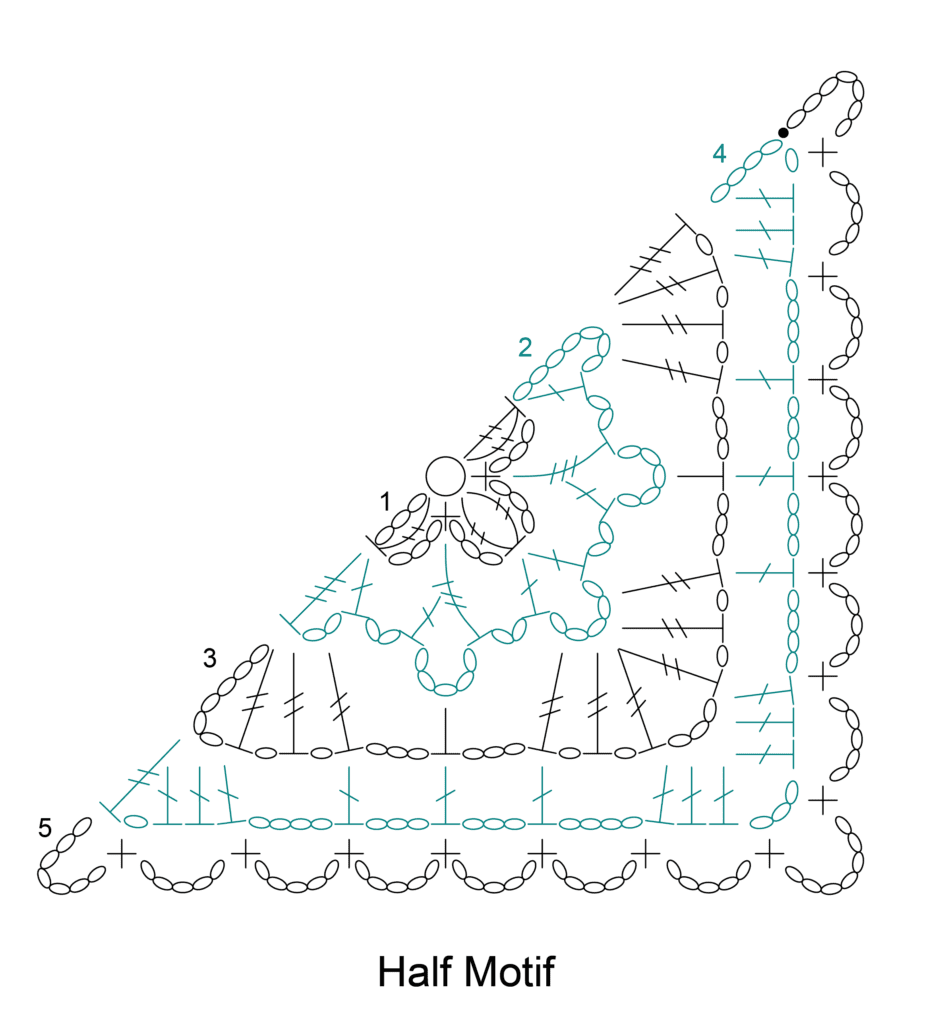
1- Side Join
Round 5: Ch 7, sc in first ch-1 sp, ch 5, sc in ch-4 sp, [ch 5, sc in next dc] 3 times, ch 5, sc in ch-4 sp, ch 5, (sc, ch-7 join, sc) in ch-3 sp, ch-5 join, sc in ch-4 sp, [ch-5 join, sc in next dc] 3 times, ch-5 join, sc in ch-4 sp, ch-5 join, (sc, ch-7 join, sl st) in beg ch-sp, fasten off.- (15 ch-sps)
2- Side Join
Round 5: Ch-7 join, sc in first ch-1 sp, ch-5 join, sc in ch-4 sp, [ch-5 join, sc in next dc] 3 times, ch-5 join, sc in ch-4 sp, ch-5 join, (sc, ch-7 join, sc) in ch-3 sp, ch-5 join, sc in ch-4 sp, [ch-5 join, sc in next dc] 3 times, ch-5 join, sc in ch-4 sp, ch-5 join, (sc, ch-7 join, sl st) in beg ch-sp, fasten off.- (15 ch-sps)

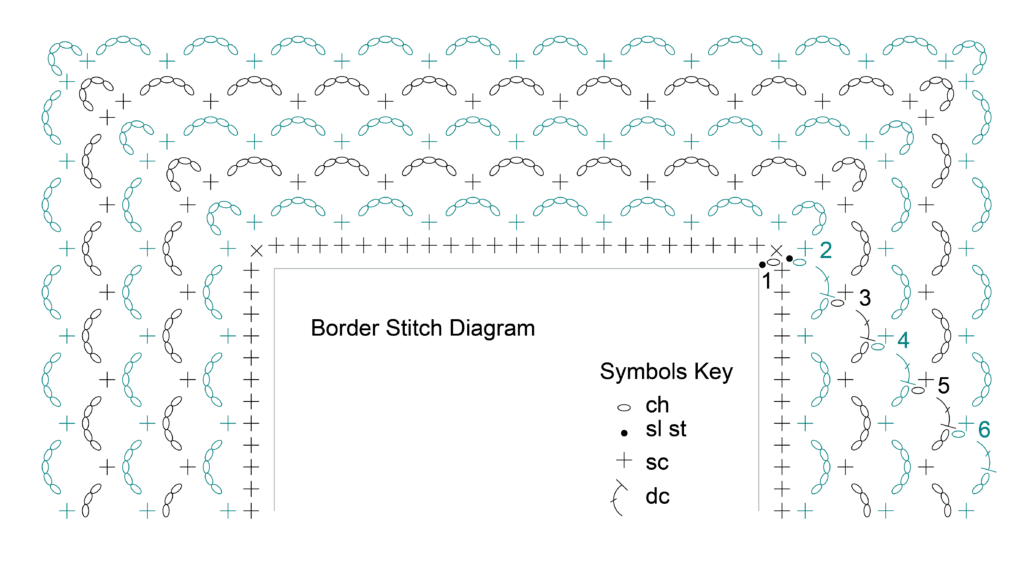
BORDER
Join yarn to any corner with sl st.
Round 1: 2 Sc in corner, *sc evenly across edge in a multiple of 4 +1 to corner**, 3 sc in corner, place marker in middle sc; repeat from * around ending at ** before first corner, sc once more in first corner, sl st to first sc, do not turn.
Round 2: (Sc, ch 5, sc) in first sc, *[ch 5, skip 3 sc, sc in next sc] repeat across to 3 sc before marker, ch 5, skip 3 sc, (sc, ch 5, sc) in marked corner sc, move marker to corner ch-5 sp; repeat from * around to last 3 sc from beginning, ch 2, dc in first sc (counts as ch-5 sp), do not turn.
Round 3: Ch 1, sc around first ch-5 sp, ch 5, (sc, ch 5, sc) in first corner ch-5 sp, *[ch 5, sc in next ch-5 sp] repeat across to marker, ch 5, (sc, ch 5, sc) in marked corner ch-5 sp, move marker to corner ch-5 sp; repeat from * around to first sc, ch 2, dc in first sc (counts as ch-5 sp), do not turn.
Round 4: Ch 1, sc around first ch-5 sp, ch 5, sc in next ch-5 sp, ch 5, (sc, ch 5, sc) in first corner ch-5 sp, *[ch 5, sc in next ch-5 sp] repeat across to marker, ch 5, (sc, ch 5, sc) in marked corner ch-5 sp, move marker to corner ch-5 sp; repeat from * around to first sc, ch 2, dc in first sc (counts as ch-5 sp), do not turn.
Round 5: Ch 1, sc around first ch-5 sp, [ch 5, sc in next ch-5 sp] twice, ch 5, (sc, ch 5, sc) in first corner ch-5 sp, *[ch 5, sc in next ch-5 sp] repeat across to marker, ch 5, (sc, ch 5, sc) in marked corner ch-5 sp, move marker to corner ch-5 sp; repeat from * around to first sc, ch 2, dc in first sc (counts as ch-5 sp), do not turn.
Round 6: Ch 1, sc around first ch-5 sp, [ch 5, sc in next ch-5 sp] 3 times, ch 5, (sc, ch 5, sc) in first corner ch-5 sp, *[ch 5, sc in next ch-5 sp] repeat across to marker, ch 5, (sc, ch 5, sc) in marked corner ch-5 sp, move marker to corner ch-5 sp; repeat from * around to first sc, ch 2, dc in first sc (counts as ch-5 sp), fasten off and weave in ends.
FINISHING
Weave in all ends.
Option 1: Pin shawl to schematic size, spray with water and allow to dry.
Option 2: Wet block shawl as demonstrated in video tutorial. Pin to schematic size and allow to dry.
Frequently Asked Questions
What is join-as-you-go (JAYG) crochet?
Join-as-you-go means you attach each new motif to the ones around it as you're finishing it — no separate seaming step at the end. On the final round of each motif, you join it directly to its neighbors by crocheting into the edge of the adjacent motif instead of working a free-standing edge stitch. The result is a seamlessly connected fabric with no seams to hide… and honestly, it's faster and more satisfying than making all the motifs first and sewing them together later. It sounds tricky at first, but once you get through the first few joins, your hands figure out the rhythm and it becomes second nature.
Is this pattern good for beginners?
It's listed as “Adventurous Beginner” — which means you should know your basic stitches (chain, slip stitch, single crochet, double crochet, treble), but you don't need intermediate experience. If motif joins are new to you, watch the video tutorials in the pattern section before starting. The join-as-you-go technique has a learning curve, but Marly's videos make it click fast. Most folks say the first few joins feel awkward, but by motif 5 or 6, it's automatic.
Can I use a different yarn for this pattern?
Red Heart Unforgettable has been discontinued, but the good news is there are great alternatives that give you the same gorgeous gradient effect. Loops & Threads Facets (available at Michaels) is a top pick — same long color-change behavior, widely available, and budget-friendly. Knit Picks Chroma Worsted or Chroma Twist Worsted are also excellent options. Whatever you substitute, stick to a long color-change worsted weight yarn — solid or variegated yarns won't give you the same motif-defining color effect that makes this shawl so enchanting.
Can this shawl be made bigger or smaller?
Yes! Each motif measures approximately 5.5″ × 5.5″ blocked. To make the shawl wider, add more motifs per row. To make it longer, add more rows of motifs. Keep the motif count per row consistent and you'll maintain the rectangular shape. Just note that you'll need to adjust your yarn yardage accordingly — count your motifs and multiply by the yardage each motif uses.
How many skeins of Red Heart Unforgettable do I need?
The shawl uses approximately 1,350 yards total. Red Heart Unforgettable comes in 270-yard skeins, so you're looking at roughly 5 skeins depending on your gauge and chosen colorway. Always check the exact yardage in the materials section of the pattern — and if using a substitute yarn, double-check the yardage carefully since skeins vary by brand.
Is there a knit version of this shawl?
Not of this exact pattern… but Marly designs extensively in both knit and crochet! If you're looking for a motif-based knit shawl, check out her other free knit shawl patterns for knitting options.
What is the Enchanted Crochet Motif Shawl?
The Enchanted Shawl is a free rectangular crochet shawl pattern made from joined motifs — individual crochet squares or geometric pieces that are crocheted and assembled into a beautiful shawl. It uses Red Heart Unforgettable yarn (a self-striping yarn with beautiful gradient transitions) which adds visual magic to the finished piece. The combination of motif construction and color-changing yarn creates a shawl that looks sophisticated and complex but is very achievable for crafters comfortable with basic crochet motifs.
What yarn is used in the Enchanted Shawl?
Red Heart Unforgettable yarn… a worsted weight self-striping acrylic that creates beautiful long gradient color transitions. The color shifts happen gradually across a long length of yarn, creating an ombre or rainbow effect in your finished project without any color changes required. The Unforgettable line comes in gorgeous color combinations that look painterly and sophisticated. Since the yarn does the color work for you, even a simple motif pattern looks complex and beautiful. And being Red Heart acrylic, it's machine washable, affordable, and widely available.
What skill level is the Enchanted Shawl?
Adventurous Beginner — you should be comfortable making basic crochet motifs, working in rounds, and understanding the join-as-you-go assembly. The individual motifs are not complex, but keeping track of the assembly order as the shawl grows and executing clean JAYG joins requires some experience. If you've made granny square projects before and understand basic motif construction, you're well-prepared for this shawl. Marly's written pattern and tutorial support make it more accessible for those newer to motif-based construction.
Can I substitute a different self-striping yarn?
Yes! Any worsted weight self-striping yarn with similar yardage would work. Caron Cakes, Lion Brand Mandala, and various Paintbox Yarns self-striping options are all similar alternatives at different price points. The beautiful gradient effect of Unforgettable is what makes this shawl “enchanted” — choose a self-striping yarn with color transitions you love. If you use a solid yarn instead, the finished piece will still be beautiful but will have a different, more subtle character where the motif texture is the main visual element rather than the color transitions.

Final Thoughts on the Enchanted Crochet Motif Shawl
If you've been looking for a shawl project that feels magical to make and looks even more magical to wear… the Enchanted Shawl is it. The join-as-you-go construction means you're building something beautiful with every single motif, and by the time you join that last motif, you have a finished, connected piece — no assembly required. That's genuinely satisfying in a way that making-then-seaming just isn't.
The color-change yarn is the real star here. You don't have to think about color planning, you don't have to weave in endless ends from color changes — the yarn does everything. Every motif catches a different part of the gradient, and the shawl just grows into something that looks impossibly intentional. People will ask how you did it, and you get to say “the yarn did it.” That never gets old.
Whether you're making this for yourself, as a gift, or as a special occasion accessory, this shawl is the kind of project you come back to. Grab your yarn, watch the JAYG tutorial before your first join, and enjoy every single motif. I can't wait to see what you make!
❤️ Your BiCrafty Bestie,
Marly Bird