Search
Close
  • The Pattern Shop
  • Our Free Patterns
    • Browse All Our Free Patterns
    • Our Free Knitting Patterns
    • Our Free Crochet Patterns
  • Blog
    • All Blog Posts
    • All Free Patterns
    • Dibble Dabble Inspiration
    • Giveaways
    • Make-Alongs
    • Product Reviews
    • Roundups
    • Tips, Tricks, Techniques for Knitting and Crochet
Stylized bird with pink and gray swirling tail above elegant โ€œMarlyโ€ text, logo for crochet accessories and home decor.
  • Marly Bird House
  • Learn to Knit & Crochet
    • Newbie? Start Here
    • Video Tutorials
    • Knitting Definitions
    • Crochet Definitions
    • Common Techniques
    • Size Charts for Knitting and Crochet Projects
  • About
ร—
  • The Pattern Shop
  • Free Patterns
  • Blog
  • Marly Bird House
  • Learn to Knit & Crochet
    • Newbie? Start Here
    • Video Tutorials
    • Knitting Definitions
    • Crochet Definitions
    • Common Techniques
    • Size Charts for Knitting and Crochet Projects
  • About
Stylized bird with pink and gray swirling tail above elegant โ€œMarlyโ€ text, logo for crochet accessories and home decor.
Search
Close

New Patterns NOW Available in Ad-Free PDF! Check out The Pattern Shop

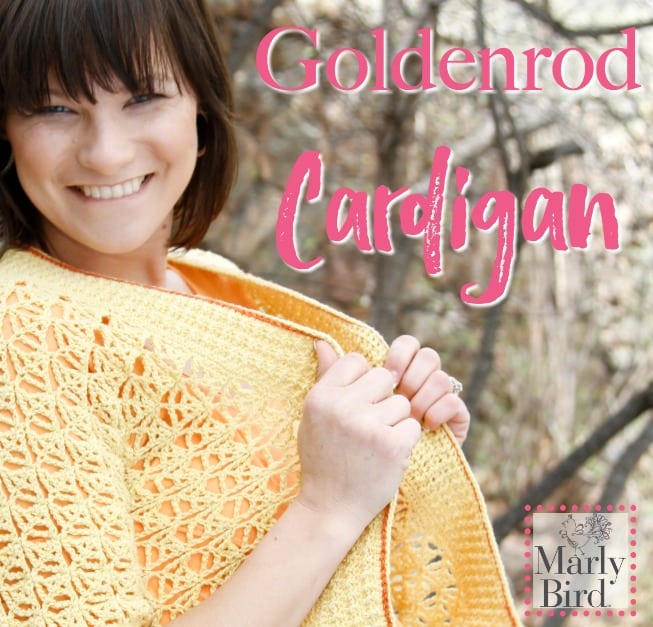
Goldenrod Crochet Cardigan Pattern by Marly Bird

December 10, 2024 By admin 3 Comments

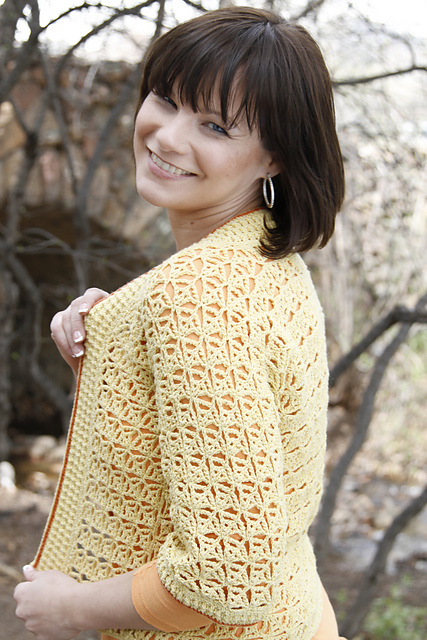
Introducing the Goldenrod Crochet Cardigan by Your BiCrafty Bestie, Marly Bird! ๐ŸŒผ This vibrant, cozy cardigan is perfect for adding a pop of color to your wardrobe. The Goldenrod Cardigan pattern is designed with beginner-friendly instructions and features a relaxed, comfy fit that's perfect for layering.

Want to explore more stylish patterns? Check out our collection for endless inspiration!

Bright yellow crocheted cardigan with open lace stitches, worn by a smiling woman against a natural background.

Goldenrod Crochet Cardigan โ€“ A Staple for Your Fall Wardrobe

Living in Colorado, I know firsthand how unpredictable fall weather can beโ€”itโ€™s 80 degrees one moment and 50 the next! Thatโ€™s why I designed the Goldenrod Crochet Cardigan, a versatile, easy-to-wear layering piece thatโ€™s perfect for any occasion. Whether youโ€™re heading out for coffee or cozying up at home, this cardigan has you covered.

Cardigans are a wardrobe essential, and the Goldenrod Crochet Cardigan is no exception. It's easy construction begins with a one-piece back, with sleeve shaping as simple as adding chain stitches where indicated in the pattern.

The beautiful lace stitch pattern adds interest without being overly complexโ€”though thereโ€™s a key tip to keep in mind: on the first repeat row, youโ€™ll need to chain a specific number of stitches and work into them before returning to the main piece.

The pattern's thoughtful edging incorporates post stitches for texture and structure, with a top chain detail that adds a flattering linear effect along the body.


Yarn and Crochet Hook Recommendations for the Goldenrod Crochet Cardigan

When creating this pattern, I chose thin yarn for its polished look and excellent drape, especially for lace. A blend of silk and wool makes the Goldenrod Crochet Cardigan breathable, warm, and perfect for layering.

Here are some yarns you might like:

  • Gloss DK
    A luxurious blend of 70% Merino Wool and 30% Silk, offering a soft feel and elegant sheen. This DK-weight yarn provides excellent stitch definition, perfect for showcasing the cardigan's lace pattern.
  • Cascade Heritage Silk
    This fingering-weight yarn combines 85% Superwash Merino Wool with 15% Mulberry Silk, resulting in a smooth texture and slight sheen. Ideal for lightweight garments like the Goldenrod Cardigan.
  • Malabrigo Silky Merino
    A DK-weight yarn made of 51% Silk and 49% Merino Wool, offering a soft touch and beautiful drape. The subtle sheen enhances the lace design of the cardigan.
  • Rowan Island Blend Fine
    This fingering-weight yarn is a blend of wool, silk, and alpaca, providing softness and a slight sheen. It's suitable for lightweight projects like the Goldenrod Cardigan.
  • Sandnes Garn Tynn Silk Mohair
    A light, airy blend of mohair, silk, and wool, this yarn adds depth of color and a beautiful halo, enhancing the cardigan's lace pattern.

When selecting your yarn, consider the desired drape and feel of your cardigan. These options provide a range of textures and finishes to suit your personal style. Also, look for a lightweight yarn that enhances the lace detailing and feels soft against the skin.

Use a crochet hook size that will allow you to get the correct gaugeโ€”the pattern provides specific gauge information to ensure the best fit.


A person with short brown hair is outdoors, wearing a yellow crocheted cardigan over an orange top. The person is smiling slightly, with hands clasped in front. The background is blurred with trees and greenery. -Marly Bird

A Crochet Cardigan Customizable Fit for Every Body

One of my goals in designing the Goldenrod Crochet Cardigan was to make it size-inclusive and easy to customize. The pattern includes a range of sizes, with specific instructions for adjustments.

Want a longer cardigan? Simply add one or two extra repeats to the back panel before working the sleeves, ensuring you end on the correct row number. Donโ€™t forget to match the added rows on the front panels for a seamless fit.

Prefer a cardigan with a closure? Consider adding hook-and-eye closures at the bust line or maybe pedestal buttons so you can add or remove at will. The lace pattern stretches beautifully, providing a flattering look without compromising the design.


Why Youโ€™ll Love the Goldenrod Crochet Cardigan

What You Will Love

  • Versatile and Layer-Friendly: Lightweight and perfect for fall's unpredictable weather.
  • Easy Construction: One-piece design with intuitive shaping for sleeves.
  • Flattering Design: Lace stitches and post stitch edging create a polished look.
  • Customizable Fit: Instructions make it easy to adjust length and size

A woman with short dark hair smiles at the camera while holding a yellow crocheted cardigan. She is standing outdoors in a natural setting with bare branches in the background. -Marly Bird

Crochet Tips for Successfully Making the Goldenrod Crochet Cardigan

This pattern is advanced beginner-friendly, but understanding how to work into crochet chains for the lace stitch is essential. Donโ€™t rushโ€”take your time on the first row of the repeat, and the rest will fall into place.

You should also understand the difference between a single crochet, double crochet and a double treble crochet. Note: these are US crochet terms.

The stitch construction is different than what you might have done before but with an open mind and the help of a crochet stitch diagram and well written instructions, you can absolutely do this.

Ready to start your Goldenrod Crochet Cardigan? Grab your yarn, crochet hook, and pattern, and letโ€™s create something fabulous! Donโ€™t forget to check out the Marlyโ€™s Minions BiCrafty Community on Facebook for extra support and inspiration: Join here.

Favorite This Pattern on Ravelry - Marly Bird

Goldenrod Crochet Cardigan Pattern Details

by Marly Bird

SKILL LEVEL 

Advanced Beginner Crocheter with basic crochet understanding.

FINISHED MEASUREMENTS

To fit bust sizes: 37 (41ยฝ, 46, 50ยฝ, 55, 59ยฝ, 64)” / 94 (105.5, 117, 128.5, 139.5, 151, 162.5) cm

Fit is to be 0-4″ of positive ease depending on desired fit.

YARN
Elsebeth Lavold, Silky Wool, 50g/175m, 45% Wool, 35% Silk, 20% Nylon
Main Color (MC): color 091 Yellow Apple, 5 (6, 8, 9, 11, 12) balls; Contrast Color (CC): 090 Persimmon, 1 ball 

CROCHET HOOK

Size US F/5 (3.75 mm) hook

NOTIONS

Stitch markers, Tapestry needle, Optional = Leather tags, Leather rivets

GAUGE
Work 4 patt st repeats and 8 rows = 4ยฝ” x 4ยฝ”, using 3.75/F hook. 

CROCHET STITCHES

โญ๏ธ ch: (chain) wrap the yarn around the crochet hook (yarn over) and draw it through the loop on the hook to form the first chain. Rep this step as many times as instructed. (The loop on the hook is never included when counting the number of chains)

โญ๏ธ dc: (double crochet) Yarn over hook, insert hook into indicated st, yarn over and pull up a loop; [yarn over and draw through 2 loops on hook] 2 times.

โญ๏ธ dtr: (double treble crochet) Yarn over hook three times, insert hook into indicated stitch, yarn over and pull up a loop; (yarn over and draw through two loops) four times.

โญ๏ธ dtr2tog: (double treble crochet 2 together) [Yarn over hook three times, insert hook into indicated stitch, yarn over and pull up a loop; (yarn over and draw through two loops) three times] twice, yarn over and draw through three loops.

โญ๏ธ sc: (single crochet) insert crochet hook in indicated stitch, yarn over and pull up a loop; yarn over and draw through both loops on hook

โญ๏ธ sl st: (slip stitch) Insert crochet hook in the indicated stitch, yarn over and draw through both the stitch and the loop on the hook.

PATTERN STITCHES

Main Patt St 

Ch a multiple of 6 ch + 2.
Row 1 (RS): Sc in second ch from hook (main ch sts), *ch 7, sc in second ch from hook, ch 1, skip 1 ch, dc in next ch, ch 1, skip 2 ch, dtr in next ch, skip 5 chs from sc on main ch, sc in next ch, rep from * to end, turn.
Row 2 (WS): Ch 5, *sc in first 2 chains of ch-7 from previous row, ch 1, skip 1 ch, dc in next ch, ch 1, skip 2 ch, **dtr in next ch, rep from * to last sc, ending at ** on last rep, dtr2tog in next ch and in last sc of previous row, turn.
Row 3 (RS): Ch 1, sc in dtr2tog, *ch 7, sc in second ch from hook, 1 ch, skip 1 ch, dc in next ch, 1 ch, skip 2 ch, dtr in next ch, **sc in tr of previous row, rep from * to end, ending at ** on last rep, sc in fifthch of tch, turn.
Rep rows 2 and 3 for Main pat.

CROCHET STITCH DIAGRAM

The stitch diagram is only available in the Ad-Free PDF. Get the PDF Here.

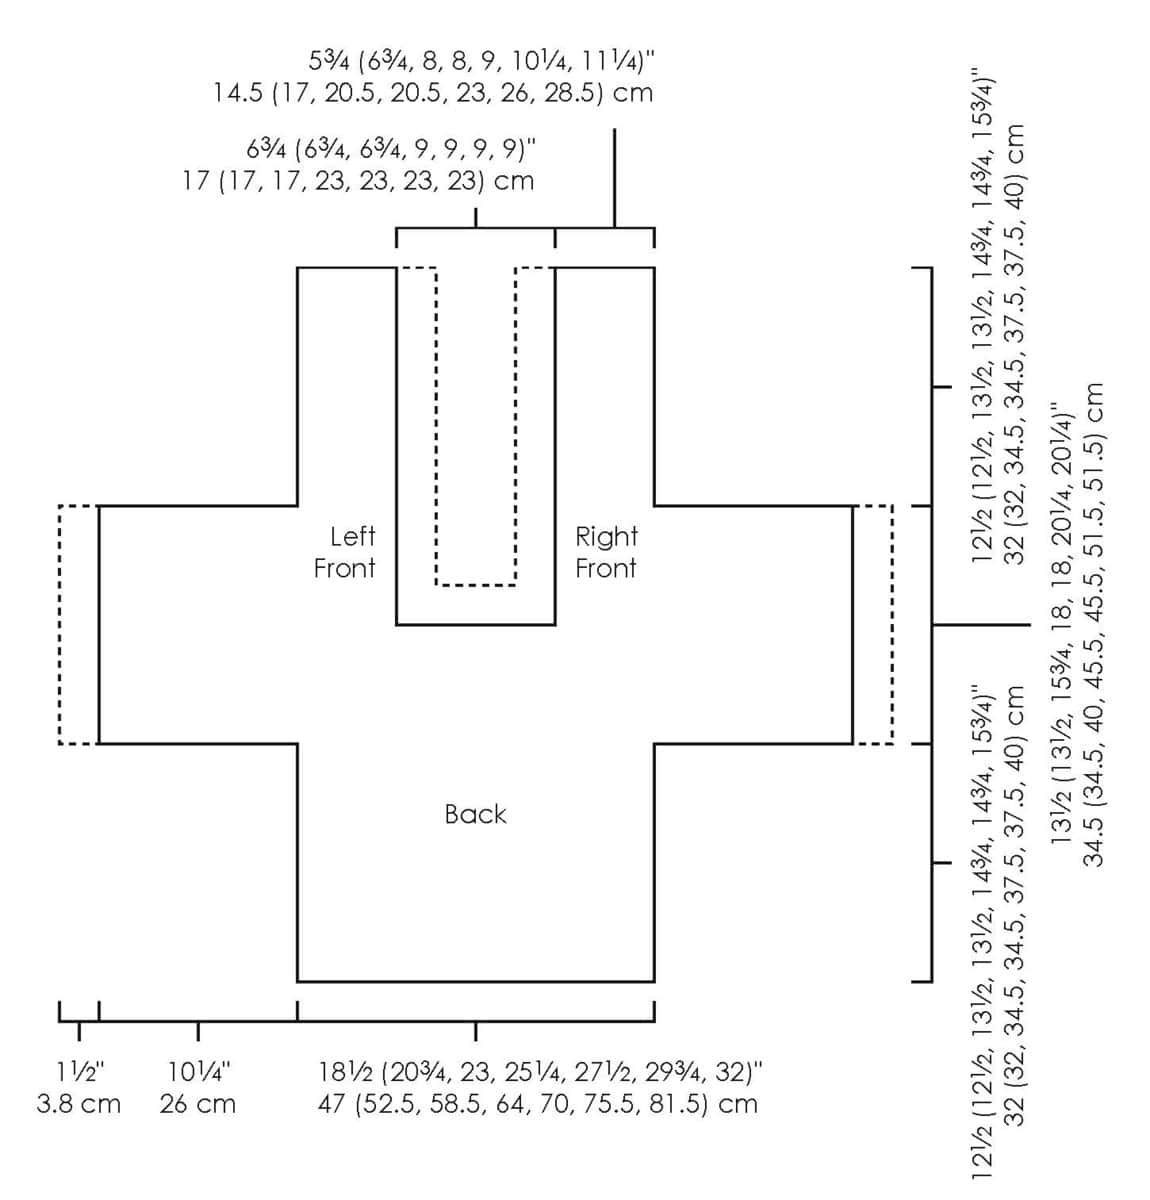
GOLDENROD CROCHET CARDIGAN SCHEMATIC

A sewing pattern layout for a Goldenrod Crochet Cardigan features three labeled sections: Left Front, Right Front, and Back. Measurements in centimeters and inches are provided around the perimeters for precise fabric cutting and seamless garment construction. -Marly Bird

PATTERN NOTES 

  • Directions are for size smallest size; changes for larger sizes are in parentheses. When only one number is given then that number applies to all sizes.
  • Cardi is to fit 0-4″ of positive ease.  If you prefer a tighter fit, pick a size closer to your bust circumference. Sample is shown is the 37″ on a 37โ€ bust. 
  • Cardi is worked from the back up the back sleeves over the shoulders and down to the front edge. 
  • Arms and sides are seamed then the edging is added to the collar and sleeves.  

GROW

To Unlockย Exclusive Subscriber Contentย click the Box below and join for free by simply adding your email and creating a password! If you are having troubles, clear your cache or reset your password or login to the Grow Publisher Portal.

>> Learn More About Grow Here <<

I'm thrilled to share this amazing pattern with you, many patterns on my blog are absolutely free! I kindly request that you don't copy and paste or distribute this pattern. Prefer an ad-free experience? Buy a digital PDF pattern for a small fee from one of my online stores for a seamless crafting journey. 

I appreciate your support and readership. You are the reason I can keep doing what I love and sharing it with others. So, thank you from the bottom of my yarn-loving heart! Disclosure: This post contains affiliate links, meaning I get a commission if you decide to make a purchase through my links at no cost to you.

GOLDENROD CROCHET CARDIGAN PATTERN INSTRUCTIONS

BACK 

With MC 98 (110, 122, 134, 146, 158, 170) ch, and work in Main pat for 22 (22, 24, 24, 26, 26, 28) rows ending after Row 2โ€”16 (18, 20, 22, 24, 26, 28) st patt reps.

INCREASE FOR SLEEVES 

Next Row (RS): Ch 55 for first sleeve, drop loop off hook. Using a separate skein of MC ch 54 and sl st to end of other end of row for second sleeve. Fasten off second skein. Put hook back in the live loop for first sleeve. Work Main pat row 1 across ch sts then cont to work Main pat row 3 across back, then work Main pat row 1 across last 54 chโ€”34 (36, 38, 40, 42, 44, 46) st patt reps. 

Cont to work in Main pat for 11 (11, 13, 15, 15, 17, 17) more rows, ending after Row 2. 

NECK OPENING 

Next Row (RS): Work Main pat row 3 across 14 (15, 16, 16, 17, 18, 19) reps for right front, drop loop off hook, skip 6 (6, 6, 8, 8, 8, 8) reps in center, join new yarn to first sc of next rep, work Main pat row 3 across rem 14 (15, 16, 16, 17, 18, 19) reps for left front. Place st marker in loop on hook then set aside. Put hook back in the live loop for right front and cont to work the right front sts only. 

RIGHT FRONT SLEEVE 

Cont to work right front sts for 11 (11, 13, 15, 15, 17, 17) more rows ending after row 2. Finish off. 

DECREASE FOR SLEEVES
Next Row (RS): Skip 9 reps, join new yarn with a sc in dtr of next repeat, cont Main pat row 3 across rem 5 (6, 7, 7, 8, 9, 10) reps. 

Cont to work for 21 (21, 23, 23, 25, 25, 27) more rows ending on a row 2. Finish off. 

LEFT FRONT 

Remove st marker and put hook back in the live loop for left front. Continue to work left front sts for 11 (11, 13, 15, 15, 17, 17) more rows, ending after row 2. 

DECREASE FOR SLEEVES
Next Row (RS): Work Main pat row 3 across 5 (6, 7, 7, 8, 9, 10) reps, turn skipping the last 9 reps. 

Continue to work for 21 (21, 23, 23, 25, 25, 27) more rows ending on a row 2. Finish off. 

FINISHING 

 Collar: With RS facing, join MC to the lower right front neck edge with a sl st, ch 1, work an odd number of scโ€™s evenly around entire neck to the lower left front neck edge, turn.
Row 1 (WS): Ch 3, dc in each st around, turn.
Row 2 (RS): Ch 3, *dc in next st, RdcF in next st; rep from * to last st, dc in last st, turn.
Rep rows 1 and 2 two more times. Rep row 1 once more. 

Next row: Ch 1, sl st in each st. Finish off.

Arm Bands: With RS facing, join MC to edge of sleeve with a sl st, ch 1, work an odd number of scโ€™s across edge of sleeve.
Row 1 (WS): Ch 3, dc in each st around, turn.
Row 2 (RS): Ch 3, *dc in first st, RdcF in next st; rep from * to last st, dc in last st, turn.
Rep row 1 once more.
Next row: Ch 1, sl st in each st. Finish off.

CC Trim: Join CC to RS of collar and work crochet chain stitch embroidery along surface of fabric. Rep for each arm band. Weave in loose ends. Block piece to measurements.
With RS facing each other, whip stitch sides together.

Lower Edging: With RS facing, join MC to lower left front trim edge and sc evenly around. Finish off.

Other Crochet Patterns by Marly Bird You Will Love!

We all love crochet cardigans and even better when they are so easily available. Check out these patterns.

  • Aurora Lace Crochet Cardigan
  • Sookie Crochet Cardigan
  • You Are Valued Crochet Cocoon Cardigan

Frequently Asked Questions

What kind of yarn do you recommend for the Goldenrod Cardigan?

Honestly… when designing this, I really loved using thin yarn because it gives such a nice drape and looks so pretty with lace stitches. A blend with silk and wool is perfect because it's breathable, warm, and just right for layering up!

Is this cardigan pattern good for beginners?

Yes! It's designed as an advanced beginner pattern. The construction is pretty straightforward, starting with a one-piece back and simple sleeve shaping. Just take your time with that first repeat row for the lace stitch…

Can I make the Goldenrod Cardigan longer?

So here's the thing… you absolutely can! If you want a longer cardigan, just add a repeat or two to the back panel before you start working on the sleeves. Make sure you end on the correct row, and don't forget to add those extra rows to the front panels too!

How do I get the best fit with this cardigan pattern?

Well… the pattern is designed to be size-inclusive and offers lots of ways to customize. It has a relaxed fit, so it's perfect for layering. If you prefer a snugger fit, you might want to choose a size that's closer to your actual measurements.

What stitch techniques are important for this pattern?

Honestly… you'll want to be comfortable working into crochet chains, especially for that beautiful lace stitch. Also, knowing the difference between single crochet, double crochet, and double treble crochet is key. Don't forget, these are all US crochet terms!

Filed Under: Crochet, Marly Bird Premium Patterns, Pattern

Classic Crochet Granny Square Stocking โ€“ Free Pattern

December 6, 2024 By admin Leave a Comment

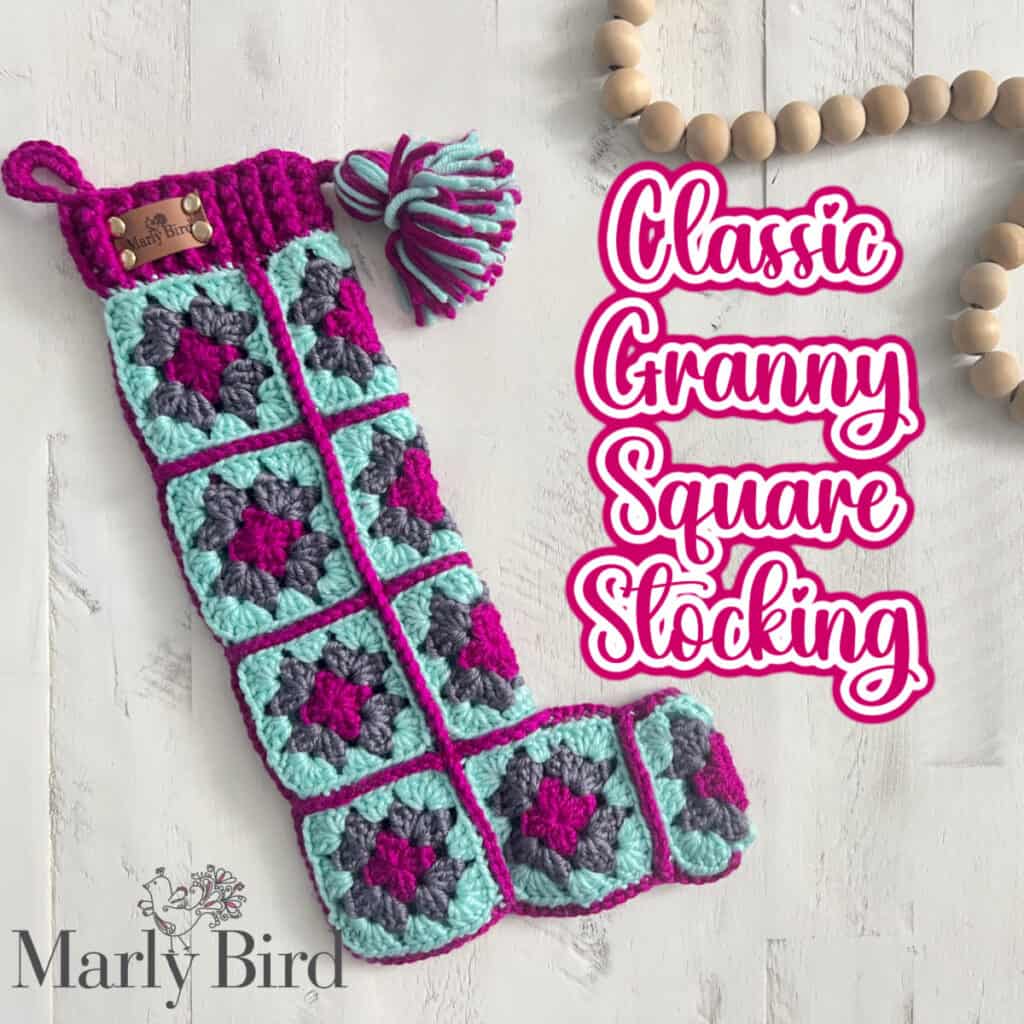
Crochet granny squares are timeless, versatile, and oh-so-charming. What better way to showcase this classic crochet technique than with a handmade Christmas Stocking? This Classic Crochet Granny Square Stocking Pattern is perfect for adding a handmade touch to your holiday decor or gifting something truly special.

In this post, youโ€™ll find helpful tips for making your own heirloom crochet stocking, ideas for customization, and even information on purchasing the ad-free PDF for a seamless crafting experience. Letโ€™s get started!

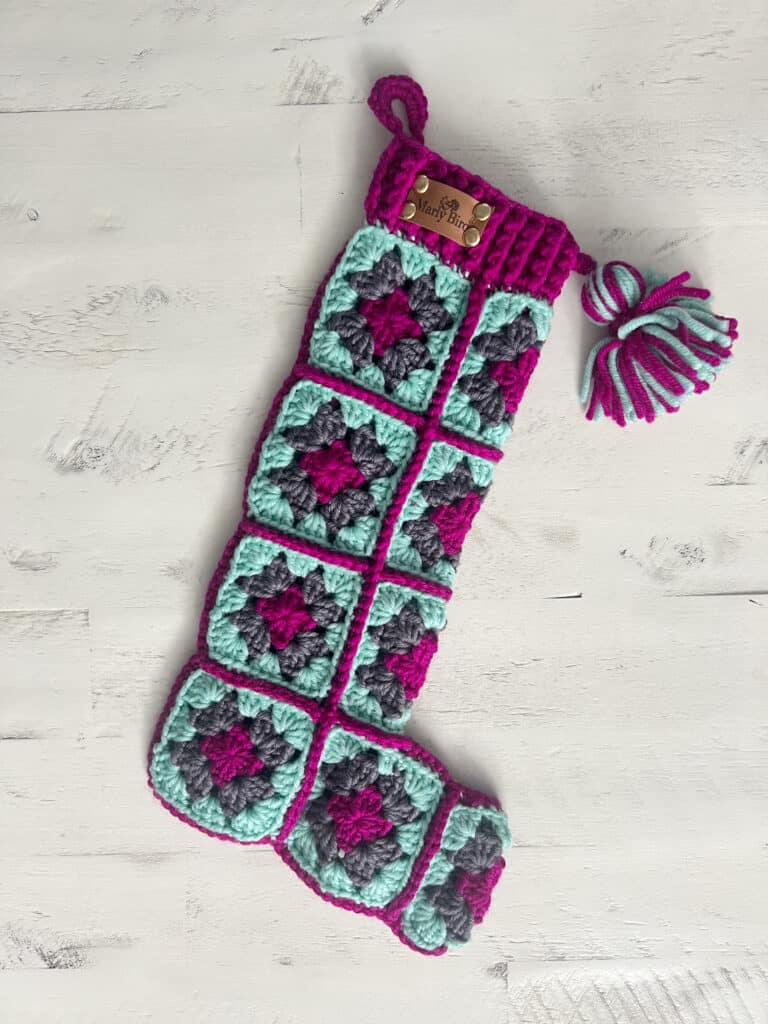
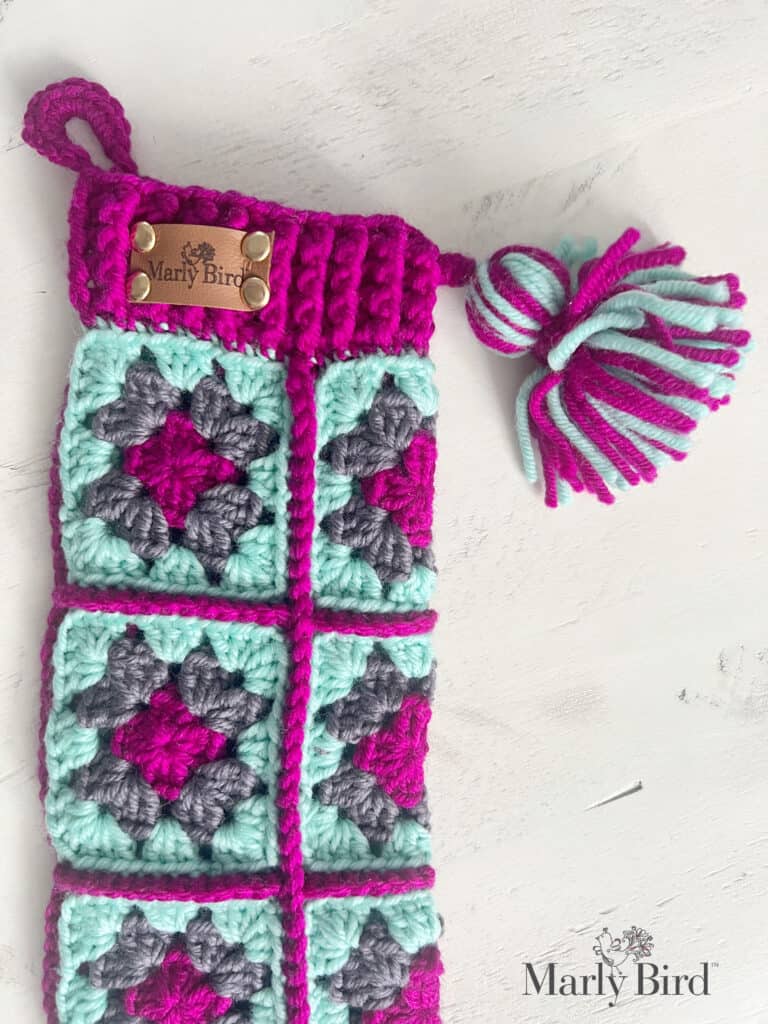
A handmade stocking made of crochet granny squares in turquoise, purple, and magenta lies on a white surface. It features a crochet loop and a tassel. "Classic Granny Square Stocking" is written in bold pink text beside it, offering inspiration for your next project with its free pattern charm. -Marly Bird

Affiliate Disclosure: This post contains affiliate links. To learn more please visit my privacy policy here๐Ÿ’–


🎄 Countdown to Christmas 🎄

—
Days
—
Hours
—
Mins
—
Secs

Until Christmas Morning! 🎄

🤴 Start your handmade gifts now — December comes faster than you think! 🎅

What Makes Granny Squares So Special?

Granny squares are a cornerstone of crochetโ€”timeless, versatile, and easy to learn. These beloved crochet motifs have been around for generations, cherished for their simplicity and beauty. Whether youโ€™re a beginner or an experienced crocheter, granny squares are the perfect project to work on:

  • Beginner-Friendly: The repetitive stitch pattern makes them a fantastic learning project for those new to crochet.
  • Endlessly Customizable: From color choices to different stitch patterns, granny squares can be adapted to suit any project or style.
  • Great for Scrap Yarn: Use up leftover yarn in your stash to create something colorful and unique.

The versatility of granny squares is part of their charmโ€”you can turn them into blankets, bags, garments, or, in this case, a beautiful holiday stocking!


What Youโ€™ll Love About the Classic Crochet Granny Square Stocking

What You Will Love

  • Timeless Design: Granny squares are a crochet classic that never goes out of style. This stocking combines their charm with holiday cheer.
  • Beginner-Friendly: If you know how to make a granny square, this project is within reach. Itโ€™s perfect for beginners and seasoned crocheters alike.
  • Customizable: From choosing your favorite colors to adjusting the size (more on that later), this stocking can be tailored to fit your vision.
  • Scrap Yarn Friendly: Use up leftover yarn from your stash to create a stocking with character and personality.

How to Make the Crochet Christmas Stocking Larger

This pattern creates a smaller-sized stocking, but you can easily make it larger with a few adjustments.

  • Add More Rounds to Each Granny Square: Use the classic granny stitch technique to add additional rounds to your squares. Each round adds both height and width, giving you larger granny squares to work with.
  • Increase Yarn Usage: Keep in mind that adding rounds will require more yarn, so plan accordingly.

For detailed instructions on creating different-sized granny squares, check out my post on how to make a classic granny square.


This crocheted Christmas stocking showcases a vibrant patchwork of granny squares in purple, turquoise, and gray. Complete with a decorative tassel and hanging hook, this stocking is perfect for adding charm to your holiday dรฉcor. Explore free patterns to create your own festive masterpiece! -Marly Bird

Relax & Crochet
Upgrade to the Printable PDF

The ad-free PDF version of this pattern is perfect for crafters who want a more streamlined and convenient experience. Hereโ€™s why youโ€™ll love it:

  • Full Written Instructions: The PDF includes the complete pattern, clearly written and easy to follow.
  • Step-by-Step Photo Tutorials: Get extra guidance with detailed photos for assembling your stocking and creating a professional finish.
  • Uninterrupted Crafting: No ads, no distractionsโ€”just a beautifully formatted pattern you can use anywhere.
  • Support the Designer: Purchasing the PDF helps support me in creating more free patterns and resources for the crochet community.
Get The Ad-Free PDF

Creative Ways to Customize Your Classic Crochet Granny Square Stocking

One of the best things about granny squares is how versatile they are! Here are some fun ways to make your stocking uniquely yours:

  • Play with Color: Use traditional holiday colors like red, green, and white, or go modern with pastels or jewel tones.
  • Add Embellishments: Sew on pom-poms, tassels, or even buttons for a festive touch.
  • Personalize It: Add a monogram or applique to make the stocking extra special for its recipient.
  • Experiment with Yarns: Try sparkly yarns for a bit of holiday glitz or stick with soft acrylics for a classic look.

For more inspiration, check out my post on creative ways to use granny squares.


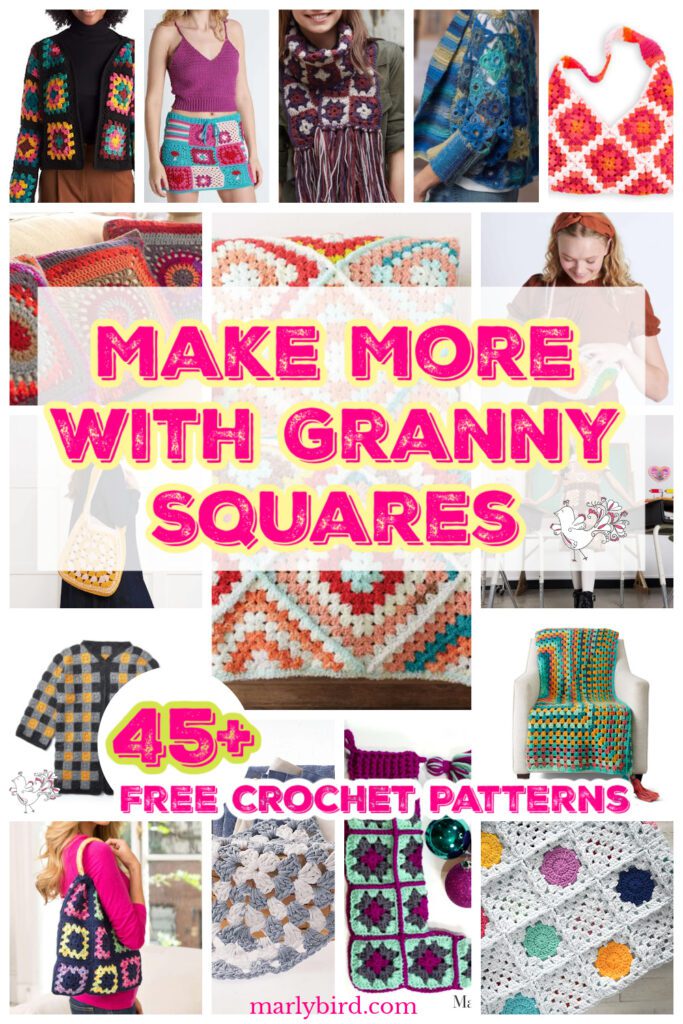
Collage of crochet projects featuring lively granny squares, including bags, blankets, and clothing. Text reads "Make More with Crochet Granny Squares" and "45+ Free Crochet Patterns." Explore the vibrant designs showcased on Marlybird.com. -Marly Bird

Common Questions About Crocheting Granny Squares

If youโ€™re new to granny squares, you might have some questions. Here are the answers to a few of the most common ones:

What is a granny square?

A granny square is a crochet motif made up of clusters of double crochet stitches arranged in a square shape. Itโ€™s worked in rounds, starting from the center, and is often bordered with chain stitches to create a lacy effect.

How do you join granny squares together?

There are several ways to join granny squares, including sewing them together with a yarn needle, using slip stitches, or crocheting them together with single crochet or slip stitch borders. You can even do a join as you go method. For this pattern, youโ€™ll use one of these joining techniques to assemble the stocking.

Can beginners make granny squares?

Absolutely! Granny squares are one of the easiest crochet patterns to master. Once you learn the basic stitchesโ€”chains, double crochet, and slip stitchesโ€”youโ€™re ready to start making granny squares. As a matter of fact, the granny square is one of the first stitches you learn in BiCrafty Bootcamp: Crochet for Knitters.

For a full tutorial, check out my post on how to make a classic granny square. But keep in mind, this is only one way to make a granny square. There are several ways to join the rounds of a square.


Tips for Crocheting Holiday Projects ๐ŸŽ„

Holiday crafting can be both exciting and overwhelming, so here are some tips to help you enjoy the process:

  • Start Early: Get a jump on your holiday projects to avoid last-minute stress. This also gives you more time to experiment with designs and techniques.
  • Choose Durable Yarns: Use washable, sturdy yarns for stockings and other holiday decor that may be used year after year.
  • Organize Your Yarn Stash: Before starting, sort through your yarn stash and gather the materials youโ€™ll need. This makes the crafting process smoother and faster.
  • Make It a Group Activity: Invite friends or family to join in on your holiday crafting. Itโ€™s a great way to spend time together and share the joy of handmade creations.

With these tips in mind, youโ€™ll be ready to tackle all your holiday crochet projects with ease and joy.


More Holiday Crochet Patterns to Explore

If youโ€™re in the holiday crafting spirit, here are more patterns to keep your hooks busy:

  • Festive Crochet Tree Skirt
  • Granny Stitch Stockings by Briana K
  • Holiday Crochet Ornaments
  • Cozy Crochet Christmas Blanket
  • 72 More Ornament Patterns You Will Love

Each of these patterns adds a personal and handmade touch to your holiday decor. Explore them all and make this season extra special!


Collage advertising a "Merry Stitchmas Stocking" sale with various elements: a coupon for 25% off, phone displaying the website, stitch patterns, completed stockings, and a festive header. -Marly Bird

More Granny Square Patterns to Explore

If you love working with granny squares, there are plenty of other patterns to enjoy! Here are some of my favorites:

  • Twisted Headband
  • Confetti Dots Granny Blanket
  • Pucker Granny Square Bag
  • Granny Stitch Planned Pooling
  • Blooming Granny Square Blanket
  • 150 Granny Square Projects

These patterns show just how versatile and fun granny squares can be!


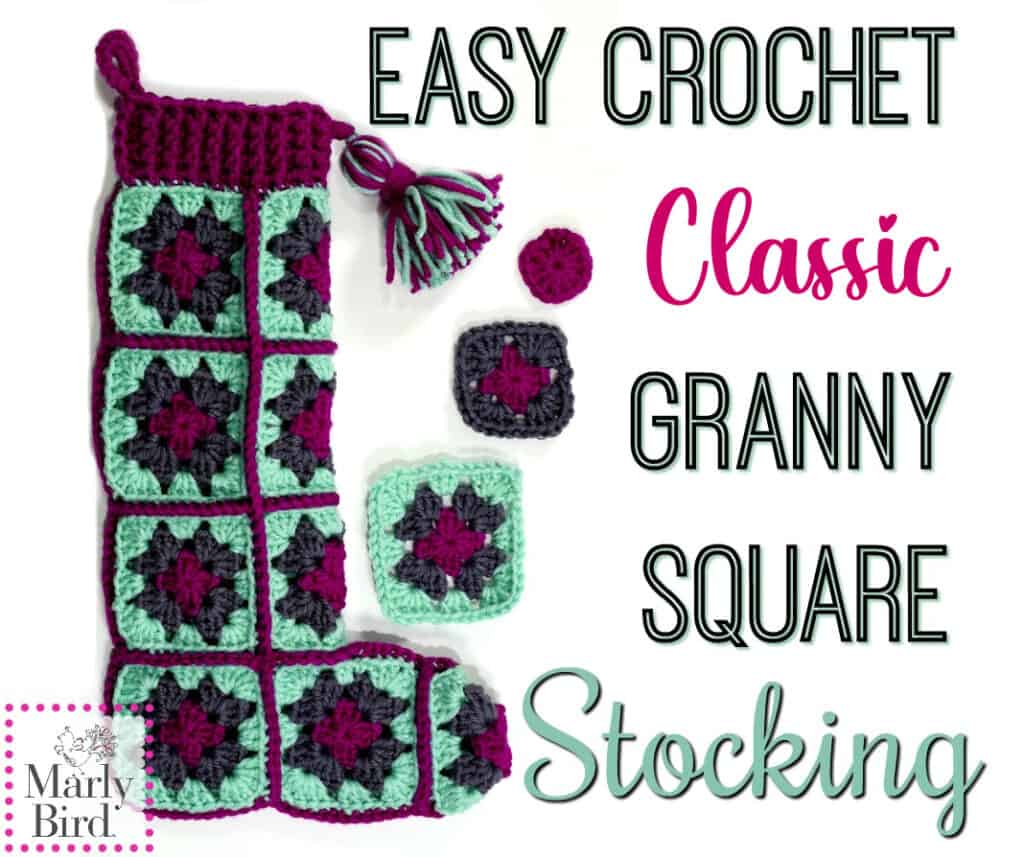
A classic crochet stocking crafted from colorful granny squares in teal, pink, purple, and gray is displayed with a matching tassel and individual squares. The words "Easy Crochet Granny Square Stocking" elegantly grace the image. -Marly Bird

Classic Crochet Granny Square Stocking

Designed by Marly Bird

SKILL LEVEL

Adventurous Beginner

MEASUREMENTS

Finished Measurements

Approximately 13.5โ€ [34.25 cm] from cuff to heel, 7.5โ€ [19 cm] from heel to toe. 

Gauge 

Each granny square motif is 3" [7.5 cm] square.

MATERIALS

Crochet Yarn 

WeCrochet, Swish DK  (100% superwash merino, 123 yds / 112 m, 1.75 oz/ 50 g, CYCA#3 light) 

Color A: Throne, 1 ball

Color B: Cobblestone Heather, 1 ball

Color C: Wonderland Heather, 1 ball

Get The Yarn Here

Crochet Hook

Size H [5 mm] or size to obtain gauge.

Notions 

Stitch markers

Tapestry needle 

Leather tags

Leather rivets

Marly Bird Amazon Store

ABBREVIATIONS

Ch - Chain(s) 

Dc - Double Crochet 

Bpdc - Back Post Double Crochet

Fpdc - Front Post Double Crochet

RS - Right Side 

Sc - Single Crochet

Sl st - Slip Stitch

Sp(s) - Space(s) 

St(s) - Stitch(es)

Stacked Dc - Stacked Double Crochet 

WS - Wrong Side

[ ] - work directions in brackets the number of times specified.

SPECIAL STITCHES 

โญ๏ธDouble Crochet (Dc): Yarn over hook, Insert hook into indicated stitch, yarn over and pull up a loop, * yarn over and draw through 2 loops on hook; repeat from * once more.

โญ๏ธ Back Post Double Crochet (bpdc): Yarn over once, insert hook from back to front to front around the post of the stitch indicated, yarn over and pull up a loop, [yarn over and pull through 2 loops on hook] 2 times.

โญ๏ธ Front Post Double Crochet (fpdc): Yarn over once, insert hook from front to back to front around the post of the stitch indicated, yarn over and pull up a loop, [yarn over and pull through 2 loops on hook] 2 times.

โญ๏ธSingle Crochet (Sc): Insert hook into indicated stitch, yarn over and pull up a loop, yarn over and draw through 2 loops on hook.

โญ๏ธSingle Crochet Seam: Hold 2 squares with WS together and working into the back loop of square closest to you, and the front loop of the square away from you, single crochet the square together.

โญ๏ธ Standing Double Crochet (Standing Dc): With slip knot on hook, yarn over hook, insert hook into stitch or space, yarn over hook and pull up a loop, [yarn over hook, draw through two loops on hook] twice.

๐ŸŽ‰ CROCHET STITCH DIAGRAM

The crochet stitch diagram is only available in the Ad-Free PDF.

Get the PDF

๐ŸŽฌ VIDEO TUTORIAL

  • How to make a adjustable ring >> Click Here for Video Help <<
  • Secure center of adjustable ring >> Click Here for Video Help <<
  • How to Bury Ends >> Click Here for Video Help <<
  • Chain Stitch >> Click Here for Video Help <<
  • Slip Stitch >> Click Here for Video Help <<
  • Seaming Crochet >> Click Here for Video Help <<
  • How to make tassels >> Click Here for Video Help <<

๐Ÿ“Œ NOTES

  • The crochet granny square stocking pattern is made up of individual motifs that are worked in joined rounds, beginning at the center.
  • Securely weave in the tail of the adjustable ring to guarantee that it doesn't pop open with use.
  • Each round of color is fastened off at the end and the new color is rejoined using stacked double crochet.
  • The single crochet seam is a design feature of the stocking and is on the RS of the fabric.
  • Weave in the tails as you go. Do not wait until the very end to weave them in.
Favorite This Pattern on Ravelry - Marly Bird

GROW

To Unlockย Exclusive Subscriber Contentย click the Box below and join for free by simply adding your email and creating a password! If you are having troubles, clear your cache or reset your password or login to the Grow Publisher Portal.

>> Learn More About Grow Here <<

I'm thrilled to share this amazing pattern with you, many patterns on my blog are absolutely free! I kindly request that you don't copy and paste or distribute this pattern. Prefer an ad-free experience? Buy a digital PDF pattern for a small fee from one of my online stores for a seamless crafting journey. 

I appreciate your support and readership. You are the reason I can keep doing what I love and sharing it with others. So, thank you from the bottom of my yarn-loving heart! Disclosure: This post contains affiliate links, meaning I get a commission if you decide to make a purchase through my links at no cost to you.

Crochet Granny Square Stocking Pattern

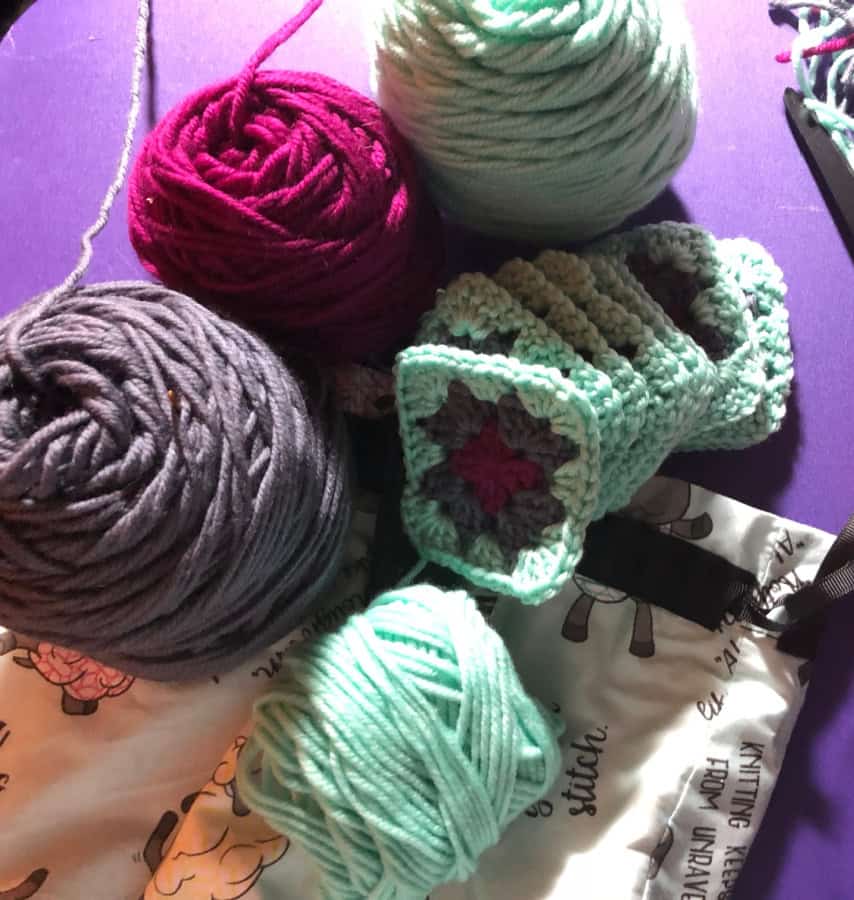
Colorful balls of yarn in pink, purple, gray, and mint green are scattered on a purple surface alongside a partially crocheted classic granny square piece with a floral pattern. A printed fabric bag with black drawstrings is nearby. -Marly Bird

Crochet Granny Square Stocking Motif

(make 13)

Make an adjustable ring using color A.

Round 1: Ch 3 (counts as a dc), 2 dc in circle, ch 1, [3 dc in circle, ch 1] 3 times, join to 3rd chain of beginning chain with sl st. Fasten off โ€” 12 dc, 4 ch-1 spaces.

With color B

Round 2: Standing dc into last ch-1 space, (2 dc, ch 1, 3 dc) in same space, ch 1, [(3 dc, ch 1, 3 dc) in next ch-1 space, ch 1] 3 times, join with sl st to first dc. Fasten off โ€” 24 dc, 8 ch-1 spaces.

With color C

Round 3: Standing dc in the first ch-1 space corner from previous round, (2 dc, ch 1, 3 dc) in same space, [ch 1, 3 dc in next ch-1 sp, ch 1, (3 dc, ch 1, 3 dc) in next ch-1 sp] 3 times, ch 1, 3 dc in next ch-1 sp, ch 1, join with a sl st to first dc. Fasten off โ€” 36 dc, 12 ch-1 spaces.

Weave in all ends to WS of square. 

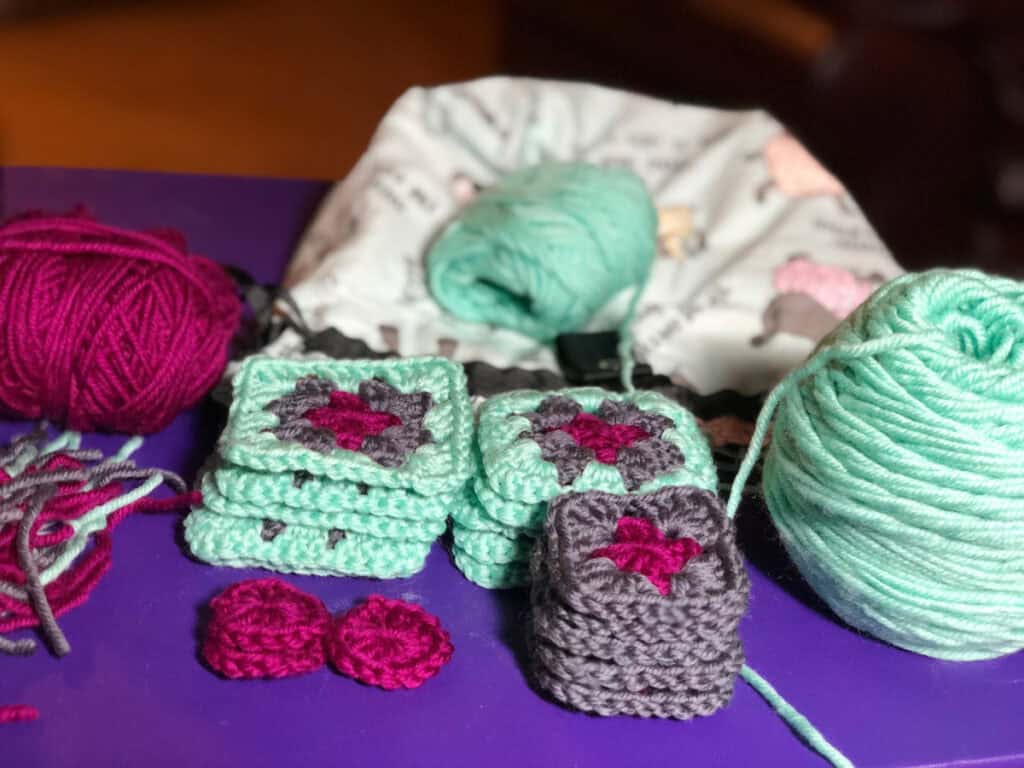
A close-up of classic crocheted granny squares in teal, gray, and burgundy yarn. Multiple skeins rest on a purple surface beside two small round crochet pieces and a yarn bag in the background, evoking a cozy stocking pattern waiting to be created. -Marly Bird

Granny Square Stocking Motif for Toe 

(make 1)

Make an adjustable ring using color A.

Round 1: Ch 3 (counts as a dc), 2 dc in circle, ch 1, [3 dc in circle, ch 1] 3 times, join to 3rd chain of beginning chain with sl st. Fasten off โ€” 12 dc, 4 ch-1 spaces.

With color B

Round 2: Standing dc into last ch-1 space, (2 dc, ch 1, 3 dc) in same space, (3 dc, ch 1, 3 dc) in next ch-1 sp, ch 1, [(3 dc, ch 1, 3 dc) in next ch-1 spaces] 2 times, ch 1, join with sl st to first dc. Fasten off โ€” 24 dc, 6 ch-1 spaces.

With color C

Round 3: Standing dc in the first ch-1 space corner from previous round, (2 dc, ch 1, 3 dc) in same space, (3 dc, ch 1, 3 dc) in next ch-1 space corner, ch 1, 3 dc in next ch-1 sp, ch 1, [(3 dc, ch 1, 3 dc) in next ch-1 space corner] 2 times, ch 1, 3 dc in next ch-1 sp, ch 1, join with a sl st to first dc. Fasten off.

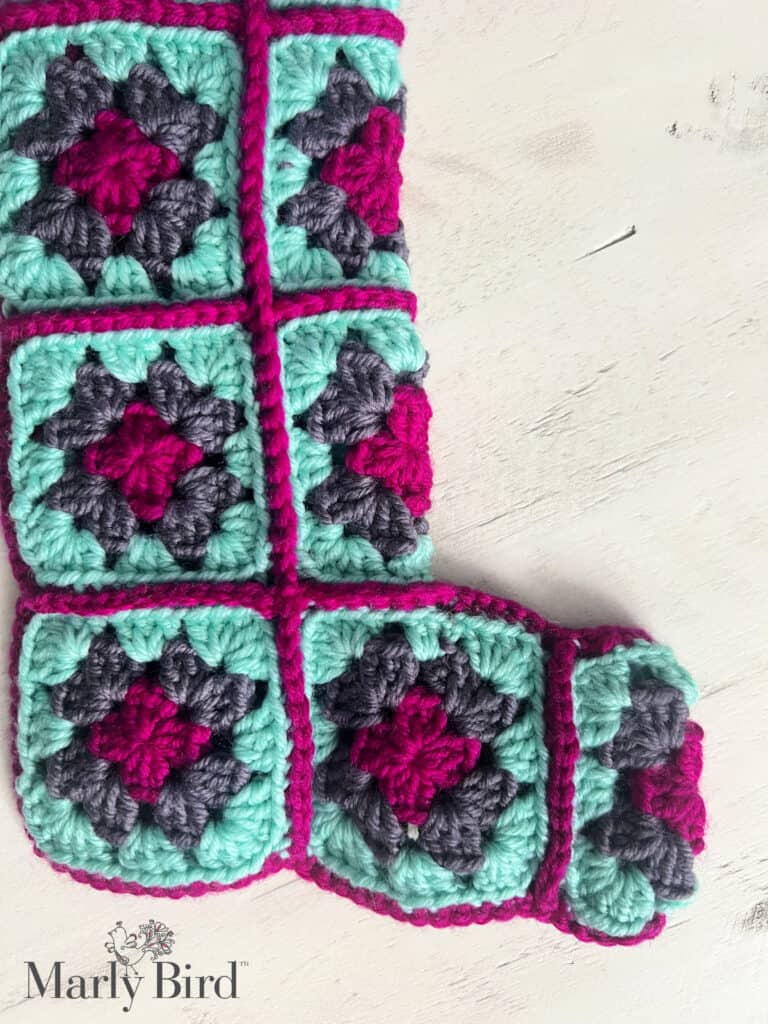
A crocheted Christmas stocking features colorful granny squares in shades of teal, gray, and magenta, creating a delightful patchwork pattern. With the Marly Bird logo in the bottom corner, this crochet treasure is perfect for those seeking a free granny square stocking pattern. -Marly Bird

Seaming the Granny Square Stocking

To assemble your Granny Square Stocking, follow these instructions for a clean and polished finish:

  1. Join the Squares:
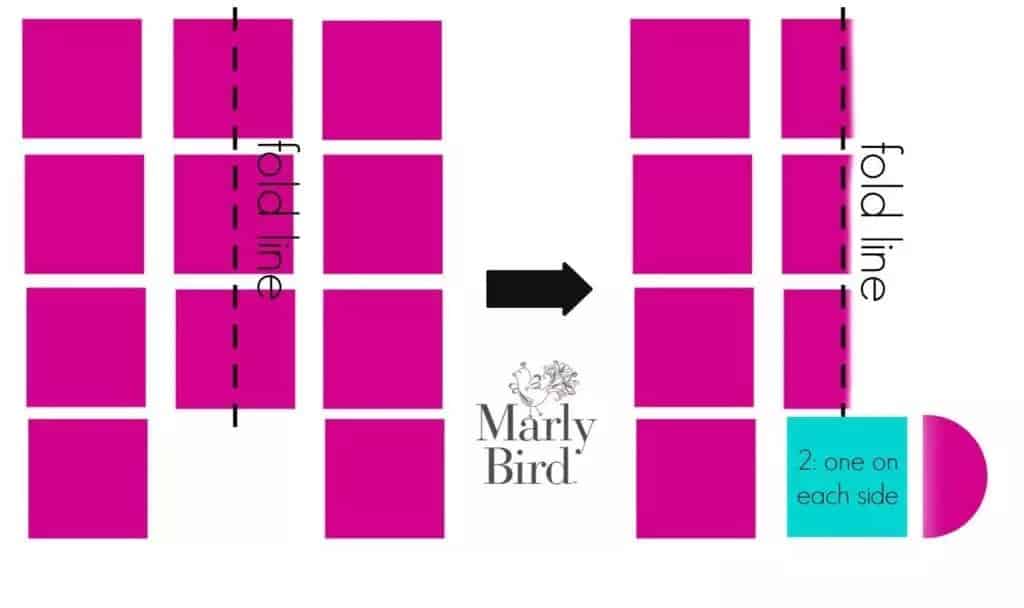
    • Arrange your squares as shown in the layout diagram.
    • Using the single crochet seam method (refer to the Special Techniques section), seam the squares vertically first, followed by horizontally. This creates the flat stocking leg panel.
  2. Seam the Stocking Leg:
    • With the leg panel completed, fold it in half lengthwise (like folding a hotdog).
    • Use the single crochet seam to join the back of the leg, ensuring a sturdy and even seam.
  3. Attach the Foot Squares:
    • Once the leg is seamed, add a square to each side of the center column to form the foot area. Refer to the layout diagram for placement (squares indicated in blue).
    • Seam each new square with a single crochet seam, attaching half of the square to the center column and the other half to the adjacent square.
  4. Finish with the Toe Square:
    • Attach the toe square last. Seam it to the foot section with the single crochet seam method for a secure and tidy finish.

Tip: Refer to the layout diagram throughout the process to ensure correct placement and alignment of your squares.

Diagram presenting a sheet of paper with a fold line. The paper features 12 pink squares in three rows of four, resembling a crochet granny square pattern. The vertical fold line divides them into two columns. "Marly Bird" logo is centered, hinting at a free stocking pattern inspiration. -Marly Bird

Finishing

Cuff Ribbing

Round 1: With RS facing, join color A with a sl st at the back of the stocking, ch 1, single crochet evenly around the top (must have even number), join with a sl st to first sc, do not turn.

Rounds 2-4: Ch 2 (does not count as a stitch), *fpdc around next st, bpdc around next st; rep from * around, join with a sl st to first fpdc, do not turn.

Round 5: Rep Round 2 to last stitch, ch 7, join with a sl st to first fpdc. Turn.

Last Row: 12 sc in ch-7 space; sl st in next stitch. Fasten off.

Optional: Create a tassel and attach to the front of the stocking. Add leather tag with rivets.

Weave in any loose ends.

A crocheted pouch with a patchwork of colorful granny squares in pink, teal, and gray features a tassel and a small metal tag labeled "Marly Bird" on top. The background is a white surface with the "Marly Bird" logoโ€”a delightful nod to traditional crochet stocking patterns. -Marly Bird

Share Your Granny Square Stocking

I canโ€™t wait to see your finished Classic Crochet Granny Square Stocking! Share your creations on Instagram with #MarlyBird or in the Marlyโ€™s Minions BiCrafty Community on Facebook. Seeing your projects inspires me and the entire crochet community.

Happy crocheting! ๐ŸŽ„โœจ

Filed Under: Chic Sheep by Marly Bird Patterns, Crochet, Our Free Patterns, Pattern, Uncategorized

FREE Mosaic Crochet Blanket Pattern

June 5, 2024 By admin 1 Comment

Have you ever heard of mosaic crochet? You must have heard of it by now. It's really grabbing a hold in the crochet world. So we'd like to tell you a little more about it. But in the meantime, go get the FREE Nordic Stripes Mosaic Crochet Blanket on the Yarnspirations website, then come right back here for more info (and a free video with tips to help you make it)!

With easy stripes and challenging colorwork (well, it might be to start with, but you can do it), this Nordic-inspired crochet blanket has enough variation to keep you interested as you work.

But first, let's answer a few of the most-asked questions about mosaic crochet…

What Are The Two Types Of Mosaic Crochet?

The main techniques used for this blanket include interlocking crochet, one of the mosaic crochet types. This involves working in front of stitches in rows below, single crochet, and more.

The other type is called overlay crochet. This technique involves working around a basic filet mesh to form a thicker fabric and intricate patterning.

Learn all about both of these types of mosaic crochet and many more knit and crochet colorwork techniques in Camp Colorwork – a course about all things color in knit and crochet. Find patterns, videos, guidance, and more in this comprehensive course all about color!

Is Mosaic Crochet Reversible?

Mosaic crochet can be reversible, but it isn't always the case. It depends on what the designer wants for the pattern as to how they design it. If it's a bag, it doesn't have to be reversible, but with a blanket or scarf, reversible mosaic crochet is a much better option.

How Do You Work Mosaic Crochet?

You work mosaic crochet from a chart. You read this chart from bottom to top and right to left. Charts always show how the Right Side (RS) of your work should look, so they're the perfect way to stay on track.

What's Easy About Mosaic Crochet?

The easy part is that you only ever use one color across a row at a time. There's no need to juggle or try to hide the second color as it has its own rows.

The slightly harder part is that each chart row shows both colors. This means that you must work two physical rows in different colors to complete one chart row. Work the background color row first, then repeat that row again, working with only the second color.

It's much easier when you see it done, so watch the video below for a closer look. I'll explain and show you everything you need to know to make this blanket a complete success!

What's The Best Yarn For Mosaic?

Whatever the pattern tells you to use will be the best choice, but unfortunately, Red Heart Heat Wave is a discontinued yarn. A great alternative is KnitPicks Brava. It's still a 100% Acrylic worsted-weight yarn. They have a huge color range and more yardage per ball. It's great value!

(Learn more about Red Heart Heat Wave in my review. It's an interesting concept!)

Want More Crochet Patterns?

If you love the look of Mosaic Crochet, check out these FREE patterns from my website:

  • Diamond Mosaic Crochet Block
  • Modern Mosaic Blocks Throw
  • Oliver and Olivia Crochet Baby Blanket

Be sure to check out the Lunch and Learn on Yarnspiration's Facebook page to learn how to work this wonderful stitch pattern. It's honestly not as hard as it looks. You'll have the technique down in no time.

Download the FREE Nordic Stripes Crochet Blanket Pattern:

Download the Nordic Stripes Crochet Blanket

And if you LOVE color like I do, don't forget to check out Camp Colorwork! Summer's the perfect time to go to camp!!!

Frequently Asked Questions

What are the different ways to do mosaic crochet?

So here's the thing… there are two main types of mosaic crochet. One is called interlocking crochet, where you work in front of stitches in rows below. The other is overlay crochet, which involves working around a basic filet mesh to get that cool texture.

Can I make my mosaic crochet project look the same on both sides?

Honestly… it really depends on the designer's intent! For things like blankets or scarves, reversible is totally the way to go. But if it's a bag, it doesn't really matter as much, you know?

How do I read a mosaic crochet chart?

Yes! You read the chart from bottom to top, and then right to left. The charts always show the right side of your work, which is super helpful for staying on track.

What makes mosaic crochet easier than other colorwork?

The super easy part is that you only use one color per row… no juggling needed! The charts show both colors, so you just work two physical rows in different colors to complete one chart row.

I can't find Red Heart Heat Wave anymore… what yarn should I use for this blanket?

Oh, that's a bummer it's discontinued! But don't worry… KnitPicks Brava is a fantastic alternative. It's also 100% acrylic and worsted weight, and they have a ton of colors to pick from!

Filed Under: Free Patterns

Most Common Knitting Abbreviations & Definitions

May 1, 2024 By admin 2 Comments

Working through a knitting pattern can sometimes be like decoding hieroglyphics when you first start out. Did you know that there are standard knitting abbreviations that are to be used in patterns to make it easier? I say easier but it only becomes that when you know what the abbreviations mean. Bookmark this page to use on your next knitting pattern when you run across a term you don't know!

Psst: if you like getting knitting help you should check out these other pages on the MarlyBird.com website: Short Row Help, Can I Take Knitting Needles on a Plane?, Cable Knitting Help.

Knitting Abbreviations List
[Read more…]

Filed Under: Knitting, Tips, Tricks, Techniques for Knitting and Crochet

Twisted Knit Headband For Beginner Knitters!

April 3, 2024 By admin 1 Comment

At first glance, twisted knit headbands exude an irresistible charm, blending cozy warmth with chic sophistication. Crafted from soft, luxurious yarns in an array of colors and textures, these headbands are a testament to the enduring appeal of handmade craftsmanship. Whether intricately knitted or delicately crocheted, each piece carries a unique charm, inviting admiration and appreciation. And one of the most enticing things about these twisted knit headbands is they are absolutely beginner friendly!

You know Marly loves designing hats like the Kaleidoscope Harmony Hat, Confetti Blips hat, Harmony Hues hat, but lately, she has been working on headbands or ear warmers so she can wear her hair in that cute updo without messing it up.

Navy blue twisted knit headband featuring a textured, cozy stitch design.

Affiliate Disclosure: This post contains affiliate links. To learn more please visit my privacy policy here๐Ÿ’–

What's so great about this easy-to-knit headband?

Well, we love the simple twist that makes this knit headband a hot seasonal favorite. But that's not all! Keep reading to learn more.

Versatility Redefined – More than JUST an Ear Warmer

One of the most compelling aspects of twisted knit headbands is their versatility. Unlike traditional hats or scarves, these accessories offer a unique blend of style and convenience. They can be effortlessly styled in a multitude of ways, allowing for endless creativity and personal expression.

For a casual daytime look, pair a neutral-toned headband with your favorite knit sweater and jeans for an effortlessly chic ensemble. Alternatively, opt for a bold, vibrant headband to add a pop of color to an otherwise monochromatic outfit. Whether you're running errands or meeting friends for brunch, a twisted knit headband is the perfect finishing touch to your look.

Absolutely Beginner Knitter Friendly Headband Pattern

Because of its unusual shape, many beginners think this project is not something they can tackle. On the contrary, this is an absolutely beginner friendly design! As long as you know how to knit and how to purl, you can tackle a little seed stitch. And if you need help fixing seed stitch in knitting, we got you covered with that as well with this fun how to fix seed stitch video on the Marly Bird YouTube Channel.

Headband Video Tutorial

So many knitters are visual learners so we made a great video that will give you all the confidence you need to take this on! Marly Bird walks through step-by-step instructions from start to finish for making this beginner ear warmer headband. Perfect project for beginner knitters and experienced knitters. Learn the long tail cast on, seed stitch knitting, binding off or casting off, whip stitch. Use the chenille yarn by Bernat called Velvet to make this lux headband with a twist.

โš ๏ธ CAUTION โš ๏ธ the chenille yarn has a tendency to pull out of place if it is not knit tight. The result is called worming and it can happen if the stitches get pulled out of place due to lack of being knit tight or even from the agitation of a washer. So if you use the chenille yarn be sure to hand wash only.

In this tutorial by Marly Bird on how to knit a twisted headband there is a lot covered. Hereโ€™s a summary of the key points covered:

  1. Introduction and Materials: Marly Bird introduces herself as a knitwear and crochet designer. She explains that the tutorial will cover casting on, knitting, purling, casting off, and seaming to create a twisted knit headband. The materials required include Bernat velvet yarn and size 8 or 5mm knitting needles.
  2. Casting On: Marly demonstrates the long-tail cast-on method, ensuring the tail is long enough for the required number of stitches. She explains the process step by step, emphasizing the importance of keeping the stitches snug.
  3. Knitting and Purling: Marly shows how to knit and purl stitches, alternating between them to create the seed stitch pattern. She demonstrates both English and Continental knitting styles, providing tips for maintaining tension and recognizing knit and purl stitches.
  4. Working the Pattern: Marly explains that the seed stitch pattern is a one-row repeat and encourages beginners to maintain consistency until the headband reaches the desired length.
  5. Casting Off: Marly demonstrates the bind-off process, where stitches are completed and finished to prevent them from unraveling. She emphasizes the importance of not pulling the yarn too tightly to avoid tight bind-off stitches.
  6. Seaming: Marly explains how to seam the headband to create a tube, using the whip stitch method. She demonstrates how to join the edges, ensuring the twist remains intact to achieve the desired design.
  7. Finishing Touches: Marly suggests weaving in yarn tails and securing them with knots to ensure the headband is neatly finished.

Overall, Marly Birdโ€™s tutorial provides comprehensive guidance for beginner knitters to create a trendy twisted knit headband.

Get the Twisted Knit Headband Here

You can find the FREE Twisted Knit Headband on the Yarnspirations website! It's a free pattern download, so you can be reading it and knitting one (or more) in no time flat!

Final Thoughts on the Twisted Knit Headband

Since this twist knit headband works up quickly, it makes for a great weekend project and a fabulous gift option for colder weather, countries, or just the winter months. And, it's especially convenient for anyone with long hair. You don't have to squish a ponytail or your signature messy-bun under a tight-fitting hat. It can flow wild and free over this ear-warming headband.

โžก๏ธ Download the FREE Bernat Twisted Knit Headband pattern now!

Are you BiCrafty and Want MORE Patterns?

Looking for more patterns like this one? We got you covered. Here are some fun patterns we found on Etsy and from our designer friends.

Knit & Crochet Headband Patterns

All links provided in this list are affiliate links that help to support this website at no extra charge to you.
Four chunky, hand-knitted headbands in pink, mustard yellow, green, and beige next to a mug of coffee.

THE PEBBLE HEADBAND

The Pebble Headband is the perfect textured knit to keep you feeling cozy and staying on trend this fall & winter season. Itโ€™s truly a versatile piece for any wardrobe. It can be worn with hair up or down - perfect for running to a fancy brunch or staying in with a messy bun and a cup of coffee. The subtle face framing twist in the front adds a flattering touch to this ultra luxe headband!

Red and white Nordic knit headband with matching crochet hats, showing detailed stitches and cozy texture on wood surface.

Dreaming Of Snow Headband / Knit Ear Warmer Pattern, Holiday Stranded Colorwork

The Dreaming Of Snow Headband is part of the Dreaming Of Snow Collection, which you can find here: https://shrsl.com/4h985

This pattern is such a fun and festive knit. Being worsted weight yarn, it knits up quickly and it makes the perfect Christmas present for a loved one. Choose soft, pastel colors or bold, bright and fun colors, either way, your headband is going to turn out beautiful.

Grey knitted headband with detailed Celtic knot pattern, shown worn outdoors; highlights texture and intricate stitchwork.

Cabled Headband - Celtic Roots Headband

Celtic Roots is a cable loverโ€™s delight! This headband features a wide Saxon cable over the forehead and down to the ears where the cabling then attractively diminishes to a single cable at the nape allowing the headband to be worn with a variety of hairstyles, both up and down.

Three Tunisian crochet headbands in gray, mustard, and taupe, shown with matching yarns and a hook for texture detail.

MJ Off the Hook Designs - Crochet Harvest Twist Ear Warmer

Get the Autumn crafting vibes with cozy knitted headbands or ear warmers. Make them in soft earthy tones or vibrant colors to match your winter coat.

Cream crocheted headband with twisted center, green-brown-burgundy geometric pattern, and leather logo tag on one corner.

Knit Stitch Headband /Knit Ear Warmer Pattern, Stranded Colorwork by JackiBean

The Knit Stitch headband is part of the Knit Stitch Collection, which you can find here: https://shrsl.com/4h98f

I had so much fun designing this worsted weight pattern. The stranded colorwork pattern resembles knit stitches. This unisex pattern is such a quick and fun knit.The pattern includes a chart, photo tutorials and video instructions as well. It is great for beginners too because the distance between the color changes is such that you do not need to catch your floats!

Multicolored yarn and wooden needles beside a textured knitting project, with a cup of tea on a wood table.

Erie Ear Warmer - Super Bulky Yarn

Time to get some bulky or super bulky yarn and whip up this headband in no time. Great item for craft fairs or to give as a gift. This pattern will knit up quickly as long as you have basic knitting skills. It is one size fist most and is knit in the round which means NO SEAMS!

Teal crocheted headband with textured stitches, shown beside a crochet hook on a white background.

Crochet Spa Headband

Some times you don't need a headband for keeping warm, but to just keep your hair back as you wash your face! It was that very thing that inspired Marly to design and croche this cute and versitile spa headband. Make one in any color you wish. Maybe splurge on a soft cotton yarn to make yours.

Because I know you are going to ask, here is where Marly gets her hooks: https://shrsl.com/4h993

And, I have a feeling you'll find some headbands here too!

Have fun creating whether it's for yourself, a coworker, a friend, or to donate.

xoxo Marly Bird

Frequently Asked Questions

How do I make a twisted knit headband?

A twisted headband is typically a flat rectangle of knitted fabric that gets a single twist before the cast-on and bind-off ends are joined. You knit a long strip (the length depends on your head size), seam one end, give the strip a single twist, then seam the other end to create the finished headband. The twist creates that characteristic figure-8 or infinity-style look that sits beautifully and doesn't slip off your head. The actual knitting is simple… the twist is just in how you join the ends.

Is this pattern truly beginner-friendly?

Yes! The headband is worked flat in rows using garter stitch or stockinette… just knit and purl. No working in the round, no shaping, no complicated stitch patterns. It's basically a rectangle… one of the simplest knitting projects possible. The “twist” happens during seaming, not during the knitting itself. If you can cast on, knit, purl, and bind off… you can make this headband. It's a fantastic first project beyond a swatch because it's small, useful, and finished quickly.

What yarn should I use for a twisted knit headband?

Most yarn weights work for headbands! Bulky or super bulky yarn makes a thick, cozy headband that works up very quickly. Worsted weight gives a more classic headband look. DK or sport weight creates a finer, more lightweight headband for mild weather. Choose soft yarn since this will sit against your forehead and ears all day… avoid anything scratchy. Wool blends are wonderful because they're warm and stretchy. For a headband that really stays in place, a yarn with a bit of natural grip (like non-superwash wool) works better than very smooth, slippery fibers.

How do I get the headband to fit correctly?

Measure your head circumference and make the headband rectangle about 2 to 3 inches shorter than that measurement before the twist. The twist and the seaming use up a bit of length, and knit fabric stretches when worn… so starting shorter creates the right snug-but-comfortable fit. Too short and it's uncomfortable. Too long and it falls off. Work a few extra rows if you're unsure and try it around your head before seaming. It's much easier to add length before seaming than after!

Can I make this as a gift without knowing the recipient's head size?

Headbands are more forgiving than hats because of how they sit on the head! Most adult headbands work in a range of about 20 to 22 inches of stretch… you'd only need to dramatically adjust for very small (child) or very large heads. For a general adult gift, working to standard adult measurements should fit most people. The knit fabric has inherent stretch that accommodates some size variation. If you know the person has a notably different head size than average, adjust accordingly, but a standard adult headband is a fairly safe gift.

Filed Under: Free Patterns, Pattern Tagged With: badge-beginner-friendly

12 FREE Knit and Crochet Spring Sweater Patterns – Perfect for Summer, Too!

March 23, 2024 By admin 1 Comment

Welcome to our roundup of 12 FREE Knit and Crochet Spring Sweater Patterns, perfect for those warmer days and cool summer nights! As we say goodbye to the heavy attire of winter and hello to the blooming beauty of spring, it's time to refresh our wardrobe with handmade treasures. These patterns are selected with the balmy weather in mind, offering lightweight, breezy options that are a pleasure to create and even more delightful to wear.

In the delightful transition of seasons, crafting enthusiasts often look for projects that match the cheerful lightness of spring. There's a certain joy in making pieces that are as perfect for a sunny day out as they are for a summer evening stroll. These free patterns cater to a variety of styles and skill levels, from beginner-friendly crochet options to more intricate designs for the experienced knitter or crocheter.

With choices that cover both all free crochet and all free knitting, you'll find your next project right here. Whether you're in the mood for a chic crochet sweater that makes a statement or a soft knit sweater for those unexpectedly brisk summer evenings, these patterns will keep your needles clicking and your hooks flying. Dive into these lightweight projects that won't weigh down your lap or your spirits as the mercury rises. Get ready to create your new favorite spring and summer essentials, and keep the chill at bay through to early autumn.

Bonus: Check out the two sweater patterns in the roundup of Marly Bird Spring KAL free patterns.

A colorful collage showcasing a variety of 12 free sweater patterns suitable for spring and summer.

6 Free Crochet Spring Sweater Patterns

If you love to crochet then you're going to be happy to see these designs. Like all great knit and crochet spring sweater patterns, they have terrific drape and ease. They're good for layering, which is exactly what you want for spring and summer. After all, you're not going to wear these sweaters all day but you might want them to drape over your shoulders in the evening.

Open Front Cozy Cardigan

This cute lightweight cardigan uses Red Heart Soft Yarn. Although it's a worsted weight yarn, it's a soft, light one compared to many other worsted weight yarns. Therefore, it's comfortable to work with this in the spring and summer months. The cardigan has an openwork design that allows the breeze to blow through.

Amimono Kimono

The epitome of springtime chic in the world of knitwear. This elegant kimono-style sweater is a breath of fresh air for your wardrobe, offering both comfort and versatility. Its open front design and three-quarter length sleeves make it perfect for layering over your favorite springtime tops. The beautiful mesh-like stitch pattern provides a light and airy feel, which is just right for those warmer days or cool evenings. Whether you're out for a casual brunch or an evening stroll, the Amimono Kimono adds a touch of sophistication to any outfit. Ideal for intermediate knitters looking to add seasonal flair to their craft, this pattern is a fashionable choice for anyone seeking a blend of style and ease. Don't miss out on this staple piece that's sure to be a highlight in any spring sweater pattern.

A close-up of a woman wearing a pink crocheted aninomo with decorative fasteners, set against a natural backdrop.

Tunisian Star Stitch Pullover

If you know how to Tunisian crochet then this is definitely one of those knit and crochet spring sweater patterns you'll want to bookmark. It's just so beautiful, thanks in large part to the pretty yarn color.

Long Lacy Cardi

This crochet pattern uses Red Heart It's a Wrap which is a #1 yarn weight. So although it is long, it is super lightweight. This is a great beach cover up that can also work in restaurants and other settings. This is an open-front short-sleeved spring / summer sweater.

Two Rectangle Cardigan

If you're looking for really easy-to-make knit and crochet spring sweater patterns then you can't go wrong with a two-rectangle design! This is a short-sleeved open-front cardigan that you'll enjoy wearing layered over many different outfits.

Over Easy Cowl Neck Sweater

This is the warmest of our knit and crochet spring sweater patterns. It's definitely for the coolest of evenings. However, it's such a delight to work with and wear that we couldn't leave it off the list. And the light blue color complements a lot of warm weather wardrobe palettes.

12 free sweater patterns for spring/summer: a colorful collection of knitwear designs.

6 Free Knit Spring Sweater Patterns

If you're bicrafty or you're solely a knitter then these are the patterns you're looking to find.

Emily Sweater

This is a very sweet seed stitch knit sweater pattern. It's a button-front short-sleeved knit sweater with flattering empire shaping. You can truly wear this from early spring through late fall.

My First Knit Summer Vest

Marly designed this vest using a light cotton yarn and to make a warm weather piece that can be enjoyed during warmer months! The goal with this project is to teach the knitter a new way of construction, a new stitch pattern, and a new way to utilize yarn colors to get a beautiful color fade

Directional Cables Sweater

Work knit cables in all kinds of different directions. As a result, you'll get a graphic pattern worked in a single color. The sweater, while warm, is designed with a spring palette in mind, similar to the Over Easy Cowl Neck Crochet sweater pattern shown in the previous section above.

Cocoon Cardigan

You probably wouldn't think that a #5 weight roving-style yarn would make a good spring sweater. However, this open-front cardigan cocoon is designed with warmer weather in mind. It's a beautiful Irish moss stitch that's fun to knit.

Knit Crew Neck Pullover

Use Caron Simply Soft yarn to knit this crew neck pullover sweater. Make it in a really bright, bold color to wear with a floral skirt or jeans this spring.

Coastal Stripes Pullover

This is a beautiful knit sweater with stripes in different colors and widths. The colors have a summery palette. It's almost a nautical design but with a slightly more romantic side. It's a beautiful knit spring sweater.

Final Thoughts

As we wrap up our roundup of 12 FREE Knit and Crochet Spring Sweater Patterns (did you notice there are even more patterns linked throughout the blog post?) that are just as delightful in summer, it's clear that each of these designs offers something unique for crafters of all levels. From the airy Amimono Kimono to breezy pullovers, these patterns are curated to add versatility and style to your wardrobe.

Whether you're a beginner or a seasoned stitcher, these patterns provide the perfect blend of comfort and fashion, keeping your crochet hooks and knitting needles busy through the longer days ahead. So, pick your favorite all free crochet or knit sweater design, grab your lightest yarns, and enjoy creating pieces that you'll reach for time and again during the cool evenings of spring, the balmy nights of summer, and the crisp beginnings of autumn.

Happy crafting!

~Marly Bird, Your BiCrafty Bestie

A cheerful Marly Bird with glasses resting their chin on their hands, surrounded by a blue dotted circle with twinkling stars, conveying a sense of playfulness and positivity.

Get More Knit and Crochet Patterns

Looking for more patterns? Not to worry, we have plenty more you can check out here on the Marly Bird website. In no particular order, here are some more patterns.

  • Aurora Lace Crochet Cardigan
  • 10 Free Knit and Crochet Spring Shawls Patterns
  • 30 Free Crochet Summer Tops for Beginners
  • Spring Blossoms in Yarn

Frequently Asked Questions

What makes a sweater appropriate for spring?

Lighter weight, breathable fabrics and a design that works for the “is it warm or cold today?” transitional weather. Spring sweaters are typically DK or sport weight rather than heavy worsted or bulky. Open stitch patterns like lace, mesh, or simple rib allow airflow. Lightweight cotton, bamboo, or linen yarns keep you comfortable as temperatures fluctuate. The silhouette matters too… cropped or fitted styles layer better over spring outfits than oversized chunky sweaters. A good spring sweater bridges that gap between “too warm for winter wool” and “too cold for nothing.”

Can spring sweater patterns work for summer too?

Yes! That's kind of the magic of lighter-weight sweaters. The same lightweight cotton or linen sweater that's perfect over a blouse in April works beautifully in an air-conditioned office in July. A cropped summer sweater or a breezy open-stitch design worn over a tank becomes a perfect warm-evening layer all summer long. The 12 patterns in this collection are specifically chosen to straddle the spring-summer line… versatile pieces you'll actually reach for from March through September.

What yarn is best for spring sweater patterns?

Cotton and cotton blends for breathability and easy care. Bamboo for incredible drape and a subtle sheen. Linen and linen blends for a beautiful natural texture that gets softer with washing. Light merino blends for a slightly warmer spring option that still has drape. The key is choosing fiber content that feels right for the temperature range you're designing for… plant fibers (cotton, linen, bamboo) are genuinely cooler than wool even in fine weights.

Are there plus size spring sweater patterns in this collection?

Many of the featured patterns include a range of sizes… check each individual pattern for their specific size options. As always with garment patterns, look at the finished measurements rather than just size labels. Pattern sizing varies between designers, so comparing finished bust measurement to your actual measurements (plus your preferred ease) gives you the most accurate size guidance.

What skill level do I need for spring sweater patterns?

The collection includes patterns across skill levels! Some simple short-sleeve or sleeveless styles are accessible for confident beginners who've made accessories and want to try their first garment. More detailed patterns with shaping, lace elements, or set-in sleeves require intermediate skills. Use the pattern's stated skill level as a guide, and choose a construction type (top-down seamless vs. flat-and-seam) that matches your experience with garments. A spring sweater is a wonderful “first sweater” project because the lighter weight yarn is forgiving on gauge and the shorter project length keeps the commitment manageable.

Filed Under: Crochet, Free Patterns, Knitting

  • « Previous Page
  • 1
  • …
  • 3
  • 4
  • 5
  • 6
  • 7
  • …
  • 122
  • Next Page »

Let's Be Social

Join the Marly's Minions Facebook group to share, ask questions, or chat about all of your yarn related crafts!

Join the group
Cartoon of a smiling woman with brown hair in a bun, glasses, black jacket and green shirt, waving next to large "hi" text.

Quick Links

The Pattern Shop

Our Free Patterns

Blog

Marly Bird House

Learn to Knit & Crochet

About

Giveaway Terms and Privacy Notice

Find Us Everywhere

Join the Newsletter

YouTube Channel

Marly's Minions FB Group

Etsy Store

Ravelry Store


AN ELITE CAFEMEDIA HOME/DIY PUBLISHER

Information from your device can be used to personalize your ad experience. Do not sell or share my personal information.

Privacy Policyย  ย Termsย  ย Marly Bird Legal Documents Copyright © 2026