Amimono Kimono Free Crochet Pattern
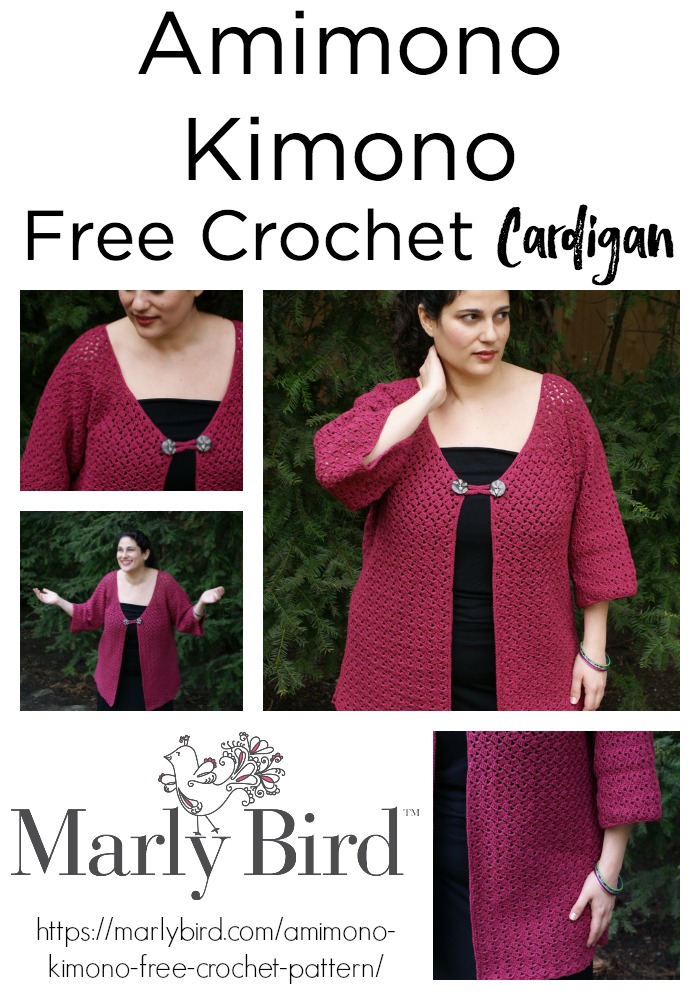
Get the Amimono Kimono Free Crochet Pattern by Marly Bird. This was one of my FIRST crochet patterns ever published and it is still a favorite. In this free crochet sweater cardigan pattern you will find both the written instruction and charts to help you with the simple shaping of the piece.
This was originally published by Classic Elite Yarns in their newsletter. But now you can find it here 😉
Queue it up and Like the Pattern on Ravelry
Amimono Kimono Free Crochet Pattern
SIZES: Small (Medium, Large, Extra Large, 2X, 3X)
To Fit measurements: 32-34 (36-38, 40-42, 40-46, 48-50, 52-54)”
Finished Measurements: 36 (40, 44, 48, 52, 56)”
MATERIALS:
A good yarn substitute is Shine Sport by WeCrochet. This is a 60% Pima Cotton, 40% Modal natural beech wood fiber and 1 ball has 110 yds.
Splurge on the yarn with this amazing yarn from WeCrochet. Samia is 80% Cupro, 20% Mulberry Silk and has 188 yds in each ball.
Discontinued Yarn Used on Project: Cotton Bam Boo by Classic Elite (52% cotton, 48% bamboo; 50 gram ball = approx 130 yards) 10 (12, 13, 14, 16, 17) balls Main Color (MC)—3495 Privileged Plum
Crochet Hook
- One size US F/4 (3,75 mm)
Or size to obtain gauge
- Tapestry needle
- Two 1″ buttons
- 6″ of 1⁄2″ grosgrain ribbon
- Sewing thread to match the ribbon
- Sewing needle
GAUGE: 4SR and 8 rows = 4″ in Assymetrical Stitch Pattern. Take time to save time, check your gauge.
SPECIAL TERMS:
ch: (chain) Wrap the yarn around the crochet hook (yo) and draw it through the loop on the hook to form the first chain. Rep this step as many times as instructed. (The loop on the hook is never included when counting the number of chains).
sl st: (slip stitch) Insert crochet hook in the indicated stitch, yo and draw through both the st and the loop on the hook.
sc: (single crochet) Insert crochet hook in indicated st, yo and pull up a loop; yo and draw through both loops on hook.
dc: (double crochet) Yo, insert hook into indicated st, yo and pull up a loop; [yo and draw through 2 loops on hook] 2 times.
PATTERN STITCHES:
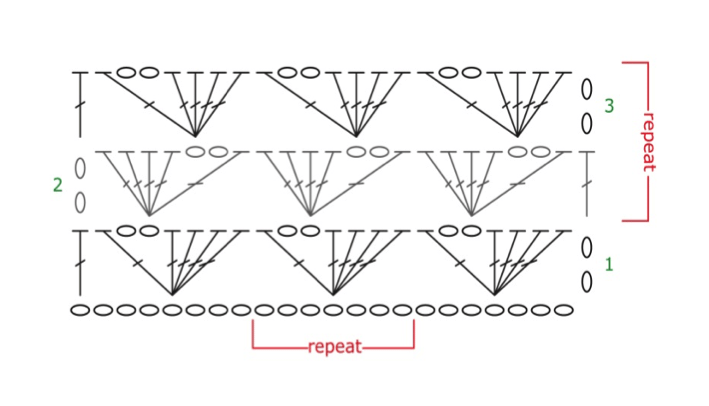
Assymetrical Stitch Pattern: (multiple of 7+3)
(also, see chart to the right)
Ch a multiple of 7 + 3.
Row 1: (Set-up Row): Dc in sixth ch from hook (first two skipped ch’s count as 1 dc), (3 dc, ch 2, 1dc) in same ch as first dc. *Skip 6 chs, (4 dc, ch 2, 1 dc) in next ch, rep from * across to last 4 chs, dc in last ch, turn.
Row 2: (WS) Ch 2, *(4 dc, ch 2, 1dc) in ch 2 sp of prev row, rep from *to end of row, dc in 6th ch or tch, turn.
Row 3: (RS) Ch 2, *(4 dc, ch 2, 1dc) in ch 2 sp of prev row, rep from *to end of row, dc in second ch or tch, turn.
Rep Row 3 for Asymmetrical St Patt.
NOTE:
The sweater is worked in one piece.
PATTERN:
Back
With MC, ch 129 (143, 157, 171, 185, 199)—18(20, 22, 24, 26, 28) repeats.
Row 1: (Set-up Row): Dc in sixth ch from
hook (first two skipped ch’s count as 1 dc), (3 dc, ch 2, 1dc) in same ch as first dc. *Skip 6 chs, (4 dc, ch 2, 1 dc) in next ch, rep from * across to last 4 chs, dc in last ch, turn.
Row 2: Ch 2, *(4 dc, ch 2, 1dc) in ch 2 sp of prev row, rep from *to end of row, dc in 6th ch or tch, turn.
Row 3: Ch 2, *(4 dc, ch 2, 1dc) in ch 2 sp of prev row, rep from *to end of row, dc in second ch or tch, turn.
Rep row three for 37(39, 39, 41, 43, 43) rows.
Increase for Sleeves:
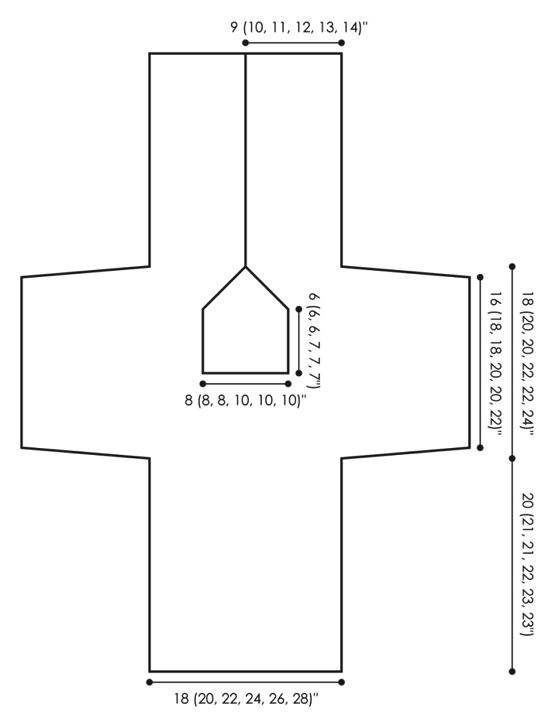
(also, see charts below)
Note:To add stitches for the arm, you will remove the hook at the beginning of each row, add chain stitches to the opposite end, fasten off and pick up the dropped loop to continue.
Row 1: Drop yarn, join new yarn to opposite end with sl st, ch 21, fasten off. Pick up row again, ch 23, dc in sixth ch from hook (first two skipped ch’s count as 1 dc), (3 dc, ch 2, 1dc) in same ch as first dc. *Skip 6 chs, (4 dc, ch 2, 1 dc) in next ch, rep from * 1 time, sk 3 ch and 1 dc, (4 dc, ch 2, 1 dc) in next ch 2 sp of previous row. Cont in est patt across back to last ch 2 sp of previous row. Work (4 dc, ch 2, 1 dc) in last ch 2 sp, sk dc and 1 ch, (4 dc, ch 2, 1 dc) in next ch, *skip 6 chs, (4 dc, ch 2, 1 dc) in next ch, rep from * 1 time, dc in last ch, turn—24 (26, 28, 30, 32, 34) repeats.
Row 2: Repeat first row—30 (32, 34, 36, 38, 40) repeats.
Row 3: Drop yarn, join new yarn to opposite end with sl st, ch 35, fasten off. Pick up row again, ch 37, dc in sixth ch from hook (first two skipped ch’s count as 1 dc), (3 dc, ch 2, 1dc) in same ch as first dc. *Skip 6 chs, (4 dc, ch 2, 1 dc) in next ch, rep from * 3 times, sk 3 ch and 1 dc, (4 dc, ch 2, 1 dc) in next ch 2 sp of previous row. Cont in est patt across back to last ch 2 sp of previous row. Work (4 dc, ch 2, 1 dc) in last ch 2 sp, sk dc and 1 ch, (4 dc, ch 2, 1 dc) in next ch, *skip 6 chs, (4 dc, ch 2, 1 dc) in next ch, rep from * 4 times, dc in last ch, turn—40 (42, 44, 46, 48, 50) repeats.
Work est patt evenly for next 11 (13, 13, 15, 17, 17) rows.

Neck Opening:
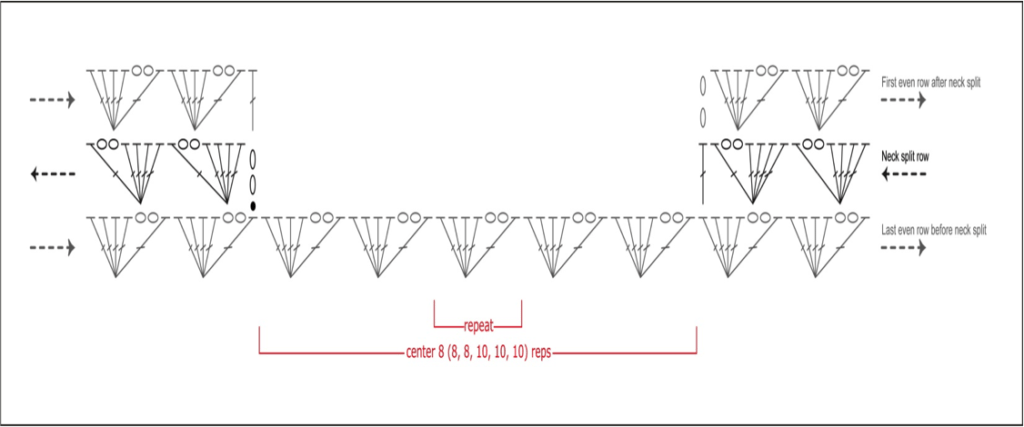
(also see chart below)
Row 1: Work est patt across 17 (18, 18, 19, 19, 20) repeats, ending with a dc in last dc of previous row repeat, drop yarn, sk 6 (6, 8, 8, 10, 10) repeats in the center, join new yarn to first dc of next repeat, ch 2, cont in est patt across sleeve. Place stitch marker in loop on hook then set aside. Continue to work the other side of the sleeve, sleeves are worked separately from this point forward.
Neck and Arm Shaping:
(also see charts below)
Work neck evenly for 12 (12, 12, 14, 14, 14) rows, then increase for 6 (6, 8, 8, 10, 10) rows, adding 3 (3, 4, 4, 5, 5) reps at each side.
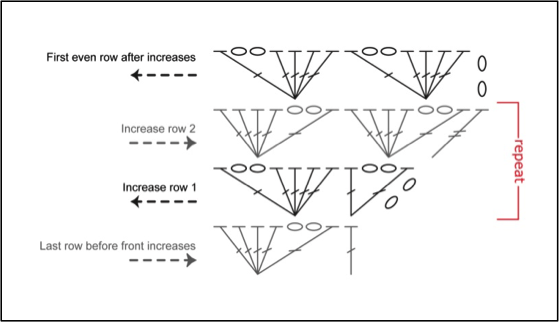
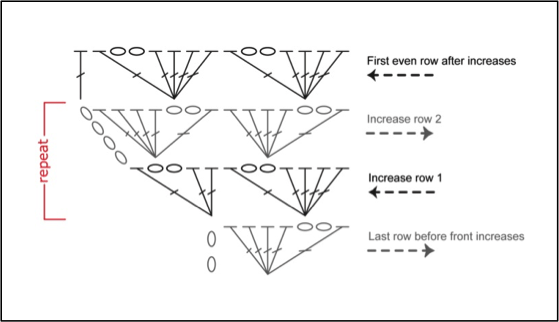
At the same time, work sleeves evenly until there are 32 (36, 36, 40, 40, 44) full rows (from cuff to cuff), then work sleeve decreases (same for all sizes, see chart).
RIGHT AND LEFT FRONT:
Cont in est patt for each front piece. Work evenly for 40 (42, 42, 44, 46, 46) rows after sleeve decreases, fasten off.
FINISHING
Block piece to measurements.
With (RS) facing each other, whip stitch sides together.
Arm Bands: With RS facing, join MC to sleeve seam with sl st.
Rnd 1: Ch 1, sc evenly around arm opening, sl st to first sc, fasten off.
Neck and Body Edging
Join MC to the middle of neck opening with sl st. Row 1: Ch 1, sc evenly around neck, body opening, bottom of piece, up the other body opening and the other half of the neck opening, sl st to first sc, fasten off.
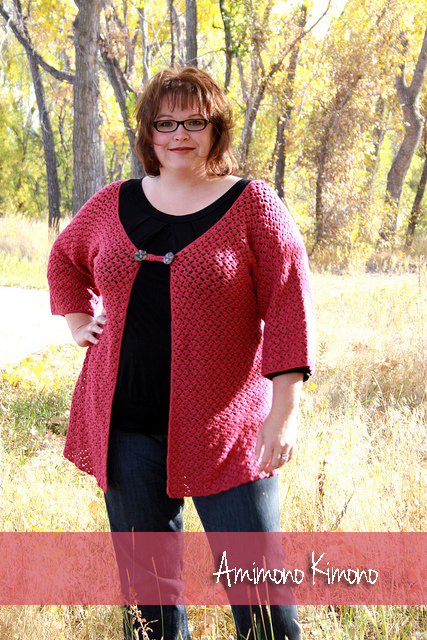
To add buttons cut 2 pieces of grosgrain ribbon 2” in length. Fold ends to the middle and pin to WS of Left Front and WS of Right Front where the buttons will be placed, look at photo for placement. Backstitch ribbon to kimono with matching sewing thread and needle. Sew buttons to RS of each front, see photo for placement.
For crocheted closure ch12 (or enough to go around the buttons but not too large so it will fall off), join with a sl st to first ch, ch 12 again and sl st to first ch (figure 8 created), ch1 and sc around the 12 chs on each side of the figure 8. Join with a sl st to first sc, fasten off.







Subscribed to Kristens YouTube channel while listening & viewed colors of the BRAVE yarn; think I really like Flamingo & Huckelberry
that’s awesome, Kathy. If you are trying to leave your comment for the prize from the podcast you will want to leave a comment on the shownotes to that show. xox
This is gorgeous and I would live to make it for my SIL. I question about the fit, is a finished size snug on the body or loose. My SIL is a bit picky about things not being to restrictive.
The best thing to do is take a look at the schematic measurements and compare those to the measurements your sister likes. The fit on my is no tight but just right.
Thank you so much!!
I’m trying to make this now for size 48-50. I have done the gauge several times and it comes out right every time. When I go to make the garment something is off. Maybe I misunderstand how this is being created? I thought the first instructions for the back start at the bottom edge across the back. I chain the 185. I’m thinking that that should measure 26″ long since that is what it shows on schematic. Instead It is way way way over 26″. I crocheted 4 rows and it was looking so big it could wrap around me. So I ripped it out and did another gauge. Perfect. Did just a chain of 185 and way over 26″. I don’t know what to do.
I’m not Marly Bird but thought I’d chime in. Don’the use the chain as a measure of width. Work a few rows and then measure.
Omgosh I love the way this sweater looks, and I totally enjoy working on your patterns! I can’t wait to get started on this one.
Mary bird do u have a video tutorial for this. Really love to make for my mother, but bad in pattern reading when it comes to arms and neck. Plz could u do even short clipings for this kimono. Plz plz plz.
Marly, I am attempting to make this for myself. This my first piece of clothing. so far I’ve been able to understand and follow the pattern but I don’t see any instructions on how to do the sleeve decrease. could you help explain please.
Looking forward to making one for myself!
Hi Marly, I’ve been commissioned to make this lovely sweater for a customer who will probably need a larger size to accommodate her 57.5″ hips. Any advice you can offer on the best (i.e. easiest) way to make it wider would be greatly appreciated. TIA!
Never mind Marly. I figured it out.
Would like to try your Amimono Kimono pattern but not sure how to figure out how long to make the foundation chain for each size of the pattern. Can you help?
I would like to make this but the text on the charts is impossible to read as it is so blurred. how have others managed?
How do you do the increase on the sleeve I see the chart but it isn’t making since I need written instructions please.