Bellini Crochet Sweater: Modern Design – Inclusive Fashion
Welcome, crafters! Are you looking for something unique and trendy to add to your wardrobe? Do you want your crochet designs to stand out from the crowd? The Bellini Crochet Sweater is here to save the day!
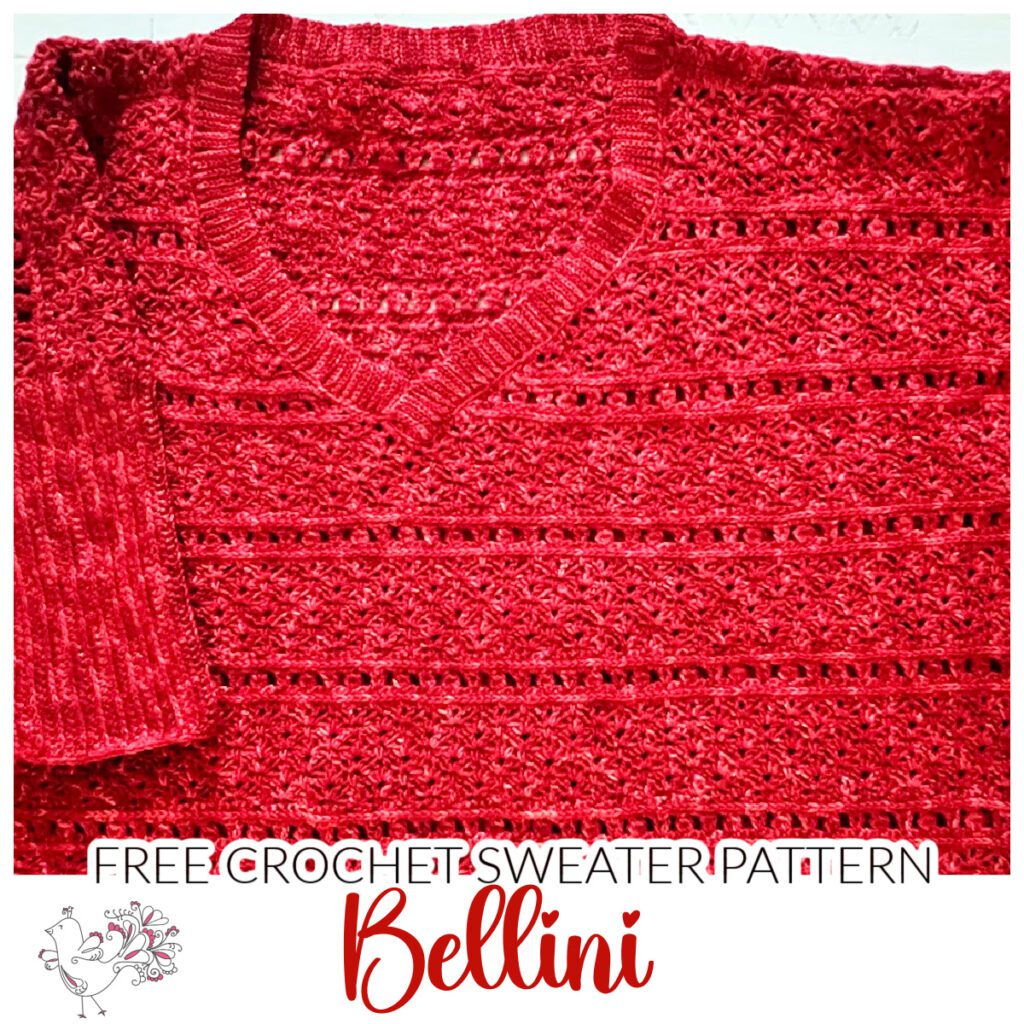
It’s a modern take on a classic style, made of fingering weight yarn. Check out the unique V-neck shaping and set in 3/4 length sleeves and its inclusive size range – XS-4xL. This sweater can accommodate any body type while bringing chic fashion into everyday life. Plus, it looks good with everything!
Read on for more details about why everyone needs a Bellini Crochet Sweater in their closet. Get the free pattern at the end of the post.
If you love this crochet sweater style, you should check out the Pumpkin Spice Cropped Mosaic Crochet Sweater or the Trifle Crochet Sweater.

The art of crochet has witnessed a monumental shift from the conventional to the chic. Gone are the days when crochet was limited to doilies and blankets. Today, it’s a fashion-forward craft, with enthusiasts creating everything from boho-chic tops to runway-ready gowns. This evolution is not just about looking good. It’s also a testament to the versatility and richness of crochet as a craft.
Affiliate Disclosure: This post contains affiliate links. To learn more please visit my privacy policy here💖

The Magic of Fingering Weight Yarn and Crochet
Fingering weight yarn is the secret weapon of many crocheters looking to craft delicate garments with great drape. Its fineness allows for intricate stitch definition and a fabric quality that’s lightweight yet warm. However, working with this yarn demands patience and precision. But the result—a garment that feels almost ethereal and flows beautifully—is always worth the meticulous effort.
We used Hawthorne Fingering Weight yarn from WeCrochet but another great choice is Yarn Citizen Fingering Weight yarn from Jimmy Beans Wool.
Exploring Sweater Lengths and Their Fashion Statements
Sweaters come in a spectrum of lengths, each with its unique vibe. Cropped sweaters are all the rage now, perfectly paired with high-waisted pants or skirts. The standard length remains classic and versatile for both casual and formal settings. Then there’s the tunic length, ideal for those who love a little extra coverage. They look amazing with leggings or skinny jeans. Each length speaks a fashion language of its own, and the key is to match it with your personal style.
Deciphering Sleeve Lengths in Crochet
From flirtatious cap sleeves to cozy full-length, sleeve options can transform your crochet garment’s look and feel. Cap and short sleeves are summer favorites, breezy and stylish. Three-quarter sleeves offer a balance—perfect for transitional weather. Full-length sleeves provide warmth and can be jazzed up with textured stitches. Understanding the impact of sleeve length can elevate your crochet game significantly.
Ease in Garment Sizing: Ensuring the Perfect Fit
When we talk about ‘ease’ in crochet, it’s the difference between your body measurements and the finished garment measurements. Positive ease means the garment is larger than your body size, providing a looser fit. Negative ease indicates a snug fit. A fundamental understanding of ease ensures that your final product isn’t just beautiful but also comfortably wearable. Always remember: the beauty of a crochet garment is magnified when it fits just right!
The given ease for this garment is listed as 8-14” of positive ease. But you can absolutely choose a size closer to your bust measurement to have a more tailored fit. Not all sizes enjoy having so much ease.

Championing Size Inclusivity in Crochet Patterns
In a world that celebrates diversity, why should crochet be left behind? Size inclusivity ensures that every individual, irrespective of their size, can embrace the joy of wearing a hand-crocheted garment. It’s not just about increasing the pattern size range; it’s about designing with different body shapes in mind. The Bellini Crochet Sweater is a beacon of inclusivity, designed to flatter many body types and sizes.
As mentioned, the suggested ease for this sweater is very generous but it is NOT necessary for all sizes. I know from experience that larger sizes tend to enjoy a closer-fitting bust. This means choosing a finished measurement nearer your bust size. For example, I chose to have my finished sweater a bit more snug than the intended ease. But that is the beauty of a handmade item, I can make it to fit ME.
Get the Ad-Free PDF

Purchasing the ad-free PDF of the Bellini Crochet Cropped Sweater Pattern is a fantastic option for those who want a seamless, uninterrupted crafting experience. This convenient format allows you to easily follow along without distractions, and it’s perfect for printing out and taking on-the-go for your crochet projects.
The PDF includes fully formatted pattern with written instructions, schematic, crochet stitch diagrams, full pattern charts for each size, and video tutorial links.

Where to get the Bellini Crochet Sweater Ad-Free PDF?
I’m thrilled to offer the Bellini Crochet Cropped Pullover Sweater pattern for free on MarlyBird.com. But I also understand the value of a seamless crafting experience. For those who’d like to immerse themselves in the project without distractions, an ad-free PDF version is available. This pdf ensures you have a clean, easy-to-follow format at your fingertips whenever inspiration strikes.

The Bellini Crochet Sweater Pattern
Designed by Marly Bird and Robyn Chachula
The Bellini Crochet Sweater is more than just a pattern; it’s a revolution in the crochet garment world. With its modern design and inclusive sizing, it appeals to a vast audience. The stitch diagrams and video tutorials further ensure that the crafting journey is smooth. Those who’ve embraced this pattern have been unanimous in their praise. Not just for its beauty, but also for its wearability and the confidence it instills.
Diverse crochet garment constructions are not just a trend; they’re the future. As we step into an era where crochet transcends traditional boundaries, every enthusiast has the opportunity to be a trendsetter. If you’re a newbie looking to craft your first garment or a seasoned pro, let the Bellini Crochet Sweater inspire. Dive in, experiment, and let your creativity run wild!
SKILL LEVEL
Adventurous Beginner
MEASUREMENTS
Finished Measurements
Sweater is 37.5 (42.5, 47.5, 52.5, 57.5, 62.5, 67.5, 72.5)” [95, 108, 120.5, 133.5, 146, 159, 171.5, 184 cm] in bust circumference to fit sizes XS, S, M, L, XL, 2X, 3X, 4X with 8-14” of positive ease. Sample shown on a 52” bust wearing a size 2X.
Gauge
3 shells by 13 rows in stitch pattern= 3.75” [9.5 cm] by 4.25” [11 cm] blocked; use any size hook to obtain the gauge.
MATERIALS
Yarn
WeCrochet, Hawthorne Fingering Weight (80% superwash fine highland wool/ 20% polyamide, 357 yds / 326 m, 3.5 oz/ 100 g, CYCA# 1 lace) : #26696 Picnic Kettle Dye, 4 (4, 5, 5, 6, 7, 7, 8) hanks
Crochet Hook size
E/4 [3.5 mm]
Crochet Notions
Stitch Marker (as necessary), Tapestry needle, Blocking Board and rust proof pins
ABBREVIATIONS
Ch – Chain(s)
Dc – Double Crochet
Hdc– Half Double Crochet
RS – Right Side
Sc – Single Crochet
Sl St – Slip Stitch
Sp(s) – Space(s)
St(s) – Stitch(es)
Tch – Turning Chain
Tr – Treble Crochet
WS – Wrong Side
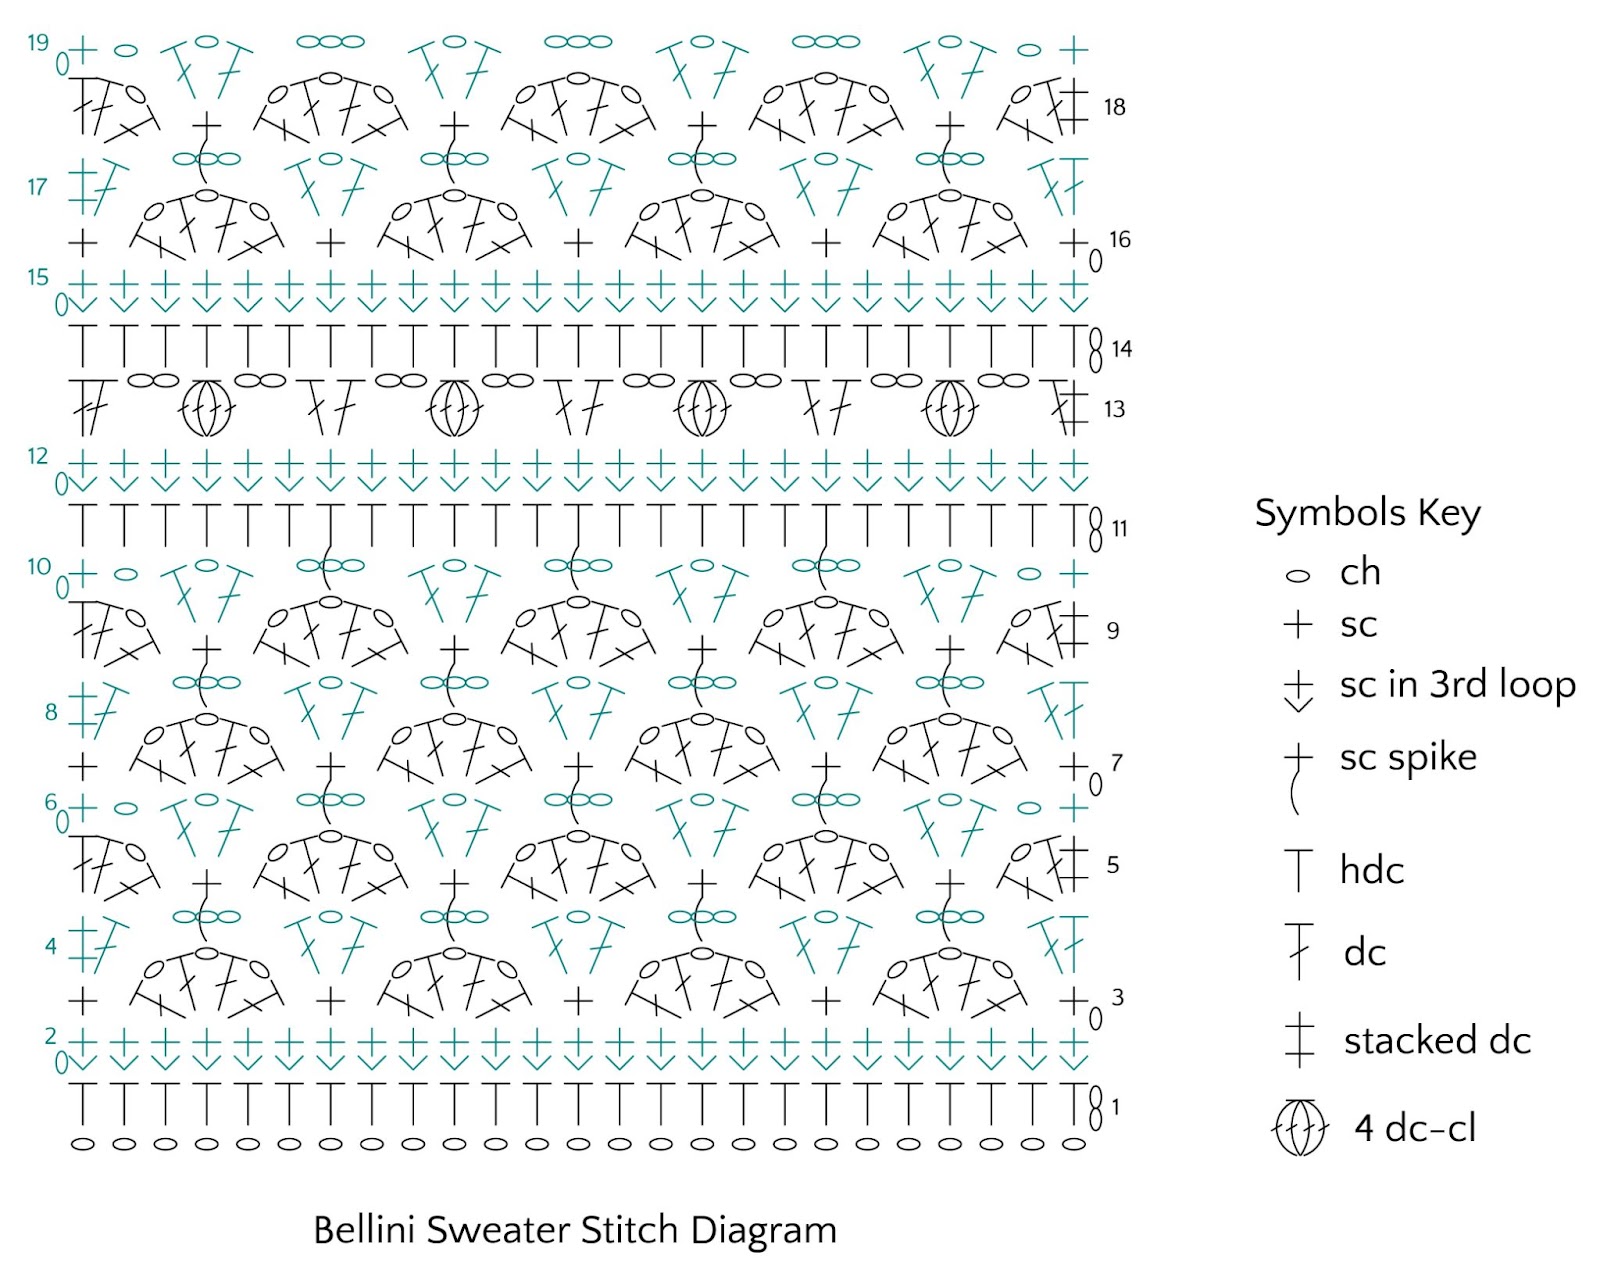
Bellini Crochet Sweater: SPECIAL STITCHES
⭐️ 4 Double Crochet Cluster (4 dc-cl): *Yarn over, insert hook into stitch indicated, yarn over and pull up a loop, yarn over and draw through 2 loops on hook; repeat from * 3 more times in same stitch, yarn over and draw through all 5 loops on hook.
⭐️ Double Crochet 2 Together (dc2tog): *Yarn over hook, insert hook into indicated st, yarn over and pull up a loop, yarn over and draw through 2 loops on hook; repeat from * in next st indicated, yarn over and draw through all 3 loops on hook.
⭐️ Half Double Crochet 2 Together (hdc2tog): *Yarn over hook, insert hook into indicated st, yarn over and pull up a loop; repeat from * in next st indicated, yarn over and draw through all 5 loops on hook.
⭐️ Shell: ([dc, ch 1] 3 times, dc) in stitch indicated.
⭐️ Single Crochet Spike (sc spike): Insert hook into stitch indicated 1 row below (over ch-3 sp), yarn over and pull up a long loop over the skipped rows, yarn over and draw through 2 loops on hook.
⭐️ Single Crochet 2 Together (sc2tog): *Insert hook into indicated stitch, yarn over and pull up a loop; repeat from * in next stitch indicated, yarn over and draw through all 3 loops on hook.
⭐️ Sleeve Decrease: *Yarn over, insert hook into stitch indicated, yarn over and pull up a loop; repeat from * 1 once more in next stitch indicated, yarn over, insert hook into next stitch indicated, yarn over and pull up a loop, yarn over and draw through 2 loops on hook, yarn over and draw through all 6 loops on hook.
⭐️ Stacked Double Crochet (stacked dc): (Do not ch 1 prior to making the first sc) Sc in first stitch, insert hook in between the two legs of the base of the sc, yarn over and pull up a loop, yarn over and draw through 2 loops on hook.
⭐️ Third Loop (3rd loop): Also known as middle or back bar. Horizontal strand located under the top 2 loops, created by the yarn over when making the hdc. When working in turned rows the third bar is on the front side of the fabric facing you.

STITCH DIAGRAMS
FULL CROCHET STITCH DIAGRAMS ARE EXCLUSIVE IN THE AD-FREE PDF!
SCHEMATIC
NOTES
- Directions are for smallest size; changes for other size are in parentheses. When only one number is given then that number applies to all sizes.
- Sweater is worked in 4 different panels: back, front, and 2 sleeves. Panels are seamed together then ribbing is added at the bottom and neckline.
- After the row with the double crochet clusters, do not turn and fasten off. Join yarn at first st and continue on RS.
- 🚨 If you’d like the sweater longer, repeat rows 2-14 for an additional 4.25” [11 cm]. You will need an additional hank of yarn for each 4.25” section you add to your sweater.
VIDEO TUTORIAL: Bellini Crochet Sweater
- Weaving In Ends >> Click Here for Video Help <<
- Blocking >> Click Here for Video Help <<
- Reading Crochet Stitch Diagrams >> Click Here for Video Help <<
- Stacked Double Crochet >> Click Here for Video Help <<
- Single Crochet Ribbing >> Click Here for Video Help <<

GROW
To Unlock Exclusive Subscriber Content click the Box below and join for free by simply adding your email and creating a password! If you are having troubles, clear your cache or reset your password or login to the Grow Publisher Portal.
>> Learn More About Grow Here <<
I’m thrilled to share this amazing pattern with you, many patterns on my blog are absolutely free! I kindly request that you don’t copy and paste or distribute this pattern. Prefer an ad-free experience? Buy a digital PDF pattern for a small fee from one of my online stores for a seamless crafting journey.
I appreciate your support and readership. You are the reason I can keep doing what I love and sharing it with others. So, thank you from the bottom of my yarn-loving heart! Disclosure: This post contains affiliate links, meaning I get a commission if you decide to make a purchase through my links at no cost to you.
BELLINI CROPPED SWEATER INSTRUCTIONS
Make a gauge swatch. Watch this video and follow the chart below:
BACK
Chain 93 (105, 117, 129, 141, 153, 165, 177).
Row 1 (RS): Hdc in 3rd ch from hook (skipped ch do not count as a stitch), hdc in each ch across turn — 91 (103, 115, 127, 139, 151, 163, 175) hdc.
Row 2: Ch 1, sc in 3rd loop of each hdc across, turn.
Row 3: Ch 1, sc in first sc, *skip next 2 sc, shell in next sc, skip next 2 sc, sc in next sc; repeat from * across, turn – 15 (17, 19, 21, 23, 25, 27, 29) shells.
Row 4: (Stacked dc, dc) in first sc, *ch 3, skip shell, (dc, ch 1, dc) in next sc; repeat from * across to last shell, ch 3, skip shell, 2 dc in last sc, turn.
Row 5: (Stacked dc, dc, ch 1, dc) in first dc, *sc spike in center ch-1 sp of shell 1 row below, shell in next ch-1 sp; repeat from * across to last ch-3 sp, sc spike in center ch-1 sp of shell 1 row below, (dc, ch 1, 2 dc) in last dc, turn.
Row 6: Ch 1, sc in first dc, ch 1, *(dc, ch 1, dc) in next sc, ch 3, skip next shell; repeat from * across to last sc, (dc, ch 1, dc) in last sc, ch 1, sc in last dc, turn.
Row 7: Ch 1, sc in first sc, *shell in next ch-1 sp, sc spike in center ch-1 sp of shell 1 row below; repeat from * across to last ch-1 sp, shell in last ch-1 sp, sc in last sc, turn.
Rows 8-10: Repeat Rows 4-6 of Back.
Row 11: Ch 2 (does not count as a st), hdc in first sc, hdc in next ch-1 sp, *hdc in next dc, hdc in next ch-1 sp, hdc in next dc, hdc in next ch-3 sp, hdc spike in center ch-1 sp of shell 1 row below, hdc in prev ch-3 sp; repeat from * across to 2nd to last dc, hdc in next dc, hdc in next ch-1 sp, hdc in last dc, hdc in last ch-1 sp, hdc in last sc, turn — 91 (103, 115, 127, 139, 151, 163, 175) hdc.
Row 12: Ch 1, sc in the 3rd loop of each hdc across, turn.
Row 13: (Stacked dc, dc) in first sc, *ch 2, skip 2 sc, 4 dc-cl in next sc, ch 2. skip 2 sc, 2 dc in next sc; repeat from * across, fasten off. DO NOT TURN.
Row 14 (RS): Join yarn to first st of prev row, ch 2 (does not count as a stitch), hdc in first st, *2 hdc in next ch-2 sp, hdc in dc-cl, 2 hdc in next ch-2 sp, hdc in space between next 2 dc; repeat from * across, turn.
Repeat Rows 2-14 of Back 3 (3, 3, 3, 4, 4, 4, 4) more times.
Repeat Rows 2-6 of Back once more
BACK NECK
Sizes XS, S, M, L
Row 1 (RS): Ch 1, sc in first sc, [shell in next ch-1 sp, sc spike in center ch-1 sp of shell 1 row below] 3 (4, 5, 6) times, (dc, ch 1, 2 dc) in next ch-1 sp, [hdc in next dc, hdc in next ch-3 sp, hdc spike in center ch-1 sp of shell 1 row below, hdc in prev ch-3 sp, hdc in next dc, hdc in next ch-1 sp] 7 times, hdc in next dc, hdc in next ch-3 sp, hdc spike in center ch-1 sp of shell 1 row below, hdc in prev ch-3 sp, hdc in next dc, (2 dc, ch 1, dc) in next ch-1 sp, [sc spike in center ch-1 sp of shell 1 row below, shell in next ch-1 sp] 3 (4, 5, 6) times, sc in last sc, turn— 6 (8, 10, 12) shells.
Row 2a: (Stacked dc, dc) in first sc, [ch 3, skip shell, (dc, ch 1, dc) in next sc] 3 (4, 5, 6) times, ch 1, skip next (dc, ch 1, dc), sc in next dc, turn, leave remaining sts unworked.
Row 3a: Ch 1, sc in first sc, *shell in next ch-1 sp, sc spike in center ch-1 sp of shell 1 row below,; repeat from * across to last dc, (dc, ch 1, 2 dc) in last dc, turn– 3 (4, 5, 6) shells.
Row 4a: Ch 1, sc in first dc, ch 1, *(dc, ch 1, dc) in next sc, ch 3, skip next shell; repeat from * across to last sc, 2 dc in last sc, turn.
Row 5a: Ch 2 (does not count as a st), hdc in first dc, *hdc in next dc, hdc in next ch-3 sp, hdc spike in center ch-1 sp of shell 1 row below, hdc in prev ch-3 sp, hdc in next dc, hdc in next ch-1 sp; repeat from * across to last dc, hdc in last dc, hdc in last ch-1 sp, hdc in last sc, fasten off.
Row 2b (WS): Skip hdc stitches on Row 1 of back of neck, join yarn with sl st in next dc, ch 1, sc in same dc, ch 1, *(dc, ch 1, dc) in next sc, ch 3, skip shell; repeat from * across to last sc, 2 dc in last sc, turn.
Row 3b: (Stacked dc, dc, ch 1, dc) in first dc, *sc spike in center ch-1 sp of shell 1 row below, shell in next ch-1 sp; repeat from * across to last sc, sc in last sc, turn – 3 (4, 5, 6) shells.
Row 4b: (Stacked dc, dc) in first sc, *ch 3, skip next shell, (dc, ch 1, dc) in next sc; repeat from * across to last (dc, ch-1 sp, 2 dc), ch 1, sc in last dc, turn.
Row 5b: Ch 2 (does not count as a st), hdc in first sc, hdc in next ch-1 sp, *hdc in next dc, hdc in next ch-1 sp, hdc in next dc, hdc in next ch-3 sp, hdc spike in center ch-1 sp of shell 1 row below, hdc in prev ch-3 sp; repeat from * across to 2nd to last dc, hdc in next dc, hdc in last dc, fasten off.
Sizes XL, 2X, 3X, 4X
Row 1 (RS): Ch 1, sc in first sc, [shell in next ch-1 sp, sc spike in center ch-1 sp of shell 1 row below] 7 (8, 9, 10) times, [hdc in prev ch-3 sp, hdc in next dc, hdc in next ch-1 sp, hdc in next dc, hdc in next ch-3 sp, hdc spike in center ch-1 sp of shell 1 row below] 8 times, hdc in prev ch-3 sp, hdc in next dc, hdc in next ch-1 sp, hdc in next dc, hdc in next ch-3 sp, [sc spike in center ch-1 sp of shell 1 row below, shell in next ch-1 sp] 7 (8, 9, 10) times, sc in last sc, turn— 14 (16, 18, 20) shells.
Row 2a: (Stacked dc, dc) in first sc, *ch 3, skip shell, (dc, ch 1, dc) in next sc; repeat from * across to last shell before hdc stitches, ch 3, skip shell, 2 dc in next sc, turn, leave remaining stitches unworked.
Row 3a: (Stacked dc, dc, ch 1, dc) in first dc, *sc spike in center ch-1 sp of shell 1 row below, shell in next ch-1 sp; repeat from * across to last ch-3 sp, sc spike in center ch-1 sp of shell 1 row below, (dc, ch 1, 2 dc) in last dc, turn.
Row 4a: Ch 1, sc in first dc, ch 1, *(dc, ch 1, dc) in next sc, ch 3, skip next shell; repeat from * across to last sc, (dc, ch 1, dc) in last sc, ch 1, sc in last dc, turn.
Row 5a: Ch 2 (does not count as a st), hdc in first sc, hdc in next ch-1 sp, *hdc in next dc, hdc in next ch-1 sp, hdc in next dc, hdc in next ch-3 sp, hdc spike in center ch-1 sp of shell 1 row below, hdc in prev ch-3 sp; repeat from * across to 2nd to last dc, hdc in next dc, hdc in next ch-1 sp, hdc in last dc, hdc in last ch-1 sp, hdc in last sc, fasten off.
Row 2b (WS): Skip hdc stitches on Row 1 of back of neck, join yarn with sl st in next sc, (stacked dc, dc) in same sc as join, *ch 3, skip shell, (dc, ch 1, dc) in next sc; repeat from * across to last shell, ch 3, skip shell, 2 dc in last sc, turn.
Row 3b: (Stacked dc, dc, ch 1, dc) in first dc, *sc spike in center ch-1 sp of shell 1 row below, shell in next ch-1 sp; repeat from * across to last ch-3 sp, sc spike in center ch-1 sp of shell 1 row below, (dc, ch 1, 2 dc) in last dc, turn.
Row 4b: Ch 1, sc in first dc, ch 1, *(dc, ch 1, dc) in next sc, ch 3, skip next shell; repeat from * across to last sc, (dc, ch 1, dc) in last sc, ch 1, sc in last dc, turn.
Row 5b: Ch 2 (does not count as a st), hdc in first sc, hdc in next ch-1 sp, *hdc in next dc, hdc in next ch-1 sp, hdc in next dc, hdc in next ch-3 sp, hdc spike in center ch-1 sp of shell 1 row below, hdc in prev ch-3 sp; repeat from * across to 2nd to last dc, hdc in next dc, hdc in next ch-1 sp, hdc in last dc, hdc in last ch-1 sp, hdc in last sc, fasten off.
FRONT
Chain 93 (105, 117, 129, 141, 153, 165, 177).
Row 1 (RS): Hdc in 3rd ch from hook (skipped ch do not count as a stitch), hdc in each ch across turn — 91 (103, 115, 127, 139, 151, 163, 175) hdc.
Repeat Rows 2-14 of BACK 2 (2, 2, 2, 3, 3, 3, 3) times.
Sizes XS (S, M, L): Repeat Rows 2-11 of BACK once more
Sizes XL (2X, 3X, 4X): Repeat Rows 2-7 of BACK once more
Neck Opening Sizes XS, S, M, L
Row 1a (WS): Ch 1, sc in third loop of next 44 (50, 56, 62) hdc, sc2tog in third loop of next 2 hdc, leave remaining stitches unworked, turn- 45 (51, 57, 63) sc.
Row 2a: Ch 3 (does not count as a stitch), skip sc2tog, skip next sc, *2 dc in next sc, ch 2, skip next 2 sc, 4 dc-cl in next sc, ch 2, skip next 2 sc; repeat from * across to last sc, 2 dc in last sc. DO NOT TURN- 7 (8, 9, 10) 4 dc-cl.
Row 3a (RS): Join yarn to first dc of prev row, ch 2 (does not count as a stitch), *2 hdc in next ch-2 sp, hdc in dc-cl, 2 hdc in next ch-2 sp, hdc in space between next 2 dc; repeat from * across, turn- 42 (48, 54, 60) hdc.
Row 4a: Ch 1, sc in 3rd loop of each hdc across to last 2 hdc, sc2tog in third loop over last 2 hdc, turn- 41 (47, 53, 59) hdc.
Row 5a: Ch 3 (does not count as a st), skip first st, (dc, ch 1, dc) in next sc, *skip next 2 sc, sc in next sc, skip next 2 sc, shell in next sc; repeat from * across to last 3 sc, skip next 2 sc, sc in last sc, turn – 6 (7, 8, 9) shells.
Row 6a: (Stacked dc, dc) in first sc, *ch 3, skip shell, (dc, ch 1, dc) in next sc; repeat from * across to last sc, hdc in top of t-ch, turn – 6 (7, 8, 9) ch-3 sps.
Row 7a: Ch 4 (does not count as a st), (dc, ch 1, dc) in first ch-1 sp, *sc spike in center ch-1 sp of shell 1 row below, shell in next ch-1 sp; repeat from * across to last ch-3 sp, sc spike in center ch-1 sp of shell 1 row below, (dc, ch 1, 2 dc) in last dc, turn – 5 (6, 7, 8) shells.
Row 8a: Ch 1, sc in first dc, ch 1, *(dc, ch 1, dc) in next sc, ch 3, skip next shell; repeat from * across to last sc, (dc, ch 1, dc) in last sc, hdc in top of tch, turn – 5 (6, 7, 8) ch-3 sps.
Row 9a: Ch 4 (does not count as a st), (dc, ch 1, dc) in first ch-1 sp, *sc spike in center ch-1 sp of shell 1 row below, shell in next ch-1 sp; repeat from * across to last sc, sc in last sc, turn – 5 (6, 7, 8) shells.
Rows 10a-12a: Repeat Rows 6a-8a of Neck Shaping
Row 13a: Ch 2 (does not count as a st), *hdc in next ch-1 sp, hdc in next dc, hdc in next ch-3 sp, hdc spike in center ch-1 sp of shell 1 row below, hdc in prev ch-3 sp, hdc in next dc; repeat from * across to last 2 ch-1 sps, hdc in next ch-1 sp, hdc in next dc, hdc in last ch-1 sp, hdc in last sc, turn — 28 (34, 40, 46) hdc.
Row 14a: Ch 1, sc in the 3rd loop of each hdc across to last 2 hdc, sc2tog in third loop of last 2 hdc, turn – 27 (33, 39, 45) sc.
Row 15a: Ch 3 (does not count as a stitch), skip sc2tog, skip next sc, *2 dc in next sc, ch 2, skip next 2 sc, 4 dc-cl in next sc, ch 2, skip next 2 sc; repeat from * across to last sc, 2 dc in last sc. DO NOT TURN- 4 (5, 6, 7) 4 dc-cl.
Row 16a (RS): Join yarn to first dc of prev row, ch 2 (does not count as a stitch), *2 hdc in next ch-2 sp, hdc in dc-cl, 2 hdc in next ch-2 sp, hdc in space between next 2 dc; repeat from * across, turn- 24 (30, 36, 42) hdc.
Row 17a: Ch 1, sc in 3rd loop of each hdc across to last 2 hdc, sc2tog in third loop over last 2 hdc, turn- 23 (29, 35, 41) hdc.
Row 18a: Ch 3 (does not count as a st), skip first st, (dc, ch 1, dc) in next sc, *skip next 2 sc, sc in next sc, skip next 2 sc, shell in next sc; repeat from * across to last 3 sc, skip next 2 sc, sc in last sc, turn – 3 (4, 5, 6) shells.
Row 19a: (Stacked dc, dc) in first sc, *ch 3, skip shell, (dc, ch 1, dc) in next sc; repeat from * across to tch, ch 1, sc in top of tch, turn.
Row 20a: Ch 1, sc in first sc, *shell in next ch-1 sp, sc spike in center ch-1 sp of shell 1 row below; repeat from * across to last dc, (dc, ch 1, 2 dc) in last dc, turn.
Row 21a: Ch 1, sc in first dc, ch 1, *(dc, ch 1, dc) in next sc, ch 3, skip next shell; repeat from * across to last sc, 2 dc in last sc, turn.
Row 22a: (Stacked dc, dc, ch 1, dc) in first dc, *sc spike in center ch-1 sp of shell 1 row below, shell in next ch-1 sp; repeat from * across to last sc, sc in last sc, turn.
Row 23a: (Stacked dc, dc) in first sc, *ch 3, skip shell, (dc, ch 1, dc) in next sc; repeat from * across to last st, ch 1, sc in last st, turn.
Row 24a: Ch 1, sc in first sc, *shell in next ch-1 sp, sc spike in center ch-1 sp of shell 1 row below; repeat from * across to last dc, (dc, ch 1, 2 dc) in last dc, turn.
Row 25a: Ch 1, sc in first dc, ch 1, *(dc, ch 1, dc) in next sc, ch 3, skip next shell; repeat from * across to last sc, 2 dc in last sc, turn.
Row 26a: Ch 2 (does not count as a st), hdc in first dc, *hdc in next dc, hdc in next ch-3 sp, hdc spike in center ch-1 sp of shell 1 row below, hdc in prev ch-3 sp, hdc in next dc, hdc in next ch-1 sp; repeat from * across to last dc, hdc in last dc, hdc in last ch-1 sp, hdc in last sc, fasten off.
Opposite Neck Opening Sizes XS, S, M, L
Row 1b (WS): Join yarn with sc in third loop of next hdc front of sweater (immediately after last hdc on Row 1a of neck opening), sc in third loop of each hdc across, turn- 45 (51, 57, 63) sc.
Row 2b: (Stacked dc, dc) in first sc, *ch 2, skip next 2 sc, 4 dc-cl in next sc, ch 2, skip next 2 sc, 2 dc in next sc; repeat from * across to last 8 sc, ch 2, skip next 2 sc, 4 dc-cl in next sc, ch 2, skip next 2 sc, dc in next sc, dc2tog over prev sc and sc 2 away (skip middle sc). DO NOT TURN- 7 (8, 9, 10) 4 dc-cl.
Row 3b (RS): Join yarn to first dc of prev row, ch 2 (does not count as a stitch), hdc in first st, *2 hdc in next ch-2 sp, hdc in dc-cl, 2 hdc in next ch-2 sp, hdc in space between next 2 dc; repeat from * across to last 2 ch-2 sps, 2 hdc in next ch-2 sp, hdc in dc-cl, hdc in next ch-2 sp, hdc2tog over prev ch-2 sp and last dc (skip middle dc), turn- 42 (48, 54, 60) hdc.
Row 4b: Ch 1, sc2tog in third loop over first 2 hdc, sc in 3rd loop of each hdc across, turn- 41 (47, 53, 59) hdc.
Row 5b: Ch 1, sc in first sc, *skip next 2 sc, shell in next sc, skip next 2 sc, sc in next sc; repeat from * across to last 4 sc, skip next 2 sc, (dc, ch 1, dc) in next sc, dc in last sc, turn – 6 (7, 8, 9) shells.
Row 6b: Ch 2 (does not count as a st), *(dc, ch 1, dc) in next sc, ch 3, skip shell; repeat from * across to last sc, 2 dc in last sc, turn – 6 (7, 8, 9) ch-3 sps.
Row 7b: (Stacked dc, dc, ch 1, dc) in first dc, *sc spike in center ch-1 sp of shell 1 row below, shell in next ch-1 sp; repeat from * across to last ch-3 sp, sc spike in center ch-1 sp of shell 1 row below, (dc, ch 1, dc) in last ch-1 sp, dc in tch, turn – 5 (6, 7, 8) shells.
Row 8b: Ch 2 (does not count as a st), *(dc, ch 1, dc) in next sc, ch 3, skip shell; repeat from * across to last sc, (dc, ch 1, dc) in last sc, ch 1, sc in last st, turn – 5 (6, 7, 8) ch-3 sps.
Row 9b: Ch 1, sc in first sc, *shell in next ch-1 sp, sc spike in center ch-1 sp of shell 1 row below; repeat from * across to last ch-1 sp, (dc, ch 1, dc) in last ch-1 sp, dc in tch, turn – 5 (6, 7, 8) shells.
Rows 10b-12b: Repeat Rows 6b-8b of Opposite Neck Shaping
Row 13b : Ch 2 (does not count as a st), hdc in first sc, hdc in next ch-1 sp, *hdc in next dc, hdc in next ch-1 sp, hdc in next dc, hdc in next ch-3 sp, hdc spike in center ch-1 sp of shell 1 row below, hdc in prev ch-3 sp; repeat from * across to last 2 dc, hdc in next dc, hdc2tog over last ch-1 sp and tch, turn — 28 (34, 40, 46) hdc.
Row 14b: Ch 1, sc2tog in third loop over first 2 hdc, sc in 3rd loop of each hdc across, turn- 27 (33, 39, 45) sc.
Row 15b: (Stacked dc, dc) in first sc, *ch 2, skip next 2 sc, 4 dc-cl in next sc, ch 2, skip next 2 sc, 2 dc in next sc; repeat from * across to last 8 sc, ch 2, skip next 2 sc, 4 dc-cl in next sc, ch 2, skip next 2 sc, dc in next sc, dc2tog over prev sc and sc 2 away (skip middle sc). DO NOT TURN- 4 (5, 6, 7) 4 dc-cl.
Row 16b (RS): Join yarn to first dc of prev row, ch 2 (does not count as a stitch), hdc in first st, *2 hdc in next ch-2 sp, hdc in dc-cl, 2 hdc in next ch-2 sp, hdc in space between next 2 dc; repeat from * across to last 2 ch-2 sps, 2 hdc in next ch-2 sp, hdc in dc-cl, hdc in next ch-2 sp, hdc2tog over prev ch-2 sp and last dc (skip middle dc), turn- 24 (30, 36, 42) hdc.
Row 17b: Ch 1, sc2tog in third loop over first 2 hdc, sc in 3rd loop of each hdc across, turn- 23 (29, 35, 41) hdc.
Row 18b: Ch 1, sc in first sc, *skip next 2 sc, shell in next sc, skip next 2 sc, sc in next sc; repeat from * across to last 4 sc, skip next 2 sc, (dc, ch 1, dc) in next sc, dc in last sc, turn – 3 (4, 5, 6) shells.
Row 19b: Ch 1, sc in first dc, ch 1, *(dc, ch 1, dc) in next sc, ch 3, skip next shell; repeat from * across to last sc, 2 dc in last sc, turn.
Row 20b: (Stacked dc, dc, ch 1, dc) in first dc, *sc spike in center ch-1 sp of shell 1 row below, shell in next ch-1 sp; repeat from * across to last sc, sc in last sc, turn.
Row 21b: (Stacked dc, dc) in first sc, *ch 3, skip shell, (dc, ch 1, dc) in next sc; repeat from * across to last st, ch 1, sc in last st, turn.
Row 22b: Ch 1, sc in first sc, *shell in next ch-1 sp, sc spike in center ch-1 sp of shell 1 row below; repeat from * across to last dc, (dc, ch 1, 2 dc) in last dc, turn.
Row 23b: Ch 1, sc in first dc, ch 1, *(dc, ch 1, dc) in next sc, ch 3, skip next shell; repeat from * across to last sc, 2 dc in last sc, turn.
Row 24b: (Stacked dc, dc, ch 1, dc) in first dc, *sc spike in center ch-1 sp of shell 1 row below, shell in next ch-1 sp; repeat from * across to last sc, sc in last sc, turn.
Row 25b: (Stacked dc, dc) in first sc, *ch 3, skip shell, (dc, ch 1, dc) in next sc; repeat from * across to last st, ch 1, sc in last st, turn.
Row 26b: Ch 2 (does not count as a st), hdc in first sc, hdc in next ch-1 sp, *hdc in next dc, hdc in next ch-1 sp, hdc in next dc, hdc in next ch-3 sp, hdc spike in center ch-1 sp of shell 1 row below, hdc in prev ch-3 sp; repeat from * across to last 2 dc, hdc in next dc, hdc in last st, fasten off.
Neck Opening Sizes XL, 2X, 3X, 4X
Row 1a (WS): (Stacked dc, dc) in first sc, [ch 3, skip shell, (dc, ch 1, dc) in next sc] 11 (12, 13, 14) times, skip next dc, skip next ch-1 sp, hdc in next dc, leave remaining stitches unworked, turn – 11 (12, 13, 14) ch-3 sps.
Row 2a: Ch 4 (does not count as a st), (dc, ch 1, dc) in first ch-1 sp, *sc spike in center ch-1 sp of shell 1 row below, shell in next ch-1 sp; repeat from * across to last ch-3 sp, sc spike in center ch-1 sp of shell 1 row below, (dc, ch 1, 2 dc) in last dc, turn – 10 (11, 12, 13) shells.
Row 3a: Ch 1, sc in first dc, ch 1, *(dc, ch 1, dc) in next sc, ch 3, skip next shell; repeat from * across to last sc, (dc, ch 1, dc) in last sc, hdc in top of tch, turn – 10 (11, 12, 13) ch-3 sps.
Row 4a : Ch 2 (does not count as a st), *hdc in next ch-1 sp, hdc in next dc, hdc in next ch-3 sp, hdc spike in center ch-1 sp of shell 1 row below, hdc in prev ch-3 sp, hdc in next dc; repeat from * across to last 2 ch-1 sps, hdc in next ch-1 sp, hdc in next dc, hdc in last ch-1 sp, hdc in last sc, turn — 64 (70, 76, 82) hdc.
Row 5a: Ch 1, sc in third loop of each hdc across to last 2 sts, sc2tog in third loop of last 2 hdc, turn- 63 (69, 75, 81) sc.
Row 6a: Ch 3 (does not count as a stitch), skip sc2tog, skip next sc, *2 dc in next sc, ch 2, skip next 2 sc, 4 dc-cl in next sc, ch 2, skip next 2 sc; repeat from * across to last sc, 2 dc in last sc. DO NOT TURN- 10 (11, 12, 13) 4 dc-cl.
Row 7a: Join yarn to first dc of prev row, ch 2 (does not count as a stitch), *2 hdc in next ch-2 sp, hdc in dc-cl, 2 hdc in next ch-2 sp, hdc in space between next 2 dc; repeat from * across, turn- 60 (66, 72, 78) hdc.
Row 8a: Ch 1, sc in 3rd loop of each hdc across to last 2 hdc, sc2tog in third loop over last 2 hdc, turn- 59 (65, 71, 77) hdc.
Row 9a: Ch 3 (does not count as a st), skip first st, (dc, ch 1, dc) in next sc, *skip next 2 sc, sc in next sc, skip next 2 sc, shell in next sc; repeat from * across to last 3 sc, skip next 2 sc, sc in last sc, turn – 9 (10, 11, 12) shells.
Row 10a: (Stacked dc, dc) in first sc, *ch 3, skip shell, (dc, ch 1, dc) in next sc; repeat from * across to last sc, hdc in top of t-ch, turn – 9 (10, 11, 12) ch-3 sps.
Row 11a: Ch 4 (does not count as a st), (dc, ch 1, dc) in first ch-1 sp, *sc spike in center ch-1 sp of shell 1 row below, shell in next ch-1 sp; repeat from * across to last ch-3 sp, sc spike in center ch-1 sp of shell 1 row below, (dc, ch 1, 2 dc) in last dc, turn – 8 (9, 10, 11) shells.
Row 12a: Ch 1, sc in first dc, ch 1, *(dc, ch 1, dc) in next sc, ch 3, skip next shell; repeat from * across to last sc, (dc, ch 1, dc) in last sc, hdc in top of tch, turn – 8 (9, 10, 11) ch-3 sps.
Row 13a: Ch 4 (does not count as a st), (dc, ch 1, dc) in first ch-1 sp, *sc spike in center ch-1 sp of shell 1 row below, shell in next ch-1 sp; repeat from * across to last sc, sc in last sc, turn – 8 (9, 10, 11) shells.
Rows 14a-16a: Repeat Rows 10a-12a of Neck Opening
Row 17a : Ch 2 (does not count as a st), *hdc in next ch-1 sp, hdc in next dc, hdc in next ch-3 sp, hdc spike in center ch-1 sp of shell 1 row below, hdc in prev ch-3 sp, hdc in next dc; repeat from * across to last 2 ch-1 sps, hdc in next ch-1 sp, hdc in next dc, hdc in last ch-1 sp, hdc in last sc, turn — 46 (52, 58, 64) hdc.
Row 18a: Ch 1, sc in the 3rd loop of each hdc across to last 2 hdc, sc2tog in third loop of last 2 hdc, turn – 45 (51, 57, 63) sc.
Row 19a: Ch 3 (does not count as a stitch), skip sc2tog, skip next sc, *2 dc in next sc, ch 2, skip next 2 sc, 4 dc-cl in next sc, ch 2, skip next 2 sc; repeat from * across to last sc, 2 dc in last sc. DO NOT TURN- 7 (8, 9, 10) 4 dc-cl.
Row 20a: Join yarn to first dc of prev row, ch 2 (does not count as a stitch), *hdc in space between next 2 dc, 2 hdc in next ch-2 sp, hdc in dc-cl, 2 hdc in next ch-2 sp; repeat from * across to last dc, hdc in last dc, turn- 43 (49, 55, 61) hdc.
Row 21a: Ch 1, sc in 3rd loop of each hdc across, turn.
Row 22a: Ch 1, sc in first sc, *skip next 2 sc, shell in next sc, skip next 2 sc, sc in next sc; repeat from * across, turn – 7 (8, 9, 10) shells.
Row 23a: (Stacked dc, dc) in first sc, *ch 3, skip shell, (dc, ch 1, dc) in next sc; repeat from * across to last shell, ch 3, skip shell, 2 dc in last sc, turn.
Row 24a: (Stacked dc, dc, ch 1, dc) in first dc, *sc spike in center ch-1 sp of shell 1 row below, shell in next ch-1 sp; repeat from * across to last ch-3 sp, sc spike in center ch-1 sp of shell 1 row below, (dc, ch 1, 2 dc) in last dc, turn.
Row 25a: Ch 1, sc in first dc, ch 1, *(dc, ch 1, dc) in next sc, ch 3, skip next shell; repeat from * across to last sc, (dc, ch 1, dc) in last sc, ch 1, sc in last dc, turn.
Row 26a: Ch 1, sc in first sc, *shell in next ch-1 sp, sc spike in center ch-1 sp of shell 1 row below; repeat from * across to last ch-1 sp, shell in last ch-1 sp, sc in last sc, turn.
Rows 27a-29a: Repeat Rows 23a-25a of Neck Opening.
Row 30a: Ch 2 (does not count as a st), hdc in first sc, hdc in next ch-1 sp, *hdc in next dc, hdc in next ch-1 sp, hdc in next dc, hdc in next ch-3 sp, hdc spike in center ch-1 sp of shell 1 row below, hdc in prev ch-3 sp; repeat from * across to 2nd to last dc, hdc in next dc, hdc in next ch-1 sp, hdc in last dc, hdc in last ch-1 sp, hdc in last sc, fasten off.
Opposite Neck Opening Sizes XL, 2X, 3X, 4X
Row 1b (WS):Skip next ch-1 sp on front immediately after last hdc from Row 1a. Join yarn with sl st in next dc, *(dc, ch 1, dc) in next sc, ch 3, skip shell; repeat from * across to last sc, 2 dc in last sc, turn – 11 (12, 13, 14) ch-3 sps.
Row 2b: (Stacked dc, dc, ch 1, dc) in first dc, *sc spike in center ch-1 sp of shell 1 row below, shell in next ch-1 sp; repeat from * across to last ch-3 sp, sc spike in center ch-1 sp of shell 1 row below, (dc, ch 1, dc) in last ch-1 sp, dc in tch, turn – 10 (11, 12, 13) shells.
Row 3b: Ch 2 (does not count as a st), *(dc, ch 1, dc) in next sc, ch 3, skip shell; repeat from * across to last sc, (dc, ch 1, dc) in last sc, ch 1, sc in last st, turn – 10 (11, 12, 13) ch-3 sps.
Row 4b : Ch 2 (does not count as a st), hdc in first sc, hdc in next ch-1 sp, *hdc in next dc, hdc in next ch-1 sp, hdc in next dc, hdc in next ch-3 sp, hdc spike in center ch-1 sp of shell 1 row below, hdc in prev ch-3 sp; repeat from * across to last 2 dc, hdc in next dc, hdc2tog over last ch-1 sp and tch, turn — 64 (70, 76, 82) hdc.
Row 5b: Ch 1, sc2tog in third loop over first 2 hdc, sc in 3rd loop of each hdc across, turn- 63 (69, 75, 81) sc.
Row 6b: (Stacked dc, dc) in first sc, *ch 2, skip next 2 sc, 4 dc-cl in next sc, ch 2, skip next 2 sc, 2 dc in next sc; repeat from * across to last 8 sc, ch 2, skip next 2 sc, 4 dc-cl in next sc, ch 2, skip next 2 sc, dc in next sc, dc2tog over prev sc and sc 2 away (skip middle sc). DO NOT TURN- 10 (11, 12, 13) 4 dc-cl.
Row 7b: Join yarn to first dc of prev row, ch 2 (does not count as a stitch), hdc in first st, *2 hdc in next ch-2 sp, hdc in dc-cl, 2 hdc in next ch-2 sp, hdc in space between next 2 dc; repeat from * across to last 2 ch-2 sps, 2 hdc in next ch-2 sp, hdc in dc-cl, hdc in next ch-2 sp, hdc2tog over prev ch-2 sp and last dc (skip middle dc), turn- 60 (66, 72, 78) hdc.
Row 8b: Ch 1, sc2tog in third loop over first 2 hdc, sc in 3rd loop of each hdc across, turn- 59 (65, 71, 77) hdc.
Row 9b: Ch 1, sc in first sc, *skip next 2 sc, shell in next sc, skip next 2 sc, sc in next sc; repeat from * across to last 4 sc, skip next 2 sc, (dc, ch 1, dc) in next sc, dc in last sc, turn – 9 (10, 11, 12) shells.
Row 10b: Ch 2 (does not count as a st), *(dc, ch 1, dc) in next sc, ch 3, skip shell; repeat from * across to last sc, 2 dc in last sc, turn – 9 (10, 11, 12) ch-3 sps.
Row 11b: (Stacked dc, dc, ch 1, dc) in first dc, *sc spike in center ch-1 sp of shell 1 row below, shell in next ch-1 sp; repeat from * across to last ch-3 sp, sc spike in center ch-1 sp of shell 1 row below, (dc, ch 1, dc) in last ch-1 sp, dc in tch, turn – 8 (9, 10, 11) shells.
Row 12b: Ch 2 (does not count as a st), *(dc, ch 1, dc) in next sc, ch 3, skip shell; repeat from * across to last sc, (dc, ch 1, dc) in last sc, ch 1, sc in last st, turn – 8 (9, 10, 11) ch-3 sps.
Row 13b: Ch 1, sc in first sc, *shell in next ch-1 sp, sc spike in center ch-1 sp of shell 1 row below; repeat from * across to last ch-1 sp, (dc, ch 1, dc) in last ch-1 sp, dc in tch, turn – 8 (9, 10, 11) shells.
Rows 14b-16b: Repeat Rows 10b-12b of Opposite Neck Opening
Row 17b : Ch 2 (does not count as a st), hdc in first sc, hdc in next ch-1 sp, *hdc in next dc, hdc in next ch-1 sp, hdc in next dc, hdc in next ch-3 sp, hdc spike in center ch-1 sp of shell 1 row below, hdc in prev ch-3 sp; repeat from * across to last 2 dc, hdc in next dc, hdc2tog over last ch-1 sp and tch, turn — 46 (52, 58, 64) hdc.
Row 18b: Ch 1, sc2tog in third loop over first 2 hdc, sc in 3rd loop of each hdc across, turn- – 45 (51, 57, 63) sc.
Row 19b: (Stacked dc, dc) in first sc, *ch 2, skip next 2 sc, 4 dc-cl in next sc, ch 2, skip next 2 sc, 2 dc in next sc; repeat from * across to last 8 sc, ch 2, skip next 2 sc, 4 dc-cl in next sc, ch 2, skip next 2 sc, dc in next sc, dc2tog over prev sc and sc 2 away (skip middle sc). DO NOT TURN- 7 (8, 9, 10) 4 dc-cl.
Row 20b: Join yarn to first dc of prev row, ch 2 (does not count as a stitch), hdc in first st, *2 hdc in next ch-2 sp, hdc in dc-cl, 2 hdc in next ch-2 sp, hdc in space between next 2 dc; repeat from * across to last 2 ch-2 sps, 2 hdc in next ch-2 sp, hdc in dc-cl, hdc in next ch-2 sp, hdc2tog over last 2 sts, turn- 43 (49, 55, 61) hdc.
Rows 21b-30b: Repeat Rows 21a-30a of Neck Opening, fasten off.
SLEEVES
Make 2
Increase Shaping Section
Chain 11 (11, 11, 11, 10, 10, 10, 10).
Row 1 (RS): Hdc in 3rd ch from hook, hdc in each ch across to last, (2 hdc, dc) in last ch, turn – 11 (11, 11, 11, 10, 10, 10, 10) sts.
Row 2: Ch 1, 2 sc in first dc, sc in third loop of each hdc across, turn- 12 (12, 12, 12, 11, 11, 11, 11) sc.
Row 3: Ch 2, hdc in each sc across to last sc, (2 hdc, dc) in last hdc, turn- 14 (14, 14, 14, 13, 13, 13, 13) sc.
Repeat Rows 2-3 of Increase Shaping Section 7 (7, 7, 7, 9, 9, 9, 9) more times- 35 (35, 35, 35, 40, 40, 40, 40) sts.
No Shaping Section
Row 1 (WS): Ch 7 (7, 7, 7, 7, 7, 7, 7), sc in 2nd ch from hook, sc in each ch across, sc in dc, sc in third loop of each hdc across, turn – 41 (41, 41, 41, 46, 46, 46, 46) sc.
Row 2: Ch 2, hdc in each sc across, turn.
Row 3: Ch 1, sc in third loop of each hdc across, turn.
Repeat Rows 2-3 of No Shaping Section 17 (17, 17, 17, 21, 21, 21, 21) more times
Decrease Shaping Section
Row 1 (RS): Ch 2, hdc in next 32 (32, 32, 32, 37, 37, 37, 37) sc, sleeve decrease over next 3 sc, leave remaining sts unworked, turn – 33 (33, 33, 33, 38, 38, 38, 38) sts.
Row 2: Ch 1, sc2tog in third loop of first 2 sts, sc in third loop of each hdc across, turn – 32 (32, 32, 32, 37, 37, 37, 37) sts.
Row 3: Ch 2, hdc in each sc across to last 3 sts, sleeve decrease over last 3 sts, turn- 30 (30, 30, 30, 35, 35, 35, 35) sts.
Repeat Rows 2-3 of Decrease Shaping Section 7 (7, 7, 7, 9, 9, 9, 9) more times. Fasten off- 9 (9, 9, 9, 8, 8, 8, 8) sts.
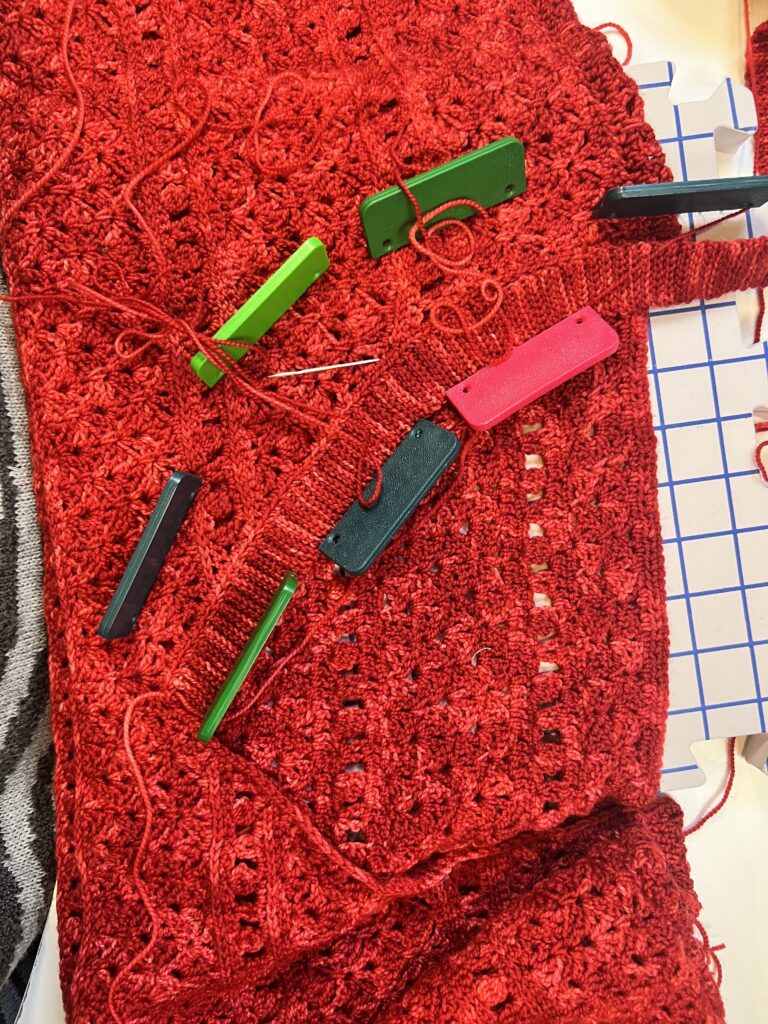
FINISHING
Blocking and Seaming
Pin front, back, and sleeves to schematic size. Spray with water and allow to dry. With WS facing, whipstitch shoulder seams of front and back panel. Place the long edge of the sleeve centered on the shoulder seam with WS facing. Whipstitch sleeve to body. Pin sweater inside out. Whipstitch under arm seam and side seam until 2” left to bottom edge of sweater. Turn right side out.
Cuff Edging
Join yarn to underside of sleeve with RS facing. Sc evenly across edge, sl st to first sc. Fasten off, weave in ends.
Collar Edging
Join yarn to back of neck with RS facing. Sc evenly around neckline to beginning, sl st to first sc, fasten off.
Collar Ribbing
Chain 7.
Row 1: Sl st in 2nd ch from hook, sl st in each ch to end, ch 1, turn- 6 sc.
Row 2: Skip ch 1, sl st in back loop of each st across, ch 1, turn.
Repeat Row 2 of Collar Ribbing until ribbing fits around the entire neckline. Fasten off.
Starting at the “V” in the front neck, pin ribbing to RS of front. Continue pinning ribbing around entire neckline, easing it into the corners (this means fanning it out in the corner so the ribbing will lay flat), until you are back at the “V” in the front neck (lay ribbing on top of previous). If needed, frog any extra ribbing you crocheted. Using a whipstitch, seam ribbing to front neckline.
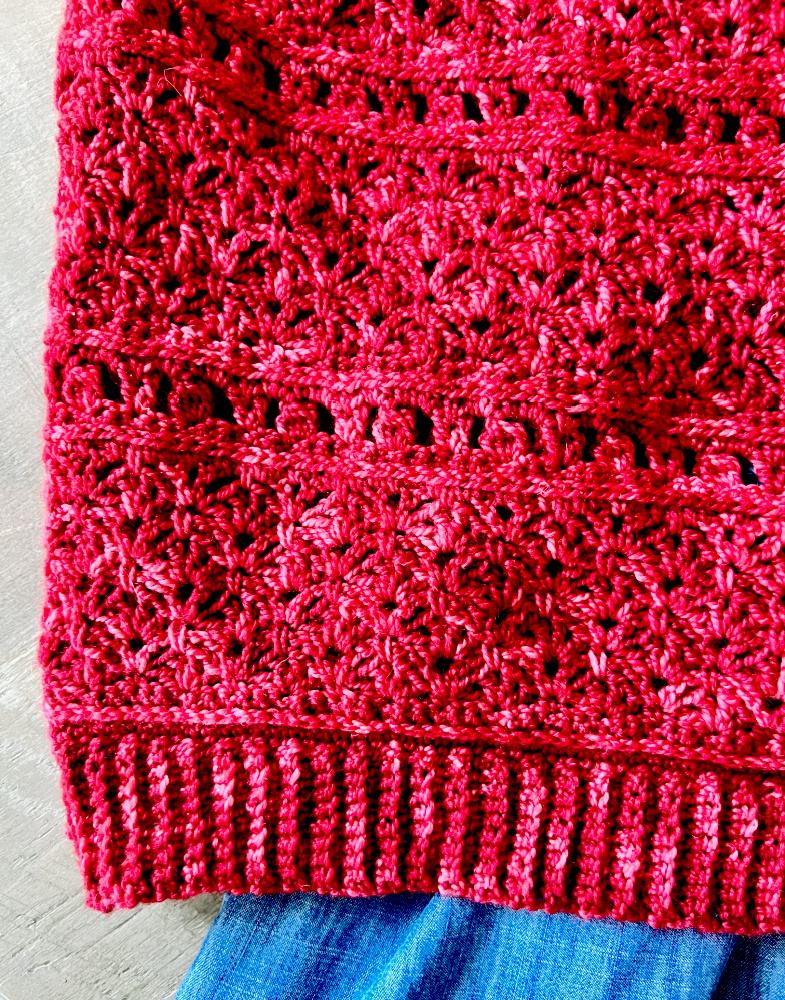
Bottom Edging
Join yarn to back at bottom edge with RS facing. Sc evenly across bottom back edge to corner, 3 sc in corner, sc evenly up side of back and down side of front to next corner, 3 sc in corner, sc evenly across front bottom edge to next corner, 3 sc in corner, sc evenly up side of front and down side of back to corner, 3 sc in last corner, sc evenly to beginning, sl st to first sc, fasten off.
Bottom Ribbing
Join yarn to corner, chain 10.
Row 1: Sc in 2nd ch from hook, sc in each ch to end, sl st to bottom edge twice (once to join row, once to count as ch 1), turn- 9 sc.
Row 2: Skip both sl st, sc in back loop of each sc across, turn.
Row 3: Ch 1, sc in back loop of each sc across, sl st to bottom edge twice, turn.
Repeat Rows 2-3 of Bottom Ribbing across to end, fasten off.
Repeat ribbing on other panel.
Get the Ad-Free PDF
Purchasing the ad-free PDF of the Bellini Crochet Cropped Sweater Pattern is a fantastic option for those who want a seamless, uninterrupted crafting experience. This convenient format allows you to easily follow along without distractions, and it’s perfect for printing out and taking on-the-go for your crochet projects.
The PDF includes fully formatted pattern with written instructions, schematic, crochet stitch diagrams, full pattern charts for each size, and video tutorial links.
If you need more crochet help, check out our Learn to Knit and Crochet page.
Frequently Asked Questions
What sizes does the Bellini Crochet Sweater come in?
The Bellini is available in XS through 4X, with finished bust measurements ranging from 37.5″ to 72.5″. The suggested ease is 8 to 14 inches of positive ease… but you don’t have to follow that for every size. Marly notes from experience that larger sizes often prefer a closer fit. Choose the finished measurement that gives YOU the comfort level you want. That’s the whole beauty of making something with your own two hands.
Is fingering weight yarn hard to work with for a sweater?
It takes more patience than worsted, yes… the stitches are smaller and the project takes longer. But the payoff is a garment with beautiful drape, lightweight warmth, and incredible stitch definition. If this is your first fingering weight project, the Bellini is actually a really good choice because the construction is straightforward and the stitch pattern is consistent. Just settle in, enjoy the rhythm, and trust that it’s going to be worth every stitch.
How do I choose my size if I want less ease than the pattern suggests?
Here’s how to think about it. Measure your actual bust. Look at the finished measurement chart. For the suggested relaxed fit, pick the size with 8 to 14 inches more than your bust measurement. For a more tailored fit, pick the size closest to your bust measurement, or just a few inches bigger. Don’t forget to check the schematic for body length and sleeve measurements too… ease at the bust is only one piece of the fit puzzle.
Can I substitute a different weight yarn?
You can… but it’s going to change the sweater pretty significantly. The Bellini was designed for fingering weight, which is what gives it that lightweight, flowy quality. If you go up to sport or DK, you’ll get something denser and warmer and you’ll need to rework your gauge and yardage. If you love the design but want heavier yarn, definitely swatch first and just know you’re going to get a different vibe.
What makes this sweater genuinely size inclusive?
Real size inclusivity is more than just adding bigger numbers to a size chart. The Bellini was designed thinking about different body shapes… the V-neck flatters lots of necklines, the set-in 3/4 sleeves work across arm sizes, and the ease recommendations are flexible so you can make it YOUR way. The pattern also acknowledges that the “right” amount of ease changes depending on your body and your preferences. That honesty is what makes it genuinely inclusive rather than just technically available in more sizes.
Categories: Crochet, Free Patterns, Marly Bird Premium Patterns, Our Free Patterns, Pattern, Uncategorized