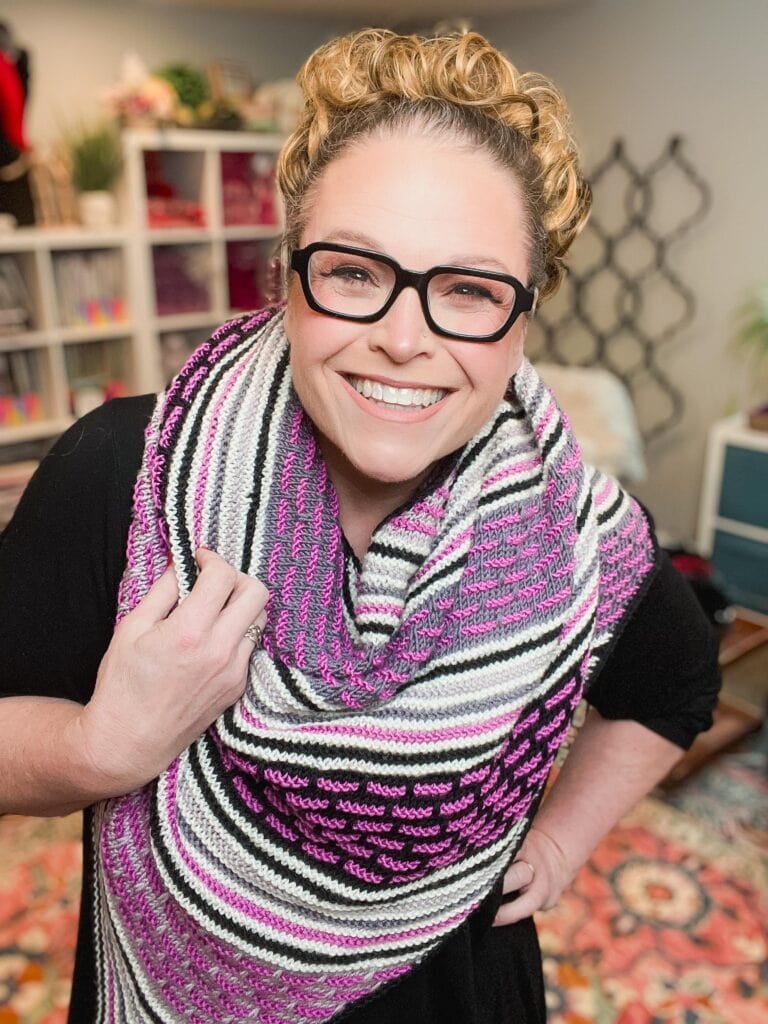
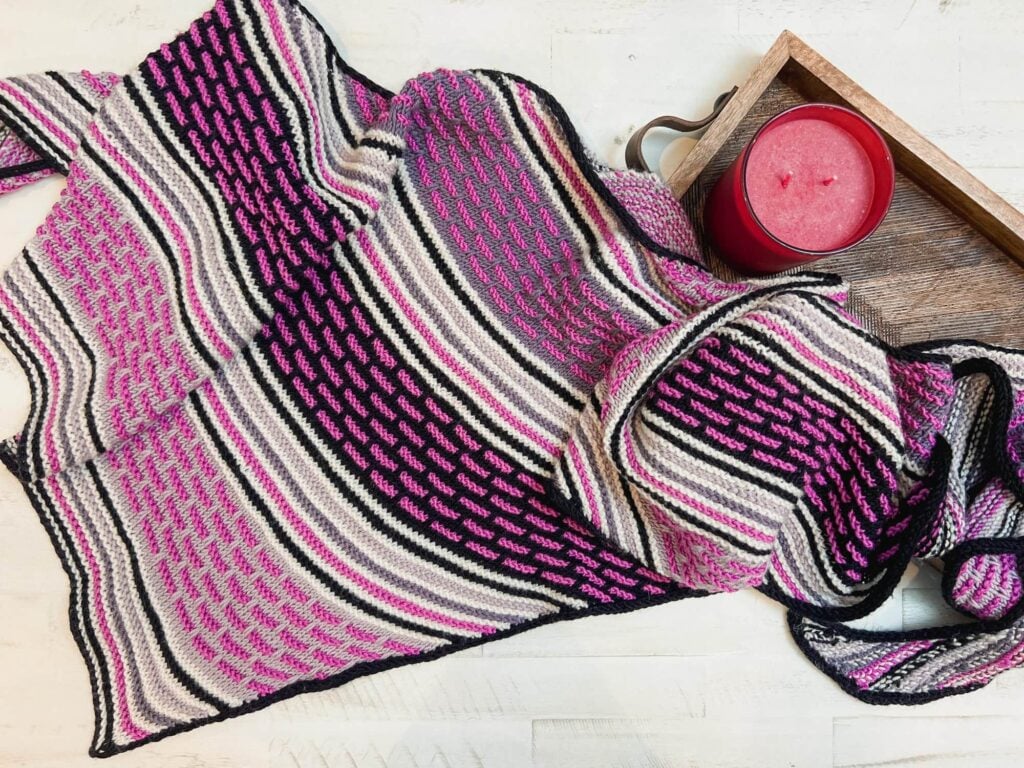
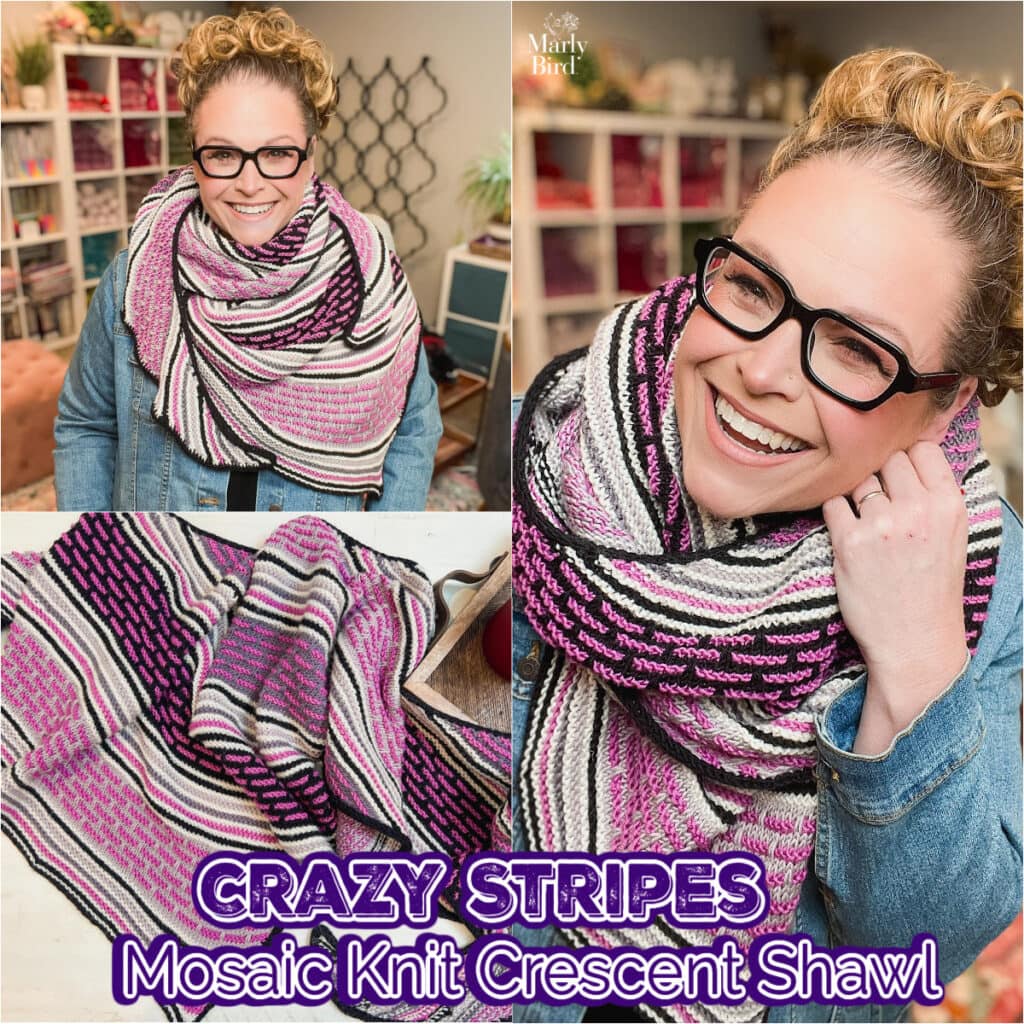
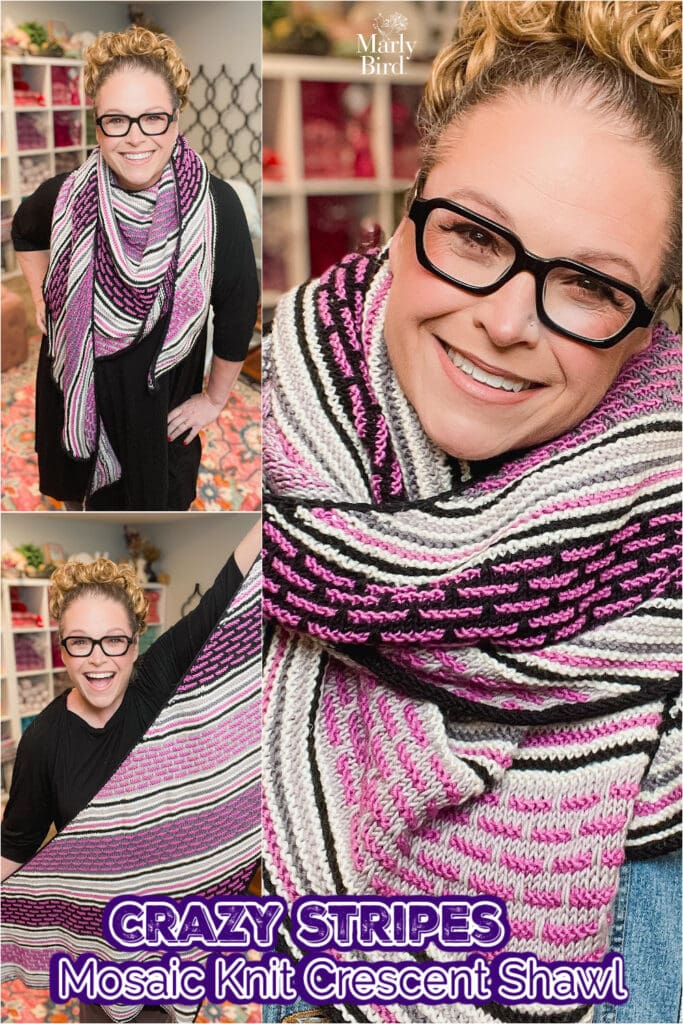
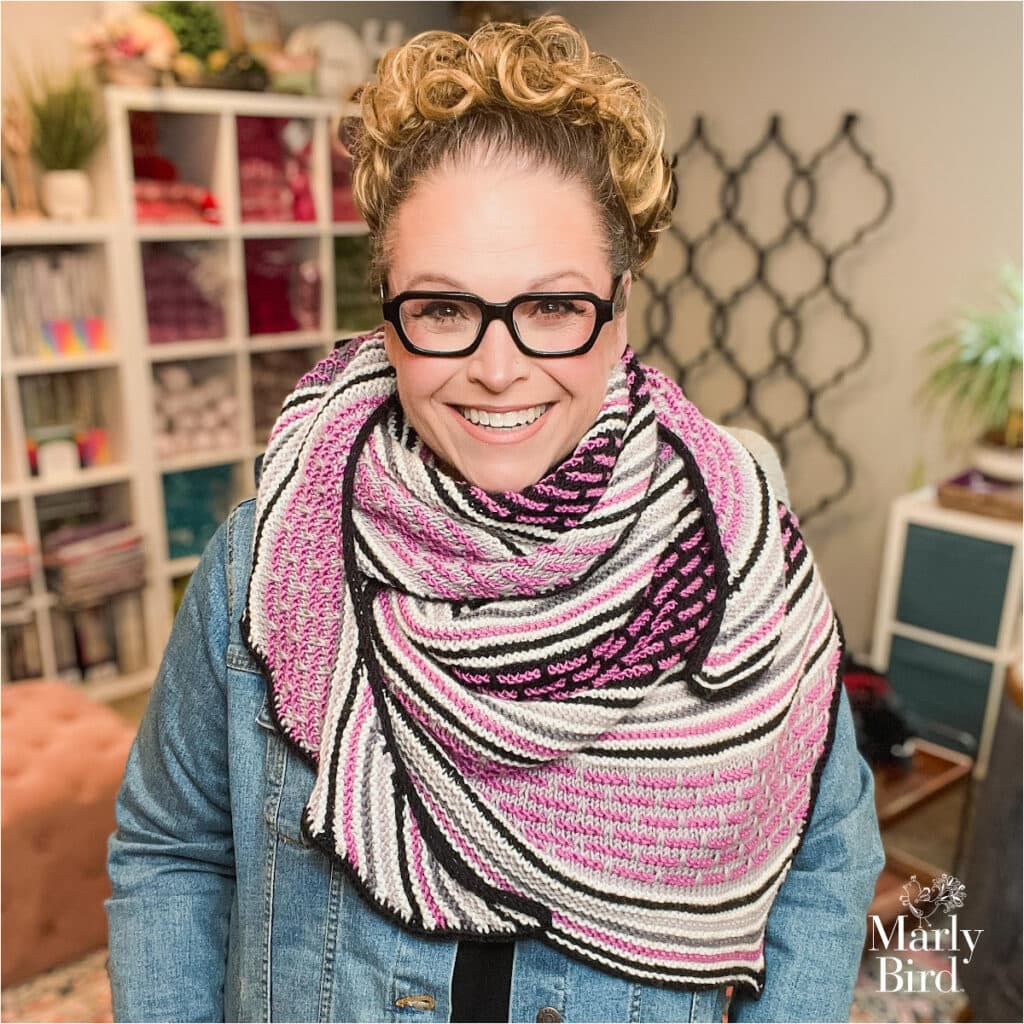
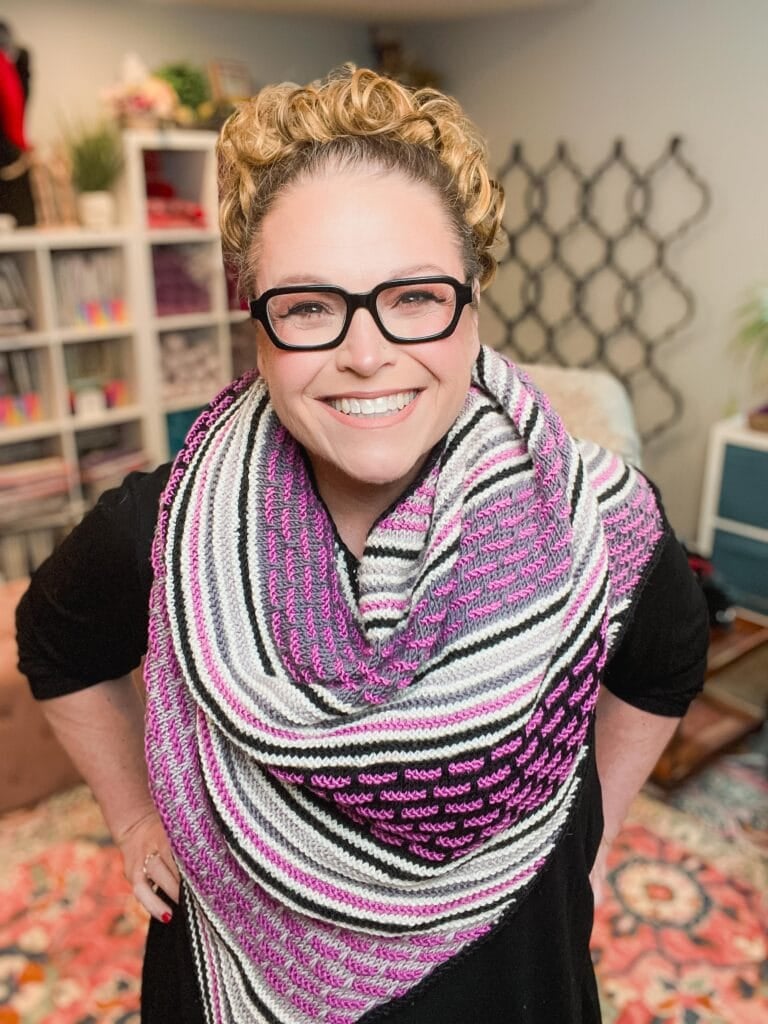
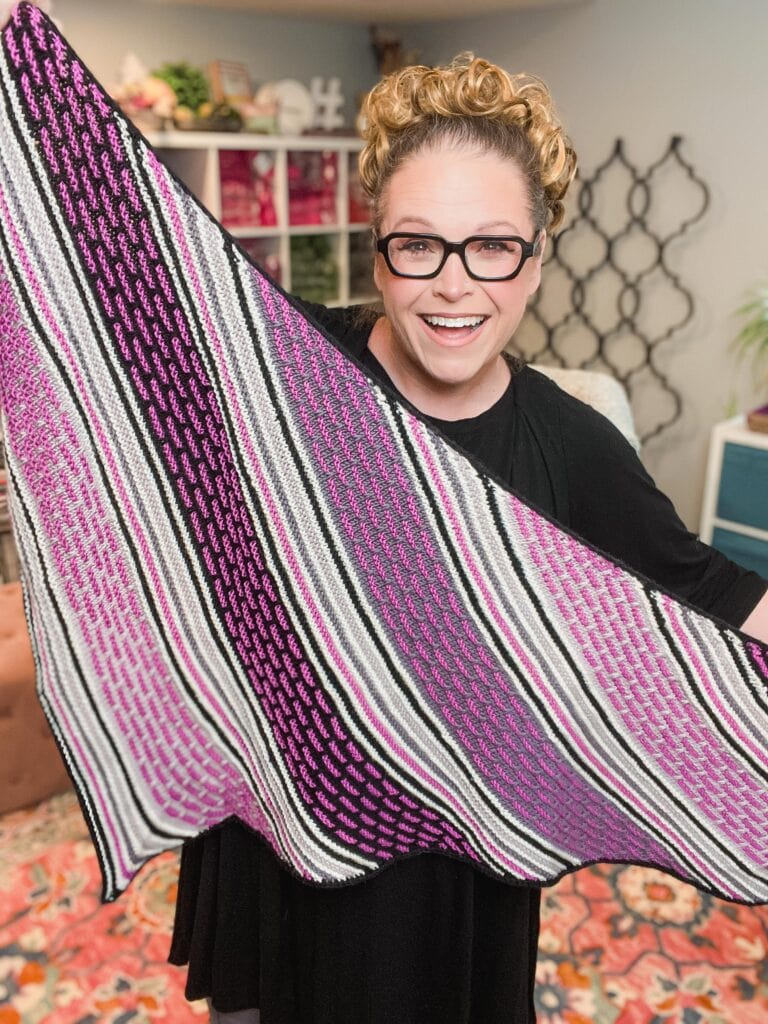
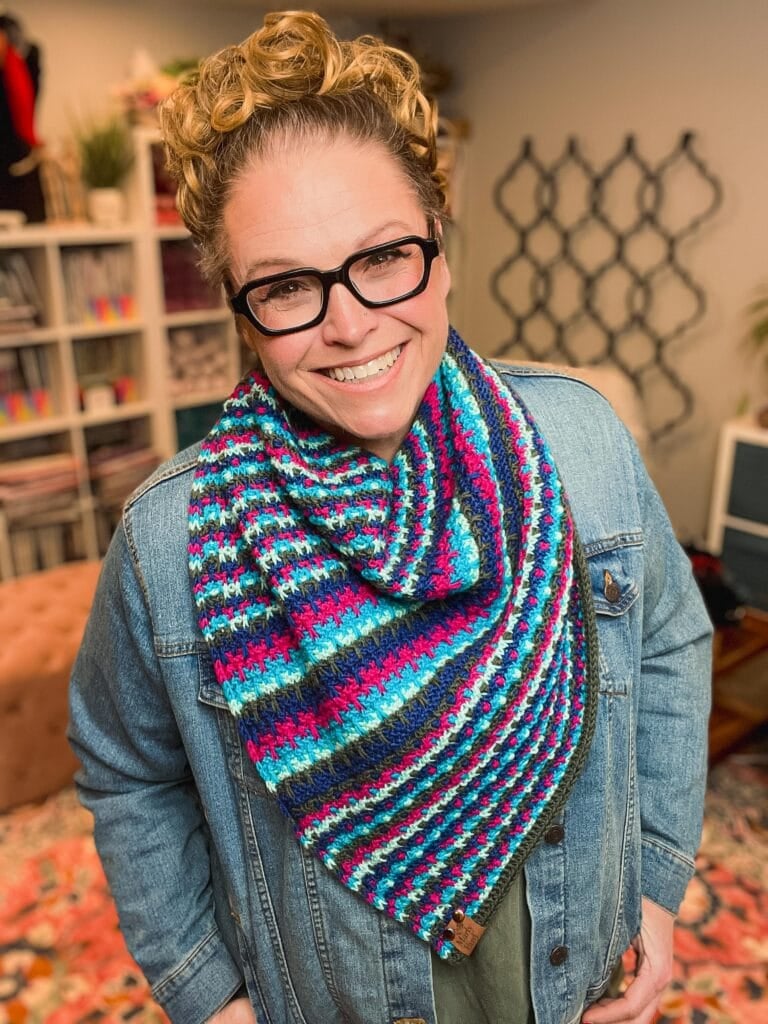
Crazy Stripes Free Easy Knit Crescent Shawl Pattern with Box Mosaic Stitches
If you love knitting projects that feel relaxing but still look impressive, this free easy knit crescent shawl pattern is a must-make.
Designed with bold box mosaic stitches and a beautifully wearable crescent shape, this shawl delivers modern colorwork using simple slip stitches and only one color per row.
It’s the kind of project that draws you in, builds confidence, and results in a cozy accessory you’ll actually reach for — whether you’re new to mosaic knitting or just want an easy, satisfying knit.

If you’re looking for an easy knit crescent shawl pattern that looks bold and modern without complicated techniques, this project is for you. 🧶✨
What You Will Love About This Pattern 💖
- Free and easy knit crescent shawl pattern
- Bold box mosaic stitches with simple slip stitches
- Only one color worked per row
- Comfortable crescent shape that stays on your shoulders
- Beginner-friendly introduction to mosaic knitting
- A modern shawl you’ll actually wear
✨ Designer Tip: Mosaic knitting feels fancy, but once you get the rhythm, it’s wonderfully relaxing and addictive.
Quick Pattern Overview
This post features a free easy knit crescent shawl pattern that uses box mosaic stitches for bold, modern colorwork. The pattern is designed for confident beginners who want to explore mosaic knitting using simple slip stitches and only one color per row.
In this post, you’ll learn:
- What a crescent shawl is and why it’s such a comfortable, wearable shape
- How mosaic knitting works and why it’s beginner-friendly
- Why box mosaic stitches are perfect for easy colorwork projects
- How to choose yarn colors that make mosaic patterns pop
- Where to learn more mosaic knitting and advanced colorwork techniques
This free knit shawl pattern is approachable, skill-building, and a great introduction to knit colorwork without overwhelm.
What Is a Crescent Shawl?
A crescent shawl is shaped with a gentle curve that mirrors the natural slope of your shoulders. Unlike triangle shawls, crescent shawls tend to stay in place and feel more comfortable for everyday wear.
Why knitters love crescent shawls:
- Natural drape
- Comfortable fit
- Less slipping and adjusting
- Ideal for accessories you wear all day
Is This an Easy Knit Crescent Shawl Pattern?
Yes — this pattern is designed for confident beginners.
You should be comfortable with:
- Knit and purl stitches
- Basic increases
- Following simple repeats
You do not need prior colorwork experience. Mosaic knitting is one of the easiest ways to explore colorwork because you work with just one color at a time.
If you’re brand new to mosaic knitting, this guide will help:
https://marlybird.com/blog/mosaic-knitting-for-beginners/
This easy knit crescent shawl proves that bold colorwork doesn’t have to be complicated — slip stitches and one color per row are all it takes.
-Your BiCrafty Bestie, Marly Bird
What Is Mosaic Knitting?
Mosaic knitting is a colorwork technique that uses slipped stitches to create patterns. Instead of carrying multiple yarns across a row, stitches are slipped to reveal the color from previous rows.
Why mosaic knitting is beginner-friendly:
- One color per row
- No stranded floats
- Clean fabric structure
- Easy-to-read charts
If you’d like a deeper dive into tools, charts, and techniques, this resource is a great place to start:
https://marlybird.com/blog/mosaic-knitting-and-mosaic-crochet-resources/
Join our Newsletter
Get Free Crochet & Knitting
Pattern Links & Coupons!

Crescent Shawl vs. Moon Shawl: What’s the Difference?
These terms are often used interchangeably, but there is a subtle distinction.
- Crescent shawls have a shallow curve and balanced drape
- Moon shawls typically feature a deeper curve and more dramatic shaping
This pattern is a classic crescent shawl, designed for comfort and versatility.
How Do You Wear a Crescent Shawl?
One of the best things about crescent shawls is how easy they are to style.
You can:
- Drape it over your shoulders
- Wrap it scarf-style
- Pin it for a polished look
- Wear it asymmetrically for a modern feel
The curved shape helps it stay put without constant fussing.
Yarn & Color Tips for Mosaic Knitting
Color contrast is key when working box mosaic stitches.
For best results:
- Choose one light and one dark color
- Use solid or lightly textured yarns
- Avoid pairing two busy variegated yarns
✨ Designer Tip: Take a black-and-white photo of your yarn choices. Strong contrast in grayscale usually means crisp mosaic stitches.
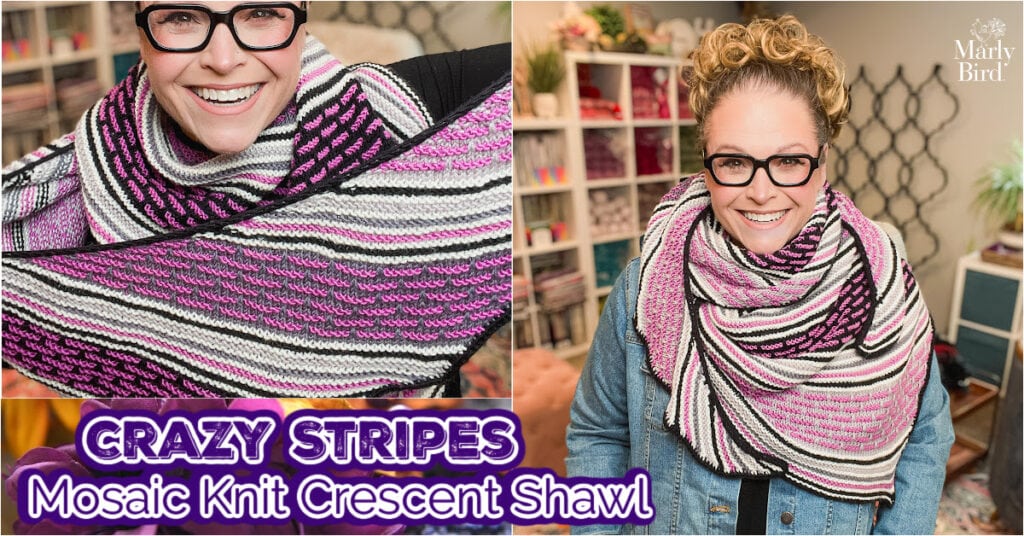
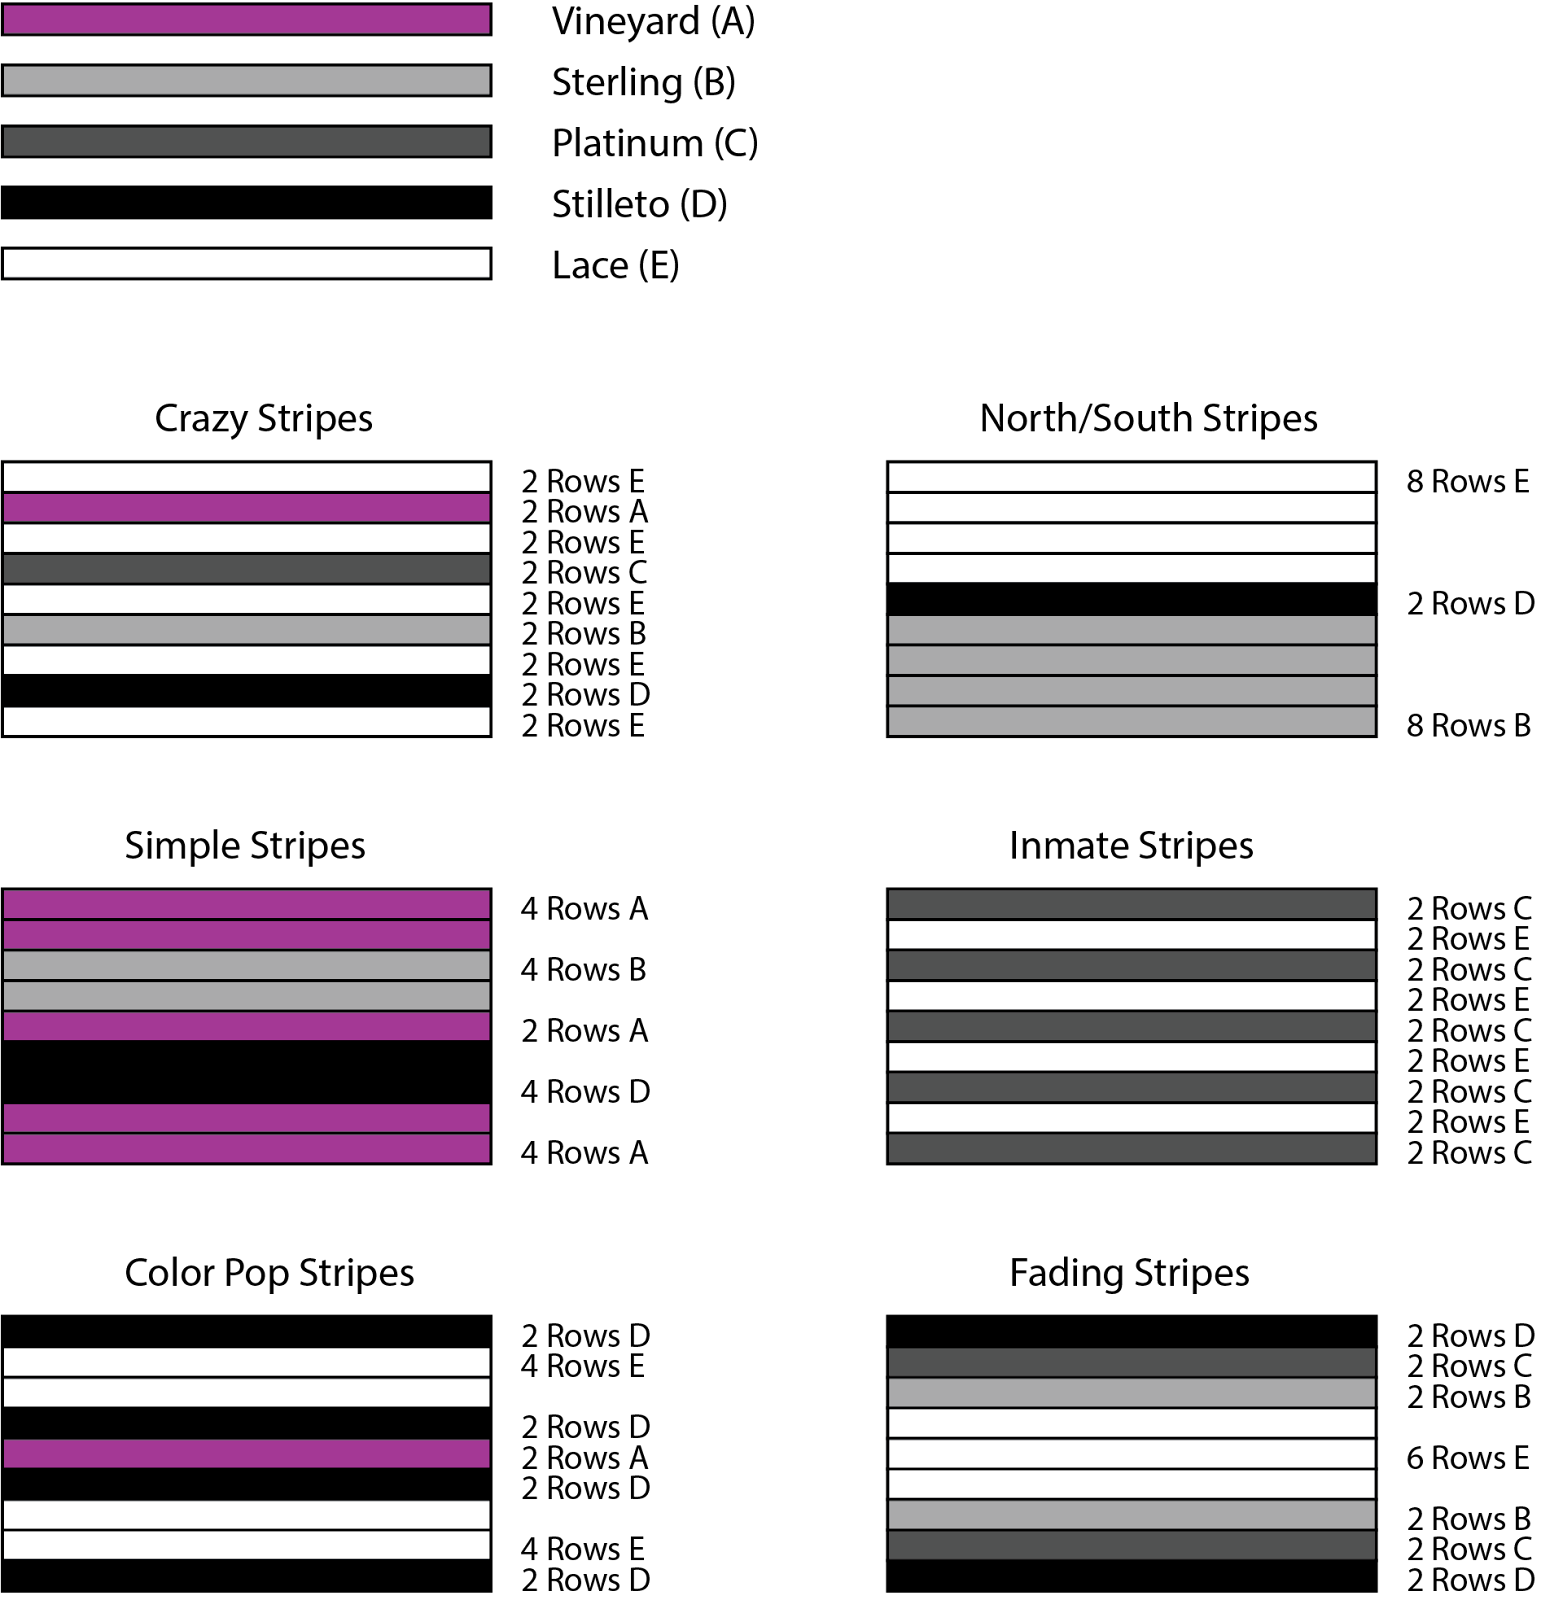
Crazy Stripes Mosaic Knit Crescent Shawl Details
MEASUREMENTS
Finished Measurements
Shawl measures 90” (228.5 cm) wingspan x 28” (71 cm) deep.
Gauge
18 sts = 4″ in stockinette stitch
MATERIALS
Yarn
Red Heart, Chic Sheep (100% merino wool, 186 yds / 170 m, 3.5 oz/ 100 g, CYCA# 4 worsted) :
- Color A: Vineyard, 5 balls
- Color B: Sterling, 1 ball
- Color C: Platinum, 1 ball
- Color D: Stiletto, 2 balls
- Color E: Lace, 2 balls
Note: Sample Yarn has been discontinued.
Good Alternative Yarns
Knit Picks, Brava (100% acrylic, 218 yds / 199 m, 3.5 oz/ 100 g, CYCA# 4 worsted)
Knit Picks Swish Worsted (100% Superwash Merino Wool, 231 yds / 211 m, 3½ oz/ 100 g, CYCA# 4 worsted)
Knitpicks, Wool of the Andes Tweed (80% Peruvian Highland Wool, 20% Donegal Tweed, 110 yds / 100.5 m, 1¾ oz / 50 g, CYCA #4 worsted)
Herrschners, Worsted Heathers (100% Premium Acrylic, 489 yds / 448 m, 8 oz/ 226 g, CYCA# 4 worsted)
Knitting Needles
9 (5.5mm) 24” circular or longer
Notions
- Stitch Markers
- Tapestry Needle
- Scissors
- Tape Measure
- Leather tags (Optional)
- Leather rivets (Optional)
STITCH GUIDE
The sample is made in Crazy Stripes for the garter stitch section. If you choose one of the other versions you will need to adjust the amount of yarn you need for each color.
SPECIAL STITCHES
⭐️KFB: knit front and back (video for help)
⭐️WYIB: with yarn in back
⭐️WYIF: with yarn in front
⭐️Cable Cast-on: Insert right hand needle between first 2 sts on left hand needle, k1 from this position, leave the first sts on left hand needle and slip new st onto left hand needle. Rep from * for desired number of sts.
⭐️Knitted Cast On: *Insert right hand needle knitwise into first st of left hand needle, wrap the yarn around the needle and pull through as to make a knit st, leave the first st on left hand needle and slip st just made to left hand needle (1 st CO); rep from * to required number of sts. Here is a video to help with knitted cast on.
⭐️SSK: slip 1 stitch as if to knit, slip 1 stitch as if to knit, insert left hand needle in front leg of those two slipped stitches on the right hand needle, knit the two stitches together.
⭐️K2tog: insert needle into first two stitches on left hand needle as if to knit, knit them together, knit the two stitches together.
NOTES
- Yarn amounts listed are based on the sample shawl shown. Yardage may vary depending on your personal gauge, yarn choice, or if you choose to make your shawl larger or smaller.
- Slip stitches as if to knit unless otherwise instructed. This is important for keeping your box mosaic stitches clean and consistent throughout the shawl.
- As the shawl grows, switch to longer needles. Crescent shawls gain width quickly, and giving your stitches room on the needle will make knitting more comfortable and help prevent stitches from bunching up.
- Consider adding lifelines at pattern change points. Placing a lifeline before starting a new section or stitch pattern gives you a safe place to rip back to if needed — especially helpful if you’re new to mosaic knitting.
- Reading charts tip: Mosaic charts are repetitive by nature. Once you establish the rhythm, trust it. Many knitters find mosaic knitting easier after the first few repeats.
- Customization friendly: Crescent shawls are easy to adjust. You can work additional repeats to make your shawl larger or stop early for a lighter, scarf-style version.
✨ Designer Tip: If this is your first mosaic project, slow down for the first few rows and focus on accuracy. Speed comes naturally once the pattern clicks.
Don’t forget to favorite and add this shawl to your Ravelry queue so you can easily find it again and share your finished project with the community.
GROW
To Unlock Exclusive Subscriber Content click the Box below and join for free by simply adding your email and creating a password! If you are having troubles, clear your cache or reset your password or login to the Grow Publisher Portal.
>> Learn More About Grow Here <<
I’m thrilled to share this amazing pattern with you, many patterns on my blog are absolutely free! I kindly request that you don’t copy and paste or distribute this pattern. Prefer an ad-free experience? Buy a digital PDF pattern for a small fee from one of my online stores for a seamless crafting journey.
I appreciate your support and readership. You are the reason I can keep doing what I love and sharing it with others. So, thank you from the bottom of my yarn-loving heart! Disclosure: This post contains affiliate links, meaning I get a commission if you decide to make a purchase through my links at no cost to you.
Crazy Stripes Mosaic Knit Crescent Shawl Free Pattern
With color A or as desired color
Cast on 5 sts.
GARTER STITCH SECTION 1
Note: See Stitch Guide for Garter Stripe pattern options. Have fun and make this shawl your own by using one of the suggested striping options or make up your own unique pattern!
Row 1 (RS): Kfb, kfb, knit to last 2 stitches, k2tog — 6 sts.
Row 2 (WS): Knit.
Repeat rows 1 and 2, 22 more times until there are 28 sts ending after a row 2.
BOXED MOSAIC SLIPPED STITCH PATTERN
Do not cut the yarn in this section until the start of the next section, carry it up along the sides. If you need visual help to see how to do this, take a look at this video (I know this isn’t the same pattern, but the link has the video starts at the point where I change colors so you can see how to do it).
With color B
Row 1 (RS): Kfb, kfb, knit to last 2 stitches, k2tog — 29 sts.
Row 2 (WS): K1, purl to last stitch, k1.
With color A
Row 3 (RS): Kfb, kfb, slip 1 wyib, *k5, slip 1 wyib; repeat from * 3 times, k2tog — 30 sts.
Row 4 (WS): *Knit to the slipped stitch, slip stitch wyif; repeat from * to last slipped stitch, knit to end.
With color B
Row 5 (RS): Kfb, kfb, knit to last 2 stitches, k2tog — 31 sts.
Row 6 (WS): K1, purl to last stitch, k1.
With color A
Row 7 (RS): Kfb, kfb, k1, slip 1 wyib, *k5, slip 1 wyib; repeat from * 3 times, k1, k2tog — 32 sts.
Row 8 (WS): *Knit to the slipped stitch, slip yarn wyif; repeat from * to last slipped stitch, knit to end.
With color B
Row 9 (RS): Kfb, kfb, knit to last 2 stitches, k2tog —33 sts.
Row 10 (WS): K1, purl to last stitch, k1.
With color A
Row 11 (RS): Kfb, kfb, k2, slip 1 wyib, *k5, slip 1 wyib; repeat from * 3 times, k2, k2tog — 34 sts.
Row 12 (WS): *Knit to the slipped stitch, slip yarn wyif; repeat from * to last slipped stitch, knit to end.
With color B
Row 13 (RS): Kfb, kfb, knit to last 2 stitches, k2tog —35 sts.
Row 14 (WS): K1, purl to last stitch, k1.
With color A
Row 15 (RS): Kfb, kfb, k3, slip 1 wyib, *k5, slip 1 wyib; repeat from * 3 times, k3, k2tog — 36 sts.
Row 16 (WS): *Knit to the slipped stitch, slip yarn wyif; repeat from * to last slipped stitch, knit to end.
With color B
Row 17 (RS): Kfb, kfb, knit to last 2 stitches, k2tog —37 sts.
Row 18 (WS): K1, purl to last stitch, k1.
With color A
Row 19 (RS): Kfb, kfb, k4, slip 1 wyib, *k5, slip 1 wyib; repeat from * 3 times, k4, k2tog — 38 sts.
Row 20 (WS): *Knit to the slipped stitch, slip yarn wyif; repeat from * to last slipped stitch, knit to end.
With color B
Row 21 (RS): Kfb, kfb, knit to last 2 stitches, k2tog —39 sts.
Row 22 (WS): K1, purl to last stitch, k1.
With color A
Row 23 (RS): Kfb, kfb, k5, slip 1 wyib, *k5, slip 1 wyib; repeat from * 3 times, k5, k2tog — 40 sts.
Row 24 (WS): *Knit to the slipped stitch, slip yarn wyif; repeat from * to last slipped stitch, knit to end.
With color B
Row 25 (RS): Kfb, kfb, knit to last 2 stitches, k2tog —41 sts.
Row 26 (WS): K1, purl to last stitch, k1.
Cut color B.
GARTER STITCH SECTION 2
Note: See Stitch Guide for Garter Stripe pattern options.
With color A or as desired.
Row 1 (RS): Kfb, kfb, knit to last 2 stitches, k2tog — 42 sts.
Row 2 (WS): Knit.
Repeat rows 1 and 2, 10 more times until there are 52 sts ending after a row 2.
BOXED MOSAIC SLIPPED STITCH PATTERN
Do not cut the yarn in this section until the start of the next section, carry it up along the sides.
With color C.
Row 1 (RS): Kfb, kfb, knit to last 2 stitches, k2tog — 53 sts.
Row 2 (WS): K1, purl to last stitch, k1.
With color A
Row 3 (RS): Kfb, kfb, slip 1 wyib, *k5, slip 1 wyib; repeat from * 7 times, k2tog — 54 sts.
Row 4 (WS): *Knit to the slipped stitch, slip stitch wyif; repeat from * to last slipped stitch, knit to end.
With color C
Row 5 (RS): Kfb, kfb, knit to last 2 stitches, k2tog — 55 sts.
Row 6 (WS): K1, purl to last stitch, k1.
With color A
Row 7 (RS): Kfb, kfb, k1, slip 1 wyib, *k5, slip 1 wyib; repeat from * 7 times, k1, k2tog — 56 sts.
Row 8 (WS): *Knit to the slipped stitch, slip yarn wyif; repeat from * to last slipped stitch, knit to end.
With color C
Row 9 (RS): Kfb, kfb, knit to last 2 stitches, k2tog — 57 sts.
Row 10 (WS): K1, purl to last stitch, k1.
With color A
Row 11 (RS): Kfb, kfb, k2, slip 1 wyib, *k5, slip 1 wyib; repeat from * 7 times, k2, k2tog — 58 sts.
Row 12 (WS): *Knit to the slipped stitch, slip yarn wyif; repeat from * to last slipped stitch, knit to end.
With color C
Row 13 (RS): Kfb, kfb, knit to last 2 stitches, k2tog — 59 sts.
Row 14 (WS): K1, purl to last stitch, k1.
With color A
Row 15 (RS): Kfb, kfb, k3, slip 1 wyib, *k5, slip 1 wyib; repeat from * 7 times, k3, k2tog — 60 sts.
Row 16 (WS): *Knit to the slipped stitch, slip yarn wyif; repeat from * to last slipped stitch, knit to end.
With color C
Row 17 (RS): Kfb, kfb, knit to last 2 stitches, k2tog — 61 sts.
Row 18 (WS): K1, purl to last stitch, k1.
With color A
Row 19 (RS): Kfb, kfb, k4, slip 1 wyib, *k5, slip 1 wyib; repeat from * 7 times, k4, k2tog — 62 sts.
Row 20 (WS): *Knit to the slipped stitch, slip yarn wyif; repeat from * to last slipped stitch, knit to end.
With color C
Row 21 (RS): Kfb, kfb, knit to last 2 stitches, k2tog —63 sts.
Row 22 (WS): K1, purl to last stitch, k1.
With color A
Row 23 (RS): Kfb, kfb, k5, slip 1 wyib, *k5, slip 1 wyib; repeat from * 7 times, k5, k2tog — 64 sts.
Row 24 (WS): *Knit to the slipped stitch, slip yarn wyif; repeat from * to last slipped stitch, knit to end.
With color C
Row 25 (RS): Kfb, kfb, knit to last 2 stitches, k2tog —65 sts.
Row 26 (WS): K1, purl to last stitch, k1.
Cut color C.

GARTER STITCH SECTION 3
Note: See Stitch Guide for Garter Stripe pattern options.
With color A or as desired
Row 1 (RS): Kfb, kfb, knit to last 2 stitches, k2tog — 66 sts.
Row 2 (WS): Knit.
Repeat rows 1 and 2, 10 more times until there are 76 sts ending after a row 2.
BOXED MOSAIC SLIPPED STITCH PATTERN
Do not cut the yarn in this section until the start of the next section, carry it up along the sides.
With color D
Row 1 (RS): Kfb, kfb, knit to last 2 stitches, k2tog — 77 sts.
Row 2 (WS): K1, purl to last stitch, k1.
With color A
Row 3 (RS): Kfb, kfb, slip 1 wyib, *k5, slip 1 wyib; repeat from * 11 times, k2tog — 78 sts.
Row 4 (WS): *Knit to the slipped stitch, slip stitch wyif; repeat from * to last slipped stitch, knit to end.
With color D
Row 5 (RS): Kfb, kfb, knit to last 2 stitches, k2tog — 79 sts.
Row 6 (WS): K1, purl to last stitch, k1.
With color A
Row 7 (RS): Kfb, kfb, k1, slip 1 wyib, *k5, slip 1 wyib; repeat from * 11 times, k1, k2tog — 80 sts.
Row 8 (WS): *Knit to the slipped stitch, slip yarn wyif; repeat from * to last slipped stitch, knit to end.
With color D
Row 9 (RS): Kfb, kfb, knit to last 2 stitches, k2tog — 81 sts.
Row 10 (WS): K1, purl to last stitch, k1.
With color A
Row 11 (RS): Kfb, kfb, k2, slip 1 wyib, *k5, slip 1 wyib; repeat from * 11 times, k2, k2tog — 82 sts.
Row 12 (WS): *Knit to the slipped stitch, slip yarn wyif; repeat from * to last slipped stitch, knit to end.
With color D
Row 13 (RS): Kfb, kfb, knit to last 2 stitches, k2tog — 83 sts.
Row 14 (WS): K1, purl to last stitch, k1.
With color A
Row 15 (RS): Kfb, kfb, k3, slip 1 wyib, *k5, slip 1 wyib; repeat from * 11 times, k3, k2tog — 84 sts.
Row 16 (WS): *Knit to the slipped stitch, slip yarn wyif; repeat from * to last slipped stitch, knit to end.
With color D
Row 17 (RS): Kfb, kfb, knit to last 2 stitches, k2tog — 85 sts.
Row 18 (WS): K1, purl to last stitch, k1.
With color A
Row 19 (RS): Kfb, kfb, k4, slip 1 wyib, *k5, slip 1 wyib; repeat from * 11 times, k4, k2tog — 86 sts.
Row 20 (WS): *Knit to the slipped stitch, slip yarn wyif; repeat from * to last slipped stitch, knit to end.
With color D
Row 21 (RS): Kfb, kfb, knit to last 2 stitches, k2tog — 87 sts.
Row 22 (WS): K1, purl to last stitch, k1.
With color A
Row 23 (RS): Kfb, kfb, k5, slip 1 wyib, *k5, slip 1 wyib; repeat from * 11 times, k5, k2tog — 88 sts.
Row 24 (WS): *Knit to the slipped stitch, slip yarn wyif; repeat from * to last slipped stitch, knit to end.
With color D
Row 25 (RS): Kfb, kfb, knit to last 2 stitches, k2tog — 89 sts.
Row 26 (WS): K1, purl to last stitch, k1.
Cut color D.
GARTER STITCH SECTION 4
Note: See Stitch Guide for Garter Stripe pattern options.
With color A or as desired
Row 1 (RS): Kfb, kfb, knit to last 2 stitches, k2tog — 90sts.
Row 2 (WS): Knit.
Repeat rows 1 and 2, 10 more times until there are 100 sts ending after a row 2
Continue in the established pattern of garter with color A, then work boxed mosaic slip stitch pattern until there are a total of 7 boxed mosaic slipped stitch pattern sections. Then do one last section of garter stitch.

Color Sequence will go
Garter– A– 28 sts
Boxed– A,B– 41 sts
Garter– A– 52 sts
Boxed– A,C– 65 sts
Garter– A– 76 sts
Boxed A,D– 89 sts
Garter– A– 100 sts
Boxed– A,B — 113 sts
Garter– A — 124 sts
Boxed– A,C –137 sts
Garter– A — 148 sts
Boxed A,D — 161 sts
Garter– A– 173 sts
Boxed– A,B– 186 sts
Garter– A — 197 sts
ATTACHED I-CORD BIND OFF
The applied i-cord bind off is a nice stretchy bind off that will give your shawl that little extra something.
Continuing with Color A.
Using the cable cast-on or the knitted cast-on, cast on 4 stitches. Place those 4 stitches on the left hand needle with the other shawl stitches.
Row 1 (RS): K3 (of the cast-on stitches), ssk (1 stitch from the newly cast-on stitches and one stitch from the shawl). Slip the 4 stitches from the right hand needle back to the left hand needle (slip them purlwise through the back leg so you don’t change the orientation of the stitch).
Repeat row 1 to the end of the row. All the live stitches on the shawl will have been worked and 4 stitches remain on your needle left hand needle. Do not turn your work.
Note: If you wish to end the i-cord here and not apply it around the entire shawl you could do so by working a row of k2tog’s, then on the next row k2tog and finish off.
First Corner of applied i-cord
Helpful Tip: For the remainder of the i-cord, you could use 2 dpn for ease instead of the long needle you used for the shawl. Also, if you want the i-cord to be more snug than the fabric of the shawl you could use a smaller needle size.
The last stitch and the first stitch that you bound off are actually at the 1st and 3rd corners of your shawl. So when we want to turn the corner and work along the edge of the shawl we will need to work another stitch into that same corner.
The corner turn instructions are different for the 2nd corner. I only point this out so when you are sure to follow the instructions.
Row 1 (RS): K4 stitches.
Row 2 (RS): Pick up and knit 1 stitch in the corner of the shawl (the same spot at the last stitch from bind off), slip the 5 stitches from the right hand needle back to the left hand needle. K3, ssk (1 stitch from the original 4 and the newly picked up and knit stitch).
You will now be working along the decrease edge of the shawl.
Row 3 (RS): Pick up and knit 1 stitch along the edge of the shawl, slip the 5 stitches from the right hand needle back to the left hand needle. K3, ssk (1 stitch from the original 4 and the newly picked up and knit stitch).
Repeat row 3 to the corner of shawl.
2nd corner of applied i-cord
Row 1 (RS): Pick up and knit 1 stitch in the corner of the shawl, slip the 5 stitches from the right hand needle back to the left hand needle. K3, ssk (1 stitch from the original 4 and the newly picked up and knit stitch). Slip the 4 stitches from the right hand needle back to the left hand needle.
Row 2 (RS): K4 stitches.
Row 3 (RS): Pick up and knit 1 stitch in the SAME corner stitch of the shawl, slip the 5 stitches from the right hand needle back to the left hand needle. K3, ssk (1 stitch from the original 4 and the newly picked up and knit stitch).
You will now be working along the increase edge of the shawl.
Row 4 (RS): Pick up and knit 1 stitch along the edge of the shawl, slip the 5 stitches from the right hand needle back to the left hand needle (slip them through the back leg so you don’t change the orientation of the stitch). K3, ssk (1 stitch from the original 4 and the newly picked up and knit stitch).
Repeat row 4 to the last corner.
3rd corner of applied i-cord
Row 1 (RS): Pick up and knit 1 stitch in the corner of the shawl (this is the first stitch that was bound off), slip the 5 stitches from the right hand needle back to the left hand needle. K3, ssk (1 stitch from the original 4 and the newly picked up and knit stitch). Slip the 4 stitches from the right hand needle back to the left hand needle (slip them through the back leg so you don’t change the orientation of the stitch).
Row 2 (RS): K4 stitches.
FINAL FINISHING
Once all the stitches on the shawl have been worked with the applied i-cord you will have 4 stitches remaining on the needle.
Seam the 4 stitches of the i-cord you have on your knitting needle together with the cast on edge of the i-cord. The easiest way to do it is to use a simple overhand stitch.
The best way to do it is to graft the stitches so that the i-cord looks seamless.
WEAVE IN YOUR ENDS
WASH AND BLOCK YOUR SHAWL 🙂 THIS IS THE FINISHING TOUCH AND ONE YOU SHOULDN’T SKIP, ESPECIALLY IF YOU ARE USING WOOL!
Blocking & Finishing Your Knit Crescent Shawl
Blocking enhances the stitch definition and overall drape of your shawl.
- Wet block gently
- Shape into a smooth crescent
- Allow to dry completely
This step really helps the mosaic pattern shine.
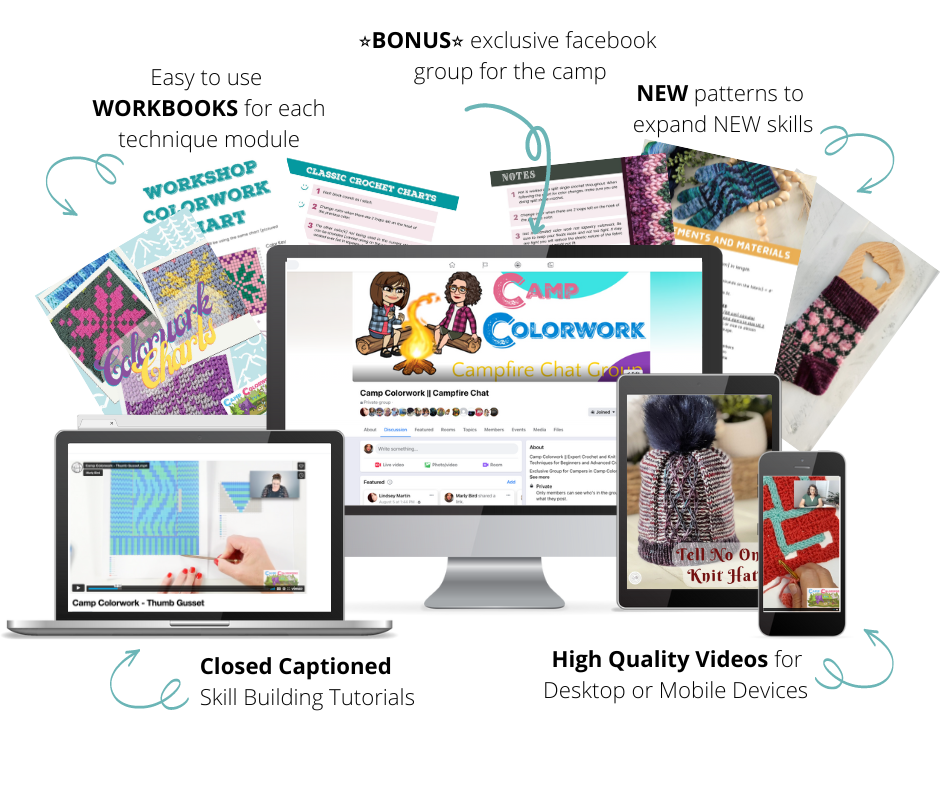
Want to Learn More Mosaic & Colorwork Techniques?
If you’re loving mosaic knitting and want to confidently explore more colorwork techniques, I highly recommend Camp Colorwork.
Learn Colorwork with Confidence in Camp Colorwork 🧶✨
Camp Colorwork is my step-by-step course designed to help knitters understand multiple colorwork styles, including mosaic knitting, stranded colorwork, and more — without overwhelm.
Inside Camp Colorwork, you’ll learn:
- How different colorwork techniques work
- How to read and follow charts confidently
- How to manage yarn and tension
- How to choose colors that work beautifully together
👉 Learn more about Camp Colorwork here:
https://marlybird.com/blog/camp-colorwork/
💖 Use coupon code HEART to get 25% off and start building your colorwork confidence today.
More Mosaic Knitting Patterns You’ll Love 🧶
If you enjoyed this easy knit crescent shawl pattern, here are more mosaic projects to explore:
- Pixel Pop Knit Hat (Free Pattern)
https://marlybird.com/blog/pixel-pop-knit-hat-free-pattern/ - Knit Mosaic Slippers (Free Pattern)
https://marlybird.com/blog/knit-mosaic-slippers-pattern/ - Twilight Trails Knit Mosaic Hat (Free Pattern)
https://marlybird.com/blog/twilight-trails-knit-mosaic-hat-pattern-a-stylish-textured-design/ - Cocoa Dreams Mosaic Knit Fingerless Mittens (Free Pattern)
https://marlybird.com/blog/cocoa-dreams-mosaic-knit-fingerless-mittens-free-pattern/ - Falling Leaves Mosaic Knit Hat (Free Pattern)
https://marlybird.com/blog/cozy-up-with-the-falling-leaves-mosaic-knit-hat-free-pattern-mosaic-tips/ - Slipped Stripes Scarf (Slip-Stitch Texture)
https://marlybird.com/blog/working-texture-with-slip-stitches-slipped-stripes-scarf/ - Dynamic Wave Mosaic Knit Hat (Free Pattern)
https://marlybird.com/blog/mosaic-knit-hat-pattern-dynamic-wave/ - Sugar Biscuit Fingerless Mitts (Free Pattern)
https://marlybird.com/blog/sugar-biscuit-knit-fingerless-mitts-pattern/ - Sugar Biscuit Knit Hat (Free Pattern)
https://marlybird.com/blog/sugar-biscuit-knit-hat-pattern/ - Treat Your Feet Sock Make-Along — Multiple slip stitch sock patterns + video tutorials
https://marlybird.com/blog/treat-your-feet-sock-make-along-2025/
You can also browse a full roundup here:
https://marlybird.com/blog/free-mosaic-knitting-patterns/

FAQ – Easy Knit Crescent Shawl Pattern
Is this knit crescent shawl pattern free?
Yes! This is a 100% free knit crescent shawl pattern available on MarlyBird.com.
Is mosaic knitting good for beginners?
Absolutely. Mosaic knitting is one of the most beginner-friendly colorwork techniques because you work with only one color per row.
Can I adjust the size of the shawl?
Yes — crescent shawls are easy to customize by adding or removing repeats.
Bonus: Another Mosaic Project You Might Love 🎉
Mosaic stitches were also used in the NYE Countdown Knit Cowl, a fun, festive colorwork project available here:
https://marlybird.thrivecart.com/nye-countdown-25-knit/
Final Thoughts 💕
This free easy knit crescent shawl pattern is proof that colorwork doesn’t have to be complicated to be stunning. With box mosaic stitches, comfortable shaping, and beginner-friendly construction, it’s a project that builds confidence while creating something beautiful and wearable.
If you make one, be sure to share it — I love seeing your projects! 💖
❤️ Your BiCrafty Bestie,
Marly Bird

#mmmdi #marlybird