
Easy One Piece Crochet Cardigan (Free Pattern) – Amimono
This easy one piece crochet cardigan pattern is perfect for beginners who want a lightweight, kimono-style layering piece. Made from a simple rectangle with minimal seaming, this free crochet cardigan includes step-by-step guidance, video support, and size-inclusive instructions for a stylish and wearable handmade garment.
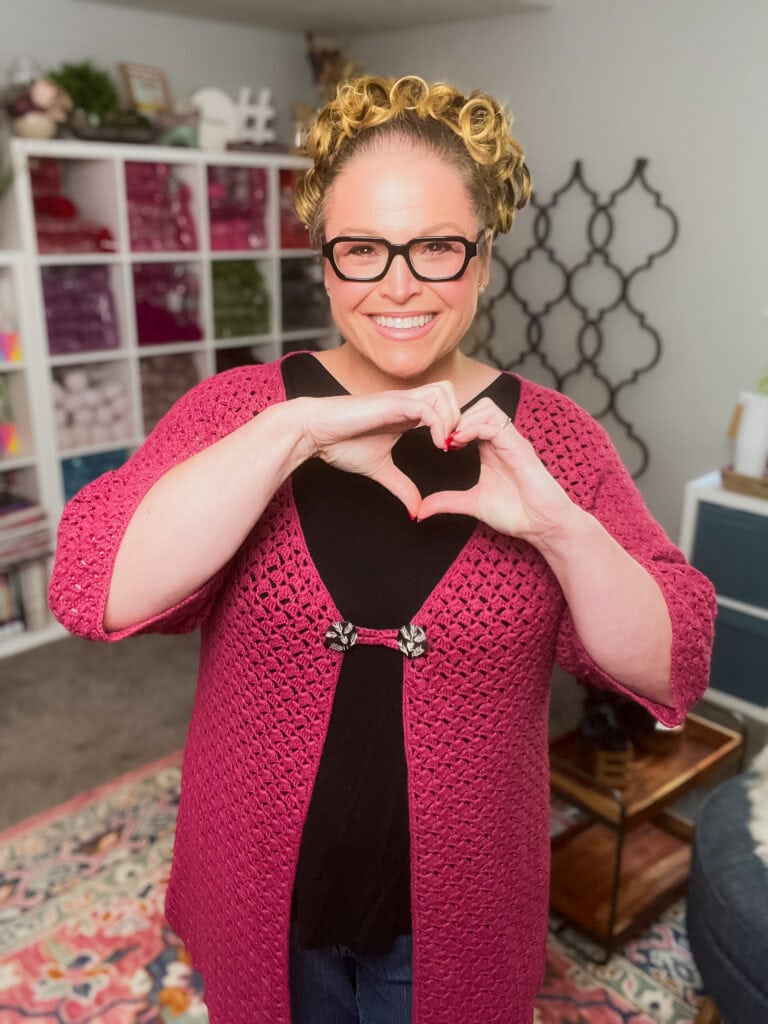
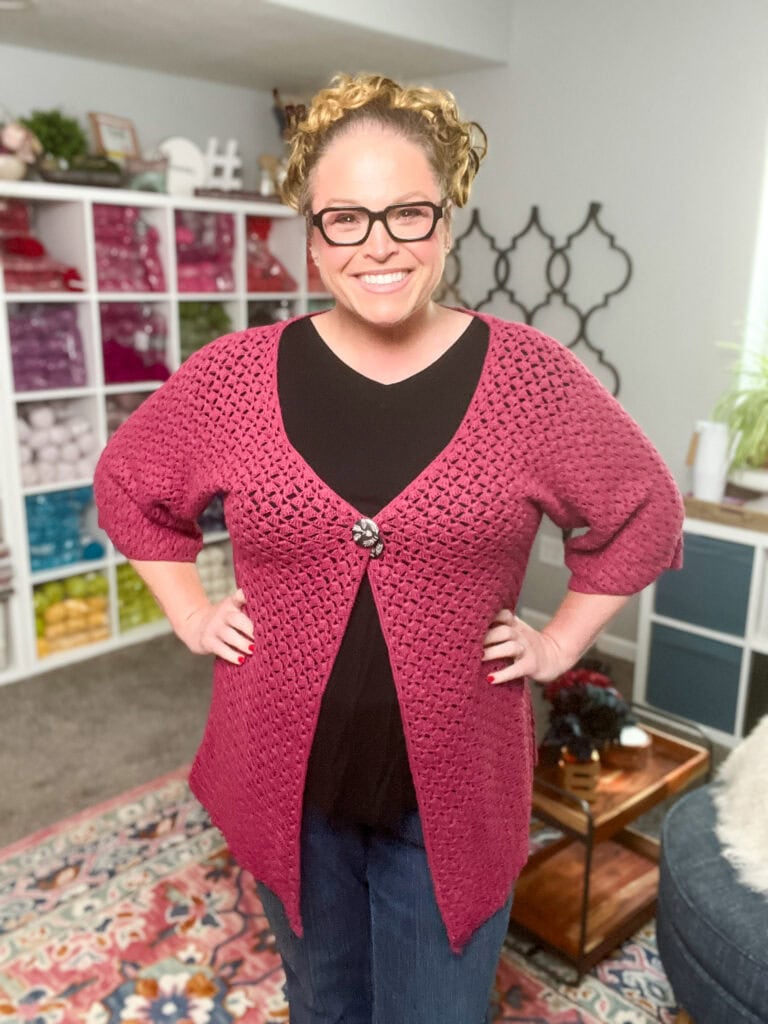
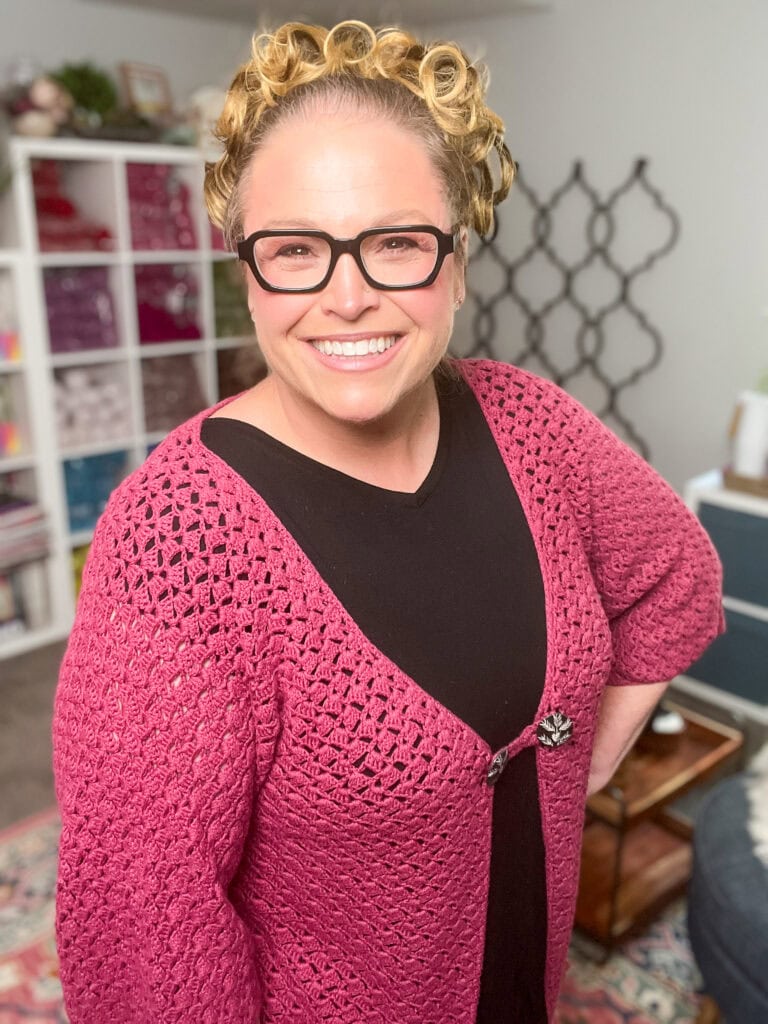
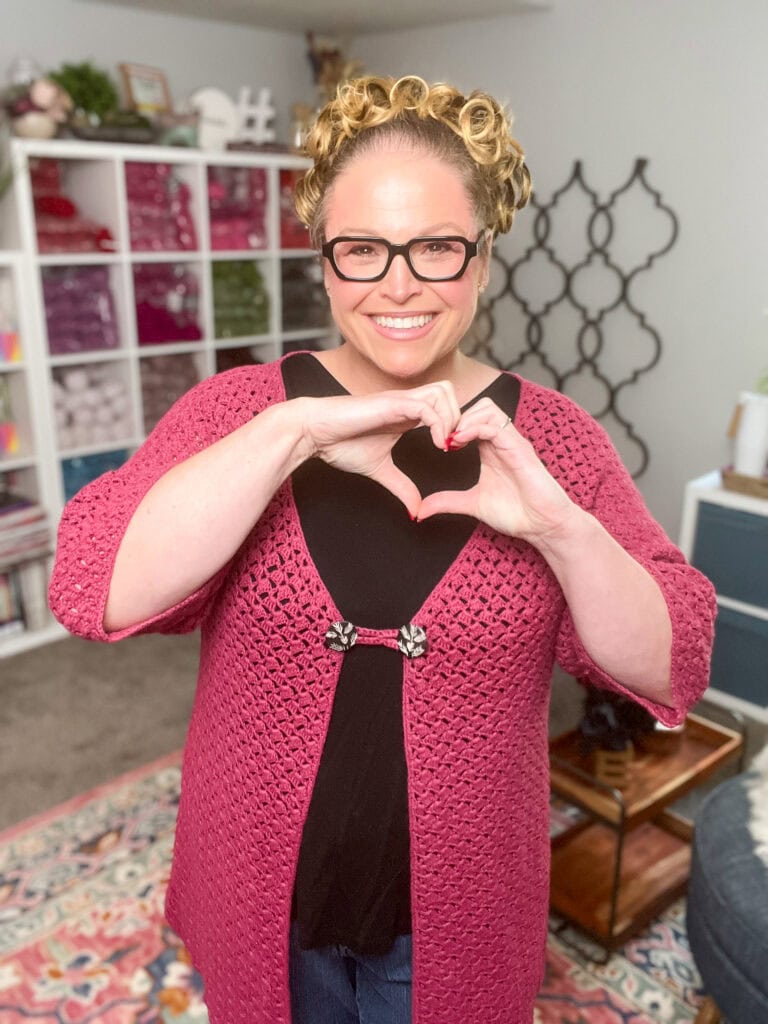
Looking for an easy one piece crochet cardigan that looks handmade in the best way possible (you know—“did you really make that?” vibes)? The Amimono Crochet Kimono Style Cardigan is the answer. This free, size-inclusive cardigan pattern is worked in one piece and has only two seams, creating a drapey, lightweight garment perfect for layering all year long.
If you’ve been searching for a free two-rectangle crochet cardigan pattern, a crochet cardigan in one piece, or just an easy crochet cardigan pattern to show off your stitches—welcome home, friend. 🧶
🧥 The Crochet Cardigan You’ll Actually Wear
Let’s be honest… not all handmade cardigans get worn 😅
This one is different.
This lightweight crochet kimono cardigan is:
- Easy to throw on over a tank or tee
- Not bulky or stiff
- Perfect for spring, summer, and layering year-round
- Stylish enough that people will ask, “Wait… you made that?!”
It’s the kind of project that doesn’t just sit in your closet… it becomes a go-to piece.
Why You’ll Love This Crochet Cardigan
- Beginner-friendly construction: Two rectangles + two seams = a modern crochet cardigan that looks far more complex than it is.
- Lightweight layering: Designed with breathable cotton-bamboo yarn for drape and shine—ideal for spring and summer.
- Size inclusive: Pattern includes multiple sizes and clear stitch diagrams so you can make the perfect fit.
- Customizable: Adjust length or sleeve width easily by adding or removing rows.
- Confidence booster: Great for your first “real garment” after scarves and blankets!
Affiliate Disclosure: This post contains affiliate links. To learn more please visit my privacy policy here💖
Yarn Selection & Substitutions
This pattern is written for a lightweight cotton-bamboo blend that offers beautiful drape and a soft sheen—perfect for warm-weather cardigans and easy to wear indoors year-round.
Discontinued Yarn Used on Project: Cotton Bam Boo by Classic Elite (52% cotton, 48% bamboo; 50 gram ball = approx 130 yards) 10 (12, 13, 14, 16, 17) balls Main Color (MC)—3495 Privileged Plum
Here are some excellent yarn choices for your Amimono Kimono:
- Heatherly Sport by WeCrochet – With a blend of acrylic and Merino wool, Heatherly is the perfect choice for baby blankets and other baby projects that require next-to-skin softness! 1 hank has 328 yds.
- Shine Sport by WeCrochet – a 60% Pima Cotton, 40% Modal natural beech wood fiber and 1 ball has 110 yds.
- WeCrochet. Samia – 80% Cupro, 20% Mulberry Silk and has 188 yds in each ball.
- WeCrochet Comfy Sport – a soft, smooth cotton/acrylic blend with great stitch definition has 136 yds.
- WeCrochet CotLin Sport – a cotton/linen blend with a matte finish and lovely texture has 123 yds.
If you prefer a touch of shimmer, try a bamboo blend. For a more rustic matte finish, linen or cotton-linen yarns are beautiful alternatives.

Important: Always make a gauge swatch—and hang it to measure accurately before starting! Learn how here:
✔️ Is This Crochet Cardigan Pattern Right for You?
If you’re nodding along to any of these… you’re in the right place 👇
- ✔️ You’ve never made a crochet garment before
- ✔️ You want something simple and low-stress
- ✔️ You love the idea of minimal shaping
- ✔️ You prefer projects with just a couple seams
- ✔️ You want a lightweight cardigan you’ll actually wear
✨ Designer Tip: This is one of my favorite “first garment” projects because it builds confidence without overwhelming you.
About the Easy Crochet Cardigan Construction
This isn’t your typical “granny square cardigan” or hexagon sweater. The Amimono is a one piece crochet cardigan that uses simple shaping and strategic seaming to create elegant sleeves and a natural drape.
You’ll work one large back panel using stitch patterns provided (complete with stitch diagrams), then add stitches for the sleeves, add space for the neck opening and then finally the two fronts of the cardigan. The seam along the side of the cardigan and bottom of the sleeve will join the cardigan together. The result? A sleek, two-seam crochet cardigan that feels handmade but polished.
Crochet Kimono Style Cardigan Pattern Details
- Skill Level: Intermediate – if you can chain, single crochet, and double crochet, you can make this. The hardest part is reading the pattern.
- Construction: One large piece with two seams.
- Pattern Includes: Full written instructions, detailed stitch diagrams, and sizing adjustments.
- Sizes: Inclusive sizing for multiple body measurements.
- Best For: Makers who want their first garment to feel easy yet impressive.
🧠 Never Made a Crochet Cardigan Before?
Friend, I’ve got you 💛
This pattern is designed to keep things simple:
- No complicated shaping
- No scary construction steps
- No confusing assembly
You’re essentially creating a rectangle (yes, really!) and turning it into a wearable cardigan.
And with the included video support, I walk you through the steps so you’re never left guessing.
🎁 Want More Beginner-Friendly Crochet Patterns?
If you loved this project, you’re going to want more patterns like this 👇
Grab your free resource here:
👉 (INSERT YOUR OPT-IN LINK — gauge worksheet or similar)
You’ll get helpful tips, pattern support, and more projects designed to build your skills with confidence.
Join our Newsletter
Get Free Crochet & Knitting
Pattern Links & Coupons!

How to Crochet This Easy One Piece Cardigan – Amimono
Designed by: Marly Bird
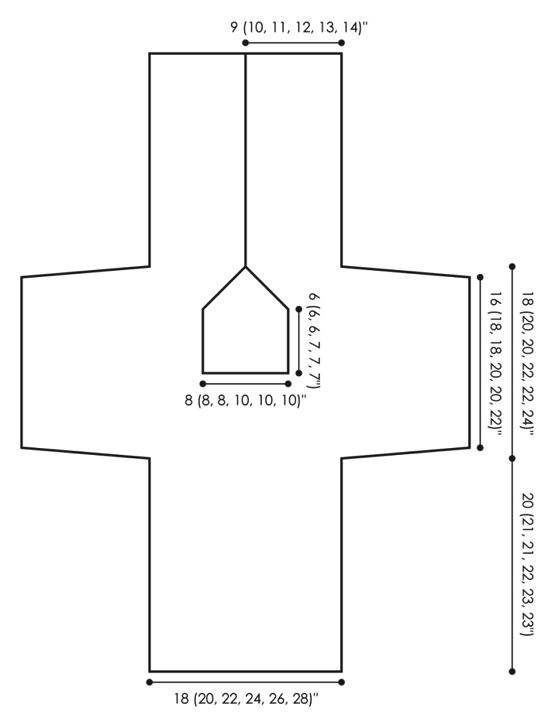
To Fit Sizes: Small (Medium, Large, Extra Large, 2X, 3X)
To Fit measurements: 32-34 (36-38, 40-42, 40-46, 48-50, 52-54)”
Finished Measurements: 36 (40, 44, 48, 52, 56)”
Gauge: 4 stitch pattern repeats and 8 rows = 4″ in Asymmetrical Stitch Pattern. Take time to save time, check your gauge.
MATERIALS
Yarn
Sample used Cotton Bam Boo by Classic Elite (52% cotton, 48% bamboo; 50 gram / 130 yards); 10 (12, 13, 14, 16, 17) balls Main Color (MC)—3495 Privileged Plum
Crochet Hook
US F/4 (3,75 mm); Or size to obtain gauge.
Notions
- Removable stitch markers
- Tapestry needle
- Chenille type needle
- Two – 1″ [2.5 cm] buttons
- 6″ [12.25 cm] of 1/2″ [1.25 cm] grosgrain ribbon
- Sewing thread to match the ribbon
- Sewing Needle
- Basic Blocking Supplies
- Steamer or Steam Iron
- Leather tag (optional)
- Leather rivets (optional)
SPECIAL TERMS
⭐️ ch (chain): Wrap the yarn around the crochet hook (yo) and draw it through the loop on the hook to form the first chain. Rep this step as many times as instructed. (The loop on the hook is never included when counting
the number of chains).
⭐️ sl st (slip stitch): Insert crochet hook in the indicated stitch, yo and draw through both the st and the loop on the hook.
⭐️ sc (single crochet): Insert crochet hook in indicated st, yo and pull up a loop; yo and draw through both loops on hook.
⭐️ dc (double crochet): Yo, insert hook into indicated st, yo and pull up a loop; [yo and draw through 2 loops on hook] 2 times.
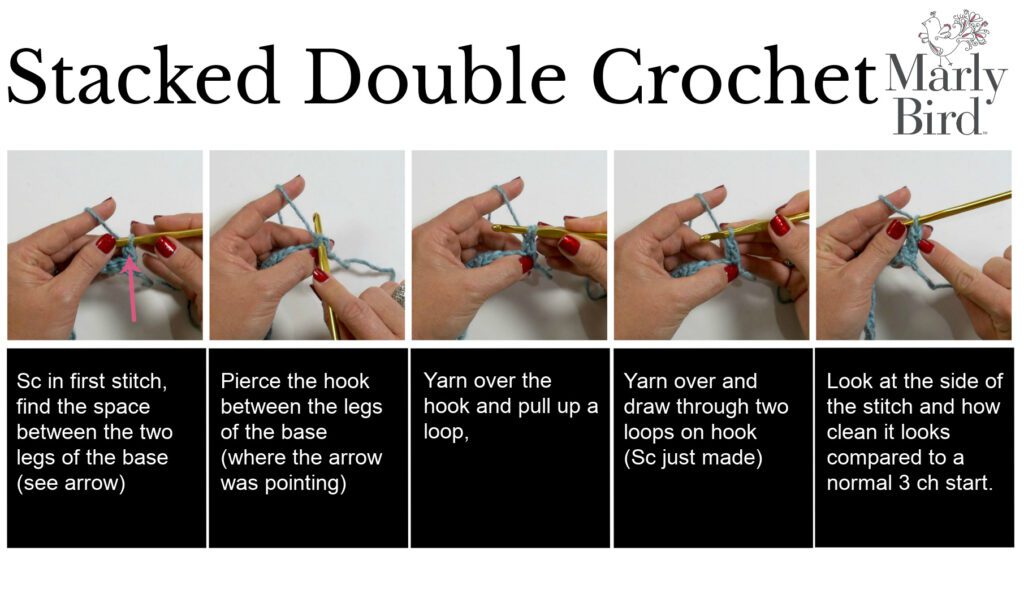
⭐️ Stacked Double Crochet (Stacked Dc): (Do not ch 1 prior to making the first sc) Sc in first stitch, insert hook in between two legs of the base, yarn over and pull up a loop, yarn over and draw through 2 loops on hook.
AMIMONO CROCHET CARDIGAN PATTERN STITCHES
Asymmetrical Stitch Pattern: (multiple of 4+1) [also, see chart to the right]
Ch a multiple of 4 + 1.
Row 1: (Set-up Row): Dc in sixth ch from hook (first two skipped ch’s count as 1 dc), (3 dc, ch 2, 1dc) in same ch as first dc. *Skip 6 chs, (4 dc, ch 2, 1 dc) in next ch, rep from * across to last 4 chs, dc in last ch, turn.
Row 2: (WS) Ch 2, *(4 dc, ch 2, 1dc) in ch 2 sp of prev row, rep from *to end of row, dc in 6th ch or tch, turn.
Row 3: (RS) Ch 2, *(4 dc, ch 2, 1dc) in ch 2 sp of prev row, rep from *to end of row, dc in second ch or tch, turn.
Rep Row 3 for Asymmetrical St Patt.
NOTE: The sweater is worked in one piece and seamed along the side and underarm.
VIDEO TUTORIALS
- How to crochet slip stitch and chain [ watch on youtube ]
- How to single crochet [ watch on youtube ]
- How to double crochet [ watch on youtube ]
- Crochet-along event live to talk about the pattern with Cryssi [ watch on youtube ]
- How to stacked double crochet [ watch on youtube ] <– this can replace a ch3 at the start of a row
- How to read crochet diagrams [ watch on youtube ]
- How to seam crochet [ watch on youtube ]
NOTES
This easy one piece crochet cardigan is worked in one panel that is seamed together to create sleeves and sides. It’s one of my favorite beginner-friendly garment constructions because it’s nearly impossible to mess up!
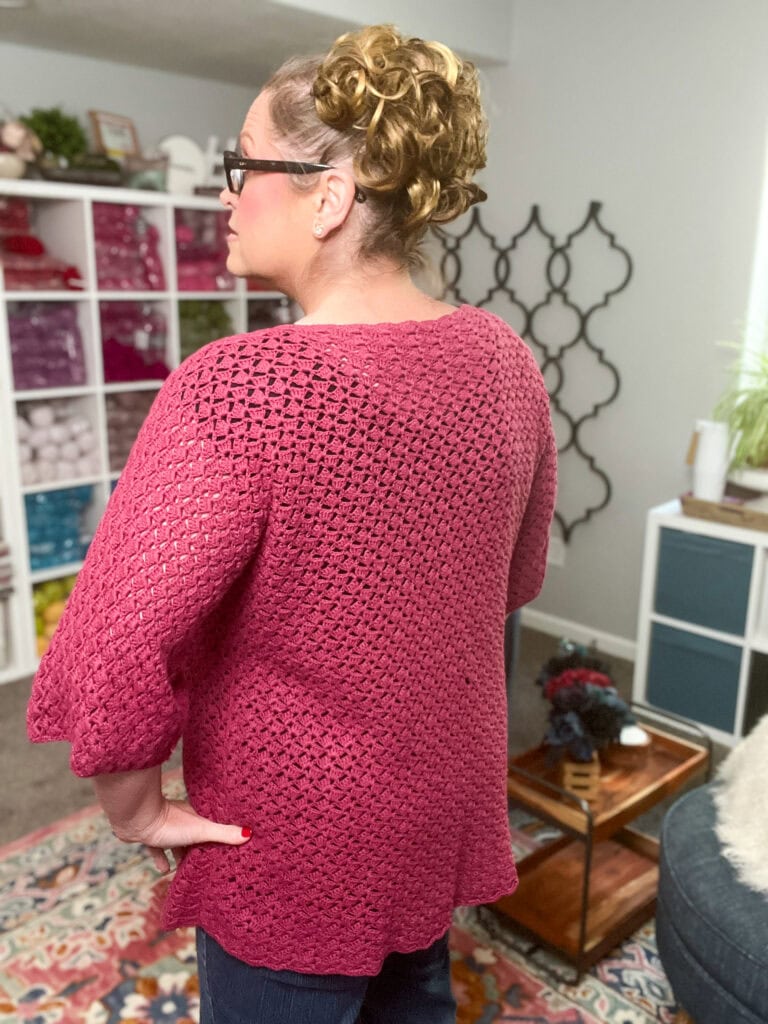
- Construction: Crocheted from the bottom up starting at the back, adding the sleeves, then added neck and front opeing. You’ll seam along the bottom of the sleeves and along each side.
- Fit: This cardigan is designed for a relaxed, drapey fit with plenty of positive ease. If you prefer a closer fit, choose a smaller size or adjust your hook size for a slightly tighter gauge. But be aware of the size of the neck opening as it can get too large.
- Gauge: Because drape is everything here, make a hanging gauge swatch before starting. Gravity changes how fabric hangs—and we want this cardigan to flow beautifully.
- Yarn Substitution: If you swap yarns, pick something with similar drape and weight. Cotton, bamboo, or linen blends are best for breathable summer cardigans. Acrylic blends work too, but may have less movement.
- Customization: Want a longer/shorter cardigan? Just add remove rows evenly to both the front before the sleeves are added and after the sleeves are decreased on the front.
- Blocking: Light blocking before and after seaming will make your stitches shine and help everything hang just right.
- Finishing Touches: Feel free to add a single crochet border, fringe, or even a belt—make it uniquely yours!
- Directions are for size Small (Medium, Large, Extra Large, 2X, 3X) are in parentheses. When only one number is given then that number applies to all sizes.
Remember, every maker’s stitch tension is unique. Take your time, check your gauge, and enjoy the relaxing rhythm of this two-seam crochet cardigan pattern. You’ve got this!
GROW
To Unlock Exclusive Subscriber Content click the Box below and join for free by simply adding your email and creating a password! If you are having troubles, clear your cache or reset your password or login to the Grow Publisher Portal.
>> Learn More About Grow Here <<
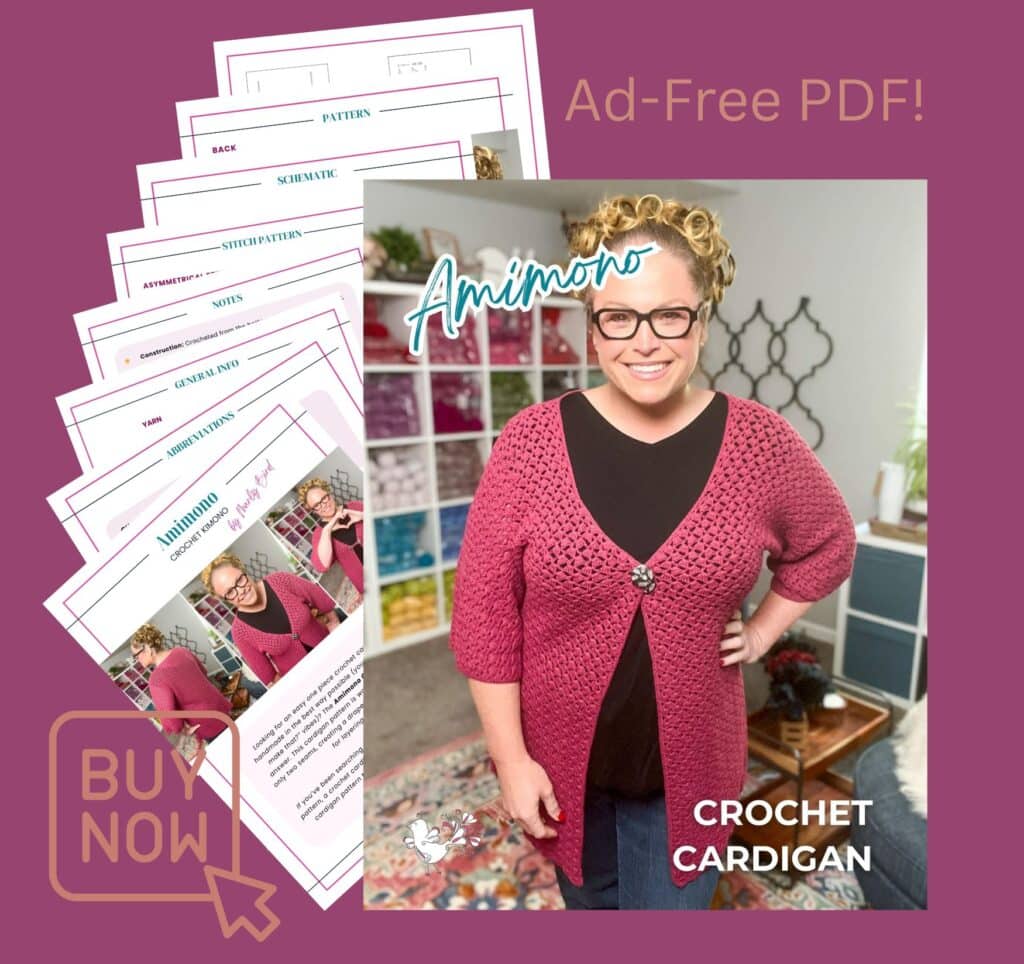
I'm thrilled to share this amazing pattern with you, many patterns on my blog are absolutely free! I kindly request that you don't copy and paste or distribute this pattern. Prefer an ad-free experience? Buy a digital PDF pattern for a small fee from one of my online stores for a seamless crafting journey.
I appreciate your support and readership. You are the reason I can keep doing what I love and sharing it with others. So, thank you from the bottom of my yarn-loving heart! Disclosure: This post contains affiliate links, meaning I get a commission if you decide to make a purchase through my links at no cost to you.
AMIMONO CROCHET KIMONO PATTERN
Back
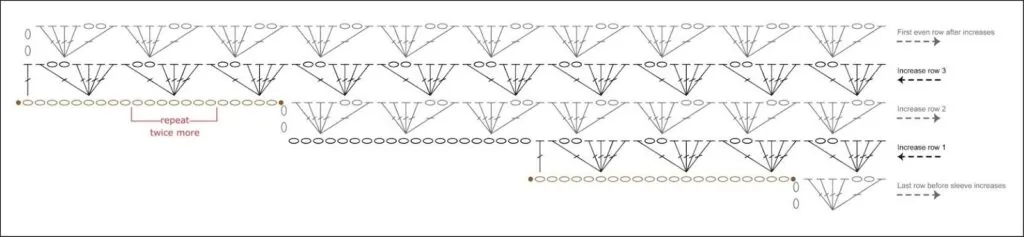
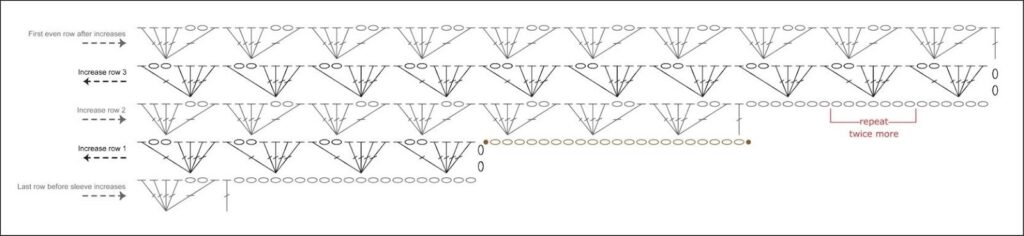
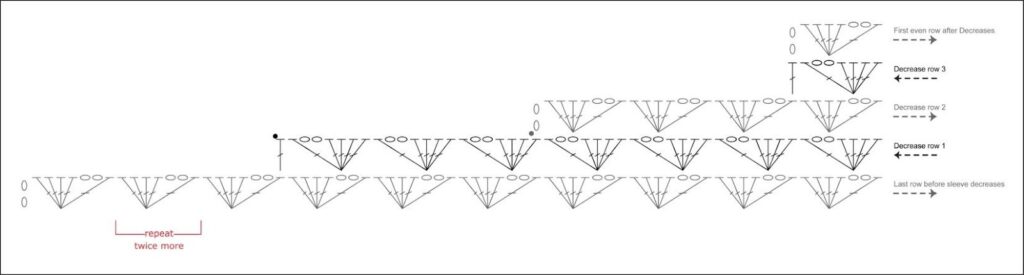
Increase for Sleeves (also, see charts below)
Note:To add stitches for the arm, you will remove the hook at the beginning of each row, add chain stitches to the opposite end, fasten off and pick up the dropped loop to continue.
Row 1: Drop yarn, join new yarn to opposite end with sl st, ch 21, fasten off. Pick up row again, ch 23, dc in sixth ch from hook (first two skipped ch’s count as 1 dc), (3 dc, ch 2, 1dc) in same ch as first dc. *Skip 6 chs, (4 dc, ch 2, 1 dc) in next ch, rep from * 1 time, sk 3 ch and 1 dc, (4 dc, ch 2, 1 dc) in next ch 2 sp of previous row. Cont in est patt across back to last ch 2 sp of previous row. Work (4 dc, ch 2, 1 dc) in last ch 2 sp, sk dc and 1 ch, (4 dc, ch 2, 1 dc) in next ch, *skip 6 chs, (4 dc, ch 2, 1 dc) in next ch, rep from * 1 time, dc in last ch, turn—24 (26, 28, 30, 32, 34) repeats.
Row 2: Repeat first row—30 (32, 34, 36, 38, 40) repeats.
Row 3: Drop yarn, join new yarn to opposite end with sl st, ch 35, fasten off. Pick up row again, ch 37, dc in sixth ch from hook (first two skipped ch’s count as 1 dc), (3 dc, ch 2, 1dc) in same ch as first dc. *Skip 6 chs, (4 dc, ch 2, 1 dc) in next ch, rep from * 3 times, sk 3 ch and 1 dc, (4 dc, ch 2, 1 dc) in next ch 2 sp of previous row. Cont in est patt across back to last ch 2 sp of previous row. Work (4 dc, ch 2, 1 dc) in last ch 2 sp, sk dc and 1 ch, (4 dc, ch 2, 1 dc) in next ch, *skip 6 chs, (4 dc, ch 2, 1 dc) in next ch, rep from * 4 times, dc in last ch, turn—40 (42, 44, 46, 48, 50) repeats.
Work est patt evenly for next 11 (13, 13, 15, 17, 17) rows.
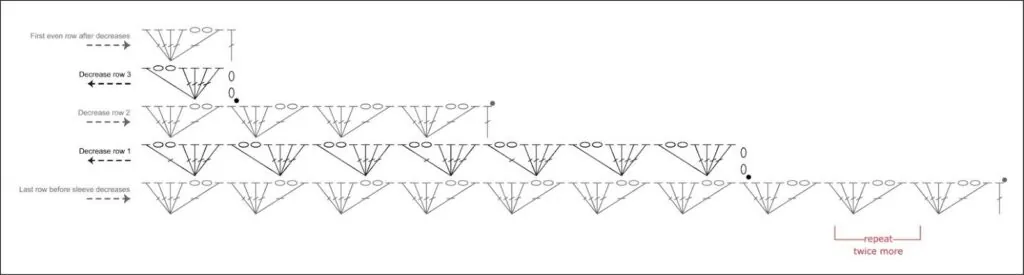
Neck Opening (also see chart below)
Row 1: Work est patt across 17 (18, 18, 19, 19, 20) repeats, ending with a dc in last dc of previous row repeat, drop yarn, sk 6 (6, 8, 8, 10, 10) repeats in the center, join new yarn to first dc of next repeat, ch 2, cont in est patt across sleeve. Place stitch marker in loop on hook then set aside. Continue to work the other side of the sleeve, sleeves are worked separately from this point forward.

Neck and Arm Shaping (also see charts below)
Work neck evenly for 12 (12, 12, 14, 14, 14) rows, then increase for 6 (6, 8, 8, 10, 10) rows, adding 3 (3, 4, 4, 5, 5) reps at each side.
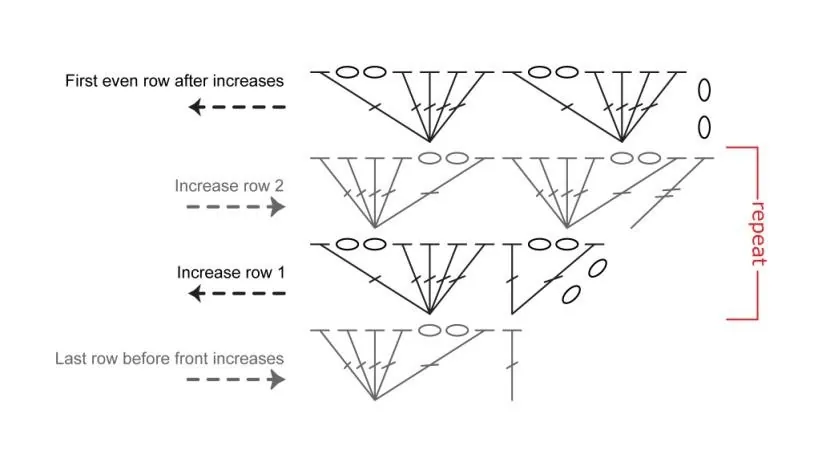
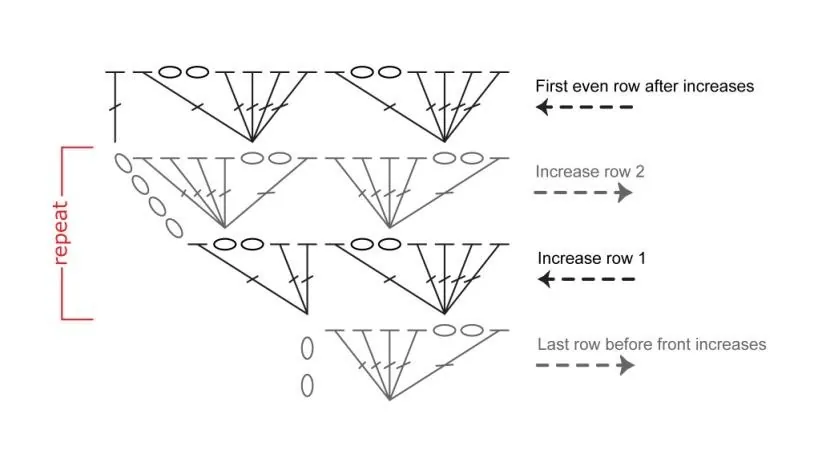
At the same time, work sleeves evenly until there are 32 (36, 36, 40, 40, 44) full rows (from cuff to cuff), then work sleeve decreases (same for all sizes, see chart).

RIGHT AND LEFT FRONT
Cont in est patt for each front piece. Work evenly for 40 (42, 42, 44, 46, 46) rows after sleeve decreases, fasten off.
FINISHING
Wash and Block piece to measurements.
With (RS) facing each other, whip stitch sides together.
Arm Bands: With RS facing, join MC to sleeve
seam with sl st.
Rnd 1: Ch 1, sc evenly around arm opening, sl st to first sc, fasten off.
Neck and Body Edging
Join MC to the middle of neck opening with sl st. Row 1: Ch 1, sc evenly around neck, body opening, bottom of piece, up the other body opening and the other half of the neck opening, sl st to first sc, fasten off.
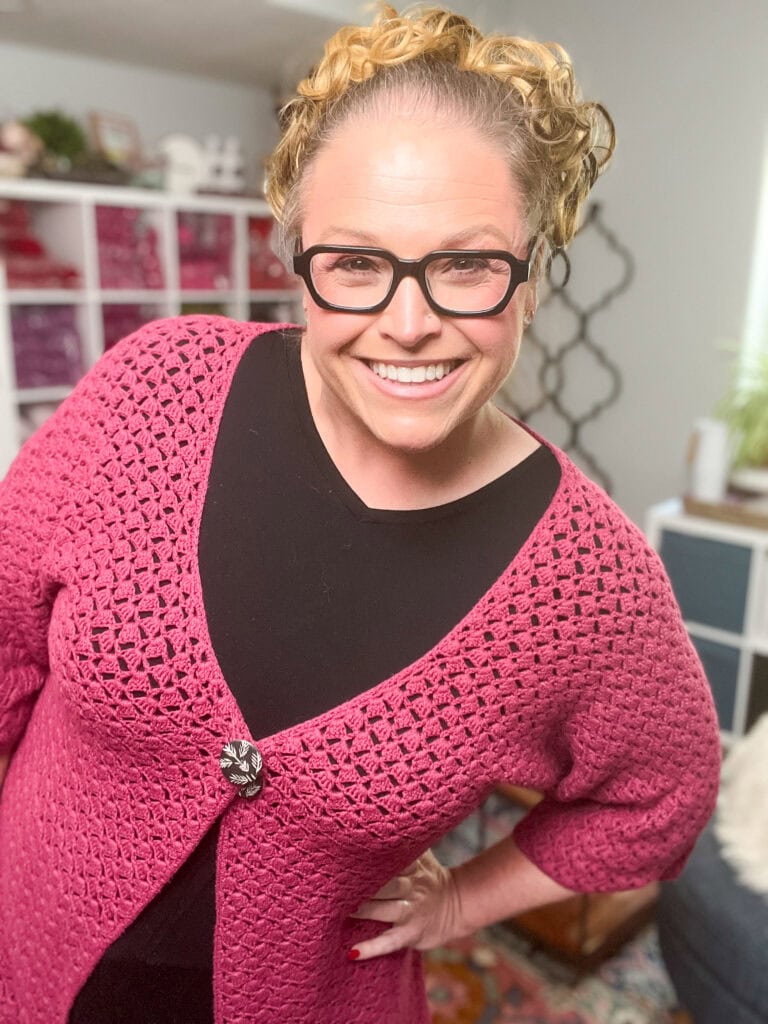
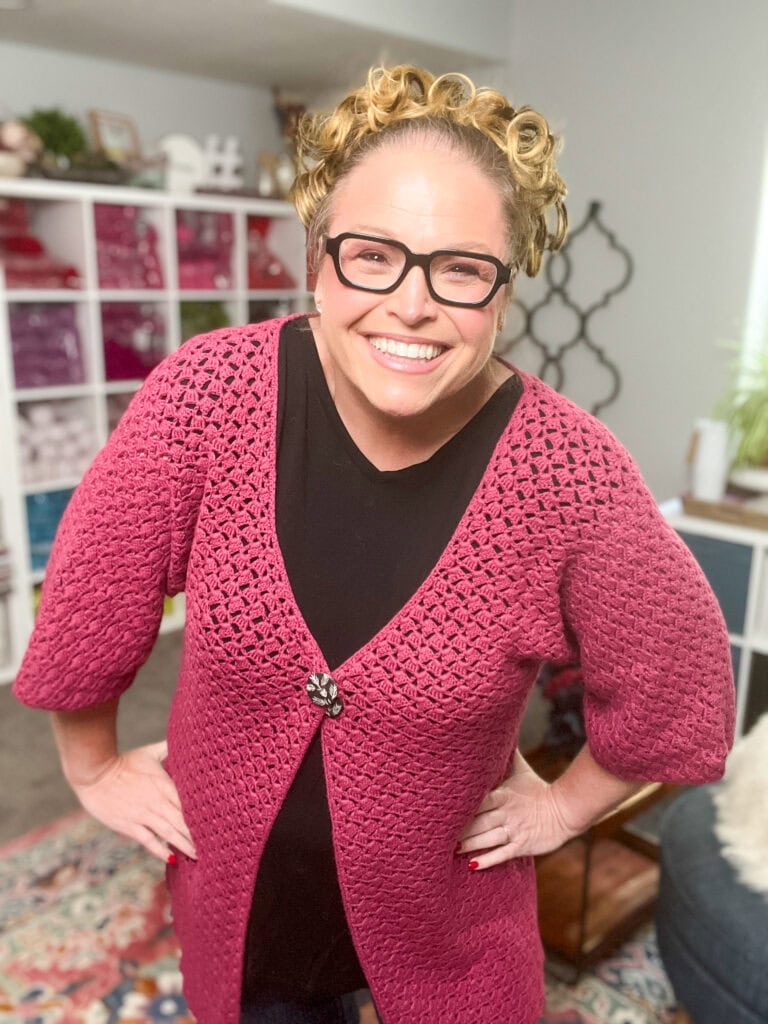
To add buttons cut 2 pieces of grosgrain ribbon 2” [5 cm] in length. Fold ends to the middle and pin to WS of Left Front and WS of Right Front where the buttons will be placed, look at photo for placement. Backstitch ribbon to kimono with matching sewing thread and needle. Sew buttons to RS of each front, see photo for placement.
For crocheted closure ch 12 (or enough to go around the buttons but not too large so it will fall off), join with a sl st to first ch, ch 12 again and sl st to first ch (figure 8 created), ch1 and sc around the 12 chs on each side of the figure 8. Join with a sl st to first sc, fasten off.
🧺 Do You Need to Block Your Crochet Cardigan?
Short answer… YES 🙌
Blocking helps:
- Even out your stitches
- Improve drape
- Give your cardigan that polished, finished look
For best results:
- Wet block or steam block (depending on fiber)
- Lay flat to dry
- Shape gently to size
✨ This step makes a HUGE difference, especially for garments.
For more details, see my guide to measuring crochet gauge and blocking tips from other garment projects on the blog.
🧵 More Crochet Patterns You’ll Love
If you loved making this cardigan, you’ll definitely want to check out these next:
👉 (ADD YOUR INTERNAL LINKS HERE — HIGH PRIORITY)
Look for:
- Other crochet cardigan patterns
- Lightweight crochet tops
- Beginner-friendly garment patterns
- Summer crochet projects
✨ This is where you keep your reader on your site longer (and boost SEO big time)
Frequently Asked Questions
Is this crIs this crochet cardigan beginner-friendly?
Yes, this crochet cardigan pattern is beginner-friendly and designed with simplicity in mind. If you are comfortable with basic crochet stitches like chains and double crochet, you can successfully make this garment.
The construction avoids complex shaping and focuses on simple techniques, making it a great way to build confidence while creating your first wearable piece.
How long does it take to crochet a cardigan?
Most crocheters can complete this cardigan in a few days to a week, depending on how much time they spend crocheting each day.
Because the pattern uses repetitive stitches and a simple structure, it’s an easy project to work on in short sessions without losing your place.
What is a one piece crochet cardigan?
A one piece crochet cardigan is a garment made primarily from a single continuous section of fabric rather than multiple panels.
In this pattern, the cardigan is worked from the back to the front in one piece, then finished with minimal seaming to create sleeves and structure.
How do you crochet a cardigan in one piece?
To crochet a cardigan in one piece, you create the main body as a single fabric panel, typically starting at the back and working outward to the front.
Once complete, small seams are added to shape the sleeves and sides. This method simplifies construction and eliminates the need for complicated shaping or piecing.
Is this a good first crochet garment?
Yes, this is an excellent first crochet garment. It introduces you to garment construction without overwhelming you with shaping, counting, or complicated assembly.
If you have made scarves or blankets before, you already have the skills needed to complete this cardigan.
Can I customize the length of the cardigan?
Yes, this pattern is very easy to customize for length.
You can add rows to make the cardigan longer or remove rows for a shorter version. Just be sure to adjust both sides evenly so the garment remains balanced.
Blocking may also add a small amount of additional length to your finished piece.
What yarn is best for a lightweight crochet cardigan?
The best yarn for a lightweight crochet cardigan is one that offers good drape and breathability.
Recommended yarn types include:
- Cotton blends for softness and structure
- Bamboo blends for excellent drape
- Linen blends for a crisp, breathable feel
- Lightweight acrylic blends for durability and easy care
Sport and DK weight yarns are especially great for creating a comfortable, wearable layer.
Can I substitute yarn for this pattern?
Yes, you can substitute yarn, but it’s important to match the gauge and choose a yarn with similar weight and drape.
Always make a gauge swatch before starting to ensure your cardigan will fit correctly. Different yarn fibers can affect how the garment stretches and feels when worn.
How do I seam a crochet cardigan neatly?
To seam a crochet cardigan neatly, use a tapestry needle and matching yarn.
Common seaming methods include:
- Whipstitch for a quick and sturdy seam
- Mattress stitch for a more invisible finish
Working from the outer edge inward helps maintain alignment and creates a clean, professional look.
Do I need to block this crochet cardigan?
Yes, blocking is an important finishing step for crochet garments.
Blocking helps:
- Even out stitches
- Improve drape
- Give the cardigan a polished, finished appearance
You can wet block or steam block depending on your yarn type. Always test your method on a swatch first.
Should I block before or after seaming?
For best results, block your pieces before seaming.
Pre-blocking helps ensure edges are straight and easier to match during assembly. After seaming, you can lightly block the finished cardigan to smooth everything out.
What is a hanging gauge swatch and why does it matter?
A hanging gauge swatch is a swatch that is allowed to hang freely to simulate how the fabric will behave when worn.
This is important because yarn can stretch under its own weight. Checking your hanging swatch helps you predict how your cardigan will fit after wearing.
Can I add a collar or edging to this cardigan?
Yes, this cardigan is easy to customize with added details.
You can:
- Add crochet ribbing along the front edges
- Create a collar for more structure
- Add decorative edging for a unique finish
These small changes can dramatically alter the style of your finished garment.
What if my crochet cardigan feels stiff?
If your cardigan feels stiff, it is usually due to tight tension or yarn choice.
To fix this:
- Compare your fabric to your gauge swatch
- Try blocking to relax the fibers
- Use a larger hook for better drape in future projects
Cotton and linen yarns will soften over time, while acrylic yarns can benefit from gentle steam blocking.
My neckline stretched out—how can I fix it?
If your neckline stretches out, you can reinforce it by sewing a strip of grosgrain ribbon along the inside back neckline.
You can also:
- Add a row of slip stitches to tighten the edge
- Lightly block the neckline to reshape it
These techniques help maintain structure while keeping the garment comfortable to wear.
More Crochet Cardigans You’ll Love
- Creekside Crochet Ruana
- Garden Party Cardigan – Glow Up
- You Are Valued
- Stoney Creek
- Aurora Lace
- Oakley Lace Shrug
- Sookie
- Trifle
- Lyvia Ruana
Each of these patterns features simple shapes, stunning textures, and clear instructions—just like the Amimono!
Final Thoughts
The Amimono Kimono is proof that you don’t need complicated shaping to make something beautiful. With a simple stitch pattern, lot's of crochet fabric, a bit of seaming, and your favorite yarn, you can create a lightweight, modern cardigan you’ll wear on repeat.
Share your finished project with me using #marlybird and #mmmdi (Marly Made Me Do It) — I can’t wait to see your gorgeous makes!
❤️ Your BiCrafty Bestie,
Marly Bird

Categories: Crochet, Free Patterns, Marly Bird Premium Patterns, Our Free Patterns, Pattern


Subscribed to Kristens YouTube channel while listening & viewed colors of the BRAVE yarn; think I really like Flamingo & Huckelberry
that’s awesome, Kathy. If you are trying to leave your comment for the prize from the podcast you will want to leave a comment on the shownotes to that show. xox
This is gorgeous and I would live to make it for my SIL. I question about the fit, is a finished size snug on the body or loose. My SIL is a bit picky about things not being to restrictive.
The best thing to do is take a look at the schematic measurements and compare those to the measurements your sister likes. The fit on my is no tight but just right.
Thank you so much!!
I’m trying to make this now for size 48-50. I have done the gauge several times and it comes out right every time. When I go to make the garment something is off. Maybe I misunderstand how this is being created? I thought the first instructions for the back start at the bottom edge across the back. I chain the 185. I’m thinking that that should measure 26″ long since that is what it shows on schematic. Instead It is way way way over 26″. I crocheted 4 rows and it was looking so big it could wrap around me. So I ripped it out and did another gauge. Perfect. Did just a chain of 185 and way over 26″. I don’t know what to do.
I’m not Marly Bird but thought I’d chime in. Don’the use the chain as a measure of width. Work a few rows and then measure.
Omgosh I love the way this sweater looks, and I totally enjoy working on your patterns! I can’t wait to get started on this one.
Mary bird do u have a video tutorial for this. Really love to make for my mother, but bad in pattern reading when it comes to arms and neck. Plz could u do even short clipings for this kimono. Plz plz plz.
Marly, I am attempting to make this for myself. This my first piece of clothing. so far I’ve been able to understand and follow the pattern but I don’t see any instructions on how to do the sleeve decrease. could you help explain please.
Looking forward to making one for myself!
Hi Marly, I’ve been commissioned to make this lovely sweater for a customer who will probably need a larger size to accommodate her 57.5″ hips. Any advice you can offer on the best (i.e. easiest) way to make it wider would be greatly appreciated. TIA!
Never mind Marly. I figured it out.
Would like to try your Amimono Kimono pattern but not sure how to figure out how long to make the foundation chain for each size of the pattern. Can you help?
I would like to make this but the text on the charts is impossible to read as it is so blurred. how have others managed?
How do you do the increase on the sleeve I see the chart but it isn’t making since I need written instructions please.
Thank you so much for this beautiful cardigan…