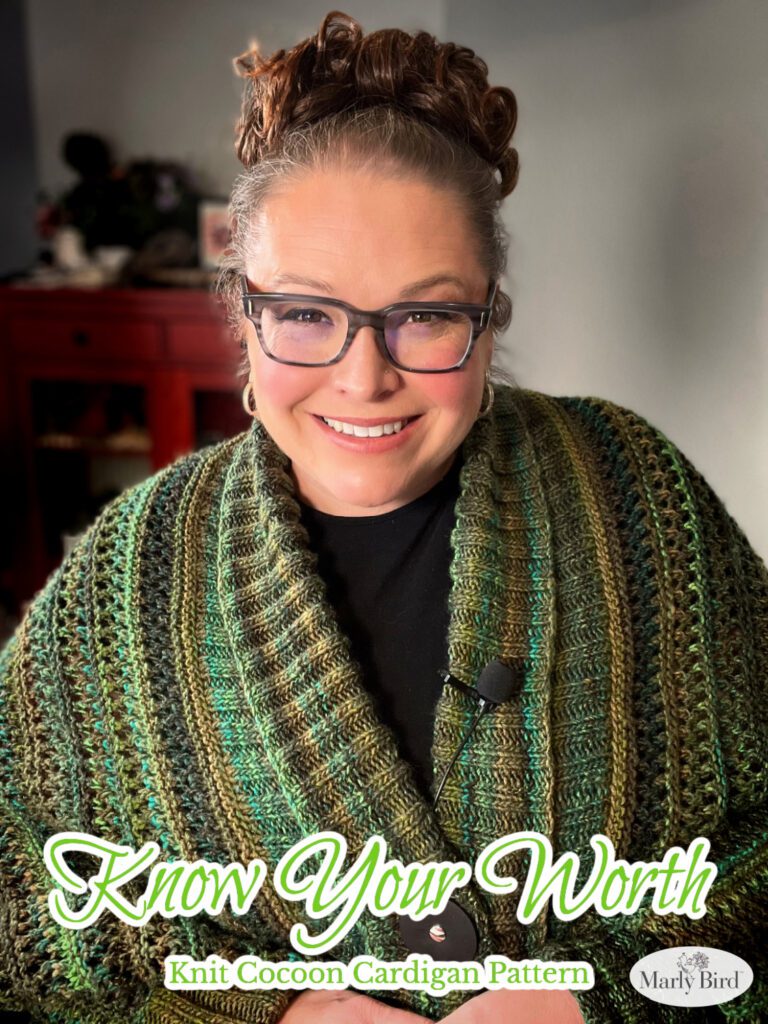
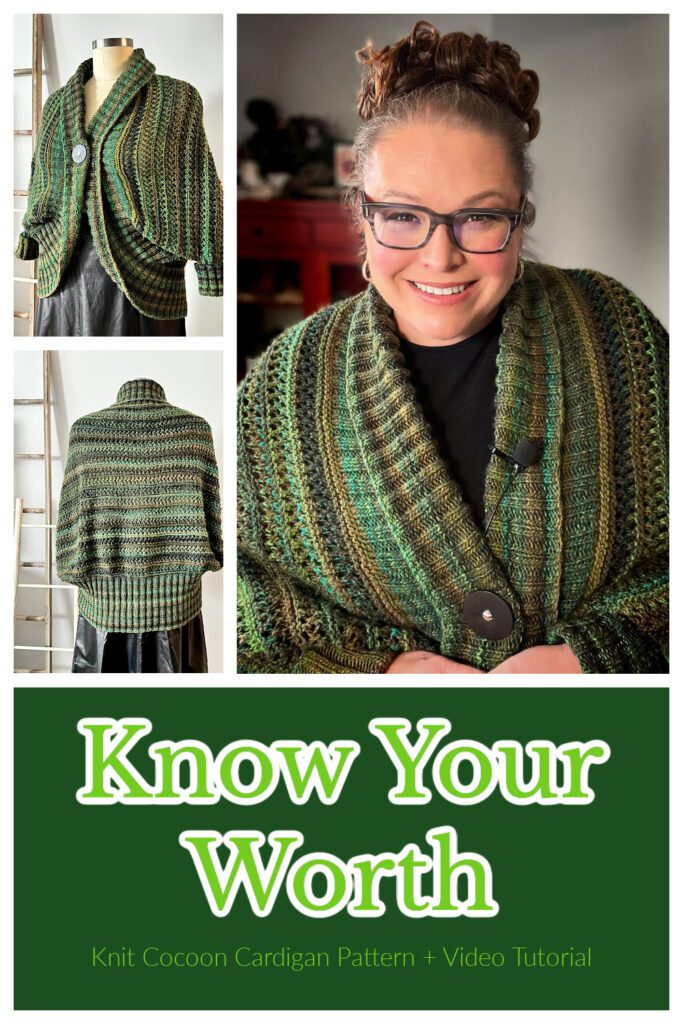
Knit your way to comfort with Marly Bird’s ‘Know Your Worth’ Knit Cocoon Cardigan Pattern + video tutorial. This easy knit sweater pattern is perfect for knitters of all levels. With simple knit lace and a big comfy ribbed collar, learn how to knit a cardigan that’s as cozy as it is beautiful.
This pattern is a beautiful blend of simplicity and elegance, with clear, step-by-step instructions that make it accessible to knitters who are just beginning to explore garment creation. At the same time, its rhythmic stitching and engaging construction will keep the more experienced knitter’s interest piqued.
If you love the Kaleidoscope Poncho or the Sycamore Knit Ruana, you will love this.
Let the ‘Know Your Worth’ Knit Cocoon Cardigan be your next beloved project, and take pride in wearing a garment that’s as unique as you are. Dive into the pleasurable world of knitting with Marly Bird and discover the profound joy of creating something truly your own.
This post contains affiliate links.
Cozy Crafting with Marly Bird’s Knit Cocoon Cardigan
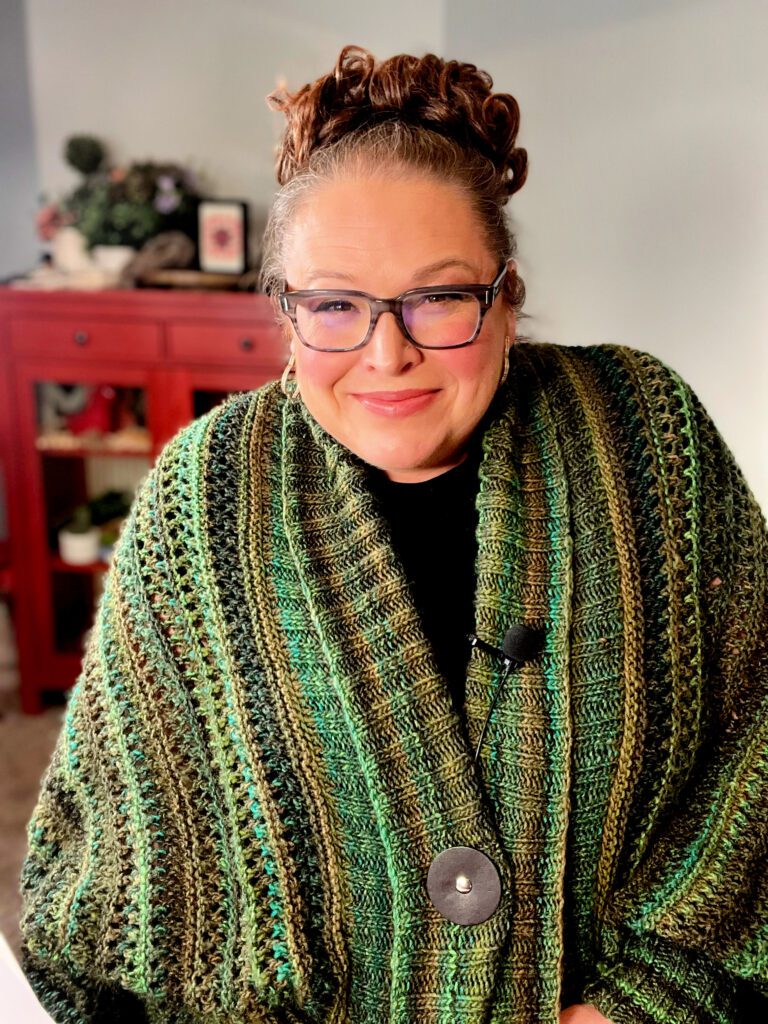
Hi, it’s me, Marly, your BiCrafty Bestie and I have to tell you, never before have I nonchalantly worn a sample piece in a video and received SO.MANY.REQUESTS FOR THE PATTERN! Yes, from the moment I opened up the box from my contractor (thanks Cryssi) and pullout out this snuggle worthy cardigan I knew I was in LOVE with it. I loved the yarn, I loved the oversized cocoon cardigan shape, and most certainly loved the fit. You better believe that I have have worn the ‘Know Your Worth’ sweater more than any other of my designs in the last two months.
And now, you get to make one too! Be prepared my friends. This knits sweater is one you will want to cuddle in immediately. So, get ready to create a huggable masterpiece. It’s not just a knit pattern; it’s your next favorite thing to wear on a chilly day!
Favorite this pattern on Ravelry and Queue it up to make.
Adding this pattern to your queue and favoriting it on Ravelry helps you not only keep track of the patterns you like and want to make, but it helps designers get their patterns noticed by other Ravelry members who might not have seen the sweater.

You can purchase on Etsy or Ravelry or Shopify.
Why Everyone is Talking About This Knit Shrug
Call it a cocoon, a cardigan, a shrug, or a big comfy sweater, you are going to love to knit it and wear it. Why? Well, let me tell you.
Just Right for Knitters at Every Level
Are you a newer knitter who has only made washcloths, scarves, or maybe a blanket? No worries! This knitted sweater is perfect if you’re just jumping into the magic that is knitting your own clothes. And if you’ve been knitting sweaters for ages, this easy knit sweater will be a fun, quick project for you. I like to say adventurous beginners will find acceptably challenging while more intermediate knitters (and experienced) will find this relaxing enough they can watch Netflix and chill out while knitting.
A Pattern That Fits All Body Types – Size Inclusive
This isn’t your ordinary knitted cardigan. This pattern comes in sizes from small all the way to 5XL, making sure everyone gets to join in the knitting fun. There is a schematic to show the measurements of each size so you can choose if one size is better than another for you. Don’t just rely on the S-M (L-2Xl, 3XL-5XL) sizeing. Choose what will fit you best. For example, I am really between a 2 extra large and a 3 extra large. I made the sample the largest of the sizes because I wanted it to fit me big. Having a tighter shrug was not the look I was going for and that is what helped me make my decision on sizing. You can do the same.
Simple Knit Stitches, Big Style
Afraid of knit lace stitches? There’s no need! The ‘Know Your Worth’ cardigan has a simple knit lace that looks fancy without all the fuss. As long as you make sure for every decrease there is a partnering increase, you will be just fine. In the video tutorial I do mention this, but it is worth repeating.
Not to menion, adding a lifeline to your knitting will help you SO MUCH. That way should you make a mistake you have a safty net to pull the stitches back to and fix a knit mistake.
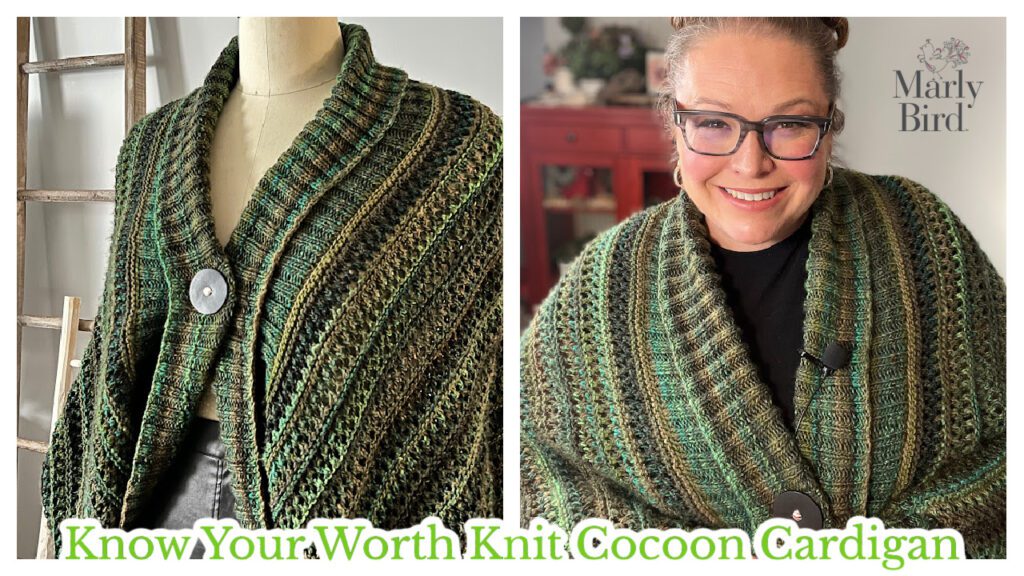
Dramatic 2×2 Knit Big Comfy Ribbed Collar
Surely there is not worry about the dramatic 2×2 knit ribbed collar, right? Listen, I am here to tell you, in this pattern the stitches are picked up and knit around the cast on and bind off edge of the cocoon. In the video tutorial I show you how to pick up stitches with the circular needle. It is super easy to do and makes it so the collar is joined as you go (meaning – no extra sesaming).
I chose to use this technique because it creates a bold and striking ribbed collar that really makes a statement on any knitwear piece.
You most likely already know this but, the 2×2 pattern refers to alternating two knit and two purl stitches in a set sequence, resulting in a wonderfully textured and stretchy fabric.
What I love about the Dramatic 2×2 Knit Ribbed Collar is how it adds depth and dimension to any garment. Whether you’re knitting a cozy sweater or a trendy scarf, this collar technique instantly elevates the design and gives it a modern edge. Plus, it’s great for beginners and seasoned knitters alike – the repetitive pattern is easy to follow, but the end result looks like it was made by a pro.
Get Sleeves Without the Fuss
Okay, they might not really be sleeves but the way the cocoon is designed, once the lace knit rectangle is seamed, you will pick up stitches around an space you leave open near the fold. This opening is the cuff hole.
Just as you do with the collar, you will pick up stitches but this time you will use the double pointed needles since you will be knitting in the round and the opening is so small. The cuff is knit in the 2×2 ribbing as well and is made to be long and folded over.
The longer folded over cuff will help the sweater stay in place and really make you feel like you’re wrapped in a hug!
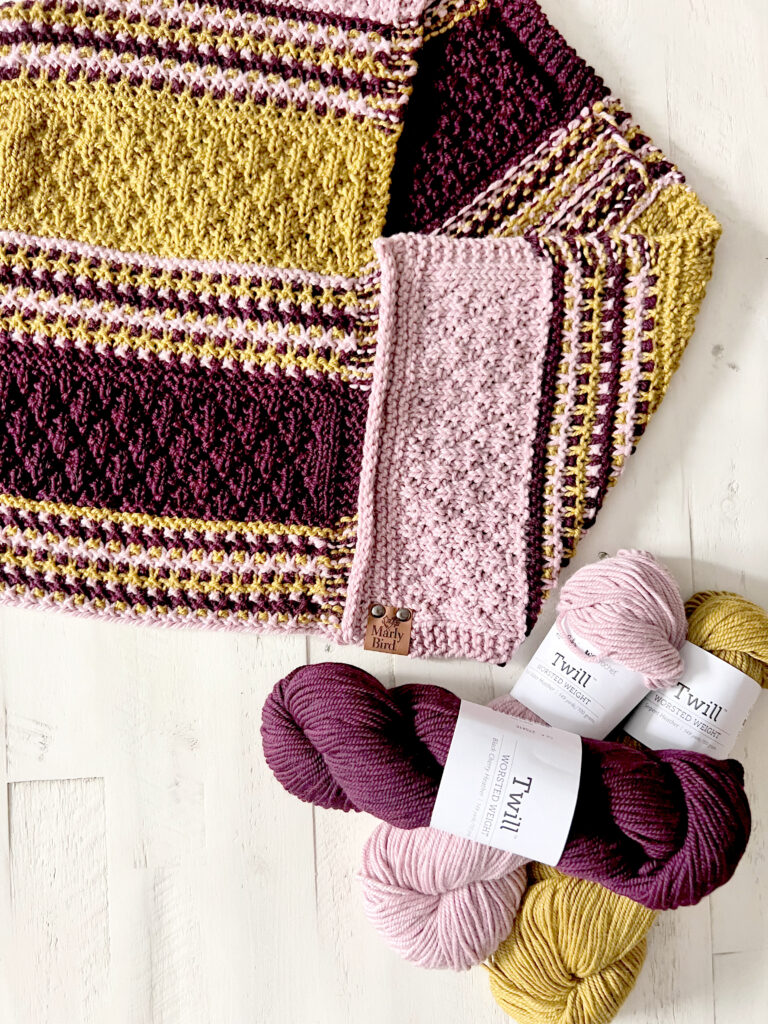
The Star of the Show: Sirdar Jewelspun Yarn
Choosing the perfect yarn for a knitting project is always a delightful part of the process for me. For the particular project I was working on, I had in mind the vibrant and colorful aesthetics of yarns like Noro, Chroma, or Unforgettable. So, when the kind folks at Sirdar sent me their yarn, Jewelspun, I was immediately drawn to its captivating blend of hues. The colors seamlessly transitioned into one another, creating a harmonious palette of complementary shades. The gradual color changes in the yarn were especially appealing as they allowed the design to shine without abrupt shifts or breaks in color. It felt like a match made in knitting heaven, and I knew right away that this yarn was perfect for the project at hand.
Using this beautiful yarn from Sirdar sparked my creativity and inspired me to bring my vision to life with its rich and dynamic colors. Knitting with it felt like a casual and enjoyable journey, where each stitch added to the overall beauty of the piece. The yarn’s quality and color palette truly elevated the project, making it a joy to work on. In the end, the yarn not only met but exceeded my expectations, proving once again that the right choice of yarn can truly enhance the knitting experience and result in a masterpiece that brings me immense satisfaction.
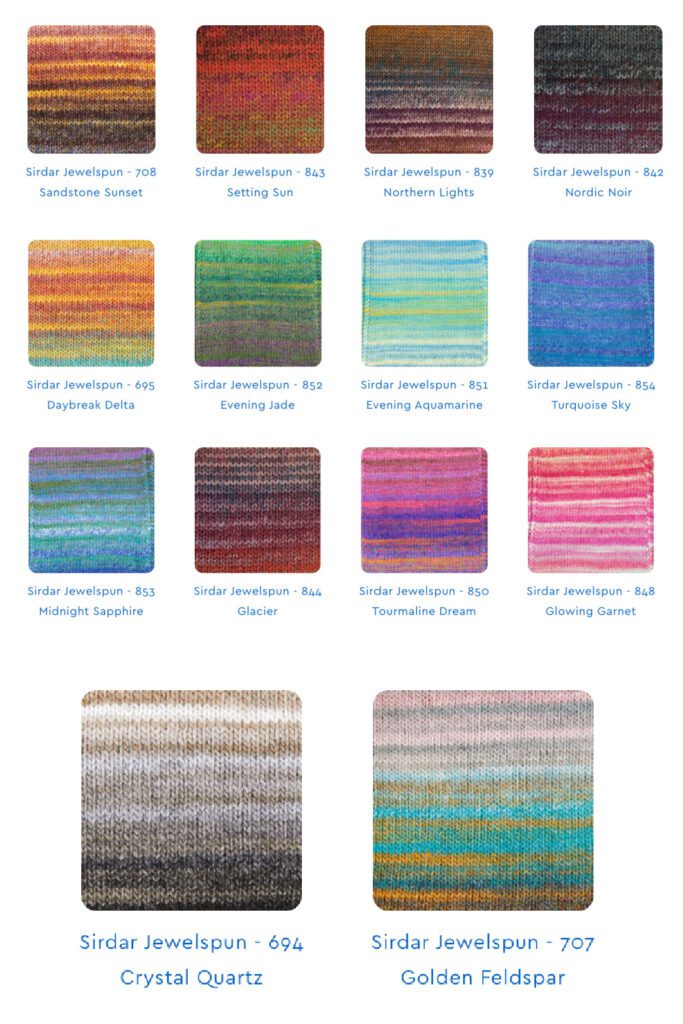
Colors That Make You Want to Knit More!
Jewelspun yarn is not available in many places I can find. But my friends over at Jimmy Beans Wool do carry it in a variety of colors. If you ask me, you can NOT go wrong with any of these choices. They are lovely. The color transition in one 200 gram ball of yarn as you work with it makes your needles go faster just to see what the next color is going to be. When all is said and done, your knitted sweater will look like a pro did it, even if you’re just starting.
Your Step-by-Step Cast On to Cast Off Guide
Starting Off Strong
Wondering how to cast on? I prefer the long tail cast on for this design. The Long Tail cast-on places the stitches on the needle as if they are all knits. Therefore, when the work is turned you are looking at purls on the needle. Because of this, I often think of the very first row after this cast on as a WS row.
So, when using this cast on technique and working garter stitch for the first 4 rows, the transition looks nice. Plus, picking up stitches along the edge is easy when it is time to add the collar.
Keep Track of the Number of Stitches When Casting On
Let me share a neat little tip with you when it comes to casting on stitches for this cardigan or any knit project. Trust me, with the sheer number of stitches you need to cast on, it’s no surprise that keeping track can be a bit of a challenge. But fear not, there’s a simple solution!
What you can do is place a stitch marker every 20th stitch as you’re casting on. This way, you create checkpoints that make it a breeze to count your stitches accurately. So, if you happen to lose count along the way (we’ve all been there!), you can easily backtrack to the nearest stitch marker and pick up right where you left off. It’s a game-changer, I tell you! Give it a try next time you’re starting a new cardigan project and thank me later. Happy knitting, y’all!
Making the Magic Happen
Once you’ve cast on for the cocoon cardigan, it’s time to dive into the knitting sweaters process. this is where you will be introduced to the Lace Bands Stitch pattern. It is a big lace knit stitch and it is so easy that it is easy to make mistakes. So go slow and keep track of all the increases and decreases in a row.
Remember, you will NOT change the stitch count ever. If you get to the end of a row and have a different stitch count than the previous row something went wrong and you need to check your work. You can tink or unknit your project to find the mistake, or find the mistake on the next row and fix it there. Either way, make sure you don’t just gloss over it. It is important you keep the correct number of stitches.
Also, I think it is important to note here that the yarnover lace portion of the stitch pattern will really GROW as you knit. So make sure you do a gauge swatch!!! If you don’t, you could end up with a sweater that is too wide (because this pattern really stretches stitchwise and shrinks rowwise).
As always, I do guide you through making a swatch which will also guide you through working the Lace Bands stitch pattern. Once you get past the first 20 rows, this stitch pattern is easy to remember and knitting this cozy knit cocoon, will be cake.
Finishing the Knit Sweater Like a Boss
Not sure how do you cast off your knitting? Not a problem. This pattern actually has you bind off in pattern. All that means is you will work each stitch that is on the left hand needle in the stitch pattern it is supposed to be (if it is a knit, knit it; if it is a purl, purl it). Then, once you get two stitches on the right hand needle, you will make the second stitch away from the tip jump up and over the first stitch close to the tip.
I did make a youtube tutorial showing how to bind off in pattern. If you’ve never done it before I suggest giving it a look.
Caution: make sure you keep the stitches sized nice and consistent and DO NOT PULL ON THE YARN to tighten up your bind off will be too tight. I know of people who will bind off with a larger needle just to make sure they don’t make their cast off too snug.
Know Your Worth Knit Cocoon Cardigan Information
This pattern is a Marly Bird Premium pattern and can be purchased here.
All the details you need about the project can be found below as well as the YouTube Video Tutorial.
Know Your Worth Cocoon Cardigan
Designed by Marly Bird
SKILL LEVEL
Easy
MEASUREMENTS
To Fit Size
XS-M (L-2X, 3X-5X)
Finished Measurements
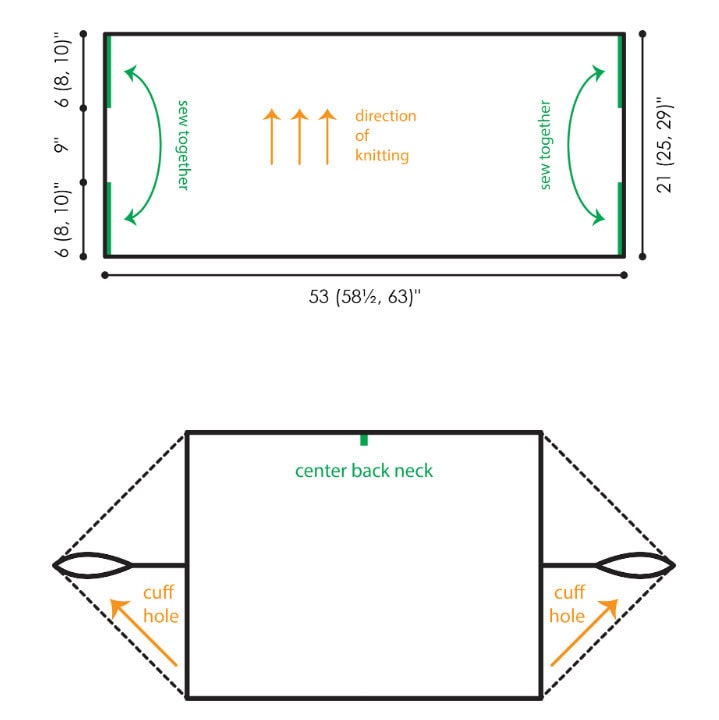
Body piece measures 53 (58½, 64)” [134.5 (148.5, 162.5) cm] x 21 (25, 29)” [53.5 (63.5, 73.5) cm] laid flat
Collar measures 7″ [18 cm] in length (or desired length)
Gauge
12.5 sts and 32 rows = 4″ [10 cm] in Lace Bands pattern, after blocking.
Note: This stitch pattern tends to stretch widthwise and shrink lengthwise as the piece gets bigger. To account for this, when blocking your gauge swatch, pull it horizontally before pinning.
MATERIALS
Yarn
Sirdar, Jewelspun (100% Acrylic, 546 yds / 500 m, 7.05 oz / 200 g CYCA #4 worsted)
4 (4, 5) balls: #0845 Golden Green
Needle
Note: Cocoon Body is worked back and forth in rows; Collar and Cuffs are worked circularly.
Notions
Removable stitch markers, tapestry needle, blocking supplies, Jul Leather Pedestal Button Closure (optional)
Video Tutorial
More Than Just a Sweater
The ‘Know Your Worth’ cardigan is more than a knitted sweater pattern – it’s a doorway to more knitting adventures. Marly’s got tons of knit patterns waiting for you, from knit shrugs to full-on sweaters.
GROW
To Unlock Exclusive Subscriber Content click the Box below and join for free by simply adding your email and creating a password! If you are having troubles, clear your cache or reset your password or login to the Grow Publisher Portal.
>> Learn More About Grow Here <<
I’m thrilled to share this amazing pattern with you, many patterns on my blog are absolutely free! I kindly request that you don’t copy and paste or distribute this pattern. Prefer an ad-free experience? Buy a digital PDF pattern for a small fee from one of my online stores for a seamless crafting journey.
I appreciate your support and readership. You are the reason I can keep doing what I love and sharing it with others. So, thank you from the bottom of my yarn-loving heart! Disclosure: This post contains affiliate links, meaning I get a commission if you decide to make a purchase through my links at no cost to you.
KNOW YOUR WORTH KNIT COCOON FREE PATTERN
ABBREVIATIONS
K – Knit
K2tog – Knit Two Stitches Together
P – Purl
RS – Right Side
St(s) – Stitches
WS – Wrong Side
Yo – Yarn Over
SPECIAL STITCHES
Ssk (Slip, Slip, Knit): Slip 2 stitches, one at a time, as if to knit. Insert left hand needle into the front of these two stitches and knit them together from this position (1 stitch decreased)
PATTERN STITCHES
Lace Bands
Worked over an even number of sts (minimum 8).
Rows 1-4 (begin RS): Knit.
Row 5: K2, * K2tog, yo; repeat from * to last 2 sts, k2.
Row 6: K2, p to last 2 sts, k2.
Row 7: K2, * Yo, ssk; repeat from * to last 2 sts, k2.
Row 8: K2, p to last 2 sts, k2.
Row 9: K2 * K2tog, yo; repeat from * to to last 2 sts, k2.
Row 10: K2, p to last 2 sts, k2.
Repeat Rows 1-10 for Lace Bands pattern.
2 x 2 Ribbing
Worked in the round over a multiple of 4 sts.
Every round: * K2, p2; repeat from * around.
NOTES
- Directions are for size XS-M; changes for sizes L-2X and 3X-5X are in parentheses. When only one number is given then that number applies to all sizes.
- The main body of the Cocoon is worked first in a rectangle shape. The short edges are then folded and sewn together to form the sleeve holes. The ribbed Cuffs and Collar are picked up from the main body and worked circularly.
VIDEO TUTORIALS
- Long-Tail Cast-On >> Click Here for Video Help <<
- Knit Stitch (continental style) >> Click Here for Video Help <<
- Purl Stitch (continental style) >> Click Here for Video Help <<
- How to Add Lifeline >> Click Here for Video Help <<
- How to Knit Lace >> Click Here for Video Help <<
- How to Tink >> Click Here for Video Help <<
- How to Bury Ends >> Click Here for Video Help <<
- How to Bind Off In pattern >> https://youtu.be/URPo9CA1duM <<
- Full Tutorial- https://youtu.be/usfXpo0ImQA?si=2gvAK9qjxMQPPLHp
KNOW YOUR WORTH PATTERN
BODY
Cast on 166 (184, 200) sts.
Work in Lace Bands pattern until piece measures 21 (25, 29)” [53.5 (63.5, 73.5) cm], ending after a pattern Row 4.
Note: This stitch pattern tends to stretch in width and shrink in length, so make sure it is pulled out widthwise and not lengthwise when deciding whether it’s long enough to bind off.
Bind off all sts loosely.
FINISHING
Fold the piece widthwise (similar to a hotdog) so that the bind-off edge aligns with the cast-on edge. Begin whip stitching from the edge towards the fold to close the short edge side of the body approximately 6 (8, 10)” [15 (20.5, 25.5) cm], leaving the remaining edge to the fold unseamed for attaching the cuff.
Cuffs
With double pointed needles, pick up and knit 44 sts evenly around resulting cuff hole, beginning and ending at seam. Join round and mark first st.
Work in 2×2 Ribbing for 6″ [15 cm].
Bind off all sts loosely in rib pattern.
Work other cuff the same.
Collar
Working around the body opening of the cocoon, with RS facing and beginning at one side seam, pick up and knit 1 st for each cast-on st and bound-off st around, not including the sts inside the seams – 328 (364, 396) sts.
Note: If you find your collar is pulling in too much, pick up an extra stitch every 7th stitch and you will get more fabric. Just make sure the final stitch count is divisible by 4.
Work in 2 x 2 Ribbing until Collar measures 7” [18 cm] in length or to desired measurement.
Bind off all sts loosely in rib pattern.
Weave in all loose ends.
Happy Knitting!
❤️ Your BiCrafty Bestie,
Marly Bird