
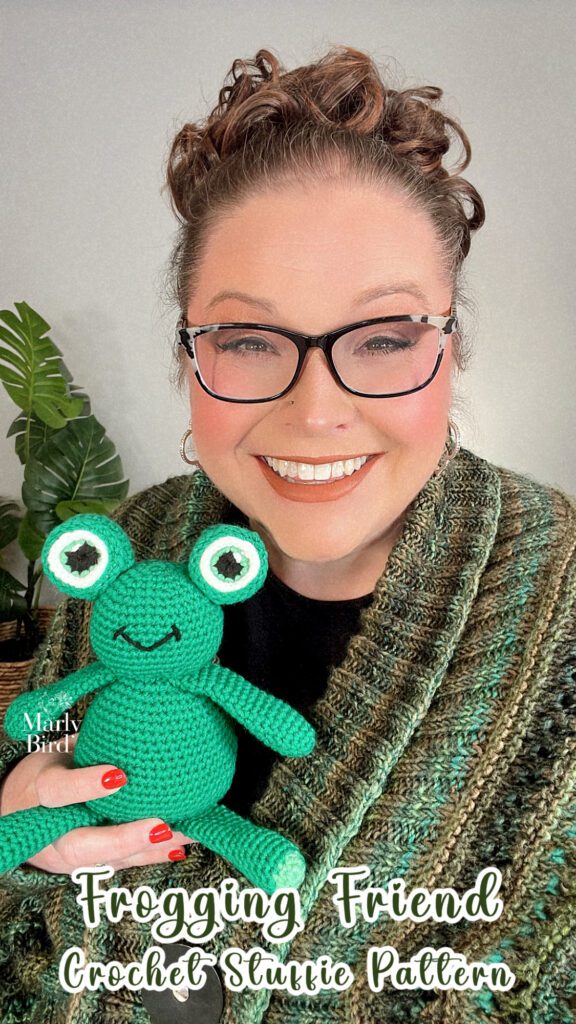
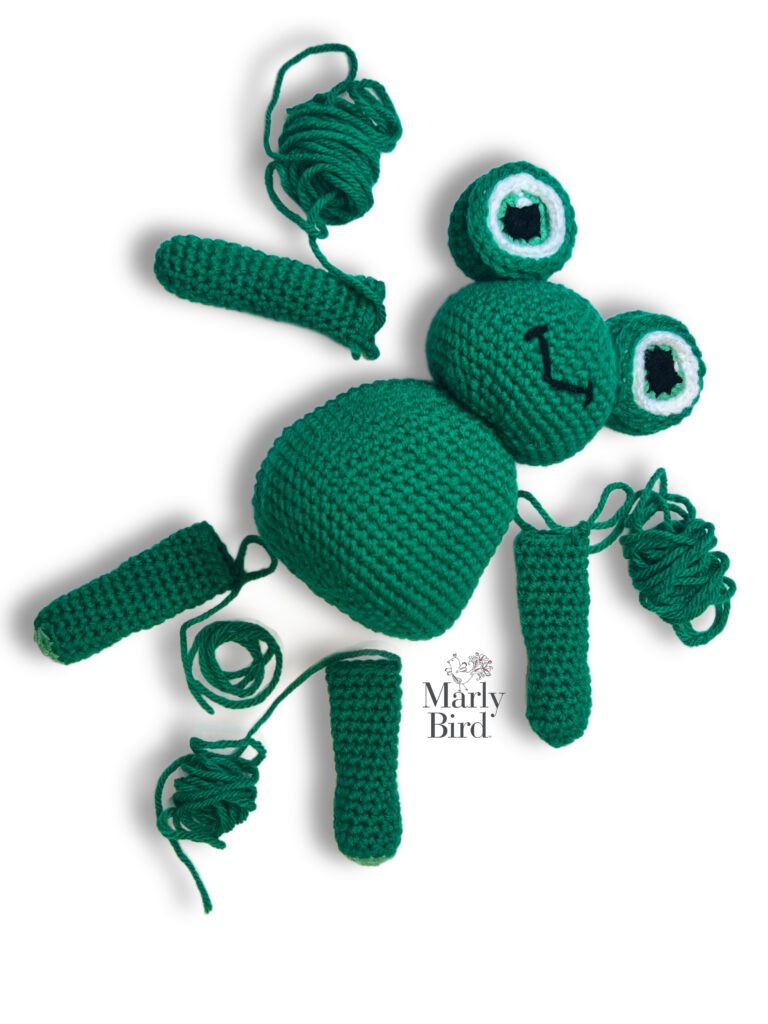
Simple Crochet Frog – Your New Frogging Friend!
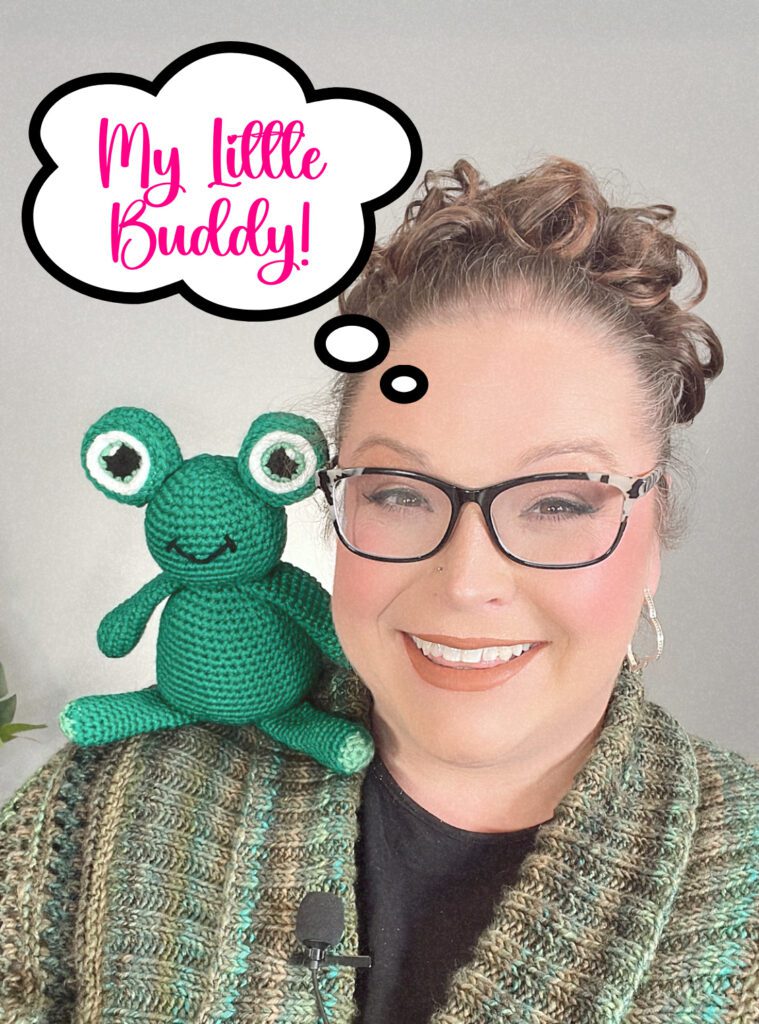
Introducing the Frogging Friend, a delightful crochet creation designed by your BiCrafty Bestie, Marly Bird! This charming amigurumi frog is not just a cute addition to your collection but also a heartwarming companion for all your crocheting escapades. Made with snuggly worsted weight yarn and crafted with love, the Frogging Friend is the perfect size to perch beside you as you stitch your latest project.
Whether you're breezing through stitches or unraveling a few “oops” moments (we all have them!), this little buddy is there with a reassuring smile. With its friendly eyes and comforting texture, the Frogging Friend is more than just a stuffed toy; it's a companion that celebrates every part of your crochet journey – the triumphs, the challenges, and everything in between.
Perfect for crocheters looking for a project with personality and charm, the Frogging Friend comes with a clear, easy-to-follow pattern and a supportive video tutorial led by Marly Bird herself. So, gather your yarn and hook, and get ready to crochet a friend who will stick by you, through thick and thin yarns alike!
Designed by Marly Bird
SKILL LEVEL
Advanced Beginner
MEASUREMENTS
Finished Measurements
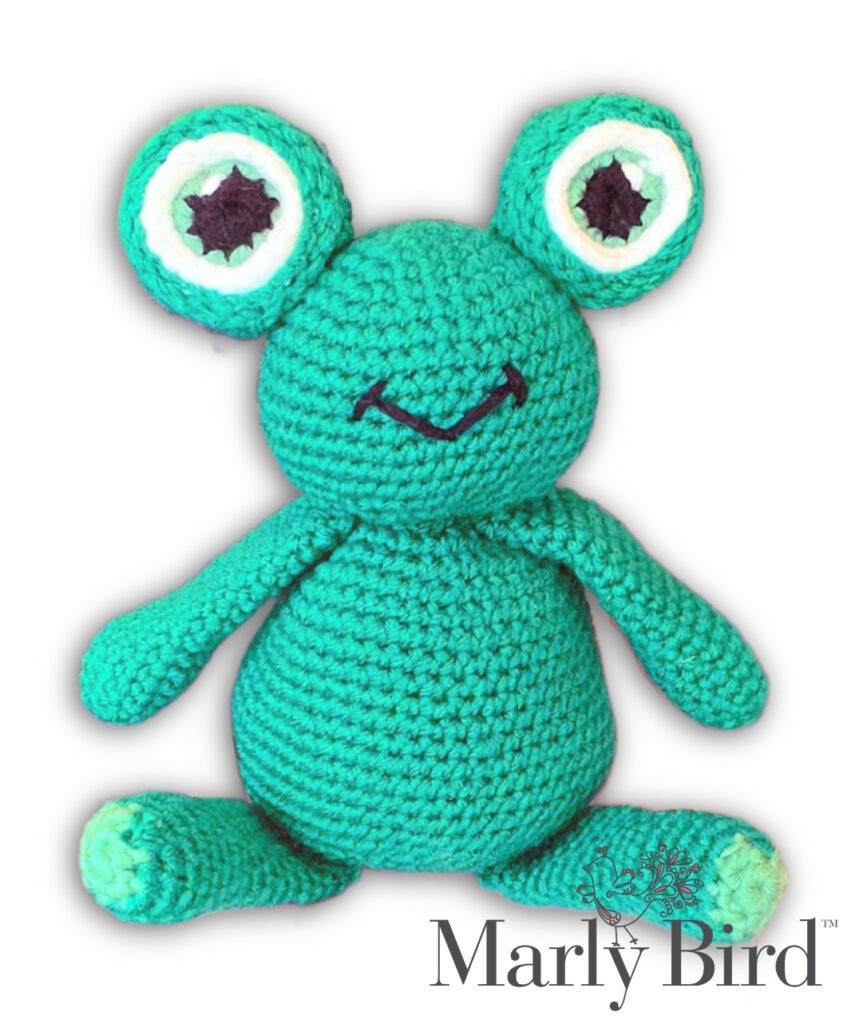
Frog is 12” [30.5 cm] circumference around widest part of body by 7” [18 cm] tall from bottom to top of eyeballs. .
Gauge
16 sc by 16 rounds = 4” [10 cm] x 4” [10 cm]; use any size hook to obtain the gauge.
MATERIALS
Crochet Yarn
Red Heart Super Saver (100% acrylic, 364 yds / 333 m, 7 oz/ 198 g, CYCA# 4 worsted):
Color A: Kelly Green, 1 skein
Color B: Spring Green, 1 skein
Color C: Black, 1 skein
Color D: White, 1 skein
Crochet Hook
Size E/5 (3.5 mm)
Notions
Tapestry needle, Fiberfil stuffing, stitch markers

ABBREVIATIONS
Ch – Chain(s)
RS – Right Side
Sc – Single Crochet
Sc2tog – Single Crochet Two Together
Sl st – Slip Stitch
Sp(s) – Space(s)
St(s) – Stitch(es)
WS – Wrong Side
SPECIAL STITCHES
Slip st (slip stitch): Insert crochet hook in the indicated stitch, yarn over and draw through both the stitch and the loop on the hook.
Single Crochet 2 Together (sc2tog): *Insert hook into indicated stitch, yarn over and pull up a loop; repeat from * in next stitch indicated, yarn over and draw through all 3 loops on hook. (1 decrease)
SPECIAL TECHNIQUES
Adjustable Ring (also known as the Magic Loop):
Start your adjustable ring exactly as you start a slip knot by pulling 6 to 8 inches of yarn from the yarn skein. The working end of yarn comes from the skein, and the tail end of yarn is on the other side. Loop the tail end of the yarn under the working end to form a loop.. Pick up the loop and pinch the working end, moving it through the loop. Place a new loop on the hook. Chain 1 to lock in the ring. Once finished crocheting around the ring, pull the tail end to close the ring.
VIDEO TUTORIALS
- Full Step By Step Video Tutorial for crocheting Frogging Friend https://youtu.be/TZ14SPtAD9Y
- How to make an adjustable ring https://youtu.be/76hW8yT4HlU
- How to secure an adjustable ring https://youtu.be/emHjFVFrzl0
- How to single crochet https://youtu.be/W6dsC-IwIGg
NOTES
- Frog is worked in pieces and seamed together. Details are added last.
- Body, head and eyes are worked in joined rounds.
- The arms and legs are worked in continuous spiral rounds that are not joined at the end of the round.
- Use a stitch marker to mark the first stitch of each new round throughout project.
- Stuff Frog’s body, head, and eyes firmly with fiberfil. The arms and legs only have about an inch of fiberfil at the bottom of the limbs.
- When changing color, pull new color through last pull through of the previous stitch or join.
- Leave a long tail on final finishing to use for seaming.
FROGGING FRIEND FROG STUFFIE PATTERN
FROG HEAD
Note: Head is worked from the top at the increasing rounds through the bottom of the head while decreasing.
Round 1: With color A and using the Adjustable Ring, 6 sc in ring, join with a slip st to first sc, pull ring closed, ch 1–6sc.
Round 2: 2 sc in each sc around, join with a slip st to first sc, ch 1– 12 sc.
Round 3: *Sc in next sc, 2 sc in next sc; repeat from * around, join with a slip st to first sc, ch 1– 18 sc.
Round 4: *2 sc in next sc, sc in next 2 sc; repeat from * around, join with a slip st to first sc, ch 1– 24 sc.
Round 5: Sc in next 2 sc, *2 sc in next sc, sc in next 3 sc; repeat from * to last 2 sc, 2 sc in next sc, sc in last sc, join with a slip st to first sc, ch 1—30 sc.
Round 6: *Sc in next 4 sc, 2 sc in next sc; repeat from * around; join with a slip stitch to first sc, ch 1—36 sc.
Round 7: Sc in next 3 sc, *2 sc in next sc, sc in next 5 sc; repeat from * to last 3 sc, 2 sc in next sc, sc in next 2 sc; join with a slip st to first sc, ch 1—42 sc.
Take a moment and weave closed the magic loop opening on the wrong side.
Rounds 8-16: Sc in each sc around, join with a slip st to first sc, ch 1.
Round 17: *Sc in next 5 sc, sc2tog over next 2 sc; repeat from * around, join with a slip st to first sc, ch 1—36 sc.
Round 18: Sc in next 2 sc, *sc2tog over next 2 sc, sc in next 4 sc; repeat from * around to last 4 sc, sc2tog over next 2 sc, sc in last 2 sc, join with a slip st to first sc, ch 1—30 sc.
Stuff frog’s head with fiberfil.
Round 19: *Sc in next 3 sc, sc2tog over next 2 sc; repeat from * around, join with a slip st to first sc, ch 1—24 sc.
Round 20: Sc in next sc, *sc2tog over next 2 sc, sc in next 2 sc; repeat from * around to last 3 sc, sc2tog over next 2 sc, sc in last sc, join with a slip st to first sc, ch 1—18 sc.
Round 21: *Sc in next sc, sc2tog over next 2 sc; repeat from * around, join with a slip st to first sc, ch 1—12 sc.
Stuff frog’s head with more fiberfil if necessary.
Round 22: *Sc2tog over next 2 sc; repeat from * around, join with a slip stitch to first sc, fasten off with long tail—6 sc.
Weave tail through the stitches on the last round, pull tight to close hole like a drawstring. Weave in ends but do not cut the tail yet. It will be used to seam the head to the body.
FROG BODY
Note: Body is worked from the top at the increasing rounds through the bottom of the head while decreasing.
Round 1: With color A and using the Adjustable Ring, 6 sc in ring, join with a slip st to first sc, pull ring closed, ch 1–6sc.
Round 2: 2 sc in each sc around, join with a slip st to first sc, ch 1– 12 sc.
Round 3: *Sc in next sc, 2 sc in next sc; repeat from * around, join with a slip st to first sc, ch 1– 18 sc.
Round 4: *2 sc in next sc, sc in next 2 sc; repeat from * around, join with a slip st to first sc, ch 1– 24 sc.
Round 5: Sc in next 2 sc, *2 sc in next sc, sc in next 3 sc; repeat from * to last 2 sc, 2 sc in next sc, sc in last sc, join with a slip st to first sc, ch 1—30 sc.
Round 6: *Sc in next 4 sc, 2 sc in next sc; repeat from * around; join with a slip stitch to first sc, ch 1—36 sc.
Round 7: Sc in next 3 sc, *2 sc in next sc, sc in next 5 sc; repeat from * to last 3 sc, 2 sc in next sc, sc in next 2 sc; join with a slip st to first sc, ch 1—42 sc.
Take a moment and weave closed the magic loop opening on the wrong side.
Rounds 8-11: Sc in each sc around, join with a slip st to first sc, ch 1.
Round 12: Sc in next 4 sc, *2 sc in next sc, sc in next 6 sc; repeat from * to last 3 sc, 2 sc in next sc, sc in last 2 sc, join with a slip st to first sc, ch 1—48 sc.
Round 13: Sc in each sc around, join with a slip st to first sc, ch 1.
Round 14: Sc in next 3 sc, *2 sc in next sc, sc in next 7 sc; repeat from * to last 5 sc, 2 sc in next sc, sc in last 4 sc, join with a slip st to first sc, ch 1—54 sc.
Round 15: Sc in each sc around, join with a slip stitch to first sc, ch 1.
Round 16: *Sc in next 8 sc, 2 sc in next sc; repeat from * around, join with a slip st to first sc, ch 1—60 sc.
Rounds 17-21: Sc in each sc around, join with a slip st to first sc, ch 1.
Round 22: *Sc in next 8 sc, sc2tog over next 2 sc; repeat from * around, join with a slip stitch to first sc, ch 1—54 sc.
Round 23: Sc in next 4 sc, *sc2tog over next 2 sc, sc in next 7 sc; repeat from * to last 5 sc, sc2tog over next 2 sc, sc in last 3 sc, join with a slip st to first sc, ch 1—48 sc.
Round 24: *Sc in next 6 sc, sc2tog over next 2 sc; repeat from * around, join with a slip st to first sc, ch 1—42 sc.
Round 25: Sc in next 3 sc, *sc2tog over next 2 sc, sc in next 5 sc; repeat from * to last 4 sc, sc2tog over next 2 sc, sc in last 2 sc, join with a slip st to first sc, ch 1—36 sc
Round 26: *Sc in next 4 sc, sc2tog over next 2 sc; repeat from * around, join with a slip st to first sc, ch 1—30 sc.
Round 27: Sc in next 2 sc, *sc2tog over next 2 sc, sc in next 3 sc; repeat from * to last 3 sc, sc2tog over next 2 sc, sc in last sc, join with a slip st to first sc, ch 1—24 sc.
Stuff frog’s body with fiberfil.
Round 28: *Sc in next 2 sc, sc2tog over next 2 sc; repeat from * around, join with a slip st to first sc, ch 1—18 sc.
Round 29: *Sc in next sc, sc2tog over next 2 sc; repeat from * around, join with a slip st to first sc, ch 1—12 sc.
Stuff frog’s body with more fiberfil if necessary.
Round 30: *Sc2tog over next 2 sc; repeat from * around, join with a slip st to first sc, fasten off—6 sc.
Weave tail through the stitch on the last round, pull tight to close the hole like a drawstring. Weave in ends.
FROG AMIGURUMI CARTOON EYES
I used the cartoon eyes by Repeat Crafter Me and added my own little tweak to them I hope you love them.
Eyeball – Make 2
Round 1: With color C and using the Adjustable Ring, 10 sc in ring, change to color B, join with a slip st to first sc, ch 1–10 sc.
Round 2: 2 sc in each sc around, change to color D, join with a slip st to first sc, ch 1– 20 sc.
Round 3: Sc in each sc around, join with a slip st to first sc.
Round 4: Slip st in each sc around, join with a slip st to first slip st. Fasten off.
Round 5: With color A, insert hook into any back loop of sc from Round 3, yarn over and pull up a loop (one loop on hook), proceed to work a slip st in the back loop of the next sc from Round 3, and in all the remaining sc around, join with a slip st to first slip st. Fasten off.
Using the tail of color D, embroider a sparkle to the edge between the pupil and the iris. Use photo as guide. Weave in all ends.
Outer Eye – Make 2
Round 1: With color A and using the Adjustable Ring, 10 sc in ring, join with a slip st to first sc, pull ring closed, ch 1–10 sc.
Round 2: 2 sc in each sc around, join with a slip st to first sc, ch 1– 20 sc.
Round 3: *Sc in next sc, 2 sc in next sc; repeat from * around, join with a slip st to first sc, ch 1– 30 sc.
Rounds 4-6: Sc in each sc around, join with a slip st to first sc.
Round 7: *Sc in next sc, sc2tog over next 2 sc; repeat from * around, join with a slip st to first sc, ch 1—20 sc.
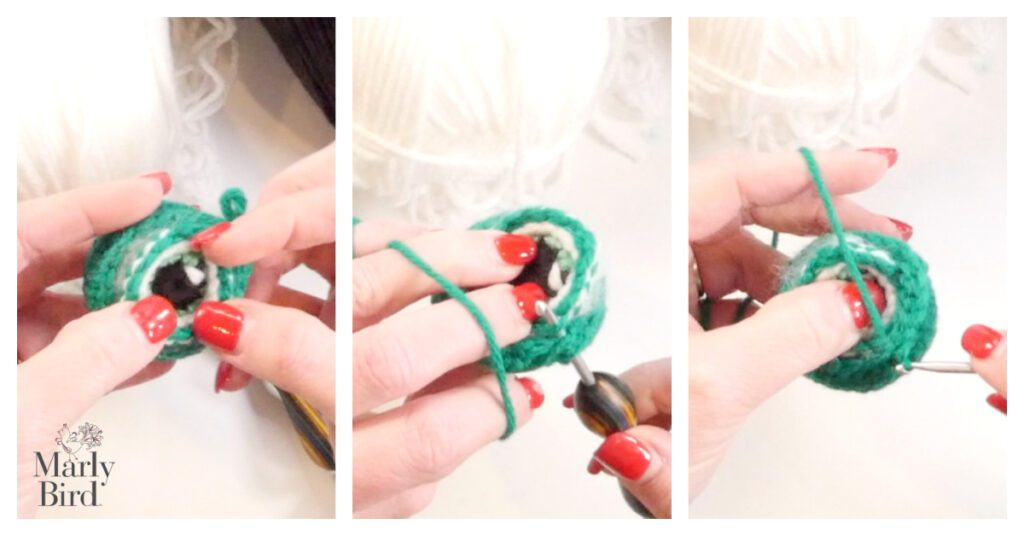
Stuff frog’s eye with fiberfil.Have the eyeball placed with the right side out on the open space of the outer eye (see image below), slip st in next sc of outer eye and through the back leg of the corresponding slip st of the eyeball of Round 5 of the eyeball, join with a slip st to first slip st. Fasten off.
FROG ARMS
Note: Arms are worked from the bottom at the increasing rounds through the length of the arm in a spiral. Do not join rounds with a slip stitch.
Make 2
Round 1: With color A and using the Adjustable Ring, 6 sc in ring, pull ring closed–6sc.
Round 2: 2 sc in each sc around– 12 sc
Rounds 3 – 22: Sc in each sc around.
Stuff lower portion of the frog’s arm with fiberfil. Sample only has about 1” [2.5 cm] filled with stuffing.
Fasten off.
FROG LEGS
Note: Legs are worked from the bottom at the increasing rounds through the length of the leg in a spiral. Do not join rounds with a slip stitch.
Make 2
Round 1: With color B and using the Adjustable Ring, 6 sc in ring, pull ring closed–6sc.
Round 2: 2 sc in each sc around, change to color A— 12 sc
Rounds 3 – 24: Sc in each sc around, do not turn.
Stuff lower portion of the frog’s legs with fiberfil. Sample only has about 1” [2.5 cm] filled with stuffing..
Fasten off.
FINISHING
Using the images as your guide, sew the eyes onto the head. Then sew the head onto the top of the body. Then pinch the legs and arms closed and whip stitch them into place on the body. Again, using the photo as a guide or watch the video tutorial.
With color C, embroider a smile to the front of the frogs face.
Frequently Asked Questions
What skill level is this frog pattern for?
Honestly… this pattern is rated for an Advanced Beginner! It’s perfect if you’ve got some crochet basics down and are ready for a fun project with a little more detail. You’ll totally be able to tackle it!
How big is the finished frog?
So here's the thing… the finished froggy friend will be about 12 inches around the widest part of its body and stand about 7 inches tall from the bottom to the top of its eyeballs. It's a great size to cuddle!
What kind of yarn do I need?
Yes! You'll need a worsted weight yarn, and the pattern calls for Red Heart Super Saver. The colors listed are Kelly Green, Spring Green, Black, and White, but feel free to get creative with your own color combos!
Can I find a video tutorial for this pattern?
Oh, absolutely! Marly has a super helpful step-by-step video tutorial just for this Frogging Friend, plus videos for special techniques like the adjustable ring. You can find the links right on the page, so no worries if you get stuck!
What do I do if I mess up a stitch?
We've all been there… don't you worry! The pattern is designed to be easy to follow, and Marly even mentions that “oops” moments happen to everyone. Just take a deep breath, maybe refer to the video tutorials for those special stitches, and you'll be back on track in no time!
Categories: Crochet, Free Patterns, Our Free Patterns, Pattern


Too stinking cute, or should I say YAY!!!!!