Search
Close
  • The Pattern Shop
  • Our Free Patterns
    • Browse All Our Free Patterns
    • Our Free Knitting Patterns
    • Our Free Crochet Patterns
  • Blog
    • All Blog Posts
    • All Free Patterns
    • Dibble Dabble Inspiration
    • Giveaways
    • Make-Alongs
    • Product Reviews
    • Roundups
    • Tips, Tricks, Techniques for Knitting and Crochet
Stylized bird with pink and gray swirling tail above elegant “Marly” text, logo for crochet accessories and home decor.
  • Marly Bird House
  • Learn to Knit & Crochet
    • Newbie? Start Here
    • Video Tutorials
    • Knitting Definitions
    • Crochet Definitions
    • Common Techniques
    • Size Charts for Knitting and Crochet Projects
  • About
×
  • The Pattern Shop
  • Free Patterns
  • Blog
  • Marly Bird House
  • Learn to Knit & Crochet
    • Newbie? Start Here
    • Video Tutorials
    • Knitting Definitions
    • Crochet Definitions
    • Common Techniques
    • Size Charts for Knitting and Crochet Projects
  • About
Stylized bird with pink and gray swirling tail above elegant “Marly” text, logo for crochet accessories and home decor.
Search
Close

New Patterns NOW Available in Ad-Free PDF! Check out The Pattern Shop

50 Free Color Block Projects to Knit and Crochet

July 8, 2021 By Marly Bird Leave a Comment

Color block your way to greatness with these free knit and crochet patterns! Each of these color block projects are designed to make it easy to achieve this effect. However, once you get the hang of it, you'll see that color blog projects are easy to DIY as well. Basically, just use a different color on the ribbing on the next hat or sweater you make, and you have a good start. Or knit / crochet the last few inches of a scarf in a contrasting shade. We hope that you not only enjoy these free patterns but also get inspired to change up your own designs.

50 Free Color Block Projects to Knit and Crochet

What Are Color Block Projects?

The name really says it all. Color block projects have sections of different colors. According to Vogue, it was a popular fashion trend in the early aughts that made a recent revival. There are so many different ways to create combinations of color. So, this isn't about putting squares together but rather combining strips and sections of different colors to create a sort of pattern of its own.

Color Block Projects for the Home

Decorate your house with bold pillows, bright baskets, and comfortable throws. No matter what color or texture you choose, knit and crochet patterns can easily add new life to any room in your home. When you make color block projects, you get the chance to add a bit of graphic pop along with that color. These also make great gifts as well as items to donate to various charities.

  • Big Statement Knit Pillow
  • Cloud Nine Knit Baby Blanket
  • Color Block Knit Pillows
  • Color Block Back Scrubber
  • Color Block Throw
  • Color Blocks Knit Throw
  • Color Block Crochet Basket
  • Color Block Baskets
  • Color Block Storage Baskets
  • Colorblock Crochet Blanket
Colorblock Crochet Blanket Free Crochet Pattern
  • Stripes and Blocks Throw
  • Macrame Color Block Plant Hanger
  • Zig Zag Breezy Knit Pillows
  • Tunisian Color Block Throw
  • Color Block Panels Blanket
  • Colorblock Knit Washcloth
  • Color Block Crochet Dishcloth
  • Crazy Corners Knit Pillow
  • Mighty Mitered Knit Pillow
Zig-Zag Breezy Knit Pillow Free Knitting Pattern

Color Block Sweaters and Accessories

Show off your love of color to everyone you meet! Mix neutrals and brights, or use the color wheel to create contrasting and coordinating colors. Either way, these color block projects embrace the opportunity to brighten your wardrobe and put a smile on the faces of those you come across throughout your day.

  • Color Swatch Knit Sweater
  • Color Block Hoodie
  • Color Block Cardi
  • Color Block Tunic
  • Color Block Crochet Cowl
  • Raglan Color Block Knit Sweater
  • Color Block Hat
  • Color Block Knit Tank
  • Contrast Pullover
  • Color Block Scarf
  • Color Block Crochet Scarf
  • Color Block Cowl
  • Color Block Crochet Scarf
  • Crochet Color Block Bobble Scarf
  • Color Block Shaker Rib Knit Scarf
Contrast Pullover Free Knitting Pattern
  • Color Block Crochet Smart Cowl
  • Modern Color Block Scarf
  • Color Block Tunic
  • Color Block Crochet Cardigan
  • Henley-etta Chic Sweater
  • Colorblock Top
  • Shifting Blocks Knit Scarf
  • Colorblock Family Knit Mittens
  • Kimono Cardigan
  • Crochet Colorblock Hat
  • Color Dipped Top
  • Colorblock Ruffle Front Vest
  • Garter Stitch Scarf to Knit
  • Color Dipper Hat
Shifting Blocks Knit Scarf Free Knitting Pattern

You May Also Like

  • Book Review: Knit Color Block Blankets
  • Beginner Crochet Scarf-Modern Color Block Scarf
  • Beginner Crochet Scarf-Modern Color Block Scarf
  • How to Knit Red Heart Color Block Knit Back Scrubber
  • Beginner Crochet Sweater with Colorblock

Frequently Asked Questions

What is color blocking in knit and crochet?

Color blocking is a technique where large sections of a project are worked in solid, contrasting colors with clean dividing lines between them… creating a graphic, modern aesthetic. Instead of gradients or stripes, you get bold blocks of color that sit next to each other. Think of a sweater with a solid white front and solid black back, or a blanket divided into four quadrants of different colors. The clean geometric quality of color blocking creates a very contemporary, fashion-forward look that's also much simpler to execute than colorwork patterns.

Is color blocking harder than regular single-color projects?

Just slightly! The main addition is managing multiple yarn tails (you'll need to join new colors where the blocks change) and weaving in more ends than a single-color project. For intarsia-style color blocking within a row, you'll have multiple yarn strands to manage. But many color blocked projects change colors between full sections rather than within rows, which is very manageable… you just join a new color at the start of a new section. The visual impact is way out of proportion to the technique complexity. Color blocking looks impressive for the amount of skill it actually requires.

What color combinations work best for color blocking?

High contrast is the key! Two or three bold, distinct colors with strong contrast between them creates the clearest color block effect. Classic combinations: black and white, navy and cream, red and camel, mustard and forest green. Monochromatic color blocking (different shades of the same color) is more subtle and sophisticated. Complementary colors (opposite on the color wheel) are bold and striking. For a contemporary look, choose colors that are trending in fashion… earth tones, dusty pastels, or bold saturated hues depending on the current season's palette.

Can beginners do color blocking?

Yes! Simple color blocking where you complete one section and then join a new color for the next section is very beginner-friendly. You only need to know how to join a new yarn color… which is a basic skill that beginners learn early on. The finished result looks complex and intentional, but the execution is simple. For beginners, look for color block patterns where the color changes happen at row beginnings rather than within rows. Starting a new color at the beginning of a row is much easier than mid-row color changes for new crafters.

What types of projects are best for color blocking?

With 50 patterns in this collection, basically everything! Blankets are perfect for color blocking because the large scale really showcases the bold color sections. Bags and totes look modern and graphic. Sweaters and cardigans with color-blocked panels are striking. Shawls divided into color sections are beautiful. Even small accessories like hats and cowls can be color-blocked effectively. The key across all project types is planning your color placement before you start and making sure you have enough of each color for its section.

Filed Under: Free Patterns

Plant Cozies and Hangers | 31 Free Patterns

July 7, 2021 By Marly Bird Leave a Comment

Houseplants are all the range! Make your plants even more colorful with these cozies designed for your plant pots, and if you run out of space hang them up with these fun hangers! There are designs to crochet, knit and craft in other ways. Therefore, you're sure to find (at least) one pattern that works for you. Plant cozies work up quickly and add pizzazz to your space.

Plant Cozies and Hangers | 31 Free Patterns

The Benefits of Plants

The more time people have spent at home recently, the more many have realized how healing it is to have plants in the home. Whether you grow herbs and other edibles or flowers and decorative greenery, adding plants to the home really helps improve the quality of life. Benefits of houseplants include:

  • Reduced anxiety
  • Improved breathing / better air quality in the home
  • Better immunity, creating overall increased wellness
  • Improved self-esteem when taking care of another living thing
  • Better concentration and focus

Knitting and crochet also have many benefits including some of the same offered from houseplants. They reduce anxiety, increase concentration, and boost self-esteem. Therefore when you craft plant cozies, you boost the benefits of your houseplants.

Plant Cozies

Dress up your plant cozies with fun patterns and stripes, or just add some color to the outside of the plants. Most plant cozies are designed to go around the pot in which the plant sits. Of course, plants come in many different pots. Therefore, you'll want to work with different sizes to suit your different houseplants. Remember that increasing or decreasing your knitting needle or crochet hook size is an easy way to make a pattern bigger or smaller. Likewise with changing yarn weights.

  • Bright Weave Plant Cozy
  • North Pole Pot Cozy
  • Crochet Pot Pals
  • Slouchy Plant Pot Cozy
  • Simple Flower Pot Cozy
  • Ridged Crochet Pot Cozy
  • Little Potted Plant Crochet Cozy
  • Large Potted Plant Crochet Cozy
  • Slouchy Crochet Plant Holders
  • Knit Plant Cozies
  • Dip Your Toe Crochet Plant Cozies
  • Knit Fair Isle Plant Cozy
  • Tapestry Flower Pot Cozy
  • Crochet Peppermint Twist Plant Pot Cozy
Knit Fair Isle Plant Cozy Free Knitting Pattern

Plant Hangers

Plant hangers free up your counters and allow you to have more plants! They can also help keep children and pets from bothering plants. Some plants are toxic to pets, making it especially important to hang them out of the way. Therefore, you might want plant hangers as an alternative to plant cozies. In addition to some beautiful crochet plant hangers, we've also included a bunch of macrame plant hangers here. Macrame is a great technique for hanging plants. If you don't know this craft, it's relatively easy to learn. The patterns will guide you along the way.

  • Macrame Simple Spiral Plant Hanger
  • Macrame Color Block Plant Hanger
  • Macrame Big Fringe Plant Hanger
  • Blooming Beauty Plant Hanger
  • Crochet Plant Hanger
  • Macrame Plant Hanger
  • Crochet Hanging Plant Trio
  • Crochet Plant Hanger
  • Knotted Plant Hangers
  • Boho Fringed Crochet Plant Hanger
  • Macrame Plant Hanger
  • Crochet Hanging Pot Cozy
  • Macrame Wall Hanging Planter
Macrame Color Block Plant Hanger Free Pattern

More Plant-Related Patterns

Plant cozies and plant hangers aren't your only options when it comes to plants. Complete your plant-related passion with these perfect projects!

  • Fringed Plant Mat
  • Hanging Crochet Planter Pods
  • Crochet Succulents
  • Crafty Flower Pots
  • Crochet Cacti
Hanging Crochet Planter Pods Free Crochet Pattern

You May Also Like:

  • 5 Eco-Friendly Yarn Options for Earth Day
  • Knit and Crochet Cozies Add Comfort to Your Home: Therapeutic Crafting Tips + Patterns for Cozies

Frequently Asked Questions

What's the difference between a plant cozy and a plant hanger?

A plant cozy sits around the outside of a pot… it's decorative, hiding the plain plastic nursery pot while adding a handmade, textural look. A plant hanger suspends the pot from above… using macrame-style knotted cords, crochet netting, or knitted fabric to create a hanging vessel for the plant. Both are beautiful home decor items that add a warm, artisan touch to any space. Plant cozies are generally quicker to make than hangers since they're just cylinders around a pot.

Will water damage a crocheted or knitted plant cozy?

It can! A cozy placed directly under a pot with drainage holes can get wet and stay wet… which causes mildew and can stain or damage yarn over time. The easy fix: use a saucer or drainage tray between the pot and the cozy, or use the cozy as a purely decorative outer sleeve for a pot that doesn't drain from the bottom. Alternatively, use a cozy for plants in pots without drainage holes (like succulents in sealed pots). Cotton yarn holds up better to occasional moisture than wool, though both need to dry out between waterings.

What yarn works best for plant cozies and hangers?

Cotton and cotton twine are the most popular and practical! Cotton doesn't deteriorate with moisture the way wool does, it's sturdy enough to hold the weight of a pot, and it has that natural, earthy aesthetic that looks so good with plants. Macrame cord (a twisted cotton twine) is specifically popular for hangers because it's very strong. Jute twine is another natural option with a rustic, earthy look. For indoor decorative cozies where moisture isn't a concern, any yarn you love works fine… wool, acrylic, linen, whatever matches your decor.

How do I know what size to make a plant cozy?

Measure your pot! You need the circumference of the pot at its widest point, and the height from the base to where you want the cozy to end. For a snug cozy, work to the exact circumference. For a relaxed fit, add an inch or two. Most cozy patterns are worked in the round and sized relative to common pot sizes… if your pot is a standard nursery size (4″, 6″, 8″ diameter), there will almost certainly be a pattern that fits it directly. For unusual pot sizes, a simple ribbed cozy is very easy to size up or down by adjusting stitch count.

Are plant hangers safe for heavy pots?

It depends on the construction and the yarn! For lightweight pots and small plants, crochet or knit hangers in worsted weight yarn are fine. For heavier pots or larger plants, use sturdy macrame cord or doubled cotton twine rather than regular yarn… it's much stronger and specifically designed for weight-bearing applications. Always hang from a proper ceiling hook rated for the weight. Test by loading the hanger and checking for stretch before trusting it with a cherished plant. Safety first… pots falling are bad for everyone involved, including the plant!

Filed Under: Free Patterns

Crochet Hooks Chart with US/UK/mm Conversion + The…

July 5, 2021 By Marly Bird Leave a Comment

We often get questions about how to read a crochet hooks chart. This is a chart that shows you the different sizes of crochet hooks. Moreover, it shows those sizes in different versions: UK and US. Additionally, you'll see letters (hook size B or G, for example.) Moreover, you'll see sizes in millimeters. It can all get really confusing. Then when you start looking at thread crochet hooks, which are totally different size-wise from yarn crochet hooks, this really get confusing. Well, we're here with our crochet hooks chart to demystify all of this for you.

NOTE: You'll see image versions of our regular and thread crochet hook charts below. However, you can also download a printable PDF version right here:

Downloadable chart for crochet hooks on a pink background with bold black text.

Choosing The Right Crochet Hook Size

As you know, you'll use different sizes of crochet hooks for different yarn weights. Of course, you can use pretty much any size hook with any size yarn to achieve different effects. However, if you're working to get specific gauge or to use the hooks in the traditional way, then you'll use specific sizes of crochet hooks with specific yarns.

See our yarn weight chart here. It explains the different yarn weights. Moreover, it has suggestions for the types of yarn used for each crochet hook size.

Thread Crochet Hooks vs. Yarn Crochet Hooks Sizing

As you'll see from our crochet hooks charts here, there is an important distinction to be made when it comes to thread crochet hooks vs. typical yarn crochet hooks. Now, to be clear, the hooks themselves are basically the same other than size. Thread crochet hooks are smaller (obviously, because thread is thinner.) They're usually made of steel. In contrast, classic yarn crochet hooks are bigger and may be made of aluminum, bamboo, plastic, etc.

Crochet Hook Sizes Grow Bigger for Thicker Yarn

However, there's a very important difference when it comes to sizing and crochet hooks charts. Typical crochet hooks used for yarn will grow in size as the yarn gets thicker. So, for example, if you look at the aforementioned yarn weight chart, you'll see that you'll usually use a size range of B1 – E4 (2.25 – 3.5 mm) when working with a #1 weight super fine yarn. (We'll cover exactly what those numbers mean momentarily.) In contrast, you'll usually use a size range of I9 – K 10.5 (5.5 – 6.5 mm) when working with a #4 worsted weight yarn.

This should feel fairly intuitive. If you're working with a thinner (smaller) yarn, then you'll use a crochet hook size that's smaller. Even if you don't understand the labeling just yet, you can tell that B-E, 1-4, and 2.25 – 3.5 are all smaller than the !-K, 9-10.5, and 5.5 – 6.5 mm ranges for the thicker worsted weight yarn. Thinner yarn, smaller letters and numbers; thicker yarn, larger letters and numbers. So, if you're working with a yarn and you feel like the hook is too small for the thickness, you'll go up in size.

Colorful whimsical bird illustration with intricate floral patterns, set against a speckled pink background.

Thread Crochet Hook Sizes Are Counterintuitive

Now, this is where it gets confusing. Here are three key things to know to get you started:

Crochet thread is assigned a number related to its thickness.

The thickest threads are #3, #5, #8, #10. After that, it increases in digits of ten as it gets thicker. So #20 thread is thinner than #10. Then #30 thread is thinner than #20. And so on up to the thinest of the threads: #100. This is counterintuitive, right? You would think: thinner thread, smaller number. After all, smaller yarn, smaller weight number right? DK weight yarn is a #3 and that's thinner than Bulky yarn which is a #5. Not the case with thread. With thread, a bigger number means a thinner yarn.

Smaller crochet thread hook numbers work with thicker threads.

As you can see from the thread crochet hooks charts we've attached here, if you're working with a size #3 thread then you'll use a US size O, 1 or 2 thread crochet hook. On the other hand, working with a size #10 thread, you might use a US size 6, 7, or 8 thread crochet hook.

You use a bigger number hook with a bigger number thread. That at least makes sense – except of course for the weird fact that the bigger number thread is actually thinner. So the bigger number hook is actually smaller. But, so far, so good. At least these things match, right? So as soon as you get used to the idea that bigger means smaller in thread crochet (but not yarn crochet hooks), you can catch on.

Except … when you look at the millimeters

As you can see from our crochet hooks charts, there are all sorts of letters and numbers assigned to hook sizes. Among those are millimeters. Remember over on the yarn weight charts, we talked about how you might use a 2.25 mm crochet hook for lightweight yarn while using a 5.5 – 6.5 mm crochet hook for worsted weight yarn. Makes sense.

And, thread crochet hooks follow the same math. You'll use a smaller millimeter range for thinner thread. Of course, then, the millimeters are higher for thicker thread. But this is where you can get confused again, right? Because when you look at our thread crochet hooks chart, you see that the hook sizes and thread sizes are increasing as the thread gets thinner … but the millimeters are decreasing! It's obvious that you need smaller millimeter hooks to grab thinner thread. It's just weird that thinner thread is a higher number and thus corresponds to a higher US number hook.

But now that you know those three key things, you can better understand thread crochet hooks.

Yarn Crochet Hooks Chart

Here's a glance at our crochet hooks chart for yarn. Remember you can also download the printable PDF file:

Crochet Hooks Chart Part 1
Crochet Hooks Chart Part 2

Okay, So What Do All The Numbers and Letters Mean on Crochet Hooks?

If you've studied crochet for very long the you know that there's a slightly different language between US and UK crochet patterns. It's very similar, but different enough that you need to know the conversion between them to follow a pattern written in the language you're less used to. Well, it's the same way with the hooks we use. That's why crochet hooks charts show US and UK sizes. They also show the millimeters.

US Crochet Hooks Sizing

US crochet hooks use a letter + number system. So a small US crochet hook is a B-1 or a C-2. A medium US crochet hook is a G-6 or an H-8. A large crochet hook might be an N-15 or P-16. (There are larger ones, such as Q or S, which aren't usually assigned a number.)

UK Crochet Hooks Sizing

UK crochet hook sizes don't use letters. They only use numbers. However, to make things confusing, their numbers work backwards on crochet hooks for yarn. The highest numbers are for the thinnest yarns, whereas the smaller numbers are for thicker yarns. Kind of like how we do with the thread crochet hooks. So, a small UK crochet hook might be a #13 or #12. In contrast, a medium UK crochet hook might be #7 or #6. Continuing on, a large UK crochet hook might be size 2. Note that there are no UK sizes comparable to the largest US crochet hooks sized US L-11 and up.

Crochet Hooks Sizing in Millimeters

The millimeters make a lot more sense because they're very straightforward. As explained before with thread crochet, the thinner the thread, the smaller the number of millimeters. This should be obvious – you want a smaller circumference hook for smaller thread to make tighter pieces. It's the same with millimeter numbering in crochet hooks for yarn.

So, working with a thin yarn, you might use a 2.5 or 2.75 mm hook. Working with a medium worsted weight yarn, you might use a 4.25 or 4.5 mm crochet hook. Then working with a bulky yarn, you might use an 8 mm crochet hook.

Reading a Crochet Hooks Chart

Most crochet hooks come with the US or UK sizing as well as the millimeters. So honestly, if you can learn which millimeter size goes with which thread and yarn size, you're usually all set. However, most of us get comfortable working with either the letters or numbers from the US and UK crochet hooks. Moreover, what if you come across an amazing set of crochet hooks that are numbered different from what you're used to? For example, you love a set of UK crochet hooks but are used to US numbering. That's where it comes in a lot of handy to be able to read a crochet hooks chart.

We've created out detailed crochet hooks charts to allow you to easily see the difference between US / UK / mm along with suggestions for the thread # or yarn weight that you'll use with them. So, let's practice. You have a worsted weight yarn – what crochet hook size will you use? (Note that there are varied answers because there's a range.) One good answer would be that you'd use a US Size H-8 crochet hook, which is a the same as a UK size 6 crochet hook, which is also the same as a metric size 4.75 or 5 mm crochet hook.

Thread Crochet Hooks Chart

Here's a look at our thread crochet hooks chart. Remember you can also download the printable PDF file.

Thread Crochet Hooks Chart Part 1
Thread Crochet Hooks Chart Part 4

Reading Yarn Labels for Hook Size

When you read a yarn label, it often tells you the recommended crochet hook and knitting needle sizes. For example, a Chic Sheep yarn label recommends that this worsted weight #4 yarn use a 5 mm or size H-8 crochet hook. That corresponds with the example that we gave above. Moreover, referring to either that example or our crochet hooks charts, you can see that you could also substitute a UK size 6 crochet hook.

You Might Also Like:

  • A Beginners Guide to Crochet Hooks: Crochet Hook Terminology
  • A Beginners Guide to Crochet Hooks: Crochet Hook Materials
  • Ergonomic Crochet Hooks
  • Interchangeable Crochet Hooks

Sources that helped in making our charts: The Spruce Crafts, Annie's, All Free Crochet, and Craft Yarn Council.

Frequently Asked Questions

Why are crochet hook sizes so confusing?

Because there are THREE different sizing systems… US letter/number sizes, UK sizes, and metric millimeter sizes. And they don't all line up perfectly. A US size J hook is 6mm in metric. A UK size 4 is also roughly 6mm. But the letter and number systems are different between US and UK, which is where people get tripped up. The good news? Metric millimeters are universal and consistent. When in doubt, always go by the mm size and you'll never get confused.

What's the difference between thread crochet hooks and yarn crochet hooks?

Thread crochet hooks are much smaller… they're designed for working with crochet thread and fine lace yarns. They use a completely different numbering system than yarn hooks (sizes like 0, 1, 2, 3, 4, 5, 6, 7, 8, 9, 10) and the sizes go in the OPPOSITE direction from yarn hooks… lower numbers mean bigger hooks in thread sizing. It's confusing if you're used to yarn hooks! Always check that you're looking at the right chart before buying a new hook.

How do I know what hook size to use for a pattern?

Every pattern should list a recommended hook size. Always start there. But here's the thing… hook size recommendations are just a starting point. Your gauge is what actually determines whether your project turns out the right size. If you're making anything that needs to fit (garments, hats, mittens), always do a gauge swatch and adjust your hook size up or down until your gauge matches the pattern. For non-fitted projects like scarves and blankets, you have more flexibility.

Does it matter what material my crochet hook is made of?

More than you'd think! Aluminum hooks are smooth and fast… great for acrylic yarns. Bamboo and wood hooks have a little grip… good for slippery yarns like silk or bamboo. Ergonomic hooks with soft handles are a lifesaver if you crochet for long periods (hello, carpal tunnel prevention). Inline vs. tapered hook heads also make a difference in how your stitches form. Try a few different styles and materials to find what feels best in YOUR hands.

Can I use any hook size with any yarn?

Technically yes… but the results will be very different! A tiny hook with bulky yarn = impossible and frustrating. A huge hook with lace weight = very open, loose, possibly floppy fabric. The yarn label always recommends a hook size range for that yarn weight… that's a great starting point. Going up from the recommendation gives you a softer, more drapey fabric. Going down gives you a denser, stiffer fabric. Both have their uses depending on what you're making.

Filed Under: Crochet, Tips, Tricks, Techniques for Knitting and Crochet

It’s Not Too Late in the Year to Knit or Crochet a…

July 1, 2021 By Marly Bird Leave a Comment

The knit or crochet temperature blanket is a popular project for people to start at the beginning of the year. The idea is that you use different colors to track the temperature throughout the year. Your colors coordinate with the temperature. Then you knit or crochet a motif or row for each day, using the color that corresponds with the temperature. At the end of the year, you have a colorful blanket. However, it's not too late in the year to start a temperature blanket. And it doesn't have to last for a full year. Many people on social media have mentioned that they're starting their blankets now. So let's talk about how you might do that.

start a temperature blanket in the summer

What is a Temperature Blanket?

If you still aren't entirely sure what a temperature blanket is, then read this introduction. As aforementioned, you basically choose a stitch pattern – whether rows or motifs – for a blanket that you'll create day by day. Then you assign colors to temperature ranges, and that's how you decide which color to knit or crochet that particular day. Many people consider temperature blankets to be a crochet project. However you can knit or crochet a temperature blanket.

Choosing Yarn, Colors, and Stitches

You'll need to decide in advance on these project basics. Here are some helpful posts:

  • How to Choose Yarn and Colors for Temperature Blankets
  • Choosing a Stitch Pattern for Temperature Blankets
  • 33 Free Knit and Crochet Patterns for Temperature Blankets and Related Projects

Additional Planning for Your Knit or Crochet Temperature Blanket

In order to figure out how many colors of yarn you'll need, though, you'll have to do a little thinking ahead. You need to consider:

  • How long you're going to work on this project (the rest of the year, one full year from now, just for the summer?)
  • How often you're going to work on this project (daily, weekly?)
  • The likely temperature range in your area for the duration of the project
  • The range of temperatures you want for each color.
  • Are you going to use the high temperature, the low temperature, or the day's average?

How to Figure Out The Number of Colors and Motifs You Need

So, for example. Let's say that you're going to work on this project until the end of the year. You want to work on it weekly. (Therefore, you'll take the average temperature for the week each week, rather than a specific daily temperature.) There are 26 weeks left in 2021. Therefore, you're going to make 26 motifs for your blanket. (Choose your motif size accordingly.)

What will the temperature range be in your area during those 26 weeks? In Tucson, the high temperature might be well over 100 for the next few months. Then it might get as low as 40's or 50's by Christmas. As a result, your temperature range might be ten degrees. So let's say that you would use a red yarn for weeks when the temperature is 100-110, an orange yarn when it's 90-100, a yellow yarn for 80-90, etc.

In comparison, San Francisco is practically always between 65-85. Therefore, I might use a temperature range of just 2-3 degrees. I might even use a different color for every single temperature within that range if I want a colorful blanket. Notably, I might make different temperature range color choices for my knit or crochet temperature blanket if I were doing a daily motif rather than a weekly one.

Read More: What Location and Time Period To Use for Your Temperature Blanket

Benefits of Starting a Knit or Crochet Temperature Blanket Now

Knit or crochet temperature blankets offer some great benefits that you might not even have thought of:

  • They provide a way to track the time. Sometimes it seems like time is slipping away from us, doesn't us?
  • The daily ritual of sitting down to crochet or knit a simple motif is relaxing, soothing, and healing.
  • Just when you think you can't bare the summer heat any longer, you'll notice your blanket colors starting to change. You'll feel a sense of relief.
  • Every time you use the blanket in the future, you'll remember whatever you were doing this summer (and maybe fall, too) when you crafted it.
  • Motif-based projects are great summer craft projects. Join the motifs at the end when the summer heat is gone.

You Might Also Like:

  • 35 Summer Crochet Blanket Patterns
  • 23 Free Knit Summer Shawls
  • 44 Free Crochet and Knit Beach Projects

Frequently Asked Questions

Can I still start a temperature blanket even if it's not the beginning of the year?

Oh, absolutely! … It's definitely not too late to start a temperature blanket. Plenty of crafters are jumping in mid-year, and you don't even have to commit to a full year if you don't want to!

How do I figure out how many colors I'll need for my temperature blanket?

So here's the thing… you'll need to think about how long you want to work on it, how often you'll add to it (daily? weekly?), and the typical temperatures in your area for that time. Then you'll decide on your temperature ranges for each color.

What's the difference between using high, low, or average temperatures for my blanket?

Honestly… it's up to you and what you want to track! Some people use the high temp, some use the low, and others go with the average. It all depends on how detailed you want your blanket's story to be.

Besides tracking the weather, what are some other cool benefits of making a temperature blanket?

Yes! … They're a wonderful way to help you notice time passing, and the simple act of adding a row or motif each day can be so relaxing. Plus, every time you snuggle up with it later, you'll be reminded of the memories you made while crafting it!

Can I really use any stitch I want for a temperature blanket?

You bet! … Whether you love knitting or crochet, you can totally do a temperature blanket. You can choose rows or motifs, and there are even tons of free patterns out there to help you find the perfect stitch!

Filed Under: Crochet, Dibble Dabble Inspiration, Round Ups

BiCrafty Bootcamp Complementary Hat || How to Knit…

June 30, 2021 By Marly Bird Leave a Comment

Can you believe that we're already at Lesson 14 of Bicrafty Bootcamp? Even Marly can't; if you watched today's live video then you saw that she originally labeled it 13. But, nope – we've done 14 lessons and 12 was a two-parter plus there was extra credit early on. We've done a ton! And now we're going to learn how to knit cables. Plus we're going to do the crown of the hat. And then you'll have your first knit hat! You are such an awesome knitter now.
First Knit Hat in the Round knit cables and crown-2

Your First Knit Hat Recap

As a reminder, here are the lessons for your first knit hat:

  • We started the hat with lesson 11 using ribbing.
  • Then Lesson 12 was a two-parter: we learned the Latvian Braid which you all loved. Then we learned Stranded Knitting.
  • After that, we had Lesson 13 – how to knit triangle lace.
  • And now we're about to learn how to knit cables, shape the crown, switch to DPNs, and finish that hat. WOW!!!

BiCrafty Bootcamp Complementary Hat || Stranded Knitting Instructions

We're going to learn how to to knit cables using the fractured lattice stitch knit pattern. You'll see as it develops that it has a triangular texture to it. Therefore it goes so well with last week's lesson when we learned how to knit triangle lace.

Cut MC, change to CC (use the jogless join technique when switching color >> Click Here for Video Help <<

Note: The stitch multiple repeat for this part of the hat is 8. Therefore, it is necessary for us to increase from 100 stitches to 104. Do this by working 4 M1’s >> Click Here for Video Help <<

Round 1: *Knit 25, m1; repeat from * around — 104 sts.

Fractured Lattice Stitch

Round 1: *Cable 2 Left, k2, Cable 2 Left, Cable 2 Right; repeat from * to end. 

Round 2: Knit. 

Round 3: *K1, Cable 2 Left, k2, Cable 2 Right, k1; repeat from * to end. 

Round 4: Knit. 

Round 5: *Cable 2 Right, Cable 2 Left, Cable 2 Right, k2; repeat from * to end. 

Round 6: Knit. 

Round 7: K3, *Cable 2 Left, k2, Cable 2 Right, k2; repeat from * to last 5 sts, Cable 2 Left, k2, work Cable 2 Right on last st of Round 7 and first st of Round 8, leaving beginning-of-Round marker in place. 

Round 8: Knit. 

Repeat rounds 1-4 once more.

Chart for Fractured Lattice Stitch

This chart will show you where to knit cables left and right as well as where to knit. And you'll get the chance to better understand reading a knit chart as you learn how to knit cables. Lots of lessons here.
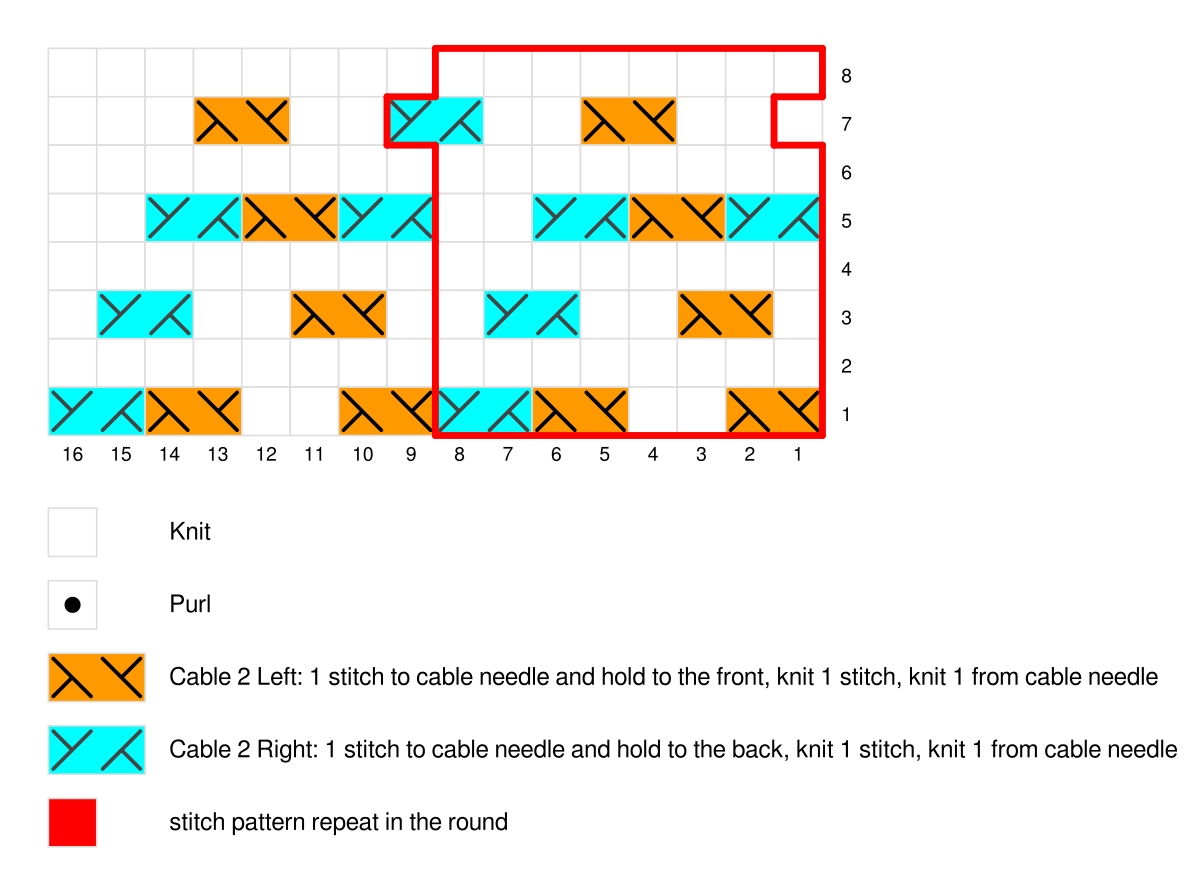
Knitting chart displaying cable stitch patterns in orange, teal, and brown on a grid.
Click on image to view larger

Note: The stitch multiple repeat for this part of the hat is 4 and it is a bigger gauge. Therefore, it is necessary for us to decrease from 104 stitches to 100. 

Cut CC, change to MC. 

Next Round: *Knit 24, k2tog; repeat from * 4 times — 100 sts. 

**NOTICE TO THOSE WHO WATCH THE VIDEO! THE INSTRUCTIONS FOR THE CROWN WERE CORRECT ALL ALONG…I JUST DIDN'T READ THEM CORRECTLY! I FEEL SO DUMB!**

How to Knit the Crown of the Hat

Now that you've learned how to knit cables, you're ready to start working on the crown of the hat. You're going to switch to seed stitch. Then you're going to learn how to knit on DPNs. This is a HUGE lesson.

NOTE: Get the DPN Case from Erin Lane Bags Here

Shape crown as follows, changing to double-pointed needles when work no longer fits comfortably on circular needle. Note, basically you're just doing seed stitch, which you already know how to do. Except that you'll decrease ten stitches in each round. To do that while maintaining seed stitch pattern, you need to do a purl 2 together and then a knit 2 together side by side.

Round 1: *(p1, k1) 4 times, p2tog, k2tog, (p1, k1) 4 times; repeat from * 4 times more – 90 sts.

Rounds 2, 4, 6, 8, 10, 12, 14, 16: Continue in established seed stitch pattern

Round 3: *(p1, k1) 3 times, p1, k2tog, p2tog, k1, (p1, k1) 3 times; repeat from * 4 times more – 80 sts.

Round 5: *(p1, k1) 3 times, p2tog, k2tog, (p1, k1) 3 times; repeat from * 4 times more – 70 sts.

Round 7: *(p1, k1) 2 times, p1, k2tog, p2tog, k1, (p1, k1) 2 times; repeat from * 4 times more – 60 sts.

Round 9: *(p1, k1) 2 times, p2tog, k2tog, (p1, k1) 2 times; repeat from * 4 times more – 50 sts.

Round 11: *p1, k1, p1, k2tog, p2tog, k1, p1, k1; repeat from * 4 times more – 40 sts.

Round 13: *p1, k1, p2tog, k2tog, p1, k1; repeat from * 4 times more – 30 sts.

Round 15: *p1, k2tog, p2tog, k1; repeat from * 4 times more – 20 sts.

Round 17: *p2tog, k2tog; repeat from * around – 10 sts.

Finishing

Cut yarn leaving at least 6” (15.24 cm) of tail and use yarn needle to thread tail through each remaining st knitwise. Pull tail tight to close top (like a drawstring). Weave tail in on wrong side of hat to secure.

How to Knit Cables (and Finish Crown of Hat on DPNs) Video:

**AGAIN NOTICE TO THOSE WHO WATCH THE VIDEO! THE INSTRUCTIONS FOR THE CROWN WERE CORRECT ALL ALONG…I JUST DIDN'T READ THEM CORRECTLY! I FEEL SO DUMB!**

Additional Videos, Patterns, and Posts You Might Like Now:

  • Knitting Beginner Basics How to Knit 4 Stitch Front Left Cable and Right Cable
  • Beginner Basics: How to Cable Without a Cable Needle
  • How to Knit Road to Success Chic Hat
  • How to Knit Snow Speckled Hat
  • All of Marly Bird's Past Spring KALs

Frequently Asked Questions

What part of the BiCrafty Bootcamp is this lesson?

Honestly… we're already on Lesson 14! Can you believe it?! We've done so much, and now we're diving into how to knit cables and finish off your very first knit hat by learning how to shape the crown.

What stitch are we using to practice cables?

So here's the thing… we're using the fractured lattice stitch pattern, which has a neat triangular texture that looks super cool and pairs perfectly with the triangle lace from the previous lesson. It's all about building those skills!

Do I need a special tool to knit these cables?

Yes! For the cables themselves, the instructions mention Cable 2 Left and Cable 2 Right. The page also includes a chart to help you visualize everything and a video link for more detailed help on how to do those cable stitches. You might also need double-pointed needles (DPNs) for the crown shaping later on!

Is it tricky to shape the crown of the hat?

Well, here's the thing… shaping the crown involves switching to seed stitch and decreasing stitches. The instructions break it down round by round, telling you exactly how to decrease while keeping the seed stitch pattern going. It's a bit more involved, but totally doable!

What happens after we finish the crown shaping?

Once you've worked all the crown decreases, you'll have just a few stitches left. You'll cut your yarn, thread the tail through the remaining stitches, and pull it tight to close the top of the hat like a drawstring. Then you just weave in your ends, and voilà… hat complete!
Filed Under: BiCrafty Bootcamp Learn to Knit, Knitting, Tips, Tricks, Techniques for Knitting and Crochet

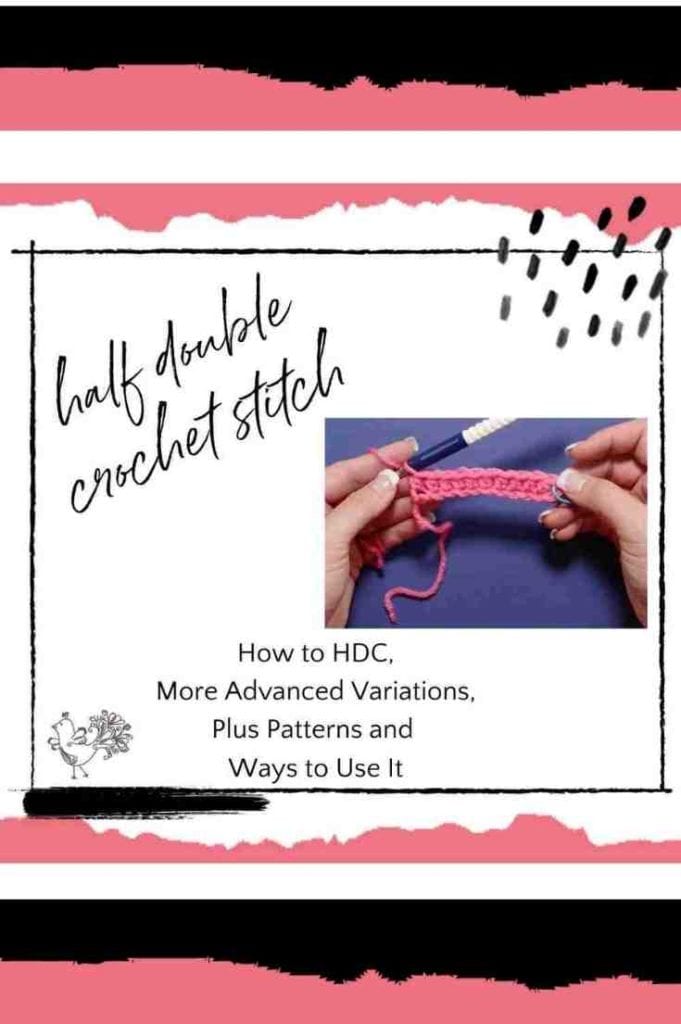
Half Double Crochet Stitch: How to HDC, More Advanced…

June 30, 2021 By Marly Bird Leave a Comment

Sometimes it's fun to go back to the basics. For example, the half double crochet stitch is one of the most popular foundational crochet stitches. We can learn this stitch … then we can learn all sorts of different ways to work with this stitch. Moreover, we can learn variations on the stitch that take this basic crochet lesson up to a more advanced level.

how to crochet hdc stitch

What is Half Double Crochet Stitch?

Half double crochet (abbreviated hdc) is a very simple beginner crochet stitch. When you first learn how to crochet, you learn how to chain. Then you learn either single crochet or double crochet stitch. The two stitches are worked very similarly; the latter just has more yarn overs. Well, as the name suggests, hdc is like working half of the double stitch. So in terms of height, it's taller than the single crochet, shorter than the double crochet. It's a favorite stitch among many people, including Marly Bird team member Kathryn.

How to Half Double Crochet Stitch

Here is how to work the half double crochet stitch:

In written directions, here's what you'll do:

  • Yarn over.
  • Insert crochet hook into the stitch where you want to create the half double crochet stitch.
  • Yarn over.
  • Pull through. You should now have three stitches on your crochet hook.
  • Yarn over.
  • Pull through all three stitches on the crochet hook.

That's it! Note that if you were working the regular double crochet stitch, the final step above would read “pull through first two stitches on the hook.” Then you would yarn over and pull through the remaining two stitches on the hook. That's why the dc is taller than the hdc. However, the basic moves are the same.
Variations on Half Double Crochet Stitch

There are a few different things that you can do to tweak this stitch. Doing so makes it a little more advanced. It also gives you more design options.

How to Extended HDC

The extended half double crochet adds just a little bit of height to the regular hdc. It's not as tall as a dc stitch, though. Here's how you do it:

  • Yarn over.
  • Insert crochet hook into the stitch where you want to create the half double crochet stitch.
  • Yarn over.
  • Pull through. You should now have three stitches on your crochet hook.
  • Yarn over.
  • Pull through one loop.
  • Yarn over.
  • Pull through all three stitches on the crochet hook.

As you can see, you add a step as compared to regular hdc, which is the step where you pull through one loop then yarn over again. If this were dc, you would pull through two loops there. So it's just a slight variation, changing the height. If you didn't know that there was a basic crochet stitch that's in between the height of hdc and dc … well, now you do!

How to Crochet Linked HDC

Note: the video for how to crochet linked hdc is also available in a left-handed version.

When working a linked HD crochet, you are simply connecting two hdc stitches together. Linking your half double crochet stitches together creates a dense fabric. Therefore, it's a great choice when you don't want holes in your work. Making the linked HDC is done by eliminating the traditional yarn over. Rather than doing a yarn over to start your stitch you will go through the bar that was created the stitch before. The video shows best how to do this.

Projects and Patterns for HDC and HDC Variations

There are so many different ways to use hdc in projects. You could simply crochet rows and rows of it to create scarves, shawls, and blankets. We couldn't possibly list all of the patterns that include this basic stitch. However, we can share a few here that use it in really unique ways:

HDC C2C

Corner-to-corner crochet (C2C) is such a great technique. As the name suggests, you work from one corner to the other. Most patterns that teach this technique use double crochet stitches. However, I Iike to use half double crochet stitch. Take a look:

You can work C2C crochet as a square or as a rectangle. My Holiday Snowflake C2C Blanket Free Pattern uses this technique. So does my Heart Throb Baby Blanket Free Pattern.

HDC V-Stitch

Similarly, the crochet v-stitch usually uses double crochet stitches, However, it's very easy to make an hdc v-stitch variation, It's a bit denser than the usual one but nevertheless has a nice openwork pattern.

Post Stitches, Chevrons, and More

You can apply the same idea with other common stitches patterns as well. For example, front post and back post crochet usually use double or treble stitches but can be done with hdc stitches as well. Likewise, chevron crochet can be worked with pretty much any basic stitch so try it with hdc, Anytime that you're working with a dc as a main feature of a stitch pattern, ask yourself what would happen if you switched it to hdc. Remember that because it's a shorter stitch, you may need more rows for the project, though.

You Might Also Like:

  • Crochet Star Stitch Pattern. This is a more advanced stitch pattern that uses hdc for parts of it.
  • How to Crochet a Standing Stitch. This is a helpful technique that you can apply to basic stitches including half double crochet stitch.
  • Crochet and Knitting Techniques That Make Crafting Better

Frequently Asked Questions

What is the half double crochet stitch?

The half double crochet (hdc) sits in height between a single crochet and a double crochet… it's taller than sc but shorter than dc. You yarn over BEFORE inserting your hook, then yarn over and pull up a loop (3 loops on hook), then yarn over and pull through all 3 loops at once. That's it! The result is a dense, slightly textured stitch that creates a beautiful fabric with more give and softness than single crochet. It's one of the most versatile and satisfying stitches in all of crochet.

What's the turning chain for half double crochet?

Traditionally you chain 2 to turn for hdc rows. But here's the thing many patterns don't mention… that chain 2 often leaves a visible hole and counting confusion. Many experienced crocheters now use a stacked hdc (like the stacked dc technique!) to replace the turning chain for a cleaner edge. Another popular option is to just chain 1 and not count it as a stitch… this creates a denser edge without the gap. Try both and see which works better for your projects.

What is the “third loop” of the half double crochet?

The hdc is special because it has a hidden “third loop”… a horizontal strand at the back of the stitch that you don't normally see or use. Working through this third loop (instead of the top two loops) creates a beautiful horizontal ridge effect that looks almost like knit fabric. This is the secret behind techniques like half double crochet through the third loop for knit-look projects, ribbing effects, and that gorgeous horizontal ridging you see in many modern crochet patterns. Once you know it's there, you'll use it everywhere.

What projects is the half double crochet good for?

Basically everything! The hdc creates a fabric that's denser than dc but more flexible than sc… it's a wonderful all-purpose stitch. Hats worked in hdc have great stretch and warmth. Blankets in hdc are cozy and work up at a nice pace. Garments and accessories benefit from hdc's slightly more drapey quality compared to single crochet. Baby items are popular in hdc because the fabric is soft and flexible. If you're wondering which stitch to use for a project and you're not sure… hdc is often the right answer.

How is half double crochet different from a waistcoat or split single crochet?

They look different and create very different fabrics. Regular hdc is worked under the top two loops (or variations). The waistcoat stitch (split single crochet) is worked through the center “V” of the stitch body, not under the top loops at all. The waistcoat stitch creates a knit-like surface that hdc doesn't. Hdc through the third loop creates a ribbed ridge effect unique to hdc. Each technique gives a different aesthetic. Understanding which variation creates which look expands your crochet vocabulary significantly.

Filed Under: Crochet, Tips, Tricks, Techniques for Knitting and Crochet

  • « Previous Page
  • 1
  • …
  • 69
  • 70
  • 71
  • 72
  • 73
  • …
  • 97
  • Next Page »

Let's Be Social

Join the Marly's Minions Facebook group to share, ask questions, or chat about all of your yarn related crafts!

Join the group
Cartoon of a smiling woman with brown hair in a bun, glasses, black jacket and green shirt, waving next to large "hi" text.

Quick Links

The Pattern Shop

Our Free Patterns

Blog

Marly Bird House

Learn to Knit & Crochet

About

Giveaway Terms and Privacy Notice

Find Us Everywhere

Join the Newsletter

YouTube Channel

Marly's Minions FB Group

Etsy Store

Ravelry Store


AN ELITE CAFEMEDIA HOME/DIY PUBLISHER

Information from your device can be used to personalize your ad experience. Do not sell or share my personal information.

Privacy Policy   Terms   Marly Bird Legal Documents Copyright © 2026