BiCrafty Bootcamp Complementary Hat || How to Knit…
Can you believe that we're already at Lesson 14 of Bicrafty Bootcamp? Even Marly can't; if you watched today's live video then you saw that she originally labeled it 13. But, nope – we've done 14 lessons and 12 was a two-parter plus there was extra credit early on. We've done a ton! And now we're going to learn how to knit cables. Plus we're going to do the crown of the hat. And then you'll have your first knit hat! You are such an awesome knitter now.
Your First Knit Hat Recap
As a reminder, here are the lessons for your first knit hat:
- We started the hat with lesson 11 using ribbing.
- Then Lesson 12 was a two-parter: we learned the Latvian Braid which you all loved. Then we learned Stranded Knitting.
- After that, we had Lesson 13 – how to knit triangle lace.
- And now we're about to learn how to knit cables, shape the crown, switch to DPNs, and finish that hat. WOW!!!
BiCrafty Bootcamp Complementary Hat || Stranded Knitting Instructions
We're going to learn how to to knit cables using the fractured lattice stitch knit pattern. You'll see as it develops that it has a triangular texture to it. Therefore it goes so well with last week's lesson when we learned how to knit triangle lace.
Cut MC, change to CC (use the jogless join technique when switching color >> Click Here for Video Help <<
Note: The stitch multiple repeat for this part of the hat is 8. Therefore, it is necessary for us to increase from 100 stitches to 104. Do this by working 4 M1’s >> Click Here for Video Help <<
Round 1: *Knit 25, m1; repeat from * around — 104 sts.
Fractured Lattice Stitch
Round 1: *Cable 2 Left, k2, Cable 2 Left, Cable 2 Right; repeat from * to end.
Round 2: Knit.
Round 3: *K1, Cable 2 Left, k2, Cable 2 Right, k1; repeat from * to end.
Round 4: Knit.
Round 5: *Cable 2 Right, Cable 2 Left, Cable 2 Right, k2; repeat from * to end.
Round 6: Knit.
Round 7: K3, *Cable 2 Left, k2, Cable 2 Right, k2; repeat from * to last 5 sts, Cable 2 Left, k2, work Cable 2 Right on last st of Round 7 and first st of Round 8, leaving beginning-of-Round marker in place.
Round 8: Knit.
Repeat rounds 1-4 once more.
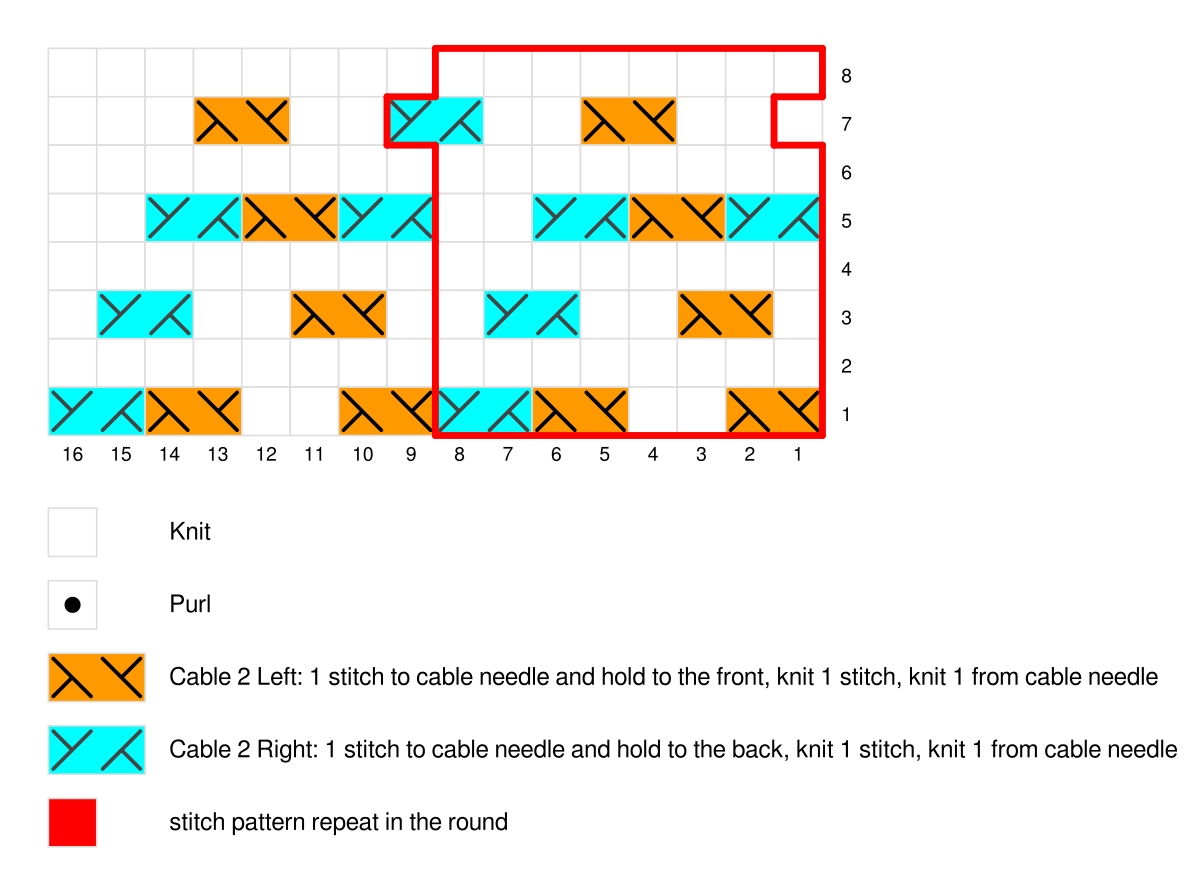
Chart for Fractured Lattice Stitch
This chart will show you where to knit cables left and right as well as where to knit. And you'll get the chance to better understand reading a knit chart as you learn how to knit cables. Lots of lessons here.
Note: The stitch multiple repeat for this part of the hat is 4 and it is a bigger gauge. Therefore, it is necessary for us to decrease from 104 stitches to 100.
Cut CC, change to MC.
Next Round: *Knit 24, k2tog; repeat from * 4 times — 100 sts.
**NOTICE TO THOSE WHO WATCH THE VIDEO! THE INSTRUCTIONS FOR THE CROWN WERE CORRECT ALL ALONG…I JUST DIDN'T READ THEM CORRECTLY! I FEEL SO DUMB!**
How to Knit the Crown of the Hat
Now that you've learned how to knit cables, you're ready to start working on the crown of the hat. You're going to switch to seed stitch. Then you're going to learn how to knit on DPNs. This is a HUGE lesson.
NOTE: Get the DPN Case from Erin Lane Bags Here
Shape crown as follows, changing to double-pointed needles when work no longer fits comfortably on circular needle. Note, basically you're just doing seed stitch, which you already know how to do. Except that you'll decrease ten stitches in each round. To do that while maintaining seed stitch pattern, you need to do a purl 2 together and then a knit 2 together side by side.
Round 1: *(p1, k1) 4 times, p2tog, k2tog, (p1, k1) 4 times; repeat from * 4 times more – 90 sts.
Rounds 2, 4, 6, 8, 10, 12, 14, 16: Continue in established seed stitch pattern
Round 3: *(p1, k1) 3 times, p1, k2tog, p2tog, k1, (p1, k1) 3 times; repeat from * 4 times more – 80 sts.
Round 5: *(p1, k1) 3 times, p2tog, k2tog, (p1, k1) 3 times; repeat from * 4 times more – 70 sts.
Round 7: *(p1, k1) 2 times, p1, k2tog, p2tog, k1, (p1, k1) 2 times; repeat from * 4 times more – 60 sts.
Round 9: *(p1, k1) 2 times, p2tog, k2tog, (p1, k1) 2 times; repeat from * 4 times more – 50 sts.
Round 11: *p1, k1, p1, k2tog, p2tog, k1, p1, k1; repeat from * 4 times more – 40 sts.
Round 13: *p1, k1, p2tog, k2tog, p1, k1; repeat from * 4 times more – 30 sts.
Round 15: *p1, k2tog, p2tog, k1; repeat from * 4 times more – 20 sts.
Round 17: *p2tog, k2tog; repeat from * around – 10 sts.
Finishing
Cut yarn leaving at least 6” (15.24 cm) of tail and use yarn needle to thread tail through each remaining st knitwise. Pull tail tight to close top (like a drawstring). Weave tail in on wrong side of hat to secure.
How to Knit Cables (and Finish Crown of Hat on DPNs) Video:
**AGAIN NOTICE TO THOSE WHO WATCH THE VIDEO! THE INSTRUCTIONS FOR THE CROWN WERE CORRECT ALL ALONG…I JUST DIDN'T READ THEM CORRECTLY! I FEEL SO DUMB!**
Additional Videos, Patterns, and Posts You Might Like Now:
- Knitting Beginner Basics How to Knit 4 Stitch Front Left Cable and Right Cable
- Beginner Basics: How to Cable Without a Cable Needle
- How to Knit Road to Success Chic Hat
- How to Knit Snow Speckled Hat
- All of Marly Bird's Past Spring KALs
Frequently Asked Questions
What part of the BiCrafty Bootcamp is this lesson?
Honestly… we're already on Lesson 14! Can you believe it?! We've done so much, and now we're diving into how to knit cables and finish off your very first knit hat by learning how to shape the crown.
What stitch are we using to practice cables?
So here's the thing… we're using the fractured lattice stitch pattern, which has a neat triangular texture that looks super cool and pairs perfectly with the triangle lace from the previous lesson. It's all about building those skills!
Do I need a special tool to knit these cables?
Yes! For the cables themselves, the instructions mention Cable 2 Left and Cable 2 Right. The page also includes a chart to help you visualize everything and a video link for more detailed help on how to do those cable stitches. You might also need double-pointed needles (DPNs) for the crown shaping later on!
Is it tricky to shape the crown of the hat?
Well, here's the thing… shaping the crown involves switching to seed stitch and decreasing stitches. The instructions break it down round by round, telling you exactly how to decrease while keeping the seed stitch pattern going. It's a bit more involved, but totally doable!
What happens after we finish the crown shaping?
Once you've worked all the crown decreases, you'll have just a few stitches left. You'll cut your yarn, thread the tail through the remaining stitches, and pull it tight to close the top of the hat like a drawstring. Then you just weave in your ends, and voilà… hat complete!