Search
Close
  • The Pattern Shop
  • Our Free Patterns
    • Browse All Our Free Patterns
    • Our Free Knitting Patterns
    • Our Free Crochet Patterns
    • The Big List of Free Knitting Patterns from Marly Bird
    • The Big List of Free Crochet Patterns from Marly Bird
  • Blog
    • All Blog Posts
    • All Free Patterns
    • Dibble Dabble Inspiration
    • Giveaways
    • Make-Alongs
    • Product Reviews
    • Roundups
    • Tips, Tricks, Techniques for Knitting and Crochet
Logo of "Marly Bird" featuring stylized text alongside a graphic of a bird perched on a branch, executed in gray and pink tones. The header design is elegant, emphasizing the brand's unique identity. -Marly Bird
  • Marly Bird House
  • Learn to Knit & Crochet
    • Newbie? Start Here
    • Video Tutorials
    • Knitting Definitions
    • Crochet Definitions
    • Common Techniques
    • Size Charts for Knitting and Crochet Projects
  • About
×
  • The Pattern Shop
  • Free Patterns
  • Blog
  • Marly Bird House
  • Learn to Knit & Crochet
    • Newbie? Start Here
    • Video Tutorials
    • Knitting Definitions
    • Crochet Definitions
    • Common Techniques
    • Size Charts for Knitting and Crochet Projects
  • About
Logo of "Marly Bird" featuring stylized text alongside a graphic of a bird perched on a branch, executed in gray and pink tones. The header design is elegant, emphasizing the brand's unique identity. -Marly Bird
Search
Close

New Patterns NOW Available in Ad-Free PDF! Check out The Pattern Shop

Twisted Knit Headband For Beginner Knitters!

April 3, 2024 By admin 1 Comment

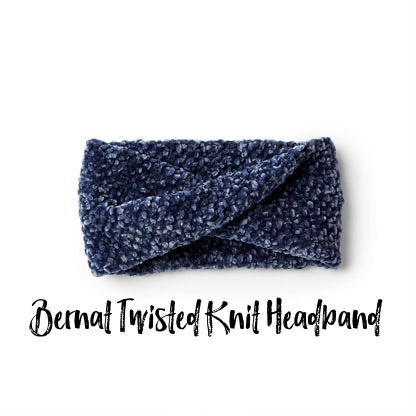
At first glance, twisted knit headbands exude an irresistible charm, blending cozy warmth with chic sophistication. Crafted from soft, luxurious yarns in an array of colors and textures, these headbands are a testament to the enduring appeal of handmade craftsmanship. Whether intricately knitted or delicately crocheted, each piece carries a unique charm, inviting admiration and appreciation. And one of the most enticing things about these twisted knit headbands is they are absolutely beginner friendly!

You know Marly loves designing hats like the Kaleidoscope Harmony Hat, Confetti Blips hat, Harmony Hues hat, but lately, she has been working on headbands or ear warmers so she can wear her hair in that cute updo without messing it up.

Affiliate Disclosure: This post contains affiliate links. If you click on one of these links and make a purchase, I may earn a small commission at no additional cost to you. This helps support the content and free patterns I provide here on MarlyBird.com. Thank you for your support—it means the world to me! 💖

What’s so great about this easy-to-knit headband?

Well, we love the simple twist that makes this knit headband a hot seasonal favorite. But that’s not all! Keep reading to learn more.

Versatility Redefined – More than JUST an Ear Warmer

One of the most compelling aspects of twisted knit headbands is their versatility. Unlike traditional hats or scarves, these accessories offer a unique blend of style and convenience. They can be effortlessly styled in a multitude of ways, allowing for endless creativity and personal expression.

For a casual daytime look, pair a neutral-toned headband with your favorite knit sweater and jeans for an effortlessly chic ensemble. Alternatively, opt for a bold, vibrant headband to add a pop of color to an otherwise monochromatic outfit. Whether you’re running errands or meeting friends for brunch, a twisted knit headband is the perfect finishing touch to your look.

Absolutely Beginner Knitter Friendly Headband Pattern

Because of its unusual shape, many beginners think this project is not something they can tackle. On the contrary, this is an absolutely beginner friendly design! As long as you know how to knit and how to purl, you can tackle a little seed stitch. And if you need help fixing seed stitch in knitting, we got you covered with that as well with this fun how to fix seed stitch video on the Marly Bird YouTube Channel.

Headband Video Tutorial

So many knitters are visual learners so we made a great video that will give you all the confidence you need to take this on! Marly Bird walks through step-by-step instructions from start to finish for making this beginner ear warmer headband. Perfect project for beginner knitters and experienced knitters. Learn the long tail cast on, seed stitch knitting, binding off or casting off, whip stitch. Use the chenille yarn by Bernat called Velvet to make this lux headband with a twist.

⚠️ CAUTION ⚠️ the chenille yarn has a tendency to pull out of place if it is not knit tight. The result is called worming and it can happen if the stitches get pulled out of place due to lack of being knit tight or even from the agitation of a washer. So if you use the chenille yarn be sure to hand wash only.

In this tutorial by Marly Bird on how to knit a twisted headband there is a lot covered. Here’s a summary of the key points covered:

  1. Introduction and Materials: Marly Bird introduces herself as a knitwear and crochet designer. She explains that the tutorial will cover casting on, knitting, purling, casting off, and seaming to create a twisted knit headband. The materials required include Bernat velvet yarn and size 8 or 5mm knitting needles.
  2. Casting On: Marly demonstrates the long-tail cast-on method, ensuring the tail is long enough for the required number of stitches. She explains the process step by step, emphasizing the importance of keeping the stitches snug.
  3. Knitting and Purling: Marly shows how to knit and purl stitches, alternating between them to create the seed stitch pattern. She demonstrates both English and Continental knitting styles, providing tips for maintaining tension and recognizing knit and purl stitches.
  4. Working the Pattern: Marly explains that the seed stitch pattern is a one-row repeat and encourages beginners to maintain consistency until the headband reaches the desired length.
  5. Casting Off: Marly demonstrates the bind-off process, where stitches are completed and finished to prevent them from unraveling. She emphasizes the importance of not pulling the yarn too tightly to avoid tight bind-off stitches.
  6. Seaming: Marly explains how to seam the headband to create a tube, using the whip stitch method. She demonstrates how to join the edges, ensuring the twist remains intact to achieve the desired design.
  7. Finishing Touches: Marly suggests weaving in yarn tails and securing them with knots to ensure the headband is neatly finished.

Overall, Marly Bird’s tutorial provides comprehensive guidance for beginner knitters to create a trendy twisted knit headband.

Get the Twisted Knit Headband Here

You can find the FREE Twisted Knit Headband on the Yarnspirations website! It’s a free pattern download, so you can be reading it and knitting one (or more) in no time flat!

Final Thoughts on the Twisted Knit Headband

Since this twist knit headband works up quickly, it makes for a great weekend project and a fabulous gift option for colder weather, countries, or just the winter months. And, it’s especially convenient for anyone with long hair. You don’t have to squish a ponytail or your signature messy-bun under a tight-fitting hat. It can flow wild and free over this ear-warming headband.

➡️ Download the FREE Bernat Twisted Knit Headband pattern now!

Are you BiCrafty and Want MORE Patterns?

Looking for more patterns like this one? We got you covered. Here are some fun patterns we found on Etsy and from our designer friends.

Knit & Crochet Headband Patterns

All links provided in this list are affiliate links that help to support this website at no extra charge to you.

THE PEBBLE HEADBAND

The Pebble Headband is the perfect textured knit to keep you feeling cozy and staying on trend this fall & winter season. It’s truly a versatile piece for any wardrobe. It can be worn with hair up or down - perfect for running to a fancy brunch or staying in with a messy bun and a cup of coffee. The subtle face framing twist in the front adds a flattering touch to this ultra luxe headband!

Dreaming Of Snow Headband / Knit Ear Warmer Pattern, Holiday Stranded Colorwork

The Dreaming Of Snow Headband is part of the Dreaming Of Snow Collection, which you can find here: http://shrsl.com/4h985

This pattern is such a fun and festive knit. Being worsted weight yarn, it knits up quickly and it makes the perfect Christmas present for a loved one. Choose soft, pastel colors or bold, bright and fun colors, either way, your headband is going to turn out beautiful.

Cabled Headband - Celtic Roots Headband

Celtic Roots is a cable lover’s delight! This headband features a wide Saxon cable over the forehead and down to the ears where the cabling then attractively diminishes to a single cable at the nape allowing the headband to be worn with a variety of hairstyles, both up and down.

MJ Off the Hook Designs - Crochet Harvest Twist Ear Warmer

Get the Autumn crafting vibes with cozy knitted headbands or ear warmers. Make them in soft earthy tones or vibrant colors to match your winter coat.

Knit Stitch Headband /Knit Ear Warmer Pattern, Stranded Colorwork by JackiBean

The Knit Stitch headband is part of the Knit Stitch Collection, which you can find here: http://shrsl.com/4h98f

I had so much fun designing this worsted weight pattern. The stranded colorwork pattern resembles knit stitches. This unisex pattern is such a quick and fun knit.The pattern includes a chart, photo tutorials and video instructions as well. It is great for beginners too because the distance between the color changes is such that you do not need to catch your floats!

Erie Ear Warmer - Super Bulky Yarn

Time to get some bulky or super bulky yarn and whip up this headband in no time. Great item for craft fairs or to give as a gift. This pattern will knit up quickly as long as you have basic knitting skills. It is one size fist most and is knit in the round which means NO SEAMS!

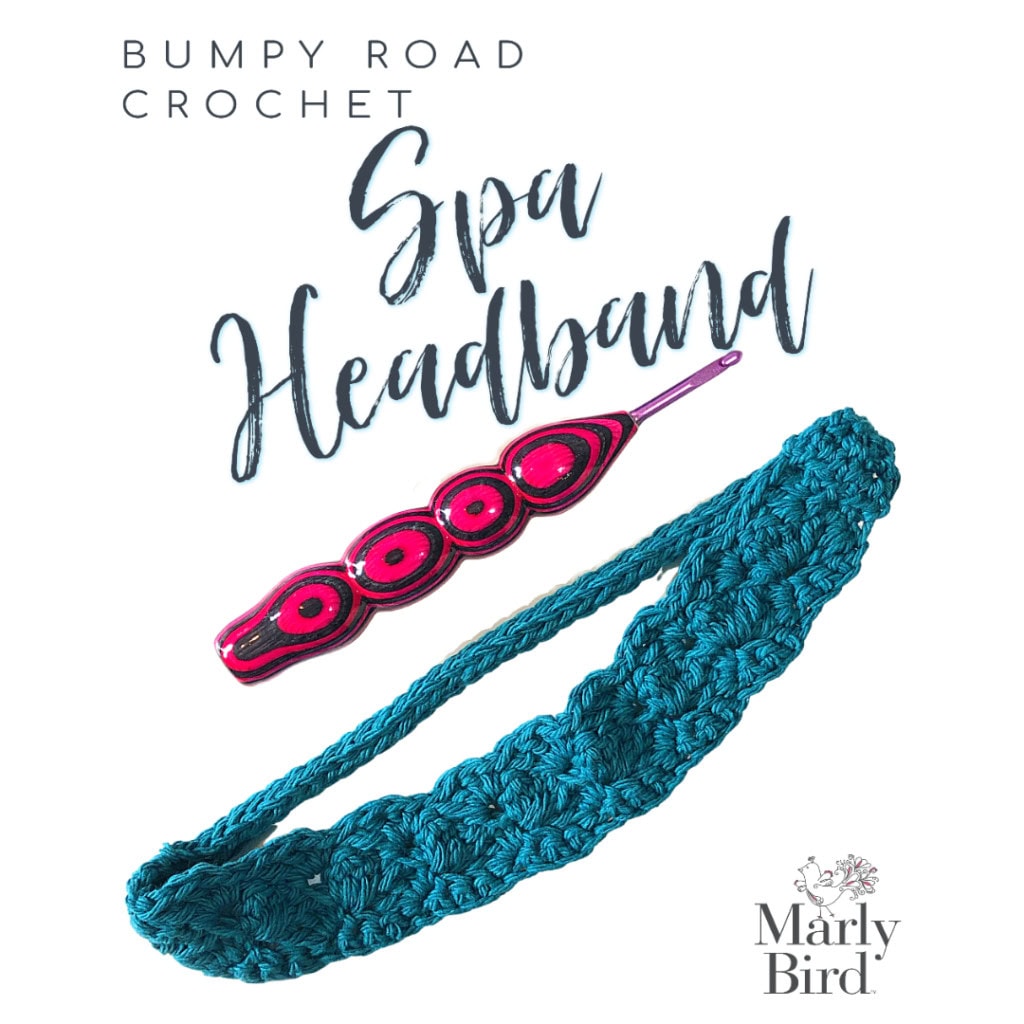
Crochet Spa Headband

Some times you don't need a headband for keeping warm, but to just keep your hair back as you wash your face! It was that very thing that inspired Marly to design and croche this cute and versitile spa headband. Make one in any color you wish. Maybe splurge on a soft cotton yarn to make yours.

Because I know you are going to ask, here is where Marly gets her hooks: http://shrsl.com/4h993

And, I have a feeling you’ll find some headbands here too!

Have fun creating whether it’s for yourself, a coworker, a friend, or to donate.

xoxo Marly Bird

Filed Under: Free Patterns, Pattern Tagged With: badge-beginner-friendly

Stoney Creek Sleeveless Tee: Beginner Crochet Sweater Pattern

September 15, 2023 By Marly Bird 1 Comment

Hey there! Welcome to the fascinating crochet world, where the endless possibilities and rewards are abundant. I’m so excited to share with you this free beginner crochet sweater pattern for the Stoney Creek Sleeveless Crochet Tee!

It’s a simple design that beginners and seasoned crochet enthusiasts will LOVE! As you work on this project, you’ll find it provides a relaxing, therapeutic experience and a wonderful sense of accomplishment.

Whether you’re just starting or have been crocheting for years, this crochet top pattern is for you. It boasts easy-to-read instructions, simple construction, and an easily memorized stitch pattern. You’ll love making this beginner crochet sweater pattern (without sleeves!)

So grab your crochet hooks, find a cozy spot, and get ready to crochet a sweater pattern in a few days! The secrets to creating something wonderful await you, and I’m thrilled to be by your side throughout this exciting adventure. Let’s get started and let your creative juices flow!

Stoney Creek Tee - beginner crochet sweater pattern - Marly Bird

Affiliate Disclosure: This post contains affiliate links. If you click on one of these links and make a purchase, I may earn a small commission at no additional cost to you. This helps support the content and free patterns I provide here on MarlyBird.com. Thank you for your support—it means the world to me! 💖

Beginner Crocheters Can Make a Sweater?

The short answer is YES; as a beginner, you can absolutely make a crochet sweater, crochet pullover, or crochet vest. Success comes with understanding how the shaping works and a good pattern by a reputable crochet designer.

Let’s get excited about crocheting your first garment project with our beginner-friendly Stoney Creek design. Delight in the simplicity of using a single half double crochet stitch through the front loop to create this stylish, versatile tee. Marvel as the Caron Cotton Cakes yarn adds a touch of elegance to your design. No need to worry about color transitions – the yarn does it for you.

How Long to Crochet a Tee?

Crocheting a tee can vary in time depending on a few factors. It mainly depends on your experience level and how quickly you crochet. Many of my crochet testers have found they can finish the Stoney Creek Sleeveless Crochet Tee completely within a week. However, if you’re planning some dedicated crochet time, a weekend offers a good chunk of time to make significant progress, if not complete it. It’s all about pacing and enjoying the process! Working on this beginner crochet sweater pattern is an easy weekend project. It’s perfect for crochet enthusiasts seeking to add staple pieces to their wardrobe.

Choosing the Best Crochet Yarn for Stoney Creek

Once you have a beginner crochet sweater pattern you love (get the ad-free pdf here), the next adventure is choosing the perfect yarn. We found the Caron Cotton Cakes, a fabulous cotton and acrylic blend. It really suits this design. This yarn type contributes to the garment’s structural integrity and enhances its tactile pleasure while crocheting.

When it comes to choosing your yarn for the Stoney Creek Tee, consider its ease of use during crocheting. Think about its maintaining qualities post-wash and its comfort when worn. The Caron Cotton Cakes checks all these boxes. It provides an optimal crocheting experience while ensuring the crafted garment is beautiful and delightful to wear. It is also a great yarn for beginners to use.

The beauty of the Caron Cotton Cakes yarn lies in its color flexibility. It’s an excellent choice for this versatile crochet tank top. Unlike traditional yarns that require careful color transition calculation, this yarn allows you to let the cake work up as it wants while still achieving a stunning design. This spontaneity aligns perfectly with my vision for a simple yet captivating beginner crochet sweater pattern.

Caron Cotton Cakes Yarn  - color: Cracked Pepper

An Alternative Yarn Choice…

Interestingly, other crocheters have found a new love in the Macchiato Cakes yarn, an 80% acrylic/20% wool blend from Caron Cakes. The eagerness of these crocheters to share their creations with us keeps the excitement growing around the Stoney Creek Sleeveless Tee project. This proves the right yarn choice can elevate the overall crochet experience.

Creating this beginner crochet sweater pattern involves mastering a fundamental crochet stitch. This stitch, the half double crochet through the back loop, offers the perfect blend of simplicity for beginners and appeal for the experienced. It’s the main part of this beginner-level crochet pattern that’s both straightforward and interesting.

Crochet Reference Library for Crochet Definitions, Abbreviations, and Stitch Diagram Symbols - Marly Bird

Learn more about crochet stitches, techniques, and all the crochet stitch diagram symbols in this comprehensive guide!

Crocheting the Stoney Creek Tee revolves around the beauty of repeating this stitch. The harmony of this stitch pattern results in a unique fabric canvas to bring the design of this tee to life. It is easy, simple, ideal for a first-time garment project, and enticing enough for experienced crocheters.

Close up of Stoney Creek Top showing body shaping darts - beginner crochet sweater pattern - Marly Bird

But it’s not all about mastering a single stitch.

There’s also an introduction to basic shaping. This offers practical lessons for beginners interested in garment construction. This beginner crochet sweater pattern is an excellent hands-on way to learn these core crochet principles. Importantly, ensure you fully understand the half double crochet stitch, both in its own right and when incorporated into the pattern. Familiarity with the stitch will help you craft a tee matching the given pattern size. Think of it as blending creativity and precision into a rewarding craft project.

How to Add Personal Touches to Your Beginner Crochet Sleeveless Sweater

Adding personal touches to your Stoney Creek Sleeveless Crochet Tee makes it uniquely yours. The first option could be to play around with the color scheme. Using the Caron Cotton Cakes yarn allows for an array of beautiful color choices; you don’t have to stick to the original. Go bold, soft, neutral, or multi-colored – the choice is yours.

Another way to personalize your tee is by adapting the pattern size. The crafting instructions give a size-inclusive range from XS to 5X. However, adjusting your pattern beyond these sizes might be as simple as a few additional calculations for those educated in crochet. So, every crocheter can have a sleeveless tee that truly fits.

While the design is a snug fit around the bust and flared at the hips, feel free to adjust these proportions. After all, this is your creation; it should be as comfortable and flattering as you want. I am modeling the 3xl size over a size 20 button-down white shirt to give you a size perspective.

Perfect For Layering!

Finally, toy with what to pair with your sleeveless tee. Layer it over a turtleneck for a fall-ready look, or wear it solo during the warmer months. Transform this simple tee into a chic wardrobe staple with a belt, a scarf, or a statement jewelry piece. Mix and match these effects until you have a garment that screams “YOU.”

Ultimately, the Stoney Creek Tee is a canvas awaiting your custom personal touch.

Image collage of the Stoney Creek Sleeveless Crochet tee. Far Left is a close up of Marly Bird wearing the tee over a button down white shirt, the top right is the tee on a plus size mannequin, and the bottom right is the tee laying flat on a table with the Caron Cotton Cakes Yarn on top - Marly Bird

Lifelong Care For Your Handmade Stoney Creek Top

This blend of cotton and acrylic, the recommended Caron Cotton Cakes yarn, is easy to maintain. It’s resilient and can withstand the washing process while preserving your sleeveless tee’s original look and integrity. Wash the top on a gentle cycle with mild detergent and cool water. It’s the best choice to prevent the yarn colors from fading. Avoid bleaching and wringing out the top; you’ll maintain the garment’s shape and color vibrancy.

After washing, allow the top to dry flat where it isn’t exposed to direct sunlight to maintain its shape and color. When storing, folding the top neatly, away from direct sunlight, will protect the color and the shape. Using mothballs or cedar blocks can drive away pests that might damage the yarn. Ironing the top on a low heat setting can help maintain its crisp look if mild wrinkles appear.

Last but not least, treat snags or loose ends promptly to avoid more significant damage to the crochet work. Minor repairs may arise over time, but with gentle handling and care, the Stoney Creek Top retains its beauty, ready to accompany you through many seasons, year in and year out. Display it proudly, knowing it is a testament to your crochet craftsmanship.

Ad-free PDF banner with link for Stoney Creek Top Pattern - Marly Bird

Big Take-Aways for this Beginner Crochet Sweater Pattern

Firstly, it’s a free pattern here on the Marly Bird website. But you can also purchase an ad-free PDF for easy printing and to take with you as you work on your crochet sweater. Make it easy to take notes on the pattern, and maybe use tick marks to count how many rows you have done on each side.

Also, this sleeveless tee adapts from summer to fall with minimal fuss. Working with a cotton and acrylic blend promises a smooth crocheting experience, comfortable wear, and an effortless washing experience.

But this is my favorite part of the pattern…the Stoney provides a flattering fit for all body types, thanks to its classic square neckline and A-line hem design. The tee is meant to offer a snug fit at the bust, transforming into a breezy flare around the hips. Wearing it brings a sense of joy and accomplishment. Don’t you see my smile?

Marly Bird is standing in a green field with grass and trees behind her with her hands up like she is cheering while she is wearing the Stoney Creek Sleeveless Crochet tee over a button down white shirt and a pair of blue jeans - Marly Bird

Remember, the Stoney Creek is size-inclusive, catering to sizes from XS to 5X. Whether you wear it alone or paired with a shirt, the tee exudes charm on any figure. This pattern is free on the MarlyBird.com website, or the ad-free pdf version is offered at a friendly price as a cherry on top.

Don’t forget to Favorite this Pattern and Queue it up on Ravelry!

Favorite This Pattern on Ravelry - Marly Bird

Stoney Creek Sleeveless Crochet Tee Pattern Details

Designed by Marly Bird

SKILL LEVEL

Adventurous Beginner

MEASUREMENTS

To Fit Sizes

XS (S, M, L, XL, 2X, 3X, 4X, 5X), The top should be close-fitting with no ease at the chest, but positive ease around the hips. Top shown is 3X.

Finished Measurements

Bust 29 (33, 37, 41, 45, 49, 53, 57, 61)” [73.5 (84, 94, 104, 114.5, 124.5, 134.5, 145, 155) cm]

Hip 44 (48, 52, 56, 60, 64, 68, 72, 76)” [112 (122, 132, 142, 152.5, 162.5, 172.5, 183, 193) cm]

Length 28 (29, 30, 31, 32, 32, 32, 33, 34)” [71 (73.5, 76, 78.5, 81.5, 81.5, 81.5, 84, 86.5) cm]

Gauge

16 sts and 8 rows = 4″ (10 cm) in hdc tfl using larger hook; use any size hook to obtain the gauge. 

MATERIALS

Yarn

Yarnspirations™ Caron®, Cotton Cakes (60% cotton, 40% acrylic, 530 yds / 485 m, 8¾ oz/ 250 g, CYCA# 4 worsted) 

Cracked Pepper, 2 (2, 2, 3, 3, 3, 3, 4, 4) cakes

Hooks

Size I/9 (5.5 mm) or size needed to obtain gauge and H/8 (5.0 mm) or one size smaller than hook needed for gauge

Notions

Removable stitch markers, tapestry needle.

ABBREVIATIONS

Ch – Chain

Hdc – Half Double Crochet

RS – Right Side

Sc – Single Crochet

Sl St – Slip Stitch

Tfl – Through Front Loop

WS – Wrong Side

Ad-free PDF banner with purchase link for Stoney Creek Top Crochet Pattern - Marly Bird

SPECIAL STITCHES 

⭐️ Single Crochet Three Together (sc3tog): *Insert hook into indicated stitch, yarn over and pull up a loop; repeat from * in next 2 stitches indicated, yarn over and draw through all 4 loops on hook.

NOTES

  • This tank is worked from shoulders down in two pieces, then seamed together and accented with an edging.
  • Directions are for size XS; changes for sizes S, M, L, XL, 2X, 3X, 4X, and 5X are in parentheses. When only one number is given then that number applies to all sizes.
Stoney Creek Sleeveless Crochet Tee Schematic - beginner crochet sweater pattern - Marly Bird

VIDEO TUTORIALS

  • Chain Stitch >> Click Here for Video Help <<
  • Single Crochet >> Click Here for Video Help <<
  • Half-Double Crochet >> Click Here for Video Help <<
  • Slip Stitch >> Click Here for Video Help <<
  • How to Bury Ends >> Click Here for Video Help <<
  • Through the Front Loop >> Click Here for Video Help <<
  • Seaming Crochet >> Click Here for Video Help <<
Ad-free PDF banner with purchase link for Stoney Creek Top Crochet Pattern - Marly Bird

GROW

To Unlock Exclusive Subscriber Content click the Box below and join for free by simply adding your email and creating a password! If you are having troubles, clear your cache or reset your password or login to the Grow Publisher Portal.

>> Learn More About Grow Here <<

I’m thrilled to share this amazing pattern with you, many patterns on my blog are absolutely free! I kindly request that you don’t copy and paste or distribute this pattern. Prefer an ad-free experience? Buy a digital PDF pattern for a small fee from one of my online stores for a seamless crafting journey. 

I appreciate your support and readership. You are the reason I can keep doing what I love and sharing it with others. So, thank you from the bottom of my yarn-loving heart! Disclosure: This post contains affiliate links, meaning I get a commission if you decide to make a purchase through my links at no cost to you.

STONEY CREEK SLEEVELESS CROCHET TEE PATTERN

BACK

Shoulders

Using larger hook, ch 14 (14, 16, 16, 18, 18, 20, 20, 22).

Row 1 (RS): Hdc in 3rd ch from hook and in each ch to end – 12 (12, 14, 14, 16, 16, 18, 18, 20) hdc.

Row 2: Ch 2, hdc tfl in each hdc to end.

Fasten off.

Work other shoulder the same, but do not fasten off.

Join Shoulders

Row 1 (RS): Ch 2, hdc tfl in each hdc to end, ch 30 (32, 32, 36, 36, 38, 38, 38, 38), hdc tfl in each hdc of first shoulder – 54 (56, 60, 64, 68, 70, 74, 74, 78) sts including ch sts.

Row 2: Ch 2, hdc tfl in each of first 12 (12, 14, 14, 16, 16, 18, 18, 20) hdc, hdc in each of next 30 (32, 32, 36, 36, 38, 38, 38, 38) ch, hdc in each of last 12 (12, 14, 14, 16, 16, 18, 18, 20) hdc – 54 (56, 60, 64, 68, 70, 74, 74, 78) hdc.

Work 12 (14, 14, 16, 15, 13, 11, 10, 8) more rows evenly in hdc tfl.

Increase for Underarm

For Last 5 Sizes Only:

Next row (increase row): Ch 2, hdc tfl in each of first 2 hdc, 2 hdc tfl in next hdc, hdc tfl in each hdc to last 3 hdc, 2 hdc tfl in next hdc, hdc in each of last 2 hdc – x (x, x, x, 70, 72, 76, 76, 80) hdc.

Repeat this increase row x (x, x, x, 0, 2, 4, 7, 9) more times – x (x, x, x, 70, 76, 84, 90, 98) hdc.

For All Sizes:

Fasten off.

Add Width for Bust

Row 1 (RS): Using larger hook, ch 2 (5, 7, 9, 10, 11, 11, 12, 12), hdc tfl in each hdc across Back, ch 4 (7, 9, 11, 12, 13, 13, 14, 14).

Row 2: Skip 2 ch, hdc in 3rd ch from hook and in each of next 1 (4, 6, 8, 9, 10, 10, 11, 11) ch, hdc tfl in each hdc to last ch 2 (5, 7, 9, 10, 11, 11, 12, 12), hdc in each of last ch 2 (5, 7, 9, 10, 11, 11, 12, 12) ch – 58 (66, 74, 82, 90, 98, 106, 114, 122) hdc.

Work 4 (4, 4, 2, 2, 2, 0, 0, 0) more rows evenly in hdc tfl.

Shape A-Line to Hip

Place marker in 10th hdc from each end.

Row 1 (increase row, RS): Ch 2, hdc tfl in each hdc to 1 hdc before marker, 2 hdc tfl in next hdc, hdc tfl in marked hdc, move marker up to hdc just made, hdc tfl in each hdc to marker, hdc tfl in marked hdc, move marker up to hdc just made, 2 hdc tfl in next hdc, hdc tfl in each hdc to end – 60 (68, 76, 84, 92, 100, 108, 116, 124) hdc.

Row 2: Ch 2, hdc tfl in each hdc to end, moving markers up as you go whenever working into a marked st.

Repeat the last 2 rows 14 more times – 88 (96, 104, 112, 120, 128, 136, 144, 152) hdc

Work 4 (4, 6, 8, 10, 10, 12, 12, 14) more rows evenly in hdc tfl.

Fasten off.

Close up of shoulder of Stoney Creek Top - beginner crochet sweater pattern - Marly Bird

FRONT

Shoulders

Using larger hook, ch 14 (14, 16, 16, 18, 18, 20, 20, 22) 

Row 1 (RS): Hdc in 3rd ch from hook and in each ch to end – 12 (12, 14, 14, 16, 16, 18, 18, 20) hdc.

Next 3 (3, 3, 5, 5, 5, 5, 5, 5) rows: Ch 2, hdc tfl in each hdc to end.

Fasten off.

Work other shoulder the same, but do not fasten off.

Join Shoulders

Row 1 (RS): Ch 2, hdc tfl in each hdc to end, ch 30 (32, 32, 36, 36, 38, 38, 38, 38), hdc tfl in each hdc of first shoulder – 54 (56, 60, 64, 68, 70, 74, 74, 78) sts including ch sts.

Row 2: Ch 2, hdc tfl in each of first 12 (12, 14, 14, 16, 16, 18, 18, 20) hdc, hdc in each of next 30 (32, 32, 36, 36, 38, 38, 38, 38) ch, hdc in each of last 12 (12, 14, 14, 16, 16, 18, 18, 20) hdc – 54 (56, 60, 64, 68, 70, 74, 74, 78) hdc.

Work 10 (12, 12, 12, 11, 9, 7, 6, 4) more rows evenly in hdc tfl.

Work Underarm, Bust and A-Line Shaping same as Back.

Ad-free PDF banner with purchase link for Stoney Creek Top Crochet Pattern - Marly Bird

FINISHING

Steam block pieces to measurements.

Sew shoulder and side seams.

Neck Edging

Using smaller hook, and with RS facing, join yarn anywhere along back neck.

Round 1 (RS): Ch 1, sc evenly around neck edge, working a sc3tog at each inner corner, join with sl st in first sc, do not turn.

Round 2: Ch 1, * sc in each sc to 1 st before corner decrease, sc3tog over next 3 sts; repeat from * 3 more times, sc in each sc to end, join with sl st in first sc.

Fasten off.

Armhole Edging

Using smaller hook, and with RS facing, join yarn to armhole at shoulder seam.

Round 1 (RS): Ch 1, sc evenly around armhole edge, working a sc3tog at each inner corner, join with sl st in first sc, do not turn.

Round 2: Ch 1, * sc in each sc to 1 st before corner decrease, sc3tog over next 3 sts; repeat from * once more, sc in each sc to end, join with sl st in first sc.

Fasten off.

Weave in all loose ends.

Don’t forget to share with us on Social Media! Use #MMMDI and #MarlyBird on Instagram so I can smash your like button, and we can all jump for joy!

Marly Bird wearing the Stoney Creek Sleeveless Crochet Tee pattern and jumping for joy

Filed Under: Crochet, Free Patterns, Marly Bird Premium Patterns, Our Free Patterns, Pattern, Uncategorized Tagged With: badge-beginner-friendly

FREE Crochet Shawl Pattern with It’s A Wrap Yarn || Bluebonnet Shawl

March 15, 2023 By admin 4 Comments

Let’s get crafty! Introducing the Bluebonnet Shawl crochet pattern, perfect for beginners and advanced crafters alike. This free crochet shawl pattern uses a classic and simple crochet stitch pattern with detailed edging for a timeless summer shawl design.

Exclusive to the ad-free pdf, this lightweight shawl pattern includes a detailed crochet stitch diagram to help you create a beautiful crochet project with lace weight yarn or fingering weight yarn.

With its natural color block created by the cake yarn, the Bluebonnet summer shawl crochet project is sure to bring joy and beauty wherever it goes – whether draped over your shoulders or as an accent in any home.

So grab your hooks and get ready to create something truly unique – only with the Bluebonnet Shawl pattern!

Crochet Pattern by Marly Bird. Bluebonnet Shawl
[Read more…]

Filed Under: Crochet, Free Patterns, Our Free Patterns, Pattern Tagged With: badge-beginner-friendly

Absolute Beginner Crochet Throw Video Tutorial with Marly Bird

May 17, 2018 By admin Leave a Comment

We’ve all started our fiber journey for one reason or another, and when we start, we are all beginners. There’s nothing wrong with that. We all have to start somewhere. Just as we learned to walk and talk as young kids, we have the same thing going on when learning a new craft. One of the important things to me is giving beginner crocheters as much help as possible when they first start. I want to ensure that people succeed with their crochet projects and keep falling ever more in love with the yarn industry. In my video tutorial today, I’ll demonstrate how to crochet the Absolute Beginner Crochet Throw – a FREE crochet throw pattern from Red Heart.

Come learn along with me. I promise it’ll be easy!

Video Tutorial for the Absolute Beginner Crochet Throw with Marly Bird
[Read more…]

Filed Under: Crochet, Free Patterns, Pattern, YouTube Video Tutorial Tagged With: badge-beginner-friendly

Let's Be Social

Join the Marly's Minions Facebook group to share, ask questions, or chat about all of your yarn related crafts!

Join the group
Digital avatar of a woman with brown hair in a bun, glasses, and a black jacket, waving and saying "hi" with a word bubble above her hand in the website footer. -Marly Bird

Quick Links

The Pattern Shop

Our Free Patterns

Blog

Marly Bird House

Learn to Knit & Crochet

About

Giveaway Terms and Privacy Notice

Find Us Everywhere

Join the Newsletter

YouTube Channel

Marly's Minions FB Group

Etsy Store

Ravelry Store


AN ELITE CAFEMEDIA HOME/DIY PUBLISHER

Information from your device can be used to personalize your ad experience. Do not sell or share my personal information.

Privacy Policy   Terms   Copyright © 2025