Search
Close
  • The Pattern Shop
  • Our Free Patterns
    • Browse All Our Free Patterns
    • Our Free Knitting Patterns
    • Our Free Crochet Patterns
    • The Big List of Free Knitting Patterns from Marly Bird
    • The Big List of Free Crochet Patterns from Marly Bird
  • Blog
    • All Blog Posts
    • All Free Patterns
    • Dibble Dabble Inspiration
    • Giveaways
    • Make-Alongs
    • Product Reviews
    • Roundups
    • Tips, Tricks, Techniques for Knitting and Crochet
Logo of "Marly Bird" featuring stylized text alongside a graphic of a bird perched on a branch, executed in gray and pink tones. The header design is elegant, emphasizing the brand's unique identity. -Marly Bird
  • Marly Bird House
  • Learn to Knit & Crochet
    • Newbie? Start Here
    • Video Tutorials
    • Knitting Definitions
    • Crochet Definitions
    • Common Techniques
    • Size Charts for Knitting and Crochet Projects
  • About
×
  • The Pattern Shop
  • Free Patterns
  • Blog
  • Marly Bird House
  • Learn to Knit & Crochet
    • Newbie? Start Here
    • Video Tutorials
    • Knitting Definitions
    • Crochet Definitions
    • Common Techniques
    • Size Charts for Knitting and Crochet Projects
  • About
Logo of "Marly Bird" featuring stylized text alongside a graphic of a bird perched on a branch, executed in gray and pink tones. The header design is elegant, emphasizing the brand's unique identity. -Marly Bird
Search
Close

New Patterns NOW Available in Ad-Free PDF! Check out The Pattern Shop

Knit Menorah Tops || Free Knitting Pattern

November 16, 2022 By Marly Bird Leave a Comment

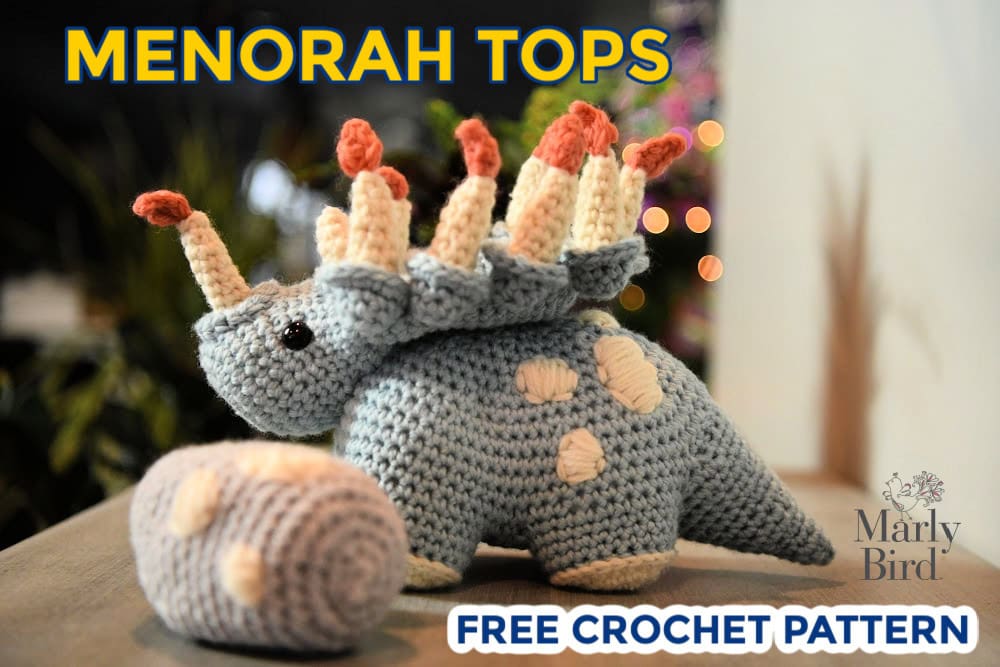
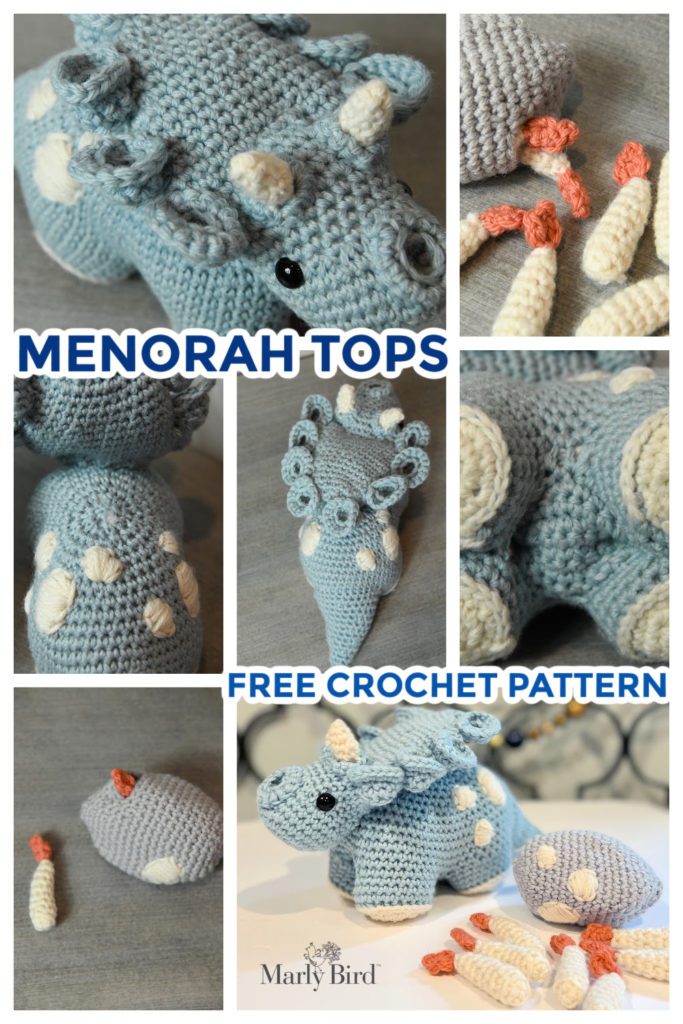
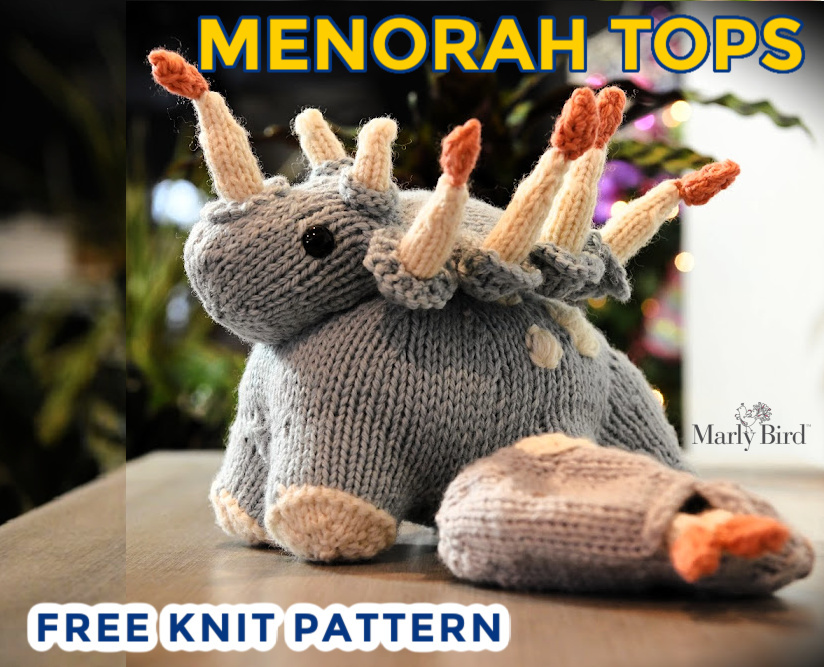
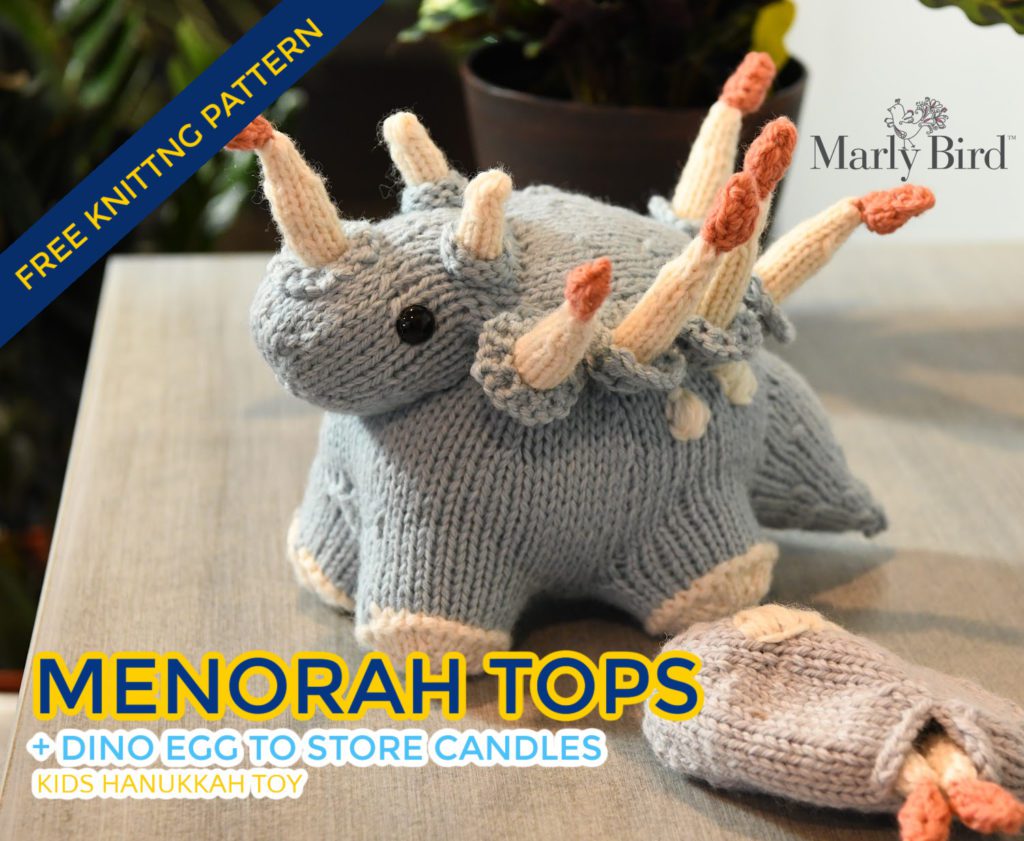
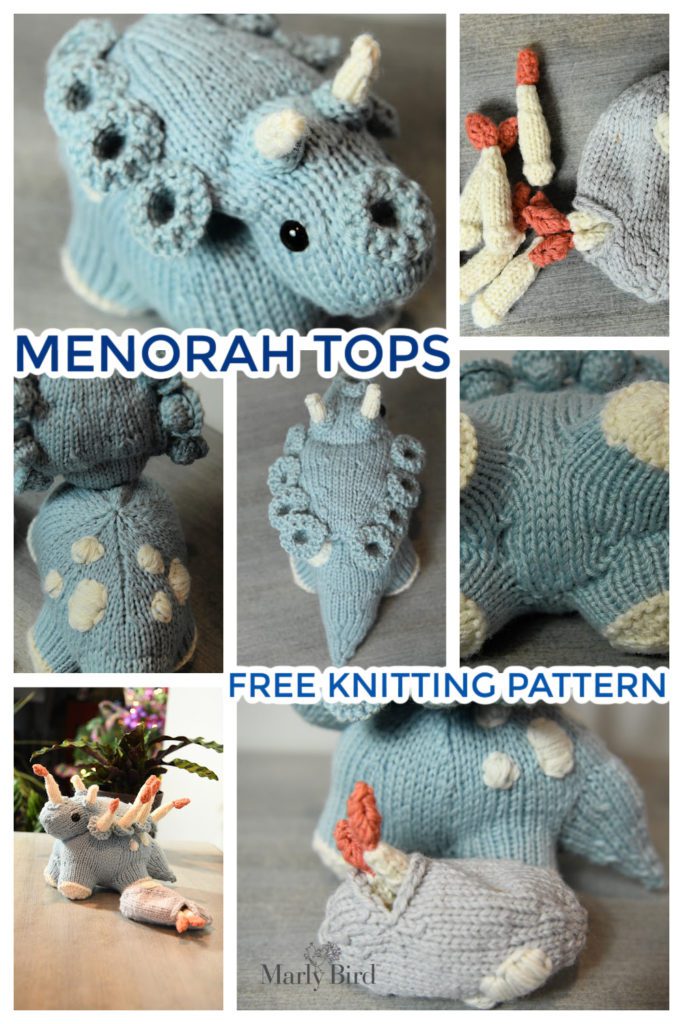
Have a dino-mite Hanukkah with Turquoise Knit Menorah Tops + dino egg to store the candles! This playful prehistoric triceratops friend is ready to celebrate the Festival of Lights. The adorable “Menorasaurus” is a free knitting pattern on marlybird.com and makes a unique gift for Hanukkah!

Knit Menorah Tops - Evie the Menorasaurus. Marly Bird

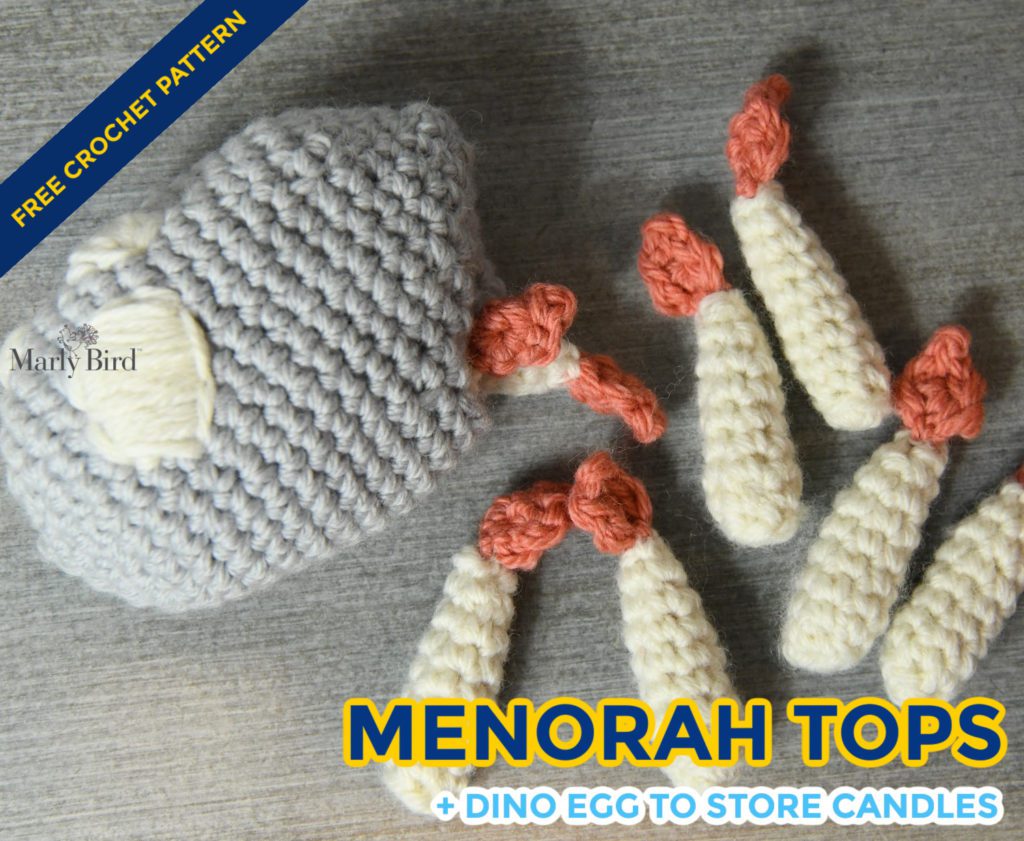
Great kid’s Hanukkah decor that you can knit. The unique candles let you ‘light’ the menorah with your kids safely. And, the best part is…you can store the candles in the dino egg so you won’t lose them!

Read more: Knit Menorah Tops || Free Knitting Pattern

*THIS POST CONTAINS AFFILIATE LINKS. BY CLICKING ONE OF THESE LINKS AND MAKING A PURCHASE A SMALL PORTION COMES BACK TO THE BLOG. THE PRICE YOU PAY DOES NOT CHANGE. THANK YOU FOR YOUR SUPPORT OF THE BLOG.*

Grab your favorite yarn and knit Evie the Menorah Tops this holiday season. The perfect kids’ Hanukkah toy.

Looking for an ad-free PDF? This free knit menorah pattern will be part of the Holiday Pattern Collection vol. 2 to be released on Nov. 17, 2022, on MarlyBird.com.

Join our newsletter to be the first to learn about this amazing Holiday Pattern Collection

<< Get Some Holiday Cheer >>

Menorah Tops Knit Pattern || The NEW “Menorah-saurus” for Hanukkah

Designed by Megan Kreiner of MK Knitting for MarlyBird.com

SKILL LEVEL

Intermediate

MEASUREMENTS

Finished Measurements

Toy is 11.5” [29.21 cm] from nose to tail

Gauge 

16 sts = 4″ [10 cm] in Stockinette Stitch  Note: Gauge is not critical in this project.

MATERIALS

Yarn 

Patons Classic Wool Worsted (100% wool, 194 yds / 177 m, 3.5 oz/ 100 g, CYCA #4 worsted) 

Color A: #77219 Seafoam, 2 skeins

Color B: #00201 Winter White, 1 skein

Color C: #77750 Coral Peach, 1 skein

Color D: #77791 Cool Gray, 1 skein

Needle

U.S. 8 [5 mm] 32” circular needle (to use as magic loop) & set of 5 double pointed needles, or size required for gauge

Notions 

  • Large Steel Tapestry Needle
  • Polyester Fiberfill
  • Straight Pins
  • Stitch markers
  • 12mm plastic safety eyes with plastic backings (for children 3 and older)
  • Black embroidery thread, black felt, or black yarn (alternative eye options)

ABBREVIATIONS

  • BO – Bind Off
  • CO – Cast On
  • DPN – Double Pointed Needle
  • K – Knit
  • P – Purl
  • PM– Place Marker
  • Sl – Slip
  • st(s) – stitches
  • YO – Yarn Over

SPECIAL STITCHES 

Kfb – Knit front and back: Knit into the front loop, then the back loop of next st (1 st increased).

M1R – Make 1 right: Insert left hand needle under horizontal strand between st just worked and next st from the back to the front, knit through the front loop (1 st increased).

K2tog – Knit two together: Knit 2 sts together (1 st decreased).

SSK – Slip, slip, knit: Slip, slip, knit: Slip 2 sts, 1 at a time, knitwise to the right hand needle; return sts to left hand needle in turned position and knit them together through the back loops (1 st decreased).

P2tog – Purl two together: Purl 2 sts together (1 st decreased).

SSP – Slip, slip, purl: Slip 2 sts, 1 at a time, knitwise to the right hand needle; return sts to left hand needle in turned position and purl them together through the back loops (1 st decreased).

PSSO – Pass slip stitch over

NOTES

  • Hold 2 strands of yarn when working all pieces. 
Queue and Favorite this pattern on Ravelry
Knit Menorah Tops - Evie the Menorasaurus. Marly Bird

GROW

To Unlock Exclusive Subscriber Content click the Box below and join for free by simply adding your email and creating a password! If you are having troubles, clear your cache or reset your password or login to the Grow Publisher Portal.

>> Learn More About Grow Here <<

I’m thrilled to share this amazing pattern with you, many patterns on my blog are absolutely free! I kindly request that you don’t copy and paste or distribute this pattern. Prefer an ad-free experience? Buy a digital PDF pattern for a small fee from one of my online stores for a seamless crafting journey. 

I appreciate your support and readership. You are the reason I can keep doing what I love and sharing it with others. So, thank you from the bottom of my yarn-loving heart! Disclosure: This post contains affiliate links, meaning I get a commission if you decide to make a purchase through my links at no cost to you.

KNITTING MENORAH-TOPS PATTERN

KNIT MENORAH-TOPS LEGS

Make 4

Round 1: Starting with color B and working with a magic loop or DPNs, CO 6. Place marker and work in the round. Distribute the stitches evenly over the magic loop or 2 DPNs.

Round 2: Kfb in each st around. (12 sts)

Round 3: K12.

Round 4: (K1, M1R, K1) 6 times. (18 sts)

Round 5:  K18.

Round 6: (K2, M1R, K1) 6 times. (24 sts)

Round 7: K24.

Round 8: P24.

Cut color B, change to color A. 

Rounds 9-16: K24.

Transfer stitches to holder. Make 3 more legs, transferring the 2nd and 3rd to stitch holders and leaving the last/4th leg on needles.

KNIT MENORAH-TOPS BELLY

Row 1: Cont to work the leg, K1, pm, and proceed to k in next 11 sts. Transfer the remaining 12 sts of the leg to stitch holders. Pick up a 2nd leg and knit into one of the leg edge stitches. Continue to knit around the top edge of the 2nd leg for 11 more sts, leaving 12 sts unworked. Turn. 

Row 2: P24.

Row 3: K2tog, K20, Ssk, turn (22 sts)

Row 4: P22.

Row 5: K2tog, K18, Ssk, turn (20 sts)

Row 6: P20.

Rows 7-10: Cont. in St st.

Row 11: K, M1R, K20, M1L, K1. (22 sts)

Row 12: P22.

Row 13: K1, M1R, K22, M1L, K1. (24 sts)

Row 14: P24.

Cut yarn leaving a 24” tail.

Hold 3rd leg edge against the edge of belly row 14. Match up the edges and kitchener stitch 12 sts from the the belly row and 12 sts from the edge of the 3rd leg together (leave remaining 12 sts on stitch holder). Pick up the 4th leg,  line up the leg edge to the edge of belly row 14 and kitchener stitch the remaining 12 sts from the belly row and 12 sts from edge of the 4th leg leaving the remaining 12 sts of the 4th leg edge on stitch holder.  

Queue and Favorite this pattern on Ravelry

KNIT MENORAH-TOPS BODY

Begin by transferring all unworked leg edges to circular needles or DPNs.

Round 1: Starting to the left of the pm stitch of belly row 1, join color A yarn, pull up and K8 along front belly edge, K12 along 1st leg edge, pull up and k2 along the belly side edge between the 1st and 2nd legs, K12 along 2nd leg edge, Turn work and CO 16 purlwise. Turn and skip over back belly edge (creating the tail opening), K12 along 3rd leg edge,  pull up and K2 along the belly side edge between the 3rd and 4th legs, K12 along 4th leg edge (ending in the pm stitch).  (76 sts)

Round 2: K76.

Round 3: K34, K2tog, K12, Ssk, K26. (74 sts)

Round 4: K74.

Round 5: K34, K2tog, K10, Ssk, K26. (72 sts)

Rounds 6-10: K72

Round 11: K8, (K6, K2tog) 4 times, (Ssk, K6) 4 times. (64 sts)

Rounds 12-14: K 64.

Round 15: K8, (K5, K2tog) 4 times, (Ssk, K5) 4 times. (56 sts)

Round 16: K56.

Round 17: K8, (K4, K2tog) 4 times, (Ssk, K4) 4 times. (48 sts)

Round 18: K48

Round 19: K8, (K3, K2tog) 4 times, (Ssk, K3) 4 times. (40 sts)

Round 20: K40.

Round 21: K8, (K2, K2tog) 4 times, (Ssk, K2) 4 times. (32 sts)

Round 22: K8, (K1, K2tog) 4 times, (Ssk, K1) 4 times. (24 sts)

Round 23 K8, K2tog 4 times, Ssk 4 times. (16 sts)

Cut and weave yarn through remaining stitches, pulling to close hole. Weave in yarn tails. 

Stuff legs of body.

KNIT MENORAH-TOPS TAIL

Round 1: With color A and working around tail opening, evenly pull up and k28. (28 sts)

Rounds 2-4: K28.

Round 5: (K5, K2tog) 4 times. (24 sts)

Rounds 6-8: K24.

Round 9: (K2, K2tog, K2) 4 times. (20 sts)

Rounds 10-11: K20.

Round 12: (K1, K2tog, K2) 4 times. (16 sts)

Rounds 13-14: K16.

Stuff body.

Round 15: (K2, k2tog) 4 times. (12 sts)

Round 16-18: K12.

Round 19: (K 1, K2tog) 4 times. (8 sts)

Rounds 20-21: K8.

Stuff tail.

Round 23: K2tog 4 times.  (4 sts)

Cut and weave yarn through remaining stitches, pulling to close hole. Weave in yarn tails. 

To reduce the splay of the legs, run a length of blue yarn back and forth between the inside surfaces of legs with a tapestry needle and pull gently to draw the inside surfaces of the legs towards each other.  Fasten off and use the leftover yarn tails to tidy up any remaining gaps along the belly and legs.

Collage of views of Menorah Tops Knitting pattern - Marly Bird

KNITTING MENORAH-TOPS HEAD

Round 1: With color A and working with a magic loop or DPNs, CO 6. Place marker (pm) and work in the round. Distribute the stitches evenly over the magic loop or 2 DPNs.

Round 2: K6.

Round 3: (K1, M1R) 6 times. (12 sts)

Round 4: K12.

Round 5: (K1, M1R) 12 times (24 sts)

Round 6: K24.

Round 7: (K5, M1R, K1) 2 times, (K1, M1L, K5) 2 times. (28 sts)

Round 8: K28.

Round 9: (K3, M1R, K4) 2 times, (K4, M1L, K3) 2 times. (32 sts)

Rounds 10-12: K32.

Round 13: K14, BO 4, K14. (28 sts)

Round 14: K14, turn work, CO 4 purlwise, turn work, skp over BO sts, K14 (32 sts)

Round 15: K32.

Round 16: K8, k2tog 4 times, Ssk 4 times, K8. (24 sts)

Rounds 17-20: K24.

If using 12 mm plastic safety eyes, install between Rounds 16-17 with 8 sts of sp between them and the horn opening facing up.

Round 21: (K5, M1R, K1) 2 times, (K1, M1L, K5) 2 times. (28 sts)

Round 22: K28.

Round 23: (K2, M1R, K1) 4 times, K4, (K1, M1L, K2) 4 times. (36 sts)

*Rounds 24-34: K36. 

(*on Round 30, pm in a stitch directly above the horn opening to mark the top of the head)

Round 35: (K2, K2tog, K2) 3 times, (K2, Ssk, K2) 3 times. (30 sts)

Rounds 36-41: K30

Round 42: (K1, K2tog, K2) 3 times, (K2, Ssk, K1) 3 times. (24 sts)

Rounds 43-46: K24.

Round 47: (K2, K2tog, K2) 2 times, (K2, Ssk, K2) 2 times. (20 sts)

Round 48: K20.

Stuff head firmly (between Rounds 1-30). If you have not installed plastic safety eyes, embroider on eyes with black yarn or cut 12 mm black felt circles and sew to the side of the head between Rounds 16-17 with 8 sts of sp between them. 

Define the top of the head by sewing a running stitch of blue yarn in an arch shape starting 7-8 Rounds behind the left eye, stitching in the curved line up to the center of Round 30 (marked with a pm), and stitching in a curved line down to 7-8 Rounds behind the right eye.

Round 49: (K1, K2tog, K2) 2 times, (K2, Ssk, K1) 2 times. (16 sts)

Round 50: K16.

BO remaining stitches. Cut yarn and weave in ends.

KNITTING MENORAH-TOPS SMALL HORNS

Make 2

Round 1: With color B and working with a magic loop or DPNs, CO 6. Place marker (pm) and work in the round. Distribute the stitches evenly over the magic loop or 2 DPNs.

Round 2-6: K6.

Lightly stuff small horn.

Round 7: K4, K2tog. (5 sts)

Round 8: K5.

Round 9: K2tog, K1, K2tog (3 sts)

Cut and weave yarn through remaining stitches, pulling to close hole. Weave in yarn tails. 

KNITTING MENORAH-TOPS SMALL HORN RINGS

Make 2

Round 1: With color A  and working with a magic loop or DPNs, CO 10. Place marker and work in the round. Distribute the stitches evenly over the magic loop or 2 DPNs.

Round 2: K10.

BO remaining stitches. Cut yarn and weave in ends.

Sew the small horn bases to the top of the head, 7 Rounds behind the eyes and with 6 sts of sp between them.  Slide the small horn rings over the horns with the WS (purl side) facing out.  Position rings at the base of the horns and sew in place.

KNITTING MENORAH-TOPS CANDLE BASE

Make 9 

Round 1: With color A and working with a magic loop or DPNs, CO10. Place marker (pm) and work in the round. Distribute the stitches evenly over the magic loop or 2 DPNs.

Round 2-3: K10

Round 4: P10.

Round 5-7: K10.

Round 8: Kfb in each st around. (20 sts)

BO remaining stitches. Cut yarn, clean up the ring with a few extra stitches as needed, and leave the remaining yarn tail for sewing.

Insert one horn base into the horn hole in the head and sew in place to secure. Position, pin, and sew the other 8 candle horn bases around the edge of the crown, taking care to angle the openings to face up.

KNIT MENORAH-TOPS CANDLE

Make 9

Make 9

Round 1: With color B  and working with a magic loop or DPNs, CO 8. Place marker and work in the round. Distribute the stitches evenly over the magic loop or 2 DPNs.
Round 2: K8.

Round 3: P8.

Rounds 4-14: K8.

Lightly stuff candle horn.

Round 15: K1, sl 1, K1, psso, K2, sl 1, K1, psso. K1. (6 sts)

Rounds 16-18: K6.

Cut and weave yarn through remaining stitches, pulling to close hole. Weave in yarn tails. 

FLAME

Make 9

Row 1: With color C, CO 4.

Row 2: K1, Kfb, Kfb, K1. (6 sts)

Row 3: P6.

Row 4: K1, k2tog, Ssk, K1 (4 sts)

Row 5: P2tog, Ssp. (2 sts)

Cut and weave yarn through remaining stitches. Sew side edges together. 

Attach base of flame to pointy ends of candles and weave in ends.

KNITT MENORAH-TOPS DINO EGG

Round 1: With color D and working with a magic loop or DPNs, CO 6. Place marker and work in the round. Distribute the stitches evenly over the magic loop or 2 DPNs.

Round 2: K6.

Round 3: Kfb in each st around (12 sts)

Round 4: K12.

Round 5: (K1, M1R, K1) 6 times. (18 sts)

Round 6: K18.

Round 7: (K2, M1R, K1) 6 times. (24 sts)

Round 8: K24.

Round 9: (K3, M1R, K3) 4 times. (28 sts)

Rounds 10-12: K28.

Round 13: (K2, M1R, K5) 4 times. (32 sts)

Rounds 14-16: K32.

Round 17: (K4, M1R, K4 ) 4 times. (36 sts)

Rounds 18-26: K36.

Round 27: (K3, K2tog, K4 ) 4 times. (32 sts)

Round 28: K32.

Round 29: K5, BO 6, K21. (32 sts)

Round 30: K5, turn, CO 6 purlwise, sk the 6 BO sts, K21. (32 sts)

Round 31: K32.

Round 32: (K2, K2tog, K4) 4 times. (28 sts)

Round 33: K28.

Round 34: (K4, K2tog, K1 ) 4 times. (24 sts)

Round 35: K24.

Round 36: (K2, K2tog, K2 ) 4 times. (20 sts)

Round 37: K20.

Round 38: (K3, K2tog ) 4 times. (16 sts)

Round 39: (K2tog, K2 ) 4 times. (12 sts)

Round 40: (K1, K2tog ) 4 times. (8 sts)

Cut and weave yarn through remaining stitches, pulling to close hole. 

KNIT MENORAH-TOPS FINISHING

Using color B, embroider spots on the sides of the body and egg.  Insert candle into egg for safekeeping when not being used.  Candles are easier to insert into the bases when twisted into place.  

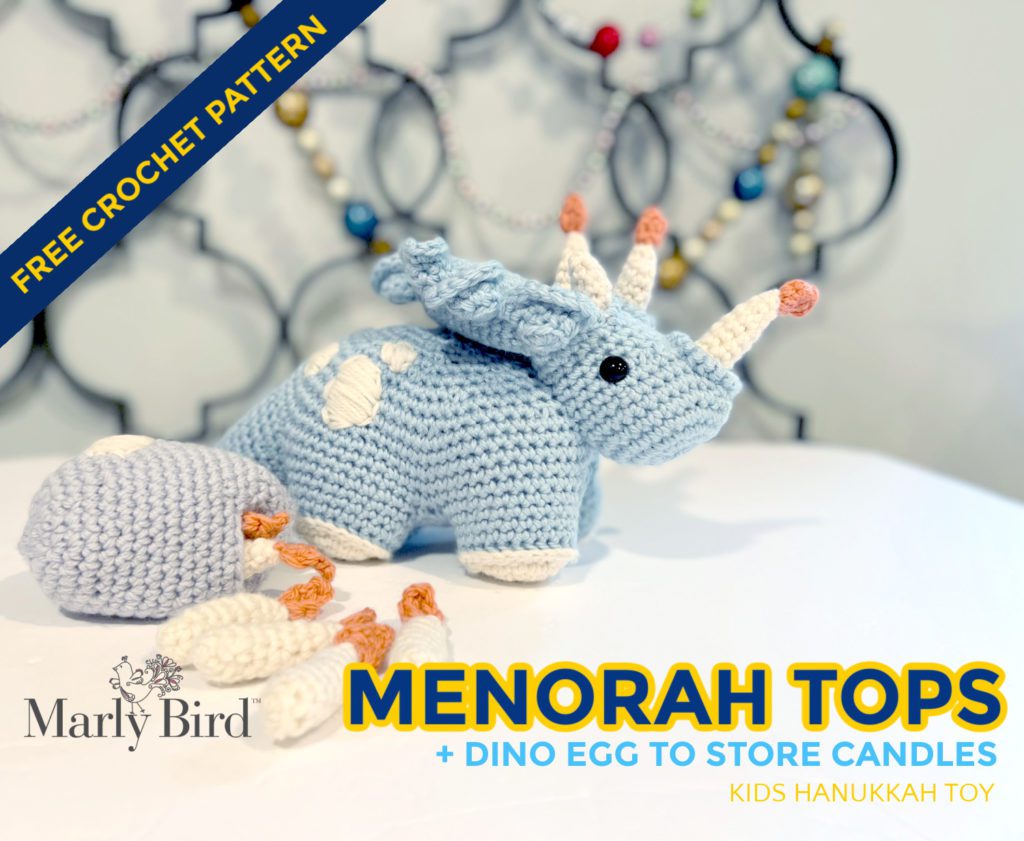
BEA THE CROCHET MENORAH TOPS || FREE CROCHET PATTERN

Evie the Knit Menorah Tops Kids Hanukkah Toy has a crochet companion!

Get Bea the Crochet Menorah Tops Kids Hanukkah Toy here on MarlyBird.com

Crcohet Menorah Tops - Bea the Menorasaurus toy. Marly Bird

Check out more free holiday patterns on MarlyBird.com

Holiday Armadillo Amigurumi Pattern

Prancing Through The Holidays Knit And Crochet Stocking Course

Free Knit Christmas Stocking Patterns

Table Runner Free Crochet Pattern

Filed Under: Designer Premium Patterns, Free Patterns, Knitting, Marly Bird Premium Patterns, Our Free Patterns, Pattern

Crochet Menorah Tops || Free Crochet Pattern

November 11, 2022 By Marly Bird Leave a Comment

Have a dino-mite Hanukkah with Turquoise Crochet Menorah Tops + dino egg to store the candles! This playful prehistoric triceratops friend is ready to celebrate the Festival of Lights. The adorable “Menorasaurus” is a free crochet pattern on marlybird.com and makes a truly unique gift for Hanukkah!

kids decor crochet menorah dinosaur triceratops free crochet pattern.  Marly Bird

This is a great kid’s Hanukkah decoration that you can crochet. The unique candles let you light the menorah safely with your kids. AND, the best part is you can store the candles in the dino egg so you won’t lose them!

Read more: Crochet Menorah Tops || Free Crochet Pattern

*THIS POST CONTAINS AFFILIATE LINKS. BY CLICKING ONE OF THESE LINKS AND MAKING A PURCHASE A SMALL PORTION COMES BACK TO THE BLOG. THE PRICE YOU PAY WILL NOT CHANGE. THANK YOU FOR YOUR SUPPORT OF THE BLOG.*

Grab your favorite yarn and crochet Bea the Menorah Tops this holiday season. The perfect kids’ Hanukkah toy.

Looking for an ad-free PDF? This free crochet menorah pattern will be part of the Holiday Pattern Collection vol. 2 to be released Nov. 17, 2022, on MarlyBird.com.

Join our newsletter to be the first to learn about this amazing Holiday Pattern Collection

<< Get Some Holiday Cheer >>

Menorah Tops Crochet Pattern || The NEW “Menorah-saurus” for Hanukkah

Designed by Megan Kreiner of MK Crochet for MarlyBird.com

SKILL LEVEL

Intermediate

MEASUREMENTS

Finished Measurements

Toy is 11.5” [29.21 cm] from nose to tail

Gauge 

7 sc by 7 rounds = 2” [5 cm] by 2” [5 cm]; use any size hook to obtain the gauge.  Note: Gauge is not critical in this project.

MATERIALS

Yarn 

Patons Classic Wool Worsted (100% wool, 194 yds / 177 m, 3.5 oz/ 100 g, CYCA #4 worsted) 

Color A: #77219 Seafoam, 2 skeins

Color B: #00201 Winter White, 1 skein

Color C: #77750 Coral Peach, 1 skein

Color D: #77791 Cool Gray, 1 skein

Hook

Size H/8 (5.0 mm)

Notions 

  • Large Steel Tapestry Needle
  • Polyester Fiberfill
  • Straight Pins
  • Stitch markers
  • 12mm plastic safety eyes with plastic backings (for children 3 and older)
  • Black embroidery thread, black felt, or black yarn (alternative eye options)

ABBREVIATIONS

  • BLO – Back Loop Only
  • BPsc- Back Post Single Crochet
  • Ch – Chain(s) 
  • FLO – Front Loop Only
  • RS – Right Side 
  • Sc – Single Crochet
  • Sc2tog – Single Crochet Two Together 
  • Sl st – Slip Stitch 
  • Sp(s) – Space(s) 
  • St(s) – Stitch(es)
  • WS – Wrong Side

SPECIAL STITCHES 

Back Post Single Crochet (bpsc): Insert hook from back to front to back around post of stitch indicated, yarn over and pull up a loop, yarn over and draw through 2 loops on hook. 

Single Crochet 2 Together (sc2tog): *Insert hook into indicated stitch, yarn over and pull up a loop; repeat from * in next stitch indicated, yarn over and draw through all 3 loops on hook. (1 decrease)

NOTES

  • Hold 2 strands of yarn when working all pieces. 
  • Rounds are not joined at the end, but worked in a spiral.  Place a marker in the first stitch throughout to keep track of the star of each round. Do not turn at the end of any round, unless otherwise noted.
Queue and Favorite this pattern on Ravelry
kids decor crochet menorah dinosaur triceratops free crochet pattern.  With dino egg to store crochet candles. Marly Bird

GROW

To Unlock Exclusive Subscriber Content click the Box below and join for free by simply adding your email and creating a password! If you are having troubles, clear your cache or reset your password or login to the Grow Publisher Portal.

>> Learn More About Grow Here <<

I’m thrilled to share this amazing pattern with you, many patterns on my blog are absolutely free! I kindly request that you don’t copy and paste or distribute this pattern. Prefer an ad-free experience? Buy a digital PDF pattern for a small fee from one of my online stores for a seamless crafting journey. 

I appreciate your support and readership. You are the reason I can keep doing what I love and sharing it with others. So, thank you from the bottom of my yarn-loving heart! Disclosure: This post contains affiliate links, meaning I get a commission if you decide to make a purchase through my links at no cost to you.

CROCHET MENORAH TOPS PATTERN

CROCHET MENORAH TOPS LEGS

Make 4

Make an adjustable ring with color B.

Round 1: Ch 1, 6 sc into ring, pull ring closed.

Round 2: 2 sc in each sc around–12 sts.

Round 3: *Sc in next sc, 2 sc in next sc; repeat from * around– 18 sts.

Round 4: Sc in first sc, *2 sc in next sc, sc in next 2 sc; repeat from * around to last 2 sc, 2 sc in next sc, sc in last sc, change color to A, fasten off B–24 sts.

Round 5: BPsc around the post of each sc around.

Round 6: Sc in each sc around, fasten off A. 

Note: On 4th leg, do not fasten off A and continue to belly directions. 

CROCHET MENORAH TOPS BELLY

Continue working with color A connected to the fourth leg.

Row 1: Sc in first sc of leg, place marker, sc in next 11 sts of leg (leave remaining 12 sts unworked), sc in next 12 sts on a 2nd leg (leave remaining 12 sts unworked), turn–24 sts. 

Row 2: Ch 1, sc2tog over first 2 sts, sc in each sc across to last 2 sts, sc2tog over last 2 sts– 22 sts.

Row 3: Ch 1, sc2tog over first 2 sts, sc in each sc across to last 2 sts, sc2tog over last 2 sts– 20 sts.

Row 4: Ch 1, sc in each sc across, turn.

Row 5: Ch 1, sc in each sc across, place marker in last st, turn. 

Row 6: Ch 1, sc in each sc across, turn.

Row 7: Ch 1, 2 sc in first sc, sc in each st across to last sc, 2 sc in last sc, turn– 22 sts.

Row 8: Ch 1, 2 sc in first sc, sc in each st across to last sc, 2 sc in last sc, turn– 24 sts.

Row 9: Ch 1, sc in each sc across, turn. 

Row 10: Hold 3rd leg edge against the edge of belly row 9. Match up the stitches and sc through both the belly row and the edge of the 3rd leg 12 times (leaving the remaining 12 sts of the leg edge unworked). Pick up the 4th leg, line up the leg edge to the edge of belly row 9, and sc through both the belly row and edge of the 4th leg 12 times (leaving the remaining 12 sts of the 4th leg edge unworked). Fasten off A.

Queue and Favorite this pattern on Ravelry

CROCHET MENORAH TOPS BODY

Round 1: Holding legs and belly with the bottom of the feet facing up, locate marker from row 5 of belly.  Join A with sl st to marked st, ch 1, sc in same st, place marker (to mark the start of the round), (working along belly front edge) sc 3 times evenly along side edge until you reach the first unworked stitch of a leg, sc in each sc leg (12 sts), sc twice along belly side edge between the leg edges, sc in each sc of leg (12 sts), ch 16, skip over back belly edge (will create opening for tail), sc in each sc of next leg (12 sts), sc twice along belly side edge between the legs, sc in each sc of last leg (12 sts), sc 4 times evenly along front belly edge. (76 sts)

Round 2: Sc in each sc to ch-sp, 12 sc in ch-16 sp, sc in each sc to end– 72 sts. 

Round 3: Sc in next 30 sc, sc in blo of next 12 sc, place marker in front loop of last st, sc in each sc to end. 

Rounds 4-6: Sc in each sc around. 

Round 7: *Sc in next 7 sc, sc2tog over next 2 sts; repeat from * around–64 sts. 

Round 8: Sc in each sc around. 

Round 9:  *Sc in next 6 sc, sc2tog over next 2 sts; repeat from * around–56 sts. 

Round 10:  Sc in next 3 sc, sc2tog over next 2 sts, *sc in next 5 sc, sc2tog over next 2 sts; repeat from * around to last 2 sts, sc in last 2 sts–48 sts. 

Round 11: Sc in next 2 sc, sc2tog over next 2 sts, *sc in next 4 sc, sc2tog over next 2 sts; repeat from * around to last 2 sts, sc in last 2 sts–40 sts. 

Round 12: Sc in first sc, sc2tog over next 2 sts, *sc in next 3 sc, sc2tog over next 2 sts; repeat from * around to last 2 sts, sc in last 2 sts–32 sts. 

Round 13: *Sc in next 2 sc, sc2tog over next 2 sts; repeat from * around–24 sts. 

Round 14: *Sc2tog over next 2 sts, sc in next sc; repeat from * around–16 sts. 

Stuff legs and front of body.

Round 15: Sc2tog over next 2 sts around, fasten off A– 8 sts. 

CROCHET MENORAH TOPS TAIL

Round 1: Turn body so tail opening is facing you and the belly/legs are facing up. Join A with sl st to front loop of marked st from round 3 of body, ch 1, sc in same st, sc in the remaining 11 front loops, sc 16 times evenly along remaining back edge to form tail opening– 28 sc.

Round 2: Sc in each sc around. 

Round 3: *Sc in next 5 sc, sc2tog over next 2 sts; repeat from * around–24 sts.  

Round 4: Sc in each sc around. 

Round 5: Sc in next 2 sc, sc2tog over next 2 sts, *sc in next 4 sc, sc2tog over next 2 sts; repeat from * around to last 2 sts, sc in last 2 sts–20 sts. 

Round 6: Sc in each sc around. 

Round 7: Sc in first sc, sc2tog over next 2 sts, *sc in next 3 sc, sc2tog over next 2 sts; repeat from * around to last 2 sts, sc in last 2 sts–16 sts. 

Round 6: Sc in each sc around. 

Stuff back of body.

Round 7: *Sc in next 2 sc, sc2tog over next 2 sts; repeat from * around–12 sts.  

Round 8: Sc in each sc around. 

Round 9: *Sc in next sc, sc2tog over next 2 sts; repeat from * around–8 sts.  

Rounds 10-11: Sc in each sc around. 

Stuff tail.

Round 12: Sc2tog in next 2 sts around, fasten off and weave in ends– 4 sts.

To reduce the splay of the legs, run a length of color A yarn back and forth between the inside surfaces of legs with a tapestry needle and pull gently to draw the inside surfaces of the legs towards each other.  Fasten off and use the leftover yarn tails to tidy up any remaining gaps along the belly and legs.

kids decor crochet menorah dinosaur triceratops free crochet pattern.  With dino egg to store crochet candles. Collage of all the parts of the stuffie - Marly Bird

CROCHET MENORAH TOPS HEAD

With color A, make an adjustable ring.

Round 1: 6 sc into ring, pull ring closed. 

Round 2: 2 sc in each sc around– 12 sc. 

Round 3: 2 sc in each sc around– 24 sc. 

Round 4: *Sc in next 5 sc, 2 sc in next sc; repeat from * around– 28 sc. 

Round 5: Sc in first 3 sc, *2 sc in next sc, sc in next 6 sc; repeat around to last 4 sc, 2 sc in next sc, sc in last 3 sc– 32 sc. 

Round 6: Sc in each sc around. 

Round 7: Sc in next 14 sc, ch 4, skip 4 sc, sc in last 14 sc– 28 sc + ch-4 sp. 

Round 8: Sc in each sc to ch-4 sp, 4 sc in ch-4 sp, sc in each sc around– 32 sc. 

Round 9: Sc in next 8 sc, [sc2tog over next 2 sts] 8 times, sc in last 8 sc– 24 sc. 

Rounds 10-11: Sc in each sc around.

If using 12 mm plastic safety eyes, install between rnds 9-10 with 8 sts of sp between them and the horn opening facing up.

Round 12: *Sc in next 5 sc, 2 sc in next sc; repeat from * around– 28 sc. 

Round 13: *Sc in next 3 sc, 2 sc in next sc; repeat from * around– 35 sc. 

Rounds 14-18: Sc in each sc around.

Round 19: *Sc in next 5 sc, sc2tog over next 2 sc; repeat from * around– 30sc. 

Rounds 20-23: Sc in each sc around.

Round 24: *Sc in next 4 sc, sc2tog over next 2 sc; repeat from * around– 25sc. 

Rounds 25-28: Sc in each sc around.

Round 29: *Sc in next 3 sc, sc2tog over next 2 sc; repeat from * around– 20sc. 

Stuff head firmly (between rnds 1-17).

If you have not installed plastic safety eyes, embroider on eyes with black yarn or cut 12 mm black felt circles and sew to the side of the head between rnds 9-10 with 8 sts of sp between them. 

Define the top of the head by sewing a running stitch of color A in an arch shape starting 4-5 rnds behind the left eye, stitching in the curved line up to the center of rnd 17, and stitching in a curved line down to 4-5 rnds behind the right eye.

Round 30: *Sc2tog over next 2 sc, sc in next 2 sc; repeat from * around– 15sc. 

Round 31: *Sc in next sc, sc2tog over next 2 sc; repeat from * around, fasten off leave long tail for seaming– 10sc. 

Add some scant stuffing to crown area above the head. Flatten and sew opening shut at the top of the crown.

CROCHET MENORAH TOPS SMALL HORNS

Make 2

With color B, make an adjustable ring.  

Round 1: 6 sc into ring, pull ring closed. 

Round 2: Sc in blo of each sc around. 

Round 3: Sc in each sc around. 

Lightly stuff small horn.

Round 4: Sc in next 2 sc, sc2tog over next 2 sc, sc in next 2 sc– 5 sc..

Round 5: Sc in next sc, skip next sc, sc in next sc, skip next sc, sl st in last sc, fasten off, weave in ends– 3 sts. 

Hold horn so the pointy side is facing up and locate the exposed front loops on rnd 2. Insert hook into one of these front loops. Join A with sl st in any front loop st, ch 1, 2 sc in same st, 2 sc in each remaining front loop, sl st to first sc to join, fasten off leave long tail for seaming — 12 sc.   

Sew the small horn bases to the top of the head, 3 rnds behind the eyes and with 2 sts of sp between them.

kids decor crochet menorah dinosaur triceratops free crochet pattern.  With dino egg to store crochet candles. Marly Bird

CROCHET MENORAH TOPS CANDLE BASE

Make 9 

With color A, make an adjustable ring.  

Round 1: 8 sc into ring, pull ring closed. 

Round 2: Sc in blo of each sc around. 

Round 3: Sc in each sc around. 

Round 4: 2 sc in flo of each sc around, sl st to first sc to join, fasten off leave long tail for seaming–16 sc. 

Insert one horn base into the horn hole in head and sew in place to secure. Position, pin, and sew the other 8 candle horn bases around the edge of the crown, taking care to angle the openings to face up.

CROCHET MENORAH TOPS CANDLE

Make 9

With color B, make an adjustable ring.  

Round 1: 6 sc into ring, pull ring closed. 

Round 2: Sc in blo of each sc around. 

Rounds 3-7: Sc in each sc around. 

Lightly stuff candle horn.

Round 8: Sc in next 2 sc, sc2tog over next 2 sc, sc in next 2 sc– 5 sc..

Round 9: Sc in next sc, skip next sc, sc in next sc, skip next sc, sl st in last sc, fasten off, weave in ends– 3 sts. 

FLAME

Make 9

With color C, make an adjustable ring.  

Round 1: 5 sc into ring, pull ring closed. 

Round 2: (Sl st, ch 2, sl st) in next st, sl st in next st, fasten off, leaving a long tail for sewing.

Weave yarn down to the base of the flame. Secure flame to pointy side of candle yarn tails.

CROCHET MENORAH TOPS DINO EGG

With color D, make an adjustable ring.  

Round 1: 6 sc into ring, pull ring closed. 

Round 2: 2 sc in each st around– 12 sc. 

Round 3: *Sc in next sc, 2 sc in next st; repeat from * around– 18 sc. 

Round 4: *2 sc in next sc, sc in next 2 sc; repeat from * around– 24 sc. 

Round 5: Sc in first 3 sc, 2 sc in next sc, *sc in next 5 sc, 2 sc in next sc; repeat from * around to last 2 sc, sc in last 2 sc– 28 sc. 

Round 6: Sc in each sc around. 

Round 7: Sc in first sc, 2 sc in next sc, *sc in next 6 sc, 2 sc in next sc; repeat from * around to last 5 sc, sc in last 5 sc– 32 sc. 

Round 8: Sc in each sc around. 

Round 9: Sc in first 3 sc, 2 sc in next sc, *sc in next 7 sc, 2 sc in next sc; repeat from * around to last 4 sc, sc in last 4 sc– 36 sc. 

Rounds 10-14: Sc in each sc around. 

Round 15: Sc in first 3 sc, sc2tog over next 2 sc, *sc in next 7 sc, sc2tog over next 2 sc; repeat from * around to last 4 sc, sc in last 4 sc– 32 sc. 

Round 16: Sc in next 13 sc, ch 6, skip 6 sc, sc in last 13 sc– 26 sc + ch-6 sp. 

Round 17: Sc in first 3 sc, sc2tog over next 2 sc, sc in next 6 sc, sc2tog over next 2 sc, 6 sc in ch-6 sp, sc2tog over next 2 sc, sc in next 6 sc, sc2tog over next 2 sc, sc in last 3 sc– 28 sc. 

Round 18: Sc in first 4 sc, sc2tog over next 2 sc, *sc in next 5 sc, sc2tog over next 2 sc; repeat from * around to last sc, sc in last sc– 24 sc. 

Round 19: Sc in first 2 sc, sc2tog over next 2 sc, *sc in next 4 sc, sc2tog over next 2 sc; repeat from * around to last 2 sc, sc in last 2 sc– 20 sc. 

Round 20: *Sc in next 3 sc, sc2tog over next 2 sc; repeat from * around — 16 sc. 

Round 21: *Sc2tog over next 2 sc, sc in next 3 sc; repeat from * around — 12 sc. 

Round 22: *Sc in next sc, sc2tog over next 2 sc; repeat from * around — 8 sc. 

Fasten off, weave yarn through stitches and pull to close

CROCHET MENORAH TOPS FINISHING

Using color B, embroider white spots on the sides of the body and egg.  Insert candles into egg for safekeeping when not being used.  Candles are easier to insert into the bases when twisted into place. 

EVIE THE KNIT MENORAH TOPS || FREE KNIT PATTERN

Bea the Crochet Menorah Tops Kids Hanukkah Toy has a knit companion!

Get Evie the Knit Menorah Tops Kids Hanukkah Toy here on MarlyBird.com

kids decor knit menorah dinosaur triceratops free knit pattern.  With dino egg to store knit candles. Marly Bird

Check out more free crochet holiday patterns on MarlyBird.com

Holiday Armadillo Amigurumi Pattern

Prancing Through The Holidays Knit And Crochet Stocking Course

Free Knit Christmas Stocking Patterns

Table Runner Free Crochet Pattern

Filed Under: Crochet, Designer Premium Patterns, Free Patterns, Marly Bird Premium Patterns, Our Free Patterns, Pattern

Crochet Gnome Advent Calendar || Free Pattern

November 10, 2022 By Marly Bird Leave a Comment

Everybody loves these mythical creatures and now you can make your own Crochet Gnome Advent Calendar designed by Michele Wilcox for MarlyBird.com.

Meet George the Gnome! He’s a fun-loving guy with a lot of love to give. This is a free gnome pattern for crocheters who need a little George around the holidays.

Crochet Gnome Advent Calendar - Marly Bird
Read more: Crochet Gnome Advent Calendar || Free Pattern

*THIS POST CONTAINS AFFILIATE LINKS. BY CLICKING ONE OF THESE LINKS AND MAKING A PURCHASE A SMALL PORTION COMES BACK TO THE BLOG. THE PRICE YOU PAY WILL NOT CHANGE. THANK YOU FOR YOUR SUPPORT OF THE BLOG.*

The construction is rather simple but all the work is in the details.

He’s there with his mini baskets to help celebrate the season, so why not pop a little treat in each day’s basket? The kids will be so excited to see what they can find in there every day leading up to Christmas.

So, grab your favorite yarn and this Crochet Gnome Advent Calendar pattern (remember his name – George) this holiday season.

Looking for an ad-free PDF? This free gnome pattern will be part of the Holiday Pattern Collection vol. 2 released Nov. 17, 2022, on MarlyBird.com.

Join our newsletter to be the first to learn about everything Marly Bird!

<< Get Some Holiday Cheer >>
Holly and berries

Crochet Gnome Advent Calendar || Free Pattern

Designed by Michele Wilcox for MarlyBird.com

SKILL LEVEL

Adventurous Beginner

MEASUREMENTS

Finished Measurements

Calendar is 18” [45.5 cm] wide by 24” [61 cm] long. 

Gauge 

13 sc x 14 rows = 4” [10 cm] x 4”[10 cm]; use any size hook to obtain the gauge. 

MATERIALS

Yarn 

WeCrochet, Brava Bulky (100% acrylic, 136 yds / 124 m, 3.5 oz/ 100 g, CYCA# 5 bulky) 

Color A: #28338 Celestial, 2 skeins

Color B: #28361 White, 2 skeins

Color C: #28352 Red, 2 skeins

Color D: #28347 Hunter, 2 skeins

WeCrochet, Mighty Stitch Bulky (80% acrylic/ 20% superwash wool, 136 yds / 124 m, 3.5 oz/ 100 g, CYCA# 5 bulky) 

Color E: #26818 Blush, 1 skein

Color F: #26820 Silver, 1 skein

Hook

Size J/10 (6.0 mm)

Notions 

Stitch Markers, Tapestry needle, Polyester fiberfil,  1 stiff brush (like a cat brush) for fluffing beard. 1 dowel for hanging 18“ [45.5 cm] long, charms or beads for each day of advent.

ABBREVIATIONS

  • Ch – Chain(s) 
  • Dc – Double Crochet 
  • FLO – Front Loop Only
  • Hdc – Half Double Crochet
  • PM – Place Marker
  • RS – Right Side 
  • Sc – Single Crochet
  • Sp(s) – Space(s) 
  • St(s) – Stitch(es)
  • Tch – Turning Chain
  • WS – Wrong Side

SPECIAL STITCHES 

⭐️ Single Crochet 2 Together (sc2tog): *Insert hook into indicated stitch, yarn over and pull up a loop; repeat from * in next stitch indicated, yarn over and draw through all 3 loops on hook. (1 decrease)

⭐️ Single Crochet 3 Together (sc3tog): *Insert hook into indicated stitch, yarn over and pull up a loop; repeat from * in next 2 stitches indicated, yarn over and draw through all 4 loops on hook. (2 decrease)

⭐️Double Crochet 2 Together (Dc2tog): *Yarn over hook, insert hook into indicated st, yarn over and pull up a loop, yarn over and draw through 2 loops on hook; repeat from * in next st, yarn over and draw through all 3 loops on hook. 

CROCHET GNOME ADVENT CALENDAR: NOTES

  • When working in the round for the nose and baskets, it can be helpful to place a marker at the beginning of each round to keep track of where you are in the round.
Crochet Gnome Advent Calendar - Marly Bird

CROCHET GNOME ADVENT CALENDAR PATTERN

BACKGROUND

With color A, chain 52.

Row 1: 2 dc in 5th ch from hook (counts as dc and skipped ch), 2 dc in next ch, *skip 2 ch, 2 dc in each of next 2 ch; repeat from * to last 2 ch, skip next ch, dc in last ch, turn.  — 50 dc.

Rows 2-28: Ch 3 (counts as dc), *skip 2 sts. 2 dc in each of next 2 dc; repeat from * across to last 2 dc, skip next dc, dc in top of tch, turn. 

Fasten off, weave in ends. 

Border

With color B, join to top left corner with sl st on RS.

Round 1 (RS): Ch 1, 3 sc in corner, work 56 sc evenly down left side (2 sc in side of each row), pm, 3 sc in bottom corner, 52 sc evenly across bottom, pm, 3 sc in corner, 56 sc evenly up right side, pm, 3 sc in corner, 52 sc evenly across top, sl st in first sc. Do not turn– 228 sc.

Row 2 (RS): (working all sides except top) Sl st to next sc, ch 3 (counts as dc), [dc in each sc to marker, pm. 2 dc in each of next 3 sc] twice, dc in each sc to marker, dc in next 2 sc, leave top edge sts unworked, turn- 176 dc.

Row 3 (WS): Ch 3 (counts as dc) [dc in each dc to marker, 2 dc in each of next 6 dc] twice, dc in each dc to tch, dc in top of tch, turn to work on top edge- 188 dc.

Row 4 (RS): Ch 1, sc evenly across top edge (working over previous row 2-3  ends and sts from Round 1), turn.

Rows 5 – 9: Ch 1, sc in each sc across, turn.

Fasten off, leaving long tail for seaming. Fold top edge behind work and sew to first sc round to form slot for dowel for hanging. Weave in ends. 

CROCHET GNOME

Face

With color E, ch 2.

Row 1 (RS): 6 sc in 2nd ch from hook, turn, DO NOT JOIN- 6 sc.

Row 2: Ch 1, 2 sc in each sc across, turn- 12 sc.

Row 3: Ch 1, *sc in next 3 sc, 2 sc in next sc; repeat from * across, turn -15 sc.

Row 4: Ch 1, *sc in next 4 sc, 2 sc in next sc; repeat from * across, turn- 18 sc. 

Row 5: Ch 1, *sc in next 5 sc, 2 sc in next sc; repeat from * across, turn- 21 sc.

Row 6: Ch 1, *sc in next 6 sc, 2 sc in next sc; repeat from * across, turn- 24 sc.

Row 7: Ch 1, *sc in next 7 sc, 2 sc in next sc; repeat from * across, turn- 27 sc.

Row 8: Ch 1, *sc in next 8 sc, 2 sc in next sc; repeat from * across, turn- 30 sc.

Row 9: Ch 1, *sc in next 9 sc, 2 sc in next sc; repeat from * across, turn- 33 sc.

Row 10: Ch 1, *sc in next 10 sc, 2 sc in next sc; repeat from * across, turn- 36 sc.

Row 11: Ch 1, *sc in next 11 sc, 2 sc in next sc; repeat from * across, turn- 39 sc.

Row 12: Ch 1, *sc in next 12 sc, 2 sc in next sc; repeat from * across, turn- 42 sc.

Round 13: Ch 1, *sc in next 13 sc, 2 sc in next sc; repeat from * across, turn to work on top edge, sc evenly across top edge (working over previous row ends), sl st to first sc to join, fasten off, weave in ends.

Ears

Make 2

With color E, ch 2.

Row 1 (RS): 6 sc in 2nd ch from hook, turn, DO NOT JOIN- 6 sc.

Row 2: Ch 1, 2 sc in each sc across, turn- 12 sc.

Row 3: Ch 1, *sc in next sc, 2 sc in next sc; repeat from * across, turn -18 sc.

Row 4: Ch 1, sc in FLO in each sc across,  turn.

Row 5: Ch 1, *sc in next sc, sc2tog over next 2 sc; repeat from * across, turn- 12 sc.

Row 6: Ch 1, *sc2tog over next 2 sc; repeat from * across, fasten off with a long tail for seaming- 6 sc. 

Fold ear down at row 4 to shape, Sew in place at top edge of face

Nose

With color E, ch 2.

Round 1 (RS): 6 sc in 2nd ch from hook, do not turn, DO NOT JOIN, work in spiral- 6 sc.

Round 2: 2 sc in each sc around, do not turn- 12 sc.

Round 3: *Sc in next sc, 2 sc in next sc; repeat from * around, do not turn- 18 sc.

Rounds 4-5: Sc in each sc around, do not turn. 

Round 6: * Sc2tog over next 2 sc; repeat from * around, fasten off leaving long tail for seaming- 9 sc. 

Stuff lightly and sew in place. 

Optional: With red crayon, color rosy cheeks on either side of nose. 

Eyes

Make 2

With color A, ch 2.

Round 1 (RS): 6 sc in 2nd ch from hook, join with sl st to first sc, fasten off leaving long tail for seaming- 6 sc.

With color B embroider 1 small straight st for a twinkle in his eyes. Sew eyes slightly above nose but close to nose.

Sew face to top center of background, close to top edge, being careful not to sew dowel slot closed. Sew remainder of head in place.

Crochet Gnome Advent Calendar: Beard

With color F cut about 100 lengths of yarn about 20” [51 cm]  long. 

Work 2 strands at a time, insert hook through st at edge of face near the ear, place center of strands on hook, pull strands lightly through face to form loop, tuck ends of strand through loop, pull closed.  Repeat 12 times total down edge of face to chin.  Repeat on opposite side from ear to chin.  Make another 2 rows below ears and nose working center of face (above chin) across. With stiff brush, brush beard until you like the way it looks. Trim bottom of beard to desired length. (Beard shown is about 7” [18 cm] long).

Crochet Gnome Advent Calendar - Marly Bird

Hat

With color C, ch 2.

Row 1 (WS): 6 sc in 2nd ch from hook, turn, DO NOT JOIN- 6 sc.

Row 2: Ch 2 (does not count as a st), dc in each sc across, turn. 

Row 3: Ch 1, 2 sc in first dc, sc in each dc to last dc, 2 sc in last dc, turn- 8 sc.

Rows 4-29: Repeat Rows 2-3- 34sc.

Row 30: Repeat Row 2

Edging round: Ch 1, *sc evenly across edge to corner, 3 sc in corner; repeat from * around, al st to first sc to join, fasten off leave long tail for seaming. 

Sew hat to gnome just covering top of face.

Ravelry logo
Queue and Favorite this Project on Ravelry

Boots

Make 2

With color C, ch 25.

Row 1 (RS): Sc in 2nd ch from hook and each ch across, turn- 24 sc.

Row 2: Ch 2 (does not count as a st), dc in each sc across, turn.

Row 3: Ch 1, sc in each dc across, turn.

Rows 4- 5: Repeat Rows 2 and 3.

Row 6: Repeat Row 2.

Row 7: Ch 1, sc in next 6 dc, 2 sc in each of next 12 dc, sc in last 6 dc, turn- 36 sc.

Rows 8- 13: Repeat Rows 2 and 3.

Row 14: Ch 2, dc in first ss, [dc2tog over next 2 sc] 3 times, dc in next 7 sc, [dc2tog over next 2 sc] 4 times, dc in next 7 sc, [dc2tog over next 2 sc] 3 times, dc in last sc, turn- 26 dc.

Row 15: Ch 1, *sc2tog over next 2 dc; repeat from * across, fasten off leave long tail for seaming- 13 sc.

Fold boot in half lengthwise and sew back side, stuff lightly, and sew bottom seam.  Place boot behind bottom edge of background, with color A, sew boot to bottom edge of background. 

Hand

Make 4

With color E, ch 10.

Row 1 (RS): Sc in 2nd ch from hook and each ch across, turn- 9 sc.

Rows 2-4: Ch 1, sc in each sc across, turn.

Row 5 (begin fingers): Ch 1, sc in next 3 sc, leave remaining sts unworked, turn- 3 sc.

Rows 6-7: Ch 1, sc in each sc across, turn.

Row 8: Ch 1, sc3tog over all 3 sts, fasten off.

Join yarn to next unworked st on Row 4 and repeat Rows 5-8 for next 2 fingers. Do not fasten off.

Edging (gives dimension to hand):

Round 1: Ch 1, sc evenly around edge of hand including fingers, place a sl st between fingers, join to first sc with sl st, do not turn.

Round 2: Ch 1, sc in each sc around, skip sl sts, join with sl st to first sc, fasten off leaving long tail for seaming.

Seam 2 hands together leaving opening at wrist. Stuff lightly.

Cuff

With color C, join to wrist with sl st.

Round 1: Ch 1, sc in evenly around wrist opening, sl st to first sc to join, do not turn.

Round 2: Ch 1, sc in each sc around, join with sl st to first sc, fasten off leave long tail for seaming. 

Stuff lightly, sew wrist opening closed and sew hands in place, slightly wrapping cuff around edge of calendar.

CROCHET GNOME ADVENT CALENDAR BASKETS

Make 24

Note: You can make the baskets in solid colors or stripe them or any combination that you like.  Calendar shown uses colors B, C, and D for the baskets.

Round 1 (RS): 6 sc in 2nd ch from hook, do not turn or join (begin working in spiral)- 6 sc.

Round 2: 2 sc in each sc around- 12 sc.

Round 3: *Sc in next 3 sc, 2 sc in next sc; repeat from * around- 15 sc.

Rounds 4 – 10: Sc in each sc around.

Round 11: *Ch 1, sc in next sc; repeat from * around, fasten off leaving long tail for seaming.. Sew baskets in place in 3 rows of 8 baskets under hands.

FINISHING

Insert dowel into opening and sew side opening closed.

Sew charms or beads to each basket to label each day of advent. 

Optional:  Using Colorful Placemat, Foam Sheet, or Posterboard, trace and cut out candy cane as place marker for day of the week. 

Black and white candy cane
Click Image to print and resize for candy cane tracing

Check out more free crochet holiday patterns on MarlyBird.com

Prancing Through The Holidays Knit And Crochet Stocking Course

Free Knit Christmas Stocking Patterns

Table Runner Free Crochet Pattern

Holiday Armadillo Amigurumi Pattern

Filed Under: Crochet, Free Patterns, Our Free Patterns, Pattern

Turkey Trot Mystery Make-Along 2022

November 8, 2022 By Marly Bird 1 Comment

Join the Turkey Trot Mystery Make-Along 2022 with Marly Bird during the Thanksgiving holiday weekend! This is the 4th annual event and we are thrilled to bring knitters, crocheters, and Tunisian crocheters together to this big fiber-loving family event.

With the success of the previous events including Turkey Trot 2021, Turkey Trot 2020, and Turkey Trot 2019, we want to bring you some added fun to Thanksgiving weekend.

Learn more about the event, grab your supplies, and get ready to trot along with me in this mystery knit along and crochet along. #MarlyBirdTurkeyTrot2022 #mmmdi #turkeytrot2022

Turkey Trot Mystery Make-Along 2022 banner - Marly Bird
[Read more…]

Filed Under: Crochet, Knitting, Make-Alongs, Marly Bird Premium Patterns, Pattern, YouTube Video Tutorial

Moogly CAL 2022 || Marly Bird Crochet Mosaic Block

October 25, 2022 By Marly Bird Leave a Comment

If you haven’t been following along with the MooglyCAL2022, then you’ve been missing out. Just like last year’s project, dozens of designers have come together to create crochet blocks throughout the year. Moogly shares all of the blocks on her site. By working on them, we all learn new crochet stitches, techniques, and approaches to creating a square. Ultimately, you have the beautiful Moogly CAL 2022 crochet blanket. As you know, I love to collaborate. I try to be a part of the community in as many ways as I can. Therefore, I’m thrilled to share my Marly Bird Crochet Mosaic Block with you today!

Crochet mosaic block 2022 - Marly Bird

Moogly CAL 2022 Marly Bird Crochet Mosaic Block Pattern

By Marly Bird

Measurements

Finished Size 

12”(30.5 cm) x 12” (30.5 cm)

Gauge 

1 motif = 12”(30.5 cm) x 12” (30.5 cm) in pattern, BLOCKED.

Materials

Yarn 

Red Heart, With Love (CYCA #4), 100% Acrylic, 198 g/7 oz, 338 meters/370 yards. You’ll need one skein each of three different colors of your choosing.

Crochet Hook  

J (6mm) or hook needed to obtain gauge

Notions 

Yarn Needle

Stitches Used

beg beginning

ch  Chain

ch-sp   Chain Space

sl st Slip Stitch

sc Single Crochet

dc  Double Crochet

tch   Turning Chain

st Stitch

RS     Right Side

WS    Wrong Side

Pattern Notes

  • Weave in loose ends as work progresses.
  • Change color with two loops left on hook of last st. 
  • Carry yarn up the side of the square
  • Work dc on odd rows of Mosaic Section in front of previous ch-sps.
  • Work the edging around the floats of yarn along the edge to hide them

Crochet Mosaic Block Chart

Mosaic Diagram


Moogly CAL 202 Marly Bird Crochet Mosaic Block Instructions

With A, ch 33.

Rows 1-8: Ch 1, sc in each sc across, turn. At end of Row 8, change to color B, fasten off A.

Rows 9-10: Ch 1, sc in each sc across, turn. At end of Row 10, change to color C. Do not fasten off B.

Row 11: Ch 1, sc in first sc, *ch 2, skip 1 sc, sc in next 3 sc, ch 2, skip 1 sc, sc in next sc; repeat from * across to last sc, sc in last sc, turn.

Row 12: Ch 1, sc in next 2 sc, *ch 2, skip next ch-sp, sc in next 3 sc, ch 2, skip next ch-sp, sc in next sc; repeat from * across to last 2 ch-sps, ch 2, skip next ch-sp, sc in next 3 sc, ch 2, skip last ch-sp, sc in last sc, change color to B, turn. 

Row 13: Ch 1, sc in first sc, *dc in next sc 2 rows below (in front of ch-sps), ch 2, skip 1 sc, sc in next sc, ch 2, skip 1 sc, dc in next sc 2 rows below, sc in next sc; repeat from * across to last sc, sc in last sc, turn. 

Row 14: Ch 1, *sc in next 3 sts, ch 2, skip ch-sp, sc in next st, ch 2, skip ch-sp; repeat from * across to last 2 sts, sc in last 2 sts, change color to C, turn. 

Row 15: Ch 1, sc in next 2 sc, *dc in next sc 2 rows below, ch 2, skip 1 sc, dc in next sc 2 rows below, sc in next sc, ch 2, skip 1 sc, sc in next sc; repeat from * across, turn. 

Row 16: Ch 1, sc in first sc, *ch 2, skip ch-sp, sc in next 2 sts; repeat from * across to last st, sc in last st, change color to B, turn. 

Row 17: Ch 1, sc in first sc, *ch 2, skip 1 sc, sc in next sc, dc in next sc 2 rows below, sc in next sc, ch 2, skip 1 sc, dc in next sc 2 rows below; repeat from * across to last sc, sc in last sc, turn. 

Row 18: Ch 1, sc in next 2 sc, *ch 2, skip ch-sp, sc in next 3 sts, ch 2, skip ch-sp, sc in next st; repeat from * across, change color to C, turn. 

Row 19: Ch 1, sc in first sc, *dc in next sc 2 rows below, ch 4, skip 3 sc, dc in next sc 2 rows below, sc in next sc; repeat from * across to last sc, sc in last sc, turn. 

Row 20: Ch 1, *sc in next 3 sts, ch 4, skip ch-sp; repeat from * across to last 2 sts, sc in last 2 sts, change color to B, turn. 

Crochet Mosaic block close-up - Marly Bird

Row 21: Ch 1, sc in next 2 sc, *dc in next 3 sc 2 rows below, sc in next sc, ch 2, skip 1 sc, sc in next sc; repeat from * across, turn. 

Row 22: Ch 1, sc in first sc, *ch 2, skip ch-sp, sc in next 5 sts; repeat from * across to last st, sc in last st, change color to C, turn. 

Row 23: Ch 1, sc in first sc, *ch 3, skip 2 sc, sc in next sc, ch 3, skip 2 sc, dc in next sc 2 rows below; repeat from * across to last sc, sc in last sc, turn. 

Row 24: Ch 1, sc in next 2 sc, *ch 3, skip ch-sp, sc in next st; repeat from * across, change color to B, turn. 

Row 25: Ch 1, sc in first sc, *dc in next 2 sc 2 rows below, sc in next sc, dc in next 2 sc 2 rows below, ch 2, skip 1 sc; repeat from * across to last sc, sc in last sc, turn. 

Row 26: Ch 1, sc in first sc, *ch 2, skip ch-sp, sc in next 5 sts; repeat from * across to last st, sc in last st, change color to C, turn. 

Row 27: Ch 1, sc in next 2 sc, *ch 4, skip 3 sc, sc in next sc, dc in next sc 2 rows below, sc in next sc; repeat from * across, turn. 

Row 28: Ch 1, *sc in next 3 sc, ch 4, skip ch-sp; repeat from * across to last 2 sts, sc in last 2 sts, change color to B, turn. 

Row 29: Ch 1, sc in first sc, *ch 2, skip 1 sc, dc in next 3 sc 2 rows below, ch 2, skip 1 sc, sc in next sc; repeat from * across to last sc, sc in last sc, turn. 

Row 30: Ch 1, sc in next 2 sc, *ch 2, skip ch-sp, sc in next 3 sts, ch 2, skip ch-sp, sc in next st; repeat from * across, change color to C, turn. 

Row 31: Ch 1, sc in first sc, *dc in next sc 2 rows below, sc in next sc, ch 2, skip 1 sc, sc in next sc, dc in next sc 2 rows below, ch 2, skip 1 sc; repeat from * across to last sc, sc in last sc, turn. 

Row 32: Ch 1, sc in first sc, *ch 2, skip ch-sp, sc in next 2 sts; repeat from * across to last st, sc in last st, change color to B, turn. 

Row 33: Ch 1, sc in next 2 sc, *ch 2, skip 1 sc, dc in next sc 2 rows below, ch 2, skip 1 sc, sc in next sc, dc in next sc 2 rows below, sc in next sc; repeat from * across, turn. 

Row 34: Ch 1, *sc in next 3 sts, ch 2, skip ch-sp, sc in next st, ch 2, skip ch-sp; repeat from * across to last 2 sts, sc in last 2 sts, change color to C, turn. 

Row 35: Ch 1, sc in first sc, *ch 2, skip 1 sc, dc in next sc 2 rows below, sc in next sc, dc in next sc 2 rows below, ch 2, skip 1 sc, sc in next sc; repeat from * across to last sc, sc in last sc, turn. 

Row 36: Ch 1, sc in next 2 sc, *ch 2, skip ch-sp, sc in next 3 sts, ch 2, skip ch-sp, sc in next st; repeat from * across, change color to B, fasten off C, turn. 

Row 37: Ch 1, sc in first sc, *dc in next sc 2 rows below, sc in next 3 sc, dc in next sc 2 rows below, sc in next sc; repeat from * across to last sc, sc in last sc, turn. 

Row 38: Ch 1, sc in each st across, change color to A, fasten off B, turn. 

Rows 39-45: Ch 1, sc in each sc across, turn.

Row 46 (WS): Ch 1, sc in each sc across, fasten off. 

Weave in all ends. 

Edging

With color A

Round 1 (RS): Join yarn with a slip stitch to the last stitch at the corner of the square, working along the outside edge of the square, 2 sc in corner, evenly space another 30 sc to the next corner, 2 sc in corner (creates corner), join with a slip stitch to the stitch at the edge. Fasten off — 34 sc. 

Repeat for the other outside edge. 

Finishing

Weave in ends. Pin square to 12” by 12”.  Spray with water to block.

We hope you’ve enjoyed making this crochet mosaic block. See below for more crochet blocks.

You Might Also Like:

  • Marly Bird Square from 2021
  • Marly Bird Square from 2020
  • Marly Bird Square from 2019
  • Marly Bird Square from 2018
  • Moogly Yearly CAL Details: https://www.mooglyblog.com/category/2014-afghan-cal/
  • Oldie But Goodie: Moogly on the Marly Bird Podcast
  • Marly Bird CAL Archives

Filed Under: Crochet, Free Patterns, Make-Alongs, Our Free Patterns, Pattern

Marly Bird First Fall Make-Along || Felted Weekender Bag

October 6, 2022 By Marly Bird 3 Comments

A new make-along is ready just in time for the change of the weather and travel for the holidays. Time for the Marly Bird First Fall Make-Along Felted Weekender Bag for both Knitters and Crocheters!

First fall make-along logo - Marly Bird
Marly Bird First Fall Make-Along || Felted Weekender Bag for Knitters and Crocheters

I’ve always been in love with felting techniques. There is something magical about creating a thick and large fabric then applying heat and agitation so it shrinks on purpose into something WONDERFUL!

Many new knitters and new crocheters ventured into the craft over the pandemic as a way to soothe their mind and soul. But now that we are a few years out of the lockdown, these new crafters are looking for something more than the same old, same old.

Enter the inaugural Marly Bird First Fall Make-Along where you get to make a larger Weekender Bag!

[Read more…]

Filed Under: Crochet, Knitting, Make-Alongs, Marly Bird Premium Patterns, Our Free Patterns, YouTube Video Tutorial

  • « Previous Page
  • 1
  • …
  • 12
  • 13
  • 14
  • 15
  • 16
  • 17
  • Next Page »

Let's Be Social

Join the Marly's Minions Facebook group to share, ask questions, or chat about all of your yarn related crafts!

Join the group
Digital avatar of a woman with brown hair in a bun, glasses, and a black jacket, waving and saying "hi" with a word bubble above her hand in the website footer. -Marly Bird

Quick Links

The Pattern Shop

Our Free Patterns

Blog

Marly Bird House

Learn to Knit & Crochet

About

Giveaway Terms and Privacy Notice

Find Us Everywhere

Join the Newsletter

YouTube Channel

Marly's Minions FB Group

Etsy Store

Ravelry Store


AN ELITE CAFEMEDIA HOME/DIY PUBLISHER

Information from your device can be used to personalize your ad experience. Do not sell or share my personal information.

Privacy Policy   Terms   Copyright © 2025