Hvita Crochet Slippers: Free Crochet Slipper Pattern by Marly Bird and Robyn Chachula
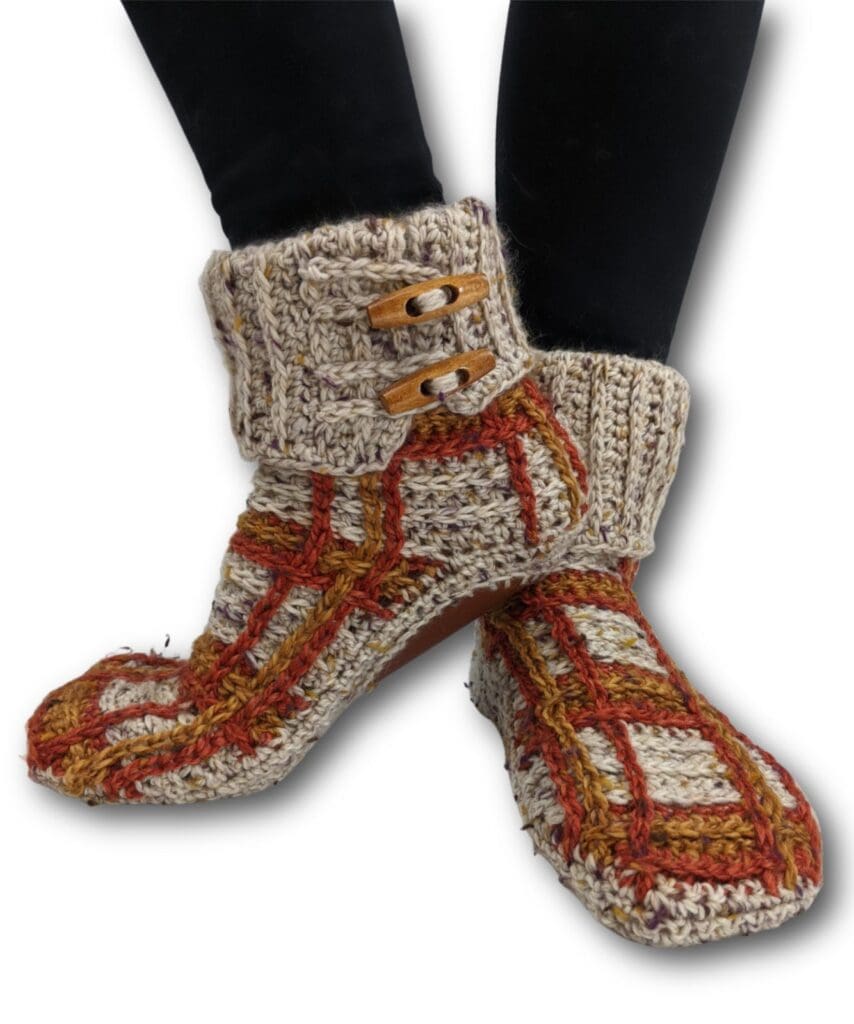
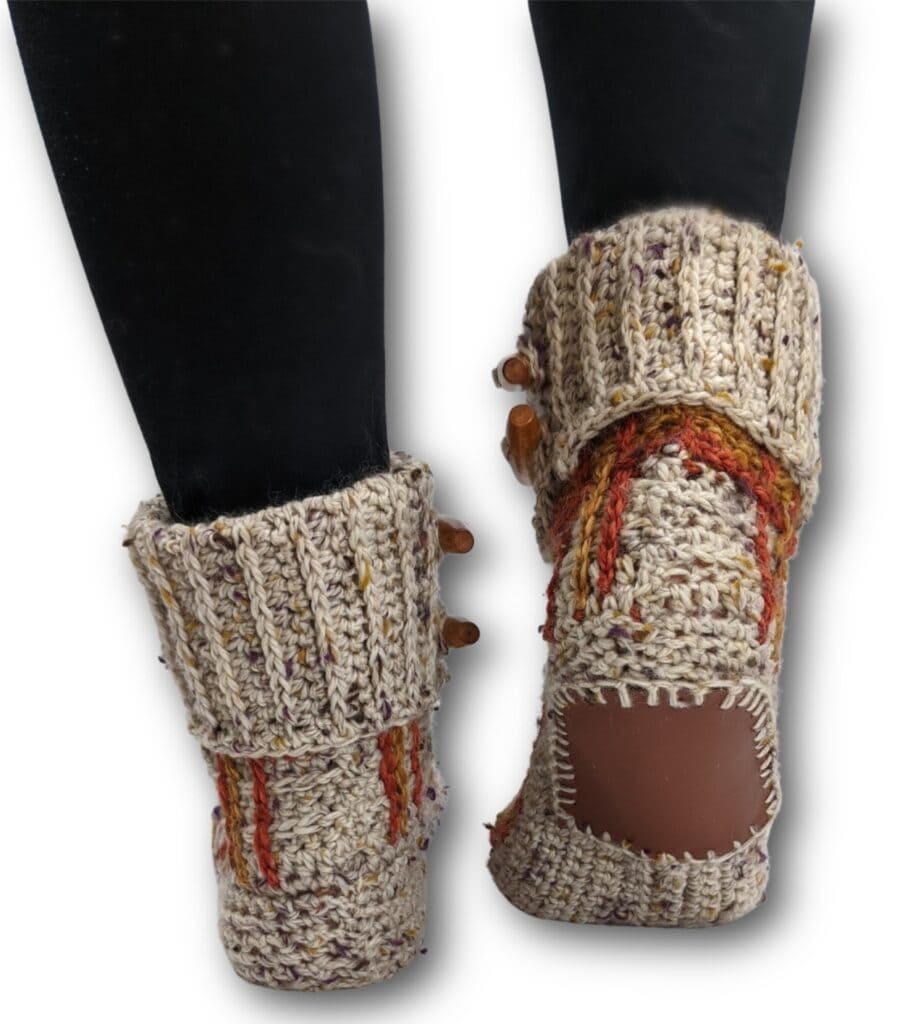
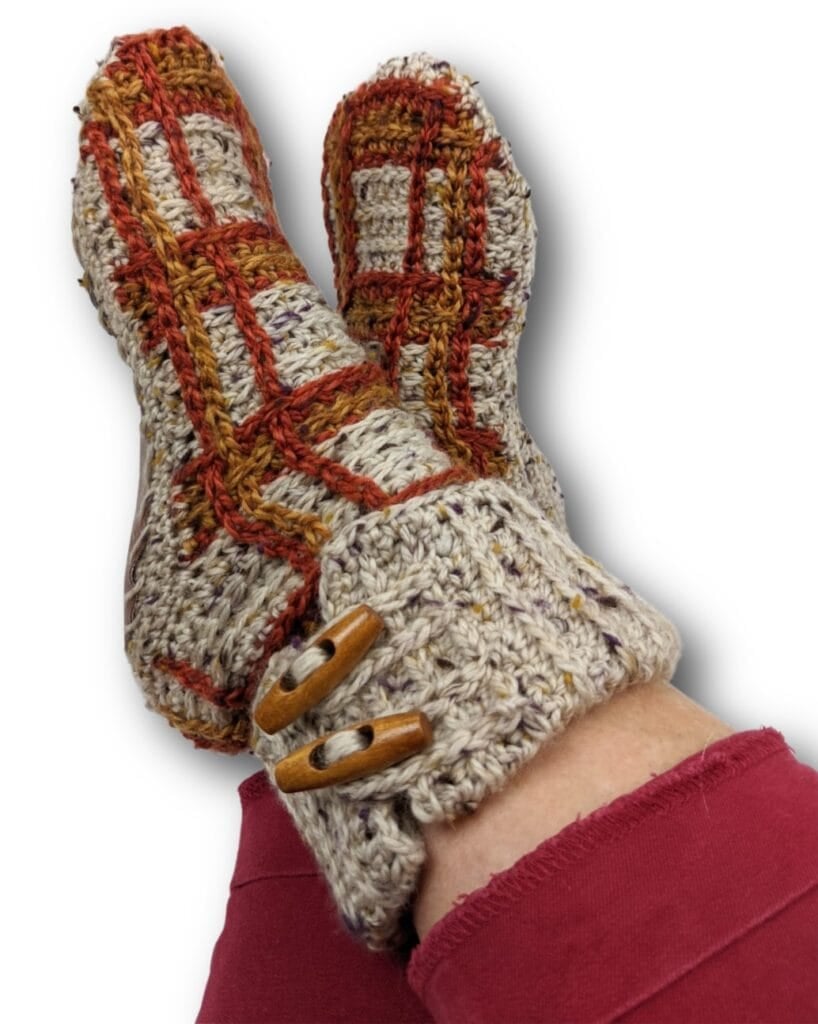
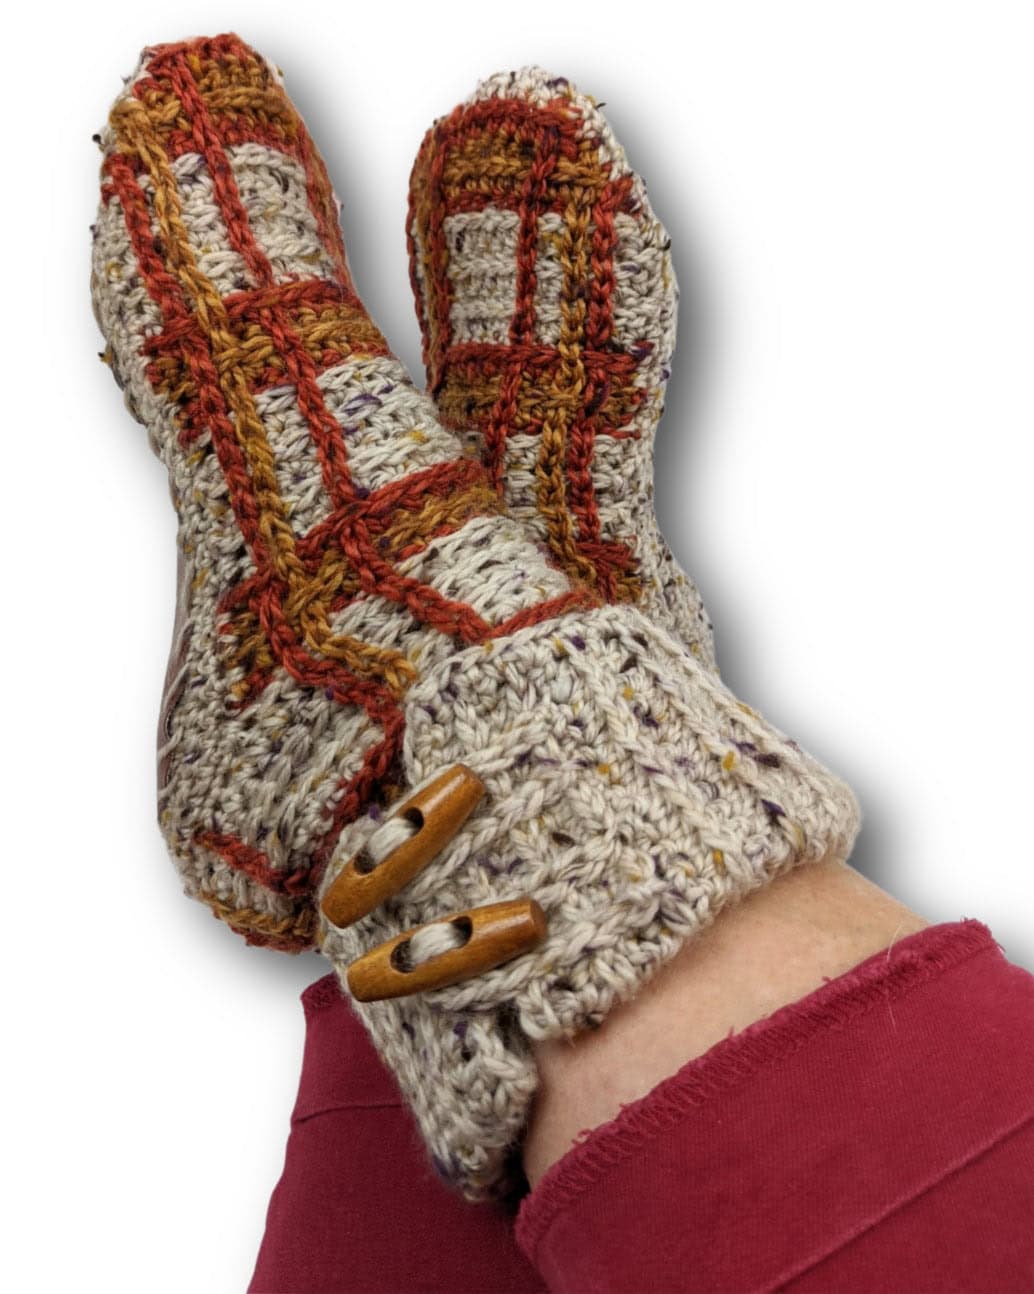
The Hvita Crochet Slippers are a free advanced beginner crochet slipper pattern designed by Marly Bird and Robyn Chachula, available in four sizes (S–XL) that fit youth through men's sizes. These slippers feature optional slip stitch embroidery for a plaid effect and can be customized with leather soles and decorative wooden toggles. Originally from the Turkey Trot 2021 Make-Along, this is now the complete standalone version of the pattern — all four days of construction in one post.
⚡ What You Need to Know:
The Hvita Crochet Slippers are an advanced beginner pattern using worsted-weight yarn in three colors (cream, pumpkin pie, caramel), sized for youth through men's sizes, with plaid slip stitch embroidery and optional leather soles. The complete pattern is free here on the blog.
Hey, bestie 💛 I'm so excited to share the complete standalone version of the Hvita Crochet Slippers with you… This pattern was born during Turkey Trot 2021, our epic four-day crochet make-along that drew thousands of people wanting to stitch along together. It became one of the most beloved patterns from that event, and now you've got the full version right here. Whether you want to make a pair for yourself, a gift, or just for the joy of working through a structured four-day build, let's dive in.
The Hvita slippers are fully customizable — you get to choose your colors, add plaid embroidery or skip it, throw on leather soles if you want durability, or keep them cozy just as they are. The structure is clear and organized: four focused days of construction means you know exactly what you're building and why.
The plaid slip stitch embroidery is the signature detail that makes these special. It's a fantastic skill-builder if you've never tried surface crochet — and if you already love embroidery, you'll feel right at home.
Slippers are the ultimate gift and these fit a range of sizes (youth 11–2 up to men's 10–12). They're cozy, personal, and the construction method lets you customize fit as you work.
This is your pattern if you're comfortable with basic stitches and ready to level up into shaping, sizing, and surface embroidery. You'll come away knowing how to build a 3D garment from flat crochet, how to use slip stitch as a decorative tool, and how to adapt a pattern across multiple sizes.
📋 Quick Facts
| 📊 Skill Level | Advanced Beginner (foundation stitches, color changes, shaping, and surface crochet) |
| 🧶 Yarn | Worsted weight, ~250 yards total (sample made in WeCrochet Provincial Tweed, now discontinued; any worsted yarn works, tweedy yarns give the same look, see Yarn & Materials for substitutes) |
| 🪝 Hook | H-8 (5 mm) or size to achieve 16 sts × 16 rows = 4″ × 4.25″ [10 × 11 cm] in the Day 1 stitch pattern |
| ⏱️ Time | 12–20 hours for one pair across all four days (varies by experience and embroidery choice) |
| ✂️ Notions | Stitch markers, tapestry needle. Optional: wooden toggle buttons and faux leather vinyl for soles. |
Love the Pattern but Want an Ad-Free PDF? ⭐
If you'd rather download the Hvita pattern as a clean, printer-friendly PDF — no ads, no interruptions, just the pattern and your stitches — you can grab the ad-free version on Shopify or Ravelry when you're ready. And if you want the pattern sent straight to your inbox plus our weekly tips and new pattern releases, join our newsletter below:
Join our Newsletter
Get Free Crochet & Knitting
Pattern Links & Coupons!
Which Size Should You Make?
The Hvita comes in four sizes to fit youth through men's sizes:
| Size | Finished Length | Mid-Foot Circumference | Fits |
| S | 7.5″ [19 cm] | 7.5″ [19 cm] | Youth US 11–2 |
| M | 8.75″ [22 cm] | 8.5″ [21.5 cm] | Women's US 5–7 |
| L | 10″ [25.5 cm] | 9.5″ [24 cm] | Women's US 8–10 or Men's US 7–9 |
| XL | 11.5″ [29 cm] | 10.5″ [26.5 cm] | Women's US 11–13 or Men's US 10–12 |
The pattern is sized S, M, L, XL with measurements given in inches and centimeters. If you're between sizes, go up — slippers can have a bit of ease and still feel cozy.
Looking for the Original Turkey Trot 2021 Clues?
This pattern was built across four days during Turkey Trot 2021. If you want to experience the make-along structure as it happened, you can read the original daily clues:
- Day 1: Hvita Ankle Section
- Day 2: Hvita Top of Foot
- Day 3: Hvita Sole Shaping
- Day 4: Hvita Cuff & Finishing
Yarn & Materials
Yarn:
The sample was made with WeCrochet Provincial Tweed (80% Fine Superwash Highland Wool, 20% Donegal Tweed; 250 yds/228 m, 4 oz/100 g per ball; worsted weight, CYCA #4), which has been discontinued. See the yarn alternatives below for tweedy options that give the same look. You'll need:
- Color A (Cream #27716): 1 (1, 2, 2) ball
- Color B (Pumpkin Pie #27572): 1 (1, 1, 1) ball
- Color C (Caramel #27571): 1 (1, 1, 1) ball
Affiliate link: I may earn a commission at no extra cost to you.
Yarn Alternatives: Provincial Tweed has been discontinued. Any worsted-weight yarn will work, and a superwash wool is a great choice for slippers. If you want the tweed look, pick a tweedy yarn. If you would rather not use wool, Brava Tweed is a really great choice. Swatch first to check you match the pattern gauge. Some solid substitutes:
- Berroco Ultra Wool — great stitch definition and full color range
- Madelinetosh Tosh Vintage — luxe feel, extensive palette
- Cascade 220 Superwash — budget-friendly and easy to find
- KnitPicks Swish Worsted — accessible and widely available
- KnitPicks Brava Tweed — an easy-care acrylic with that tweedy look, a great choice if you prefer to avoid wool
- KnitPicks Wool of the Andes Tweed — a tweedy wool for the classic tweed look (not superwash, so hand wash and lay flat to dry)
A note on wear: none of these yarns contain nylon, so the slipper soles can wear thin or develop holes with heavy use. Adding the optional suede or leather sole (see Optional Leather Sole below) helps protect the bottoms and prevent holes, but it is not a 100% guarantee.
Notions & Tools:
Optional Notions:
- Four (4) 1.5″ wooden toggle buttons (for cuff closures)
- Faux leather vinyl (12″ × 12″) for soles, plus tracing paper, fine point marker, and a sharp sewing needle
Hvita Crochet Slippers || Pattern Details
Skill Level
Advanced Beginner. You should be comfortable with basic crochet stitches (chain, single crochet, half double crochet, slip stitch), color changes, decreases, and ready to learn surface crochet embroidery and 3D shaping.
Finished Measurements
S: 7.5″ [19 cm] length × 7.5″ [19 cm] mid-foot circumference
M: 8.75″ [22 cm] length × 8.5″ [21.5 cm] mid-foot circumference
L: 10″ [25.5 cm] length × 9.5″ [24 cm] mid-foot circumference
XL: 11.5″ [29 cm] length × 10.5″ [26.5 cm] mid-foot circumference
Gauge
16 sts × 16 rows = 4″ × 4.25″ [10 × 11 cm] in Day 1 stitch pattern (1 row hdc alternating with 1 row sc in 3rd loop). Need help checking your gauge? Learn how to make a gauge swatch in crochet.
Hook & Yarn
Hook: H-8 (5 mm) or size to achieve gauge
Yarn: Worsted weight, ~250 yards total (approximately 1–2 balls per size in three colors)
Abbreviations
| ch | chain |
| fsc | foundation single crochet |
| hdc | half double crochet |
| hdc2tog | half double crochet decrease (see Special Stitches) |
| pm | place marker |
| rs | right side |
| sc | single crochet |
| sc2tog | single crochet decrease (see Special Stitches) |
| sl st | slip stitch |
| st(s) | stitch(es) |
| tch | turning chain |
| ws | wrong side |
| yo | yarn over |
Special Stitches
Foundation Single Crochet (fsc): Insert hook into the bottom of the previous stitch, yo pull up loop, yo draw through 1 loop (forming a chain), yo draw through 2 loops.
3rd Loop: The horizontal strand under the top 2 loops (the back bar of the hdc), on the front side of the fabric when rows are turned and facing you.
SC2tog: *Insert hook into indicated st, yo pull up loop; repeat from * in next st, yo draw through all 3 loops.
HDC2tog: *Yo, insert hook into indicated st, yo pull up loop; repeat from * in next st, yo draw through all 5 loops.
Notes
- The pattern is written for size S; changes for M, L, and XL are given in parentheses. When only one number is given, it applies to all sizes.
- Ch 2 does NOT count as a stitch throughout.
- When the pattern doesn't say “fasten off” at a color change, carry the old color up the side.
- Color change order (throughout Day 2): B, C, C, B, A, A, A, A, A, A — fasten off B and C after their stripe, carry A throughout.
- Make 2 slippers: you'll need two completed ankle sections (Day 1) to build a pair.
🎥 Hvita Slipper Video Tutorials
Want to crochet along? These videos are from the original Turkey Trot 2021 Mystery Make-Along, when we built the Hvita slippers together over four days. Watch right here on the page, or tap View on YouTube under each video.
Day 1: Ankle Section
Day 3: Sole of the Slipper
Find all of my crochet video tutorials on my YouTube channel.

GROW
To Unlock Exclusive Subscriber Content click the Box below and join for free by simply adding your email and creating a password! If you are having troubles, clear your cache or reset your password or login to the Grow Publisher Portal.
>> Learn More About Grow Here <<
I'm thrilled to share this amazing pattern with you, many patterns on my blog are absolutely free! I kindly request that you don't copy and paste or distribute this pattern. Prefer an ad-free experience? Buy a digital PDF pattern for a small fee from one of my online stores for a seamless crafting journey.
I appreciate your support and readership. You are the reason I can keep doing what I love and sharing it with others. So, thank you from the bottom of my yarn-loving heart! Disclosure: This post contains affiliate links, meaning I get a commission if you decide to make a purchase through my links at no cost to you.
Hvita Crochet Slippers || Pattern Instructions
Day 1: Ankle Section
Make 2 (one for each slipper)
Day 1 Finished Measurements: 8 (9, 10, 11)” [20.5, 23, 25.5, 28 cm] wide × 3″ [7.5 cm] long
Row 1 (WS): With Color A, 32 (36, 40, 44) fsc, turn.
Row 2 (RS): Ch 2, hdc in each sc across, change color to B, turn.
Row 3: Ch 1, sc in 3rd loop of each hdc across, change color to C, turn.
Row 4: Ch 2, hdc in each sc across, turn.
Row 5: Ch 1, sc in 3rd loop of each hdc across, change color to B, fasten off C, turn.
Row 6: Ch 2, hdc in each sc across, change color to A, fasten off B, turn.
Row 7: Ch 1, sc in 3rd loop of each hdc across, turn.
Row 8: Ch 2, hdc in each sc across, turn.
Rows 9–12: Repeat Rows 7–8; fasten off.
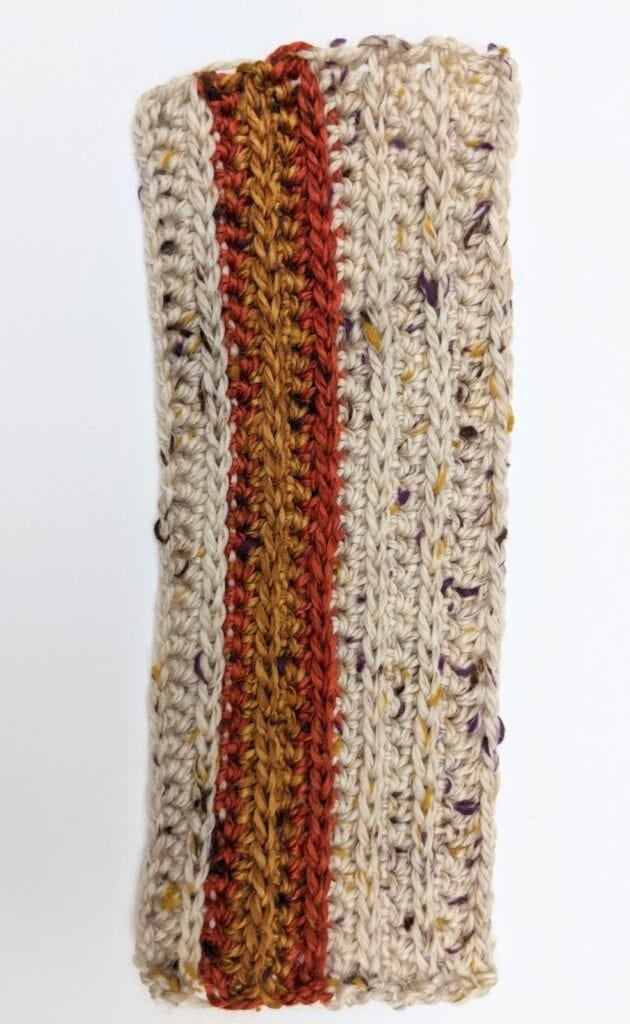
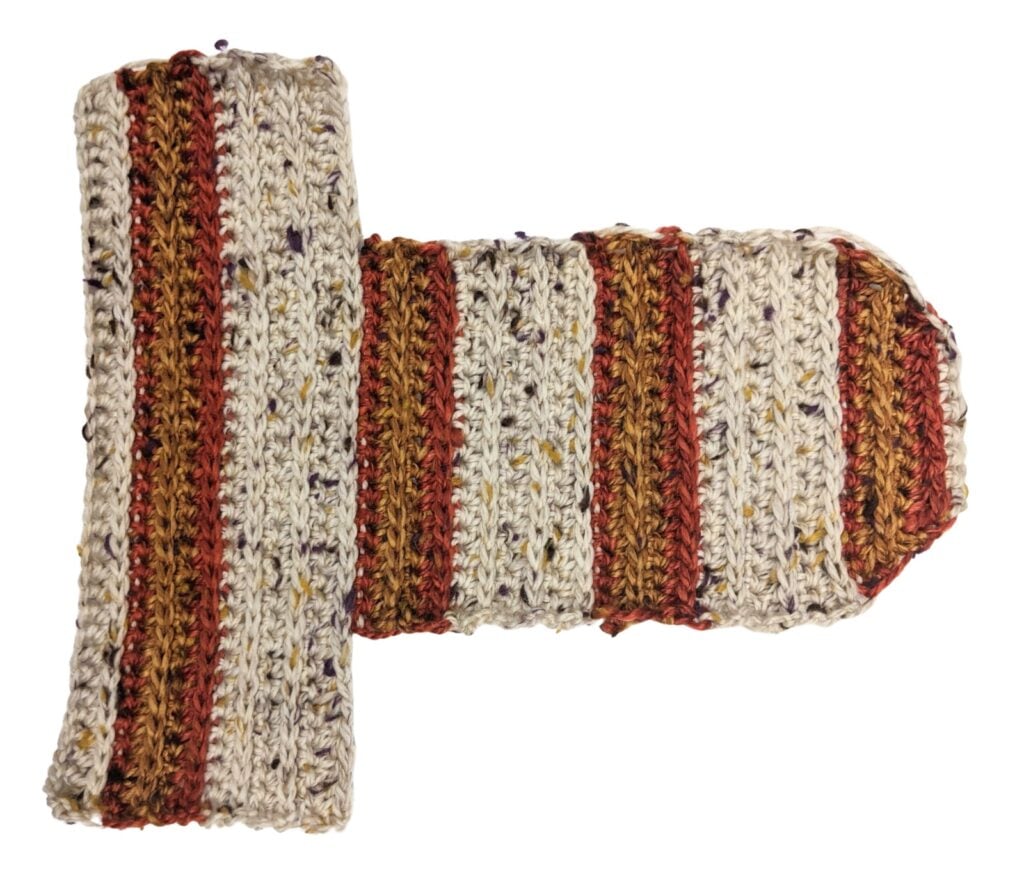
Optional Slip Stitch Embroidery (Plaid)
See color chart and video for layout placement.
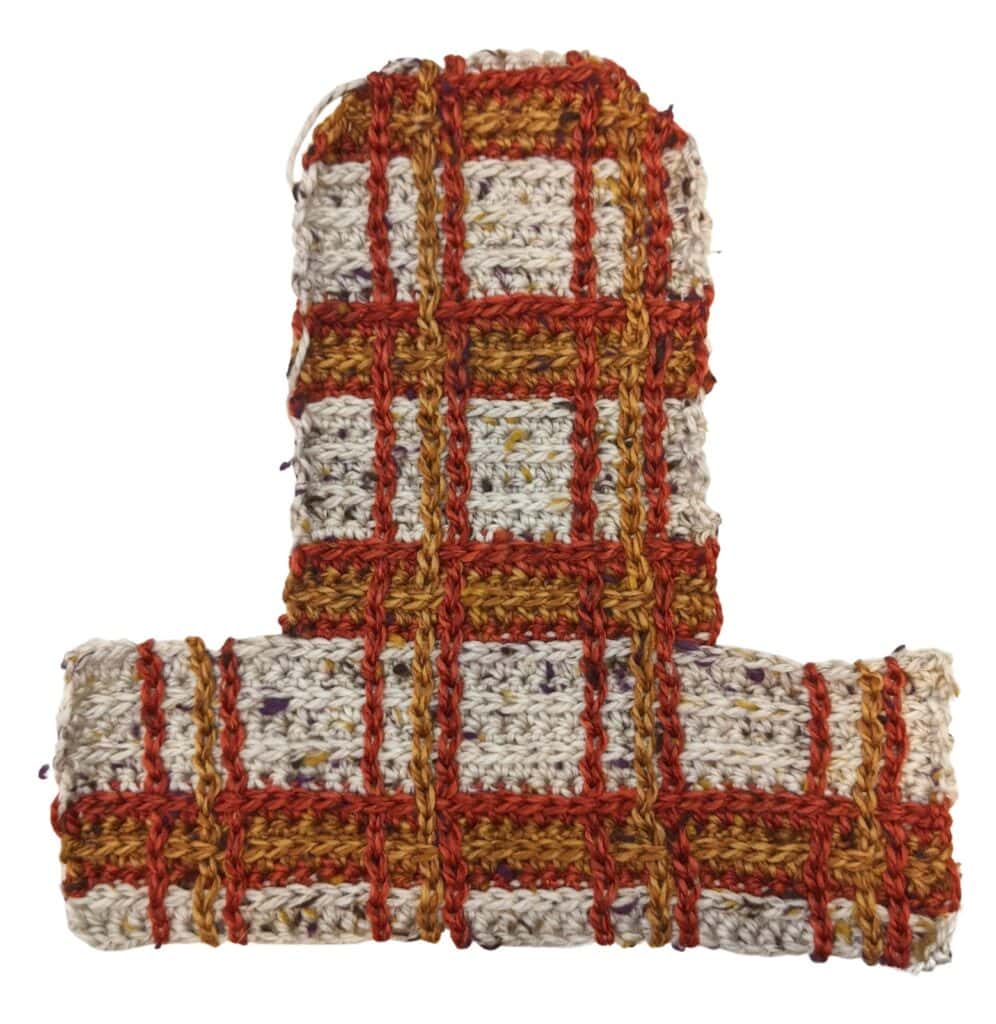
First Column: Join Color B between 2nd and 3rd st of foundation; hold working yarn on WS, *insert hook from front to back between same stitches 1 row up, yo pull loop up to RS and through loop on hook; repeat from * up fabric.
(Optional: when you get to any color B hdc row, remove hook from free loop, insert hook under top 2 loops of hdc, replace free loop and pull through. This places the sl st under the hdc row.)
Second Column: Join Color C between 3rd and 4th st on foundation; repeat directions for first column.
Third Column: Join Color B between 5th and 6th st on foundation; repeat. Skip 4 (5, 6, 7) sts and repeat starting another column in between next 2 sts after skipped stitches. Repeat across project.
Fasten off and weave in ALL ends now.
Day 3: Sole of Slipper
Day 3: Sole of the Slipper
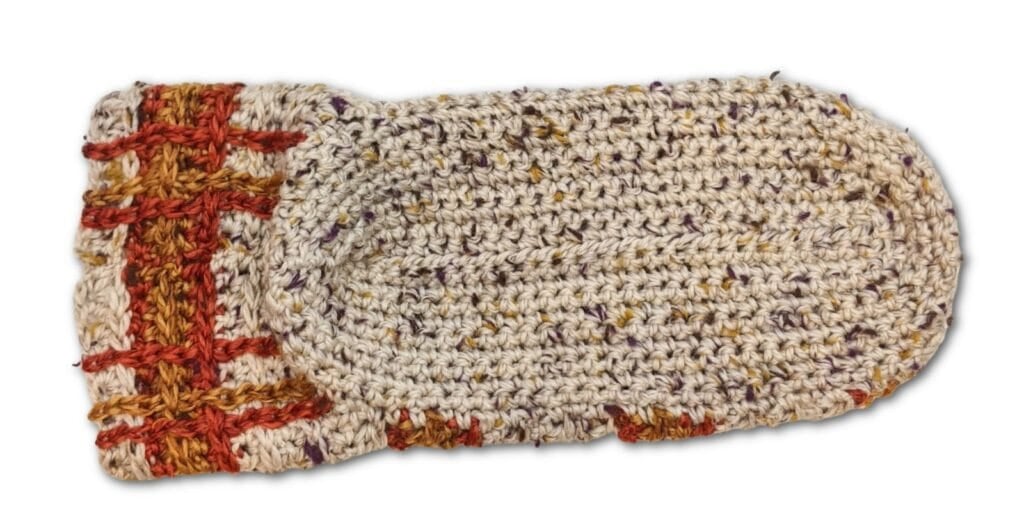
Row 1: Join A to RS edge of project at corner with sl st, ch 1, sc in each sc across last row of Day 1 to Day 2, sc evenly up row ends of Day 2 (do not add extra stitches to turn corner), sc in each sc across last row of Day 2, sc evenly down row ends of Day 2, sc in each sc across last row of Day 1, turn.
Find center of project at last row of Day 2; skip 4 (5, 6, 7) sts and place marker in next st; repeat on other side. Result: marker — 8 (10, 12, 14) sts — marker.
Row 2: Ch 1, sc2tog over first 2 sc, sc in each sc to marker, sc2tog over marked st and next st, move marker, sc in each sc to 1 st before marker, sc2tog over next st and marked st, move marker, sc in each sc to last 2 sts, sc2tog over last 2 sts, turn. (4 sts decreased)
Row 3: Ch 1, sc in each sc across, move markers, turn.
Repeat Rows 2–3 three (3, 4, 4) times. Repeat Row 2 zero (1, 0, 1) times.
Turn project inside out; whipstitch remaining sole section (row ends) together; continue whipstitching up ankle section (row ends), leaving foundation section of Day 1 open.
Day 4: Finishing — Cuff
Row 1: Join A to edge of opening at side, ch 19, sc in 2nd ch from hook and each ch across, sl st twice to edge (once to join row, once as turning ch), turn — 18 sc.
Row 2: Skip both sl sts, hdc in each sc across, turn.
Row 3: Ch 1, sc in 3rd loop of each hdc across, sl st twice to edge, turn.
Repeat Rows 2–3 around opening.
Sl st down foundation on Row 1; turn to work on row ends. Sc evenly across row ends. Fasten off and weave in ends.
Repeat on other slipper, joining yarn on opposite side so cuffs open on opposite sides.
Optional Toggles
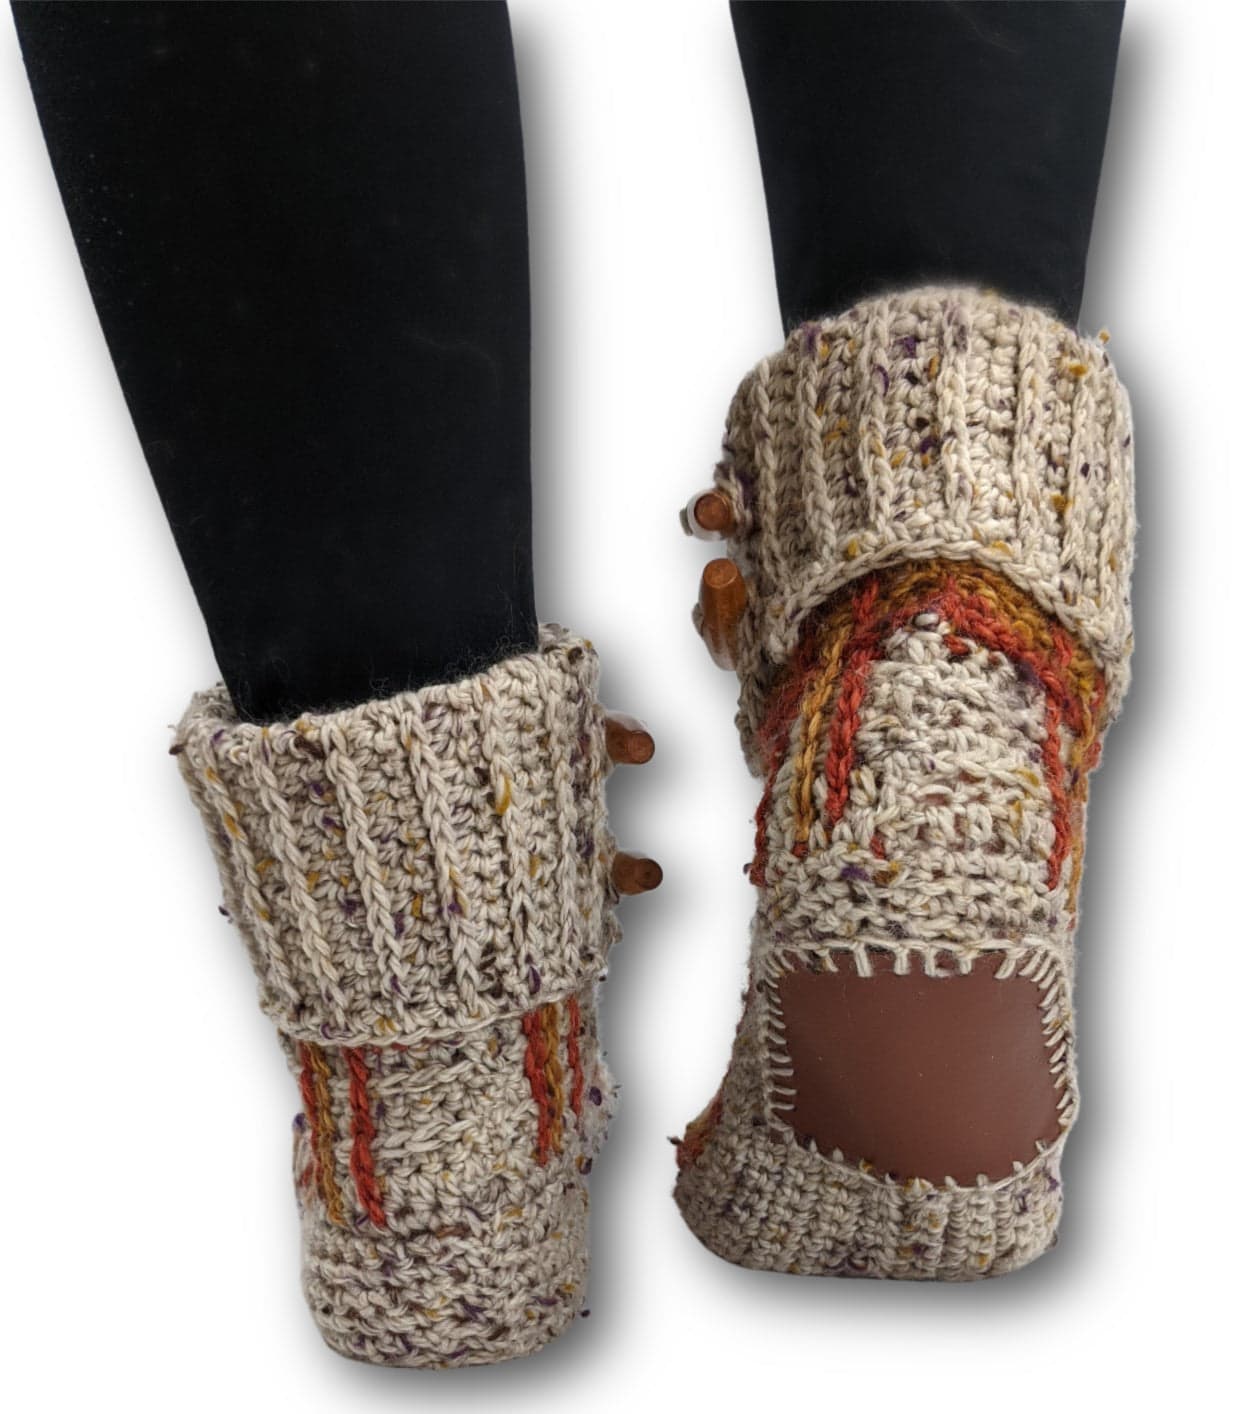
Join A with sl st (holding working yarn to WS) about 1″ [2.5 cm] from side edge of cuff and ¾” [2 cm] from bottom. Sl st embroider to edge, ch 5, skip ½” [1.25 cm] along edge, sl st embroider back about 1″ [2.5 cm] away; fasten off. Join A to first sl st, sl st in each sl st and chain across (to reinforce button hole); fasten off. Repeat button hole ¾” [2 cm] up from previous. Sew toggles to opposite side of cuff from button holes.
Optional Leather Sole
Trace bottom of slipper onto trace paper — elongated oval approx 3 (3.5, 4, 4.5)” wide × 7 (8, 9, 10)” long. Cut in half (heel + toe, allows stretch while walking). Place dots ⅛” from edge every ¼”–⅜”. Poke holes at each dot with sharp needle. Whipstitch leather sole to bottom of foot with tapestry needle.
Blocking Tips
The Hvita slippers are shaped by the construction itself — the sole shaping and color stripes provide the 3D structure. You don't need to block them to achieve the shape, but a gentle wet block can even out any slight gauge variations:
- Wet block if desired: soak in cool water with a gentle soak solution, gently squeeze out water, and lay flat to dry. The superwash wool makes this low-risk.
- If you're adding leather soles, block before attaching them so the base shape is even.
- The plaid embroidery will hold its crisp lines without blocking.
Love This Yarn? More Patterns Using WeCrochet Provincial Tweed
If the Provincial Tweed tweeds your heart, here are other patterns that showcase this beautiful yarn. It has been discontinued, but you can use any of the tweedy yarn alternatives above:
- Paris Geller Knit Sweater
- Marigold Morning
- Poplar Tunisian Crochet Poncho
- The Parkers Crochet Mini Ornaments
More Free Crochet Slipper & Bootie Patterns You'll Love
If you love crochet slippers and booties, check out these other cozy foot-hug patterns:
👣 Hvita Slippers in Real Life
Here are more ways to wear and style your Hvita slippers. Tap a photo to see the ad-free PDF pattern.
Frequently Asked Questions
Can I make these slippers without the plaid embroidery?
Absolutely! The slip stitch embroidery is optional. Skip the embroidery step and you'll have solid-colored slippers — they're just as cozy and beautiful, with a cleaner finish. You'll also shave a bit of time off the project.
What if my gauge is off?
Gauge is crucial for fit in slippers — a half-stitch difference per inch can throw off the finished measurements. If your gauge is tighter (more stitches), size down; if it's looser (fewer stitches), size up. Or adjust your hook size: one size smaller hook = tighter gauge, one size larger = looser gauge. Here's a full guide to taking an accurate gauge swatch.
How long does it really take to make a pair?
It depends on your speed and experience — anywhere from 12 to 20 hours for a pair. Beginners at the advanced-beginner level often take 15–20 hours; faster crocheters finish in 12–14. If you skip the embroidery or optional leather soles, you'll save 2–4 hours.
Can I customize the colors?
Yes, absolutely! The pattern works with any three coordinating colors of superwash wool in worsted weight. You can go all neutrals, all jewel tones, or any combination that makes your heart happy. The plaid embroidery will showcase whatever colors you choose.
Do I really need leather soles?
Nope — they're entirely optional. Leather soles add durability and grip for walking, especially on hardwood or tile floors. Without them, the slippers are more of a cozy-at-home slipper; with soles, they're wearable anywhere. Your choice!
Can I use a different yarn weight?
The pattern is written specifically for worsted weight at the given gauge. If you use a different weight, the fit and finished measurements will change — you'd need to adjust the stitch counts and row counts to maintain the same sizing, which is a lot of math. I'd recommend sticking with worsted or finding a very similar yarn weight and testing your gauge first.
Where do I find the stitch diagram?
The stitch diagram for the Day 1 repeating pattern is included in the ad-free PDF version on Shopify or Ravelry — it helps visualize the alternating hdc/sc rows. The embroidery layout chart is also in the PDF.
Can I make a pair for a wider foot?
If the XL mid-foot circumference (10.5″) is too narrow, you could increase the stitches in the Day 1 foundation row (add 4–8 more fsc) and adjust the shaping counts in Day 2 accordingly. You'd need to test the fit as you go, but it's doable if you're comfortable adjusting stitch counts.
Is this a beginner pattern?
It's Advanced Beginner — not a true beginner pattern. You need solid skills in basic stitches, color changes, and decreases. If you're newer to crochet, try the Easy Crochet Slippers for Absolute Beginners first, then tackle the Hvita once you've got some experience under your belt.
Can I sell items made from this pattern?
Yes! You are welcome to sell finished items you make from the Hvita pattern. If you sell online, please credit Marly Bird and Robyn Chachula as the designers and link back to this post. Our photos are copyright protected, so please use your own photos of your own work. The pattern itself may not be copied, redistributed or shared in any form.
Final Thoughts
The Hvita slippers are such a special pattern… I'm thrilled to share the complete standalone version with you now. They're the perfect project if you're looking for a structured, multi-day build with room to customize and get creative.
Once you finish your pair (or two, or three… hey, they make amazing gifts), I'd absolutely love to see them. Tag me @marlybird on Instagram or Facebook and use #MMMDI (Marly Made Me Do It), #MarlyBird, or #HvitaSlippers so I can see your gorgeous finished slippers. 💛
❤️ Your BiCrafty Bestie,
Marly Bird

Categories: Crochet, Free Patterns, Make-Alongs, Marly Bird Premium Patterns, Our Free Patterns, Pattern