
Marly Bird Granny Square Motif Cardigan Section 1
The Marly Bird Granny Square Motif Cardigan Section 1
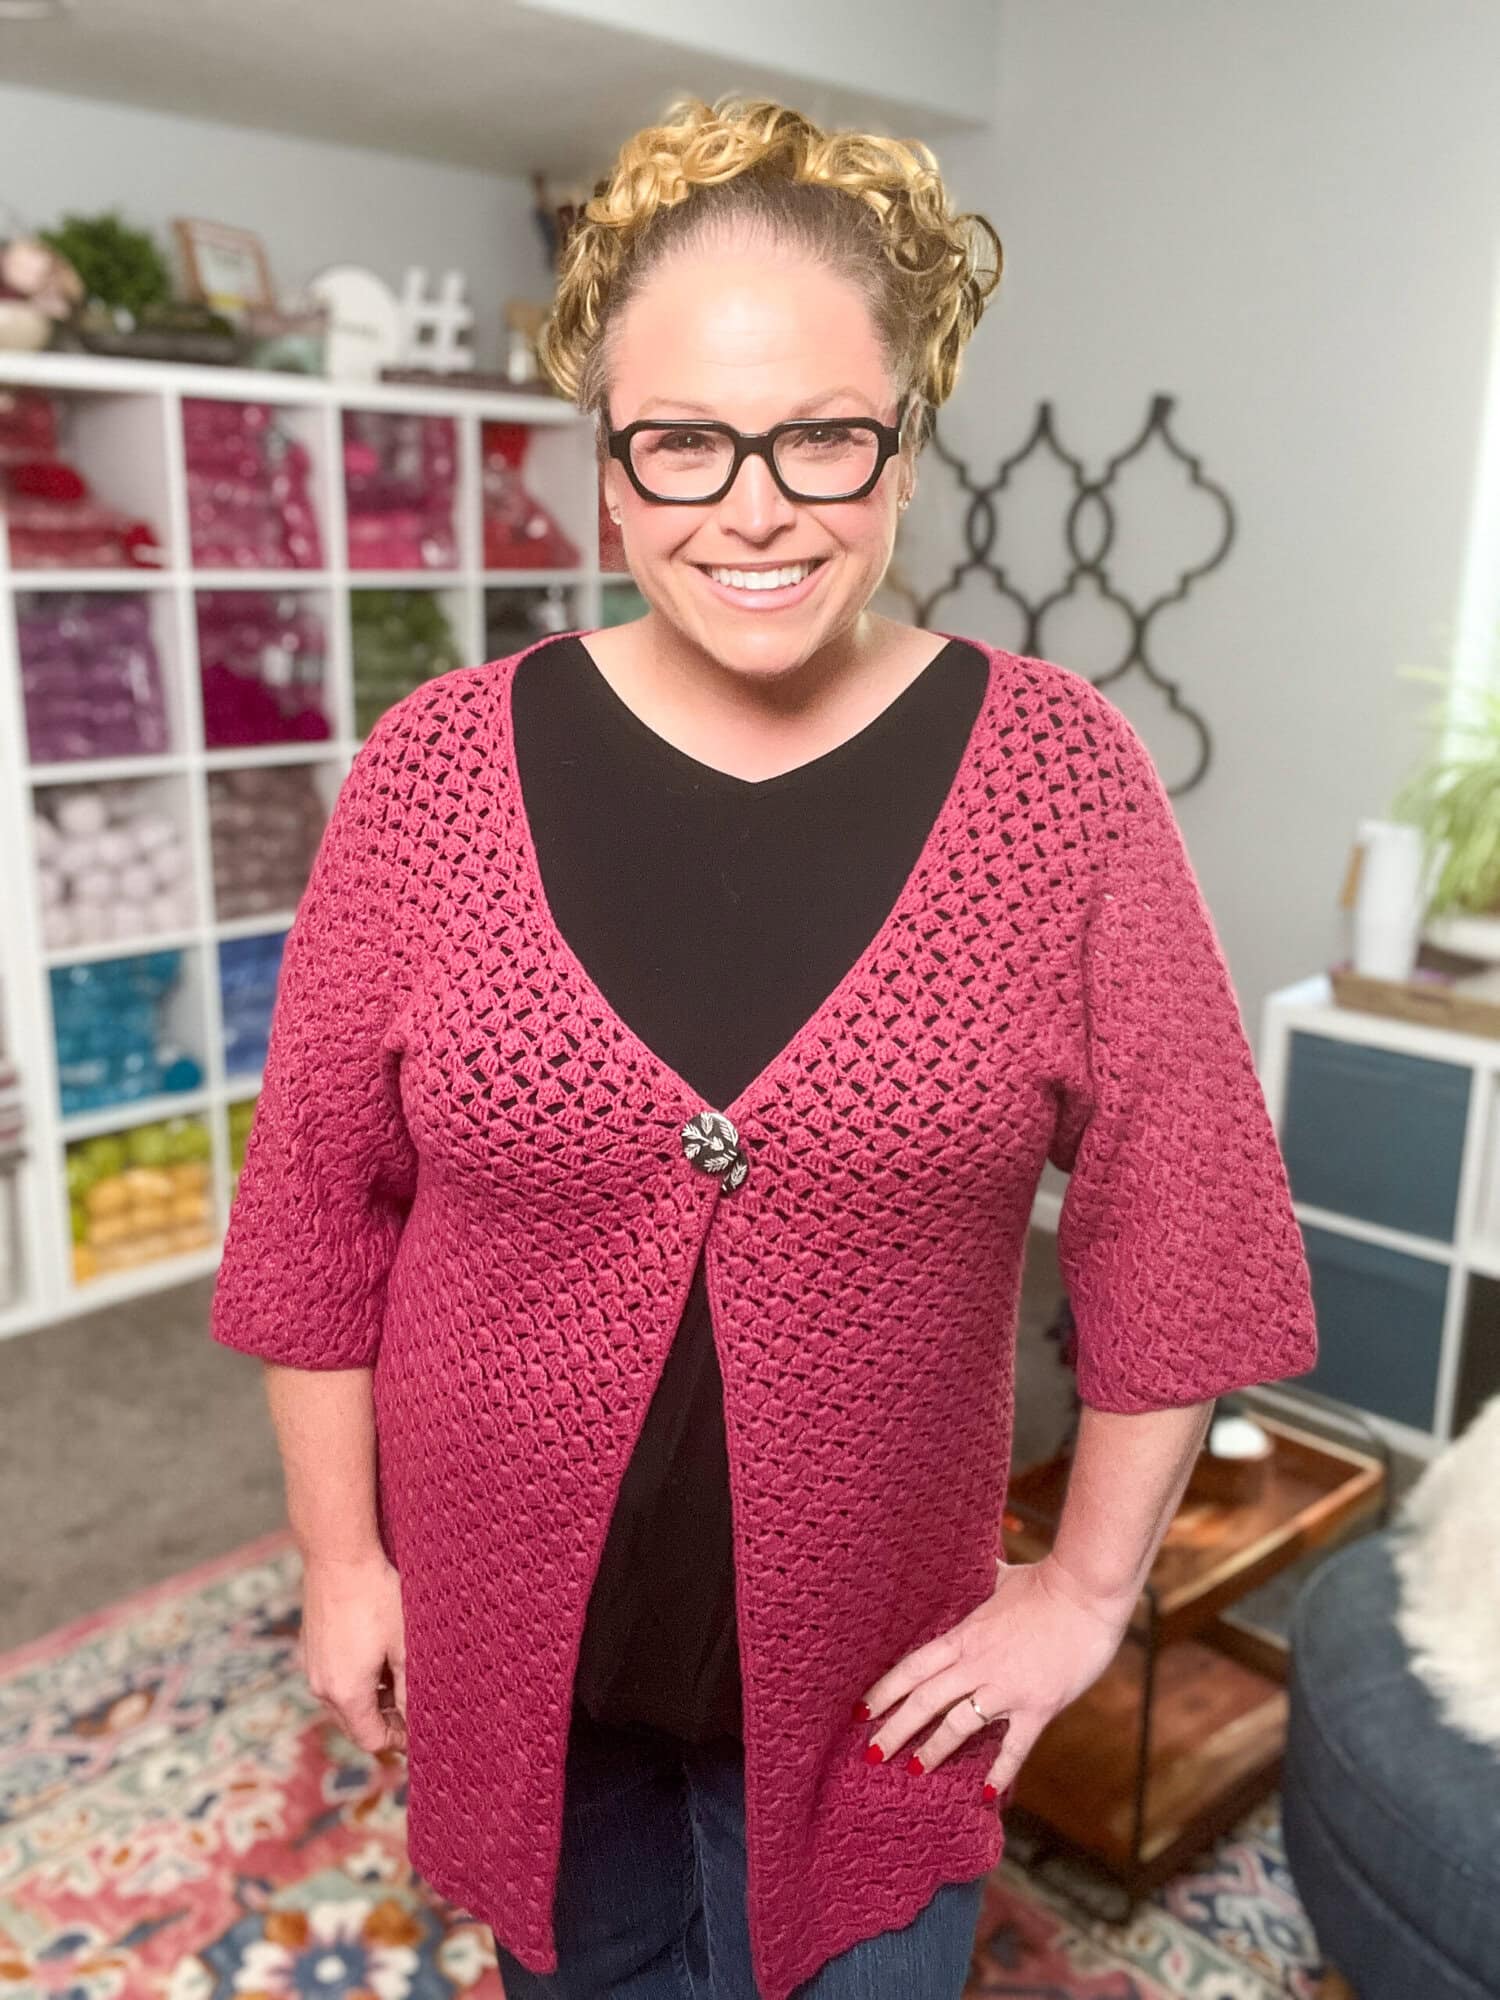
That’s right, it’s that time of year for a crochet-along and boy do I have a good one for you. Welcome to Section 1 for the Marly Bird Granny Square Motif Cardigan Crochet-along.
Once the CAL is complete the full pattern will be available at Yarnspirations
Queue it up and Like the Pattern on Ravelry
*This post contains affiliate links. By clicking one of these links and making a purchase a portion will go to the blog. The price you pay will not be changed. Thank you for your support of the blog.*
Find all the CAL details you need on the announcement page here https://marlybird.com/announcing-2017-crochet-along-marly-bird
THE DETAILS
MATERIALS
RED HEART® Boutique Unforgettable®:, Art. E793, available in 3½ oz (100 g), 270 yd (247 m) balls; 6 (9, 11) balls [sample shown in Regatta 3968]
Susan Bates® Crochet Hook: 4 mm [US G-6]
Susan Bates® split lock stitch markers
MEASUREMENTS
Directions are for size S/M; changes for sizes L/XL and 2X/3X are in parentheses.
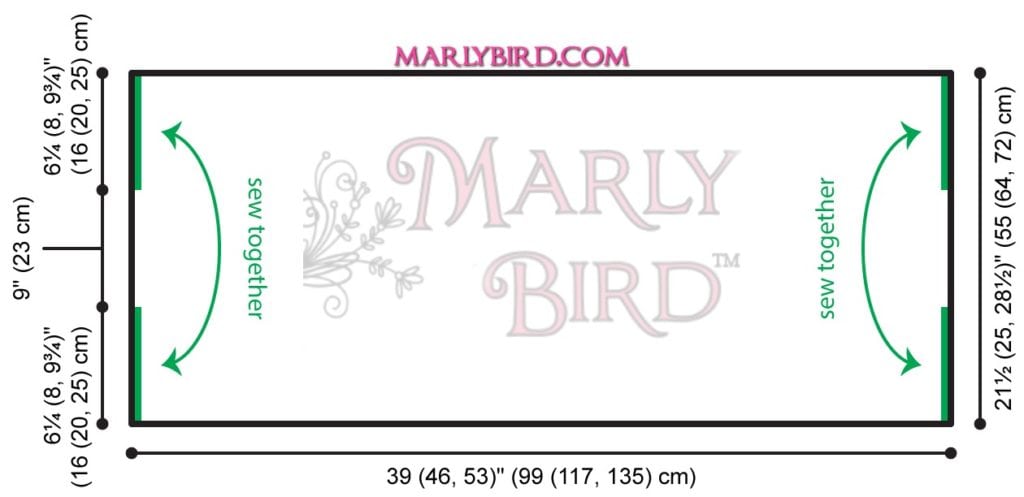
Cocoon measures 48 (56, 64)” (122 (142, 163) cm) in width including cuffs, and 21½ (25, 28½)” (55 (64, 72) cm) in length not including collar.
Please make a note that the schematic only shows the dimensions of the body of the garment, it does NOT include cuffs or collar!
Need help choosing which size to make? Not a problem, I can help with that. CLICK HERE
GAUGE
1 Motif = 3½ x 3½” (9 x 9 cm) CHECK YOUR GAUGE. Use any size hook to obtain the gauge.
SPECIAL STITCHES
Picot – Ch 3, slip st in last dc made
PATTERN
Below you will find the Marly Bird Granny Square Motif Cardigan SECTION 1 instructions. You have a choice to follow along with the written pattern or the chart for the crochet motif and the join as you go motifs. Both are provided for you.
BODY
Make 66 (91, 120) Motifs, joining them into a rectangle of 6 (7, 8) by 11 (13, 15) as you go, as follows:
First Motif
Ch 10, and slip st in first ch to form a ring.
Round 1: Ch 3 (counts as 1 dc), 23 dc in ring, join with slip st to 3rd of beginning ch-3 – 24 dc.
Round 2: Ch 1, sc in same st as joining slip st and in each of next 2 dc, (sc, ch 7, sc) in next dc, * sc in each of next 5 sc, (sc, ch 7, sc) in next dc; repeat from * twice more, sc in each of last 2 dc, join with slip st in first sc.
Round 3: Ch 1, (sc, ch 7, sc) in first sc, * skip 3 sc, (7 dc, picot, 6 dc) in next ch-7 space, skip 3 sc, (sc, ch 7, sc) in next sc; repeat from * twice more, skip 3 sc, (7 dc, picot, 6 dc) in next ch-7 space, skip 3 sc, join with slip st in first sc.
Fasten off.
All Remaining Join As You Go Motifs
Ch 10, and slip st in first ch to form a ring.
Rounds 1 and 2: Work same as first Motif.
Round 3: Ch 1, (sc, ch 7, sc) in first sc, skip 3 sc, 7 dc in next ch-7 sp, ch 1, slip st in corresponding picot on adjoining Motif, ch 1, slip st in last dc made on current Motif, 6 more dc in same ch-7 space as last 7 dc made, * skip 3 sc, sc in next sc, ch 3, sc in corresponding ch-7 space on adjoining motif, ch 3, sc again in same sc as last sc made, skip 3 sc, 7 dc in next ch-7 sp, ch 1, slip st in corresponding picot on adjoining Motif, ch 1, slip st in last dc made on current Motif, 6 more dc in same ch-7 space as last 7 dc made; repeat from * for each edge to be joined, then complete Round 3 same as first Motif.
Fasten off.
Designer Tip: WEAVE IN YOUR ENDS AS YOU GO! Do not wait until the very end!
ABBREVIATIONS:
ch = chain; dc = double crochet; sc = single crochet; st(s) = stitch(es); * or ** = repeat whatever follows the * or ** as indicated.

Chart for Motif and Join As You Go (JAYGO) as seen in the video
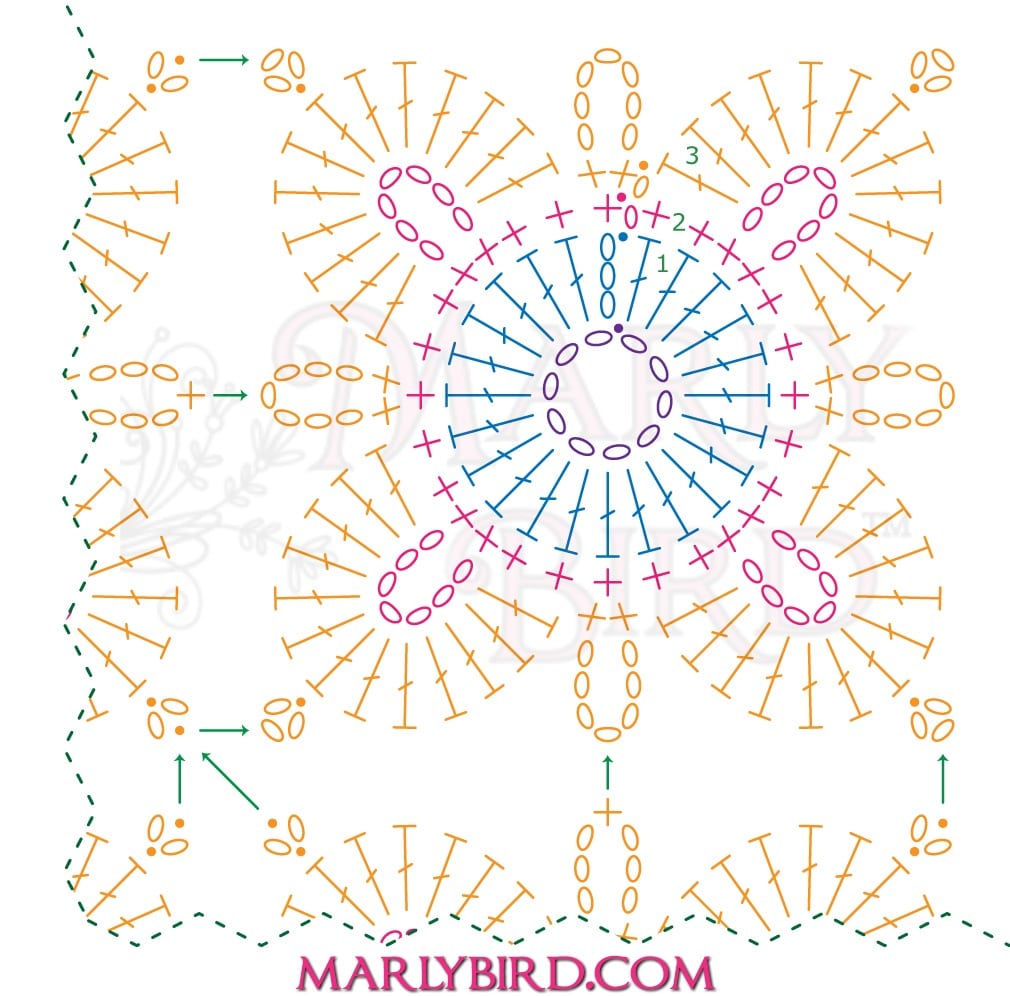
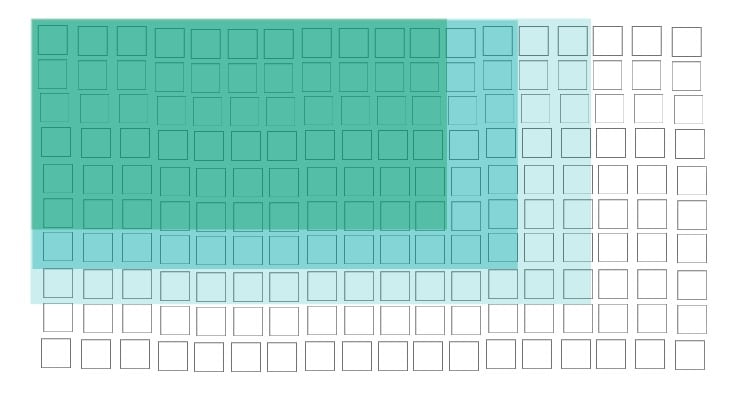
Follow this chart for the Marly Bird Granny Square Motif Cardigan just as is written in the pattern. Make 1 full square, then join the remaining squares to the completed square(s) in round 3 as indicated in the chart.

Each round of the motif is a different color on the crochet chart to make it easier to see what stitches are used for each round.
Purple-Foundation chains
Blue-Rnd 1
Pink-Rnd 2
Orange-Rnd 3 (this is also the joining round)
Green Arrow-points to where the joining motif will be joined to the already made motif(s).
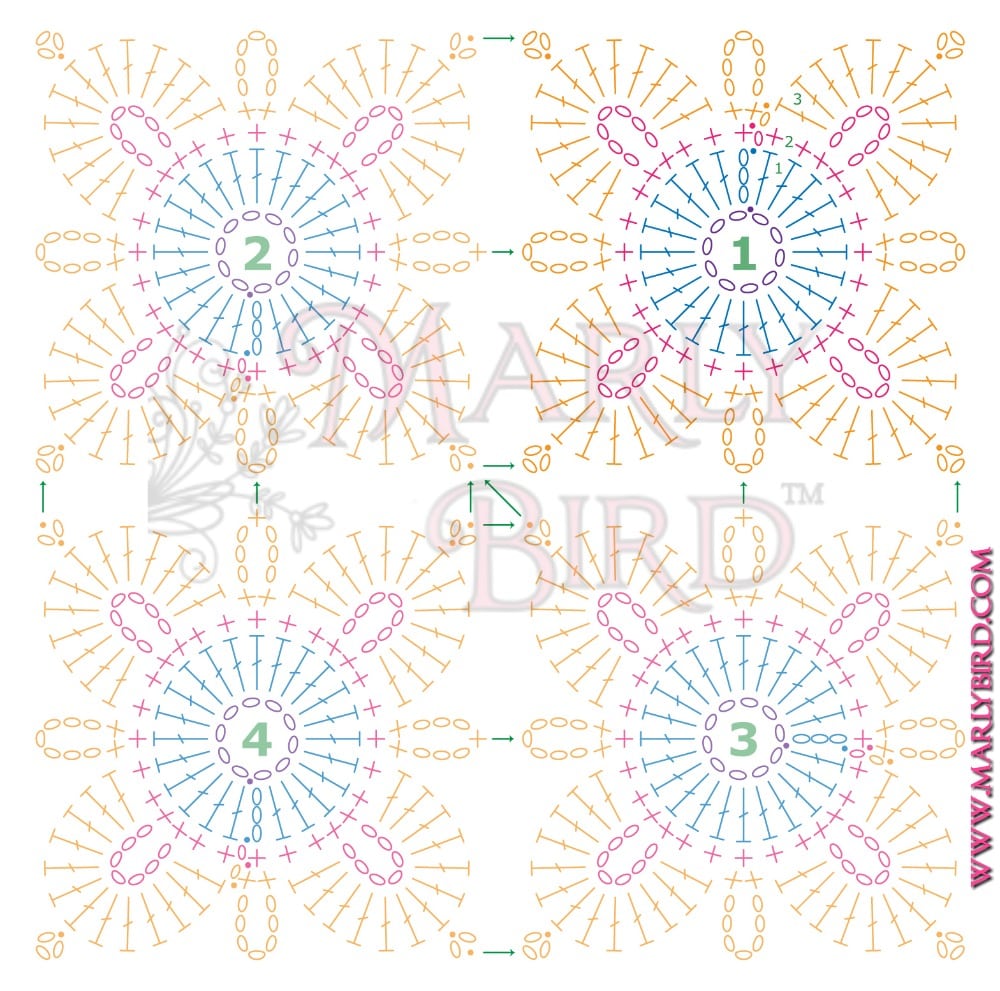
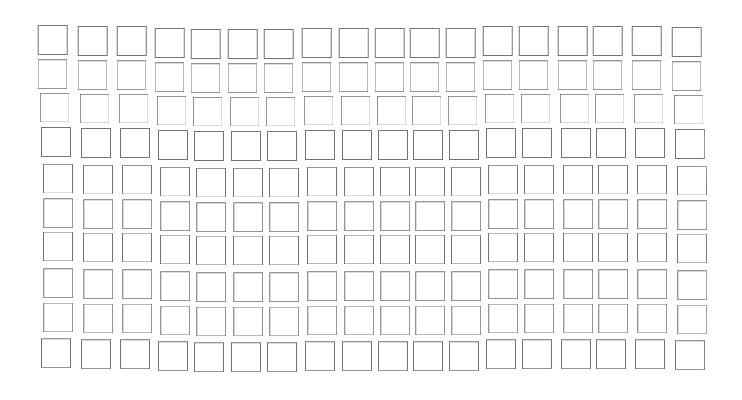
Full JAYGO Motif Chart
I am also including a chart below that has the full image of the Marly Bird Granny Square Motif Cardigan crochet joining squares because I know some of you like to see full motifs vs the partial bit that is getting joined. Please note, this is the same chart/same process as the chart above.
Charts as referred to in the video
These charts are here to help you decide how many squares you need to make for your cardigan. I explain how to use them in the Video #2 for the CAL (it is below).
Video
You wouldn’t believe how difficult it is to film, read a chart, crochet, and talk at the same time. LOL. Having said that…I had one little flub up on the videos.
Heads up, At 17:22 I meant to say ‘chain 3’ not ‘chain 7’.
Right Handed:
Left Handed:
I recommend learning this new motif with stash yarn first, then do another motif for your actual cardigan to measure gauge.
Do not forget that it is a MUST that you get the correct gauge on your squares or you will have to make mathematical adjustments to the pattern.
OH, One last thing!
Be sure to use the hashtag #MarlyBirdCAL when you post about it on social media
so we can find what you are saying 🙂
Categories: Crochet, Make-Alongs, Pattern, Uncategorized, YouTube Video Tutorial


Although my preference is written instructions, this is teaching me how to read and use charts, so thank you! Thank you, too, for the full chart. It makes it much easier to see how to attach each motif as you go. I had some of this yarn left from a previous project, so am practicing with that. Now if my ordered yarn would get here before the 11th! Or maybe I will go get more of this color at WM and make two.
I am having trouble with my gauge.
I get 3″ with a 4 hook.
What do I do?
Try using a 4.5mm and see if that comes to 3.5″ square
The instructions for the cuff mentions a second marker but the only marker placed Is at 9 inch (center) on each end, HELP!