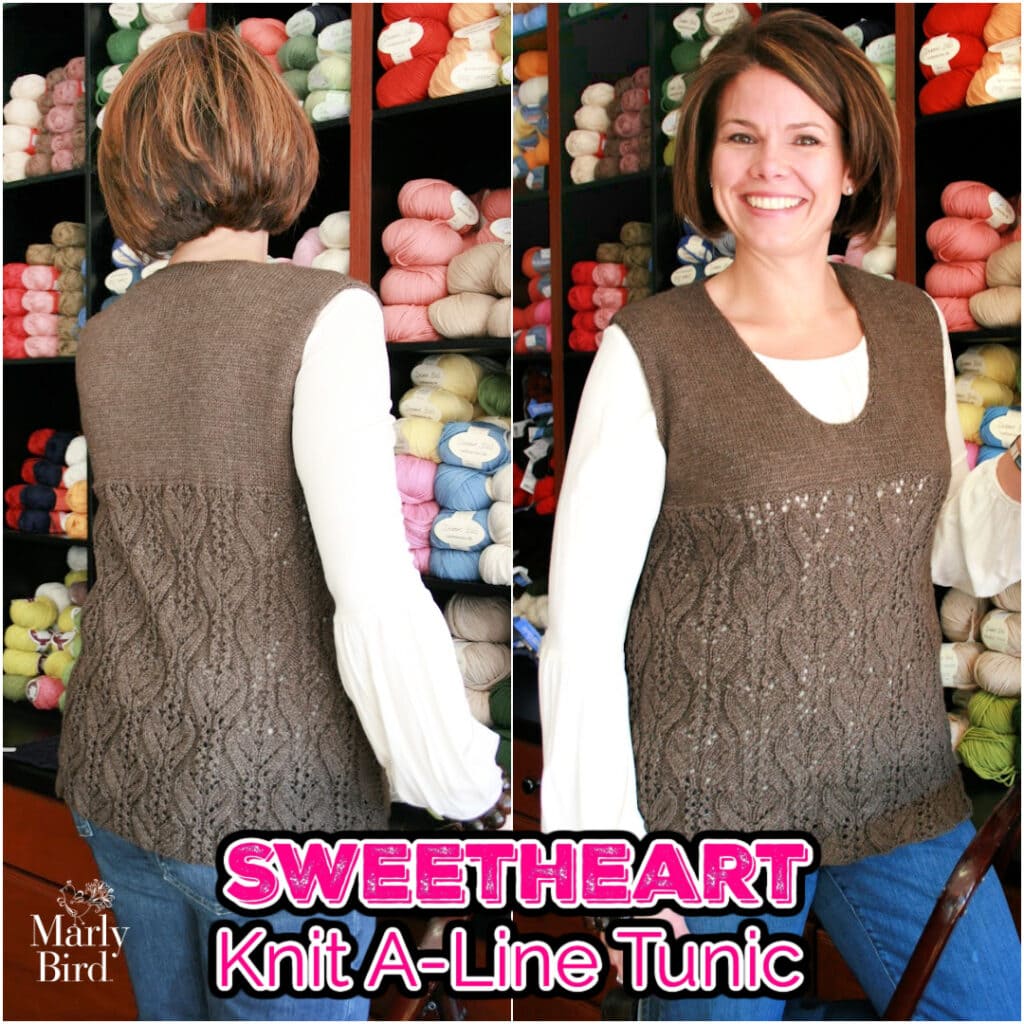
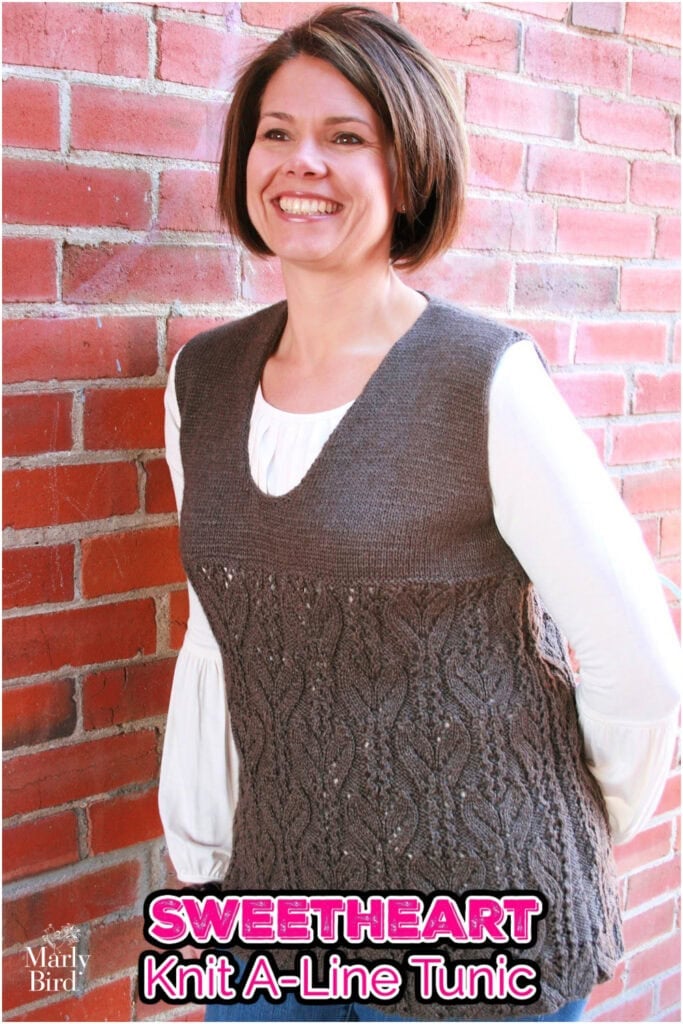
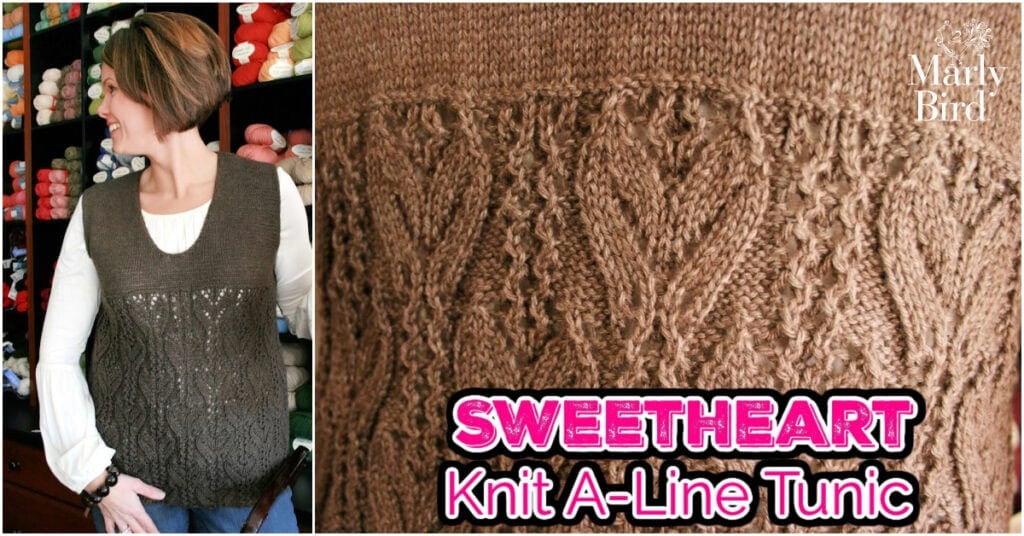
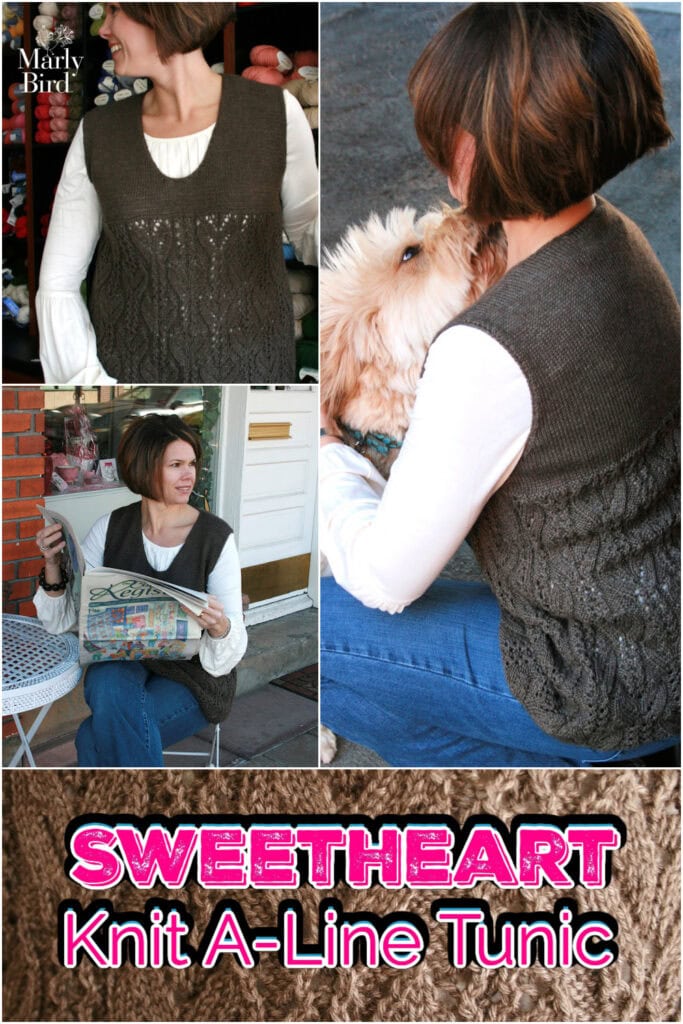
Free Knit Tunic Pattern – Sweetheart A-Line Tunic by Marly Bird
Looking for a free knit tunic pattern that’s flattering, comfortable, and actually wearable? The Sweetheart A-Line Knit Tunic is a free pattern designed to skim the body beautifully while giving knitters a relaxing, confidence-building project they’ll reach for again and again.
Affiliate Disclosure: This post contains affiliate links. To learn more please visit my privacy policy here💖
Some patterns never go out of style—and the Sweetheart A-Line Tunic is one of them. 💕 This was my very first knit sweater design, and years later, knitters still come back to it again and again. There’s just something special about a project that combines beautiful lace, a flattering A-line silhouette, and a design that feels just as good to wear as it does to knit.
The Sweetheart Free Knit Tunic Pattern features a lace-patterned lower body that flows effortlessly into smooth stockinette at the top, creating a piece that’s elegant without feeling fussy. It’s the kind of sweater that sparks compliments—and conversations—every time you wear it.
What You Will Love About This Pattern
- 💕 A flattering A-line shape designed to celebrate real bodies
- 🧶 Lace detail that feels engaging to knit and stunning to wear
- 📊 Charted lace patterns for visual knitters
- 👚 Sleeveless tunic style perfect for layering
- ✨ A tried-and-true design that has stood the test of time

Who Is This Pattern Perfect For?
The Sweetheart A-Line Tunic is a wonderful choice for knitters who enjoy thoughtful construction and classic style.
This pattern is perfect for you if:
- You’re an intermediate knitter comfortable with knit, purl, and basic lace techniques
- You enjoy working from charts as well as written instructions
- You want a garment that’s forgiving, flattering, and wearable
- You love timeless designs that don’t chase trends
- You want to knit a sweater that feels special without being overly complicated
Design Features & Construction
This tunic is worked in pieces and seamed after blocking, allowing the lace to open beautifully and the garment to drape just right.
- Lace at the hem adds movement and visual interest
- Stockinette upper body keeps the focus on fit and comfort
- Sweetheart-inspired lace motifs give the design its name
- A-line shaping provides ease through the body without clinging
✨ Designer Tip: Blocking is essential for this pattern—especially for the lace. Take the time to block thoroughly and you’ll be rewarded with gorgeous stitch definition.
Understanding A-Line Shaping in Knit Garments
One of the reasons the Sweetheart A-Line Tunic remains such a fan favorite is its thoughtful shaping. A-line shaping gently widens the garment from the hem upward, creating a silhouette that skims the body instead of clinging to it.
In knitting, this effect is created through strategic increases placed along the sides of the garment. As you work upward, those increases add width gradually, allowing the tunic to flow comfortably over the hips and midsection while still fitting nicely across the bust and shoulders.
This style of shaping is especially forgiving and flattering, making it a great choice for many body types. It also gives the finished tunic beautiful movement when worn — one of those details you might not fully appreciate until you see it on.
Sizing, Fit, Yarn & Gauge
The Sweetheart A-Line Tunic is designed with positive ease through the body, creating a relaxed and flattering fit.
- Sizes: XS (S, M, L, XL, 2X, 3X, 4X)
- Fit: A-line silhouette with comfortable ease
- Gauge: Achieved in both lace and stockinette (be sure to check gauge for each)
This tunic looks best when the lace has room to open up, so choosing the right yarn and achieving gauge are key.
Lace Gauge & Blocking: What to Expect as You Knit
If this is your first time knitting a lace garment, it’s important to know this upfront: lace almost never looks its best while it’s still on the needles.
As you work through the Sweetheart lace section, the fabric may appear dense, uneven, or even slightly smaller than expected. That’s completely normal. Lace patterns rely on blocking to open up the stitches and reveal the full beauty of the design.
This is why checking gauge — and checking it after blocking — is so important for this tunic. Taking the time to knit, wash, and block a proper swatch will give you a much clearer picture of how the finished garment will look and fit.
Trust the process. Once blocked, the lace transforms, and the stitch pattern truly comes to life.
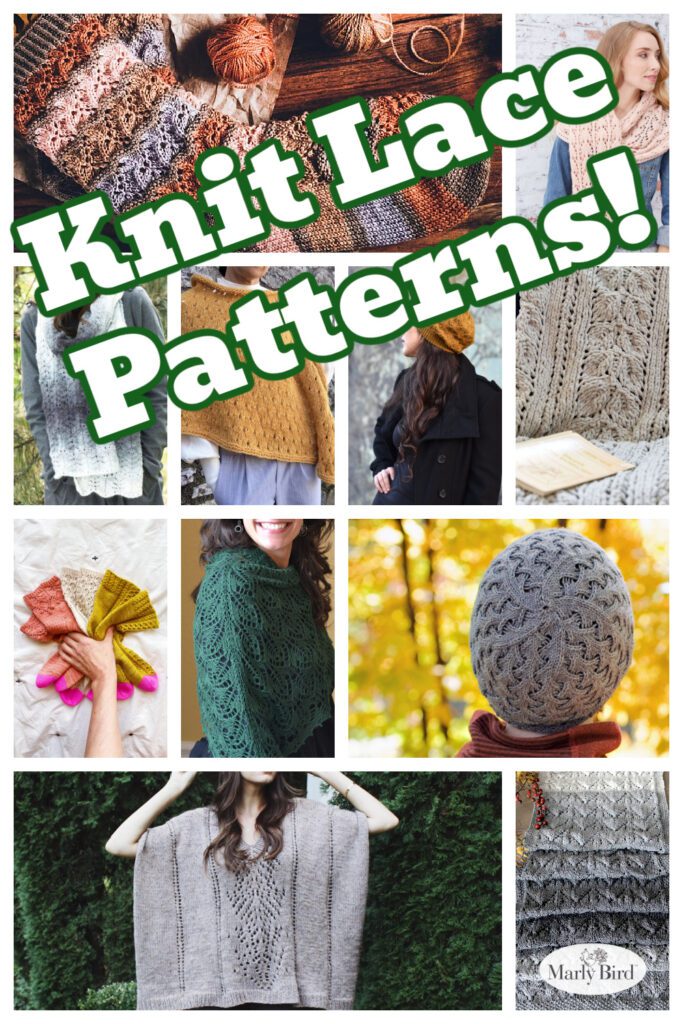
Here is an article we wrote all about Lace Knitting 101.
Join our Newsletter
Get Free Pattern Links & Coupons!

Yarn Choices & Substitutions
The original sample was knit using Bijou Basin Ranch Lhasa Wilderness Yak, a luxurious blend that adds incredible softness and drape. While that yarn is now discontinued, there are many excellent alternatives that work beautifully for this design.
Great Yarn Substitutions
When choosing a substitute, look for a sport-weight yarn with good drape and stitch definition.
From Jimmy Beans Wool:
- Blue Sky Fibers Woolstok Light – Soft, smooth, and excellent for lace definition
- Malabrigo Caprino Yarn – A versatile wool that blocks beautifully
From Knit Picks:
- Knit Picks Galileo – This is our first choice as a substitute
- Heatherly Sport– A wool/silk blend that gives lovely drape and sheen
- Hawthorne Sport – Durable with crisp stitch definition
- Wool of the Andes Sport – A budget-friendly option with excellent structure
- Knit Picks Woolen Tweed Yarn – Beautiful rustic look you will love
✨ Designer Tip: Swatch generously and block your swatch the same way you’ll block the finished tunic. Lace behaves very differently before and after blocking.
Needles, Tools & Techniques You’ll Use
- Circular needles (used to hold stitches while working flat)
- Stitch markers and tapestry needle
- Blocking mats and pins (highly recommended!)
You’ll practice:
- Reading lace charts
- Working lace increases and decreases
- Seaming sweater pieces
- Blocking lace for maximum impact
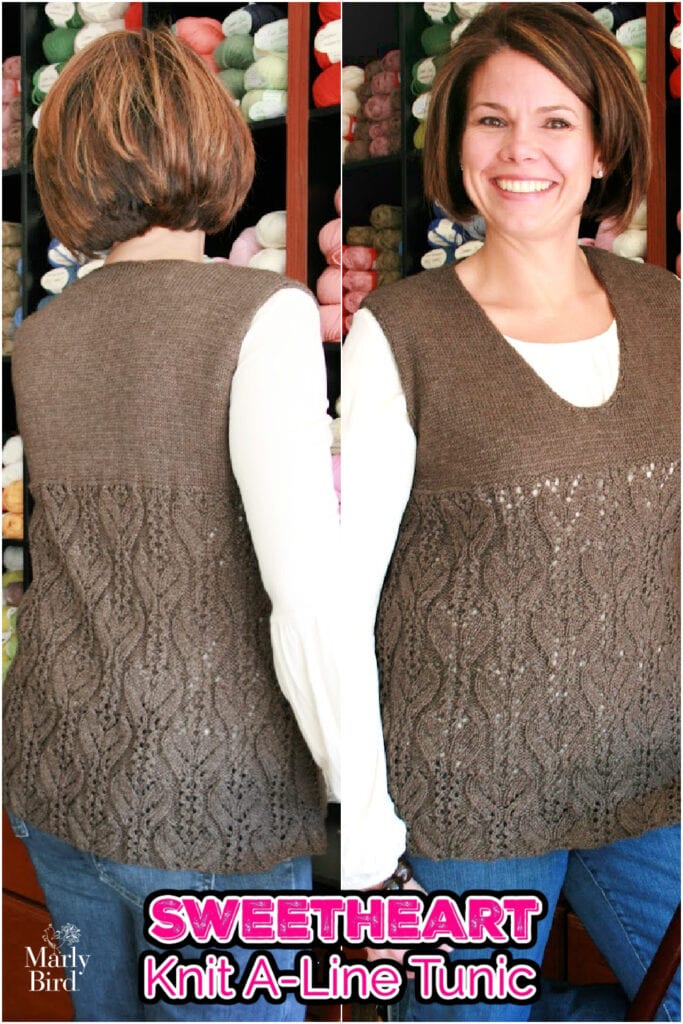
Styling & Layering Ideas
One of the reasons this tunic remains a favorite is how easy it is to style:
- Layer it over a long-sleeve tee or blouse for everyday wear
- Pair it with jeans, leggings, or slim trousers
- Dress it up with boots and accessories for a polished look
It’s a piece you’ll reach for again and again.
Seaming Your Tunic: Order Matters
Seaming is one of those steps that can feel intimidating, but with a clear plan, it becomes much more manageable.
For the Sweetheart A-Line Tunic, it’s generally easiest to:
- Seam the shoulders first, ensuring the neckline aligns correctly
- Seam the side seams from hem to underarm
Working in this order helps maintain the garment’s shape and makes it easier to match lace sections neatly. Blocking all pieces before seaming is especially helpful here, as it allows the fabric to relax and makes alignment more precise.
Taking your time during finishing is well worth it — careful seaming is what turns beautifully knit pieces into a polished, wearable garment.
Frequently Asked Questions
Is the Sweetheart A-Line Tunic a free pattern?
Yes! The pattern instructions are available for free on the blog. An ad-free PDF is also available for knitters who prefer a printable format.
Does this pattern include charts?
Yes, the lace patterns are fully charted, making this an excellent choice for visual knitters.
Is this sweater knit in the round?
No. The tunic is worked flat in pieces and seamed after blocking.
Are there video tutorials for this pattern?
This pattern does not include dedicated videos, but it’s written clearly and supported by standard knitting techniques many knitters are already familiar with.
Sweetheart A-Line Tunic Pattern Details
To Fit Sizes
XS (S, M, L, XL, 2X, 3X, 4X)
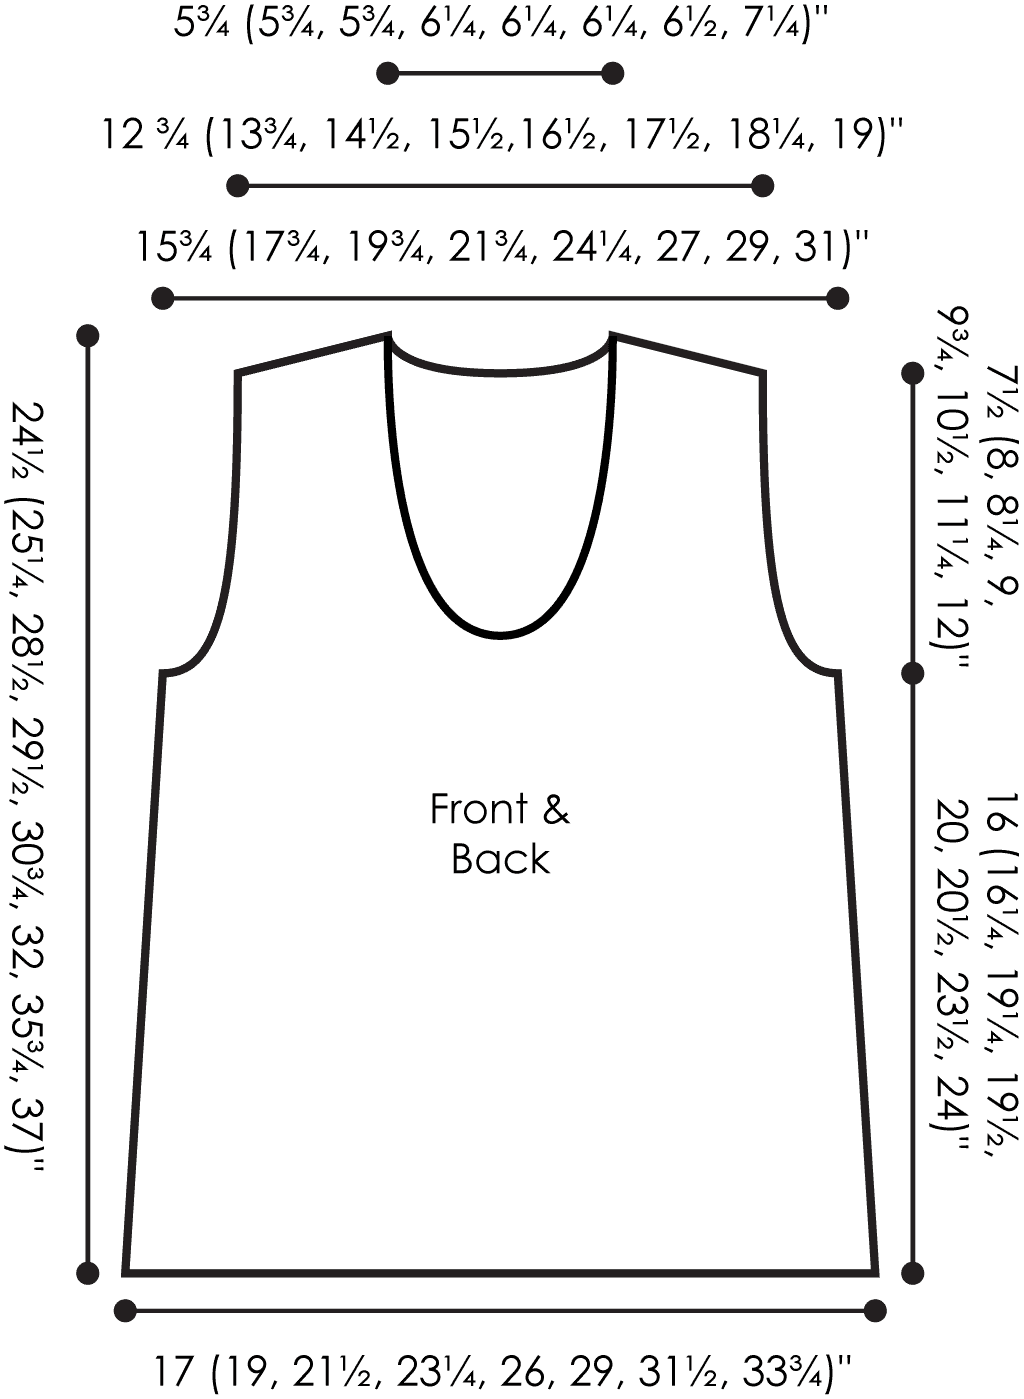
Finished Measurements
To fit bust: 30 (34, 38, 42, 46, 50, 54, 58)”
Finished bust: 35 (39, 43, 48, 54, 58, 62)”
Finished length: 24 (25½, 28½, 29½, 30½, 32, 35, 37)”
Gauge
34 sts and 28 rows = 4″ (10 cm) in Sweetheart Lace over needles listed, after blocking
34 sts and 28 rows = 4″ (10 cm) in Stockinette stitch using smaller needles, after blocking
Take time to save time, check your gauge.
Sample Yarn
Discontinued – Bijou Basin Ranch
Bijou Basin Ranch “Bijou Spun”; 75% Yak / 25% Bamboo; 180 yards; 50 grams; CYCA size 2 sport
Natural Brown; 4 (5, 6, 6, 7, 9, 10, 11) hanks
Alternative Yarn
Knit Picks Galileo; 50% Merino Wool, 50% Viscose from Bamboo; 131 yards; 50 grams; CYCA size 2 sport
Needles
Size US 5 (3.75 mm) 24″ circular needles or longer
Size US 4 (3.5 mm) circular needles, 24″ or longer; or size to obtain correct gauge
Hook
US D-3 (3.25 mm)
Notions
- Stitch markers
- Tapestry needle
- T-pins
- Tape measure
- Blocking Squares
- Blocking Pins
- Soaking Basin
- Eucalan Wool Wash
- Leather tags (optional)
- Leather rivets (optional)
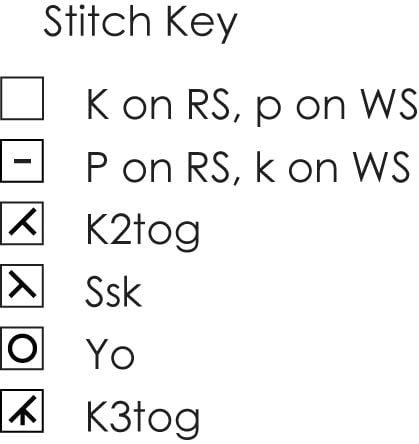
Abbreviations
BEG – Beginning
CONT – Continue
EST – Establish(ed)
K – Knit
K2TOG – Knit 2 Together
P – Purl
P2TOG – Purl 2 Together
REP – Repeat
RS – Right Side
SL – Slip
SSK – Slip, Slip, Knit
ST(S) – Stitch(es)
WS – Wrong Side
YO – Yarn Over
Video Tutorials
Knit – https://youtu.be/nkzVGuaksR8
Purl – https://youtu.be/TsPqLvRmOow
SSK – https://youtu.be/sjT0hKT5SD8?t=1074
K2tog – https://youtu.be/JrHqDYb2ss8?t=346
Yarn Over – https://youtu.be/sjT0hKT5SD8?t=602
Add a Lifeline – https://youtu.be/FiqYUE_aHAw
UnKnit / Tink – https://youtu.be/c7Gud7k4Y8k
Bury Ends – https://youtu.be/B_NBGUKjO-E
Blocking – https://youtu.be/lt_hXakidFM
Seaming – https://youtu.be/lvbj_J_SJ4
Stitch Patterns
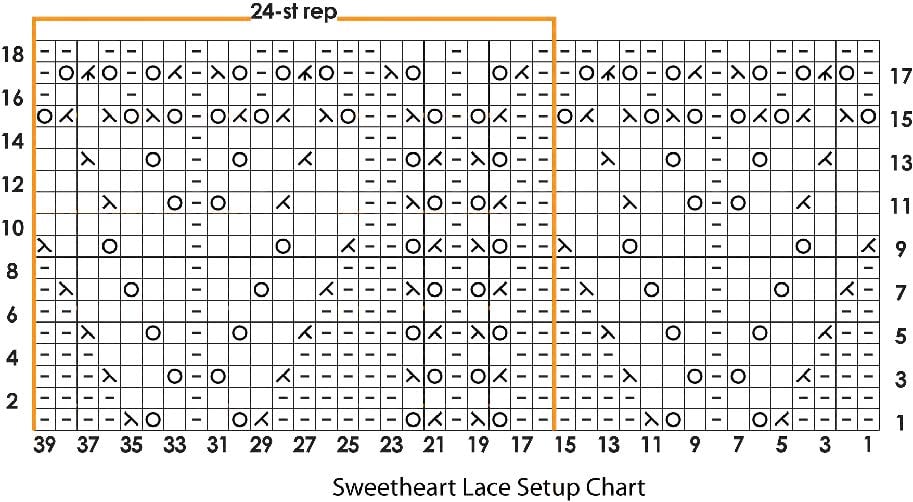
Sweetheart Lace Setup (top chart)
Worked over a multiple of 24 sts + 15.
Row 1 (RS): P4, k2tog, yo, k1, p1, k1, yo, ssk, p4, * p2, yo, ssk, p1, k2tog, yo, p6, k2tog, yo, k1, p1, k1, yo, ssk, p4; rep from * to end.
Row 2: K4, p3, k1, p3, k4, * k2, p2, k1, p2, k6, p3, k1, p3, k4; rep from * to end.
Row 3: P3, k2tog, k2, yo, p1, yo, k2, ssk, p3, * p2, k2tog, yo, p1, yo, ssk, p5, k2tog, k2, yo, p1, yo, k2, ssk, p3; rep from * to end.
Row 4: K3, p4, k1, p4, k3, * k2, p2, k1, p2, k5, p4, k1, p4, k3; rep from * to end.
Row 5: P2, k2tog, k2, yo, k1, p1, k1, yo, k2, ssk, p2, * p2, yo, ssk, p1, k2tog, yo, p4, k2tog, k2, yo, k1, p1, k1, yo, k2, ssk, p2; rep from * to end.
Row 6: K2, p5, k1, p5, k2, * k2, p2, k1, p2, k4, p5, k1, p5, k2; rep from * to end.
Row 7: P1, k2tog, k2, yo, k2, p1, k2, yo, k2, ssk, p1, * p2, k2tog, yo, p1, yo, ssk, p3, k2tog, k2, yo, k2, p1, k2, yo, k2, ssk, p1; rep from * to end.
Row 8: (K1, p6) twice, k1, * k2, p2, k1, p2, k3, (p6, k1) twice; rep from * to end.
Row 9: K2tog, k2, yo, k3, p1, k3, yo, k2, ssk, * p2, yo, ssk, p1, k2tog, yo, p2, k2tog, k2, yo, k3, p1, k3, yo, k2, ssk; rep from * to end.
Row 10: P7, k1, p7, * k2, p2, k1, p2, k2, p7, k1, p7; rep from * to end.
Row 11: K3, k2tog, k2, yo, p1, yo, k2, ssk, k3, * p2, k2tog, yo, p1, yo, ssk, p2, k3, k2tog, k2, yo, p1, yo, k2, ssk, k3; rep from * to end.
Row 12: As row 10.
Row 13: k2, k2tog, k2, yo, k1, p1, k1, yo, k2, ssk, k2, * p2, yo, ssk, p1, k2tog, yo, p2, k2, k2tog, k2, yo, k1, p1, k1, yo, k2, ssk, k2; rep from * to end.
Row 14: As row 10.
Row 15: Yo, ssk, k1, (k2tog, yo) twice, p1, (yo, ssk) twice, k1, k2tog, yo, * p2, k2tog, yo, p1, yo, ssk, p2, Yo, ssk, k1, (k2tog, yo) twice, p1, (yo, ssk) twice, k1, k2tog, yo; rep from * to end.
Row 16: K1, p3, (k1, p2) twice, k1, p3, k1, * k2, p2, k1, p2, k3, p3, (k1, p2) twice, k1, p3, k1; rep from * to end.
Row 17: P1, yo, k3tog, yo, p1, yo, ssk, p1, k2tog, yo, p1, yo, k3tog, yo, p1, * p1, k2tog, yo, k1, p1, k1, yo, ssk, p2, yo, k3tog, yo, p1, yo, ssk, p1, k2tog, yo, p1, yo, k3tog, yo, p1; rep from * to end.
Row 18: k2, p1, k2, p2, k1, p2, k2, p1, k2, * (k1, p3) twice, k3, p1, k2, p2, k1, p2, k2, p1, k2; rep from * to end.
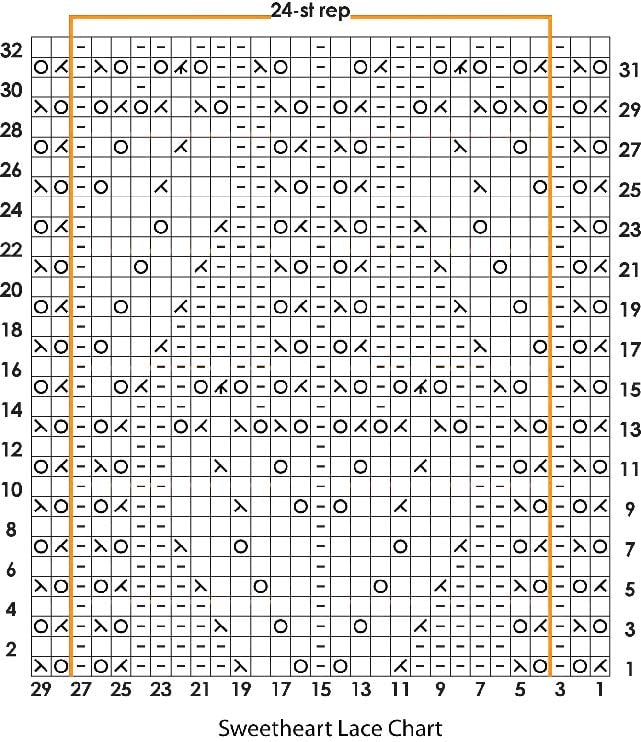
Sweetheart Lace Setup (bottom chart):
(worked over a multiple of 24 sts + 5)
Row 1 (RS): K2tog, yo, p1, * yo, ssk, p5, k2tog, k2, yo, p1, yo, k2, ssk, p5, k2tog, yo, p1; rep from * to last 2 sts, yo, ssk.
Row 2: P2, k1, * p2, k5, p4, k1, p4, k5, p2, k1; rep from * to last 2 sts, p2.
Row 3: Yo, ssk, p1, * k2tog, yo, p4, k2tog, k2, yo, k1, p1, k1, yo, k2, ssk, p4, yo, ssk, p1; rep from * to last 2 sts, k2tog, yo.
Row 4: P2, k1, * p2, k4, p5, k1, p5, k4, p2, k1; rep from * to last 2 sts, p2.
Row 5: K2tog, yo, p1, * yo, ssk, p3, k2tog, k2, yo, k2, p1, k2, yo, k2, ssk, p3, k2tog, yo, p1; rep from * to last 2 sts, yo, ssk.
Row 6: P2, k1, * p2, k3, p6, k1, p6, k3, p2, k1; rep from * to last 2 sts, p2.
Row 7: Yo, ssk, p1, * k2tog, yo, p2, k2tog, k2, yo, k3, p1, k3, yo, k2, ssk, k2, yo, ssk, p1; rep from * to last 2 sts, k2tog, yo.
Row 8: P2, k1, * p2, k2, p7, k1, p7, k2, p2, k1; rep from * to last 2 sts, p2.
Row 9: K2tog, yo, p1, * yo, ssk, p2, k3, k2tog, k2, yo, p1, yo, k2, ssk, k3, p2, k2tog, yo, p1; rep from * to last 2 sts, yo, ssk.
Row 10: As row 8.
Row 11: Yo, ssk, p1, * k2tog, yo, p2, k2, k2tog, k2, yo, k1, p1, k1, yo, k2, ssk, k2, p2, yo, ssk, p1; rep from * to last 2 sts, k2tog, yo.
Row 12: As row 8.
Row 13: k2tog, yo, p1, * yo, ssk, p2, yo, ssk, k1, (k2tog, yo) twice, p1, (yo, ssk) twice, k1, k2tog, yo, p2, k2tog, yo, p1; rep from * to last 2 sts, yo, ssk.
Row 14: P2, k1, * p2, k3, p3, (k1, p2) twice, k1, p3, k3, p2, k1; rep from * to last 2 sts, p2.
Row 15: Yo, ssk, p1, * k1, yo, ssk, p2, yo, k3tog, yo, p1, yo, ssk, p1, k2tog, yo, p1, yo, k3tog, yo, p2, k2tog, yo, k1, p1; rep from * to last 2 sts, k2tog, yo.
Row 16: P2, k1, * p3, k3, p1, k2, p2, k1, p2, k2, p1, k3, p3, k1; rep from * to last 2 sts, p2.
Row 17: K2tog, yo, p1, * yo, k2, ssk, p5, k2tog, yo, p1, yo, ssk, p5, k2tog, k2, yo, p1; rep from * to last 2 sts, yo, ssk.
Row 18: P2, k1, * p4, k5, p2, k1, p2, k5, p4, k1; rep from * to last 2 sts, p2.
Row 19: Yo, ssk, p1, * k1, yo, k2, ssk, p4, yo, ssk, p1, k2tog, yo, p4, k2tog, k2, yo, k1, p1; rep from * to last 2 sts, k2tog, yo.
Row 20: P2, k1, * p5, k4, p2, k1, p2, k4, p5, k1; rep from * to last 2 sts, p2.
Row 21: K2tog, yo, p1, * k2, yo, k2, ssk, p3, k2tog, yo, p1, yo, ssk, p3, k2tog, k2, yo, k2, p1; rep from * to last 2 sts, p2.
Row 22: P2, k1, * p6, k3, p2, k1, p2, k3, p6, k1; rep from * to last 2 sts, p2.
Row 23: Yo, ssk, p1, k3, yo, k2, ssk, p2, yo, ssk, p1, k2tog, yo, k2tog, k2, yo, k3, p1, k2tog, yo.
Row 24: P2, k1, * p7, k2, p2, k1, p2, k2, p7, k1; rep from * to last 2 sts, p2.
Row 25: K2tog, yo, p1, * yo, k2, ssk, k3, p2, k2tog, yo, p1, yo, ssk, p2, k3, k2tog, k2, yo, p1; rep from * to last 2 sts, yo, ssk.
Row 26: As row 24.
Row 27: Yo, ssk, p1, * k1, yo, k2, ssk, k2, p2, yo, ssk, p1, k2tog, yo, p2, k2, k2tog, k2, yo, k1, p1; rep from * to last 2 sts, k2tog, yo.
Row 28: As row 24.
Row 29: K2tog, yo, p1, * (yo, ssk) twice, k1, k2tog, yo, p2, k2tog, yo, p1, yo, ssk, p2, yo, ssk, k1, (k2tog, yo) twice, p1; rep from * to last 2 sts, yo, ssk.
Row 30: P2, k1, * p2, k1, p3, k3, p2, k1, p2, k3, p3, k1, p2, k1; rep from * to last 2 sts, p2.
Row 31: Yo, ssk, p1, * k2tog, yo, p1, yo, k3tog, yo, p2, k2tog, yo, k1, p1, k1, yo, ssk, p2, yo, k3tog, yo, p1, yo, ssk, p1; rep from * to last 2 sts, k2tog, yo.
Row 32: P2, k1, * p2, k2, p1, k3, p3, k1, p3, k3, p1, k2, p2, k1; rep from * to last 2 sts, p2.
Rep rows 1-32 for Sweetheart Lace.
Charts
Sweetheart Knit A-Line Tunic Schematic
Notes
⭐️ Regarding Yarn and Gauge: The Sweetheart Tunic is a light piece with open lacework along the bottom and Stockinette stitch at the top. It is important to choose a yarn that will hold the lace open while looking good in the Stockinette.
Please be sure to take pre-block, post-block and hanging gauge swatch measurements. All three will be important for you to do all you can to make sure your piece will be finished the way you want.
⭐️The instructions are written for smallest size. If changes are necessary for larger sizes the instructions will be written thus ( ). When only one number is given, it applies to all sizes.
⭐️ Tunic is made in pieces and seamed together after blocking!
⭐️ For the shaping, here are some simple instructions:
- Work lace dec rows as follows (RS): P1, p2tog, work as est to last 3 sts, p2tog, p1.
- Work back armhole dec sts as follows (RS): K1, ssk, work as est to last 2 sts, k2tog, k1.
- Work front armhole dec rows as follows: Left Front (RS): K1, ssk, work as est to end. Right Front (RS): Work as est to last 3 sts, k2tog, k1.
- Work front neck dec row as follows: Left Front (RS): Work as est to last 3 sts, k2tog, k1. Right Front (RS): K1, ssk, work as est to end.
GROW
To Unlock Exclusive Subscriber Content click the Box below and join for free by simply adding your email and creating a password! If you are having troubles, clear your cache or reset your password or login to the Grow Publisher Portal.
>> Learn More About Grow Here <<
I’m thrilled to share this amazing pattern with you, many patterns on my blog are absolutely free! I kindly request that you don’t copy and paste or distribute this pattern. Prefer an ad-free experience? Buy a digital PDF pattern for a small fee from one of my online stores for a seamless crafting journey.
I appreciate your support and readership. You are the reason I can keep doing what I love and sharing it with others. So, thank you from the bottom of my yarn-loving heart! Disclosure: This post contains affiliate links, meaning I get a commission if you decide to make a purchase through my links at no cost to you.
Sweetheart Knit A-Line Tunic Pattern
Back
Sweetheart Lace Bottom: With larger needles, CO 113 (125, 141, 153, 171, 191, 207, 221) sts.
Row 1 (RS): P1 (7, 3, 9, 6, 4, 12, 7), pm, work in Sweetheart Lace Setup to last 1 (7, 3, 9, 6, 4, 12, 7) sts, pm, p to end.
Row 2: K to marker, work in Sweetheart Lace Setup to next marker, k to end. Cont as est, keeping edge sts in Rev St Stand center sts in Sweetheart Lace Setup, until all 18 rows of chart have been worked.
Remove markers.
Next 2 rows:
Row 1 (RS): P6 (12, 8, 14, 11, 9, 17, 12), pm, work in Sweetheart Lace to last 6 (12, 8, 14, 11, 9, 17, 12) sts, pm, p to end.
Row 2: K to marker, work in Sweetheart Lace to next marker, k to end.
Cont as est, keeping edge sts in Rev St St and center sts in Sweetheart Lace, for a total of 80 (80, 96, 96, 96, 96, 112, 112) rows, or 2.5 (2.5, 3, 3, 3, 3, 3.5, 3.5) Sweetheart Lace reps (not including setup). AT THE SAME TIME, dec 1 st at each edge on 11th row of Sweetheart lace, then every 22 (22, 20, 20, 16, 14, 14, 12) rows 3 (3, 4, 4, 5, 6, 7, 8) more times – 105 (117, 131, 143, 159, 177, 191, 203) sts rem. See notes on first page on how to decrease.
Stockinette St Top:
Change to smaller needles, and work in flat Stockinette St for 2 (21⁄4, 23⁄4, 31⁄4, 33⁄4, 41⁄4, 43⁄4, 51⁄2)”, ending with a WS row.
Shape Armholes
BO 5 (6, 7, 8, 9, 10, 11, 12) sts at beg of next 2 rows, then 5 sts at beg of next 0 (0, 0, 0, 0, 0, 2, 2) rows, then 4 sts at beg of next 0 (0, 0, 0, 0, 2, 2, 2) rows, then 3 sts at beg of next 0 (0, 0, 2, 4, 4, 2, 2) rows, then 2 sts at beg of next 2 (2, 4, 2, 2, 2, 2, 4) rows.
Dec 1 st at each edge EOR 2 (3, 3, 4, 4, 4, 5, 6) times, then every 4 rows 1 (2, 3, 3, 4, 5, 5, 5) times – 85 (91, 97, 103, 109, 115, 121, 125) sts rem.
Cont evenly until piece measures 231⁄2 (241⁄4, 271⁄2, 281⁄2, 293⁄4, 31, 343⁄4, 36)” from beg, ending with a RS row.
Shape Shoulders and Neck
Next row (WS): P33 (36, 39, 40, 43, 46, 48, 48), BO19 (19, 19, 23, 23, 23, 25, 29), p to end.
Right Shoulder
Row 1 (RS): BO 5 (6, 7, 7, 8, 9, 9, 9), k to end.
Row 2: BO 3 sts, p to end.
Row 3: BO 6 (6, 7, 7, 8, 9, 9, 9), k to end.
Row 4: BO 3 sts, p to end.
Row 5: BO 6 (7, 7, 8, 8, 9, 10, 10), k to end.
Row 6: BO 2 sts, p to end.
Row 7: BO 6 (7, 8, 8, 9, 9, 10, 10), k to end. BO rem 2 sts.
Left Shoulder
With RS facing, reattach yarn
to 33 (36, 39, 40, 43, 46, 48, 48) sts still on the needle.
Row 1(RS): BO 3 sts, k to end.
Row 2: BO 5 (6, 7, 7, 8, 9, 9, 9), p to end. Row 3: BO 3 sts, k to end.
Row 4: BO 6 (6, 7, 7, 8, 9, 9, 9), p to end. Row 5: BO 2 sts, k to end.
Row 6: BO 6 (7, 7, 8, 8, 9, 10, 10), p to end. Row 7: BO 2 sts, k to end.
BO rem 6 (7, 8, 8, 9, 9, 10, 10) sts.
Front
Work same as Back to armhole.
Shape Armhole and Neck
Shape armhole same as back. AT THE SAME TIME, when piece measures 16 1⁄2 (16 3⁄4, 19 3⁄4, 20 1⁄4, 20 3⁄4, 21 1⁄2, 24 1⁄2, 25 1⁄2)”, end with a RS row and shape neck as follows:
Next row (WS): P41 (44, 47, 50, 53, 56, 59, 61), BO 3 sts, P to end.
Work each side separately in St St, dec 1 st at neck edge EOR 12 (11, 10, 12, 11, 11, 10, 10) times, every 4 rows 6 (7, 7, 7, 8, 8, 10, 12) times, and every 6 rows 0 (0, 1, 1, 1, 1, 1, 1) times.
When piece measures 231⁄2 (241⁄4, 271⁄2, 281⁄2, 293⁄4, 31, 343⁄4, 36)” from beg, shape shoulder same as back.
DESIGNER NOTE: Shape shoulders on the front same as the back – only the shoulder shaping and not the neck shaping.
When the back instructions read to do shaping on the neck edge ignore it, maintain Stockinette st pattern.
Be sure to follow instructions for left shoulder back for right shoulder front and vice versa.
My tech editor and I thought this was clear but we have had some questions about it. So I hope this helps 🙂
Finishing
Block all pieces to measurements.
Sew shoulder and side seams.
Edging
With RS facing, work 1 round in single crochet around neck edge and each armhole edge.
Love This Pattern? Save It on Ravelry 💖
Be sure to favorite the Sweetheart A-Line Tunic on Ravelry, add it to your queue, and share your finished tunic with the knitting community.

Final Thoughts
The Sweetheart A-Line Tunic will always hold a special place in my heart. As my very first sweater design, it represents everything I love about knitwear—thoughtful construction, timeless style, and the joy of creating something you truly love to wear.
If you’re looking for a knit tunic pattern that feels classic, flattering, and deeply satisfying to make, this one might just become a favorite in your wardrobe too.
Happy knitting! 🧶💕
❤️ Your BiCrafty Bestie,
Marly Bird

Categories: Free Patterns, Knitting, Marly Bird Premium Patterns, Our Free Patterns, Pattern