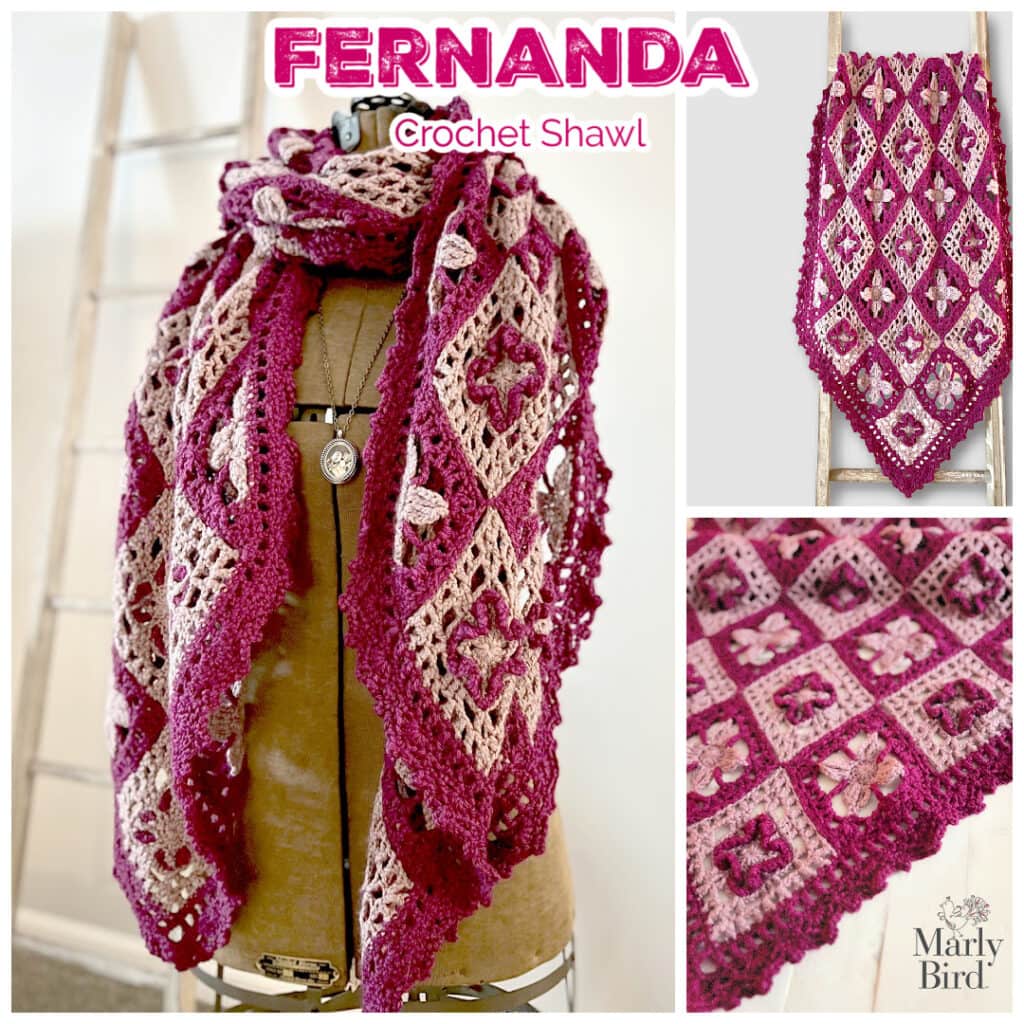
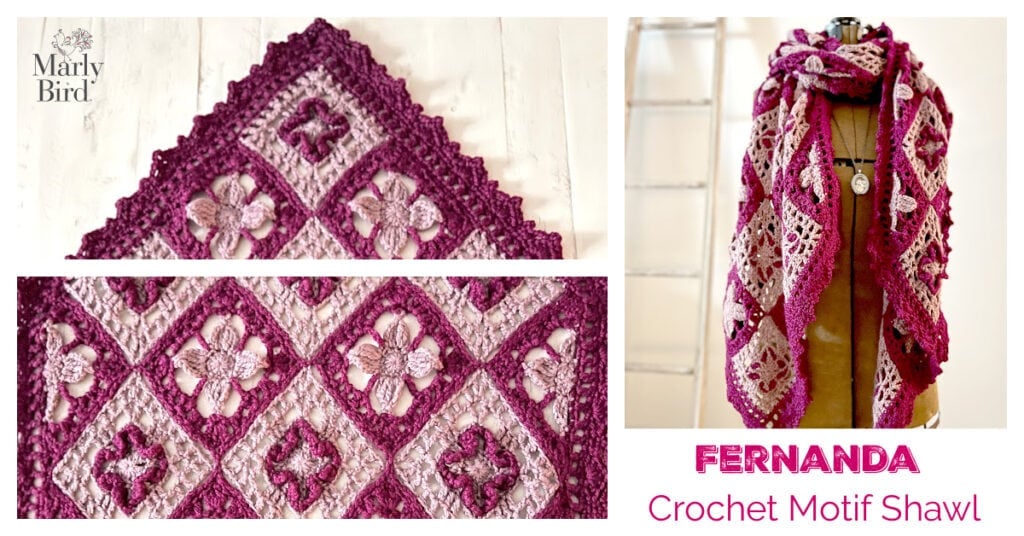
Free Crochet Motif Shawl Pattern – Fernanda Shawl by Marly Bird
Looking for a crochet shawl that looks wildly fancy but is secretly relaxing and rhythmic to make?
The Fernanda Crochet Motif Shawl is here to do exactly that. 💃
This free crochet motif shawl pattern combines lacy, floral-inspired motifs, a luxurious DK-weight yarn, and a join-as-you-go construction that feels like stitching together little works of art. It’s drapey, glamorous, and surprisingly approachable once you get into the motif rhythm.
Affiliate Disclosure: This post contains affiliate links. To learn more please visit my privacy policy here💖
You can follow the full free pattern right here on the blog (you’ll paste that in below), or treat yourself to the ad-free PDF that’s perfect for printing, scribbling notes, and tossing in your project bag.
✨ Why You’ll Love the Fernanda Crochet Motif Shawl
- Motif-based construction – work one floral square at a time, then join-as-you-go
- Stunning drape – DK merino/silk yarn gives this shawl a soft, flowy, almost fabric-like feel
- Light but cozy – airy lace that works for multiple seasons
- Relaxing repeat – once you learn the motif, it’s Netflix-and-crochet friendly
- Dress-it-up piece – this is the “I made it myself” shawl that looks boutique-worthy 💅
🧶 Designer Tip: If you’re someone who loves finishing motifs as you go, this is your pattern. Each join feels like checking another little box off your to-do list. So satisfying.

🧶 Yarn & Substitutions for the Fernanda Crochet Motif Shawl
The sample shawl is worked in a luxurious, silky DK-weight yarn that really shows off the lace.
Yarn Used:
- WeCrochet Gloss DK (70% merino wool / 30% silk, 123 yds [112 m], 1.75 oz [50 g], CYCA #3 light)
- Color A: Velveteen – 4 balls
- Color B: Plume – 5 balls
This blend gives you:
- Beautiful stitch definition for the motifs
- A soft sheen that makes the lace look extra fancy
- A shawl that feels amazing around your neck and shoulders
Yarn Substitution Ideas
Any smooth DK-weight yarn with good drape will work, especially:
- Merino or merino blends: Swish DK or Capra DK
- Merino + silk or merino + bamboo: Galileo
- Soft acrylic DK if you want easy-care: Vintage DK or Wool Ease DK
If you substitute:
- Match the fiber behavior (wool/silk or wool/plant-blend for similar drape)
- Swatch and block your motifs to check size before you commit
🧶 Designer Tip: If you want extra drama, choose a yarn with a subtle tonal or kettle-dyed look. Too much high-contrast variegation can fight with the motif details, but tonals + lace = chef’s kiss.
📏 Gauge & Finished Size
While this is a shawl (so we’re not fitting it to a body), gauge still matters if you want a similar size and yarn usage.
Gauge (after blocking):
- 16 sts and 8 rows = 4″ [10 cm] in pattern
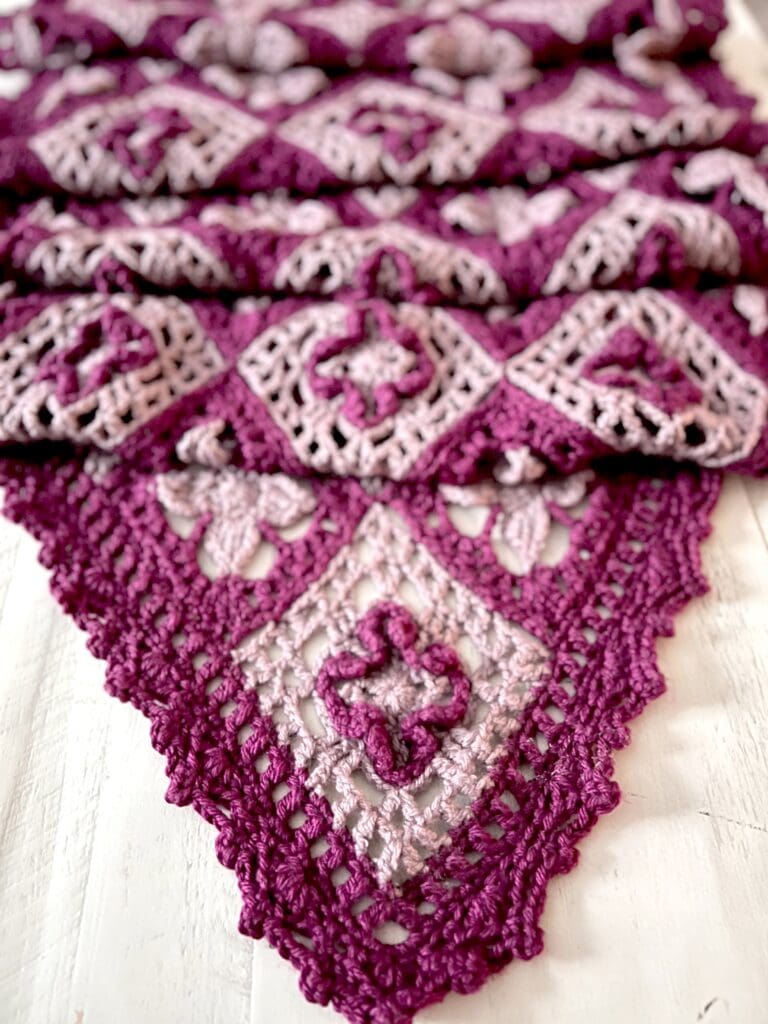
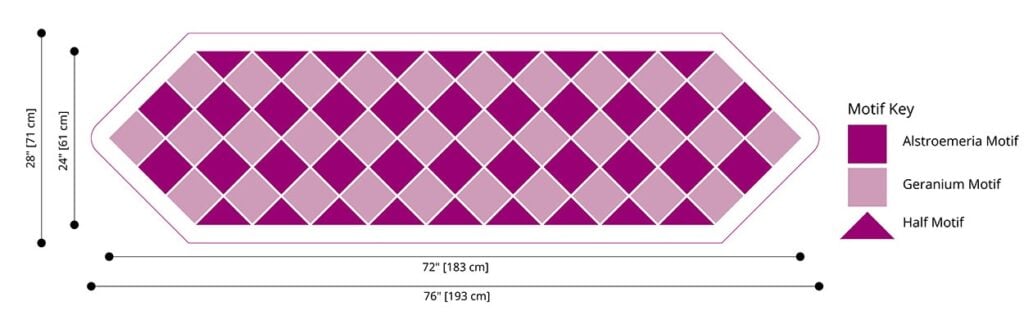
Finished Measurements (after blocking):
- Approximately 76″ [193 cm] wide at the top edge
- Approximately 28″ [71 cm] deep at the center
If your gauge is looser, your shawl will be larger and use more yarn. Tighter gauge = smaller, denser shawl.
🧶 Designer Tip: Make and block one motif as a swatch. That’ll tell you everything: drape, size, and if you love your yarn/hook combo before you commit to the full project.
🔧 Hook & Notions
You don’t need anything wild to make this beauty:
- Hook:
- US H/8 (5.0 mm) crochet hook (or size needed to get gauge)
- Notions:
- Stitch markers (to mark joins or motif points)
- Tapestry needle
- Blocking mats, pins, and a gentle wash or wool wash for finishing
If you tend to crochet tightly, you may want to go up a hook size; if you’re loose, go down until your blocked motif hits the right size.
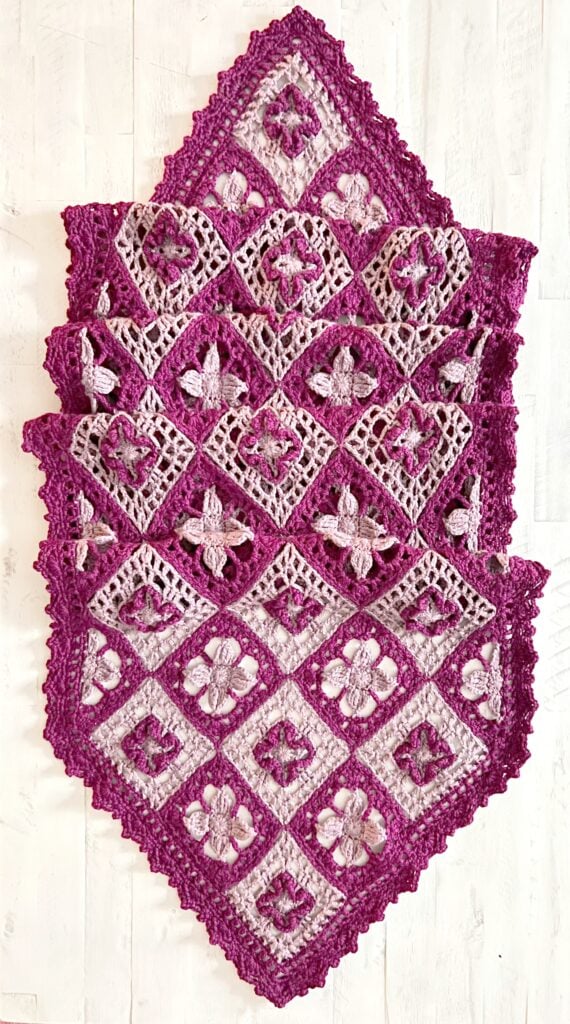
🧵 How the Fernanda Crochet Motif Shawl Is Constructed
This isn’t a simple triangle worked from one end to the other—it’s smarter than that.
- The shawl is made from lace motifs that are worked individually and then joined-as-you-go.
- The shape is a long, shallow triangle, which makes it super wearable—easy to wrap, knot, or drape.
- The motifs build from one end to the other so you can really see your shawl growing with each join.
You’ll:
- Crochet the first motif completely.
- Work the next motifs and join them on the final round as you go.
- Continue adding motifs in a planned layout to shape the triangle.
- Work an edging/border to bring it all together and tidy up those beautiful lace edges.
🧶 Designer Tip: If you’re nervous about join-as-you-go, make two practice motifs and use scrap yarn to try one join before you start your “real” shawl. Low pressure, big confidence boost.
📚 Skill Level & What You’ll Learn
I’d rate Fernanda as Adventurous Beginner to Intermediate.
If you can:
- Work basic stitches (ch, sc, hdc, dc, tr)
- Follow simple decreases like dc2tog
- Crochet in rounds
- Keep track of repeats
…then you can absolutely make this shawl.
Along the way you’ll get practice with:
- Motif construction (crocheting in the round)
- Join-as-you-go techniques
- Light lace in DK weight, which is easier to see and handle than thread or super-fine yarn
- Blocking lace so it really opens up
If you’ve done granny squares or simpler motifs, Fernanda is a lovely “glow up” project.
🎨 Choosing Colors for Your Fernanda Shawl
You only need two colors, but they do a lot of heavy lifting visually.
Some fun combinations:
- High contrast: deep plum + icy teal, charcoal + silver
- Soft & romantic: blush + cream, dusty blue + pearl
- Bold statement: emerald + gold, fuchsia + aubergine
You can decide which color you want to “star”—the one used in more motifs or placed in the more dominant sections.
🧶 Designer Tip: Lay your yarns in grayscale (snap a black-and-white photo on your phone). If they still look distinct, you’ve got good contrast for your lace to shine.
If you want more help thinking about color, check out my post
“How to Choose Colors for a Colorwork Project” on MarlyBird.com – the same concepts totally apply here, even though this is crochet lace instead of stranded knitting.
🧼 Blocking Your Fernanda Crochet Shawl
Lace does not reach its full potential until it’s blocked—especially with a wool/silk blend.
Basic steps:
- Soak your finished shawl in lukewarm water with a little gentle wash.
- Press (don’t wring) out excess water and roll in a towel.
- Pin to final measurements, opening up the lace and straightening edges.
- Let it dry completely before unpinning.
For a deeper dive, read my post:
“Steam Blocking vs Wet Blocking Superwash Yarn” on MarlyBird.com – the principles of blocking, pinning, and shape-setting are super helpful here too.
🧶 Designer Tip: When you first pin it out, it might look comically huge and “holey.” Don’t panic. That’s blocked lace doing exactly what it’s supposed to do. Once it’s dry and off the mats, it relaxes into something gorgeous.
🎥 Helpful Tutorials
While Fernanda is written as a standalone pattern, these tutorials can support you along the way (all available on my YouTube channel):
- How to read crochet stitch diagrams
- How to block crochet projects
- How to weave in ends so they stay put
- How to fix mistakes without frogging everything (tinking and smart recoveries)
You can link your favorite existing Marly Bird videos here when you drop this into WordPress, or embed them near the pattern section.
🧶 Fernanda Crochet Motif Shawl – Free Pattern
SKILL LEVEL
Intermediate
MEASUREMENTS
Finished Measurements
Shawl is 76” [193 cm] wide by 28” [71 cm] tall.
Gauge
Geranium or Alstroemeria Motifs = 6” [15.3 cm] diagonally corner to corner; use any size hook to obtain the gauge.
MATERIALS
Yarn
WeCrochet Gloss DK Weight (70% Merino Wool/ 30% Silk, 123 yds / 112 m, 1.75 oz/ 50 g, CYCA #3 light)
Color A: #25592 Velveteen, 6 balls
Color B: #28591 Plume, 8 balls
Hook
Size H/8 (5.0 mm)
Notions
Tapestry needle, rust-proof pins and spray bottle for blocking
ABBREVIATIONS
Ch – Chain(s)
Dc – Double Crochet
Dc2tog – Double Crochet Two Together
Hdc – Half Double Crochet
RS – Right Side
Sc – Single Crochet
Sl st – Slip Stitch
Sp(s) – Space(s)
St(s) – Stitch(es)
Stacked Dc – Stacked Double Crochet
Tch – Turning Chain
Tr – Treble Crochet
WS – Wrong Side
Yo – yarn over
SPECIAL STITCHES
Double Crochet 2 Together (dc2tog): *Yarn over hook, insert hook into chain space indicated, yarn over and pull up a loop, yarn over and draw through 2 loops on hook; repeat from * once more in next space indicated, yarn over and draw through all loops on hook.
SCHEMATIC
STITCH DIAGRAMS
{See pattern}
NOTES
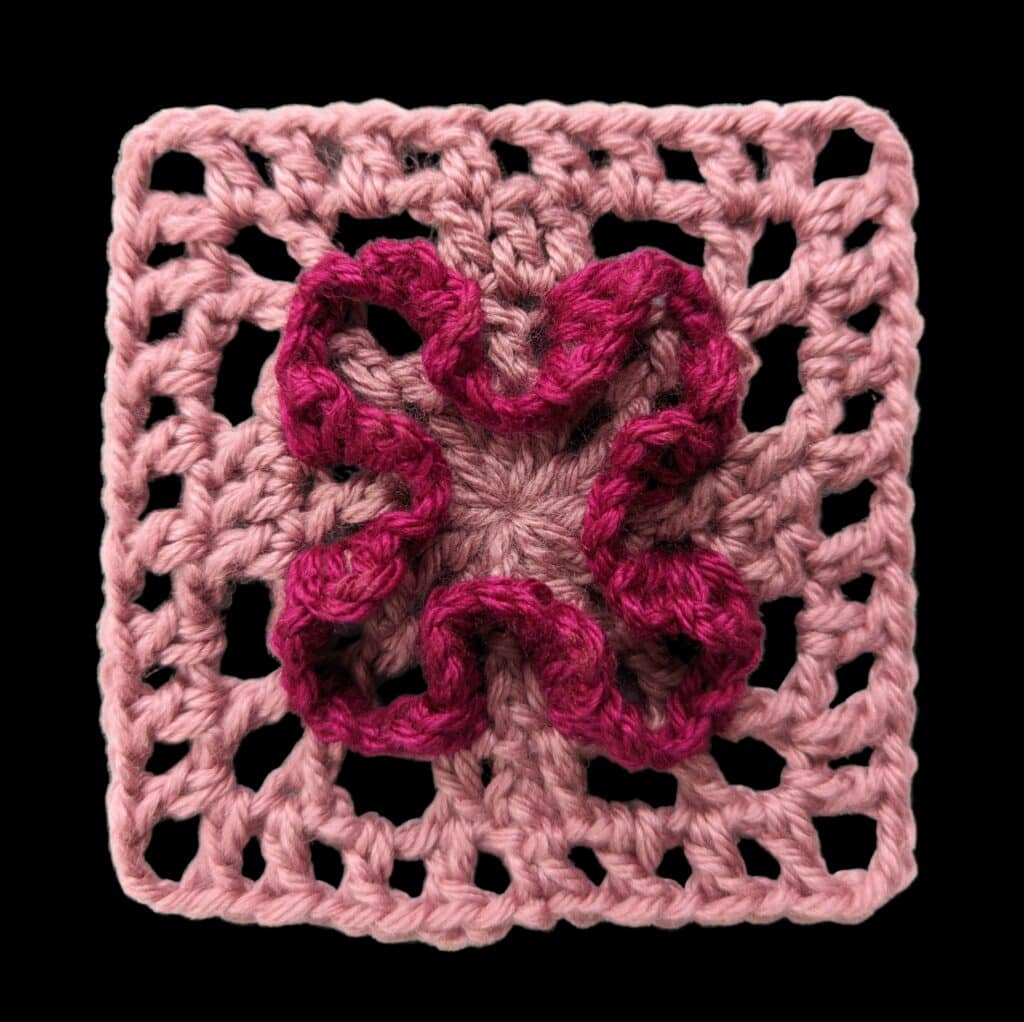
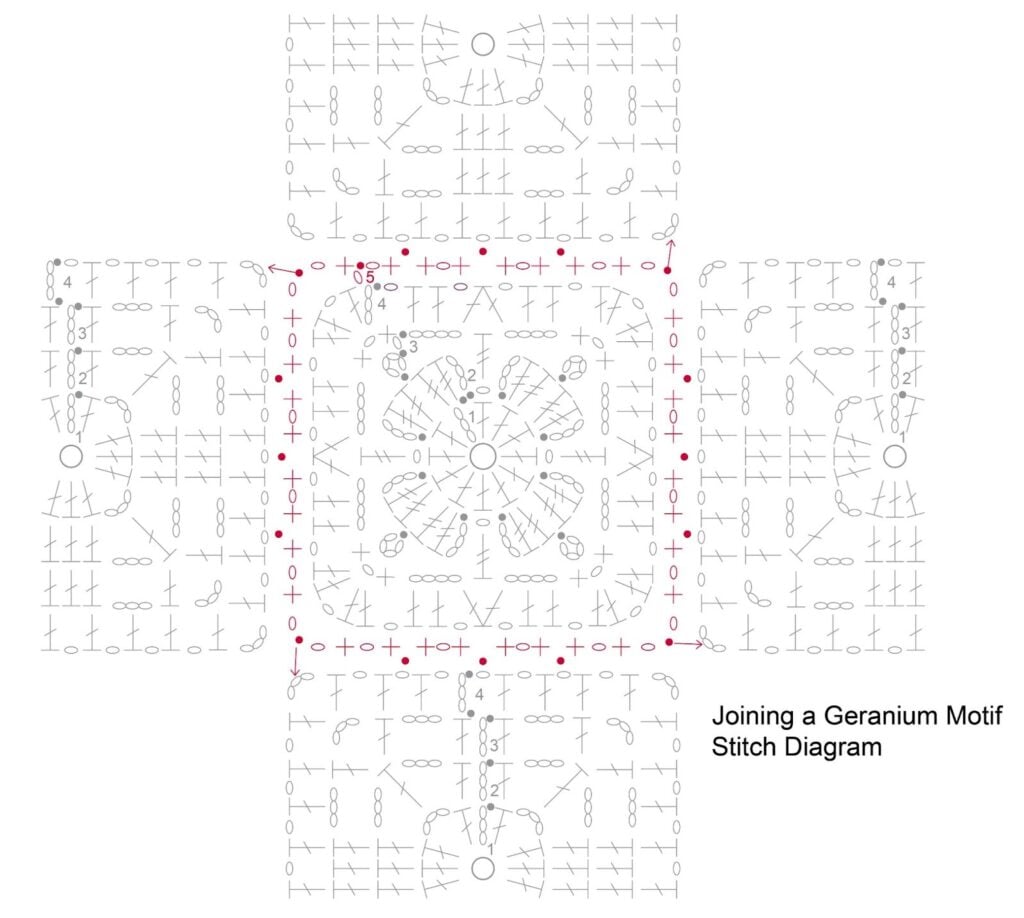
- Round 5 of the Geranium Motif adds an embellishment in the center of the motif. It is worked after the base motif is finished.
- Make all the Geranium Motifs first. Then while crocheting the last round of the Alstroemeria Motifs connect them to the Geranium Motifs. Use the layout for location of motifs.
- Once the motifs are all connected, finish the shawl with the 2” [5 cm] border.
GROW
To Unlock Exclusive Subscriber Content click the Box below and join for free by simply adding your email and creating a password! If you are having troubles, clear your cache or reset your password or login to the Grow Publisher Portal.
>> Learn More About Grow Here <<
I'm thrilled to share this amazing pattern with you, many patterns on my blog are absolutely free! I kindly request that you don't copy and paste or distribute this pattern. Prefer an ad-free experience? Buy a digital PDF pattern for a small fee from one of my online stores for a seamless crafting journey.
I appreciate your support and readership. You are the reason I can keep doing what I love and sharing it with others. So, thank you from the bottom of my yarn-loving heart! Disclosure: This post contains affiliate links, meaning I get a commission if you decide to make a purchase through my links at no cost to you.
FERNANDA CROCHET MOTIF SHAWL PATTERN
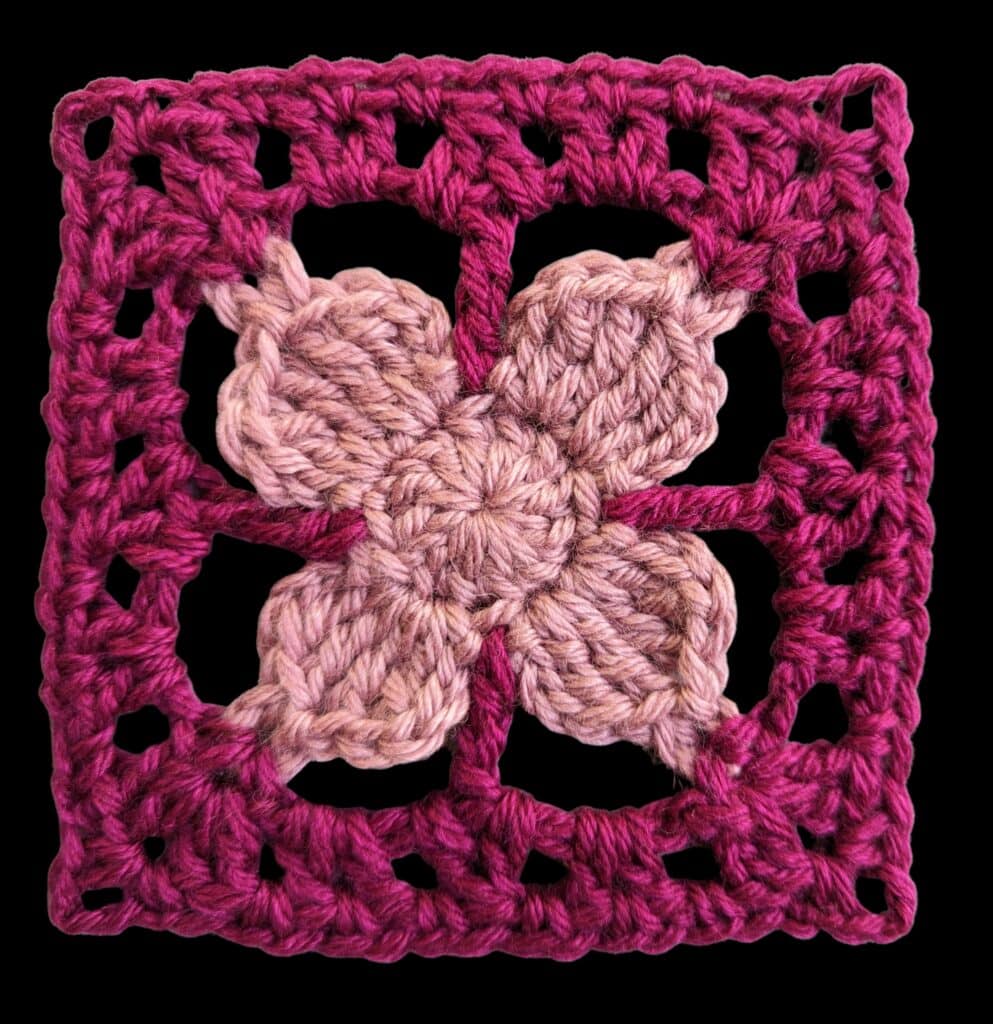
GERANIUM MOTIF
Make 32
With A, make an adjustable ring,
Round 1 (RS): Ch 3 (counts as a dc), dc in ring, [ch 3, 3 dc in ring] 3 times, ch 3, dc in ring, sl st to top of beginning ch, do not turn. Pull adjustable ring closed. (12 dc + 4 ch-3 sps)
Round 2: Ch 3 (counts as dc), dc in next dc, *ch 3, dc in next ch-3 sp, ch 3**, dc in next 3 dc; repeat f rom * around ending at **, dc in last dc, sl st to top of beginning ch, do not turn. (8 ch-3 sps + 16 dc)
Round 3: Ch 3 (counts as dc), dc in next dc, *ch 3, (dc, ch 3, dc) in corner dc, ch 3**, dc in next 3 dc; repeat f rom * around ending at **, dc in last dc, sl st to top of beginning ch, do not turn. (4 corner ch-3 sps + 8 side ch-3 sps + 20 dc)
Round 4: Sl st to next dc, ch 4 (counts as dc + ch-1 sp), dc in next ch-3 sp, ch 1, dc in next dc, ch 1, *(dc, ch 3, dc) in next ch-3 sp, ch 1, dc in next dc, ch 1, dc in next ch-3 sp, ch 1, dc in next dc, ch 1, skip next dc, dc in next dc, ch 1, dc in next ch-3 sp, ch 1, dc in next dc, ch 1;
repeat f rom * 3 times total, (dc, ch 3, dc) in next ch-3 sp, ch 1, dc in next dc, ch 1, dc in next ch-3 sp, ch 1, dc in next dc, ch 1, sl st to 3rd ch of beginning ch, fasten off A. (32 dc + 4 ch-3 sps + 28 ch-1 sps)
Center Embellishment
Note: Sc are worked around the post of the dc, like you are placing and edging on the stitch. The slip stitches are placed at the top of the corner dc around any 2 strands of the stitch. Keep working yarn in front of motif.
Round 5: Join B around top two loops of any corner dc on Round 2 with sl st, *ch 2, ([sc, ch 3] 3 times) around post of next dc, skip 1 dc, ([sc, ch 3] twice, sc) around post of next dc, ch 2, sl st to top of next corner dc; repeat from * around, fasten off, weave in ends.
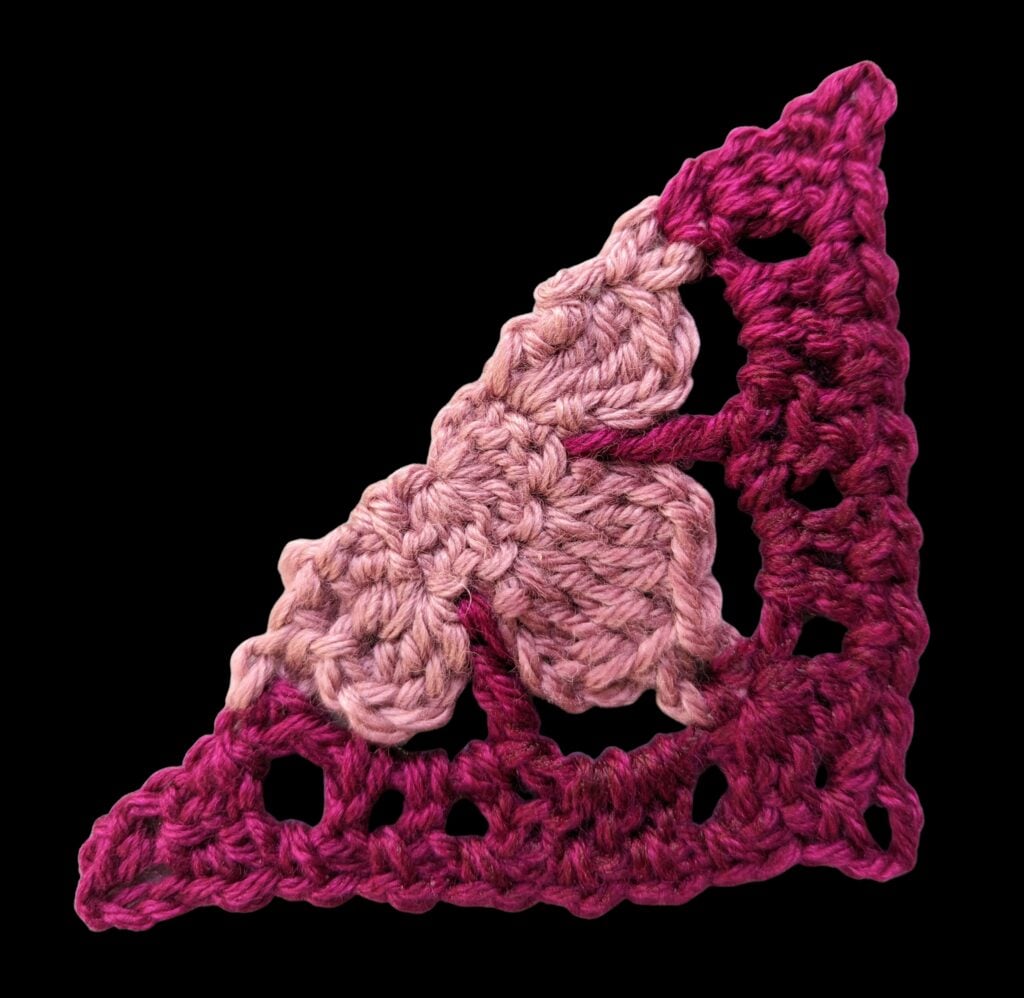
ALSTROEMERIA MOTIF
2. Round 5 is used as the joining round. Most of the motifs will be connected on every side. Only the few at the ends of the shawl will be connected on 3 sides.
Join 18 on all 4 sides, Join 4 on 3 sides
With A, make an adjustable ring,
Round 1 (RS): Ch 3 (counts as a dc), 11 dc in ring, sl st to top of beginning ch, do not turn. Pull adjustable ring closed. (12 dc)
Round 2: Ch 3, 2 tr in same ch as join, *ch 4, sl st to previous tr, (2 tr, ch 3, sl st) in next dc, ch 1, skip 1 dc**, (sl st, ch 3, 2 tr) in next dc; repeat from * around ending at **, sl st to previous join, fasten off A, do not turn. (4 ch-4 sps + 4 ch-1 sps)
Round 3: Join B to any ch-4 sp with sl st, ch 1, *(sc, ch 1, sc) in ch-4 sp, ch 4, tr in ch-1 sp, ch 4; repeat from * around, sl st to first sc, do not turn. (4 corner ch-1 sps + 8 ch-4 sps)
Round 4: Sl st to first ch-1 sp, ch 3 (counts as dc), (dc, ch 1, 2 dc) in same ch-1 sp, *ch 1, 2 dc in next ch-4 sp, ch 1, dc2tog in previous and next ch-4 sp, ch 1, 2 dc in same ch-4 sp (as second leg of dc2tog), ch 1, (2 dc, ch 1, 2 dc) in next ch-1 sp; repeat from * twice more, ch 1, 2 dc in next ch-4 sp, ch 1, dc2tog in previous and next ch-4 sp, ch 1, 2 dc in same ch-4 sp as dc2tog, ch 1, sl st to top of beginning ch, do not turn. (32 dc + 4 dc2tog + 20 ch-1 sps)
Joining on 4 Sides
Round 5: Ch 1, *sc in next dc, ch 1, sl st to ch-3 sp corner of adjacent motif, ch 1, sc in next dc, ch 1, sc in next ch-1 sp, skip 1 ch-1 sp on adjacent motif, sl st to next ch-1 sp on adjacent motif, sc between next 2 dc, ch 1, sc in next ch-1 sp, skip 1 ch-1 sp on adjacent motif, sl st to next ch-1 sp on adjacent motif, sc in next ch-1 sp, ch 1, sc between next 2 dc, skip 1 ch-1 sp on adjacent motif, sl st to next ch-1 sp on adjacent motif, sc in next ch-1 sp, ch 1, skip next dc; repeat from * around, sl st to first sc, fasten off B, weave in ends. (32 sc + 16 sl st joins)
Joining on 3 Sides
Round 5: Ch 1, *sc in next dc, ch 1, sl st to ch-3 sp corner of adjacent motif, ch 1, sc in next dc, ch 1, sc in next ch-1 sp, skip 1 ch-1 sp on adjacent motif, sl st to next ch-1 sp on adjacent motif, sc between next 2 dc, ch 1, sc in next ch-1 sp, skip 1 ch-1 sp on adjacent motif, sl st to next ch-1 sp on adjacent motif, sc in next ch-1 sp, ch 1, sc between next 2 dc, skip 1 ch-1 sp on adjacent motif, sl st to next ch-1 sp on adjacent motif, sc in next ch-1 sp, ch 1, skip next dc; repeat from * twice more, sc in next dc, ch 1, sl st to ch-3 sp corner of adjacent motif, ch 1, sc in next dc, ch 1, sc in next ch-1 sp, ch 1, sc between next 2 dc, [ch 1, sc in next ch-1 sp] twice, sc between next 2 dc, ch 1, sc in next ch-1 sp, ch 1, sl st to first sc, fasten off B, weave in ends. (32 sc + 16 sl st joins)
HALF MOTIF
Notes: 1. See Alstroemeria Motif stitch diagram on page X for assistance.
2. Round 5 is used as the joining round.
Join 18
With A, make an adjustable ring,
Row 1 (WS): Ch 3 (counts as a dc), 7 dc in ring, turn. Pull adjustable ring closed. (8 dc)
Row 2: Ch 8, sl st to 5th ch from hook, skip first dc, (2 tr, ch 3, sl st) in next dc, ch 1, skip next dc, (sl st, ch 3, 2 tr) in next dc, ch 4, sl st to previous tr, (2 tr, ch 3, sl st) in next dc, ch 1, skip next dc, (sl st, ch 3, 2 tr) in next dc, ch 4, sl st to previous tr, tr in top of tch, turn, fasten off A. (3 ch-4 sps + 2 ch-1 sps)
Row 3: Join B with sl st to ch-4 sp, ch 1, 2 sc in first ch-4 sp, ch 4, tr in next ch-1 sp, ch 4, (sc, ch 1, sc) in next ch-4 sp, ch 4, tr in next ch-1 sp, ch 4, 2 sc in last ch-sp, turn. (1 corner ch-1 sps + 4 ch-4 sps)
Row 4: Ch 3 (counts as dc), 2 dc in first sc, ch 1, 2 dc in next ch-4 sp, ch 1, dc2tog over previous and next ch-4 sps, ch 1, 2 dc in previous ch-4 sp, ch 1, (2 dc, ch 1, 2 dc) in ch-1 sp corner, ch 1, 2 dc in ch-4 sp, ch 1, dc2tog over previous and next ch-4 sp, ch 1, 2 dc in previous ch-4 sp, ch 1, 3 dc in last sc, turn. (18 dc + 2 dc2tog + 9 ch-1 sps)
Joining on 4 Sides
Row 5: Ch 1, *sc in next dc, ch 1, sl st to ch-3 sp corner of adjacent motif, ch 1, sc in next dc, ch 1, sc in next ch-1 sp, skip 1 ch-1 sp on adjacent motif, sl st to next ch-1 sp on adjacent motif, sc between next 2 dc, ch 1, sc in next ch-1 sp, skip 1 ch-1 sp on adjacent motif, sl st to next ch-1 sp on adjacent motif, sc in next ch-1 sp, ch 1, sc between next 2 dc, skip 1 ch-1 sp on adjacent motif, sl st to next ch-1 sp on adjacent motif, sc in next ch-1 sp, ch 1, skip next dc; repeat from * once, sc in next dc, ch 1, sl st to ch-3 sp corner of adjacent motif, ch 1, sc in top of tch, fasten off B, weave in ends. (18 sc + 9 sl st joins)
FINISHING
Pin shawl to schematic size, spray with water and allow to dry.
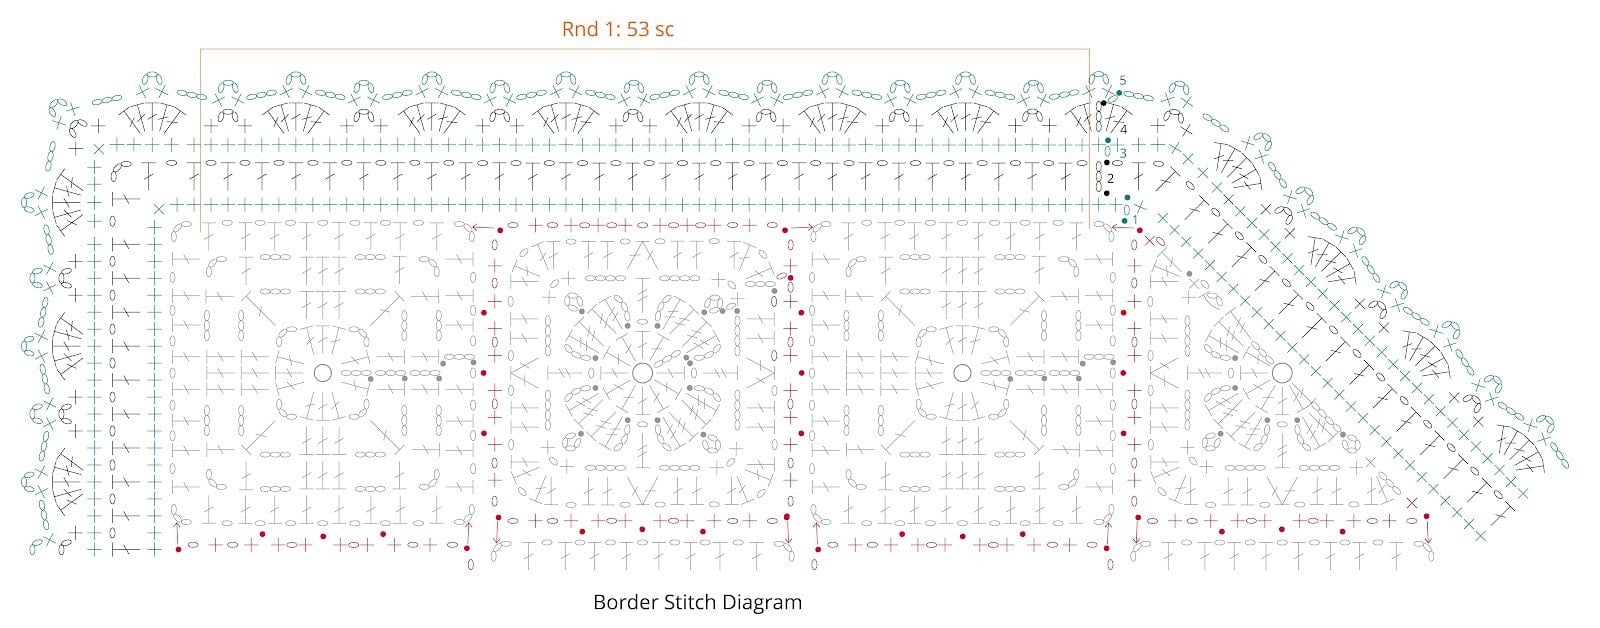
Border
Join B with sl st,
Join B with a sl st at * on Layout in ch-3 corner of Geranium Motif
Round 1 (RS): Ch 1, 2 sc in same ch-3 sp as join, *evenly space 53 sc along diagonal edge of shawl across motifs to ch-3 tip of shawl, 5 sc in ch-3 next ch-3 sp (place marker in 3rd sc of group), evenly space 53 sc along diagonal edge of shawl across motifs to outside corner, 3 sc in ch-3 sp of the Geranium Motif (place marker in 3rd sc), 2 sc in the ch-sp of the Half Motif, evenly space a multiple of 8 sc along edge of Half Motifs to next outside corner, 2 sc in the ch-sp of the Half Motif on the outside Corner (place marker in 2nd sc)*, 2 sc in the ch-3 sp of the Geranium Motif in the outside corner; repeat from * to * around rest of shawl, sl st to first sc, DO NOT TURN. (6 marked stitches – 2 at the tips of the shawl and 4 at the outside corners. 57 stitches between the marked outside corner st and marked tip st. Multiple of 8 + 3 between outside corner marked stitches)
Round 2: Sl st in next sc, ch 4 (counts as dc + ch-1 sp), skip next sc, *[dc in next sc, ch 1, skip next sc] repeat to next marker, (dc, ch 3, dc) in marked st, move marker to ch-3 sp, ch 1, skip next sc, [dc in next sc, ch 1, skip next sc] repeat to next marker, (dc, ch 1, dc) in marked st, move marker to ch-1 sp, ch 1, skip next sc, [dc in next sc, ch 1, skip next sc] repeat to next marker, (dc, ch 1, dc) in marked st, move marker to ch-1 sp, ch 1, skip next sc; repeat from * once more, sl st to 3rd ch of beginning ch. DO NOT TURN.
Round 3: Ch 1, sc in same ch as join, *[sc in next ch-1 sp, sc in next dc] repeat across to marker, 5 sc in marked ch-3 sp, move marker to 3rd sc, sc in next dc, [sc in next ch-1 sp, sc in next dc] repeat across to next marker, 2 sc in marked ch-1 sp, move marker to first sc, sc in next dc, [sc in next ch-1 sp, sc in next dc] repeat across to next marker, 2 sc in marked ch-1 sp, move marker to first sc, sc in next dc; repeat from * once more, sc in next ch-1 sp, sl st to first sc. DO NOT TURN.
Round 4: Ch 3 (counts as dc), 2 dc in same st as join, *[skip next 2 sc, sc in next sc, ch 3, skip next sc, sc in next sc, skip 2 sc, 5 dc in next sc] repeat across to marked st, skip 2 sc, (sc, ch 3, sc) in next st, skip 2 sc, 5 dc in next sc, [skip next 2 sc, sc in next sc, ch 3, skip next sc, sc in next sc, skip 2 sc, 5 dc in next sc] repeat across to 2 sc before marked st, skip next 2 sc, sc in next sc, ch 3, DO NOT SKIP NEXT SC, sc in next sc, skip 2 sc, 5 dc in next sc, [skip next 2 sc, sc in next sc, ch 3, skip next sc, sc in next sc, skip 2 sc, 5 dc in next sc] repeat across to 2 sc before marked st, skip next 2 sc, sc in next sc, ch 3, DO NOT SKIP NEXT SC, sc in next sc, skip 2 sc**, 5 dc in next sc; repeat from * to ** once more, 2 dc in same st as join, sl st to top of beginning ch. DO NOT TURN.
Round 5: Ch 1, (sc, ch 3, sc) in same ch as join, *ch 3, (sc, ch 3, sc) in next ch-3 sp, ch 3, skip 2 dc, (sc, ch 3, sc) in next dc; repeat from * around to last ch-3 sp, ch 3, (sc, ch 3, sc) in last ch-3 sp, ch 3, sl st to first sc. Fasten off.
💖 Want the Printable PDF?
Want to crochet without ads and endless scrolling?
Grab the Fernanda Crochet Motif Shawl ad-free, printable PDF from the Marly Bird Store. It’s perfect if you:
- Like to print and highlight
- Want a clean layout with everything in one place
- Keep your patterns in binders or digital pattern libraries
You can add your direct product link here when it’s ready.
🧶 Related Crochet Shawl Patterns You’ll Love
If Fernanda has you hooked (sorry, I had to 😜), you might also enjoy:
- Lace Crochet Shawl – a gorgeous, airy wrap if you want more lace play
- Free Crochet Shawl Pattern with It’s a Wrap Yarn – another lightweight, drapey favorite
- Celestia Chevron Crochet Shawl – a fingering-weight chevron shawl with fabulous color play
🙋♀️ FAQs: Fernanda Crochet Motif Shawl
Do I have to use DK yarn?
DK-weight yarn will give you results closest to the sample. You can use sport or light worsted, but your motif size and yarn usage will change. Just swatch and adjust!
Is this a good first motif project?
Yes—if you’re an adventurous beginner who’s comfortable with basic stitches and working in the round. The repeats are consistent, and once you’ve made a couple motifs, it starts to feel very intuitive.
Can I make the shawl larger or smaller?
Absolutely. Add or subtract motifs in the layout to customize the wingspan or depth. Just keep the overall triangle shape in mind as you adjust.
Does the yarn have to be wool/silk?
No, but those fibers do give the prettiest drape. You can use acrylic or cotton blends; just know the drape and blocking behavior will be different.
💬 Final Thoughts
The Fernanda Crochet Motif Shawl is one of those pieces that looks like it walked straight out of a boutique window…but you get to say, “Oh this? Yeah, I made it.” 😉
Whether you’re dressing up jeans and a tee, adding drama to a dress, or just wanting to feel a little extra fancy at knit night, Fernanda delivers both comfort and wow-factor.
❤️ Your BiCrafty Bestie,
Marly Bird

Categories: Crochet, Free Patterns, Marly Bird Premium Patterns, Our Free Patterns, Pattern, Uncategorized