Celestia Shawl: Crochet With Fingering Weight Yarn
If your fingering weight yarn stash is starting to look like a tiny-skein rainbow explosion, the Celestia Chevron Crochet Shawl is here to rescue (and justify 😘) all that gorgeous sock yarn.
Affiliate Disclosure: This post contains affiliate links. To learn more please visit my privacy policy here💖
Meet the Celestia Chevron Crochet Shawl
If your fingering weight yarn stash is starting to look like a tiny-skein rainbow explosion, the Celestia Chevron Crochet Shawl is here to rescue (and justify 😘) all that gorgeous sock yarn.
This free easy lacy crochet shawl pattern uses fingering weight yarn in a dramatic chevron lace that looks fancy but is totally doable once you get into the rhythm. It’s perfect for:
- Advent calendar mini hanks
- Hand-dyed sock yarn you’ve been “saving for something special”
- That one skein you loved so much you bought it… and then froze 🧊
You can follow the full pattern for free in this post, or grab the ad-free PDF (with stitch diagram) in the Marly Bird Store if you like your patterns printer-friendly and project-bag ready.
Free pattern? Check.
Yarn stash justification? Double-check.
Let’s play with some chevrons. 💫
Why You’ll Love This Free Easy Lacy Crochet Shawl Pattern
Here’s why the Celestia Chevron Crochet Shawl has such main-character energy:
- Lacy chevron stitch pattern – eye-catching zigzags and open stitches that drape beautifully
- Lightweight but cozy – perfect for transitional weather, cool evenings, or indoor AC battles
- Adventurous beginner friendly – if you’re comfortable with basic stitches and simple decreases, you’re golden
- Mini-skein + leftovers friendly – amazing for scrappy fades, advent sets, and sock yarn leftovers
- Repeat that actually repeats – once you’ve done a few rows, the rhythm kicks in and it becomes a “just one more row…” project 🧶
💡 Designer Tip: If you’re nervous about working with small yarn, start with a solid or tonal color. It’s easier to see your stitches while you’re getting to know the pattern.
Celestia Chevron Crochet Shawl – Free Pattern + Ad-Free PDF
You’ve got options, Bestie:
- The entire Celestia Chevron Crochet Shawl pattern is free right here in this blog post – just scroll to the pattern section below.
- You can also purchase the ad-free PDF in the Marly Bird Store for a cleaner, printer-friendly version that includes the stitch diagram.
Free pattern on the blog or pretty PDF in your project bag – you truly cannot go wrong.
Ad-free PDF:
https://shop.marlybird.com/products/celestia-chevron-shawl
Psst: You can also favorite and queue this pattern on Ravelry to save it for later:
https://www.ravelry.com/patterns/library/celestia-chevron-shawl
How Do You Crochet the Chevron Shawl with Fingering Weight Yarn?
Before we dive deep into the pattern, let’s talk about the yarn for a second – because a lot of crocheters ask:
“What is fingering weight yarn, and is it the same as sock yarn?”
The short version:
- Fingering weight yarn = thin, drapey, beautiful
- Sock yarn = usually fingering weight, but with extra durability (like nylon)
And yes, Celestia is a fabulous way to use both.
💡 Designer Tip: If you’ve been wanting to try fingering weight yarn but feel a little intimidated, a shawl is the perfect place to start. It doesn’t have to “fit” a body the way a sweater does—so you get all the drape and color fun with less stress.
What Is Fingering Weight Yarn?
Fingering weight yarn is also known as:
- “Superfine yarn”
- “Sock yarn”
- “Baby yarn”
- “4-ply” (in some countries)
Depending on where you live (US, UK, Australia, New Zealand), the terminology changes, but the yarn is the same:
A thin, flexible yarn that’s perfect for everyday wear and detailed stitch work.
According to the Craft Yarn Council, fingering falls into Category 1 / Super Fine. It’s:
- Thinner than sport weight
- Thicker than lace weight
That sweet spot means it’s excellent for shawls, light garments, accessories, and of course… socks.
Join our Newsletter
Get Free Crochet & Knitting
Pattern Links & Coupons!

What Is the Difference Between Fingering Weight Yarn and Sock Yarn?
All sock yarn is fingering weight, but not all fingering weight is sock yarn.
- Fingering weight yarn – can be made from many fibers: wool, cotton, blends, etc.
- Sock yarn – usually a blend, often wool + nylon, where the nylon adds durability for high-wear areas (like heels and toes).
So:
- If you’re making socks, look for a yarn specifically labeled “sock yarn” for strength.
- If you’re making shawls, wraps, or garments like Celestia, you can use almost any fingering weight yarn that feels good against your skin and blocks nicely.
💡 Designer Tip: Have a skein of special sock yarn that’s “too pretty for socks”? Celestia is a perfect way to show it off where everyone can see it.
Curious about socks too? Check out the Classic and Colorful Crochet Socks course in the Marly Bird House:
https://www.marlybirdhouse.com/products/courses/view/1110002
Crocheting with Fingering Weight Yarn (a.k.a. Sock Yarn) Made Easy
Crocheting with fingering weight yarn feels different from working with a worsted (#4) or bulky (#5) yarn—but not in a bad way. It’s more like switching from a chunky sharpie to a really smooth gel pen. ✒️
You get:
- Delicate stitch definition – lacy patterns and chevrons really shine
- Lovely drape – especially when blocked
- Lightweight fabric – great for layering and multi-season wear
Yes, it may require a little more attention and patience, but the payoff is gorgeous: a shawl that looks intricate, feels floaty, and wears beautifully.
What Is the Recommended Hook Size for Fingering Weight or Sock Yarn?
As a general rule, fingering weight yarn pairs well with:
- C/2 (2.75 mm)
- D/3 (3.25 mm)
- E/4 (3.5 mm)
The exact hook size depends on:
- The pattern
- Your personal tension
- The fabric you want (denser vs. lacier)
For the Celestia Chevron Crochet Shawl, follow the hook size and gauge listed in the pattern section below, and adjust as needed.
Designers sometimes go up a hook size to get a more open, lacy fabric, or down a size for a denser, warmer fabric. Both are valid—it just depends on the look and feel you want.
❣️ Marly’s favorite hooks for small yarns (larger handles to save your hands): Too Shay Crochet
💡 Designer Tip: When in doubt, grab two hooks—one the pattern suggests, and one a half-size bigger. Swatch with both and see which fabric you like better.
What Is the Best Crochet Gauge for Fingering Weight Yarn?
Gauge in crochet is all about:
- Hook size
- Yarn weight
- Your personal tension
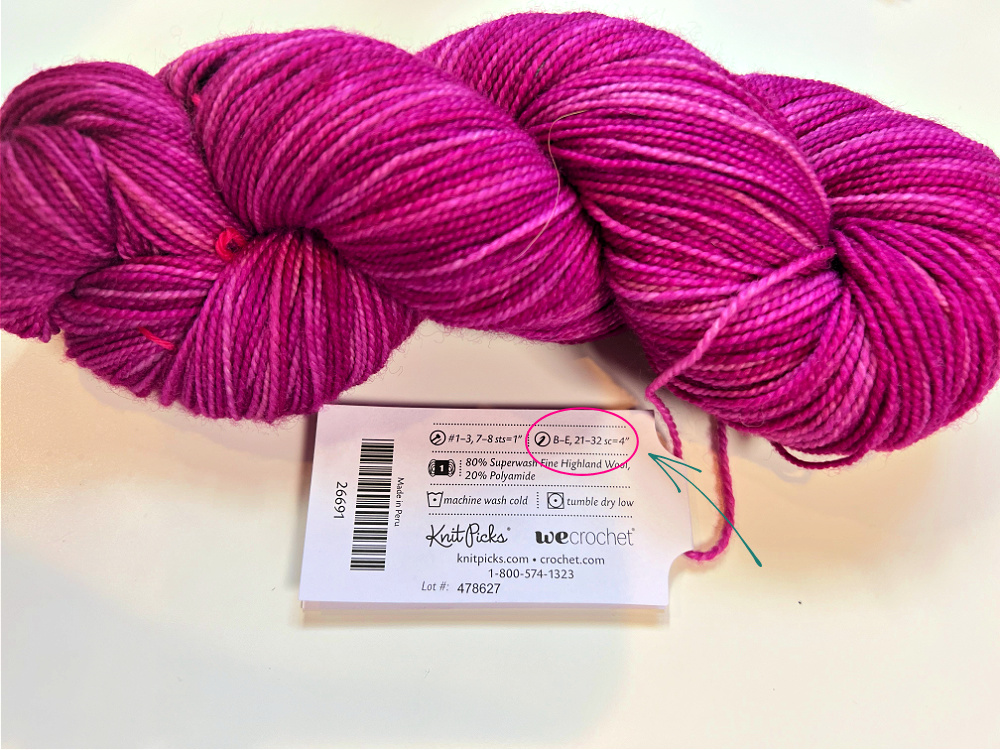
Yarn labels often suggest a general gauge. For fingering weight yarn (CYC #1), typical crochet gauge might be around:
- 21–32 stitches over 4″ using single crochet
- Hook sizes around 2.25 mm – 3.5 mm
But remember: those are guidelines, not laws.
Especially for shawls like Celestia, “best” gauge depends on the fabric you want:
- Looser gauge → more drape, more open lace
- Tighter gauge → denser fabric, slightly smaller shawl
So the real answer to “What is the best gauge?” is:
👉 The one that gives you the fabric you love.
When in Doubt, Make a Gauge Swatch
A little swatching now saves a lot of “why is this so stiff/loose?” later.
To find your gauge:
- Make a swatch in the stitch pattern used in the project (not just plain single crochet).
- Aim for at least 4″ x 4″, but 6″ x 6″ is even better for accuracy.
- Count how many stitches and rows you have over 4″.
- Compare to the pattern gauge.
If you want:
- More drape → go up a hook size
- Denser fabric → go down a hook size
Measuring Your Gauge Swatch
Once your swatch is made:
- Measure it before blocking and jot those numbers down.
- Then wash and block the swatch the way you’ll block your shawl.
- Tutorial: https://youtu.be/Tf_hXkaidFM
- Let it dry completely (I know, waiting is rude, but necessary 😅).
- Measure again after blocking.
💡 Designer Tip: Wet blocking your swatch does double duty—it also tests whether your yarn is colorfast. Better to find out on a 6″ swatch than a full shawl.
Tools that make this easier:
- Blocking mats: https://amzn.to/423DJ7r
- Blocking combs/pins: https://amzn.to/3owkJ3L
- Crochet gauge square: https://shrsl.com/430bm
Place the gauge square in the center of your blocked swatch and count stitches and rows inside the window. Divide by four to get stitches/rows per inch.
Tips for Crocheting with Fingering Weight Yarn
Keeping Tension with a Crochet Hook and Fine Yarn
When you’re working with finer yarns like fingering weight on projects such as crochet shawls, wraps, or lightweight garments, consistent tension is key for:
- A smooth, even fabric
- Nice drape
- A professional-looking finish
To help with tension:
- Choose the right hook size (see above)
- Keep your hand relaxed—no white-knuckle gripping
- Try hooks with larger handles to reduce hand strain
- Pause occasionally and check your stitches to see if you’re creeping tighter or looser over time
💡 Designer Tip: If you’ve made a gauge swatch, keep it nearby. Use the pre-blocked measurements from that swatch to check your fabric as you go.
Benefits of Stitch Markers in Crochet: Keeping Edges Straight, Stitch Count, and More
Stitch markers are like tiny, colorful traffic cones for your crochet. 🚧
They’re especially helpful with:
- Chevron patterns (like Celestia)
- Long rows in shawls and wraps
- Areas with regular increases or decreases
You can use removable stitch markers to:
- Mark edges so your sides stay straight
- Highlight increase and decrease points in the chevron pattern
- Keep track of pattern repeats over long rows
Video about removable stitch markers:
https://youtu.be/Sqi2gpfgsvw
Favorite stitch markers:
https://amzn.to/3oDX5SS
Marly’s favorite stitch to pair with markers: the Stacked Double Crochet
https://marlybird.com/blog/how-to-crochet-a-stacked-double-crochet/
Stitch Markers for Edges
For shawls like Celestia, neat edges make a huge difference.
You can:
- Place a marker in the first and last stitch of each row
- Mark special points like the center of a chevron
This helps:
- Keep your stitch count on track
- Prevent accidental increases/decreases at the edges
- Give you that crisp, straight border that looks so good after blocking
The Beauty of Blocking a Crochet Project
You’ve nailed your tension. You’ve used your markers. You’ve woven in your ends. Now it’s time for the magic step: blocking. ✨
Blocking is especially important for:
- Lace patterns
- Chevron designs
- Fingering weight shawls (hi Celestia 👋)
Blocking:
- Opens up the lace
- Sharpens points and chevrons
- Evens out your stitches
- Helps your shawl lie beautifully on the body
Basic Instructions for Blocking Crochet
Yes, you can block acrylic, but it behaves differently than wool. For wool and wool blends, traditional wet-blocking is often best. For acrylics, you’ll usually want gentle steam.
Video on blocking acrylic:
https://youtu.be/lJnH4DD75zI
You’ll need:
- A sink or basin
- Wool wash or gentle detergent: https://amzn.to/3qbCfuL
- Blocking mats/boards: https://amzn.to/4257zZq
- Rust-proof pins or blocking combs: https://amzn.to/3BWIa9K
- Towels
(Yes, these are the same tools you used for your gauge swatch—look at you being prepared. 😉)
Blocking Crochet – Step by Step
- Fill a sink/basin with lukewarm water and a little wool wash.
- Gently immerse your crochet project and let it soak 15–20 minutes.
- Drain the water and press out excess moisture (do not wring or twist).
- Lay the project on a towel, roll it up, and press again to remove more moisture.
- Lay out your blocking mats on a flat surface.
- Arrange your shawl on the mats, shaping to the desired measurements.
- Pin edges and points with T-pins or blocking combs.
- Allow to air dry completely.
- Remove pins and admire how fancy your stitches look now.
By the way, there’s an exclusive blocking video from the BiCrafty Games course in the Marly Bird House that walks through this visually, and I’ve made it available here for free:
https://youtu.be/Tf_hXkaidFM
Caution When Blocking
⛔ A quick warning: Some yarns bleed when exposed to water.
To test:
- Wet a small swatch or a tiny corner of your work.
- Press it onto a white cloth or towel.
If color transfers:
- Avoid full wet-blocking
- Consider steam blocking instead
If it doesn’t bleed, you’re good to go with wet blocking.
Does Color Choice Matter When Crocheting with Fingering Weight Yarn?
Most of the time, with fingering weight yarn, we’re focusing on:
- Stitch detail
- Lace pattern
- Overall fabric and drape
But color can absolutely make a difference in terms of visibility and ease of stitching, especially for:
- Beginners
- Crocheters with low vision
- Very detailed stitch patterns
For beginners, high-contrast colors (and avoiding very dark yarn at first) can make stitches easier to see.
Solid or Variegated?
Both can be beautiful, but they behave differently:
- Variegated yarns – amazing visual effects, color pooling, and shifting tones
- Check out color pooling basics here:
https://marlybird.com/blog/basics-of-planned-pooling-crochet/
- Check out color pooling basics here:
- Solid or tonal yarns – show stitch definition more clearly, which is wonderful for lace and chevrons
If your main goal is to make the stitch pattern the star, solid or tonal yarns are often the best choice. If you want the color story to be the star, variegated is a blast.
Ultimately, your yarn, your rules. 💁♀️
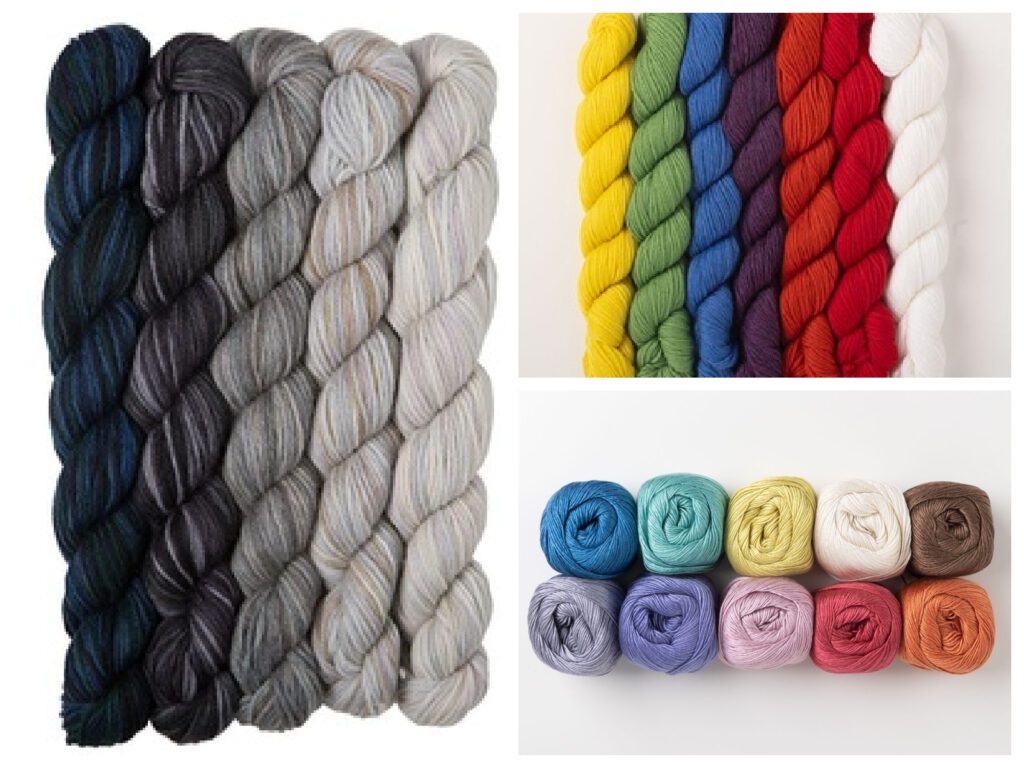
High Contrast and Grayscale Color Yarn
For crocheters with low vision, high-contrast colors or grayscale combinations can make a huge difference.
- Bold pairs (like black/white or bright/high-contrast combos) make stitches easier to see
- Grayscale or neutrals can give subtle contrast that’s easier on the eyes
Choosing high-contrast or grayscale fingering-weight yarns can:
- Make counting stitches easier
- Reduce eye strain
- Increase confidence and enjoyment in the project
What Is the Best Fingering Weight Yarn?
The honest answer: it depends on budget, fiber preference, and what you’re making.
For Celestia and similar shawls, here are some great options:
- Budget-friendly:
- WeCrochet Hawthorne: https://shrsl.com/42jwl
- WeCrochet Stroll: https://shrsl.com/430s2
- More WeCrochet fingering yarns: https://shrsl.com/430s7
- “Treat yourself” options:
💡 Designer Tip: Whatever yarn you choose, make a small swatch, block it, and wear it against your neck for a few minutes. If it feels great there, it will feel great as a shawl.
Sock Yarn for More Than Just Socks!
Sock yarn is usually fingering weight and designed to be:
- Durable
- Smooth
- Comfortable next to the skin
It’s fantastic for socks—but it can do so much more:
- Shawls
- Wraps
- Scarves and cowls
- Baby garments
- Lightweight sweaters
- Home decor
- Amigurumi and toys
Sock Yarn Project Suggestions
Here are a few idea categories where sock yarn shines:
- Crochet Shawls and Wraps
- Lightweight, elegant, and drapey
- Beautiful for lacework and chevron patterns
- Example: Lots of lace shawl inspiration here:
https://marlybird.com/blog/lace-crochet-shawl/ - Another wrap idea:
https://marlybird.com/free-crochet-patterns/free-crochet-patterns-chevron-waves-lacy-wrap/
- Crochet Scarves and Cowls
- Airy but warm
- Choose solids or variegated colorways for interest
- Fun cowl pattern:
https://marlybird.com/closing-time-cowl/ - More lacy patterns to explore:
https://brianakdesigns.com/crafting-your-way-to-the-best-lacy-crochet-patterns/
- Baby Garments and Accessories
- Soft, drapey, easy to layer
- Great for lightweight sweaters, hats, and booties
- Home Decor
- Accent blankets, decorative pillows, and more
- Example:
https://www.ravelry.com/patterns/library/coral-story-blanket
- Amigurumi and Toys
- Strong and smooth yarn = toys that can handle love and play
- Tons of patterns here:
https://www.ravelry.com/patterns/search#craft=crochet&weight=light-fingering&pc=toysandhobbies&sort=best&view=captioned_thumbs
Sock yarn is one of those “do everything” yarns once you decide it doesn’t have to be just for feet. 😉
Make a Show-Stopping Celestia Chevron Shawl with This Free Easy Lacy Crochet Shawl Pattern
Ready to stitch? Let’s talk specifics.
Celestia is:
- Worked in chevron lace using multiple colors of fingering weight yarn
- Designed as a long, wrap-style shawl with tassels at the corners
- A great canvas for fades, minis, or colorplay
You can purchase the ad-free PDF pattern here:
https://shop.marlybird.com/products/celestia-chevron-shawl
Or keep scrolling for the full free pattern below.
And don’t forget to favorite/queue on Ravelry:
https://www.ravelry.com/patterns/library/celestia-chevron-shawl
SKILL LEVEL
Adventurous Beginner
MEASUREMENTS
Finished Measurements
Shawl is 18.5” [47 cm] wide by 74” [188 cm] long.
Gauge
28 sts (2 chevrons) x 12 rows in stitch pattern = 5.25” [13.5 cm] x 4.25” [11 cm]; use any size hook to obtain the gauge.
MATERIALS
Yarn
WeCrochet, Hawthorne Fingering Weight (80% superwash fine highland wool/ 20% polyamide, 357 yds / 326 m, 3.5 oz/ 100 g, CYCA# 1 lace):
Color A: #28626 Equinox Kettle Dye, 3 hanks
Color B: #26693 Poseidon Kettle Dye, 1 hank
Color C: #26693 Daphne Kettle Dye, 1 hank
Color D: #28625 Turkish Delight Kettle Dye, 1 hank
Color E: #28624 Nymph Kettle Dye, 1 hank
Hook
Size E/4 [3.5 mm]
Notions
- Stitch markers: https://amzn.to/41hcAOv
- Tapestry needle: https://amzn.to/3mn7t0r
- Blocking mats and blocking pins: https://amzn.to/3MzcFc0
- Spray water bottle for blocking (optional)
CROCHET ABBREVIATIONS
Ch – Chain(s)
Dc – Double Crochet
Dc2tog – Double Crochet Two Together
Dc3tog – Double Crochet Three Together
Sc – Single Crochet
Sc2tog – Single Crochet Two Together
Sc3tog – Single Crochet Three Together
Sp(s) – Space(s)
St(s) – Stitch(es)
Tch – Turning Chain
Tr – Treble Crochet
Tr2tog – Treble Crochet Two Together
Tr3tog – Treble Crochet Three Together
WS – Wrong Side
SPECIAL STITCHES
⭐️ Single Crochet 2 Together (sc2tog):
*Insert hook into indicated stitch, yarn over and pull up a loop; repeat from * in next stitch indicated, yarn over and draw through all 3 loops on hook.
⭐️ Single Crochet 3 Together (sc3tog):
*Insert hook into indicated stitch, yarn over and pull up a loop; repeat from * in next 2 stitches indicated, yarn over and draw through all 4 loops on hook.
⭐️ Double Crochet 2 Together (dc2tog):
*Yarn over hook, insert hook into indicated st, yarn over and pull up a loop, yarn over and draw through 2 loops on hook; repeat from * in next st indicated, yarn over and draw through all 3 loops on hook.
⭐️ Double Crochet 3 Together (dc3tog):
*Yarn over hook, insert hook into indicated st, yarn over and pull up a loop, yarn over and draw through 2 loops on hook; repeat from * in next 2 sts indicated, yarn over and draw through all 4 loops on hook.
⭐️ Treble Crochet 2 Together (tr2tog):
*Yarn over hook twice, insert hook into indicated st, yarn over and pull up a loop, [yarn over and draw through 2 loops on hook] twice; repeat from * in next st indicated, yarn over and draw through all 3 loops on hook.
⭐️ Treble Crochet 3 Together (tr3tog):
*Yarn over hook twice, insert hook into indicated st, yarn over and pull up a loop, [yarn over and draw through 2 loops on hook] twice; repeat from * in next 2 sts indicated, yarn over and draw through all 4 loops on hook.
STITCH DIAGRAM
Only available in the Ad-Free PDF. Upgrade here:
https://shop.marlybird.com/products/celestia-chevron-shawl
NOTES
- Do not turn after working Color A and stay on the RS. Join a new color on RS in the first stitch of Color A row.
- Make shawl to any length that you desire. You will need to order additional hanks of A if you want a longer shawl.
- Tassels are optional.
VIDEO TUTORIALS
- Weaving In Ends >> https://www.youtube.com/watch?v=8_NBGUKjO-E
- Blocking >> https://youtu.be/lJnH4DD75zI
- Reading Crochet Stitch Diagrams >> https://youtu.be/fJvO9WwGAUU
GROW
To Unlock Exclusive Subscriber Content click the Box below and join for free by simply adding your email and creating a password! If you are having troubles, clear your cache or reset your password or login to the Grow Publisher Portal.
>> Learn More About Grow Here <<
I'm thrilled to share this amazing pattern with you, many patterns on my blog are absolutely free! I kindly request that you don't copy and paste or distribute this pattern. Prefer an ad-free experience? Buy a digital PDF pattern for a small fee from one of my online stores for a seamless crafting journey.
I appreciate your support and readership. You are the reason I can keep doing what I love and sharing it with others. So, thank you from the bottom of my yarn-loving heart! Disclosure: This post contains affiliate links, meaning I get a commission if you decide to make a purchase through my links at no cost to you.
Celestia Chevron Crochet Shawl Pattern || Free Easy Lacy Crochet Shawl Pattern
Chain 102 with color A.
Row 1: Tr in 5th ch from hook, *tr in next 5 ch, 3 tr in next ch, tr in next 5 ch, tr3tog over next 3 ch; repeat from * across to last 13 ch, tr in next 5 ch, 3 tr in next ch, tr in next 5 ch, tr2tog over last 2 ch, fasten off color A. Do not turn — 99 sts.
Row 2: Join color B to first st of previous row, sc2tog over first sc and space between prev and next st, [sc in space between prev and next st] 6 times, sc in next st, [sc in space between prev and next st] 6 times*, sc2tog in space between prev and next 2 sts; repeat from * across ending at ** at last st, sc2tog in space between prev and last st and in last st, turn.
Row 3: Ch 2, skip first st, dc in next sc, [ch 1, skip next sc, dc in next sc] twice, ch 1, skip next sc, (dc, ch 1, dc) in next sc, [ch 1, skip next sc, dc in next sc] twice, ch 1, skip next sc*, dc3tog over next 3 sc; repeat from * across ending at ** in last 2 sts, dc2tog over last 2 sts, turn.
Row 4: Ch 1, sc2tog over first st and next ch-1 sp, [sc in next dc, sc in next ch-1 sp] twice, sc in next dc, 3 sc in next ch-1 sp, [sc in next dc, sc in next ch-1 sp] twice, sc in next dc*, sc3tog over next (ch-1 sp, st, ch-1 sp); repeat from * across ending at ** in last ch-1 sp, sc2tog over last ch-1 sp and last st, fasten off color B. Do not turn.
Row 5: Join color A to first st on previous row, ch 3 (does not count as a st), tr in next sc, tr in next 5 sc, 3 tr in next sc, tr in next 5 sc*, tr3tog over next 3 sc; repeat from * across ending at ** at last 2 sc, tr2tog over last 2 sc, fasten off color A. Do not turn.
Repeat Rows 2–5 51 more times or to desired length change color in following order: C, A, D, A, E, A, B, A
FINISHING
Edging
Join color A to any corner, sc evenly along the long edge. Fasten off, weave in the ends. Repeat on the opposite side.
Blocking
Weave in all ends.
Option 1: Pin shawl to schematic size, spray with water and allow to dry.
Option 2: Wet block shawl as demonstrated in video tutorial. Pin to schematic size and allow to dry.
Tassels
Make 4 tassels, one with each Color B, C, D, and E. Join to each corner.
FAQs: Celestia Chevron Crochet Shawl
Is this crochet shawl pattern beginner friendly?
I call this Adventurous Beginner. If you’re comfortable with chains, single crochet, double crochet, treble crochet, and basic decreases (2-together, 3-together), you’re ready. The repeat looks fancy, but once you’ve worked it a few times, it flows.
Can I make the shawl longer or shorter?
Yes! You can customize the length by repeating the main section more or fewer times. Just remember: more repeats = more yarn. If you’re going longer, grab an extra hank of Color A to be safe.
Do I have to use fingering weight yarn?
Fingering weight gives the light, floaty drape I designed for. You can experiment with sport weight, but it will change the size and feel. Always swatch first and make sure you love the fabric.
Can I use just one color instead of several?
Absolutely. Celestia looks stunning in a single solid or tonal color. The lace chevrons will really pop.
How should I block my Celestia Shawl?
Wet block for wool and wool blends, or use gentle steam for acrylic. For step-by-step blocking instructions, see:
https://youtu.be/lJnH4DD75zI
and
https://youtu.be/Tf_hXkaidFM
Final Thoughts
The Celestia Chevron Crochet Shawl is one of those projects that looks “store bought” in the best possible way—but you get all the stitching satisfaction of making it yourself. 🥰
It’s:
- Relaxing without being boring
- A fabulous use of fingering/sock yarn
- A great skill-stretcher for adventurous beginners
Whether you’re dressing up a simple tee and jeans, layering over a sundress, or wrapping up for a cool evening, Celestia is ready to be your new “grab it on the way out the door” shawl.
When you finish yours, please share it so I can cheer you on:
- Tag me on Instagram: @themarlybird
- Use the hashtags #mmmdi and #marlybird
- Share your pics in the Marly’s Minions: Marly Bird BiCrafty Community on Facebook
Now go grab that gorgeous yarn you’ve been saving and give it the chevron moment it deserves. 💖🧶
❤️ Your BiCrafty Bestie,
Marly Bird