Search
Close
  • The Pattern Shop
  • Our Free Patterns
    • Browse All Our Free Patterns
    • Our Free Knitting Patterns
    • Our Free Crochet Patterns
  • Blog
    • All Blog Posts
    • All Free Patterns
    • Dibble Dabble Inspiration
    • Giveaways
    • Make-Alongs
    • Product Reviews
    • Roundups
    • Tips, Tricks, Techniques for Knitting and Crochet
Stylized bird with pink and gray swirling tail above elegant โ€œMarlyโ€ text, logo for crochet accessories and home decor.
  • Marly Bird House
  • Learn to Knit & Crochet
    • Newbie? Start Here
    • Video Tutorials
    • Knitting Definitions
    • Crochet Definitions
    • Common Techniques
    • Size Charts for Knitting and Crochet Projects
  • About
ร—
  • The Pattern Shop
  • Free Patterns
  • Blog
  • Marly Bird House
  • Learn to Knit & Crochet
    • Newbie? Start Here
    • Video Tutorials
    • Knitting Definitions
    • Crochet Definitions
    • Common Techniques
    • Size Charts for Knitting and Crochet Projects
  • About
Stylized bird with pink and gray swirling tail above elegant โ€œMarlyโ€ text, logo for crochet accessories and home decor.
Search
Close

New Patterns NOW Available in Ad-Free PDF! Check out The Pattern Shop

Free Crochet Cowl Pattern Effortless

January 9, 2015 By admin Leave a Comment


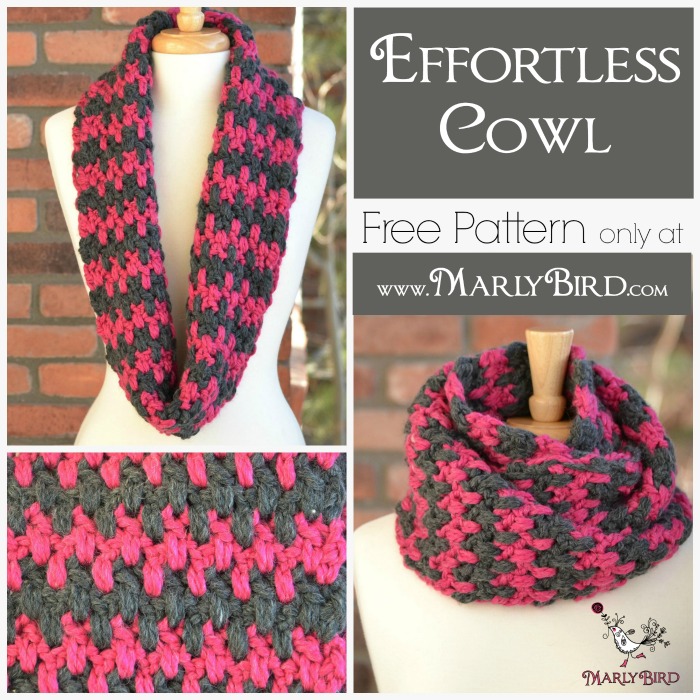
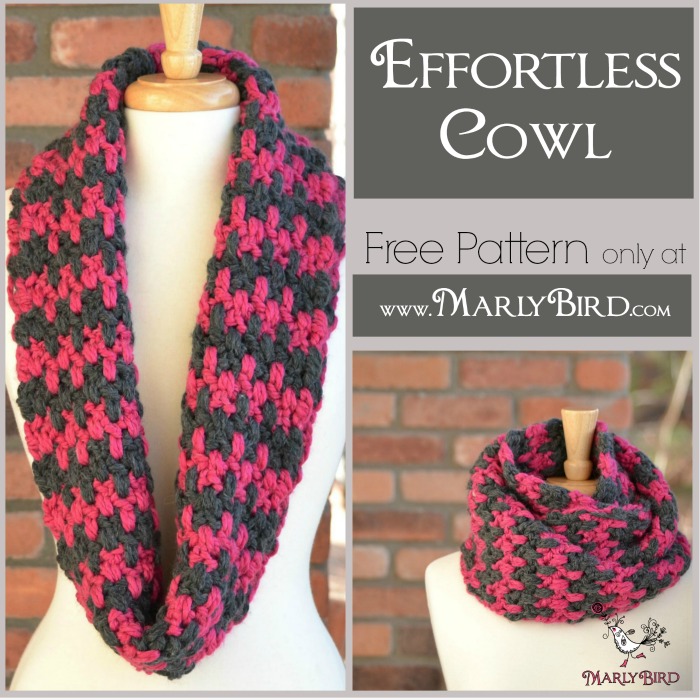
FREE Crochet Cowl Pattern, Effortless, by Marly Bird. A longer length cowl worked in double crochet linen stitch and 2 colors of yarn. Sample shown in dark grey and bright pink.

The Free Crochet Cowl Pattern, Effortless!ย ย You can make it with one skein of super bulky yarn in each of two colors. Use a large crochet hook too, and it's a quick, fun project. From the moment I finished this project, I've wanted to wear it 24/7. As a matter of fact, I did wear it out the same day I finished it. It brought me a TON of compliments.

If you're looking for a quick project with lovely yarn, don't look any further! With a little direction along the way, you'll have this finished in no time flat. You can't go wrong with the written instructions and the HD YouTube Tutorial for the Long Double Crochet Linen Stitch.

[Read more…]
Filed Under: Crochet, Our Free Patterns, Pattern, Uncategorized, YouTube Video Tutorial

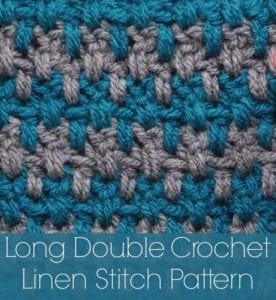
Long Double Crochet Linen Stitch Pattern

January 8, 2015 By admin 1 Comment

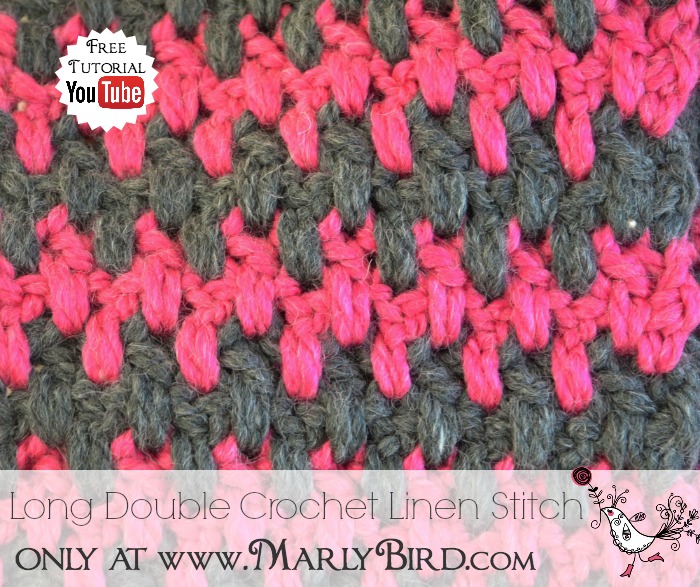
The long double crochet linen stitch pattern is a fun pattern that is easy to follow, reversible and perfect for men, women, boys and girls. The great part about this stitch pattern is that you can get a completely different look if you decide to use one color throughout, change colors every two rows, or change colors every row!

What makes this pattern look so unique is the placement of the stitches one row below the last row worked. 

Long Double Crochet Linen Stitch Pattern Tutorial and FREE Pattern at www.MarlyBird.com

The long double crochet stitch (Ldc)  is made in the row below This might seem confusing but once you see it in the HD YouTube Video Tutorial I‘ve done for you it will be a piece o' cake!

In the crochet Long Double Crochet Linen Stitch Pattern video I teach you how to do this fun new stitch that can be used in any accessory or garment. As a matter of fact, I've already done a super cute cowl pattern using this stitch pattern that I want to offer to you for FREE!

That's not all! I've also designed a new cowl Effortless that is absolutely FREE!

Affiliate Disclosure: This post contains affiliate links. To learn more please visit my privacy policy here๐Ÿ’–


Effortless Cowl Pattern Free at www.MarlyBird.com

Free Pattern + Free Instructional Video = Success!


Long Double Crochet Linen Stitch Pattern

Yarn

Any yarn will work for this project. To get the chevron look use at least two colors.

The sample in the video is made using Red Heart, “With Love” (100% acrylic, 315 yds/170g) —

Hook

6 mm (Marly uses Addi Crochet Hooks)

Notions

Removable Stitch Markers

Long Double Crochet Linen Stitch Pattern YouTube Tutorial and FREE PATTERN by Marly Bird. www.MarlyBird.com

Stitches Used (and YouTube Video links to help you learn)

    • Chain Stitch (ch)
    • Half Double Crochet (hdc)
    • Extended Half Double Crochet (Exhdc) –this stitch is optional.
    • Double Crochet (dc)
    • Changing Colors

Special Stitch Guide

Long Double Crochet (Ldc): Work a double crochet (dc) in the st indicated one row below the previous row worked. This stitch will be worked around the previous row worked.

Pattern Stitch

One Color Option:

To complete this stitch pattern you will need to chain a multiple of 2 chains. The sample in the video used 10 chains (ch).

Foundation Row 1:  Double crochet (dc) in fourth ch from hook (3 skipped chs count as the first dc), * ch 1, skip next ch, dc in next ch; rep from * to end.

Row 2: Ch 2 (counts as first hdc), turn; Long Double Crochet (Ldc) in space (sp) below the next ch, ch 1, * skip next st, Ldc in skipped st one row below next ch, ch 1; repeat from * across to last 2 sts, skip last st, hdc in last st.

Row 3: Ch 2 (counts as first hdc), turn; Ldc in dc below the next ch, ch 1, * skip next st, Ldc in dc one row below next ch, ch 1; repeat from * across to last 2 sts, skip last st, hdc in last st.

Repeat row 3 for the pattern to last row.

Last row: Ch 1, turn; sc in first st, Ldc in skipped st one row below next ch, *sc in next st, Ldc in skipped st one row below next ch; repeat from * across to last 2 sts, sc in last 2 sts; finish off.

To use more than one color: 

To complete this stitch pattern you will need to chain a multiple of 2 chains. The sample in the video used 10 chains (ch).

Foundation Row 1:  Double crochet (dc) in fourth ch from hook (3 skipped chs count as the first dc), * ch 1, skip next ch, dc in next ch; rep from * to end.

Row 2: Ch 2 (counts as first hdc), turn; Long Double Crochet (Ldc) in space (sp) below the next ch, ch 1, * skip next st, Ldc in skipped st one row below next ch, ch 1; repeat from * across to last 2 sts, skip last st, hdc in last st.

Time to change colors–

There are several options for you if you want to change colors–

  1. Finish off your work here and rejoin with a new color using a standing half-double crochet. This method will create a tail for each color change that will need to be tucked in when finished.  
  2. Finish off your work here and rejoin with a new color using a slip stitch join then proceed with the instructions. This method will create a tail for each color change that will need to be tucked in when finished.
  3. You can change color to next color on last stitch of row, cut the old color and when it is time to rejoin with a new color repeat the process. This method will create a tail each color change that will need to be tucked in when finished.
  4. You can change color to next color on last stitch of row, leave the old color hanging out and when it is time to rejoin with a new color float the old color up the side of the work to use it. Then continue on in pattern leaving the new old color just hanging out. This is my preferred method and it is the one I show you in the youtube video. This method will create a float at each color change along the side that can be hidden with a little trim.

Once you've decided how you will change colors you carry on in pattern which is SUPER SIMPLE!

Next 2 rows: Ch 2 (counts as first hdc), turn; Ldc in dc below the next ch, ch 1, * skip next st, Ldc in dc one row below next ch, ch 1; repeat from * across to last 2 sts, skip last st, hdc in last st.

Repeat the last 2 rows for the pattern and changing colors every two rows. Continue to until desired length and work the last row.

TIP: Since you are using two colors for this swatch the opposite color of yarn will be waiting for you at one end signalling that it is time to change colors. You can carry the yarn up the side creating floats, or cut the yarn color each time and join a new ball of yarn.

Last row: Ch 1, turn; sc in first st, Ldc in skipped st one row below next ch, *sc in next st, Ldc in skipped st one row below next ch; repeat from * across to last 2 sts, sc in last 2 sts; finish off.

Thatโ€™s it! Now, go and make something fun! Don't forget the FREE PATTERN for the Effortless Cowl 


Frequently Asked Questions

What is the linen stitch in crochet?

The linen stitch (also called the woven stitch or granite stitch in some traditions) creates a fabric that looks remarkably like woven linen cloth. It alternates single crochet stitches and chain stitches in a staggered pattern, creating a tight, dense fabric with a textured woven appearance. The “long double crochet” variation uses taller stitches for the main stitch components, creating a slightly looser, more airy version of the same woven look. It's one of those stitches that produces a fabric that looks much more complex than it is.

Is the linen stitch beginner-friendly?

Yes! If you can single crochet and chain, you can do the linen stitch. The alternating sc and ch-1 pattern is very consistent and becomes rhythmic quickly. The slight complexity is in the offset of the pattern on each row (you're always working into the chain spaces of the row below, not into the stitches), but that clicks quickly once you see the fabric developing. The long double crochet variation is slightly more complex since you're working a taller stitch, but it's still very accessible for advanced beginners.

What projects work best with the linen stitch?

The woven, cloth-like quality of the linen stitch makes it perfect for items that benefit from that fabric-like appearance. Bags and totes look incredibly polished and intentional in linen stitch. Market bags and project bags. Pillow covers with a textured surface. Kitchen items like dish towels and pot holders. The fabric has good body and structure for bags. For wearables, it creates a lovely, smooth fabric for tops and light garments. The texture reads as sophisticated rather than “obviously crocheted” which appeals to crafters who want their work to look more textile-like.

What yarn is best for linen stitch projects?

Smooth yarn with good stitch definition! The woven look depends on each stitch sitting cleanly in its position… fuzzy yarn blurs that precise placement. Cotton and linen-cotton blends are particularly beautiful choices for the linen stitch because the natural fiber and the woven stitch pattern visually reinforce each other. DK or worsted weight creates a firm, substantial fabric ideal for bags. Lighter weights create more delicate fabric for garments. Avoid very stretchy yarns that would make the fabric too elastic and lose the clean woven quality.

How is the linen stitch used in planned pooling?

The linen/granite stitch is THE classic stitch for planned pooling! The sc and ch-1 alternation in the linen stitch creates the perfect stitch structure for color pooling… the chain spaces between stitches help colors line up in specific diagonal patterns when combined with the right magic number for your yarn's color repeat. If you want to try planned pooling argyle or plaid effects, learning the linen stitch is your first step. Marly has dedicated posts on planned pooling that specifically teach the linen/granite stitch as the foundation technique.

Filed Under: Crochet, Our Free Patterns, Pattern, Tips, Tricks, Techniques for Knitting and Crochet, Uncategorized, YouTube Video Tutorial

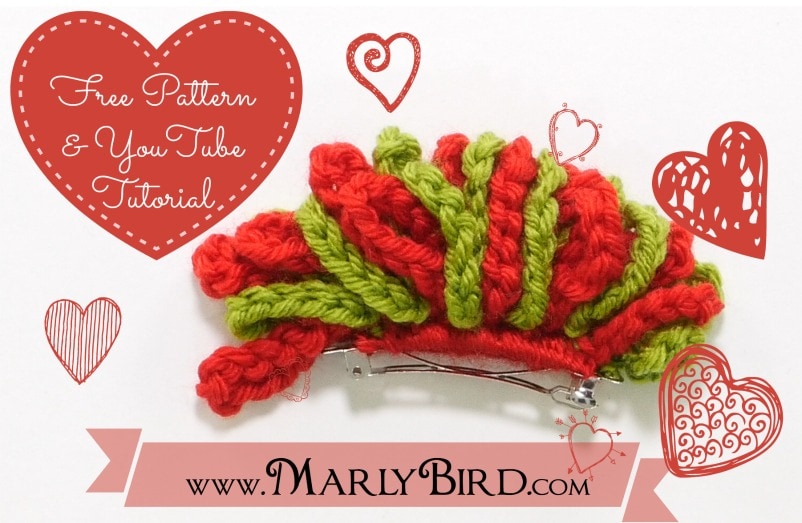
Free Crochet Pattern Holiday Barrette

December 12, 2014 By admin Leave a Comment

This free crochet pattern Holiday Barretteย is a great quick project for any crocheter! Using less than 100 yds of yarn in any color used in the project this project is not only quick but cheap to make! Make these barrettes for the little girl in your life ๐Ÿ™‚

There is even a YouTube video taught by Marly with a few tips an tricks to help you make the perfect barrette!

Gentle reminder: ย It has just come to my attention that many people are unaware thatย free patterns still have copyrightsย and it is not legal to distribute. I ask that if you like the pattern and want to tell your friends that you share the link to the pattern (found here:ย https://marlybird.com/free-crochet-pattern-little-girl-barretteย ). By doing so you are allowing me to make a little money via advertising which in turn makes it possible for me to keep designing fun and free patterns.

Thanks so much!


*Disclaimer: this post includes affiliate links**

Crochet hair clip in red and green, featuring textured ruffles, with decorative heart graphics and tutorial information.

Holiday Barrette

PATTERN DETAILS

Yarn

Any yarn will work for these but here are some of my favorites:

Brown Sheep, โ€ Nature Spun Worstedโ€(100% wool, 245 yds/100g). (Use this link for 25% discount!)

Cascade, โ€œ220 Superwash Sportโ€ (100% superwash merino wool, 136.7 yds/50g). (Use this link for 30% discount!)

Cascade, โ€œUltra Pinaโ€ (100% pima cotton, 220 yds/100g). (Use this link for 25% discount!)This is a cotton yarn that I can endorse! The shimmer of this cotton will make the mittens look lovely!

Lion Brand, โ€œWool-Easeโ€ (80% acrylic, 20% wool, 197 yds/85g) (Use this link for 30% discount!)

Lion Brand, โ€œAmazing Yarnโ€ (53% wool, 47% acrylic, 147 yds/50g). (Use this link for 35% discount!) This yarn will give the garland and completely unique look as the yarn has wonderful long color changes so your mittens will look Amazing!

Hook

Use a hook that will get you the size mitten you want. For the sample I used an H/8 (5m) (Marly uses Addi Crochet Hooks)

Notions

  • Barrette
  • Tapestry Needle

Stitches Used (and YouTube Video links to help you learn)

  • Chain Stitchย (ch)
  • Single Crochet (sc)

PATTERN

Open the metal barrette and remove the center metal spring.

With any color sc around the body of the barrette. You will do as many single crochets as you need to cover the entire barrette.

NOTE: make sure your stitches do not disrupt the function of the barrette.

Once you have as many stitches put the metal spring back in place so you don't lose it. Now let's make some fringe!

Chain 10 (or more if you want it bigger, fluffier, more dramatic), then join in the back loop of the single crochet with a slip stitch. Chain 10 and join in the front loop of the next single crochet. Continue doing the chains and alternating the back loop and front loop to stagger the loops until all the sc around the barrette are used.

When all the single crochets are used you can change colors or continue on with the same color.

(If you change colors join with a slip stitch) chain 10 (or more or less) turn the barrette and working back along the barrette and * working ย into the open loops of the single crochet ย join with a slip stitch then chain 10 and repeat from * ย until all the single crochets are used.

Finish off.

Weave in ends.


Hmm, as I write these instructions I'm noticing how hard it is to explain how to do this. How about a video. Will that help?

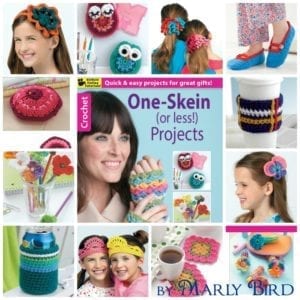
I love making quick projects and even wrote a leaflet with Leisure Arts on how to do some fun things! If you too are looking for fun and quick projects go and check out the One Skein or Less book by Marly Bird.

One Skein or Less Projects by Marly Bird. Let them know I sent you (affiliate link): https://shrsl.com/?~7afb

Ravelry Icon _2Like this pattern on Ravlery
MB_icon1_dropshadow_smLook at some other Marly Bird Designs
Written pattern copyright Marly Bird Designs, a division of Yarnsports LLC (c)ย 2014.
Please do not reprint or repost this pattern, but please do link to this page to share this pattern with others.
If you wish to make items for sale from this pattern that is permitted.

Frequently Asked Questions

Can I sell the barrettes I make from this pattern?

Yes! You can definitely make items to sell from this pattern. Just remember that the pattern itself is copyrighted and you shouldn't share that, but selling the finished items is totally fine.

How much yarn do I need for this barrette?

Honestly… you only need a tiny bit! The pattern uses less than 100 yards of yarn, so itโ€™s a super economical project. You can use up scraps too!

Is there a video tutorial for this pattern?

Yes! Thereโ€™s a YouTube video where I walk you through the pattern myself, with some handy tips and tricks. Itโ€™s a great way to see exactly how itโ€™s done.

What kind of yarn works best for this barrette?

So here's the thing… any yarn will work! Iโ€™ve listed a few of my favorites like Brown Sheep Nature Spun Worsted and Cascade 220 Superwash Sport, but feel free to grab whatever you have on hand.

Do I need any special crochet stitches for this?

Nope, you just need to know the chain stitch and the single crochet stitch! I've included links to videos to help you learn them if you need a refresher.

Filed Under: Crochet, Our Free Patterns, Pattern, YouTube Video Tutorial

Free Pattern Crochet Spike Stitch Coffee Cozy

December 4, 2014 By admin 1 Comment

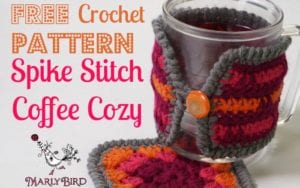
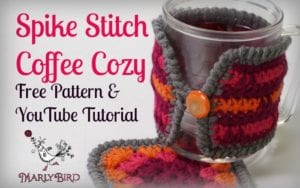
This free pattern crochet Spike Stitch Coffee Cozy is a great quick project for any crocheter! Using less than 100 yds of yarn in any color used in the project this project is not only quick but cheap to make! And itโ€™s a quick gift for a teacher, doctor, boss, in-law, or bunko groupie ๐Ÿ™‚

There is even a YouTube video taught by Marly with a few tips an tricks to help you master the Spike Stitch!

The name of the pattern is Spike Stitch because that is the basis of the popsicle spike stitch that is used in the pattern. By changing up the number of spikes used and where they are located in the row you get a super sexy single crochet stitch that is a version of the original Spike Stitch but different ๐Ÿ˜‰

When I told my husband the name of this pattern he asked me, “Does that mean the hot chocolate or coffee in the cup is spiked?” I thought that was FUNNY! So, now you have a perfect gift don't you?ย Spiked Stitch Coffee Cozy Pattern Free at MarlyBird.com

  • A simple mug
  • A Spiked Stitch Coffee Cozy to go around the mug
  • A bag of your favorite coffee
  • A bottle of Bailey's Irish Cream

I think that is the perfect gift for anybody in your life (except maybe your pastor ๐Ÿ™‚

Gentle reminder that it is illegal to photocopy or copy and paste the instructions ย and distribute to the public. You certainly can copy for your own use and I encourage you do so!

It has just come to my attention that many people are unaware thatย free patterns still have copyrightsย and it is not legal to distribute. I ask that if you like the pattern and want to tell your friends that you share the link to the pattern (found here: https://marlybird.com/free-pattern-crochet-spike-stitch-coffee-cozy ). By doing so you are allowing me to make a little money via advertising which in turn makes it possible for me to keep designing fun and free patterns.

Thanks so much!


*Disclaimer: this post includes affiliate links**

Spike Stitch Coffee Cozy Free Pattern @ MarlyBird.com

Spike Stitch Coffee Cozy

Pattern Details

Measurements

Approx: 11″ long x 3 1/2″ tall

Gauge

14 sts = 4″ in single crochet

ย Yarn

Red Heart, “With Love” (100% acrylic, ย 370 yds/198g),ย any four colors. ย This yarn is a little larger than worsted weight.

Hook

I/9 (5.5 mm) (Marly uses Addi Crochet Hooks)

Notions

  • Removable Stitch Markers
  • Tapestry Needle
  • Decorative Button
  • Sewing Thread and Needle

Stitches Used (and YouTube Video links to help you learn)Stylish woman wearing a gray crocheted hat, promoting discounts on crochet kits for hats and mitts.

  • Chain Stitchย (ch)
  • Single Crochetย (sc)
  • Spike Stitchย ย or Long Single Crochet: Insert hook into next stitch 3 rows below and pull up a loop, yarn over hook and pull through all the loops on the hook.
  • Crab Stitchย or Reverse Single Crochet

Pattern Stitch

Popsicleย Spikeย Stitchย (flat): need to chain a multiple of 6 stitches +4 (+1 for the turning chain)

Row 1 (foundation row): With the first color, Singleย crochet (sc) into 2nd chain from hook and in each chain to the end, change color to next color in sequenceย on last stitch of row,ย turn.

Row 2: Ch 1, sc in first sc, and in each sc to the end,ย turn.

Row 3: Ch 1, sc in first sc, and in each sc to the end, changing color to next color in sequence on the last stitch of row, turn.

Row 4 (create popsicle spike):ย Ch 1, sc in first stitch, *ย spike stitch [see stitches used] overย the next 2 stitches, sc in next 4 sts; rep from * to last 3 sts,ย spike stitchย into the next 2 stitches, sc, turn.

Row 5:ย Ch 1, sc in first sc, and in each sc to the end, changing color to next color in sequenceย on the last stitch of row, turn.

Row 6 and 7: Repeat rows 2 and 3.

Row 8:ย Ch 1, * sc in next 4 sc, spike stitchย over next 2 sc; rep from * to last 4 sts, sc in last 4 sc, turn.

Row 9:ย Ch 1, sc in each sc to end, changing color to next color in sequence in last stitch of row, turn.

Row 10-13:ย Repeat rows 6-9.

Repeat rows 2 – 13 ย for FULL Popsicle Stitchย pattern stitch.


style=”display:inline-block;width:728px;height:90px”
data-ad-client=”ca-pub-0972571961675075″
data-ad-slot=”5182162599″>


Pattern

Body

Ch 35

Follow theย Spike Stitchย pattern stitch changing colors as follows to match the sample. Note that you can use as many colors as you wish:

Row 1: Main Spike Color

Rows 2 & 3: Background Color #1

Rows 4 & 5: Main Spike Color

Rows 6 & 7: Background Color #2

Rows 8 & 9: Main Spike Color

Rows 10 & 11: Background Color #1

Rows 12 & 13: Main Spike Color

Finish off the work.
Crochet project with colorful yarn, showcasing a variety of stitches on a work surface and a banner for free classes.

TIP: Take the time to weave in the tails at this point of the project.

Edging

Rnd 1: With border color, join with a slip stitch at the corner (you could join with a standing single crochet), ch 1, 2 sc in the same corner stitch, then sc into each rowย around the cozy placing 2 stitches at each corner, join with a slip stitch to the first sc. DO NOT TURN.

Rnd 2: Work a crab stitch [see stitches used] around the entire cozy pausing at the mid-way point on one of the short sides to create the loop for the button closure. When you get to the point that you want the loop simply chain a multiple of stitches that will allow the loop to be larger enough to go around the button but not so large that it will not hold the cozy to the cup. To finish the loop work a sc into the same stitch that you began the chain stitch, then carry on around the cozy finishing with a slip stitch into the first crab stitch. Finish off.

TIP: Make your cozy different and add more than one button, simply add more loops where you want buttons on the opposite side and there you go!


That's it! Super easy isn't it? If you find that you need to adjust the length of your cozy you can do that by changing the number of chains to start. You know that you need a multiple of 6 + 4 stitches and 1 more for the turning chain. You can change this pattern to fit just about any mug you have.

So, now you have a cozy for your mug…how about a coaster? The pattern for the FREE Coffee Coaster to coordinate with the cozy will be available soon.

Ravelry Icon _2Like this pattern on Ravlery
MB_icon1_dropshadow_smLook at some other Marly Bird Designs
Written pattern copyright Marly Bird Designs, a division of Yarnsports LLC (c)ย 2014.
Please do not reprint or repost this pattern, but please do link to this page to share this pattern with others.
If you wish to make items for sale from this pattern that is permitted.

Colorful gift cards for knitting and crochet classes on a striped background with holiday-themed accents.


Spike Stitch Coffee Cozy Free Pattern from MarlyBird.com Free Pattern from marlybird.comFree Pattern from MarlyBird.com

Frequently Asked Questions

How much yarn do I need for this cozy?

So here's the thing… you only need less than 100 yards of yarn! It's a super quick and cheap project, perfect for using up scraps.

Is there a video tutorial for this pattern?

Yes! Honestly… there's a YouTube video taught by me, Marly, with some extra tips and tricks to help you master the Spike Stitch. It's super helpful!

Can I sell the coffee cozies I make from this pattern?

Yes! You are totally allowed to make items to sell from this pattern. Just please don't share the pattern itself… link back to the page instead so I can keep designing freebies!

What size is the finished coffee cozy?

It's about 11 inches long and 3.5 inches tall… but you can totally adjust the length by changing the starting chain number!

What are the special stitches used in this pattern?

Honestly… the main ones are the Spike Stitch, which is a long single crochet, and the Crab Stitch, which is just a reverse single crochet for the edging. There are YouTube links for all the stitches too!

Filed Under: Crochet, Our Free Patterns, Pattern, Uncategorized, YouTube Video Tutorial

Crochet Standing Stitch

November 25, 2014 By admin 2 Comments

Technique Tuesday!

Many crocheters think that they MUST have a turning chain at the beginning of each row and is not true. It is possible to begin a new row with a crochet standing stitch. Doing a standing crochet stitch is super easy and can be done with a single crochet, half double crochet, double crochet, treble crochet, so on and so forth.

How to begin add a new yarn or change colors at the start of the row with a crochet standing stitch:

Online Crochet Class

To begin a new row with a new yarn/color you simply begin with a slip knot on your hook. This slip knot represents the active loop that would normally remain on the hook after you finish a stitch.

Now you complete the stitch you want to make in the space/stitch you need to make it into. For example, if you want a sc you will proceed into the st or sp indicated in the pattern and work a sc; if you want to make a dc you yarnover the hook then proceed into the st or sp indicated in the pattern and work the dc.

It really is that easy.

Not sure what I mean? Here I've done a YouTube Video for you. Watch and enjoy.

Did that help you learn the crochet standing stitch? GREAT! If you like this video I have several more on my YouTube Channel. Stay up to date with new video releases by hitting subscribe.

Thanks!

Filed Under: Crochet, Tips, Tricks, Techniques for Knitting and Crochet, Uncategorized

Free Knitting Pattern: Pear Sorbet Shawlette

November 24, 2014 By admin 7 Comments

๐Ÿ“ Updated 2026-05-27: Refreshed with the full framework v2… new intro, “What You'll Love,” Quick Pattern Overview, “Love the Pattern but Want an Ad-Free PDF?” section, “Is This Pattern Right for You?,” Build Your Skills, fresh yarn substitutes with affiliate links, FAQ + JSON-LD schema, internal links to other Marly knit lace shawls, and the designer note baked right into the Finishing instructions so no one ends up with a curling edge. โค๏ธ Marly Bird

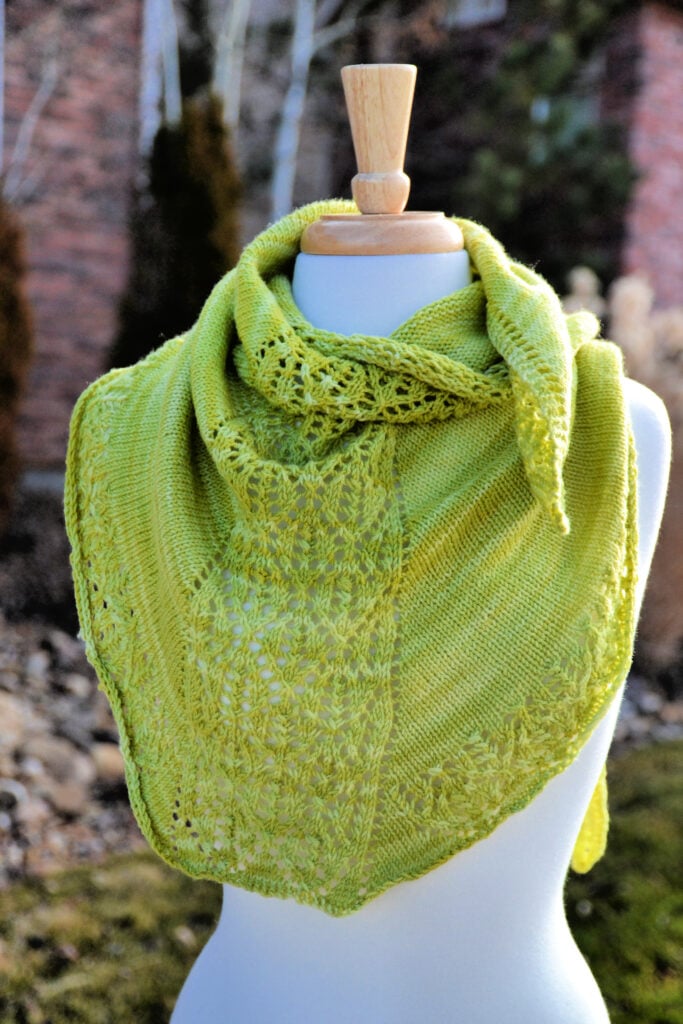
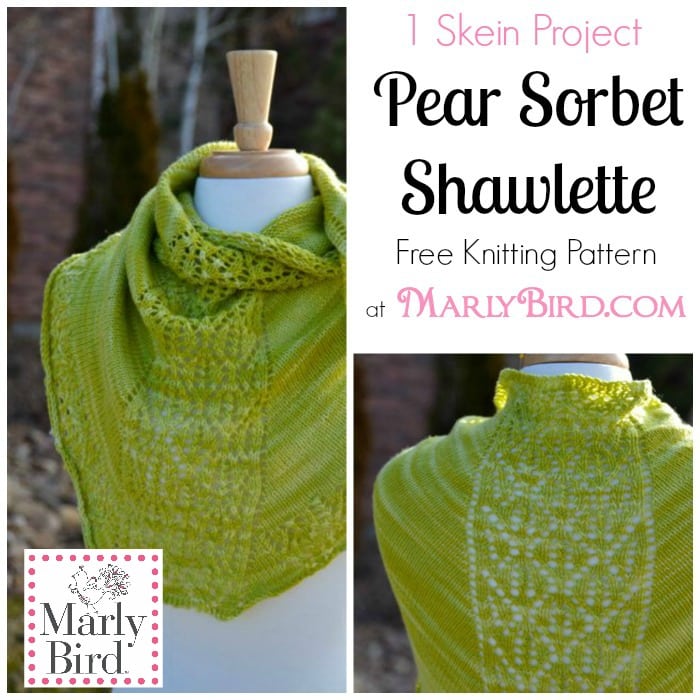
The Pear Sorbet Shawlette is a free knit lace shawl pattern by Marly Bird, designed for advanced-beginner knitters. Worked top-down from a garter tab cast-on, it features a stunning lace center panel surrounded by stockinette wings and finished with a wide border lace edge. Knit in fingering-weight yarn (~440 yds) on US 7 (4.5 mm) circular needles, the finished shawlette measures 50″ wingspan ร— 26″ depth. The original sample is in Drew Emborsky's “Inappropriate” yarn (90% merino, 10% nylon), but it works in any smooth fingering weight wool or wool blend.

Hand-dyed fingering weight yarn + a single hank + a beginner-friendly lace chart = the kind of free knit lace shawl pattern that turns into a beloved drawer staple. The Pear Sorbet Shawlette has been one of my most-favorited designs since 2014, and I've finally given her the framework refresh she deserves. Lace center panel, gentle stockinette wings, a wide border lace edge, and a built-in fix for that “lace shawl rolling at the bottom” problem we ALL know too well.

Light green knitted shawl with lace and solid sections, displayed on a mannequin outside, blurred trees and brick wall behind.

Hey, bestie ๐Ÿ’›

I designed the Pear Sorbet Shawlette to be the project I'd give a knitter who told me she had “one beautiful hand-dyed skein and no idea what to do with it.” We've all been there. You see the yarn at the festival, you fall in love, you take it home, and then you scroll Ravelry for three months trying to find the pattern worthy of it. Pear Sorbet is that pattern. One skein. A lace center panel that shows off the color play of a hand-dyed yarn. A border lace edge that makes the whole thing feel finished and intentional. And the kind of soft drape that has you reaching for this shawl every time you grab your tea mug.

Cast on with me, bestie. This is the lace shawl that's going to live in heavy rotation in your wardrobe.

๐Ÿงถ Affiliate Disclosure: This post contains affiliate links. If you purchase through them I may earn a small commission at no extra cost to you… and it helps support free patterns and content from my yarn-loving heart ๐Ÿ’› See my privacy policy here.
Pear Sorbet free knit lace shawlette by Marly Bird, light green fingering weight yarn shown on a wooden mannequin, displaying the lace center panel and border lace edge.

What You'll Love About the Pear Sorbet Shawlette

  • ๐Ÿ’› It's a one-skein wonder. Roughly 440 yards of fingering weight yarn gets you a full 50″ ร— 26″ shawlette. Perfect for that single special hand-dyed skein.
  • ๐Ÿ’› The garter tab cast-on teaches you a foundational shawl skill. Once you understand how a garter tab generates stitches in three directions, you can knit literally any top-down triangle shawl pattern.
  • ๐Ÿ’› The lace center panel is the showpiece. Sixteen rows of repeating lace down the spine, surrounded by easy stockinette wings, finished with a wide border lace edge. Three different lace experiences in one shawl.
  • ๐Ÿ’› Charts AND written instructions are included. Read whichever format makes your brain happiest.
  • ๐Ÿ’› The shawl shows off hand-dyed yarn beautifully. Stockinette wings let semi-solid or speckled colorways shine while the lace center adds visual interest.

Quick Pattern Overview

  • ๐ŸŽฏ Skill level: Advanced Beginner (comfortable with knit, purl, increase, decrease)
  • ๐Ÿ“ Finished measurements: 50″ wingspan ร— 26″ depth (after blocking)
  • ๐Ÿงถ Yarn weight: Fingering (CYCA #1)
  • ๐Ÿงถ Yarn used in sample: Drew Emborsky “Inappropriate” (90% merino, 10% nylon, 440 yds / 113 g per hank)… 1 hank in 90's-decade colorway “Psych!” (the sample weighs ~110 g, so the full hank should be plenty; with hand-dyed yarn an extra hank is always smart insurance)
  • ๐Ÿชก Needles: US 7 (4.5 mm) 36″ or longer circular needle, or size required for gauge
  • ๐Ÿ“ Gauge: 17 sts ร— 22 rows = 4″ (10 cm) in stockinette stitch, after blocking
  • ๐Ÿงท Notions: Stitch markers, tapestry needle, fiber wash for blocking

Love the Pattern but Want an Ad-Free PDF?

โœจ The complete Pear Sorbet Shawlette pattern is right here on the blog, completely free.

But if you'd love a clean, printable, ad-free version you can take with you to the yarn store or pin to your project bag, well, we are working on that.

And while you're here… pop your email in the box below so I can send you information about brand-new free patterns the moment they hit the blog ๐Ÿ’Œ

Join our Newsletter

Get Free Crochet & Knitting
Pattern Links & Coupons!

Hand-drawn bird with curling, detailed feathers and pink accents; cheerful pose showcases fine line and texture work.
>> Become An Insider <<
A woman with glasses and curly hair models a colorful crocheted scarf, showing textured stitches and vibrant yarn.

Is This Pattern Right for You?

The Pear Sorbet Shawlette is your match if…

  • โœ… You're an advanced-beginner knitter who's confident with knit, purl, basic increases, and basic decreases (k2tog, skp, sk2p).
  • โœ… You have one beautiful hand-dyed fingering-weight skein you've been hoarding and you want to finally cast on with it.
  • โœ… You want to learn the garter tab cast-on (the foundational top-down shawl skill).
  • โœ… You love the look of a lace center panel framed by softer stockinette wings.
  • โœ… You're ready to commit to a fingering-weight project (estimated 40-60 hours of knitting).

This pattern is probably NOT for you if…

  • โŒ You're brand new to knitting and have never done a yarn over or k2tog before. Start with the Asymmetrical Knit Lace Shawl first to build confidence.
  • โŒ You want a fast project. Fingering weight + a 50″ wingspan = a real time investment. If you want lace fast, try a bulky-weight lace wrap (like one from the Free Knit Lace Shawl Patterns roundup) instead.

Build Your Skills: What You'll Learn Knitting the Pear Sorbet Shawlette

This pattern is a beautiful “skills bridge” project. By the end of it, you'll have practiced:

  • ๐Ÿงถ The garter tab cast-on. This is the magic that turns 3 cast-on stitches into a top-down triangular shawl. Once you understand it, you'll feel like a wizard.
  • ๐Ÿงถ Reading a lace chart alongside written instructions. Both formats are included so you can build chart-reading confidence with the written version as your safety net.
  • ๐Ÿงถ Working a lace pattern panel inside a larger stockinette context. The Center Panel sits between two stockinette wings… you'll learn to use stitch markers to keep your lace position straight while you increase around it.
  • ๐Ÿงถ The sk2p double decrease. Slip 1 knitwise, k2tog, pass slipped stitch over. It's a centered double decrease that makes the lace point beautifully… and it'll show up in lots of future patterns.
  • ๐Ÿงถ Blocking lace. The before-and-after on this shawl is dramatic. You'll see exactly what wet-blocking does to open up yarn-over holes and define the lace motif.
โœจ Designer Tip: Use lifelines on this pattern. After every full Center Panel repeat (every 16 rows), thread a piece of contrasting smooth thread through every live stitch. If you make a mistake 30 rows from now, you can rip back to a lifeline and pick up cleanly without losing the whole shawl. Lifelines are the single best lace-knitting habit you can build.

Yarn and Materials

The Yarn Used in the Sample

The original Pear Sorbet sample is knit in Drew Emborsky's “Inappropriate”… a 90% merino, 10% nylon fingering-weight hand-dyed yarn. Each hank is 440 yds / 113 g, and the sample shown is in the 90's-decade colorway called “Psych!” The 1 hank used in the sample weighed about 110 g, so the full skein should be plenty.

โš ๏ธ Important: With any hand-dyed yarn, I always recommend grabbing an extra hank just in case. Hand-dyed colorways vary slightly between dye lots, and the security of having that backup hank (rather than discovering you're 20 yards short halfway through the border) is well worth it.

Yarn Substitutes

If you can't find Drew Emborsky's Inappropriate yarn (it's a small-batch indie dyer, so availability varies), any smooth fingering-weight wool or wool-blend yarn with roughly 400-450 yds per skein will work beautifully. Here are my top substitute recommendations:

  • ๐Ÿงถ Malabrigo Sock … my top hand-dyed substitute. Kettle-dyed superwash merino fingering with semi-solid colorways that mimic the painterly look of the original. 440 yds per skein… a 1:1 yardage match.
  • ๐Ÿงถ KnitPicks Gloss Fingering … 70% merino / 30% silk fingering. The silk halo makes the lace pop, and the smooth ply shows every stitch clearly.
  • ๐Ÿงถ KnitPicks Stroll Fingering Sock Yarn … budget-friendly superwash merino/nylon. Comes in dozens of solid colors if you want a more graphic, single-color version of Pear Sorbet.
  • ๐Ÿงถ Cascade Heritage … 75% merino / 25% nylon fingering. Smooth, strong, blocks like a dream.
  • ๐Ÿงถ KnitPicks Capretta Superwash Fingering … merino/cashmere/nylon blend. The cashmere makes the finished shawl extra soft. Splurge option for a special-occasion shawl.

Video Tutorials

If any of the techniques in this pattern are new to you, my YouTube channel has free step-by-step video tutorials covering:

  • ๐ŸŽฅ Long-Tail Cast-On (great starting cast-on for the garter tab)
  • ๐ŸŽฅ How to Knit Lace (yarn overs + decreases explained)
  • ๐ŸŽฅ How to Add a Lifeline (highly recommended for this pattern)
  • ๐ŸŽฅ How to Tink (Un-knit) (your lace knitter best friend when you catch a mistake one stitch back)
  • ๐ŸŽฅ Wet Blocking Tips
  • ๐ŸŽฅ How to Bury Ends
โญ๏ธ Marly Bird Amazon Storefront โญ๏ธ

Pattern Details

Abbreviations

  • K … knit
  • P … purl
  • RS … right side
  • WS … wrong side
  • St(s) … stitch(es)
  • Yo … yarn over
  • K2tog … knit two stitches together (right-leaning decrease)
  • Skp … slip 1, k1, pass slipped stitch over (left-leaning decrease)
  • M1 … make 1 (lift the bar between stitches onto the left needle and knit it through the back loop)
  • Pm / Slm … place marker / slip marker
  • Pu&k … pick up and knit
  • Rep … repeat

Special Stitches

Sk2p: Slip 1 stitch knitwise, k2tog, pass the slipped stitch over the k2tog stitch (2 stitches decreased). A centered double decrease that makes a clean point in the lace.

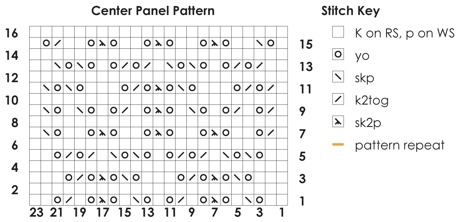
Stitch Pattern: Center Panel

Worked over a panel of 23 stitches.

  • Row 1 (RS): K2, *yo, skp, k1, yo, sk2p, yo, k1, k2tog, yo, k1; rep from * to last st, k1.
  • Row 2 and all WS rows: Purl.
  • Row 3: K3, *yo, skp, yo, sk2p, yo, k2tog, yo, k3; rep from * to end.
  • Row 5: K2, *[yo, skp] twice, k1, [k2tog, yo] twice, k1; rep from * to last st, k1.
  • Row 7: K1, k2tog, yo, k2, *yo, sk2p, yo, k2; rep from * to last 3 sts, yo, skp, k1.
  • Row 9: [K1, k2tog, yo] twice, k1, yo, skp, k1, yo, sk2p, yo, k1, k2tog, yo, [k1, yo, skp] twice, k1.
  • Row 11: K1, [k2tog, yo] twice, k3, yo, skp, yo, sk2p, yo, k2tog, yo, k3, [yo, skp] twice, k1.
  • Row 13: K2, *[k2tog, yo] twice, k1, [yo, skp] twice, k1; rep from * to last st, k2.
  • Row 15: K1, yo, skp, k2, *yo, sk2p, yo, k2; rep from * to last 3 sts, k2tog, yo, k1.
  • Row 16: Purl.

Repeat Rows 1-16 for Center Panel pattern.

Center Panel Pattern lace chart for the free Pear Sorbet Shawlette knit pattern, with key and 23-stitch repeat.

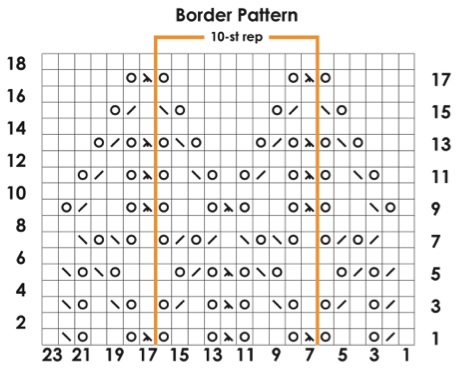
Stitch Pattern: Border Lace

Worked over a multiple of 10 stitches + 13.

  • Row 1 (RS): K1, k2tog, yo, k2, yo, *sk2p, yo, k2, yo; rep from * to last 8 sts, sk2p, yo, k2, yo, skp, k1.
  • Row 2 and all WS rows: Purl.
  • Row 3: [K1, k2tog, yo] twice, *k1, yo, skp, k1, yo, sk2p, yo, k1, k2tog, yo; rep from * to last 7 sts, [k1, yo, skp] twice, k1.
  • Row 5: K1, [k2tog, yo] twice, k1, *k2, yo, skp, yo, sk2p, yo, k2tog, yo, k1; rep from * to last 7 sts, k2, [yo, skp] twice, k1.
  • Row 7: K2, [k2tog, yo] twice, *k1, [yo, skp] twice, k1, [k2tog, yo] twice; rep from * to last 7 sts, k1, [yo, skp] twice, k2.
  • Row 9: K1, yo, skp, k2, *yo, sk2p, yo, k2; rep from * to last 3 sts, k2tog, yo, k1.
  • Row 11: K2, yo, skp, k1, yo, *sk2p, yo, k1, k2tog, yo, k1, yo, skp, k1, yo; rep from * to last 8 sts, sk2p, yo, k1, k2tog, yo, k2.
  • Row 13: K3, yo, skp, yo, *sk2p, yo, k2tog, yo, k3, yo, skp, yo; rep from * to last 8 sts, sk2p, yo, k2tog, yo, k3.
  • Row 15: K4, yo, skp, *k1, k2tog, yo, k5, yo, skp; rep from * to last 7 sts, k1, k2tog, yo, k4.
  • Row 17: K5, yo, *sk2p, yo, k7, yo; rep from * to last 8 sts, sk2p, yo, k5.
  • Row 18: Purl.

Work Rows 1-18 for Border Lace pattern.

Border Lace pattern chart for the free Pear Sorbet Shawlette knit pattern, with full 18-row repeat.

GROW

To Unlockย Exclusive Subscriber Contentย click the Box below and join for free by simply adding your email and creating a password! If you are having troubles, clear your cache or reset your password or login to the Grow Publisher Portal.

>> Learn More About Grow Here <<

I'm thrilled to share this amazing pattern with you, many patterns on my blog are absolutely free! I kindly request that you don't copy and paste or distribute this pattern. Prefer an ad-free experience? Buy a digital PDF pattern for a small fee from one of my online stores for a seamless crafting journey. 

I appreciate your support and readership. You are the reason I can keep doing what I love and sharing it with others. So, thank you from the bottom of my yarn-loving heart! Disclosure: This post contains affiliate links, meaning I get a commission if you decide to make a purchase through my links at no cost to you.

Instructions: Pear Sorbet Shawlette Pattern

Garter Tab Cast-On

Cast on 3 sts and knit 50 rows (25 garter stitch ridges). Do not turn after the last row.

Rotate work 90 degrees and pick up and knit 25 sts along the side edge of the piece. Rotate work another 90 degrees and pick up and knit 3 more sts across the cast-on edge … 31 sts total.

Next row (WS): K3, pm, p1, pm, p23, pm, p1, pm, k3.

Begin Center Panel Pattern and Shape Sides

Inc Row (RS): K3, slm, yo, knit to next m, yo, slm, work 23 sts in Center Panel pat, slm, yo, knit to next m, yo, slm, k3 … 4 sts increased.

Next Row (WS): K3, slm, purl to marker, slm, work Row 2 of Center Panel pat over next 23 sts, slm, purl to m, slm, k3.

Repeat the last 2 rows 57 more times, then work Inc Row once more, ending after Row 5 of Center Panel pat … 267 sts total (3 edge garter sts each side, 119 stockinette sts each side, and 23 center panel sts).

Begin Border

Inc Row (WS): K3, slm, [p24, M1] 4 times, [purl to next marker, slm] twice, [p24, M1] 4 times, purl to next marker, slm, k3 … 275 sts total (3 edge garter sts each side, 123 stockinette sts each side, and 23 center panel sts).

Set-up Row 1 (RS): K3, slm, yo, pm, work 123 sts in Border Lace pat, pm, yo, slm, work 23 sts in Border Lace pat, slm, yo, pm, work 123 sts in Border Lace pat, pm, yo, slm, k3 … 279 sts.

Set-up Row 2: K3, slm, *p1, slm, work in Border Lace pat to next m, slm; rep from * 2 more times, purl to last m, slm, k3.

Inc Row (RS): K3, slm, yo, knit to next marker, slm, work Border Lace pat to next marker, slm, knit to next marker, yo, slm, work Border Lace pat to next marker, slm, yo, knit to next marker, slm, work Border Lace pat to next marker, slm, knit to next marker, yo, slm, k3 … 4 sts increased.

Next Row: K3, slm, *purl to m, slm, work Border Lace pat to next m, slm; rep from * 2 more times, purl to last m, slm, k3.

Repeat the last 2 rows 7 more times, ending after Row 18 of Border Lace pat … 311 sts.

โœจ Designer Note (added in this refresh): When I knit the original sample, I bound off right after Row 18 of the Border Lace pattern… and the bottom edge tended to roll a bit. If I were knitting this one again, I'd work 3-5 rows of garter stitch after the Border Lace pattern, before binding off. The garter rows give the bottom edge structure and stop the roll. I'd recommend you do the same. Highly suggested ๐Ÿ’›

Bind Off (Recommended Garter-Edge Version)

Work 3-5 rows of garter stitch (knit every stitch on both RS and WS rows), keeping the 3 edge stitches in garter and slipping markers as you encounter them. Then bind off all stitches loosely on a RS row.

Finishing

Weave in ends. Use a tapestry needle to bury all loose yarn tails through the wrong side of the fabric.

Wet block. Washing the finished shawl is a must… it cleans the yarn, allows it to relax, and opens the lace into its beautiful finished form. Soak in lukewarm water with a splash of wool wash for 20 minutes. Gently squeeze out excess water (do not wring). Lay flat on blocking mats and pin out to 50″ ร— 26″, opening all the lace pattern motifs as you pin. Let dry completely (12-24 hours) before unpinning.

I love using Allure Fine Fiber and Fabric Wash from Bijou Basin Ranch for blocking. It smells beautiful and was designed by my friend Eileen Koop, who's both the owner of Bijou Basin Ranch and a chemist by training.


Meet the Designer

About Marly Bird
Marly Bird is a professional yarn artist and designer who has been teaching both knitting and crochet since 2007. She's the creator of the BiCrafty method… the only approach that teaches both crafts together. Follow her work at marlybird.com and her online education community at Marly Bird House.
A woman waves beside a shawlette knitting project, with yarn, pattern, and tools visible under a "FAQS" banner.

Frequently Asked Questions

Is the Pear Sorbet Shawlette pattern really free?

Yes, absolutely. The full pattern (charts, written instructions, the works) is right here on the blog for free. If you'd rather have a clean, printable, ad-free PDF version, you can grab that from the buttons up above… and your purchase supports my free pattern library.

What yarn do I need for the Pear Sorbet Shawlette?

Honestly… you only need ONE skein of fingering weight yarn (about 440 yds). The sample uses Drew Emborsky's “Inappropriate” yarn, a gorgeous 90% merino, 10% nylon hand-dyed fingering. If you can't find it, any smooth fingering-weight wool or wool blend will work beautifully… Malabrigo Sock, KnitPicks Gloss Fingering, Cascade Heritage, and KnitPicks Stroll are all excellent substitutes.

How much yarn do I need for the Pear Sorbet Shawlette?

So here's the thing… the pattern calls for one hank of Inappropriate yarn (about 440 yds). The original sample weighed about 110 g. However, since hand-dyed yarn varies between dye lots, I always recommend grabbing an extra hank just in case… better safe than sorry, right?

What skill level is the Pear Sorbet Shawlette?

It's listed as Advanced Beginner. You'll want a comfortable grasp on knit, purl, basic increases, and basic decreases (k2tog, skp, and sk2p… I include videos for any technique that might be new). The garter tab cast-on is the most “new” technique in the pattern, and once you do it once you'll understand the magic that turns 3 cast-on stitches into a full triangular shawl.

My shawl is curling at the bottom edge. What can I do?

Oh, honestly… that's a really common issue with lace patterns that bind off right after a lace row. The fix is simple: work 3-5 rows of garter stitch after Row 18 of the Border Lace pattern, BEFORE you bind off. The garter rows give the bottom edge structure and stop the roll. I've added this to the pattern instructions as the recommended bind-off approach.

How long does it take to knit the Pear Sorbet Shawlette?

Plan on roughly 40-60 hours of knitting time. Fingering weight + a 50″ wingspan = a real commitment, but not a marathon. Most knitters finish in 4-6 weeks of evening knitting. The Center Panel section is the longest stretch, but it's deeply meditative once you've worked through the 16-row repeat a couple of times.

Are charts or written instructions included?

Both. The pattern includes both written line-by-line instructions AND visual lace charts for the Center Panel and the Border Lace pattern. Read whichever format makes your brain happier… or use both in tandem (written for verification + chart for the visual rhythm).

Do I have to block the finished shawlette?

Yes. Always. Unblocked lace looks like a sad, scrunched-up tangle. After a wet block, it transforms into the airy, drapey piece you fell in love with on Pinterest. Wet block the finished shawl by soaking in lukewarm water with wool wash for 20 minutes, then pinning out flat to 50″ ร— 26″ to dry. Blocking is non-negotiable for lace.


More Free Knit Lace Shawl Patterns From Marly Bird

  • ๐Ÿงถ 11 Free Knit Lace Shawl Patterns … the full roundup including Pear Sorbet and 10 others
  • ๐ŸŒŸ Lehabah Fire Sprite Knit Shawl … fingering-weight asymmetrical right triangle lace shawl
  • ๐Ÿฉธ Blood of My Blood Outlander Knit Shawl … lace-weight half-hexagon with cables + lace
  • ๐ŸŒณ Eowyn Cable Knit Shawl … textured right triangle with cables (less lace, more cable goodness)
  • ๐Ÿฆ‹ Mariposa Textured Triangle Shawl … worsted-weight triangle with a lace spine
  • ๐Ÿ“š Knit Shawl Patterns: Free Designs for Every Shape, Season & Skill Level … master hub for every free knit shawl on the blog

Want to Go Deeper With Knit Lace? Join Marly Bird House

If Pear Sorbet has you falling in love with lace knitting… I'd love to invite you into Marly Bird House, my online education community. We've got the BiCrafty Stitch Nite program (live shawl knit-alongs with me), full courses on lace construction and chart-reading, and a warm community of knitters cheering each other on. Come check it out.


Final Thoughts

The Pear Sorbet Shawlette has been one of my most-favorited free patterns since 2014, and I'm so glad I finally gave her the framework refresh she deserved. New yarn substitute recommendations, new “Build Your Skills” walkthrough, the designer's garter-edge fix baked right into the bind-off, full FAQ with schema, and internal links to her cousin shawls. If you've been eyeing a hand-dyed fingering skein on your shelf, this is your sign ๐Ÿ’›

I'd love to see your finished Pear Sorbet Shawlette! Share it on Instagram with #MMMDI and #MarlyBird so I can find your project and cheer you on ๐Ÿ’›

Queue it up and favorite the Pear Sorbet Shawlette on Ravelry here so your knitting friends can see what you're making.

Pin this pattern for later, share it with a knitting friend, and happy knitting, bestie! ๐Ÿ’›

Written pattern copyright Marly Bird Designs, a division of Yarnsports LLC ยฉ 2014. Refreshed 2026. Please do not reprint or repost this pattern, but please do link to this page to share it with others.

โค๏ธ Your BiCrafty Bestie,
Marly Bird

A cartoon avatar of a person with glasses and a brown bun smiles warmly. Their green shirt and black jacket add a stylish touch, while colorful hearts surround them like loving temperature blankets, stitching together an aura of love and positivity. -Marly Bird

Filed Under: Knit Shawl Patterns, Knitting, Our Free Patterns, Pattern, Uncategorized

  • « Previous Page
  • 1
  • …
  • 95
  • 96
  • 97
  • 98
  • 99
  • 100
  • Next Page »

Let's Be Social

Join the Marly's Minions Facebook group to share, ask questions, or chat about all of your yarn related crafts!

Join the group(opens in new tab)
Cartoon of a smiling woman with brown hair in a bun, glasses, black jacket and green shirt, waving next to large "hi" text.

Quick Links

The Pattern Shop

Our Free Patterns

Blog

Marly Bird House

Learn to Knit & Crochet

About

Giveaway Terms and Privacy Notice

Find Us Everywhere

Join the Newsletter

YouTube Channel

Marly's Minions FB Group

Etsy Store

Ravelry Store


AN ELITE CAFEMEDIA HOME/DIY PUBLISHER

Information from your device can be used to personalize your ad experience. Do not sell or share my personal information.

Privacy Policyย  ย Termsย  ย Marly Bird Legal Documents Copyright © 2026