How to Join As You Go Crochet Motifs (BiCrafty Bootcamp:…
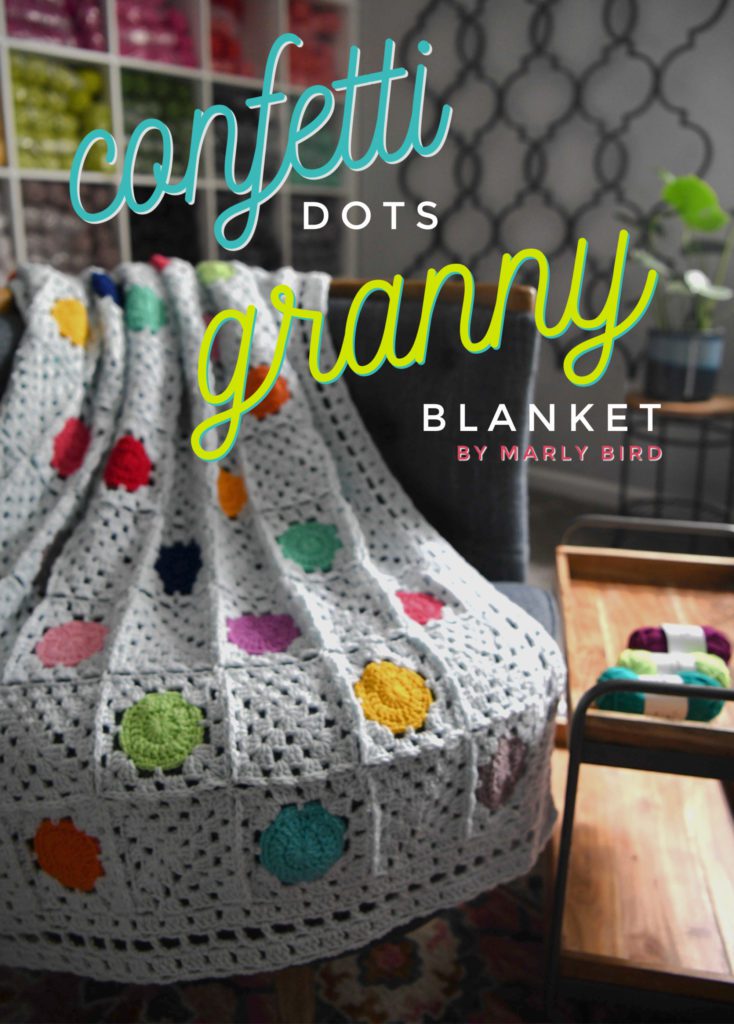
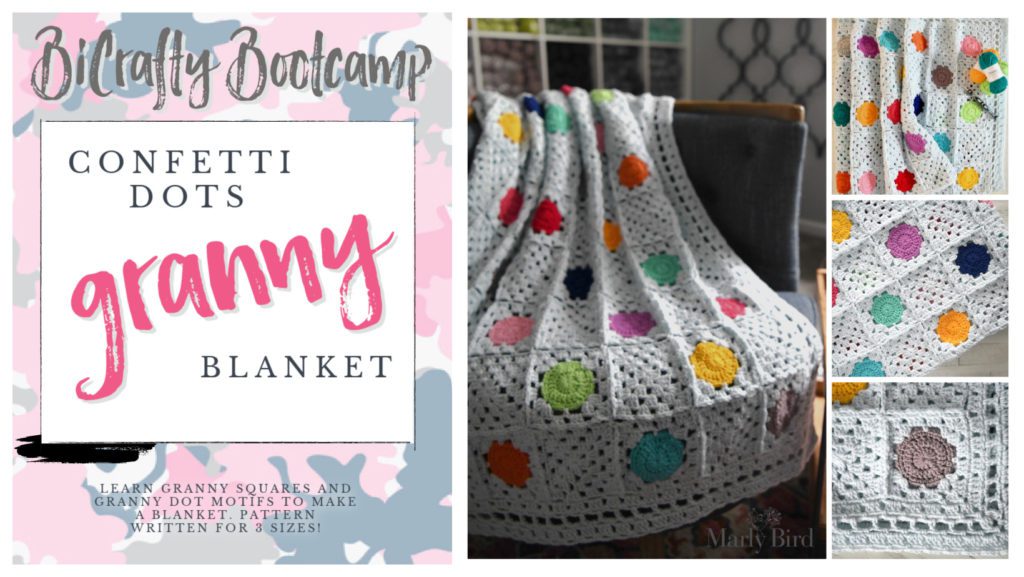
In our previous lesson, you learned how to crochet motifs in the round. Specifically, you learned the granny square. Next, we're going to work on a crochet motif blanket. It uses a variation on the granny square which begins with a circle in the center. We're calling it the Confetti Dots Granny Blanket. In addition to learning a new crochet motif; you're going to learn a new joining technique. You'll learn how to join as you go crochet motifs.
What Are Join As You Go Crochet Motifs?
As you've already seen, there are different ways to seam crochet or to join motifs together. In most methods, you crochet all of the motifs first. Then you use needles or crochet hooks to stitch them together in some form or fashion.
However, a lot of people don't enjoy this last part of the process. They like making the motifs but then they're left at the end with all of the joining and weaving in those ends. Therefore, some people prefer join as you go crochet.
As the name suggests, this is a method of starting one crochet motif in such a way that it joins to the motif you've already created. You join them as you go. It's particularly easy to do these with crochet granny squares. So, this is a great time for you to learn this technique. You might be surprised by how easy it is to pick it up once you get the gist of it.
Join As You Go Crochet Diagrams or Charts
You BiCrafty Bootcampers have been doing great with charts. So, we don't want to stop here. For this lesson, you'll learn how to see what JAYGO looks like on a chart. Moreover, you'll learn how to make adjustments to other crochet motif charts so you can adapt them to “join as you go” if they're not designed this way.
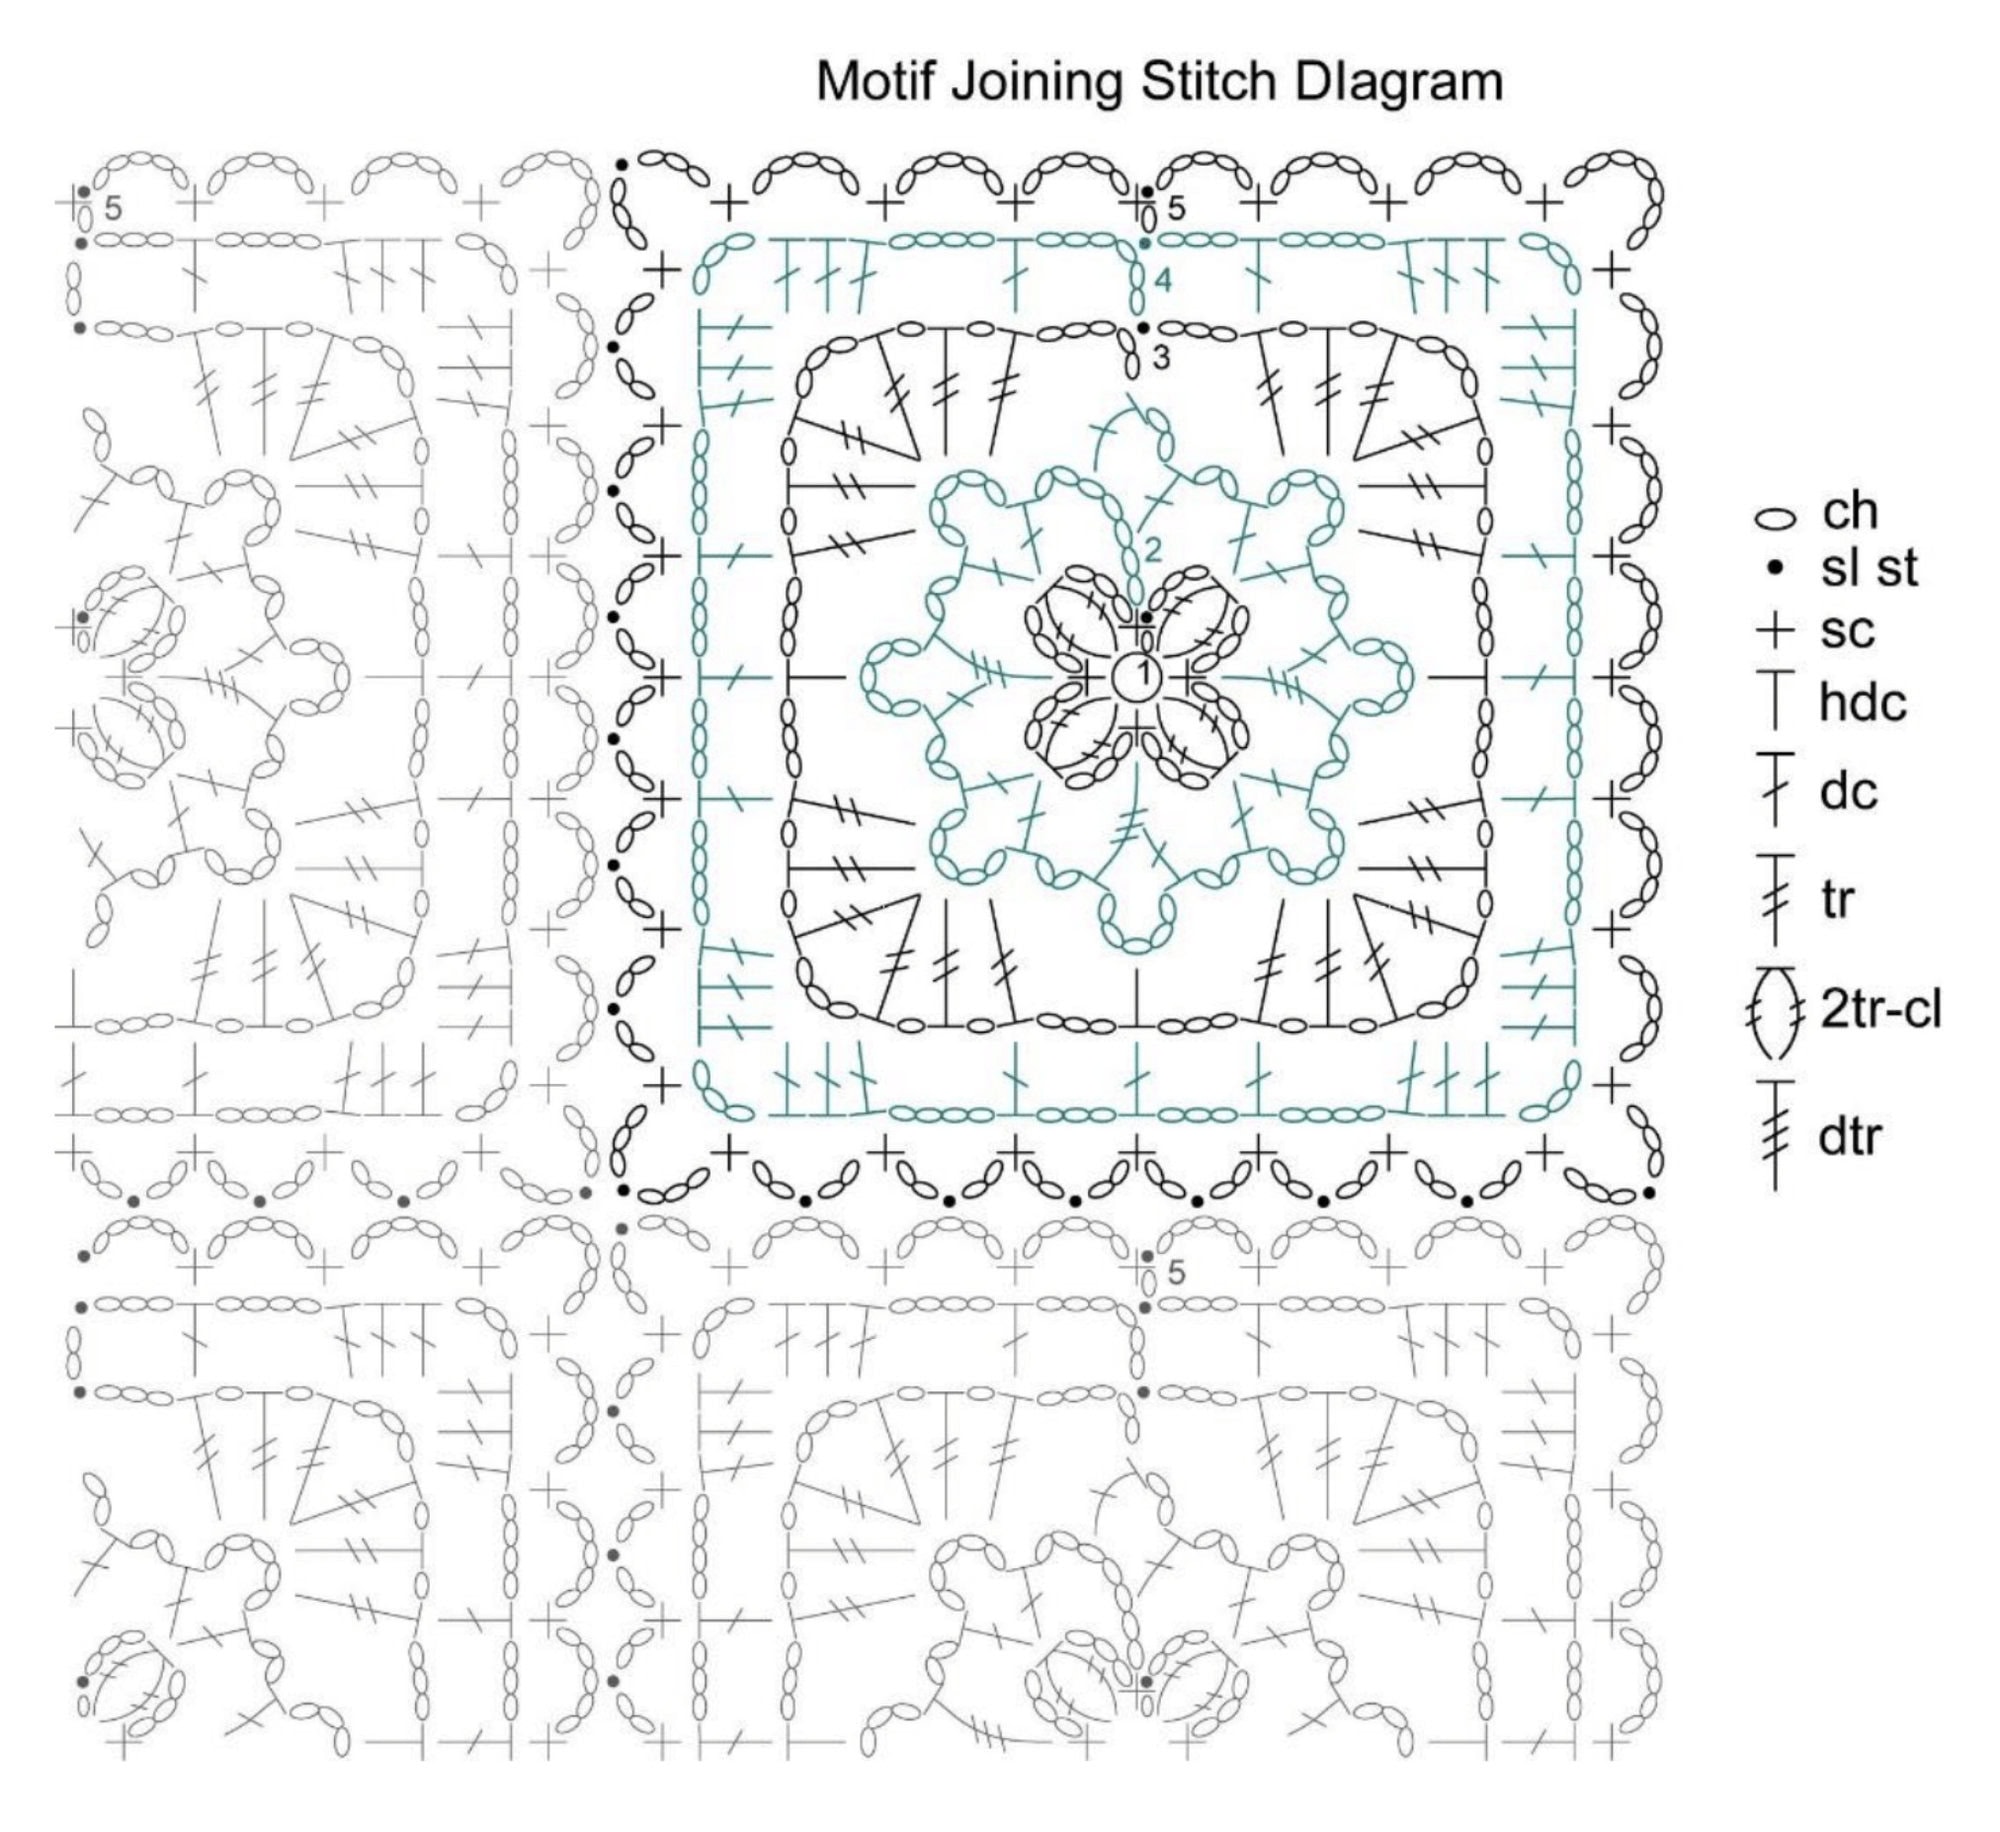
We are going to look at the follow motif which as a basic chain and single crochet final round border or edging. I chose this because it is one you can literally modify any motif and make work. Plus, it is easy to see how these joins work.
Slip Stitch Join
Use a crochet slip stitch to join motifs together. It is very simple, to crochet motifs together as you go, replace a chain with a slip stitch and literally crocheting one motif onto another. Do this by following the directions for the last round of the motif. When you get to a chain space, remove the middle chain and replace it with a slip stitch to the same space on an adjoining motif.
In the first example, you would chain 2, slip stitch to the adjoining motif, chain 2, and then continue crocheting the working motif. See image below
In the second example, you would complete the 3dc granny set, then instead of ch 1, slip stitch to the adjoining motif in the ch-1 space. Do this along each side that needs to be joined. Then continue crocheting the working motif. See image below

Cluster Chain Seam
To crochet a cluster chain seam it takes a little more than the simple slip stitch join but it is not hard and ads something a little different to a motif.
Align the edges of the motifs side-by-side, and join the yarn to the edge of the motif on the right. Ch 1, sc in same sp as join, *ch 3, 2 dc-cl in 1st ch, sc in next ch-sp (or sk 3 sts and sc in next st) on motif on left, ch 3, 2 dc-cl in 1st ch, sc in next ch-sp (or sk 3 sts and sc in next st) on motifon right; rep from * across, fasten off. See image below.

Join As You Go Crochet Motifs Video
Find the video for this weeks lesson on join as you go motifs here
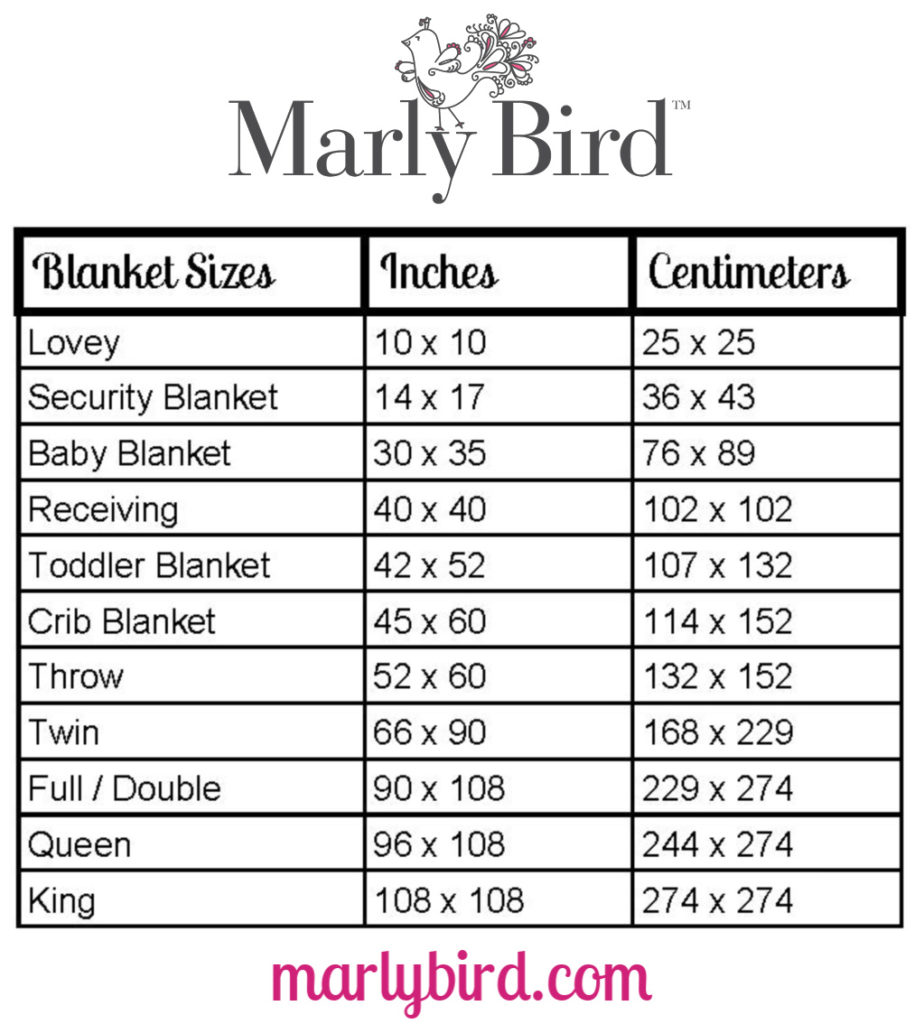
Crochet Blanket Sizes
The great thing about crochet motif blankets is that you can grow them to any size that you want. You can make a baby blanket. Or you can crochet more motifs and make a blanket that fits a king sized bed. Check out this post for a chart of common blanket sizes. The Confetti Dots Granny Blanket is written for three common blanket sizes: baby, throw size, and full size.
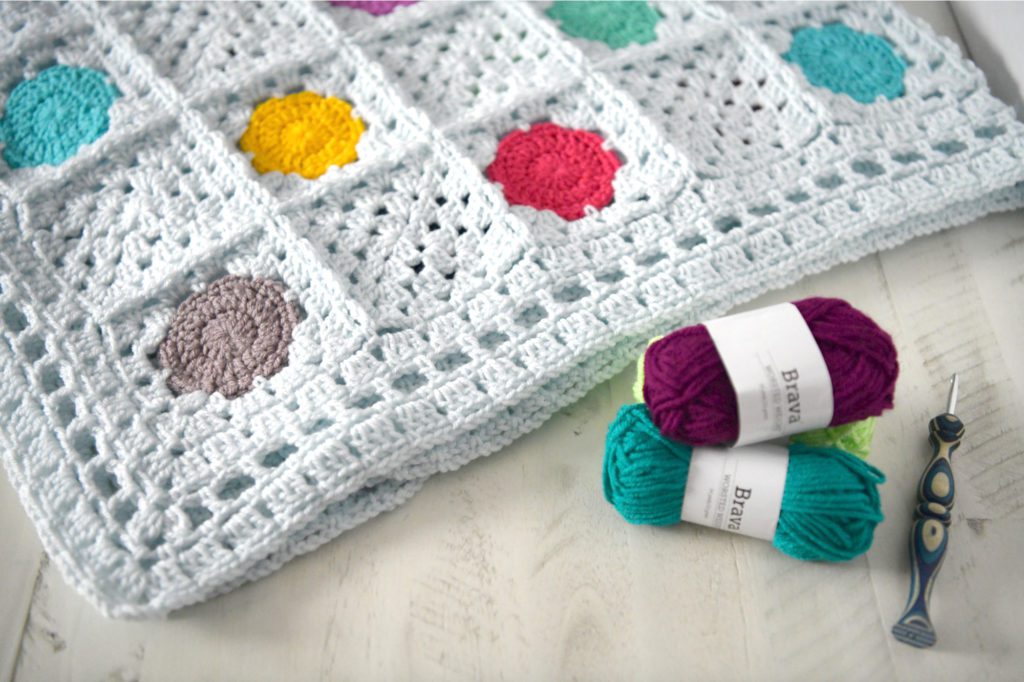
Confetti Dots Granny Blanket: Materials
Obviously, the materials you'll need will vary depending upon the blanket size that you choose for this join as you go crochet blanket project. You'll work with worsted weight yarn and can use scraps of yarn for the different colors if you so desire. However, we recommend working with the Brava Worsted Yarn and Brava Mini Packs.
Yarn Amounts for Join As You Go Crochet Motif Blanket
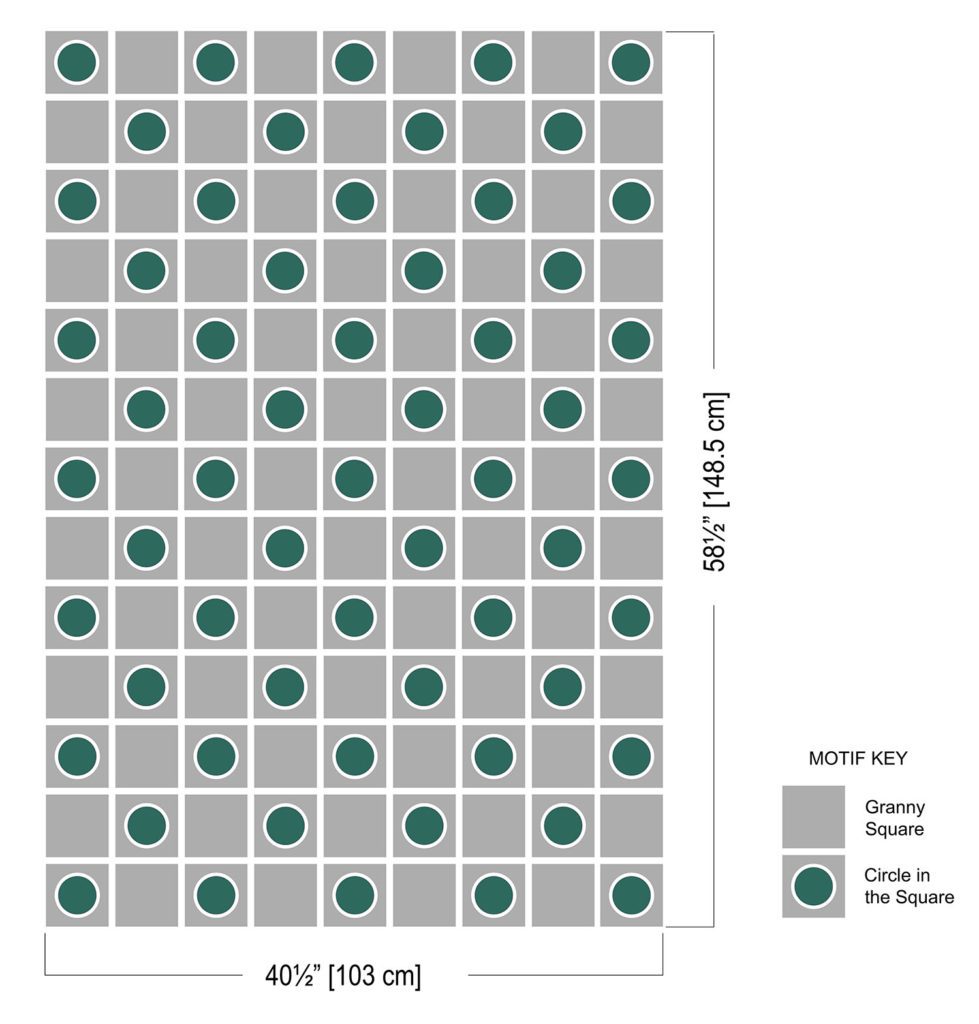
- Baby Blanket (40.5″ square): 8 balls of Brava Worsted in the same color and 1 Brava Mini Packs
- Throw Blanket (78.5″ x 40.5″): 10 balls of Brava Worsted in the same color and 2 Brava Mini Packs
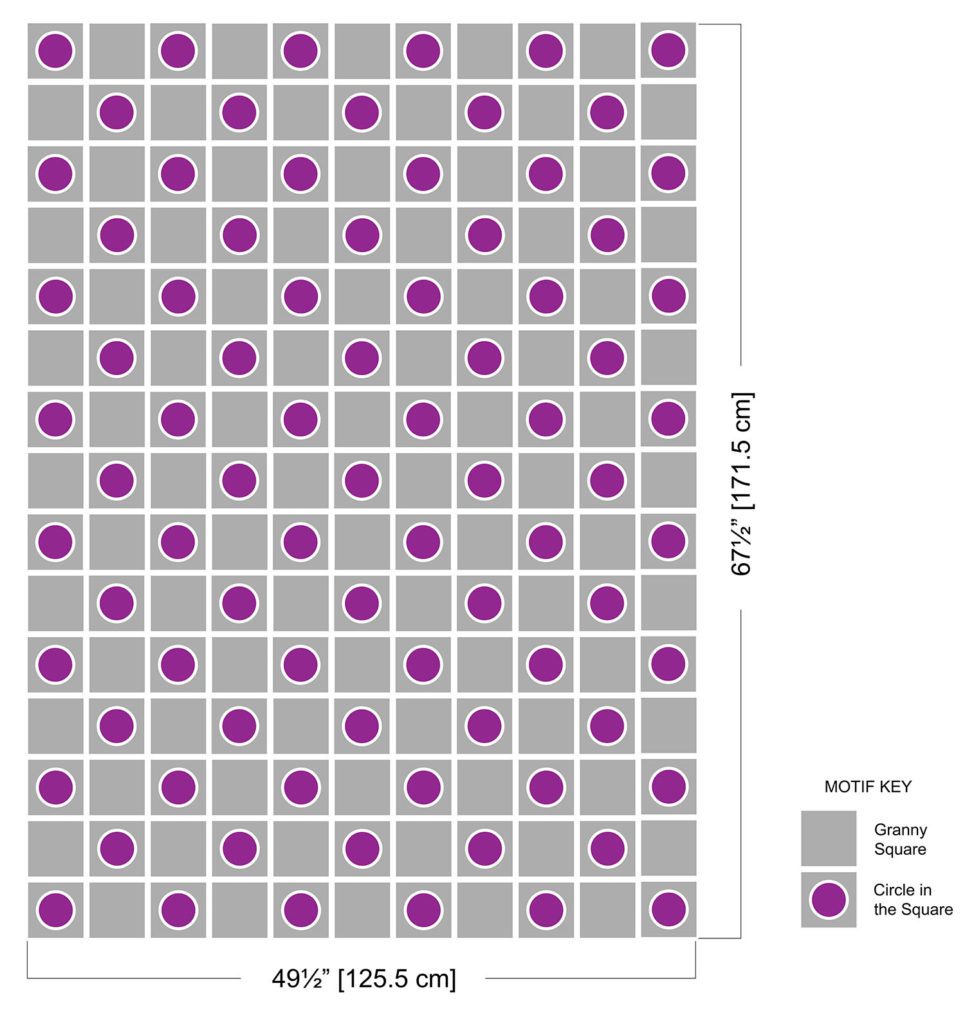
- Regular Blanket (67.9″ x 49.5″): 14 balls of Brava Worsted in the same color and 2 Brava Mini Packs
Other Materials
Hook: Size H (5 mm) or any size hook to obtain the gauge. (WeCrochet Hook, TooShay Crochet Hook)
Notions: Locking stitch markers from WeCrochet (optional), Chenille and tapestry needles for weaving in ends
Confetti Dots Blanket Crochet Pattern
The Confetti Dots Granny Blanket ad-free pdf pattern is available on Ravelry. The ad-free pdf pattern includes full diagram for the joins and the border.
????Special Notice ONLY for BiCrafty Bootcampers???? use code CONFETTI and get 50% off the ad-free pdf. This coupon is good until March 15, 2022.
SPECIAL STITCHES
Adjustable Ring: Make a large loop with the yarn leaving a 4” tail. With the hook, draw the working yarn through the loop; Ch 1, follow the pattern instructions from here. Once the first rnd of sts is complete, pull the tail snugly to close the ring.
NOTES
- See stitch diagram for assistance with pattern
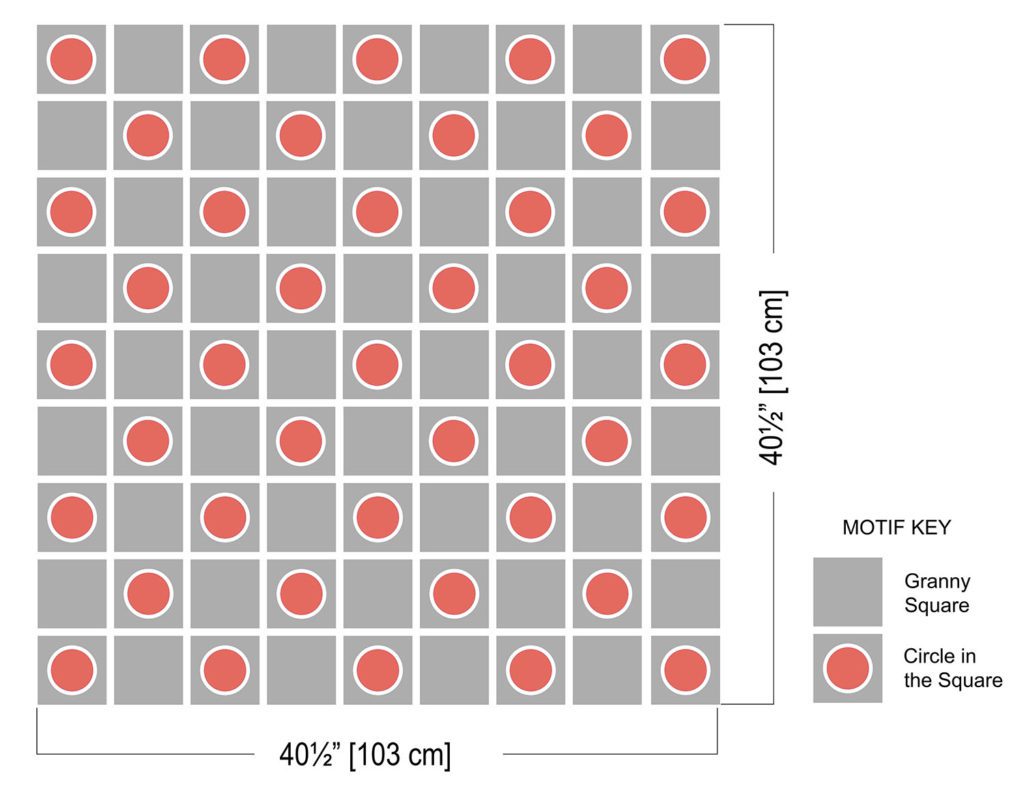
- See Layout for placement of squares
- Choose colors for the dots at random from the mini pack
- Change colors on last pull through on stitch before new color
- Squares are made in a join as you go (JAYGO)
- Border is worked in the round around the entire blanket
- HIGHLY RECOMMEND that you bury your ends as you complete each square Get Rid of Ends in 2 steps- Learn to Bury in Ends for Knitting and Crochet
HELPFUL VIDEO TUTORIALS
- Adjustable Ring: Learn How to Make an Adjustable Ring for Crochet AKA Magic Ring or Magic Loop
- Weave in tail on adjustable ring: Best Way to Weave in Tail for Adjustable Ring Crochet
- Changing Color: Learn How to Change Colors and Crochet Stripes with Marly Bird
CONFETTI DOTS GRANNY BLANKET PATTERN
The pattern was originally made to have the granny squares at the corners but was changed last minute to have the dots at the corners. Either way works, the only difference is this, whichever one is in the corner is the one you will start with then build the rest of the squares on that with the JAYGO method.
CIRCLE IN THE SQUARE
Make 1, Join 82 for blanket, 58 for throw, 40 for baby blanket
With CC1, make an adjustable ring
Round 1 (RS): Ch 3 (counts as dc), 15 dc in ring, sl st to top of beginning ch-3, pull ring closed, do not turn. (16 dc)
Round 2: Ch 3 (counts as dc), *2 dc in next dc, dc in next dc; repeat from * around to last dc, 2 dc in last dc, sl st to top of beginning ch-3, change color to CC2, fasten off CC1, do not turn. (24 dc)
Round 3: Ch 1, sc in top of tch, sc in next dc, *2 sc in next dc, sc in next 2 dc; repeat around to last dc, 2 sc in last dc, sl st to first sc, change color to MC, do not turn. (32 sc)
Round 4: Ch 3 (counts as dc), 2 dc in first sc, *ch 3, skip 3 sc, sc in next sc, ch 3, skip 3 sc, (3 dc, ch 1, 3 dc) in next sc; repeat from * around to last 7 sc, ch 3, skip 3 sc, sc in next sc, ch 3, skip 3 sc, 3 dc in first sc, hdc in top of beginning ch-3 (counts as ch-sp), do not turn. (24 dc, 8 ch-3 sps, 4 sc)
Round 5: Ch 3 (counts as dc), (2 dc, ch 1, 3 dc) in sp made by hdc, *[ch 1, 3 dc in next ch-3 sp] twice, ch 1, (3 dc, ch 1, 3 dc) in next ch-1 sp; repeat from * around to last 2 ch-3 sps, [ch 1, 3 dc in next ch-3 sp] twice, ch 1, sl st to top of beginning ch-3, fasten off, weave in ends. (48 dc + 16 ch-sps)
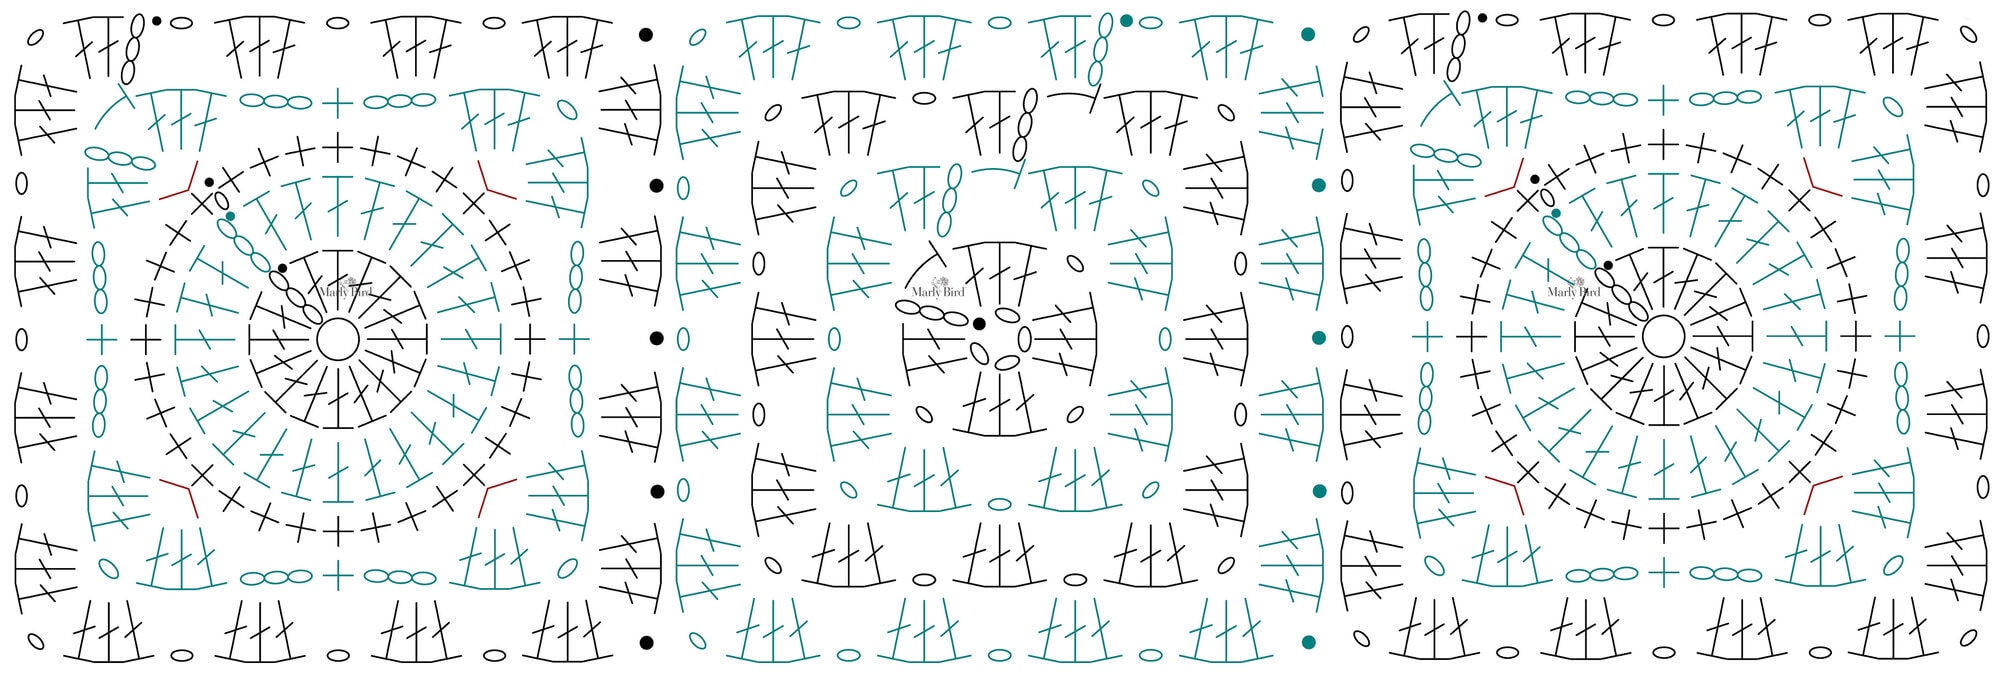
When making these motifs to join other motifs already made, you will make adjustments to the final round. To join to an adjacent motif, do not ch-1 but sl st to adjoining ch-1 sp on the adjacent motif on the final round. For more of a visual guide, look at the diagram for the border. It shows the motifs with the slip stitch in place of the chains on the final rounds of both the granny squares and the dots square.
GRANNY SQUARE
Join 82 for blanket, 58 for throw, 40 for baby blanket. Mix and match any contrasting color
With MC, ch 4, sl st to first ch to form a ring.
Round 1 (RS): Ch 3 (counts as dc), (2 dc, ch 1, [3 dc, ch 1] twice, 3 dc) in ring, hdc in top of beginning ch-3 (counts as a ch-sp), do not turn. (12 dc)
Round 2: Ch 3 (counts as dc), (2 dc, ch 1, 3 dc) in sp made by hdc, *ch 1, (3 dc, ch 1, 3 dc) in next ch-1 sp; repeat from * around, hdc in top of beginning ch-3 (counts as a ch-sp), do not turn. (24 dc + 8 ch-sps)
Round 3: Ch 3 (counts as dc), 2 dc in sp made by hdc, *ch 1, (3 dc, ch 1, 3 dc) in next ch-1 sp, ch 1, 3 dc in next ch-1 sp; repeat from * around to last ch-1 sp, ch 1, (3 dc, ch 1, 3 dc) in last ch-1 sp, hdc in top of beginning ch-3 (counts as ch-sp), do not turn. (36 dc + 12 ch-sps)
Round 4: Ch 3 (counts as dc), 2 dc in sp made by hdc, ch 1, 3 dc in ch-1 sp, *ch 1, (3 dc, ch 1, 3 dc) in next ch-1 sp, [ch 1, 3 dc in next ch-1 sp] twice; repeat from * around to last ch-1 sp, ch 1, (3 dc, ch 1, 3 dc) in last ch-1 sp, ch 1, sl st to top of beginning ch-3, fasten off, weave in ends. (48 dc + 16 ch-sps)
Make 1 motif as written in full. When making the other motifs, you will be joining on the 4th round. To join to an adjacent motif, do not ch-1 but sl st to adjoining ch-1 sp on the adjacent motif on round 4. For more of a visual guide, look at the diagram for the border. It shows the motifs with the slip stitch in place of the chains on the final rounds of both the granny squares and the circle in the square.
FINISHING
Weave in all ends.
Pin to schematic size, lightly spray with water and allow to dry.
BORDER
*stitch diagram for border is available in the ad-free pdf*
Round 1: Join MC with sl st to any corner, ch 1, sc in same corner, *[ch 3, sc in next ch-1 sp] 3 times, ch 3**, sl st in corner join between granny squares; repeat from * across edge to corner ending at **, (sc, ch 3, sc) in corner ch-1 sp; repeat from * around blanket ending at **, sc in first corner ch-1 sp, ch 1, hdc in first sc (counts as ch-3 sp), do not turn. (148, 180, 212 ch-3 sps)
Round 2: Ch 3 (counts as dc), 2 dc around post of hdc, *ch 1, 3 dc in next ch-3 sp; repeat from * across to corner, ch 1**, (3 dc, ch 3, 3 dc) in corner ch-3 sp; repeat from * around blanket ending at **, 3 dc in first corner-sp, ch 1, hdc to top of beginning ch-3, do not turn. (152, 184, 216 dc groups)
Round 3: Ch 1, sc around post of hdc, *ch 3, sc in next ch-1 sp; repeat from * across to corner, ch 3 **, (sc, ch 3, sc) in corner ch-sp; repeat from * around blanket ending at **, ch 1, hdc in first sc (counts as ch-sp), do not turn. (156, 188, 220 ch-3 sps)
Round 4: Ch 2, 2dc-cl around post of hdc, *ch 3, dc in next ch-3 sp; repeat from * to corner, ch 3**, (3 dc-cl, ch 5, 3 dc-cl) in corner ch-sp; repeat from * around blanket ending at **, 3 dc-cl in first corner sp, ch 3, dc in top of 2 dc-cl (counts as ch-5 sp), do not turn. (160, 192, 224 ch-sps)
Round 5: Ch 1, sc around post of dc, *ch 3, sc in next ch-3 sp; repeat from * across to corner, ch 3 **, (sc, ch 3, sc) in corner ch-sp; repeat from * around blanket ending at **, ch 1, hdc in first sc (counts as ch-sp), do not turn. (164, 196, 228 ch-3 sps)
Round 6: Ch 3 (counts as dc), 2 dc around post of hdc, *ch 1, 3 dc in next ch-3 sp; repeat from * across to corner, ch 1**, (3 dc, ch 3, 3 dc) in corner ch-3 sp; repeat from * around blanket ending at **, 3 dc in first corner-sp, ch 1, hdc to top of beginning ch-3, do not turn. (168, 200, 232 dc groups)
Round 7: Ch 1, sc around post of hdc, *ch 5, sc in next ch-1 sp; repeat from * across to corner, ch 5**, (sc, ch 7, sc) in corner ch-sp; repeat from * around blanket ending at **, sc in first corner ch-sp, ch 7, sl st to first sc, fasten off. (172, 204, 236 ch-3 sps)
Additional Posts and Patterns You Might Like:
Be sure to check out our new roundup of Granny Square Books. These are great resources for growing your skills.
- Two Color Crochet Square Motif – an advanced granny square I taught in the Tournament of Stitches
- Byars Baby Blanket, another join as you go crochet blanket pattern; here's a video for it
- Red Heart Colorful Squares JAYGO Throw free pattern
- Ivy's Poppy Baby Blanket, another JAYGO crochet pattern; this is more advanced but you can bookmark them now and use them soon
- Paton's Fall Colors Granny Blanket
- Marly Bird Granny Square Motif Cardigan can be done JAYGO, which I show in this video
Frequently Asked Questions
What exactly is “Join As You Go” crochet?
Honestly… it's a way to connect your crochet pieces as you make them, instead of sewing them all together at the very end! You start one motif in a way that it attaches to another one you've already made. It's super handy if you're not a fan of all that finishing work.
Can you really adapt any crochet motif to be “Join As You Go”?
Yes! The cool thing is you can totally modify charts and patterns. The page shows how you can adjust the last round of a motif with a single crochet border to make it work for joining. It’s all about replacing a chain stitch with a slip stitch to connect your pieces!
What's the difference between a Slip Stitch Join and a Cluster Chain Seam?
So here's the thing… a slip stitch join is the simplest way to connect motifs by basically swapping a chain for a slip stitch. The cluster chain seam is a bit more involved, using a special cluster stitch, but it adds a really neat decorative touch between your pieces!
How big can I make the Confetti Dots Granny Blanket?
Oh, the possibilities are endless! You can make it any size you dream of, from a sweet baby blanket to a king-sized snuggle for your bed. The pattern specifically gives you measurements and yarn amounts for baby, throw, and full-size blankets.
Do I have to use the exact yarn mentioned for the blanket?
Not at all! While Brava Worsted yarn and the mini packs are recommended, you can totally use up your scrap yarn stash for those colorful “dots.” The most important thing is to make sure you're using a worsted weight yarn so your gauge works out!