How to Crochet in Spaces and Stitches to Make Shells and…
Can you believe how much we've already learned in BiCrafty Bootcamp: Beginner Crochet Lessons for Knitters? We're only on lesson three and you've already learned all of the basic crochet stitches. Plus, you've made a crochet headband and facecloth. We've been crocheting one stitch into each stitch across a row. This week you'll learn how to crochet in spaces and stitches. Moreover, you'll learn how to use chain stitches in a row to create larger spaces. You'll also learn how to crochet multiple stitches into a space or stitch. As a result, you'll be able to crochet shell stitches and the granny stitch by the end of this lesson (and one more surprise stitch).
It's not too late to join BiCrafty Bootcamp. Sign up free here.
BiCrafty Bootcamp Recap
— Lesson One was to learn how to crochet basics. We gave you our Ultimate Guide to Crochet Hooks as well as chart about crochet hook sizes. Big shoutout to our sponsor WeCrochet where you can get terrific crochet hooks, the yarn for BiCrafty Bootcamp projects and more. You learned how to hold your hook and yarn, crochet a foundation chain, single crochet stitch, and use turning chains. If you followed the pattern, you crocheted a headband. Perhaps you even made a single crochet dishcloth if you were going for extra credit.
— Lesson Two expanded upon those basic skills and used them in a beginner crochet facecloth pattern. You learned how to half double crochet, double crochet, and treble crochet. Then you learned how to combine those stitches across the row to create the Long Wave Crochet Stitch. This gave you a chance to learn more about turning chains. Plus, you've now learned about reading crochet charts and patterns. You did so with two colors, so you also learned how to change colors in crochet. Finally, you learned how to count rows in crochet.
How to Read Crochet Charts
We've already shown you a lot about how to read crochet charts in the past two week's videos. We're going to continue showing you more of that in this week's video lesson (which you'll find below, underneath the two patterns). A lot of you are finding this helpful as a supplement or even alternative to reading the written instructions.
Counting Stitches and Rows
Last week's video provided you with lots of great tips about how to count rows in crochet. If you missed that, it's really helpful.
This week we touch a little bit on how to make it easier to count stitches within a row. You can use a stitch marker to mark every five or ten stitches in a row. You should put stitch markers on either end of the work anyway to help you keep it straight; this will easily tell you if your count is going awry. We discussed that tip in Lesson One. Someone in the chat also mentioned that there are stitch counters you can wear on your finger to count easily. And the main thing is that the more you get used to crochet, the easier it'll be for you to keep count.
How to Crochet in Spaces
This week you'll learn how to crochet in spaces. You can work into many different aspects of each stitch. We've been working through both loops of a stitch so far. We spoke briefly about how you can work in one loop only to create different texture. You can also learn how to crochet in spaces (between the stitches) rather than into the stitch itself.
You'll work the same basic crochet stitches (such as single crochet or double crochet). However, you'll insert the hook into the space between stitches. You'll also learn how to use crochet chains within the row to create larger spaces.
How to Crochet Multiple Stitches Into One Space or Stitch
Once you learn how to crochet in spaces, you give yourself a lot of fresh options for variations on basic crochet stitches. You can expand this even more when you learn how to crochet multiple stitches into one space or stitch.
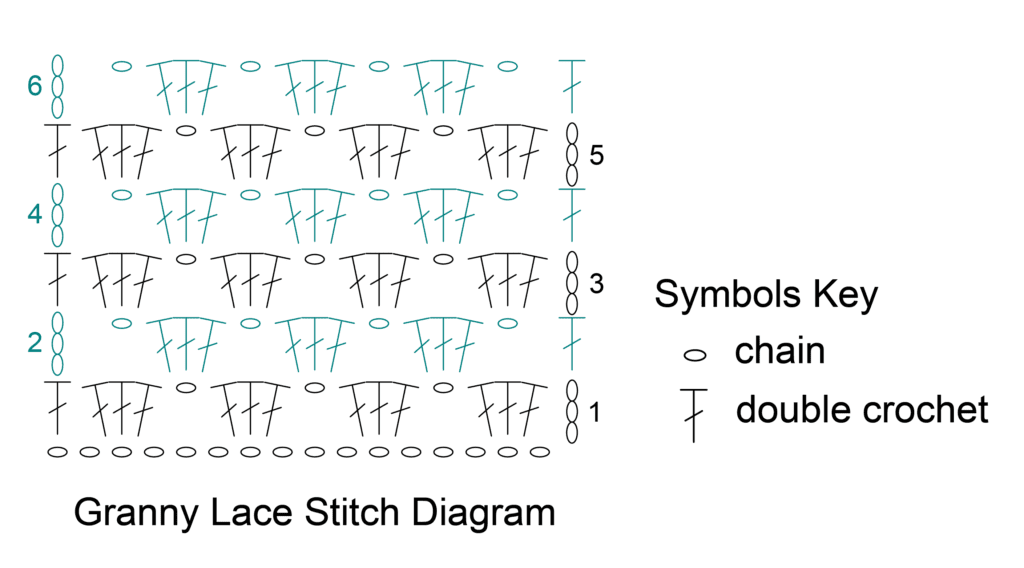
For example, you'll learn how to crochet three double crochet into one space to create the granny stitch. (This popular stitch looks similar to the classic granny square, but is worked in rows instead of in the round. You'll learn the granny square itself a few lessons down the road.)
Similarly this week, you'll learn how to crochet 5 double crochet stitches together in one space or stitch. This allows you to create the crochet shell stitch. There are many variations on the shell stitch but this one is a very common option. You'll use chains to create spaces as well as to keep your stitch count even across the entire row.
Here is a video Marly did for a cute shell stitch pattern used on a crochet baby blanket. Spoiler alert: she used stacked stitches in this pattern which we will talk about later.
Lesson 3 Crochet Bootcamp Patterns: Materials
When possible, we have provided affiliate links for items. Using these links does not cost you anything more but it does let the company know you came there from us and we get a portion of the sale.
We have two crochet patterns for homework this week. The granny stitch headband will help you practice how to crochet in spaces. Both it and the crochet shell facecloth pattern will allow you to practice crocheting multiple stitches into a space or stitch.
You'll need:
Yarn: 1 ball of WeCrochet Dishie Yarn, any color (one ball is enough to complete both patterns)
Hook: 1 Size G (4.0mm) crochet hook (WeCrochet Hook, TooShay Crochet Hook)
Notions: Locking stitch markers from WeCrochet, Chenille and tapestry needles for weaving in ends
Pattern #1: Granny / Headwrap for Self Care
Ch 55
(Tip: In the video instruction, we discuss how you can actually chain extras to give yourself room to work in case you miss a chain, which is easy to do. Then you can either skip a chain at the end or undo the extra chains.) Stitch Multiple for Granny Lace Stitch is 4 + 3.
Row 1 (RS): 3 dc in 5th ch from hook, * ch 1, skip 3 ch, 3 dc in next ch; repeat from * to last 2 ch, skip 1 ch, dc in last ch, ch 4, turn — 13 granny sets.
Row 2 (WS): Skip 3 dc, *3 dc in next ch-1 space, ch 1, skip 3 dc; repeat from * to last st, dc in 3rd ch of tch, ch 3, turn — 12 granny sets.
Row 3 (RS): *3 dc in next ch-1 space, ch 1, skip 3 dc; repeat from * to last ch-1 sp, 3 dc in next ch-1 sp, dc in 3rd ch of tch, ch 4, do not turn, rotate the work 90 degrees to work along short edge — 13 granny sets.
????Stop here for headband.
If you wanted to continue in the pattern, repeat rows 2 and 3 (turning on row 3 if continuing) for desired length ending after a row 3.
Continue Pattern instructions for Headband
We're going to make headband ties similar to those we made for the headband in Lesson One.
1st Side Edge
Working into the short edge,
Row 1 (RS): 2 sc into the edge of each row, 1 sc in foundation chain, ch 1, turn — 7 single crochet
Row 2 (WS): Sc2tog, sc in next 3 sc, sc2tog, ch 1, turn — 5 single crochet.
Row 3: Sc2tog, sc in next sc, sc2tog, ch 1, turn — 3 single crochet.
Row 4: Sc3tog — 1 single crochet
1st Finishing ties or no ties (see both options)
Option 1: After the single crochet 3 together, chain 50. Fasten off.
Option 2: Fasten off. Make I-cord 15″ (38 cm) long. Seam to edging.
2nd Side Edging
Turn 180 degrees to other short edge.
Row 1 (RS): Join yarn with a slip stitch in foundation chain edge, ch 1 and sc in same chain, 2 sc into the edge of each row, ch 1, turn — 7 single crochet
Row 2 (WS): Sc2tog, sc in next 3 sc, sc2tog, ch 1, turn — 5 single crochet.
Row 3: Sc2tog, sc in next sc, sc2tog, ch 1, turn — 3 single crochet.
Row 4: Sc3tog — 1 single crochet
2nd Finishing ties or no ties (see both options)
Choose same option as you did for the 1st side edging.
Option 1: After the single crochet 3 together, chain 50. Fasten off.
Option 2: Fasten off. Make I-cord 15″ (38 cm) long. Seam to edging.
Weave in all ends.
NOTE: You can also make a longer headband, then simply seam the two short ends together to create a headband without ties. Begin with a chain that's a multiple of 4 + 2. Then do the same thing as above or the pattern. You'll have to fiddle around to find the right size but you'll get it! We also discussed in chat that this is a great stitch pattern to create a long garland, for example to wrap around a Christmas tree.
Pattern #2: Crochet Shell Facecloth to Match Headband
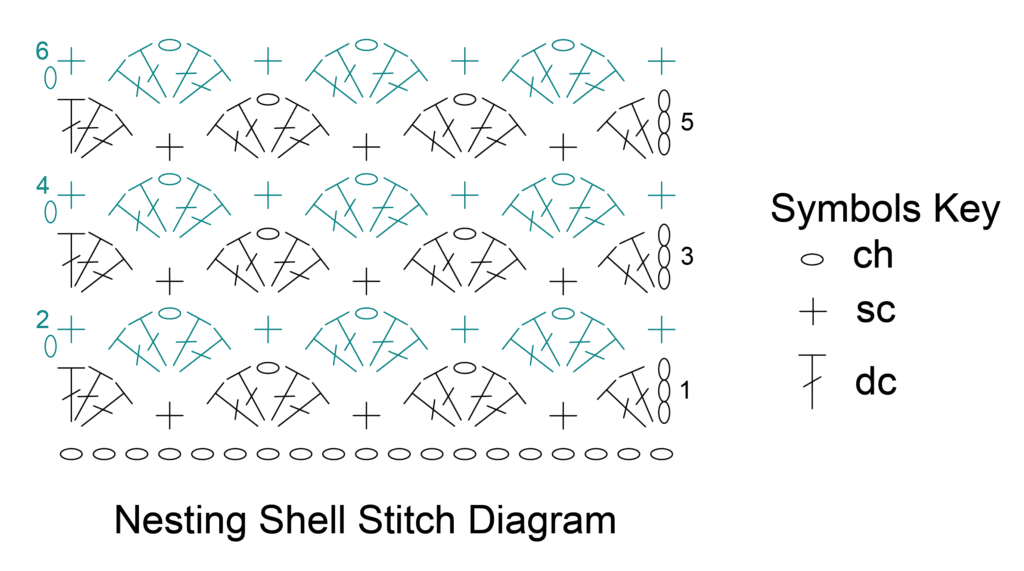
Chain a multiple of 6 + 4. You can make this facecloth as wide as you want with a starting chain length of your choosing.
Row 1 (RS): 2 dc in 4th ch from hook (skipped 3 ch count as dc), * skip 2 ch, sc in next ch, skip 2 ch, (2 dc, ch 1, 2 dc) in next ch; repeat form * to last 6 ch, skip 2 ch, sc in next ch, skip 2 ch, 3 dc in next ch, ch 1, turn — stitch count depends on how many you chained to begin with for the foundation chain.
Row 2 (WS): Sc in first dc, skip 2 dc, * (2 dc, ch 1, 2 dc) in next sc, skip 2 dc, sc in next ch-1 sp, skip 2 dc; repeat from * to last sc, (2 dc, ch 1, 2 dc) in last sc, skip 2 dc, sc in 3rd ch of tch, ch 3, turn.
Row 3 (RS): 2 dc in first sc (ch 3 counts as dc now and throughout), skip 2 dc, * sc in next ch-1 sp, skip 2 dc, (2 dc, ch 1, 2 dc) in next sc, skip 2 dc; repeat from * to last ch-1 sp, sc in last ch-1 space, skip 2 dc, 3 dc in last sc, ch 1, turn.
Repeats Row 2 and 3 to desired length. Recommended facecloth size is approximately 10″ x 10″ but this is flexible.
Once the facecloth is desired size, fasten off yarn.
Weave in ends.
BiCrafty Bootcamp Lesson 3 Video Instruction
Here's our video instruction (originally LIVE but of course still available for replay on YouTube) for how to crochet in spaces and work multiple stitches into spaces and and stitches to create crochet shells and granny stitch:
Additional Videos and Patterns You're Ready For
You can already complete so many different crochet patterns thanks to your knowledge of basic crochet stitches. In fact, we updated the links at the bottom of Lesson 2's post to give you more to practice with. We also created a post about how to crochet lemon peel stitch. This post also has lots of crochet patterns that you can use. Now that you know how to crochet in spaces and crochet multiple stitches in one space or stitch, you can also enjoy the following:
- Easy Crochet Shell Stitch Blanket Free Pattern *includes video tutorial
- Crochet Beginner Shells Blanket With Thick Yarn *includes video tutorial
- Caron X Pantone Striping Shells Crochet Shawl Free Pattern
- Caron Crochet Shell Shawl Free Pattern
- Caron Cheery Crochet Granny Stripes Baby Blanket Free Pattern
- Crochet Stitch Sampler Blanket Pattern *includes video tutorial
- Beginner Crochet Poncho Pattern
- Jilly Bean Cowl with Linen Stitch *includes video tutorial
- Feeling ambitious? Learn the Long Double Crochet Chevron Stitch Video Tutorial and make the Colorado Sunrise Cowl.
- Shivering Chic Shawl — a granny stitch shawl that is fun to wear and is made with merino wool yarn AND has a video tutorial linked below for left handed crochet and right handed crochet.
➡️ Need a Left Handed Video for Shawl: https://youtu.be/HQ63G2EqNtE
Frequently Asked Questions
What's the main thing we're learning in this lesson?
So here's the thing… in this lesson, we're diving into how to crochet in the spaces between stitches, not just into the stitches themselves! We'll also learn how to use those chain stitches to make bigger spaces, which is super handy.
Can I really make shells and granny stitches after this?
Yes! Honestly, once you get the hang of crocheting into spaces and putting multiple stitches into one spot, you'll totally be able to make those pretty shell stitches and the classic granny stitch. It really opens up a lot of new pattern possibilities!
Do I need any special yarn or hooks for these patterns?
You know, the patterns suggest using Dishie yarn from WeCrochet and a G (4.0mm) hook. But honestly… you can probably use what you have in your stash if it's a similar weight! Just make sure your hook size is appropriate for the yarn you choose.
What if I'm not in the BiCrafty Bootcamp… can I still learn this?
Absolutely! While the lesson is part of the BiCrafty Bootcamp, the video tutorial is right there on the page. So, you can totally follow along and learn these awesome new techniques even if you're not officially signed up!
What's the difference between crocheting in a space versus a stitch?
Great question! Normally, we put our hook through both loops of a stitch… but when you crochet in a space, you just insert your hook into the gap between stitches. It feels a little different at first, but it makes for some really cool textures and stitch patterns!