
Crochet Slip Stitch Ribbing for Super Stretch
There are several different ways to crochet ribbing. We're talking about that this week in BiCrafty Bootcamp: Beginner Crochet Lessons for Knitters. One of the options is slip stitch ribbing. I've used this for quite a few things but it's especially great as a hat brim. Let me show you how to do it.
Crochet Hat Brim
One of the most popular ways that I'ver ever used crochet slip stitch ribbing Is as the brim for my Ribbed for Him or Her Hat. This was my take on a messy bun hat and it included a brim. When I wear a hat with a brim, I like something that has structure and doesn't lay flat on my face. It's actually pretty hard to find that among all of the crochet hat designs out there. So, I created my own. I found that by using a crochet stretchy slip stitch rib, I could get the perfect brim for this hat.
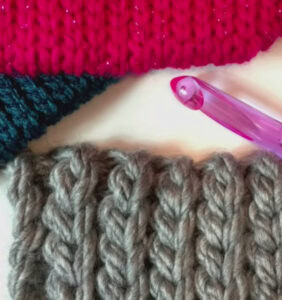
The crochet stretchy slip stitch rib is great to use for a hat brim like this one. However, you can also use it anytime that you want stretchy ribbing. For example, use it on sweater sleeve cuffs or the cuffs of crochet mittens. The crochet slip stitch ribbing has so much memory which makes for such a stretchy band on your project. Another great thing about this rib is that it looks like knitted rib but is really crochet. In order to get the stretchy properties you will only be working in the back loop of the stitch. Take a look at the video and see where you can apply this crochet ribbing.
What Is Crochet Slip Stitch Ribbing?
As I said, you'll crochet in the back loop only of the stitch. You'll use slip stitch in those back loops. It's really a super easy technique!
How to Crochet Slip Stitch Ribbing
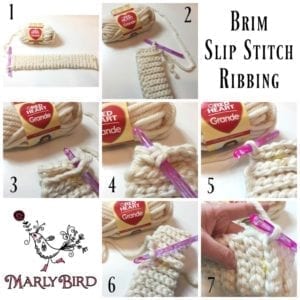
You'll find a photo tutorial and two video tutorials below. This should make it simple for you to learn how to work this technique. The basic written instructions are as follows:
- Chain the width you desire.
- Insert the hook into the back loop only.
- Yarn over and pull up a loop.
- Confirm that the loop is parallel in height to the loop on the hook. This helps you get the right tension.
- Then continue pulling that loop through the loop on the hook. In other words, complete the slip stitch.
- Chain one and turn to start the next row. When starting the next row, do not count the chain one as the first stitch.
Stretchy Slip Stitch Ribbing Photo Tutorial
Here's a simple photo tutorial that shows you the seven steps you'll use to create this ribbing:
YouTube Tutorial of Crochet Stretchy Slip Stitch Rib:
Obviously, many people learn better from video tutorials than from photo tutorials. Therefore, I've also created that for you. In fact, I've created two. The first one is generally how to crochet this type of ribbing:
And the second one is more specifically how to crochet this ribbing as the hat brim for the aforementioned popular messy bun hat pattern:
Yarn Recommendations:
You can use this technique when working with any kind of yarn. In the videos and the pattern shown above, I've used:
You Might Also Like:
- Learn How to Crochet: Your First Five Stitches
- How to Seam Crochet: Mattress Stitch
- Learn to Crochet Basics
Frequently Asked Questions
What is slip stitch ribbing in crochet?
Slip stitch ribbing is one of the best ways to get a stretchy, knit-like edge in crochet. Instead of using chains for your turning chain (which leaves holes and gaps), you work rows of slip stitches through the back loop. The result is a dense, stretchy ribbed fabric that looks remarkably like knit ribbing. It's incredibly popular for hat brims because it snaps back to hug your head… no saggy brim, ever.
Is slip stitch ribbing hard to learn?
It's one of those things that feels a little weird at first because slip stitches are tight… but once you get your tension right, it moves quickly. The key is keeping your stitches loose enough to work into comfortably. If your slip stitches are super tight, go up a hook size for the ribbing section. Once the rhythm clicks, slip stitch ribbing is actually pretty meditative and fast. Marly uses it regularly and has a video tutorial to show you exactly how.
What's the difference between slip stitch ribbing and other crochet ribbing methods?
There are a few ways to do crochet ribbing! Post stitch ribbing (using front and back post double crochet) gives you that raised rib texture. Half double crochet through the third loop is another popular method. And then there's slip stitch ribbing… which is the stretchiest of the bunch and the most knit-like in appearance. Each method has a different stretch, thickness, and look. Slip stitch ribbing is specifically great when you need maximum stretch and a clean, tidy edge.
Where can I use slip stitch ribbing in my projects?
Hat brims are the most popular use, but it works anywhere you'd want stretchy ribbing… cuffs on mittens and gloves, waistbands on sweaters, neckline edgings, sock cuffs. Any place where you need the fabric to stretch over something (like your head or your wrist) and then spring back… that's where slip stitch ribbing shines. It's a technique that belongs in every crocheter's toolkit.
Can I use slip stitch ribbing if I'm a beginner crocheter?
Yes! If you know how to do a basic slip stitch and work into the back loop… you can do this. The challenge is mostly tension control, which just takes a little practice. Start with a small swatch before jumping into a project. Once you see how stretchy and neat it looks, you'll want to use it on everything. It's one of those “why didn't anyone teach me this sooner” techniques.
Categories: Crochet, YouTube Video Tutorial


It’s kind of freaky that this was the video you posted today. This is a technique I just heard about but couldn’t wrap my brain around. Your videos are always so clear and easy to follow. I love your sparkly nails too.