Triple Twist Knit Ear Warmer – Free Knit Ear Warmer Pattern
Looking for a fast, cozy knit that uses just one skein and still looks like you put in way more effort than you actually did? 😏
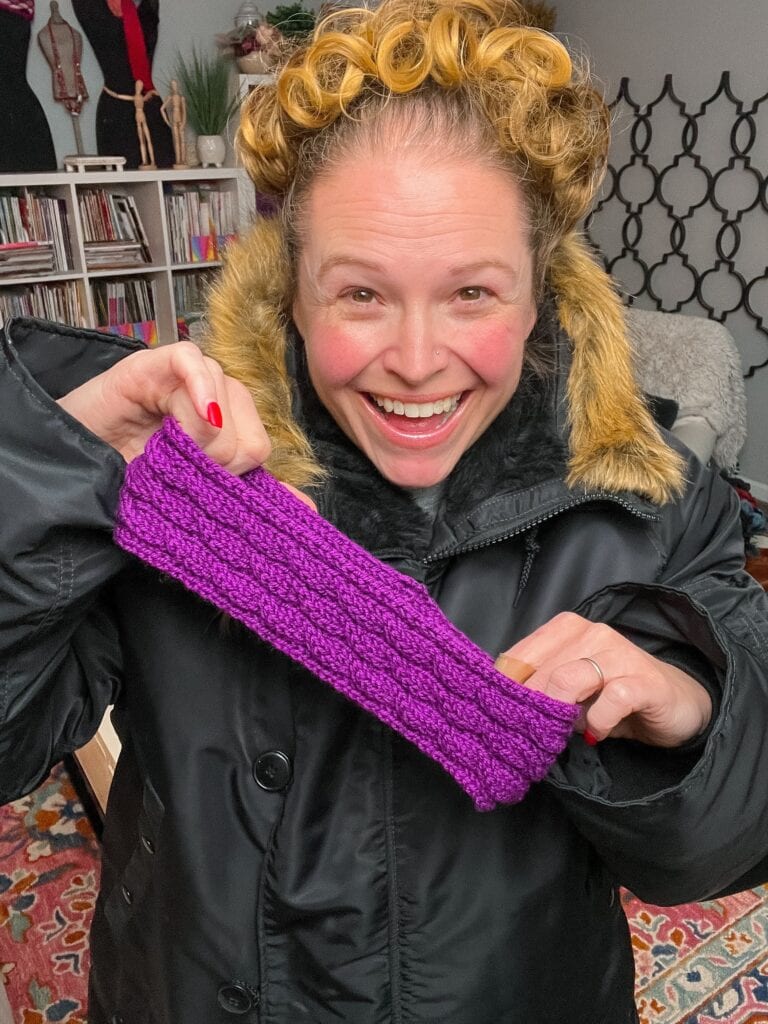
Say hello to the Triple Twist Knit Ear Warmer.

Affiliate Disclosure: This post contains affiliate links. To learn more please visit my privacy policy here💖
This cabled knit headband is worked flat as a long strip, then joined into a loop with a neat 3-needle bind off. The result is a beautifully textured, twisted ear warmer that keeps your ears toasty without giving you full-on hat hair. Win. Win. WIN. 🙌
Originally part of my Jolly Holiday with Marly collection, this pattern has been a fan favorite in PDF form — and now you can follow it free here on the blog, with the option to upgrade to an ad-free, printable PDF if you like your patterns neat, tidy, and project-bag ready.

Why You’ll Love This Knit Ear Warmer
Let’s talk about why this little project has become such a go-to for gift knitting and “just one more skein” moments:
- Quick knit project – great for evenings, weekends, or “I need a gift by tomorrow” emergencies
- Single-skein pattern – uses approximately one skein of worsted weight yarn
- Flat construction – worked back and forth, then joined, so no knitting in the round required
- Simple but stunning cables – just a couple of 2/2 cables give that yummy triple twist effect
- Adjustable circumference – knit to the length you want, then join
- Perfect stash buster – use that special skein you’ve been saving (yes, that one)
🧶 Designer Tip:
If you’re making this as a gift, aim for about ¾”–1½” (2–4 cm) smaller than the actual head circumference. The fabric has stretch, and a little negative ease helps it stay in place without squeezing.

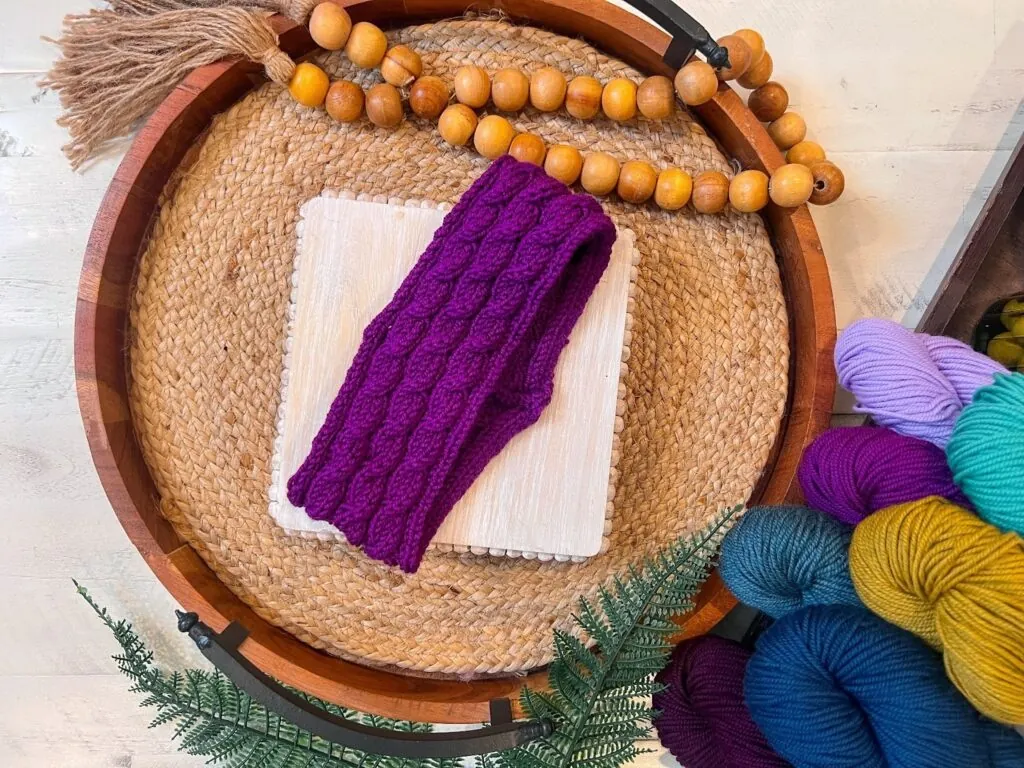
Yarn and Substitutions
The original sample is knit in:
- Yarn: Knit Picks Twill
- Fiber: 100% superwash merino wool
- Weight: Worsted (#4)
- Yardage: 149 yds / 135.5 m per 100 g
- Color: Eggplant
- Amount: 1 skein
You can absolutely substitute another worsted weight yarn you love. Look for:
- A soft yarn that feels good against your forehead and ears
- A fiber that has a bit of bounce and memory (wool and wool blends are great)
- Good stitch definition so those cables really pop
Because this is an ear warmer and not a fitted sweater, gauge is not critical for size in the same way — it matters more for:
- The fabric feel (too loose vs too stiff)
- Ensuring you have enough yarn for the length you want
🧶 Designer Tip:
If you’re unsure whether your yarn will work, knit just one full pattern repeat, block it, and see how it feels. You’ll know pretty quickly whether it’s “cozy headband” or “cardboard crown.” 😉

Size, Fit, and Adjusting the Ear Warmer
From the pattern:
- Width: Approximately 2¾” [7 cm]
- Circumference: About 20″ [51 cm], adjustable
The pattern is designed so you can easily adjust the fit by working more or fewer repeats of the 6-row cable pattern.
Here’s a simple way to customize:
- Measure around your head where you want the ear warmer to sit.
- Subtract about ¾”–1½” (2–4 cm) for a snug-but-comfy fit.
- Work the pattern until your strip measures that length, then follow the instructions to finish and join.
Want it wider? You’d need to adjust the stitch count and cable panel, which is more of an “intermediate knitter who likes math” adventure — but you can do it if you’re comfortable modifying patterns.
🧶 Designer Tip:
Before you join the ends, safety pin them together and try it on. Walk around, bend over, pretend you’re grabbing something off the bottom shelf at the grocery store — if it stays put, you nailed it.
Skill Level and Techniques Used
I’d call this pattern Adventurous Beginner / Confident Beginner.
You should already be comfortable with:
- Knit (k)
- Purl (p)
- Working flat in rows
- Basic stitch abbreviations
- Counting stitches and rows
In this pattern, you’ll also use:
- 2/2 RC (Right Cable) – slip 2 sts to cable needle, hold in back, knit 2, then knit 2 from cable needle
- 2/2 PRC (All-Purled Right Cable) – slip 2 sts to cable needle, hold in back, purl 2, then purl 2 from cable needle
- Provisional cast-on using a crochet chain
- 3-needle bind off to join the ends neatly
You’ll work the headband flat, following a simple 6-row repeat that builds that beautiful triple twist effect down the center.
🧶 Designer Tip:
If cables make you a little nervous, practice the 2/2 RC and 2/2 PRC on a tiny swatch first. Once you see how the stitches cross and line up, the headband will feel much more approachable.

Helpful Tutorials for This Pattern
Inside the PDF, I point you to specific video tutorials to help with:
- Provisional Cast-on >> https://www.youtube.com/watch?v=jo99NawdTZU <<
- Knit Stitch (Continental) >> https://www.youtube.com/watch?v=M3brKFKg5Yc <<
- Purl Stitch (Continental) >> https://www.youtube.com/watch?v=LuDt-8jqh4g <<
- How to Cable: 2/2 RC >> https://www.youtube.com/watch?v=cKNc7xrhdD4 <<
- How to Fix Miscrossed Cables >> https://www.youtube.com/watch?v=5se7YKWv5xg <<
- How to Cable with No Cable Needle >> https://www.youtube.com/watch?v=d0tJvpTc1O8 <<
- How to Add a Lifeline (3 ways) >> https://youtu.be/FiqYUE_aHAw <<
- How to Tink >> https://youtu.be/c7Gud7k4Y8k <<
- How to Bury Ends >> https://www.youtube.com/watch?v=8_NBGUKjO-E <<
Bookmark those if you’re the type who likes a video cheerleader while you knit. 🎥🧶
🧶 Designer Tip:
If this is your first cable project, consider adding a lifeline every few repeats. That way if you need to rip back (it happens!), you don’t have to start from the very beginning.
Blocking and Finishing Your Ear Warmer
Even a small project like an ear warmer can benefit from a little finishing love. Blocking helps:
- Relax the stitches
- Smooth out the fabric
- Make the cable pattern really shine
Because the sample yarn is superwash wool, you’ll want to be thoughtful about how you block it (superwash can grow if you overdo it).
For more detail on steam vs wet blocking, check out my full post:
- Steam Blocking vs Wet Blocking Superwash Yarn
https://marlybird.com/blog/steam-blocking-vs-wet-blocking-superwash-yarn-prism-make-along-part-10/
Quick tips:
- Don’t stretch the ear warmer aggressively — you don’t want to lose that snug fit.
- Smooth it gently, then let it dry completely before trying it on.
- If you’re using non-superwash wool or acrylic, adjust your blocking method accordingly.


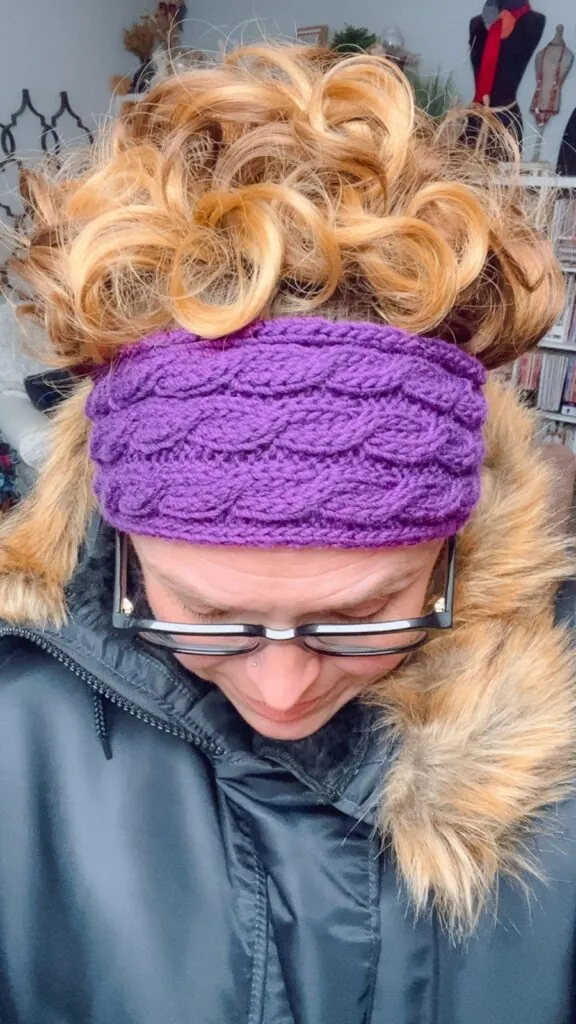
Styling Ideas – How to Wear the Triple Twist Knit Ear Warmer
This little accessory is way more versatile than it looks at first glance. Here are a few fun ways to wear it:
- Messy bun days: Perfect when you want your hair up but your ears warm.
- Under the hood: Layer it under a jacket hood for extra cozy, no-bulk warmth.
- Match your coat: Knit it in a color that coordinates with your favorite winter coat and suddenly you look very “I planned this” in the school pickup line. 😉
- Outdoor walks: Great for walks, dog duty, or cheering at games when a full hat feels like too much.
- Gift-ready sets: Pair the ear warmer with matching mitts or a cowl for an easy gift set.
🧶 Designer Tip:
If you love making sets, knit a second ear warmer in a contrast color and gift it with a note like, “One for now, one for when you lose the first one.” Your fellow yarn lovers will feel seen. 😂
Triple Twist Knit Ear Warmer – Free Pattern
Designed by Marly Bird
SKILL LEVEL
Adventurous Beginner
MEASUREMENTS
Size
One size fits most adults.
Finished Measurements
Headband measures approximately 2¾“ [7 cm] in width and 20” [51 cm] around.
Circumference can be adjusted to fit.
Gauge
Gauge is not essential for this item.
MATERIALS
Yarn
Knit Picks, Twill (100% superwash merino wool, 149 yds / 135.5 m, 3½ oz / 100 g CYCA #4 worsted)
1 skein: #61372 Eggplant
Needles
U.S. Size 9 [5.5 mm] or size needed for gauge, plus a spare needle for use in 3-Needle Bind-Off.
Hook
Crochet hook in similar size or larger for use in Provisional Cast-on.
Notions
ABBREVIATIONS
2/2 PRC – 2/2 All-Purled Right Cable (see Cable Stitches)
2/2 RC – 2/2 Right Cable (see Cable Stitches)
K – Knit
P – Purl
RS – Right Side
St(s) – Stitch(es)
WS – Wrong Side
CABLE STITCHES
⭐ 2/2 RC (2/2 Right Cable): Slip 2 stitches onto cable needle and hold in back, knit 2 stitches from left needle, then knit 2 stitches from cable needle.
⭐ 2/2 PRC (2/2 All-Purled Right Cable): Slip 2 stitches onto cable needle and hold in back, purl 2 stitches from left needle, then purl 2 stitches from cable needle.
SPECIAL TECHNIQUES
Provisional Cast-on: Using hook and scrap yarn, chain desired number of sts. Fasten off. Using knitting needle, pick up and knit 1 st in each chain, using the back-bump, or spine, of the chain. After piece is completed, you can unravel the crochet chain and place live sts at cast-on edge back onto the needle.
3-Needle Bind Off: Hold both pieces to be joined in your left hand, needles parallel to each other, one in front of the other. Hold a 3rd, empty needle in your right hand. Insert right needle knitwise into the 1st st on both front and back needles, and knit them together. Work the next pair of sts the same way, then pass 1st st on right needle over 2nd st. Continue in this manner until all sts have been bound off.
CHART
Click on image to enlarge for printing
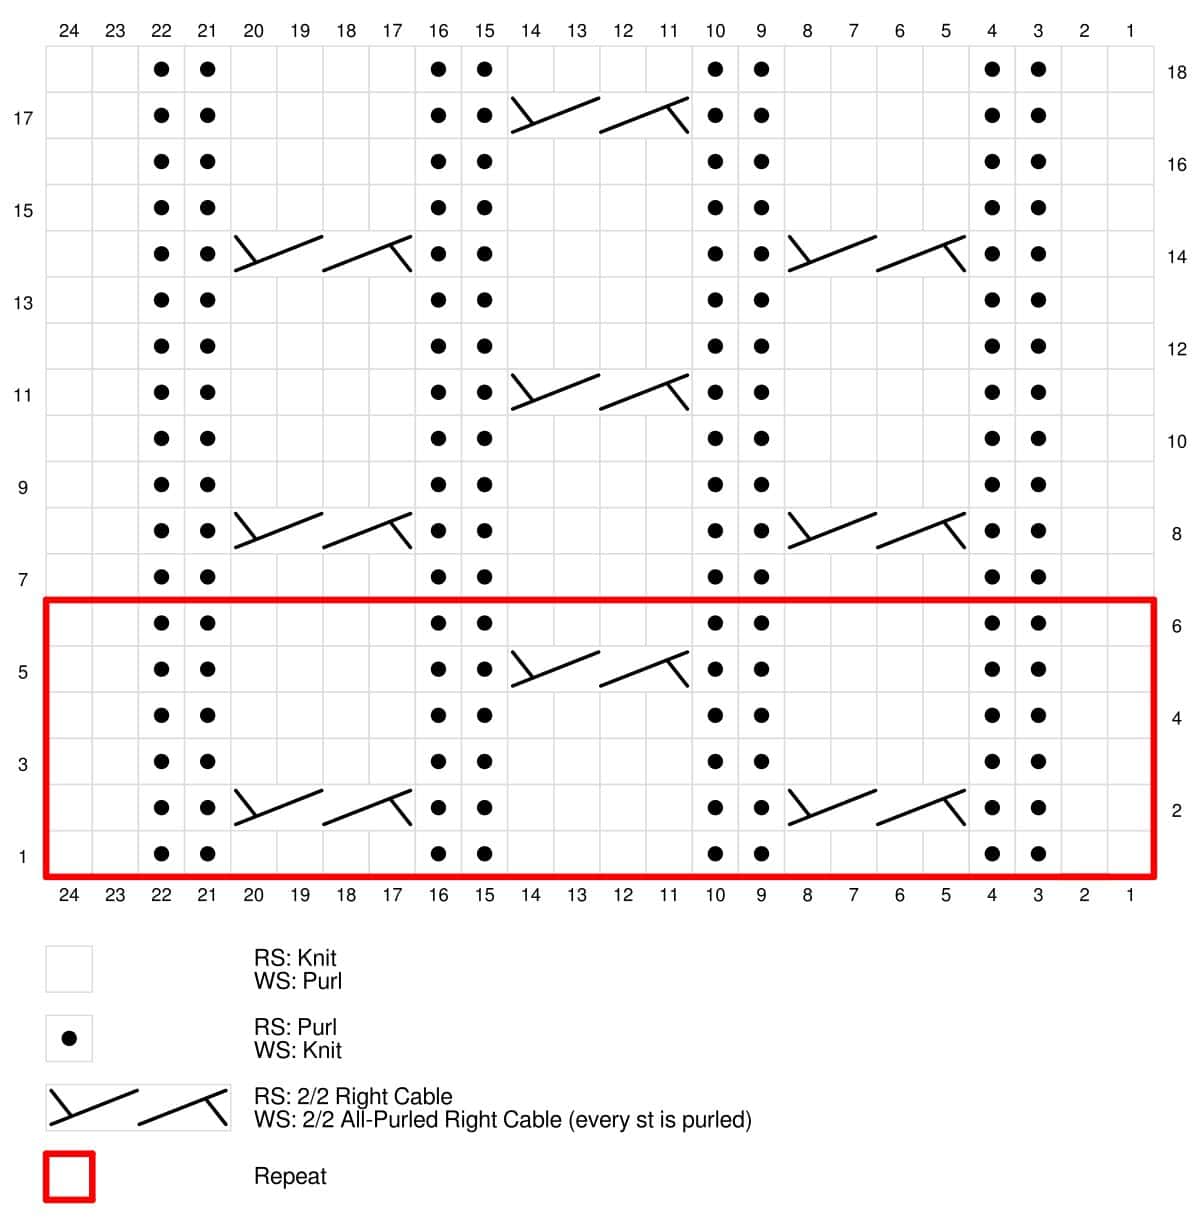
NOTES
- Headband is worked flat as a long cabled band, then joined together at the short edges.
- Purled cables are used on the WS to keep the twists evenly offset.
VIDEO TUTORIALS
- Provisional Cast-on >> https://www.youtube.com/watch?v=jo99NawdTZU <<
- Knit Stitch (Continental) >> https://www.youtube.com/watch?v=M3brKFKg5Yc <<
- Purl Stitch (Continental) >> https://www.youtube.com/watch?v=LuDt-8jqh4g <<
- How to Cable: 2/2 RC >> https://www.youtube.com/watch?v=cKNc7xrhdD4 <<
- How to Fix Miscrossed Cables >> https://www.youtube.com/watch?v=5se7YKWv5xg <<
- How to Cable with No Cable Needle >> https://www.youtube.com/watch?v=d0tJvpTc1O8 <<
- How to Add a Lifeline (3 ways) >> https://youtu.be/FiqYUE_aHAw <<
- How to Tink >> https://youtu.be/c7Gud7k4Y8k <<
- How to Bury Ends >> https://www.youtube.com/watch?v=8_NBGUKjO-E <<
GROW
To Unlock Exclusive Subscriber Content click the Box below and join for free by simply adding your email and creating a password! If you are having troubles, clear your cache or reset your password or login to the Grow Publisher Portal.
>> Learn More About Grow Here <<
I’m thrilled to share this amazing pattern with you, many patterns on my blog are absolutely free! I kindly request that you don’t copy and paste or distribute this pattern. Prefer an ad-free experience? Buy a digital PDF pattern for a small fee from one of my online stores for a seamless crafting journey.
I appreciate your support and readership. You are the reason I can keep doing what I love and sharing it with others. So, thank you from the bottom of my yarn-loving heart! Disclosure: This post contains affiliate links, meaning I get a commission if you decide to make a purchase through my links at no cost to you.
TRIPLE TWIST EAR WARMER HEADBAND PATTERN
Using the Provisional Cast-on (see Special Techniques and Video Tutorials), cast on 24 sts.
Row 1 (WS): P2, * k2, p4; repeat from * twice more, k2, p2
Row 2: K2, p2, 2/2 RC, p2, k4, p2, 2/2 RC, p2, k2
Row 3: P2, * k2, p4; repeat from * twice more, k2, p2
Row 4: K2, * p2, k4; repeat from * twice more, p2, k2
Row 5: P2, k2, p4, k2, 2/2 PRC, k2, p4, k2, p2
Row 6: K2, * p2, k4; repeat from * twice more, p2, k2
Repeat Rows 1-6 until piece measures approximately 19¼“ [49 cm], or ¾” [2 cm] less than desired finished circumference, then work Rows 1-5 only once more.
FINISHING
Holding Headband upside down and with RS facing, and using an empty needle, pick up the right leg of each st across the topmost working-yarn row, just below the waste yarn, working from right to left, and ending by picking up the final leftmost bar of the row.
Count: 24 sts.
Unravel and remove waste yarn from provisional cast-on.
Hold both needles in your left hand with WS of Headband facing out, and join with 3-Needle Bind-off (see Special Techniques).
Fasten off.
Weave in all loose ends.
Attach leather tag with rivets (optional).
Want the Printable PDF?
If you prefer to knit from a clean, ad-free layout, you can grab the Triple Twist Knit Ear Warmer PDF as a paid upgrade.
It’s perfect if you:
- Love to print and highlight your patterns
- Like having the abbreviations, special stitches, and notes all on one page
- Want a mobile- or tablet-friendly version to knit from on the go
- Would like to support the designer while still enjoying the free version on the blog 💖
More Knit Patterns You’ll Love
If you enjoy a quick, satisfying knit like this ear warmer, you might also love exploring more free knitting patterns on my site.
You can browse:
- All Free Patterns from Marly Bird:
https://marlybird.com/our-free-patterns/
Filter by knitting, choose your favorite yarn weight, and keep those needles busy. 🧶✨
FAQs: Triple Twist Knit Ear Warmer
Is this pattern beginner friendly?
I’d call this Adventurous Beginner / Confident Beginner.
If you’re comfortable with knit, purl, working flat, and following a 6-row repeat, you’re in a great spot. The cables and provisional cast-on might be new to you, but that’s what the tutorials are for.
Do I have to use a provisional cast-on?
The pattern is written with a provisional cast-on so you can use a 3-needle bind off and get a beautiful, sturdy, nearly seamless join.
If you really don’t want to use a provisional cast-on, you could:
- Cast on normally,
- Work the strip, then
- Seam the ends together with mattress stitch or whipstitch.
It will work, but the 3-needle bind off is really worth trying — it’s one of those “wow, I feel like a real knitter” moments. 😉
Can I make the ear warmer longer or shorter?
Yes! That’s built right into the pattern.
You can:
- Add repeats of the 6-row pattern to lengthen
- Work fewer repeats for a shorter circumference
Just keep in mind you want the finished length to be slightly smaller than the head measurement for a snug fit.
How much yarn do I need?
The pattern is designed to use approximately one skein of worsted weight yarn (as listed above).
If you’re planning to make it significantly longer or knit multiple ear warmers from one skein, consider weighing your yarn and your project as you go so you don’t play yarn chicken at the bind-off. 🐔
Can I sell finished ear warmers made from this pattern?
In general, yes — you can sell finished items made from my patterns on a small scale, especially at craft fairs, local shops, and online handmade marketplaces.
Please credit the design as:
“Triple Twist Knit Ear Warmer pattern by Marly Bird – MarlyBird.com”
And as always, please do not copy, sell, or redistribute the pattern itself.
How do I share my finished Triple Twist Ear Warmer?
Please, please share it — I love seeing your makes! 🥰
You can:
- Tag me on Instagram: @themarlybird
- Use the hashtags: #mmmdi and #marlybird
- Share in the Marly’s Minions: Marly Bird BiCrafty Community on Facebook so we can all ooh and ahh over your cables together

Final Thoughts
The Triple Twist Knit Ear Warmer is one of those small-but-mighty projects: quick on the needles, big on texture, and endlessly giftable.
It’s the perfect pattern for:
- Using a favorite skein
- Practicing or polishing your cable skills
- Knitting something cozy while you binge your latest show
- Filling a holiday gift basket with handmade goodness 🎁
So grab your yarn, cast on those 24 stitches, and let those twists do their thing.
And when you bind off that last stitch and try it on?
You know the drill: tag me @themarlybird and use #mmmdi and #marlybird so I can cheer you on and share your gorgeous ear warmers with the community. 💖
Categories: Uncategorized