Free Knit Tunic Pattern – Birgitta Knit Tunic by Marly Bird
Looking for a knit top that’s breezy, a little bit fancy, and still totally “throw it on with jeans” friendly? 💁♀️
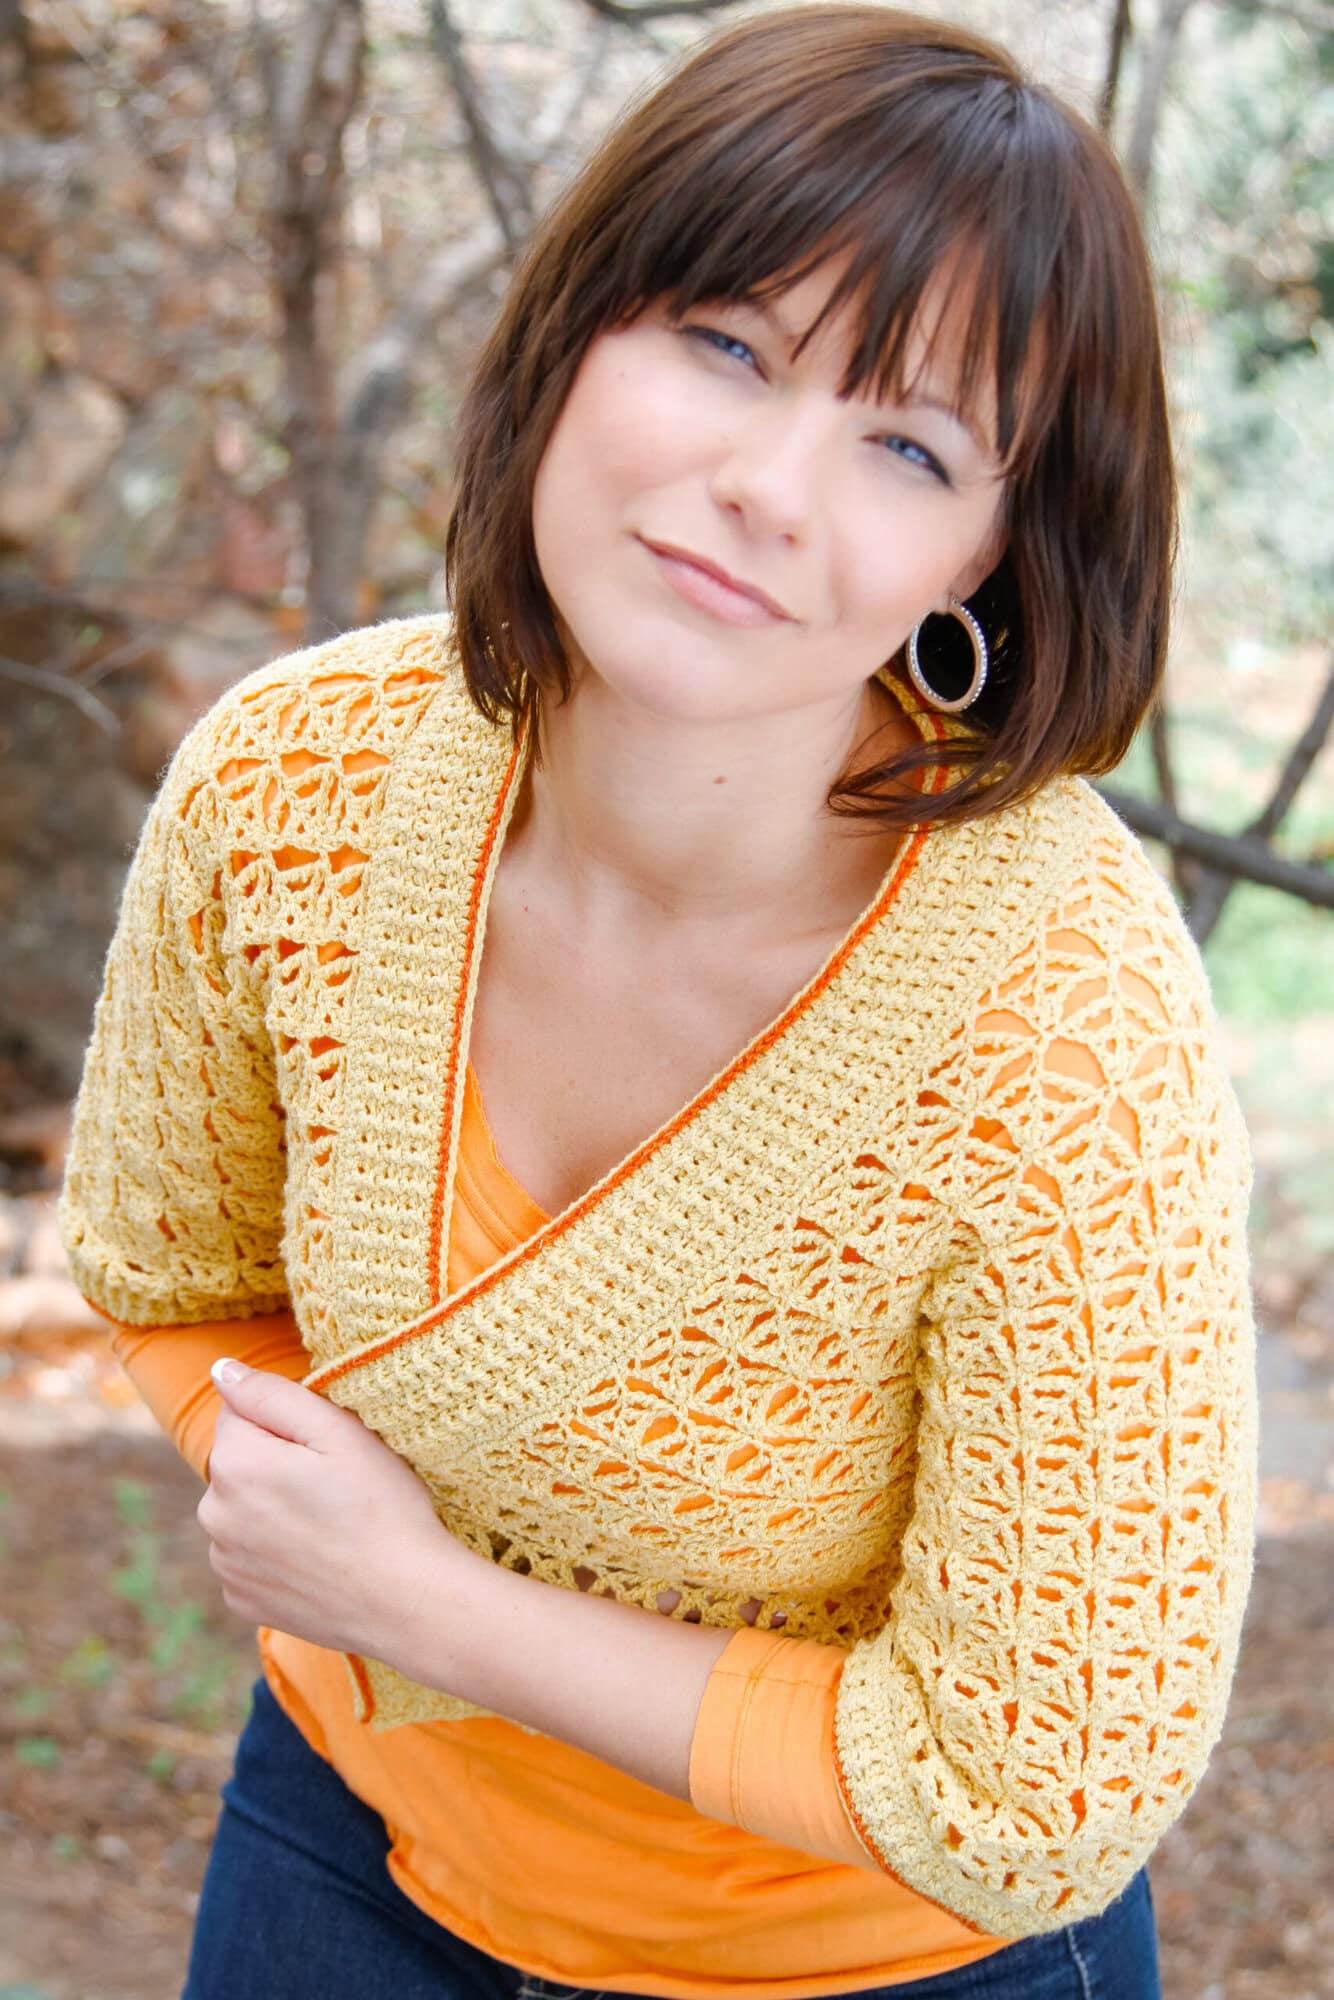
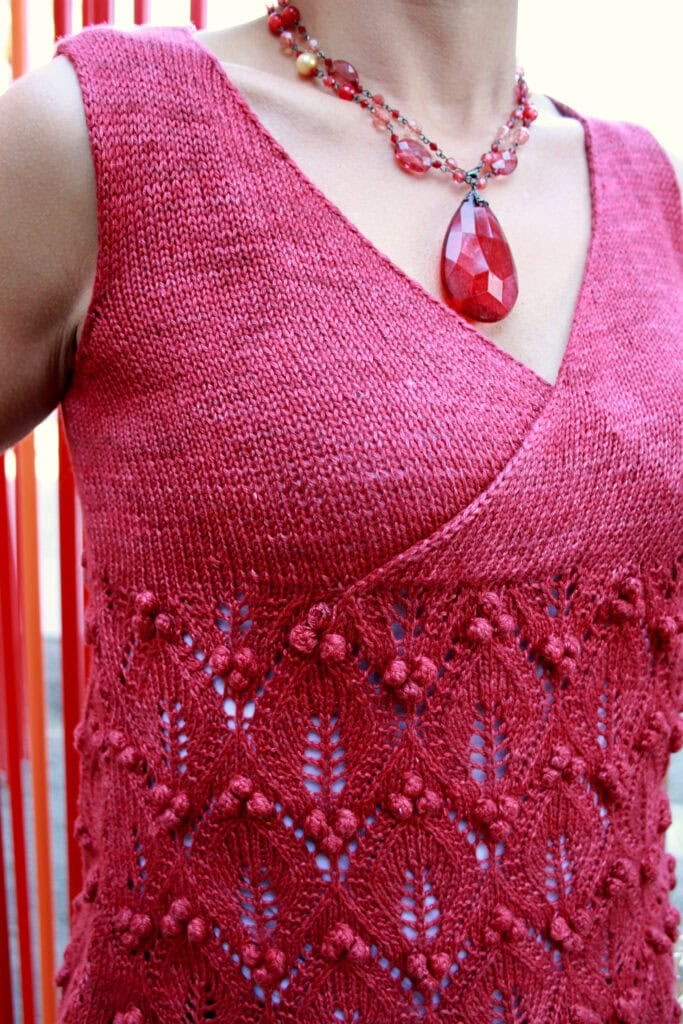
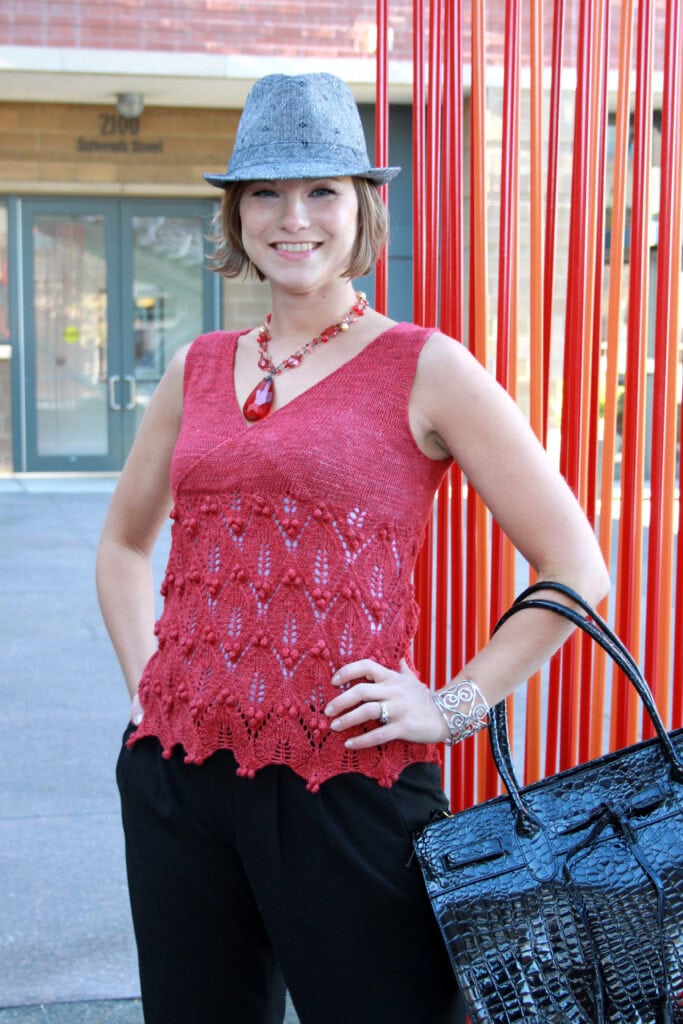
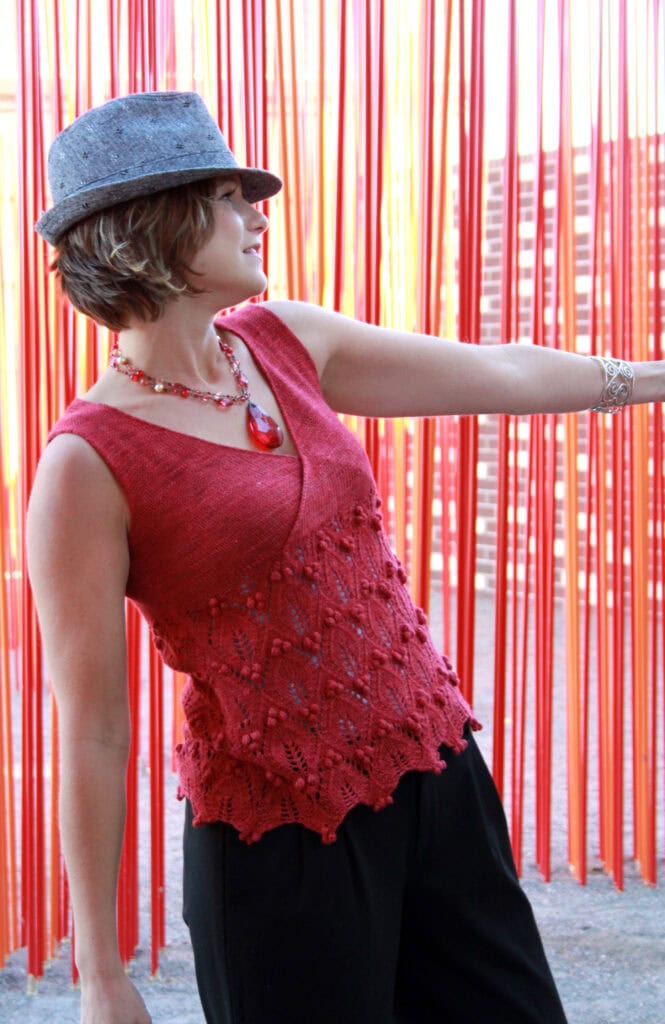
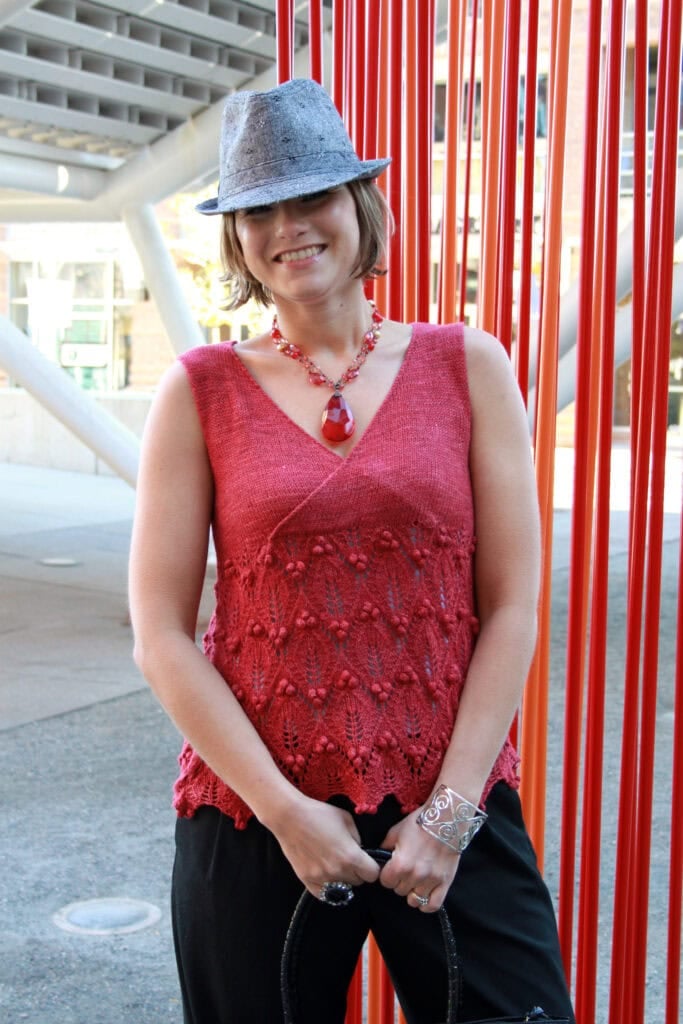
Meet the Birgitta Knit Tunic – a lacy, tunic-length knit that looks amazing on lots of different body types. It has beautiful lace panels, tunic coverage over the hips, and that effortless “oh this old thing? I knit it” energy we love.
Affiliate Disclosure: This post contains affiliate links. To learn more please visit my privacy policy here💖
This is one of my most popular garment patterns ever, and now you can follow the free knit tunic pattern right here on the blog, with the option to grab a printable, ad-free PDF if you like to knit without scrolling.
Wear it over as a camisole in summer, over a fitted long-sleeve tee in fall, or layered with leggings and boots when the weather cools down. It’s a wardrobe workhorse with some serious knit-nerd cred. 😉
Why You’ll Love This Free Knit Tunic Pattern
Let’s talk about why Birgitta has had such staying power in the Marly universe:
- Tunic length = built-in confidence boost
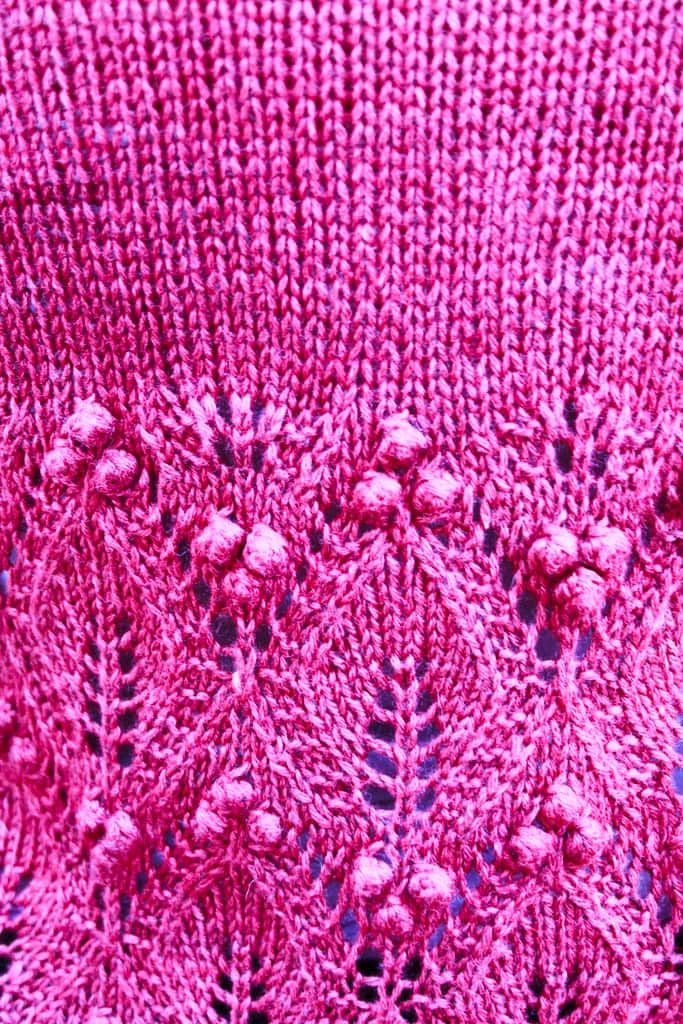
Covers the hips and upper thighs in a flattering way that works with lots of outfits. - Lace + stockinette combo
The lace panel keeps things visually interesting, while the stockinette areas let you relax into some soothing knitting. - Layering superstar
Wear it over tanks, tees, dresses, or even a slim turtleneck. It works across seasons. - Knit in pieces and seamed
Easier to manage on your needles and great for knitters who like a bit of structure in their garments. - Multiple sizes for real bodies
Written in a wide size range so more makers can enjoy it. - Perfect step-up project
Great if you’ve knit accessories and are ready to move into garments without diving straight into a super complex sweater.
🧶 Designer Tip:
Think of Birgitta as your “fancy t-shirt.” If you’d wear a tee with jeans or leggings in a certain situation, you can swap in this tunic and instantly look more put together… with the same comfort level.
Yarn and Substitutions for the Birgitta Knit Tunic
The original Birgitta Knit Tunic was designed in a sport-weight yarn (category #2) with a lovely blend of fibers that gave it drape, softness, and a bit of sheen. The exact yarn may be harder to find now, but the good news is: this pattern plays very nicely with other yarns in the same general category.
You’re looking for:
- Weight: Sport or light DK
- Gauge: Pattern gauge is 22 sts and 32 rows = 4″ (10 cm) in Stockinette Stitch, blocked
- Fiber:
- Wool blends for bounce and memory
- Yak, alpaca, or bamboo blends for drape and softness
- Cotton or plant blends if you run warm and want a more summery top
If you want a sleek, dressy look → choose something with a bit of sheen (bamboo/silk blends are lovely).
If you want cozy and casual → go for a soft wool or wool/nylon blend.
🧶 Designer Tip:
Swatch with the actual yarn you want to use, and block the swatch. Lace and drapey fibers can “grow up” after blocking, and this tunic’s fit depends on that relaxed, blocked fabric.
Choosing Your Size and Understanding Fit
One of the reasons this tunic is so flattering is the combination of lace, tunic length, and easy drape. To get that magic for your body, size choice matters more than you might think.
From the pattern:
- Finished bust measurements range from approximately 32″ up to 60″
- The tunic is intended to have positive ease (extra room) so it skims rather than clings around the hips but hug the chest.
Here’s how I recommend choosing your size:
- Measure your upper bust and full bust
- Upper bust: around your chest just under your armpits
- Full bust: around the fullest part of your bust
- Look at the finished bust measurements in the pattern
- Choose a size that gives you about 0-2″ (0–5 cm) of positive ease at the bust, depending on how relaxed you like your tops.
- Think about layering
- If you plan to wear it mostly over thin tanks → 0-2″ ease may be perfect.
- If you’ll wear it over long sleeves or heavier layers → aim for 2–6″ ease.
- Pay attention to the hip measurements
- The top is intended to skip the hips and not be snug. If the bust measurement you choose results in a hip measurement that is too snug, consider going up a size.
Skill Level and Techniques Used
I’d rate the Birgitta Knit Tunic as Intermediate.
You should be comfortable with:
- Casting on and binding off
- Knit and purl stitches
- Reading right-side (RS) vs wrong-side (WS) rows
- Basic increases and decreases (such as k2tog, ssk)
- Following a lace pattern (written and/or charted)
- Working short rows for shaping
- Seaming pieces together
- Picking up stitches for simple edging
If some of those sound a little spicy but exciting, you’re in the right place. This is a great “level up” project.
Here are some helpful video tutorials you can use alongside the pattern:
- Knit – https://youtu.be/nkzVGuaKsR8
- Purl – https://youtu.be/TsPqLvRmOow
- SSK – https://youtu.be/sjT0hKT55D8?t=1074
- K2tog – https://youtu.be/JrHqDYb2ss8?t=346
- Add a Lifeline – https://youtu.be/FiqYUE_oHAw
- UnKnit / Tink – https://youtu.be/c7Gud7k4Y8k
- Seaming – https://youtube.com/live/tjBzj-j_SJ4
If you need a bigger refresh, you can also explore:
Learn to Knit & Crochet with Marly Bird: Marly Bird BiCrafty Bootcamp: Knitting
Getting Gauge and Choosing Needles
From the pattern:
- Gauge: 22 stitches and 32 rows = 4″ (10 cm) in Stockinette Stitch, blocked
- Recommended Needles: US 4 (3.5 mm) or size needed to obtain gauge
(You’ll see the exact needle recommendations in the pattern.)
Because this is a garment, gauge really matters—not just so it “fits,” but also so the lace and tunic length behave as designed.
Here’s how I’d approach it:
- Knit a swatch
- Work a swatch in Stockinette Stitch that’s at least 5″ x 5″.
- Block the swatch
- Wash and dry/lay flat exactly how you’ll treat the finished tunic.
- Measure stitches and rows in the center
- Don’t count edge stitches—they lie. They’re little chaos goblins. 😅
- Adjust if needed
- Too many stitches per 4″? Go up a needle size.
- Too few stitches per 4″? Go down a needle size.
🧶 Designer Tip:
If you’re very close on stitch gauge but a bit off on row gauge, prioritize stitch gauge and know that you can adjust the length by knitting a little more or less before shaping, especially in the body.
Blocking for the Best Drapey Tunic
This tunic really shines after a good blocking session. That’s when the lace opens up, the fabric relaxes, and the tunic gets that “swoosh” when you move.
For a deep dive, check out:
Steam Blocking vs Wet Blocking (and when to use each):
https://marlybird.com/blog/steam-blocking-vs-wet-blocking-superwash-yarn-prism-make-along-part-10/
Quick blocking reminders:
- Soak gently in cool water with a little wool wash (if the yarn allows).
- Support the fabric as you squeeze out excess water—no aggressive twisting.
- Lay flat, pin to measurements, and coax the lace to open up evenly.
- Let it dry completely before unpinning.
🧶 Designer Tip:
Block Your Swatch first. It’s like a dress rehearsal for your tunic—less pressure, same learning. Plus, the gauge is based on a blocked gauge!
How to Style the Birgitta Knit Tunic
This is where Birgitta really earns her place in your closet. You can dress her up, down, and everywhere in between:
- With leggings and boots:
Tunic length + leggings = comfy but intentional. Add a long necklace and you are absolutely “I have brunch plans” ready. - With skinny jeans and flats or sneakers:
Great for everyday errands, knit group, or casual Fridays. - Over a fitted dress:
Treat it like a layering piece over a simple tank dress or bodycon-style dress for a fun texture combo. - With wide-leg pants:
Go for a chic, artsy vibe with drapey tunic + flowy pants + statement earrings. - Belted:
Add a thin belt at the natural waist if you like more waist definition without losing that tunic drama.
🧶 Designer Tip:
When you finish the front and back but before seaming, hold them up in front of a mirror with different outfits. It will give you instant styling ideas and motivate you to sew those seams and block the piece.
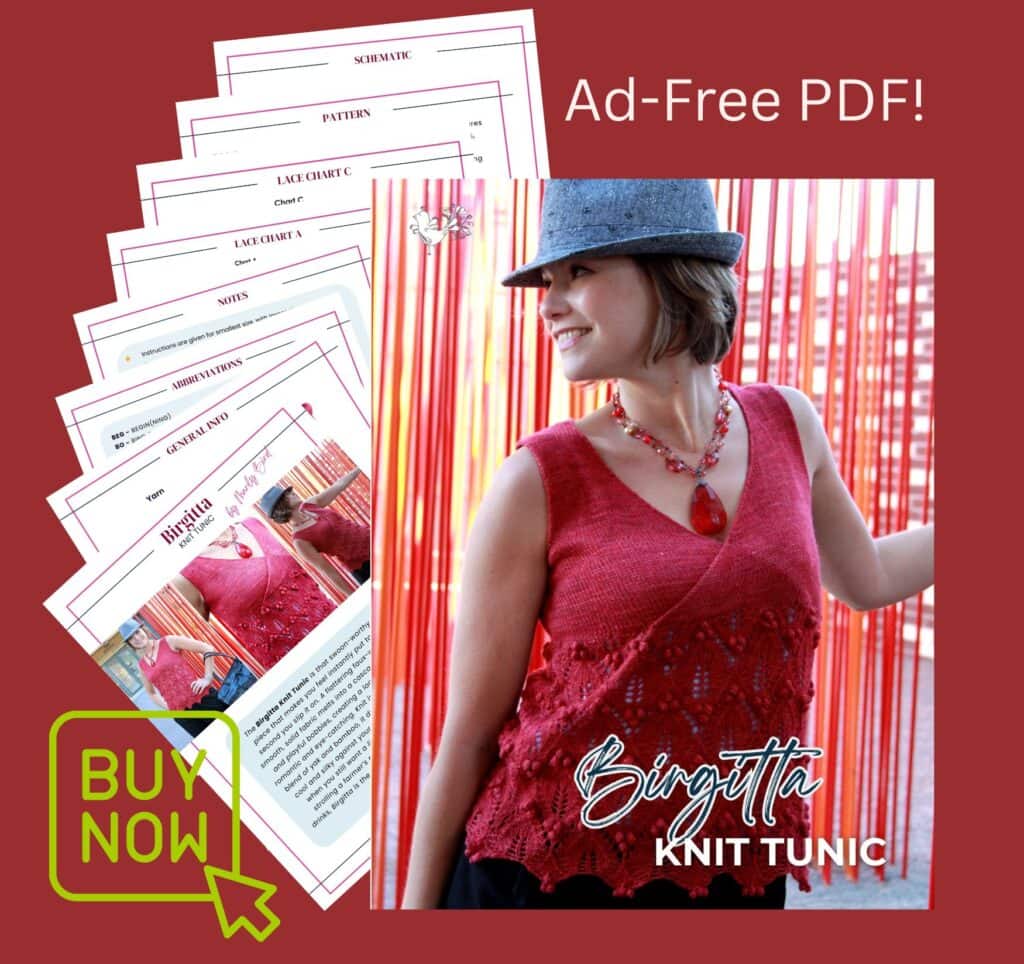
Ad-Free Printable PDF for the Birgitta Knit Tunic
Love having a clean pattern you can toss into your project bag (or load on your tablet) and knit distraction-free?
You can grab the ad-free, printable PDF of the Birgitta Knit Tunic in the Marly Bird Store and on my usual pattern platforms (like Etsy and Ravelry).
The PDF is perfect if you:
- Want a clean, easy-to-read layout
- Like to highlight, check off rows, and jot notes
- Prefer having charts, schematics, and written instructions all in one tidy place
- Want a simple way to support the designer while still enjoying the free pattern here on the blog
Birgitta Knit Tunic – Free Knit Tunic Pattern
This is where the magic happens. ✨
by Marly Bird
MARLYBIRD.COM
DESCRIPTION
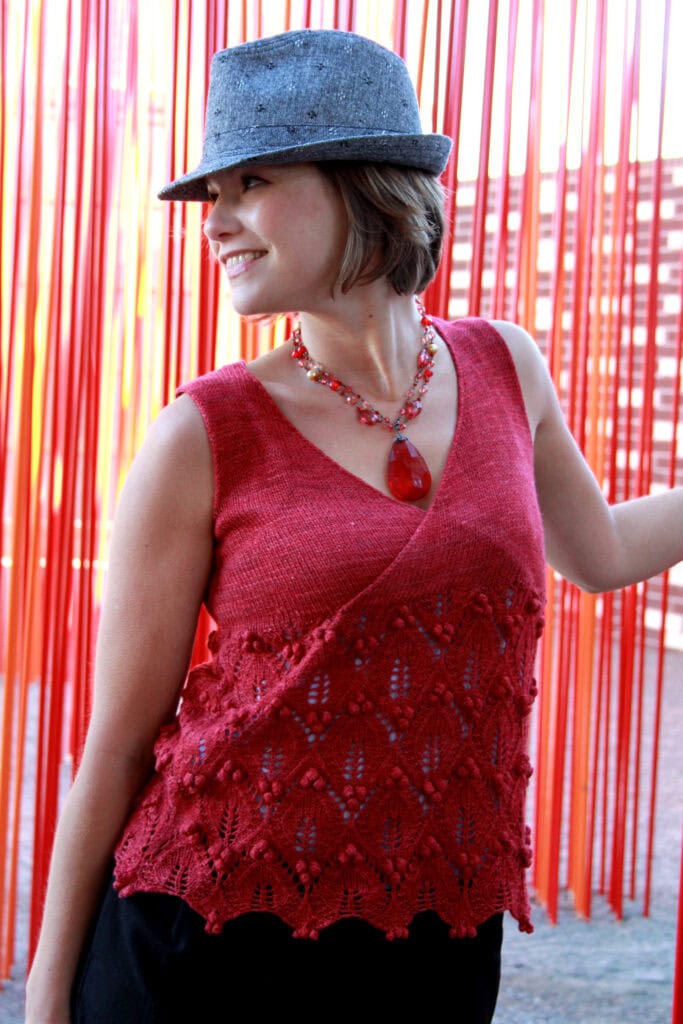
The Birgitta Knit Tunic is that swoon-worthy summer piece that makes you feel instantly put together the second you slip it on. A flattering faux-wrap bodice in smooth, solid fabric melts into a cascade of intricate lace and playful bobbles, creating a look that’s equal parts romantic and eye-catching. Knit in a dreamy sport-weight blend of yak and bamboo, it drapes beautifully and feels cool and silky against your skin—perfect for warm days when you still want a little elegance. Whether you’re strolling a farmer’s market or heading out for sunset drinks, Birgitta is the kind of head-turner that quietly steals the whole show.
GENERAL INFO
Yarn
Bijou Spun, Lhasa Wilderness (75% yak / 25% bamboo, 180 yds / 165 m, 2 oz / 56 g, CYCA #2 sport)
Ruby:
3 (3, 4, 4, 4, 5, 5, 6, 6, 6) hanks
Knitting Needles
US 4 (3.25 mm) 24″ circular needle
US 2 (2.75 mm) 16″ and 32″ circular needles
—or size to obtain correct gauge
Crochet Hook
US E/4 (3.5 mm)
Notions
- Stitch markers
- Tapestry needle
- Stitch holders
- Blocking supplies
Gauge
22 sts and 30 rows = 4″ (10 cm) in Lace Stitch pattern with larger needles
22 sts and 30 rows = 4″ (10 cm) in Stockinette Stitch with larger needles
Sizes
XS (S, M, L, XL, 2XL, 3XL, 4XL, 5XL)
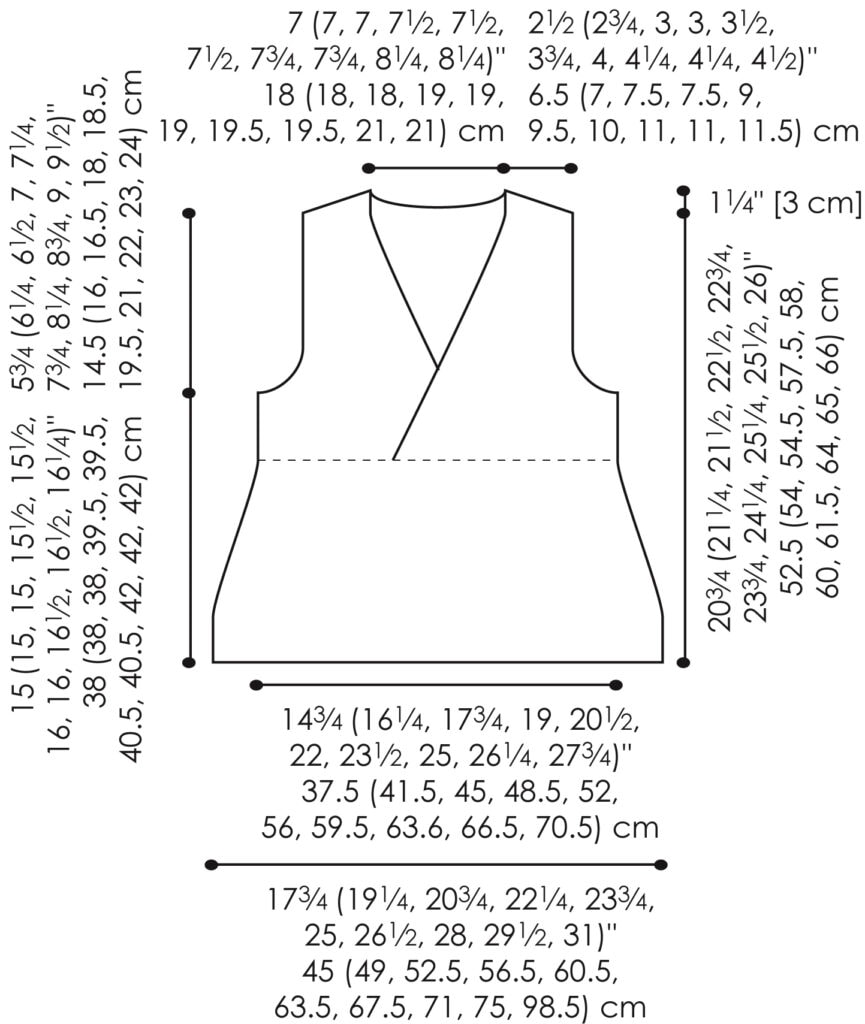
Finished Bust Sizes
29½ (32½, 35½, 38, 41, 44, 47, 50, 52½, 55½)”
[75 (83, 90, 97, 104, 112, 119, 127, 133, 141) cm]
ABBREVIATIONS
BEG – begin(ning)
BO – bind off
CO – cast on
CONT – continue
DEC – decrease
EOR – every other row
EST – establish(ed)
K – knit
P – purl
PATT – pattern
PM – place marker
REM – remaining
RS – right side
ST(S) – stitch(es)
YO – yarn over
WS – wrong side
SPECIAL STITCHES
k2tog: knit 2 sts together
p2tog: purl 2 sts together
M1 (make 1): Insert left-hand needle under horizontal strand between stitch just worked and next stitch, from front to back; knit through the back loop.
MB (make bobble):
With crochet hook, slip 1 stitch from left-hand needle to hook, *yo, insert hook into stitch immediately below the loop in the hook (1 row below), pull up a loop, yo, pull through 2 loops leaving remaining loops unworked; repeat from * 2 more times (4 loops on hook). Yo, pull through all loops on hook, slip stitch into the same stitch the bobble was made and pull tightly to make the bobble pop. Place remaining loop on right-hand needle.
sl2-k1-p2sso: Slip 2 stitches together knitwise to right-hand needle, knit 1, pass 2 slipped stitches over knit stitch.
ssk (slip, slip, knit): Slip 2 stitches one at a time knitwise, return to left-hand needle in turned position, knit together through back loop.
sssp (slip, slip, slip, purl): Slip 2 stitches one at a time knitwise, return to left-hand needle in turned position, purl together through back loops.
NOTES
- Instructions are given for smallest size, with larger sizes in parentheses. When only one number is given, it applies to all sizes.
- Circular needle is used to accommodate large number of stitches.
- Do not join; work back and forth in rows.
- Work decreases and increases 1 stitch in from each edge.
- When decreasing on RS, work decrease as ssk at beginning of row or k2tog at end of row.
- When decreasing on WS, work decrease as ssp at beginning of row or p2tog at end of row.
- All increases are worked with M1.
Cable Cast On: Insert right-hand needle between last two stitches on left-hand needle. Knit a stitch and place it on left-hand needle (1 stitch increased). Repeat for each stitch needed.
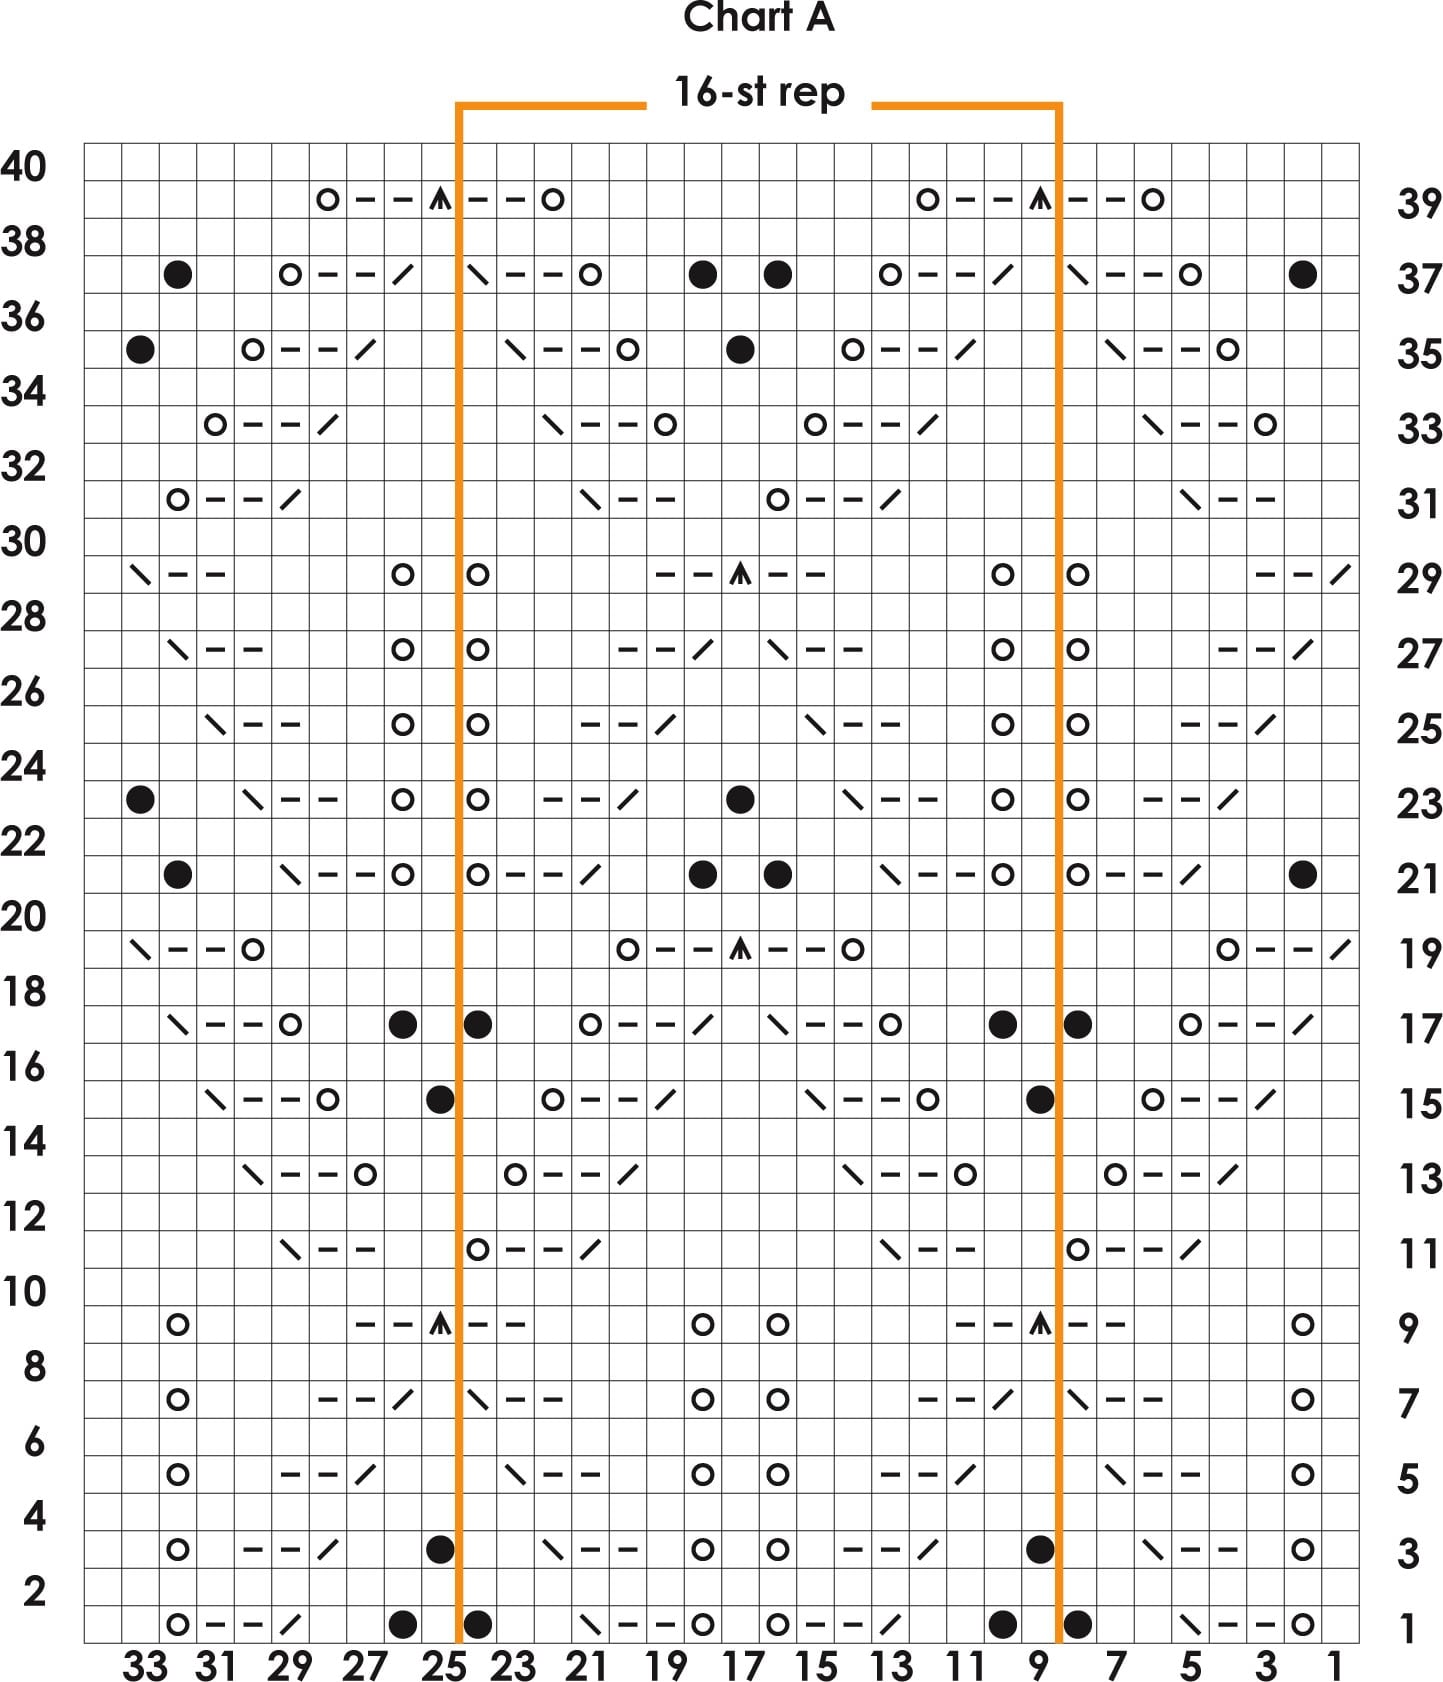
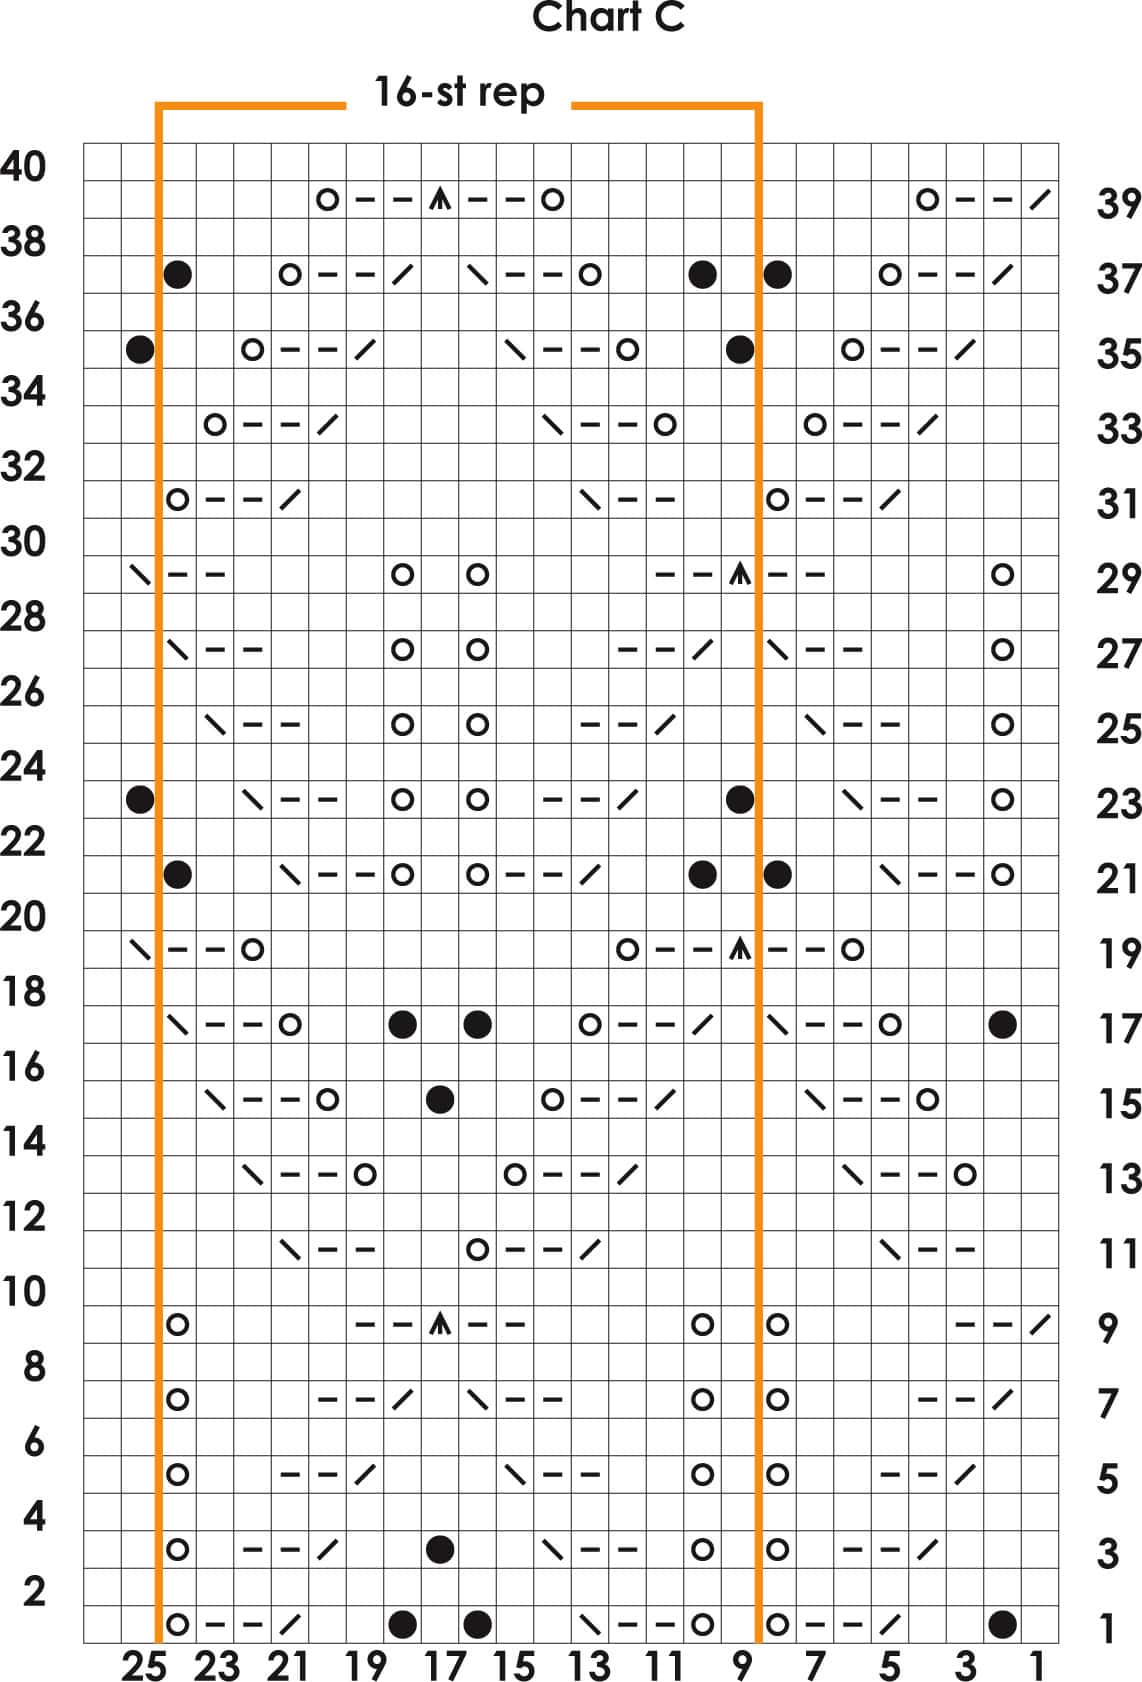
LACE CHARTS
- Lace Chart A
- Lace Chart B
- Lace Chart C
Click on the image to enlarge for printing!

SCHEMATIC
PATTERN
BACK
With circular needles, CO 98 (106, 114, 122, 130, 138, 146, 154, 162, 170) sts.
Work 16 (16, 16, 16, 16, 16, 10, 10, 10, 10) rows in Lace stitch pattern following Chart A (B, A, B, A, B, A, B, A, B).
Shape Body
Dec Row (RS): Continue in established pattern and decrease 1 stitch each side on this row, then every 12 (12, 12, 10, 10, 10, 10, 10, 10, 10)th row 4 (4, 4, 5, 5, 5, 6, 6, 6, 6) more times —
88 (96, 104, 110, 118, 126, 132, 140, 148, 156) sts remain.
Continue working Lace stitch pattern until the next instance of Row 4 of the Lace stitch pattern is completed.
Dec Row (RS): Knit, decreasing 7 (7, 7, 5, 5, 5, 3, 3, 3, 3) stitches evenly across —
81 (89, 97, 105, 113, 121, 129, 137, 145, 153) sts remain.
Work in Stockinette stitch until piece measures
15 (15, 15, 15½, 15½, 16, 16, 16½, 16½, 16½)”
[38 (38, 38, 39.5, 39.5, 40.5, 40.5, 42, 42, 42) cm],
ending after a WS row.
Shape Armholes
Next Row (RS): BO 3 (3, 4, 5, 6, 7, 8, 9, 10, 11) sts at beginning of next 2 rows —
75 (83, 89, 95, 101, 107, 116, 119, 125, 131) sts remain.
Decrease 1 stitch each side of next RS row, then every row 3 (6, 7, 5, 5, 5, 3, 3, 3, 3) more times, then EOR 0 (0, 0, 4, 4, 6, 9, 11, 12, 14) more times —
67 (69, 73, 75, 81, 83, 87, 89, 93, 95) sts remain.
Work even until armhole measures
5¾ (6¼, 6½, 7, 7¼, 7¾, 8¼, 8¾, 9, 9½)”
[14.6 (15.9, 16.5, 17.8, 18.4, 19.7, 21, 22.2, 22.9, 24.1) cm],
ending with a WS row.
Place marker around center 27 (27, 26, 27, 27, 27, 32, 33, 33, 32) sts.
Shoulder and Neck Shaping
Rows 1–3: BO 3 (4, 4, 4, 5, 5, 6, 6, 6, 6) sts, work to end —
58 (57, 61, 63, 66, 68, 69, 71, 75, 77) sts remain.
Row 4 (WS): BO 3 (4, 4, 4, 5, 5, 6, 6, 6, 6) sts, work to neck marker, BO neck stitches between markers, work to end —
14 (13, 15, 15, 16, 17, 16, 17, 18, 19) sts remain each side.
Continue working right shoulder stitches only; keep left shoulder stitches on needle to be worked later.
Right Shoulder
Row 5 (RS): BO 3 (4, 4, 4, 5, 5, 6, 6, 6, 6) sts, work to end —
11 (9, 11, 11, 11, 12, 10, 11, 12, 13) sts remain.
Row 6: BO 6 sts, work to end —
5 (3, 5, 5, 5, 6, 4, 5, 6, 7) sts remain. BO remaining sts.
Left Shoulder
Join yarn to left shoulder stitches, begin with RS row.
Row 5 (RS): BO 6 sts at neck edge —
8 (7, 9, 9, 10, 11, 10, 11, 12, 13) sts remain.
Bind off 3 (4, 4, 4, 5, 5, 6, 6, 6, 6) sts at shoulder —
5 (3, 5, 5, 5, 6, 4, 5, 6, 7) sts remain. BO remaining sts.
FRONT
With circular needles, CO 98 (106, 114, 122, 130, 138, 146, 154, 162, 170) sts.
Work 16 (16, 16, 16, 16, 16, 10, 10, 10, 10) rows in Lace stitch pattern following Chart A (C, A, C, A, C, A, C, A, C).
Shape Body
Same as Back —
88 (96, 104, 110, 118, 126, 132, 140, 148, 156) sts remain.
Continue working Lace stitch pattern until next instance of Row 4 of Lace stitch pattern is completed.
Dec Row (RS): Knit, decreasing 7 (7, 7, 5, 5, 5, 3, 3, 3, 3) stitches evenly across —
81 (89, 97, 105, 113, 121, 129, 137, 145, 153) sts remain.
Continue in Stockinette stitch, work 1 WS row.
Dividing Row (RS): Knit 51 (57, 62, 69, 74, 82, 87, 94, 98, 104) sts, slip remaining
30 (32, 35, 36, 39, 39, 42, 43, 47, 49) sts onto stitch holder for right front.
Work 1 WS row even.
Note: Read the following instructions before beginning; before neck shaping is finished, armhole shaping begins.
Shape Left Front Neck
Decrease 1 stitch at neck edge of next RS row, then EOR
28 (30, 31, 35, 36, 40, 42, 45, 46, 48) times, then every 4th row 1 time.
At the same time, when left front measures same as back to armhole, shape armhole as for back at armhole edge only —
14 (15, 17, 17, 20, 21, 22, 23, 24, 25) sts remain after all shaping.
Work even until left front armhole measures same as back armhole, ending after a WS row.
Shape Left Shoulder
BO 3 (4, 4, 4, 5, 5, 6, 6, 6, 6) sts at beginning of next 3 RS rows —
5 (3, 5, 5, 5, 6, 4, 5, 6, 7) sts remain. BO remaining sts.
Shape Right Front
Slip stitches from holder to needle and join yarn to work a WS row.
Next Row (WS): Purl across 30 (32, 35, 36, 39, 39, 42, 43, 47, 49) sts, then use cable method to CO
21 (25, 27, 33, 35, 43, 45, 51, 51, 55) sts —
51 (57, 62, 69, 74, 82, 87, 94, 98, 104) sts.
Shape Neck and Armhole
Same as for back. Work even until right front armhole measures same as back armhole, ending after a RS row.
Shape Left Shoulder
BO 3 (4, 4, 4, 5, 5, 6, 6, 6, 6) sts at beginning of next 3 WS rows —
5 (3, 5, 5, 5, 6, 4, 5, 6, 7) sts remain. BO remaining sts.
FINISHING
Tuck right neckline edge to inside and slip stitch invisibly to bodice front.
Block to measurements.
Sew side and shoulder seams.
Neck Trim
Using smaller needles and with RS facing, pick up and knit 3 stitches for every 4 rows and 1 stitch for every stitch along right front neck edge, back neck edge, and left front neck edge.
Knit 1 row, then BO all stitches.
Armhole Trim
Using smaller needles and with RS facing, pick up and knit 3 stitches for every 4 rows and 1 stitch for every stitch around armhole.
Knit 1 row, then BO all stitches.
Repeat for other armhole.
Related Knit Garment Patterns You’ll Love
If Birgitta makes you fall in love with garment knitting (or fall in love all over again), you might also enjoy:
- Paris Geller Knit Sweater Pattern
A classic, cozy pullover you can dress up or down.- Shopify: https://shop.marlybird.com/products/paris-geller-knit-sweater-pattern
- Etsy (affiliate): https://tidd.ly/46LgNPT
- Ravelry: https://www.ravelry.com/patterns/library/paris-geller
- Our Free Patterns Library
Browse more free knit and crochet patterns from Marly Bird:
https://marlybird.com/our-free-patterns/
You can mix and match these knits with your Birgitta for a handmade wardrobe that feels like you.
FAQs: Birgitta Knit Tunic – Free Knit Tunic Pattern
Is the Birgitta Knit Tunic pattern beginner friendly?
I’d call it Advanced Beginner / Intermediate. If you’re comfortable knitting, purling, following simple lace instructions, and doing some shaping and seaming, you’ll be fine. If this is your first garment ever, don’t be scared—just take it one section at a time and use stitch markers and lifelines.
Can I substitute yarn?
Yes! Any yarn that meets gauge and gives you a fabric you love can work. Aim for:
- Sport or light DK weight
- A fiber blend that has enough drape to hang nicely, but enough body that the lace doesn’t go all jellyfish on you
Always swatch and block before committing. Your future self will thank you.
Can I make the tunic longer or shorter?
You sure can.
- To make it longer, add a bit of length in the body before armhole shaping (keeping the lace pattern correct).
- To make it shorter, work fewer rows before shaping.
Just remember: changing the length will change how much yarn you need.
Can I knit the tunic in the round instead of in pieces?
The pattern is written to be worked flat in pieces and seamed. If you’re an adventurous knitter, you might adapt it to work in the round, but you’ll need to account for:
- Lace pattern alignment in the round
- Different shaping logic
- How you want the side seams (or lack of seams) to support the structure
For most knitters, I recommend knitting the pattern as written the first time, then experimenting if you want to make a second Birgitta.
Do I really have to block it?
Technically, you can do whatever you want 😜 but for this tunic: yes, please block it.
Blocking:
- Opens up the lace
- Smooths out the fabric
- Helps the tunic hang and drape the way it was designed to
You can find detailed blocking help here:
https://marlybird.com/blog/steam-blocking-vs-wet-blocking-superwash-yarn-prism-make-along-part-10/
How do I share my finished Birgitta Knit Tunic?
Please show it off—I love seeing your makes!
- Tag me on Instagram: @themarlybird
- Use hashtags: #mmmdi and #marlybird
- Share in the Marly’s Minions: Marly Bird BiCrafty Community on Facebook so we can all ooh and ahh over your stitches together 💖
Final Thoughts
The Birgitta Knit Tunic is one of those pieces that hits the sweet spot:
- Relaxing to knit (once you settle into the lace rhythm)
- Super wearable in real life
- Flattering on lots of different bodies
- Easy to style a bunch of ways
It’s the kind of knit that makes people say, “Wait… you made that?” and you get to smile and say “Yep.” 🥰
So grab your yarn, swatch wisely, and treat yourself to a tunic that’s as fun to knit as it is to wear.
And when you bind off and block that beauty?
Don’t forget to tag @themarlybird and use #mmmdi and #marlybird so I can cheer you on and show your gorgeous Birgitta some love. 💕
❤️ Your BiCrafty Bestie,
Marly Bird

Categories: Free Patterns, Knitting, Marly Bird Premium Patterns, Our Free Patterns, Pattern, Uncategorized