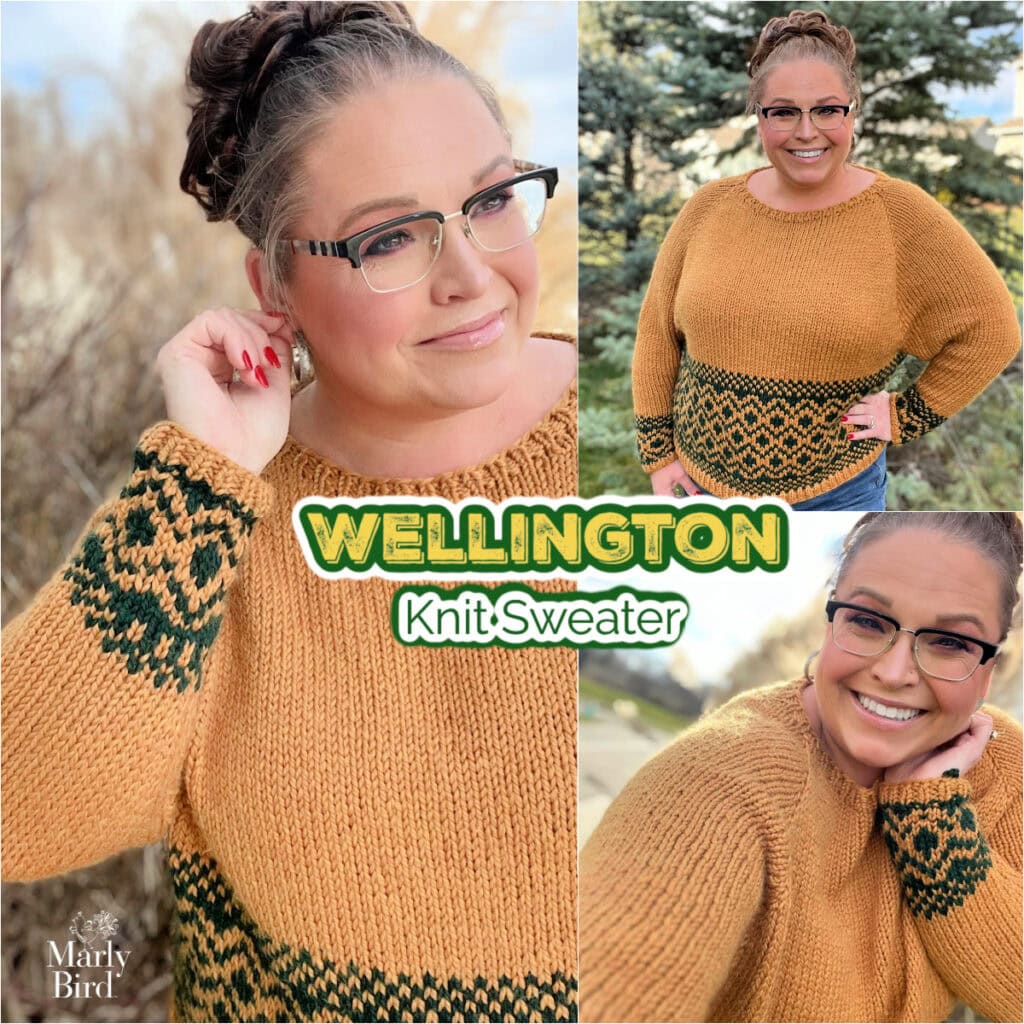
Stranded Colorwork Knit Sweater Pattern – Wellington Pullover
If you’ve been dreaming of knitting a sweater that feels modern, wearable, and deeply satisfying, the Wellington Pullover Knit Sweater is ready to become your next favorite project 🧶✨. This stranded colorwork pullover blends classic stockinette with bold charted motifs to create a garment that’s fun to knit and even better to wear.
Designed with thoughtful shaping and size inclusivity, Wellington proves that colorwork sweaters don’t have to be intimidating.

Affiliate Disclosure: This post contains affiliate links. To learn more please visit my privacy policy here💖
Quick Pattern Overview
The Wellington Knit Sweater is a stranded colorwork knit pullover worked in the round with raglan shaping and German short rows for fit. The body and sleeves feature repeating colorwork charts, balanced by clean ribbed edges.
In this post, you’ll learn:
- How stranded colorwork works in garments
- Why raglan construction supports colorwork
- What makes this sweater approachable
- How charts are used across body and sleeves
- Where to deepen your colorwork skills
What Makes Stranded Colorwork Sweaters Different?
In stranded colorwork sweaters, two colors are worked in the same round to create motifs that wrap seamlessly around the body and sleeves. This creates warmth, structure, and visual impact — perfect for pullovers meant to be worn and loved.
The Wellington Sweater uses general stranded colorwork knitting, not traditional Fair Isle, allowing for flexible motif placement and modern design choices.
What You Will Love About This Pattern 💖
- Modern stranded colorwork knit sweater
- Hip length silhouette with length options
- Inclusive sizing from S–5XL
- Raglan shaping for comfort
- German short rows for a great neckline fit
- Charted colorwork that builds confidence
✨ Designer Tip: Swatching both plain stockinette and stranded stockinette helps ensure your sweater fits just the way you want.

Fit, Construction, and Skill Highlights
- Knit in the round from the top down
- Raglan shaping with short rows
- Stockinette body with colorwork sections
- Sleeves worked in the round
- Charts provided for body and sleeves

Wellington Knit Sweater Pattern Details
Designed by Marly Bird
SKILL LEVEL
Adventurous Beginner
MEASUREMENTS
To Fit Sizes
S-M (L, XL, 2XL, 3XL, 4XL, 5XL)
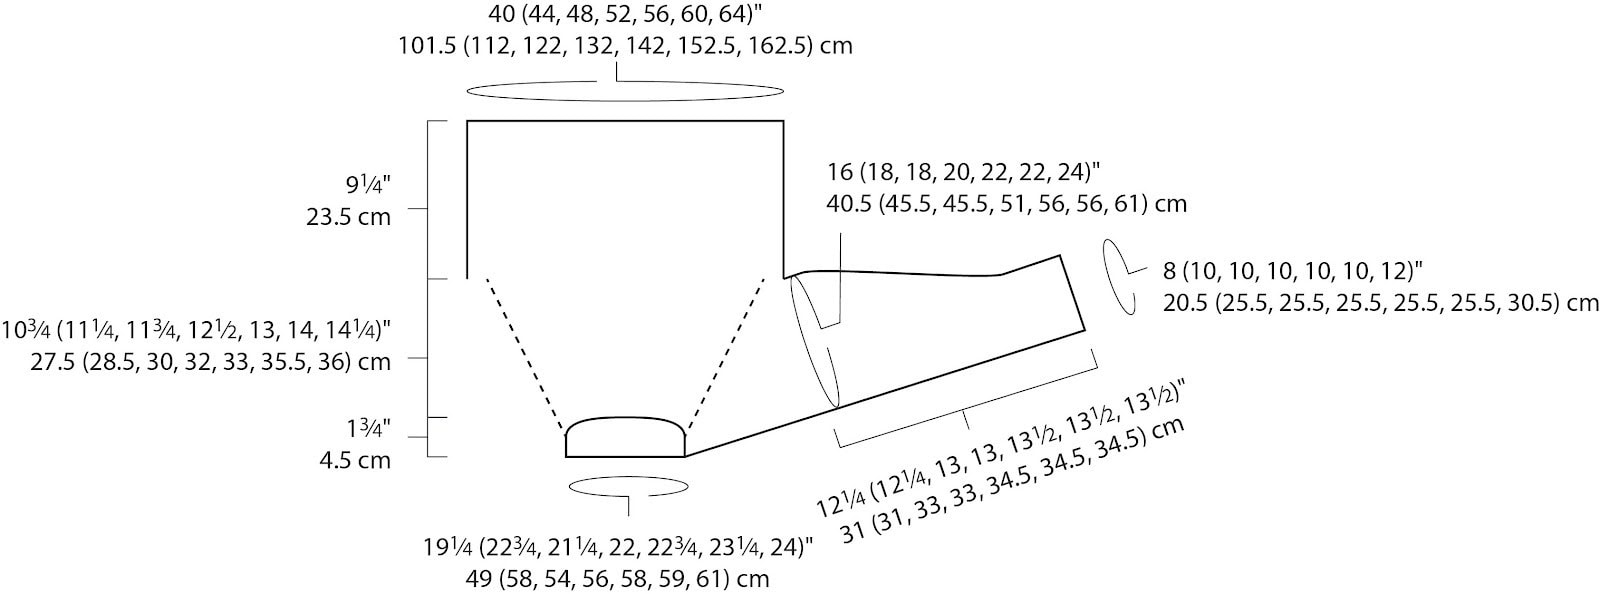
Finished Measurements
Note: Measurements do not include ribbed edgings.
Around Bust: 40 (44, 48, 52, 56, 60, 64)” [101.5 (112, 122, 132, 143, 152.5, 162.5) cm], meant to be worn with 4” [10 cm] ease.
Upper Arm: 16 (18, 18, 20, 22, 22, 24)” [40.5 (45.5, 51, 56, 56, 61) cm]
Raglan Armhole Length: 10¾ (11¼, 11¾, 12½, 13, 14, 14¼)” [27.5 (28.5, 30, 32, 33, 35.5, 36) cm]
Body Length Below Underarm: 9¼” [23.5 cm]
Gauge
12 sts and 18 rounds = 4” (10 cm) in Stockinette stitch and Body and Sleeve Charts with larger needles (see Notes).
MATERIALS
Yarn
Knit Picks Biggo (50% Superwash Merino Wool, 50% Nylon; 3½ oz / 100 g; 110 yds / 100.5 m; CYCA #5 bulky)
Color A: Tansy Heather 7 (8, 9, 10, 11, 11, 12)
Color B: Aurora Heather 1 (1, 1, 2, 2, 2, 3)
Needles
Size 10 [6mm] and 10½ [6.5mm] circular knitting needles, 16” [40.5 cm] and at least 29” [73.5 cm] in length in each size, set of 5 double pointed needles in each size, or size required for gauge.
Notions
- Stitch markers
- Tapestry needle
- Scissors
- Leather tags
- Leather rivets
- Stitch Saver Cord (use in place of scrap yarn)
- Tape measure
- Blocking Squares
- Blocking Pins
- Soaking Basin
- Eucalan Wool Wash
ABBREVIATIONS
K – Knit
K2tog – Knit 2 together
LLM1 – Left Lifted Make-one Increase (see Special Stitches)
P – Purl
PM – Place Marker
RLM1 – Right Lifted Make-one Increase (see Special Stitches)
SLM: – Slip Marker
Ssk – Slip, Slip, Knit (see Special Stitches)
St(s) – Stitch(es)
SPECIAL TECHNIQUE
German Short Rows
These short rows are worked in such a way that you get a ‘double stitch’ in place of a traditional wrap-and-turn short row.
- When turning from Wrong side to Right side: Work to as indicated to turning point, turn work to right side, bring the yarn to the front BETWEEN the needles, slip the first stitch on the left needle onto the right needle purlwise with the yarn in front pull the yarn to the back of the work OVER TOP of the right needle. This will distort the stitch making it look as if there are 2 stitches instead of 1. This is called the ‘double stitch’. With yarn in back, begin knitting.
- When turning from Right side to Wrong side: Work to as indicated to turning point, turn work to wrong side, slip the first stitch from the left needle onto the right needle purlwise with yarn in front, pull the yarn to the back of the work OVER TOP of the right needle. This will distort the stitch, making it look as if there are 2 stitches instead of 1. This is called the ‘double stitch’. Don’t forget to bring the yarn to the front BETWEEN the needles to begin purling.
Continue in this fashion as specified, creating your ‘doubled’ stitches. When knitting or purling into these stitches later in the pattern, simply knit or purl both strands of the double stitch together.
SPECIAL STITCHES
LLM1: Insert left needle tip into the left leg of the stitch two rows below the first stitch on the right hand needle (the grandmother stitch), knit it through the back leg. (1 stitch increased)
LLPM1: Insert left needle tip into the left leg of the stitch two rows below the first stitch on the right hand needle (the grandmother stitch), purl it through the back leg. (1 stitch increased)
RLM1: Insert right needle tip into the right leg of the stitch directly under the stitch on the left hand needle (the mother stitch), lift the leg onto the left hand needle and knit it. (1 stitch increased)
RLPM1: Insert right needle tip into the right leg of the stitch directly under the stitch on the left hand needle (the mother stitch), lift the leg onto the left hand needle and purl it. (1 stitch increased)
Slip, Slip, Knit (Ssk): Slip 2 sts knitwise, one at a time, onto right needle, insert tip of left needle into front loops of both sts, and knit them together through the back loop.
STITCH PATTERNS
1×1 RIBBING
(Worked in the round over an even number of sts)
Round 1: * K1, p1; repeat from * around.
Repeat Round 1 for 1 x 1 Ribbing.
STOCKINETTE STITCH
Knit all sts, every round.
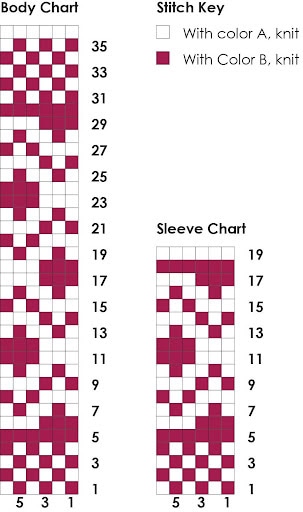
FAIR ISLE COLOR PATTERNS
(Each worked over a multiple of 6 sts)
SCHEMATIC
VIDEO TUTORIAL
- Cable Cast-on: https://marlybird.com/knitted-cast-video-tutorial-marly-bird/
- Long Tail Cast-On >> Click Here for Video Help <<
- Knit Stitch (continental style) >> Click Here for Video Help <<
- Purl Stitch (continental style) >> Click Here for Video Help <<
- Perfect Ribbing >> Click Here for Video Help <<
- How to Add Lifeline >> Click Here for Video Help <<
- How to Tink >> https://youtu.be/c7Gud7k4Y8k <<
- Duplicate Stitch >> Click Here for Video Help <<
- Bury Ends >> Click Here for Video Help <<
- Fair Isle vid >> https://youtu.be/OaJg_hh1VVw <<
NOTES
- The gauge is the same for plain stockinette and the 2-color stranded stockinette worked in the Body and Sleeve charts. It is recommended to swatch both, and use whichever needle size(s) give the correct gauge. It’s common for a larger needle to be used for the 2-color stranded stockinette to match the gauge of the single color stockinette.
- This pattern uses German Short rows (see Special Techniques) to shape the neck.
- This sweater is a hip length, with an option for a shorter or longer body if desired.
GROW
To Unlock Exclusive Subscriber Content click the Box below and join for free by simply adding your email and creating a password! If you are having troubles, clear your cache or reset your password or login to the Grow Publisher Portal.
>> Learn More About Grow Here <<
I’m thrilled to share this amazing pattern with you, many patterns on my blog are absolutely free! I kindly request that you don’t copy and paste or distribute this pattern. Prefer an ad-free experience? Buy a digital PDF pattern for a small fee from one of my online stores for a seamless crafting journey.
I appreciate your support and readership. You are the reason I can keep doing what I love and sharing it with others. So, thank you from the bottom of my yarn-loving heart! Disclosure: This post contains affiliate links, meaning I get a commission if you decide to make a purchase through my links at no cost to you.

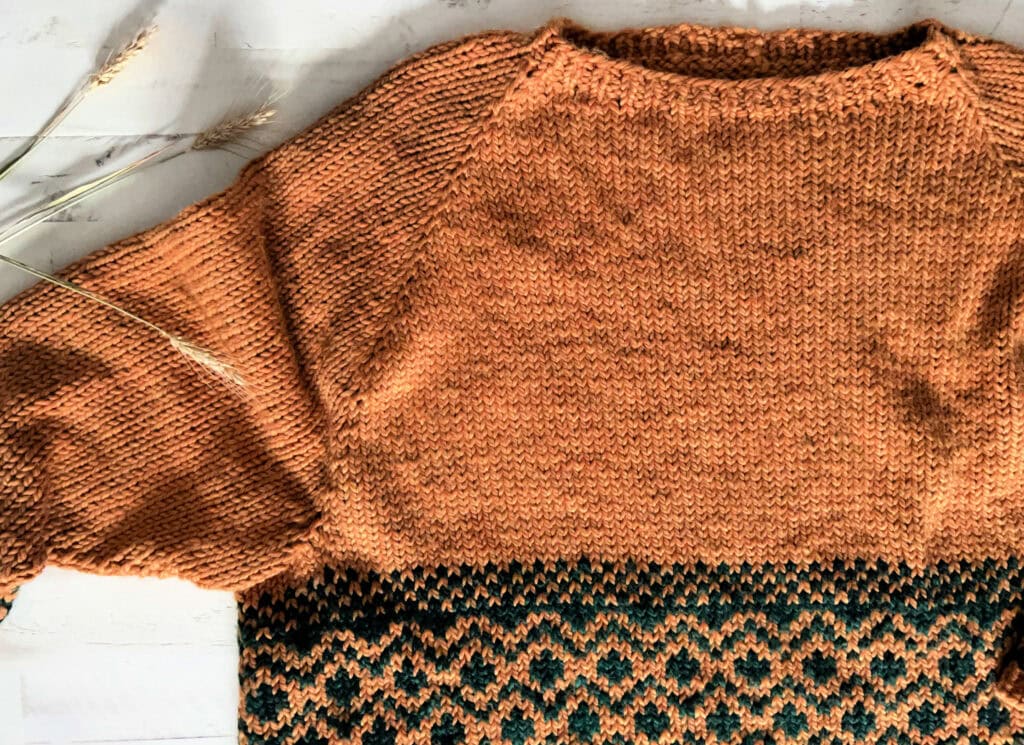
Wellington Stranded Knit Pullover Sweater Pattern
YOKE
With color A and smaller 16” [40.5 cm] circular needle, using long tail cast on, cast on 58 (68, 64, 66, 68, 70, 72) sts. Join round being careful to not twist cast-on edge, and PM to mark first st.
Next 4 rounds: * K1, p1; repeat from * around.
Change to larger 16” [40.5] circular needle. Begin working in Stockinette st (knit all sts every round), and set up raglan points as follows:
Next Round: K10 (12, 13, 13, 14, 15, 16) for Back, PM, K7 (9, 5, 5, 5, 3, 3) for Sleeve, PM, K23 (26, 28, 29, 30, 33, 34) for Front, PM, K7 (9, 5, 5, 5, 3, 3) for Sleeve, PM, K11 (12, 13, 14, 14, 16, 16) for Back.
Work the German short row method to raise the back neck as follows:
Row 1 (RS, German Short Row): Knit to 2 sts before first raglan marker, turn work.
Row 2 (WS, German Short Row): Purl to beginning of round marker, SLM, purl to 2 sts before next raglan marker, turn work.
Row 3 (RS, increase row, German Short Row): Knit to ‘double stitch’, knit the two strands of the ‘double stitch’ together as one, RLM1, k1, slip raglan marker, LLM1, k3 (4, 2, 2, 2, 1, 1), turn work – 2 sts increased: 1 on left Back and 1 on left Sleeve.
Row 4 (WS, increase row, German Short Row): Purl to ‘double stitch’, purl the two strands of the ‘double stitch’ together as one, RLPM1, p1, slip raglan marker, LLPM1, p3 (4, 2, 2, 2, 1, 1), turn work – 2 sts increased: 1 on right Back and 1 on right Sleeve.
There are now 11 (13, 14, 14, 15, 16, 17) sts in left Back section, 8 (10, 6, 6, 6, 4, 4) sts in each Sleeve section, 23 (26, 28, 29, 30, 33, 34) sts in Front section, and 12 (13, 14, 15, 15, 17, 17) sts in right Back section – 62 (72, 68, 70, 72, 74, 76) total sts.
Row 5 (RS, increase row, German Short Row): Knit to beginning of round marker, SLM, knit to 1 st before raglan marker, RLM1, k1, slip marker, LLM1, knit to ‘double stitch’, knit the two strands of the ‘double stitch’ together as one, knit to next marker, RLM1, slip marker, k1, LLM1, k1, turn work – 4 sts increased; 1 st on Back, 2 sts on Sleeves, and 1 st on Front.
Row 6 (WS, increase row, German Short Row): Purl to beginning of round marker, slip marker, purl to 1 st before raglan marker, RLPM1, p1, slip marker, LLPM1, purl to ‘double stitch’, purl the two strands of the ‘double stitch’ together as one, purl to next marker, RLPM1, slip marker, p1, LLPM1, p1, turn work – 4 sts increased; 1 st on Back, 2 sts on Sleeves, and 1 st on Front.
There are now 12 (14, 15, 15, 16, 17, 18) sts in Left Back section, 10 (12, 8, 8, 8, 6, 6) sts in each Sleeve section, 25 (28, 30, 31, 32, 35, 36) sts in Front Section and 13 (14, 15, 16, 16, 18, 18) sts in Right Back section – 60 (68, 68, 70, 72, 76, 78) total sts.
Row 7 (RS, increase row, German Short Row): Knit to beginning of round marker, slip marker, knit to 1 st before raglan marker, RLM1, k1, slip marker, LLM1, knit to next marker, RLM1, slip marker, k1, LLM1, k2, knit the two strands of the ‘double stitch’ together as one, k4, turn work – 4 sts increased; 1 st on Back, 2 sts on Sleeves, and 1 st on Front.
Row 8 (WS, increase row, German Short Row): Purl to beginning of round marker, SLM,, purl to 1 st before marker, RLPM1, p1, slip marker, LLPM1, purl to next marker, RLPM1, slip marker, p1, LLPM1, p2, purl the two strands of the ‘double stitch’ together as one, p4, turn work – 4 sts increased; 1 st on Back, 2 sts on Sleeves, and 1 st on Front.
There are now 13 (15, 16, 16, 17, 18, 19) sts in Left Back section, 12 (14, 10, 10, 10, 8, 8) sts in each Sleeve section, 27 (30, 32, 33, 34, 37, 38) sts in Front section and 14 (15, 16, 17, 17, 19, 19) sts in Right Back section – 78 (88, 84, 86, 88, 90, 92) total sts.
Next row (RS): Knit to beginning of round marker, remove marker, break yarn. Slip 13 (15, 16, 16, 17, 18, 19) sts from left needle to right needle to first raglan marker. Replace this marker with a different colored marker to mark the new beginning of the round. Rejoin yarn and continue working in the round.

Shape Raglan
Note: on the first round, work two strands of each ‘double stitch’ together as one as you come to them. Change to longer circular needle when sts no longer fit comfortably on shorter circular needle.
Next round (increase round): * LLM1, knit to next marker, RLM1, SLM, k1, LLM1, knit to 1 st before marker, RLM1, k1, SLM; repeat from * once more – 8 sts increased.
There are now 14 (16, 12, 12, 12, 10, 10) sts in each Sleeve section and 29 (32, 34, 35, 36, 39, 40) sts in each Front and Back sections – 86 (96, 92,94, 96, 98, 100) total sts.
Repeat this increase every other round 7 (8, 11, 13, 16, 18, 21) times, then every 4th round 7 (7, 6, 6, 5, 5, 4) times.
There are now 42 (46, 46, 50, 54, 56, 60) sts on in each Sleeve section and 57 (62, 68, 73, 78, 85, 90) sts in each Front and Back sections – 198 (216, 228, 246, 264, 282, 300) total sts.
Divide Body and Sleeves
(Note: Remove all raglan markers as you come to them.)
Place next 42 (46, 46, 50, 54, 56, 60) sleeve sts onto a st holder or waste yarn, turn so WS is facing, use the cable cast-on method to cast on 6 (8, 8, 10, 12, 12, 12) sts for underarm, turn work so RS is facing, k57 (62, 68, 73, 78, 85, 90) sts for Body, place next 42 (46, 46, 50, 54, 56, 60) Sleeve sts onto a st holder or waste yarn, turn so WS is facing, use the cable cast-on method to cast on 3 (4, 4, 5, 6, 5, 6) sts for underarm, place marker for new beginning of round, cast on another 3 (4, 4, 5, 6, 5, 6) sts, turn work so RS is facing – 120 (132, 144, 156, 168, 182, 192) Body sts.
Join our Newsletter
Get Free Pattern Links & Coupons!

BODY
Knit 2 rounds.
Note: For a longer sweater, work 5” [12.5 cm] more evenly in Stockinette st at this point.
Work Rounds 1–36 of Body Fair Isle Color Pattern.
Change to smaller needle and Color A only.
Next 4 rounds: * K1, p1; repeat from * around.
Bind off all sts loosely in pattern.
SLEEVES
Return 42 (46, 46, 50, 54, 56, 60) held sts from one sleeve onto larger double-pointed needles. Beginning at center of underarm sts, pick up and knit 3 (4, 4, 5, 6, 5, 6) sts from half of underarm cast-on sts, knit to end of held sts, then pick up and knit another 3 (4, 4, 5, 6, 5, 6) sts from remaining underarm cast-on sts. Place marker for beginning of round, and join to work in the round – 48 (54, 54, 60, 66, 66, 72) sts.
Knit 2 rounds.
Shape Sleeve
Decrease Round: K1, k2tog, knit to last 3 sts, ssk, k1 – 46 (52, 52, 58, 64, 64, 70) sts.
Repeat this decrease round every other round 8 (8, 6, 12, 17, 17, 17) more times, then every 4th round 3 (3, 5, 2, 0, 0, 0) more times – 24 (30, 30, 30, 30, 30, 36) sts.
Work Rounds 1–19 of Sleeve Fair Isle Pattern.
Change to smaller double-pointed needles and Color A only.
Next 4 rounds: * K1, p1; repeat from * around.
Bind off all sts loosely in rib pattern.
Work other Sleeve the same.
FINISHING
Block piece to measurements. Weave in all loose ends.
Level Up Your Stranded Colorwork Skills
If Wellington inspires you to knit more colorwork garments, Camp Colorwork will help you build the skills that make projects like this enjoyable instead of stressful.
👉 Learn more about Camp Colorwork:
https://marlybird.com/blog/camp-colorwork/
More Stranded Colorwork Projects to Explore
- Prism Path Knit Swoncho:
https://marlybird.com/blog/prism-path-knit-swoncho-pattern-free/ - Chill Out Winter Hat:
https://marlybird.com/free-knitting-patterns/chill-out-winter-hat/ - Game Changer Cowl:
https://marlybird.com/free-knitting-patterns/game-changer-cowl/ - Free Fair Isle Knit Cardigans (inspiration):
https://marlybird.com/blog/free-fair-isle-cardigan-sweaters/
FAQ – Wellington Knit Sweater
Is this sweater pattern free?
Yes! The pattern is free on MarlyBird.com with an optional ad-free PDF.
Is this suitable for first-time sweater knitters?
Confident knitters with basic sweater knowledge will feel supported.
Is this true Fair Isle?
No — this pattern uses general stranded colorwork knitting techniques.
Final Thoughts
The Wellington Cropped Knit Sweater brings stranded colorwork into a modern, wearable silhouette that feels just as good to knit as it does to wear. If you’re ready to take your colorwork skills into garments, this sweater is a beautiful next step.
❤️ Your BiCrafty Bestie,
Marly Bird

Categories: Free Patterns, Knitting, Marly Bird Premium Patterns, Our Free Patterns, Pattern