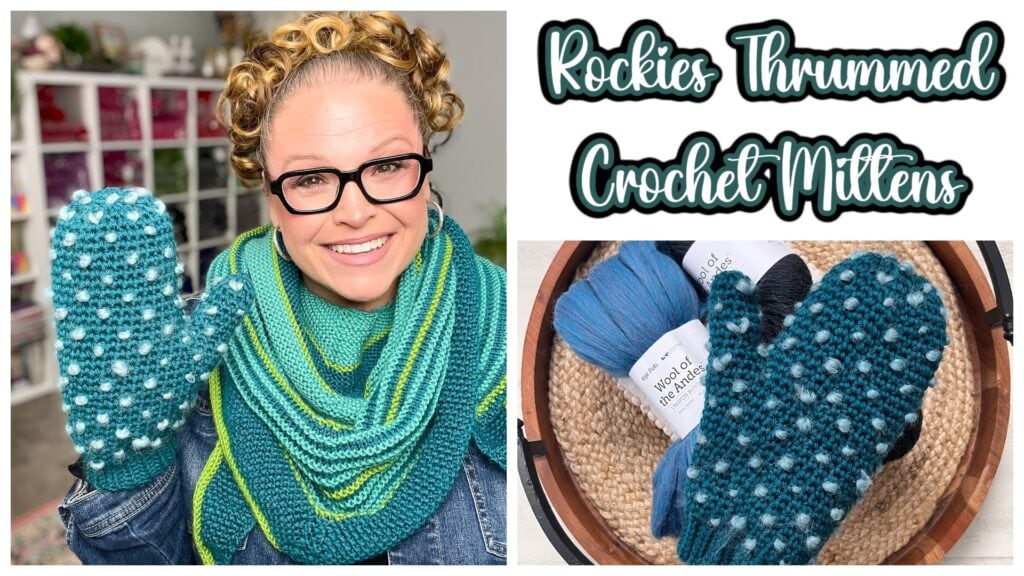
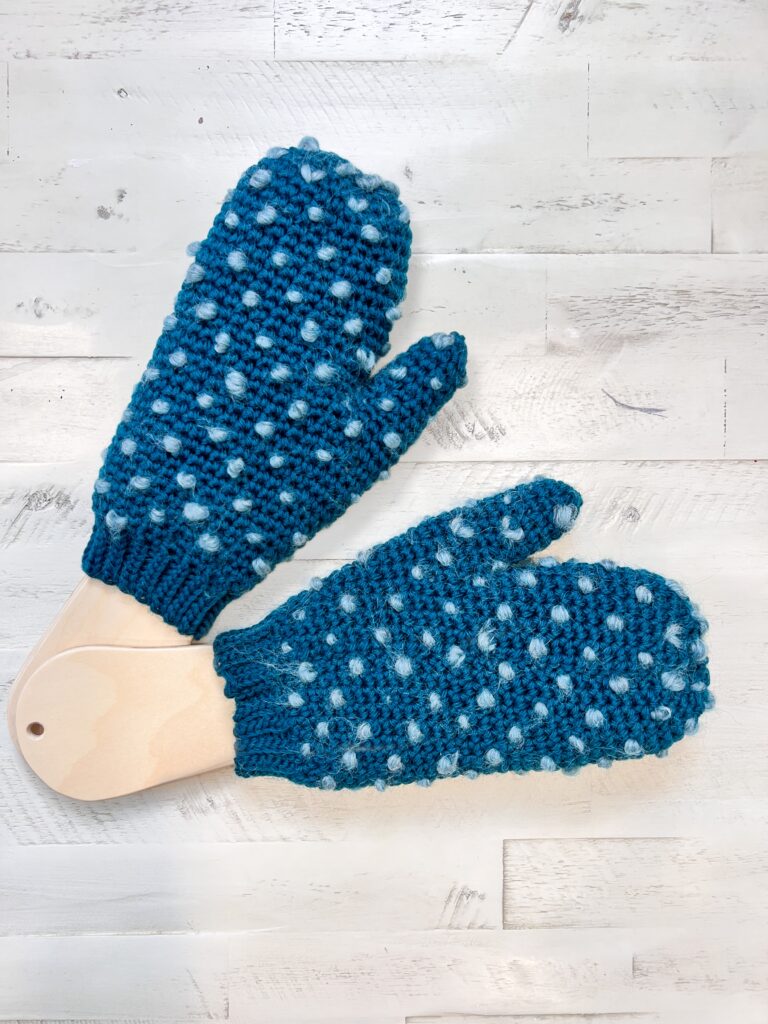
Free Crochet Thrummed Mitten Pattern (Rockies Mittens) – Cozy Fleece-Lined Crochet Project with Marly Bird
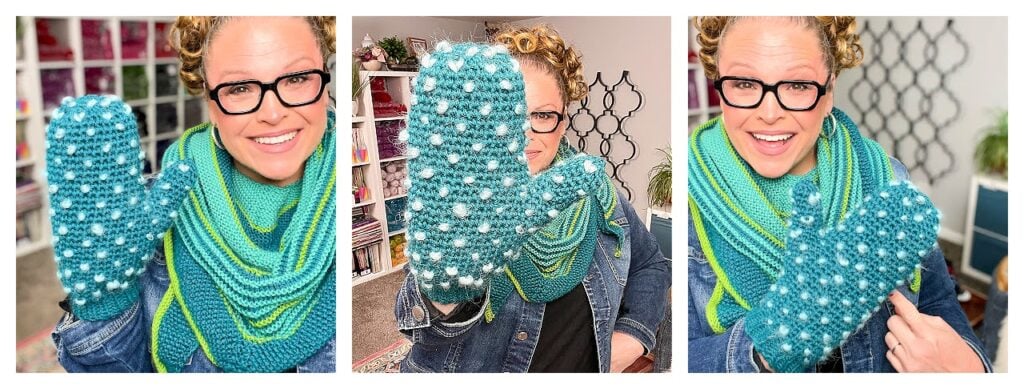
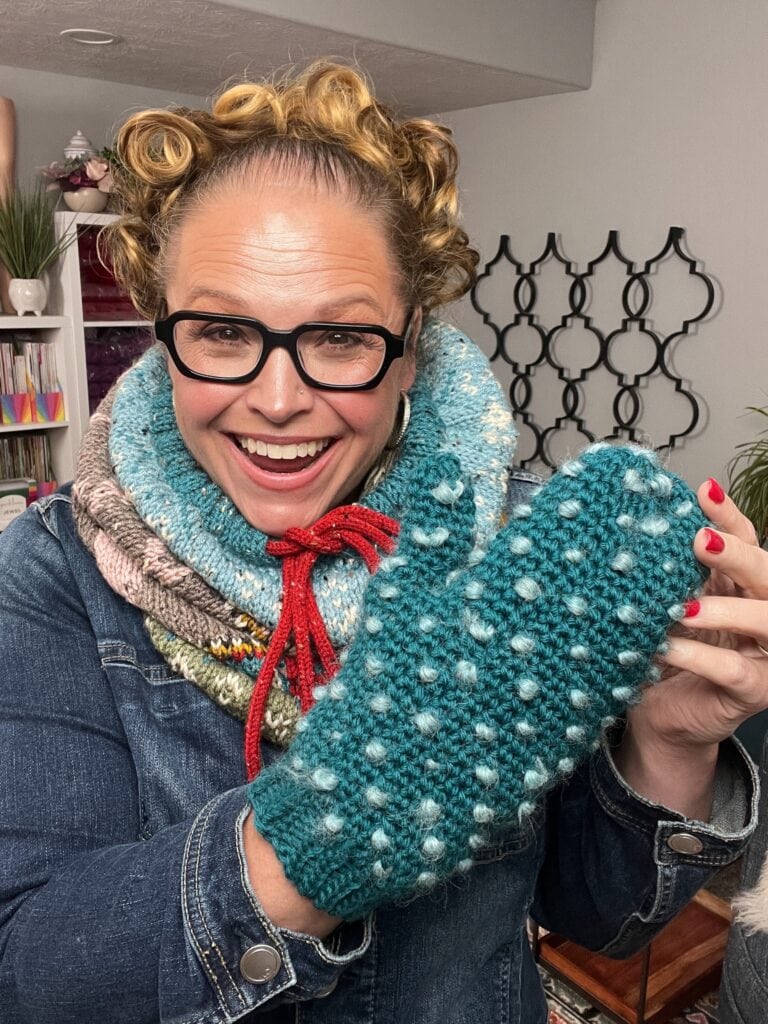
If you’ve never tried a thrummed mitten, you’re in for a treat. These fleece-lined wonders are like little hand hugs — soft, fluffy, and incredibly warm!
The Rockies Thrummed Crochet Mittens are part of my First Fall 2025 Knit and Crochet Make-Along, and they’re the perfect way to add a new technique to your crochet toolbox. This free crochet thrummed mitten pattern walks you through every stitch to create mittens you’ll actually wear (and everyone will request).
Affiliate Disclosure: This post contains affiliate links. To learn more please visit my privacy policy here💖
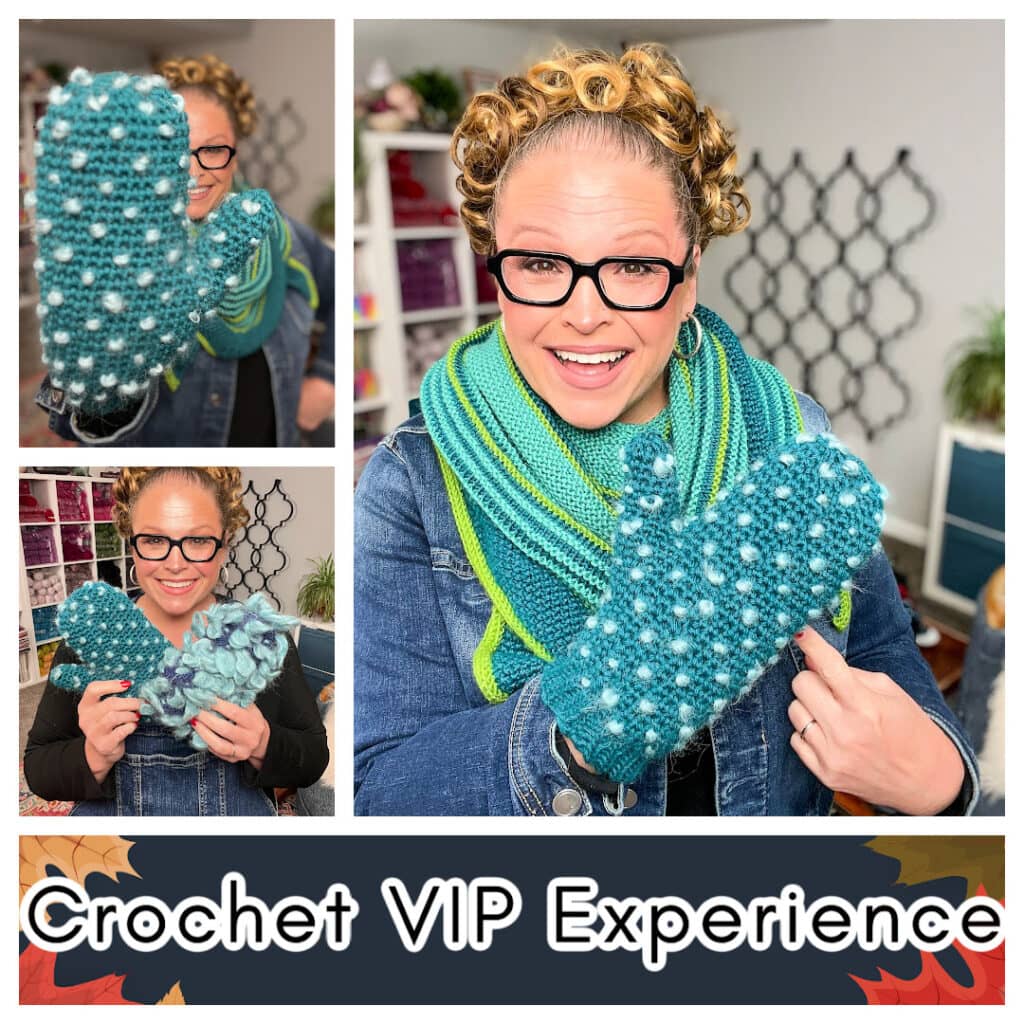
Prefer an ad-free, printable version? The PDF and ad-free video tutorial are available in the First Fall VIP Experience, along with three bonus hand warmer patterns and coupon bonuses you’ll love.
🧤 What Are Thrummed Mittens?
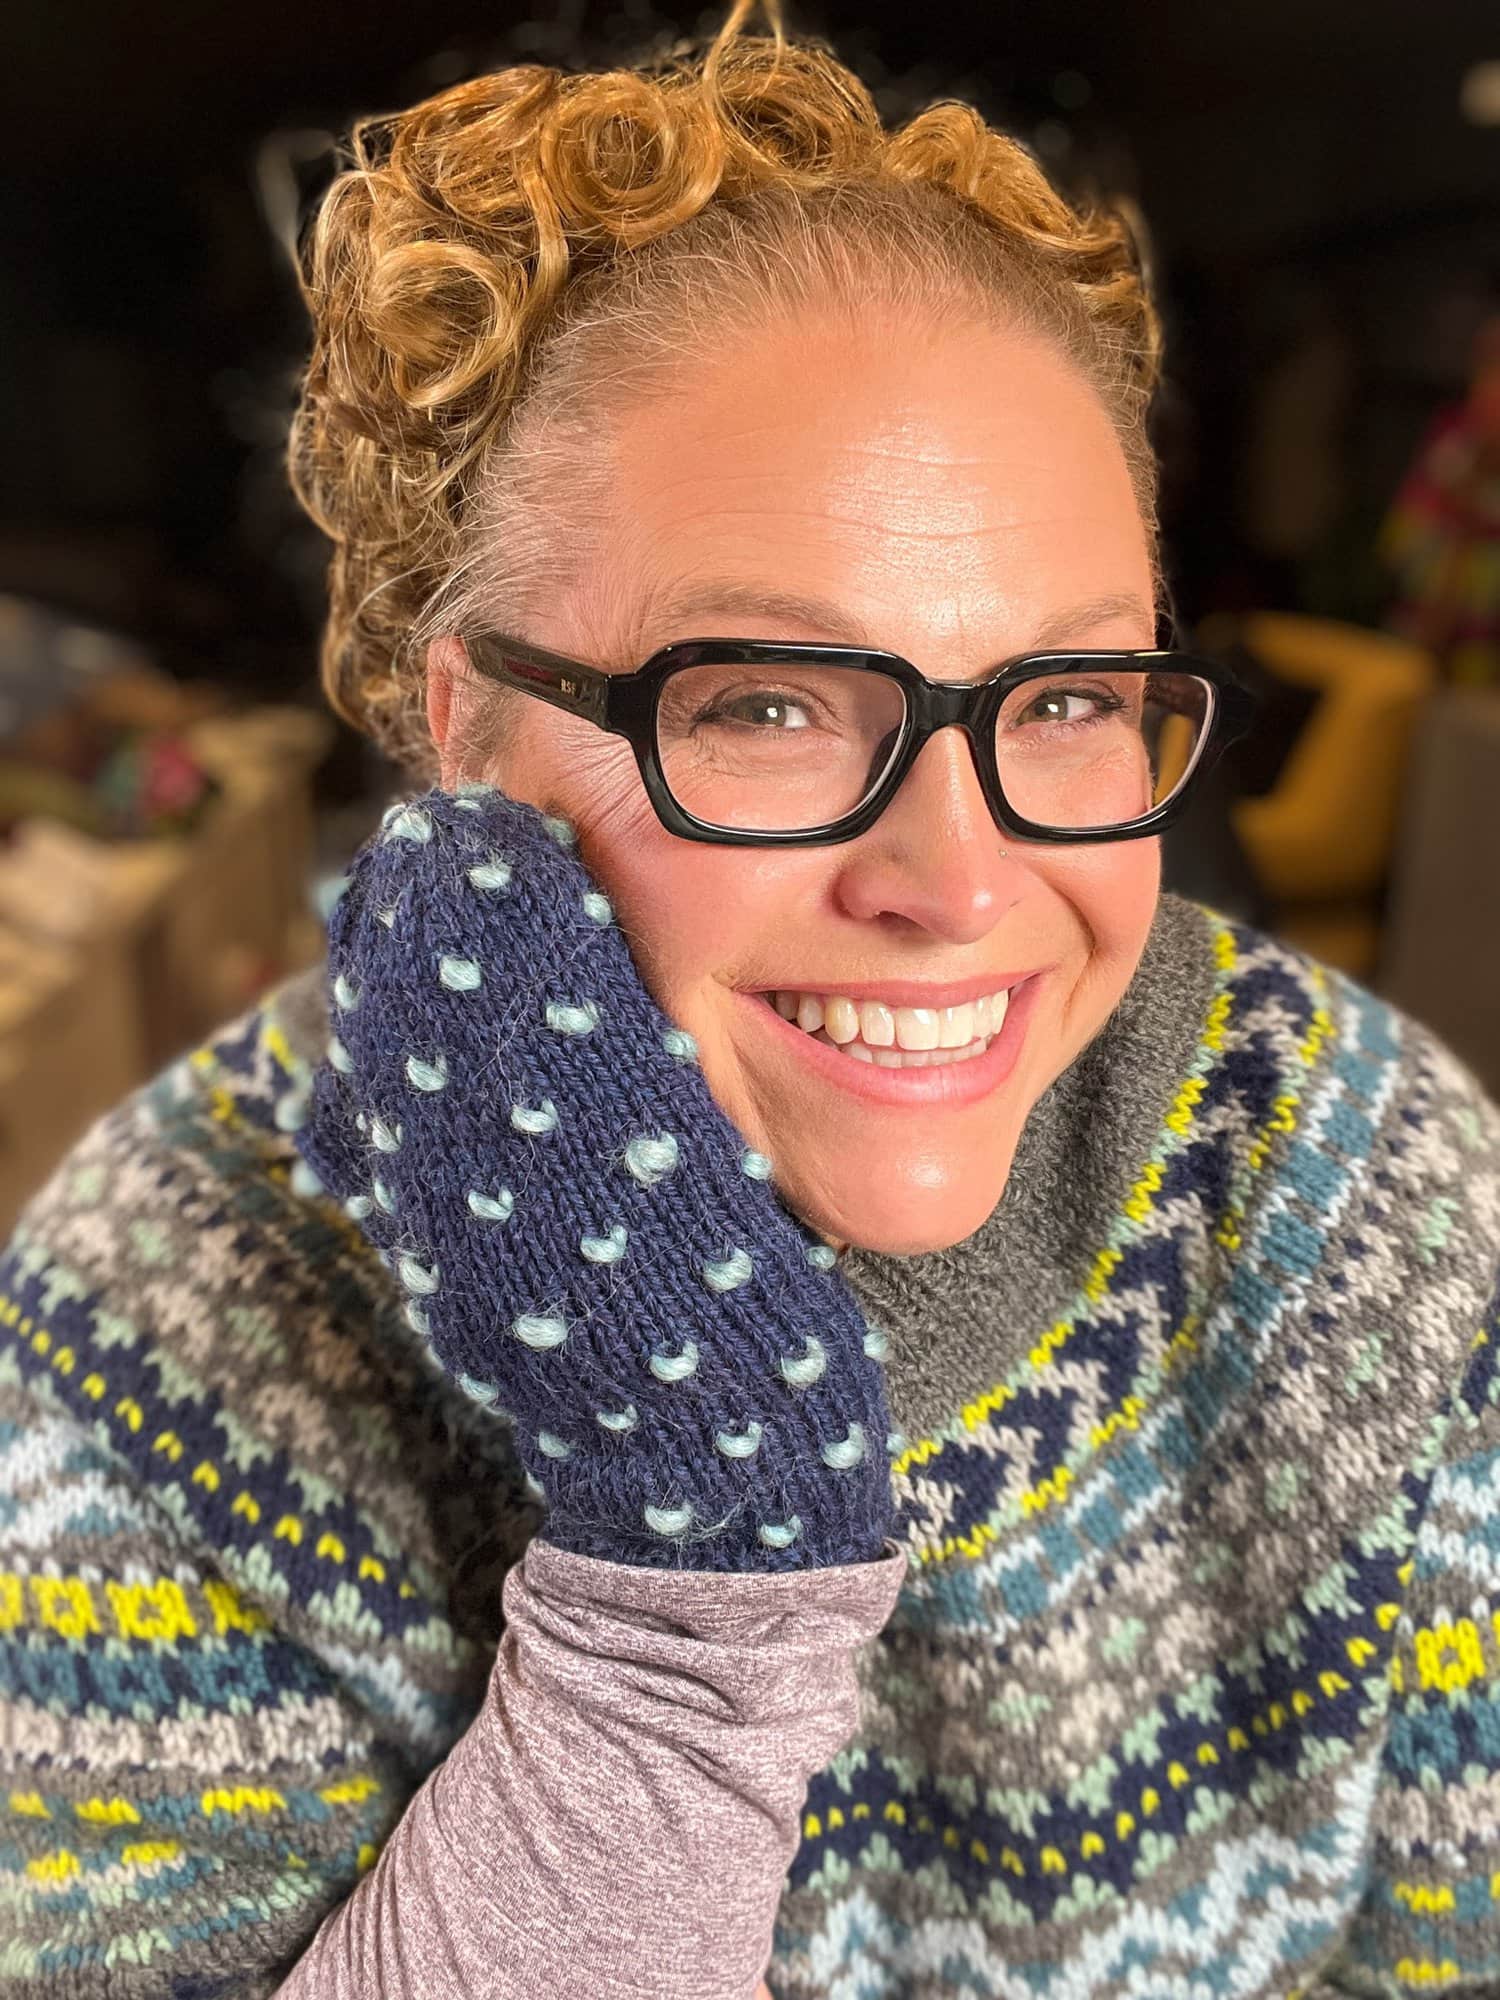
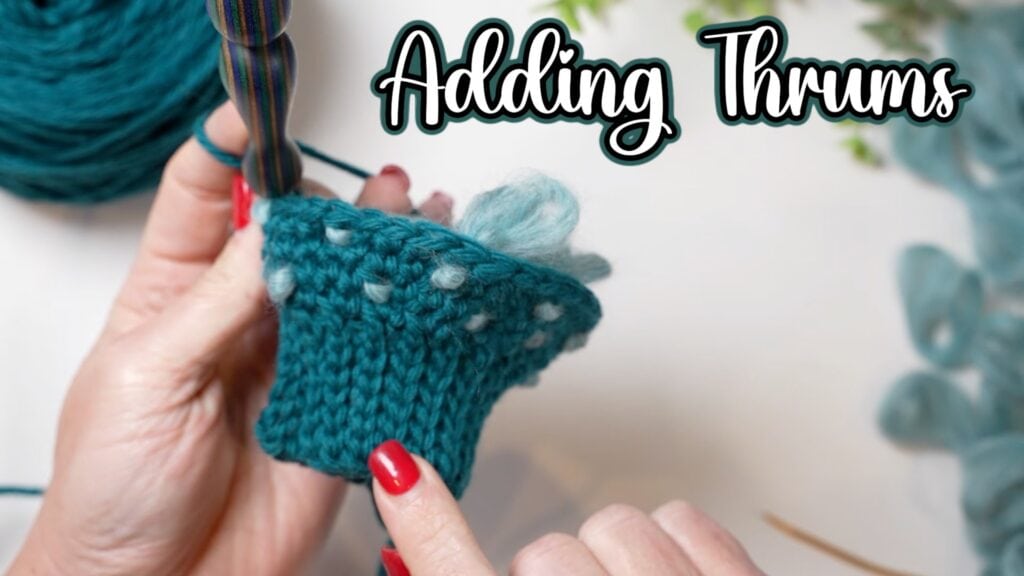
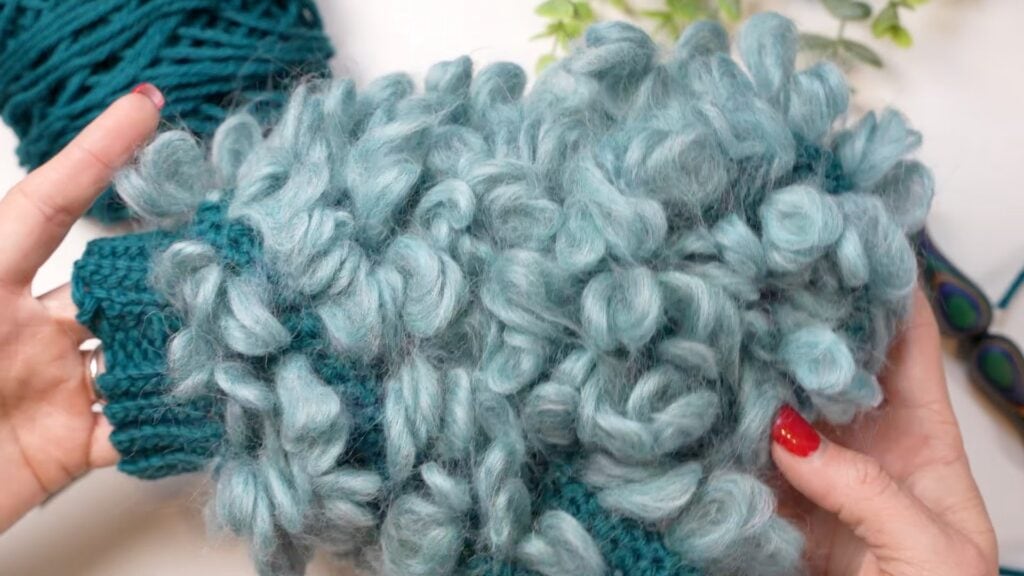
Thrummed mittens originated in Newfoundland and Labrador, Canada — a region famous for brutal winters and cozy woolwear. Instead of using a separate lining, thrummed mittens add tiny tufts of unspun roving (“thrums”) directly into the fabric as you crochet.
Those fluffy thrums create a soft, felt-y interior that keeps your hands warm on even the coldest days. Once you wear them, you won’t want to go back to plain mittens!
If you’re new to thrums, check out my quick tutorial before starting:
👉 https://youtu.be/_AhqavVJ1f4
💖 Why You’ll Love This Free Crochet Thrummed Mitten Pattern
- Serious Warmth: The roving thrums create a cozy, fleece-like interior that traps heat.
- Texture You Can Feel: Those little clouds look cute and work hard.
- Beginner-Friendly Technique: If you can single crochet in the round, you can learn to thrum.
- Giftable & Fast: Bulky yarn + simple shaping = quick wins for everyone on your list.
- Confidence Boost: Try a new technique with step-by-step support and video help.
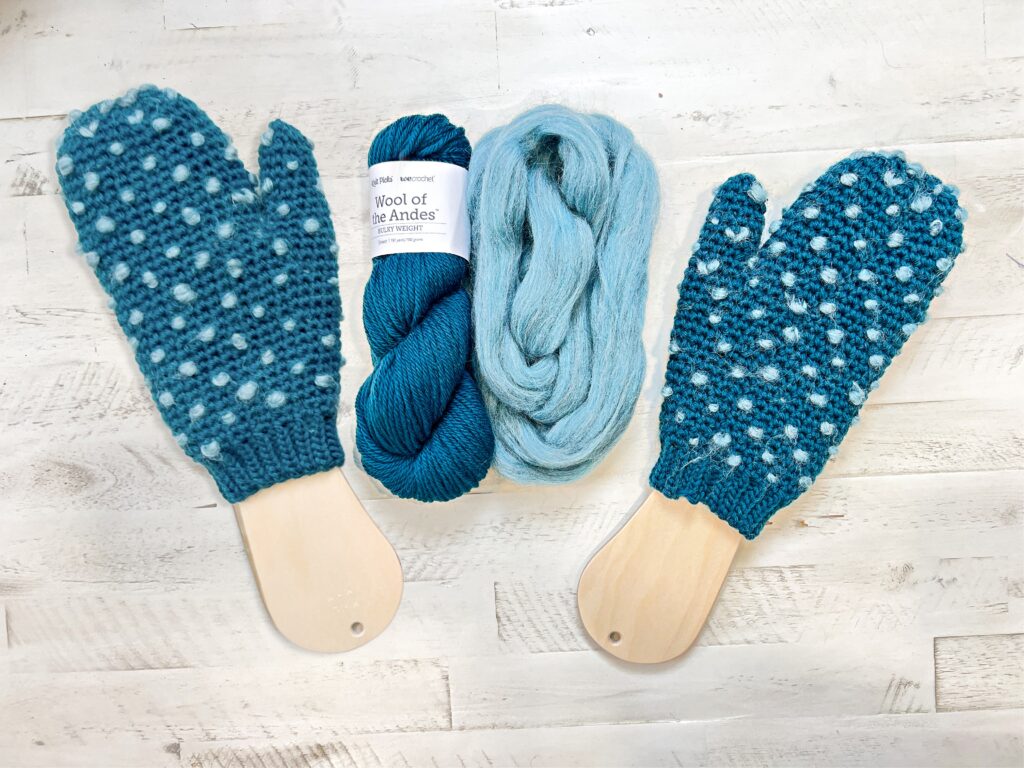
🧶 Yarn + Materials for Thrummed Crochet Mittens
For the sample shown, I used Wool of the Andes Bulky from WeCrochet (same company as KnitPicks) — it’s soft, sturdy, and absolutely perfect for thrummed mittens. Use a contrasting roving color so your thrums pop beautifully on the outside.
Yarn Used:
- Knit Picks Wool of the Andes Bulky – https://tidd.ly/4ogN7QN
- Knit Picks Wool of the Andes Roving – https://tidd.ly/4q1E7AF
Yarn Alternatives (Bulky/Category 5):
- Knit Picks Wool of the Andes Superwash Bulky – Get it here
- Knit Picks Swish Bulky – Get it here
- Semilla Grosso GOTS (Hobbii) – Get it here
Hook:
- Size J/10 (6.0 mm), or size needed to obtain gauge
Notions:
- Removable stitch markers – https://erinlanebags.com/collections/stitch-markers
- Tapestry needle – https://amzn.to/42LkAui
- Chenille-type needle – https://amzn.to/4qfRBbZ
- Quality project bag – https://erinlanebags.com/collections/view-bags
- (Optional) Stitch saver cord (knitters) – https://amzn.to/3IOH07j
- (Optional) Leather tag – https://tidd.ly/47hQAaW
- (Optional) Leather rivets – https://amzn.to/4eSByem
🪡 Pattern Details & Skill Level
Skill Level: Intermediate
To Fit Sizes: Child (Small Adult, Medium Adult, Large Adult)
Finished Hand Circumference: 6 (7, 8, 9) inches [15 (18, 20.5, 23) cm] not including the extra fluff from thrums
Gauge: 14 sts x 15 rnds = 4″ x 4″ (10 x 10 cm) in pattern stitch in the round; use any hook size to meet gauge.
Construction Notes:
- Cuff is worked flat and seamed, then the hand is worked in joined rounds from the long edge.
- Thrums are added as you crochet (see Special Stitches).
- Use a marker to identify the first stitch of each round; do not turn at the end of rounds.
- Join rounds with an invisible join for a clean look (see Special Stitches).
💌 Get the Ad-Free PDF + VIP Experience (Best Deal!)
This free crochet thrummed mitten pattern is available right here on the blog, but if you’d like everything neatly organized, grab the ad-free PDF + ad-free video inside the First Fall VIP Experience. You’ll also get bonuses you can’t get anywhere else.
VIP Includes:
✅ Ad-free printable PDF for both Rockies Crochet + Andes Knit Mittens
✅ Ad-free, step-by-step video tutorials
✅ 3 bonus hand warmer patterns (available now)
✅ $5 Ravelry coupon + $5 off Jolly Holiday coupon
✅ Unlimited access inside the Marly Bird House
Learn more and join:
https://marlybird.com/blog/first-fall-2025-knit-and-crochet-make-along-with-marly-bird/
🧤 Free Crochet Thrummed Mitten Pattern — Rockies Thrummed Crochet Mittens — First Fall 2025
The air’s getting crisp, the PSLs are flowing, and it’s time to stitch up the for the coziest project of the season — the Rockies Crochet Thrummed Mittens. The easy-to-follow stitch pattern and step-by-step video tutorial make it simple to stay on track, even if you’ve never made thrums before. Each stitch feels like a little love letter to winter, wrapping your hands in warmth and texture. The thrums create a cloud-like lining that’s unbelievably soft and toasty. Once you see those fluffy bits take shape, you’ll be hooked — one pair quickly turns into a whole pile for friends and family!
SKILL LEVEL
Intermediate
MEASUREMENTS
To Fit Size
Child (Small Adult, Medium Adult, Large Adult)
Finished Measurements
Finished Hand Circumference: 6 (7, 8, 9) inches [15 (18, 20.5, 23) cm] not including the extra fluff of the thrums
Gauge
14 sts x 15 rounds = 4″ (10 cm) x 4″ (10 cm) in pattern stitch in the round; use any size hook to obtain the gauge.
MATERIALS
Crochet Yarn
Knit Picks, Wool of the Andes Bulky Yarn (100% Peruvian Highland Wool, 137 yds / 125 m, 3.5 oz/ 100 g, CYCA# 5 bulky): #28220 Spruce, 1 (1, 2, 2) hanks
Knit Picks, Wool of the Andes Roving (100% Peruvian Highland Wool Roving, 3.5 oz/ 100 g): #28171 Fjord Heather, 1 (1, 1, 1) hank
For best results, choose colors that contrast. This will make it so you can see the thrums on the outside of the mitten.
Crochet Hook Size J/10 [6.0 mm]
Notions
- Removable stitch markers,
- tapestry needle,
- chenille type needle,
- quality project bag I absolutely 🩵 these ones,
- optional stitch saver cord (knitters only),
- Leather tag (optional),
- leather rivets (optional)
ABBREVIATIONS
CH – Chain(s)
BLO – Back Loop Only
PM – Place Marker
RS – Right Side
SC – Single Crochet
SL ST – Slip Stitch
ST(S) – Stitch(es)
WS – Wrong Side
SPECIAL STITCHES
⭐️Chain (ch): With slip knot or free loop on hook, yarn over hook and pull through loop on hook.
⭐️Invisible join: This is created by removing the free loop from hook, thread hook from front to back in first st, place free loop on hook and draw through stitch.
⭐️Single Crochet (sc): Insert hook into indicated stitch, yarn over and pull up a loop, yarn over and draw through 2 loops on hook.
⭐️Single Crochet Two Together (sc2tog): *Insert hook into indicated stitch, yarn over and pull up a loop; repeat from * in next stitch indicated, yarn over and draw through all 3 loops on hook.
⭐️ Single Crochet (sc-thrum): insert hook into next st, hold thrum over hook so ends are to the inside of mitten, yarn over hook, draw thrum and yarn through st (loop, thrum, loop), pull the first front loop on hook through ONLY the thrum (2 loops on hook), yarn over and draw through two loops hook.
⭐️Slip Stitch (sl st): Insert hook into indicated stitch, yarn over and pull up a loop and draw through loop on hook.
NOTES
- The instructions are written for the smallest size. If changes are necessary for larger sizes the instructions will be written thus ( ). When only one number is given, it applies to all sizes.
- A thrum is a lock of fleece about 4″ (10 cm) long with both ends folded to the middle, then twisted/rubbed together. Center of thrum should be approx the same thickness as the yarn being used for mitten.
- The end of the thrums (“the butterfly”) will tuck into the wrong side of the mitten.
- Make thrums prior to beginning the mitten.
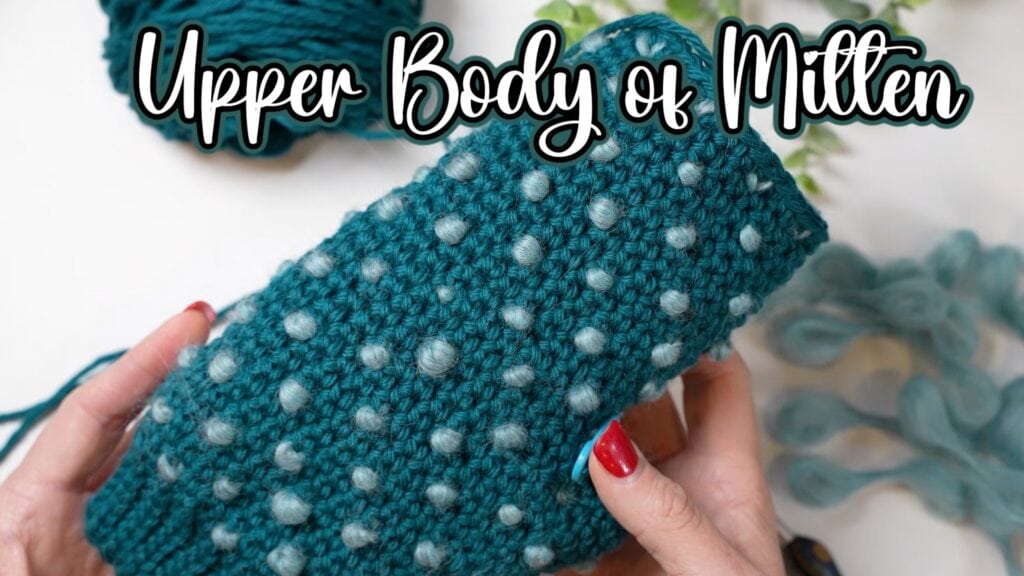
- Cuff of the mitt is worked flat then seamed together before starting on the body of mitten.
- Body of the mitt is worked into the long side edge of the cuff as instructed.
- Body of the mitt is worked in joined rounds. Use a marker to identify the first stitch of each round. Do not turn at end of each round.
- Join each round with an invisible join (see special stitches).
- Stitches highlighted in green are part of the thumb gusset.
VIDEO TUTORIALS
- Slip Stitch Crochet Ribbing >> Click Here for Video Help <<
- Single Crochet >> Click Here for Video Help <<
- Through the Back Loop >> Click Here for Video Help <<
- How to Bury Ends >> Click Here for Video Help <<
- How to Make Thrums >> Click Here for YouTube Video <<
- How to Crochet the Rockies Thrummed Crochet Mittens >> Click Here for YouTub Video <<
GROW
To Unlock Exclusive Subscriber Content click the Box below and join for free by simply adding your email and creating a password! If you are having troubles, clear your cache or reset your password or login to the Grow Publisher Portal.
>> Learn More About Grow Here <<
I’m thrilled to share this amazing pattern with you, many patterns on my blog are absolutely free! I kindly request that you don’t copy and paste or distribute this pattern. Prefer an ad-free experience? Buy a digital PDF pattern for a small fee from one of my online stores for a seamless crafting journey.
I appreciate your support and readership. You are the reason I can keep doing what I love and sharing it with others. So, thank you from the bottom of my yarn-loving heart! Disclosure: This post contains affiliate links, meaning I get a commission if you decide to make a purchase through my links at no cost to you.
ROCKIES THRUMMED CROCHET MITTENS PATTERN
CUFF
Chain 6 (6, 8. 10)
Row 1 (RS): Sl st in 2nd ch from hook and in each ch across, turn — 5 (5, 7, 9) slip stitches.
Row 2: Ch 1, sl st-blo in each stitch across, turn.
Repeat last row 18 (22, 26, 30) more times — 20 (24, 28, 32) rows.
Cuff Seaming
Joining Row: Ch 1, *sl st-blo of next st and next ch on foundation ch at the same time: repeat from * across, do not turn.
LOWER HAND
Turn to begin working on long edge of cuff (around the row ends), ch 1.
Set-up Round (RS): Evenly place 20 (24, 28, 32) sc along long side of cuff, join to first sc (begin working in the round), do not turn throughout – 20 (24, 28, 32) sc.
Round 1: Sc in first st, *sc-thrum in next st, sc in next 3 sts; repeat from * to last 3 sts, sc-thrum in next st, sc in next 2 sts, join to first sc.
Round 2: Sc in each st around, join to first sc.
Round 3: *Sc in next 3 sts, sc-thrum in next st; repeat from * around, join to first sc.
Round 4: Sc in each st around, join to first sc.
THUMB GUSSET
Round 1 (increase round): Sc in first st, sc-thrum in next st, sc in next 3 sts, sc-thrum in next st, 2 sc in next st (place a marker in the first stitch of the two), sc in next st, 2 sc in next st (place a marker in the second stitch of the two), *sc-thrum in next st, sc in next 3 sc; repeat from * to last 3 sts, sc-thrum in next st, sc in next 2 sts, join to first sc. — 17 (21, 25, 29) sts + 5 sts on thumb.
Round 2: Sc in first st and in each sc around, join to first sc. Move the marker up on the thumb stitches.
Round 3: Sc in next 3 sts, sc-thrum in next st, sc in next 2 sts, sc in next 2 sts (move marker up), sc-thrum in next st, sc in next 2 sts (move marker up), sc in next 2 sts, *sc-thrum, sc in next 3 st3; repeat from * to last st, sc-thrum in last stitch, join to first sc.
Round 4: Sc in first st and in each sc around, join to first sc. Move the marker up on the thumb stitches.
Round 5 (increase round): Sc in first st, sc-thrum in next st, sc in next 3 sts, sc-thrum in next st, 2 sc in next st (move marker in the first stitch of the two), sc in next 3 sts, 2 sc in next st (move marker in the second stitch of the two), *sc-thrum in next st, sc in next 3 sc; repeat from * to last 3 sts, sc-thrum in next st, sc in next 2 sts, join to first sc. — 17 (21, 25, 29) sts + 7 sts on thumb
Round 6: Sc in first st and in each sc around, join to first sc. Move the marker up on the thumb stitches.
Round 7: Sc in next 3 sts, sc-thrum in next st, sc in next 2 sts, sc in next 3 sts (move marker up), sc-thrum, sc in next 3 sts (move marker up), sc in next 2 sts, *sc-thrum, sc in next 3 st3; repeat from * to last st, sc-thrum in last stitch, join to first sc.
Round 8: Sc in first st and in each sc around, join to first sc. Move the marker up on the thumb stitches.
Round 9 (increase round): Sc in first st, sc-thrum in next st, sc in next 3 sts, sc-thrum in next st, 2 sc in next st (move marker in the first stitch of the two), sc-thrum in next st, sc in next 3 sts, sc-thrum in next st, 2 sc in next st (move marker in the second stitch of the two), *sc-thrum in next st, sc in next 3 sc; repeat from * to last 3 sts, sc-thrum in next st, sc in next 2 sts, join to first sc. — 17 (21, 25, 29) sts + 9 sts on thumb
Round 10: Sc in first st and in each sc around, join to first sc. Move the marker up on the thumb stitches.
Child Size Continue to Upper Hand
Round 11 (increase round): Sc in next 3 sts, sc-thrum in next st, sc in next 2 sts, 2 sc in next st (move marker up), sc in next 3 sts, sc-thrum in next st, sc in next 3 sts, 2 sc in next st (move marker up), sc in next 2 sts, *sc-thrum, sc in next 3 st3; repeat from * to last st, sc-thrum in last stitch, join to first sc — – (21, 25, 29) sts + 11 sts on thumb
Round 12: Sc in first st and in each sc around, join to first sc. Move the marker up on the thumb stitches.
Small Adult Size Continue to Upper Hand
Round 13 (increase round): Sc in first st, sc-thrum in next st, sc in next 3 sts, sc-thrum in next st, 2 sc in next st (move marker in the first stitch of the two), sc in next 2 sts, sc-thrum in next st, sc in next 3 sts, sc-thrum in next st, sc in next 2 sts, 2 sc in next st (move marker in the second stitch of the two), *sc-thrum in next st, sc in next 3 sc; repeat from * to last 3 sts, sc-thrum in next st, sc in next 2 sts, join to first sc. — – (-, 25, 29) + 13 sts on thumb
Round 14: Sc in first st and in each sc around, join to first sc. Move the marker up on the thumb stitches.
Medium Adult Size Continue to Upper Hand
Round 15 (increase round): Sc in next 3 sts, sc-thrum in next st, sc in next 2 sts, 2 sc in next st (move marker up), sc in next st, [sc-thrum in next st, sc in next 3 sts] twice, sc-thrum in next st, sc in next st, 2 sc in next st (move marker up), sc in next 2 sts, *sc-thrum, sc in next 3 st3; repeat from * to last st, sc-thrum in last stitch, join to first sc. — – (-, -, 29) sts + 15 sts on thumb
Round 16: Sc in first st and in each sc around, join to first sc. Move the marker up on the thumb stitches.
Large Adult Size Continue to Upper Hand
UPPER HAND
CHILD AND MEDIUM ADULT ONLY
Round 1: Sc in next 3 sts, sc-thrum in next st, sc in next 2 sts, ch 3, skip ALL thumb sts, sc in next 2 sts, *sc-thrum, sc in next 3 st3; repeat from * to last st, sc-thrum in last stitch, join to first sc – 17 (-, 25, -) sts + ch-3 sp.
Round 2: Sc in first st and in each st around (including chs), join to first sc.- 20 (-, 28, -) sc.
SMALL AND LARGE ADULT ONLY
Round 1: Sc in first st, sc-thrum in next st, sc in next 3 sts, sc-thrum in next st, ch 3, skip ALL thumb sts, *sc-thrum in next st, sc in next 3 sc; repeat from * to last 3 sts, sc-thrum in next st, sc in next 2 sts, join to first sc – – (21, -, 29) sts + ch-3 sp.
Round 2: Sc in first st and in each st around (including chs), join to first sc.- – (24, -, 32) sc.
Round 3: *Sc in next 3 sts, sc-thrum in next st; repeat from * around, join to first sc.
Round 4: Sc in each st around, join to first sc.
ALL SIZES
Round 3 (5, 3. 5): Sc in first st, *sc-thrum in next st, sc in next 3 sts; repeat from * to last 3 sts, sc-thrum in next st, sc in next 2 sts, join to first sc.
Round 4 (6, 4, 6): Sc in each st around, join to first sc.
Round 5 (7, 5, 7): *Sc in next 3 sts, sc-thrum in next st; repeat from * around, join to first sc.
Round 6 (8, 6, 8): Sc in each st around, join to first sc.
Continue in pattern (last 4 rounds) until the mitten measures approx 6 (7, 8, 9)” [ 15, 18, 20.5, 23 cm] from edge to top of mitten (not including cuff) ending after a Round 5 (7, 5, 7).
TOP OF MITTEN
Round 1 (decrease round): *Sc2tog in next 2 sts; repeat from * around, join to first sc — 10 (12, 14, 16) sc.
Round 2: Sc in first st, *sc-thrum in next st, sc in next st; repeat from * to last stitch, sc-thrum in last stitch, join to first sc.
Round 3 (decrease round): *Sc2tog in next 2 sts; repeat from * around, join to first sc — 5 (6, 7, 8) sc.
Cut a 10” [4cm] tail and Fasten off.
FINISHING
Thread tail through a tapestry needle, weave yarn through front leg only of each stitch of the last round. Pull to tighten the mitten closed. Weave yarn around stitches, then back in the opposite direction to secure the end.
THUMB FINISHING
Note: You can space your thrums as directed or any amount of stitches you desire. See video tutorial for tips.
Round 1: Join yarn to the 2nd ch of the ch-3 sp with a sl st, sc in same ch, sc2tog over next ch and first marked st of thumb, sc in next 3 (2, 1, 0) sts, sc-thrum in next st, [sc in next 3 sts, sc-thrum in next sc] repeat 0 (1, 2, 3) times , sc in next 3 (2, 1, 0) sts, sc2tog over last marked st of thumb and last ch, join to first sc, remove thumb markers – 10 (12, 14, 16) sts.
Round 2: Sc in each st around, join to first sc.
Round 3: Sc in first st, sc in next 2 (1, 0, 3) sts, sc-thrum in next st, [sc in next 3 sts, sc-thrum in next sc] 1 (2, 2, 2) times , sc in next 2 (1, 4, 3) sts, join to first sc.
Round 4: Sc in each st around, join to first sc.
Round 5: Sc in first st, sc in next 0 (3, 2, 1) sts, sc-thrum in next st, [sc in next 3 sts, sc-thrum in next sc] 1 (1, 2, 3) times , sc in next 4 (3, 2, 1) sts, join to first sc.
Continue in pattern (last 4 rounds) until the thumb measures desired amount ending after a Thumb Round 3 or 5.
Last Round 3: *Sc2tog in next 2 sts; repeat from * around, join to first sc — 5 (6, 7, 8) sc.
Cut a 10” [4cm] tail and Fasten off.
FINISHING
Thread tail through a tapestry needle, weave yarn through front leg only of each stitch of the last round. Pull to tighten the thumb closed. Weave yarn around stitches, then back in the opposite direction to secure the end.
(optional) Add Leather Tag to Cuff
🔗 Helpful Resources + Related Posts
- First Fall 2025 Knit and Crochet Make-Along with Marly Bird – https://marlybird.com/blog/first-fall-2025-knit-and-crochet-make-along-with-marly-bird/
- How to Make Thrums for Mittens (Knit & Crochet) – https://youtu.be/_AhqavVJ1f4
- Free Crochet Mitten Patterns – https://marlybird.com/blog/free-crochet-mitten-patterns/
- Free Knit and Crochet Holiday Patterns – https://marlybird.com/blog/free-knit-and-crochet-holiday-patterns/
- How to Make a Gauge Swatch in Crochet (free worksheet) – https://marlybird.com/blog/how-to-make-a-gauge-swatch-in-crochet-free-worksheet-step/
- Reading Crochet Chart Symbols: Basics, Tips & Tricks – https://marlybird.com/blog/reading-crochet-chart-symbols-basics-tips-tricks/
❓ FAQs
What makes thrummed mittens special?
Thrums add soft wool roving inside the fabric, which felts slightly with wear and creates a warm, cloud-like lining.
Are thrummed crochet mittens beginner-friendly?
If you’re comfortable crocheting in the round and working simple decreases, yes! The video will walk you through the thrum technique.
What yarn works best for thrummed crochet mittens?
A slightly “sticky” wool like Wool of the Andes Bulky grips the thrums well. Pair with contrasting roving so the thrums show on the outside.
Where can I buy the ad-free PDF?
Inside the First Fall 2025 VIP Experience (you’ll also get ad-free videos and 3 bonus hand warmers).
Do I need special tools?
Just your hook, roving for thrums, and standard finishing tools. A chenille needle makes weaving ends through thrums easier.
💭 Final Thoughts
There’s something magical about a project that’s as practical as it is cozy. These thrummed crochet mittens aren’t just another make — they’re comfort you can wear. Every little tuft of roving turns simple stitches into something extra-special, wrapping your hands in warmth (and love) all winter long.
Whether you’re joining me for the First Fall 2025 Make-Along or working through this free crochet thrummed mitten pattern on your own time, I hope the Rockies Mittens spark your creativity and keep you toasty for seasons to come.
If you love this pattern, don’t miss the VIP Experience for ad-free PDFs, ad-free videos, and three bonus hand warmer patterns that coordinate beautifully with your mittens.
Now grab your yarn, make a lot of thrums, and crochet yourself a little piece of warmth you’ll reach for year after year. 💕
Your BiCrafty Bestie,
Marly Bird 🧶
#MarlyBird #FreeCrochetThrummedMittenPattern #RockiesMittens #ThrummedMittens #FreeCrochetPattern #CrochetMittens #WeCrochet #FirstFallMakeAlong #FiberArts #YarnLove #BiCraftyBestie
Categories: Uncategorized