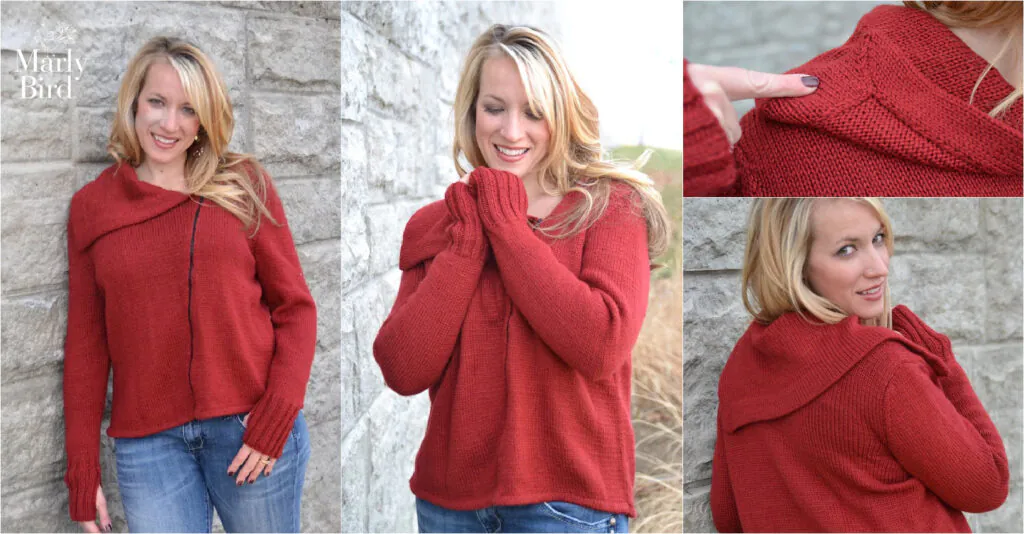
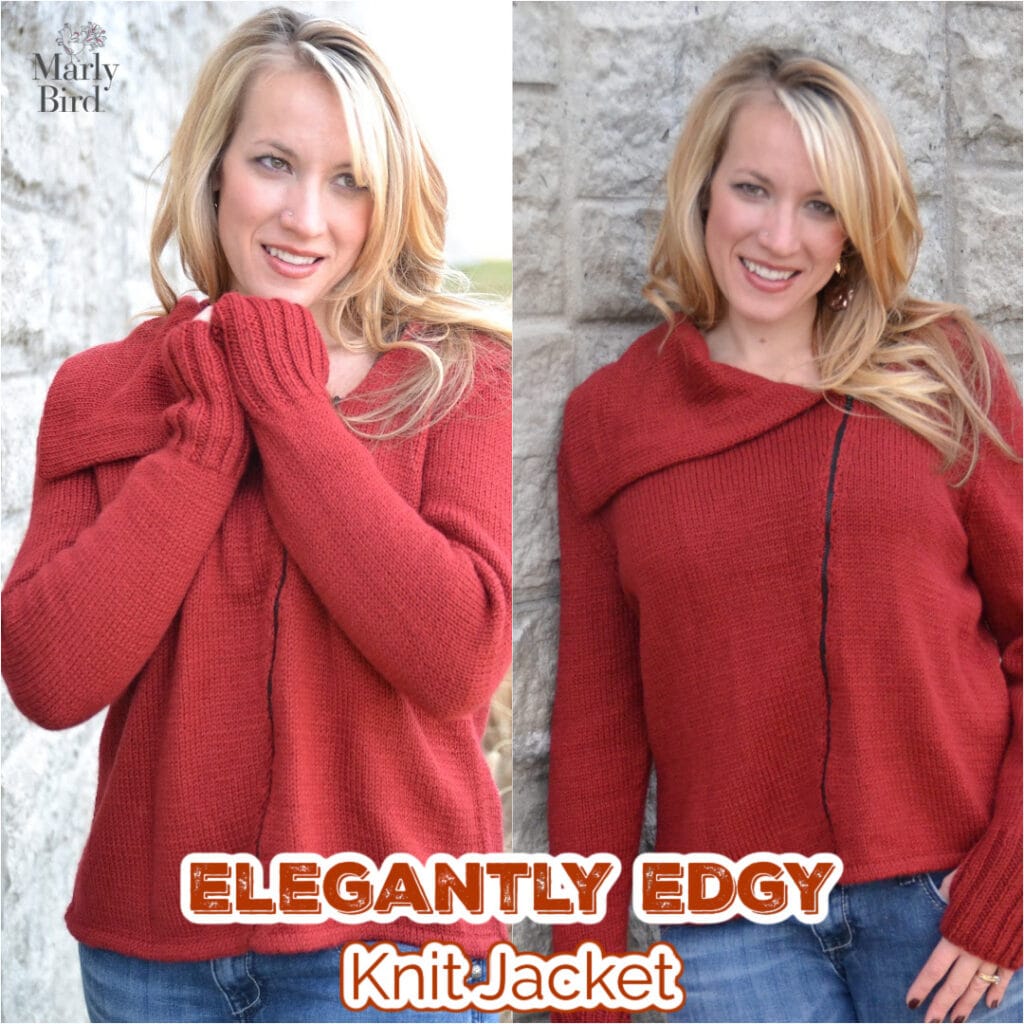
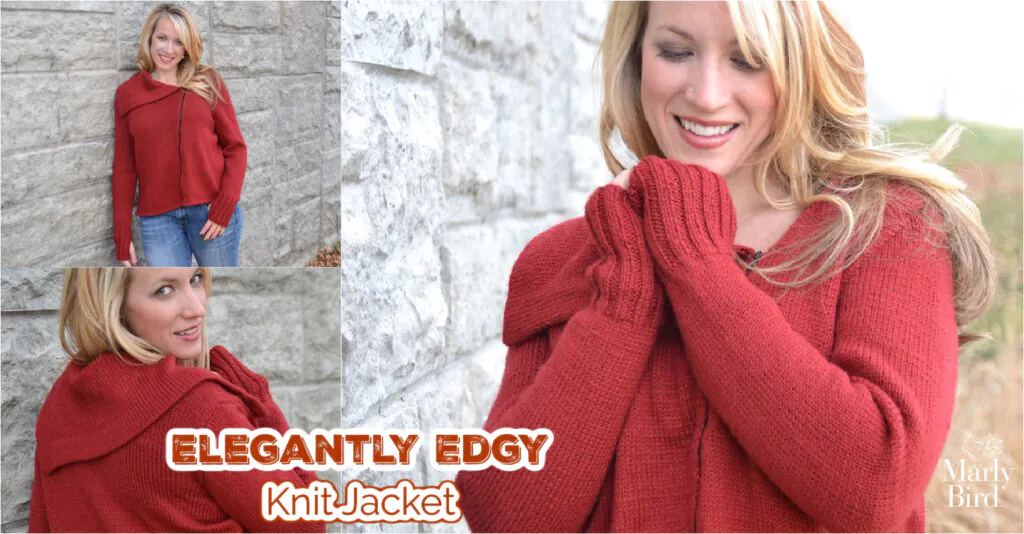
Some knit garments are cozy. Some are stylish. And every once in a while, one manages to be both — without trying too hard. The Elegantly Edgy Knit Jacket is one of those pieces. With its asymmetrical zipper, dramatic oversized collar, and relaxed modern fit, this jacket feels effortlessly cool while still being comfortable enough for everyday wear.
If you love garments that look polished but feel approachable, this newly free knit jacket pattern might be exactly what your wardrobe (and your needles) have been waiting for.
Quick Pattern Overview
The Elegantly Edgy Knit Jacket is a free, zip-front knit jacket pattern worked flat and seamed, featuring sculpted shaping and thoughtful design details.
In this post you’ll learn:
What makes an asymmetrical knit jacket flattering and wearable
Who this pattern is best suited for skill-wise
How fit, ease, and drape are built into the design
Why this is a great confidence-building garment project
How to style and layer the finished jacket year-round
What Does “Asymmetrical” Mean in Knit Garments?
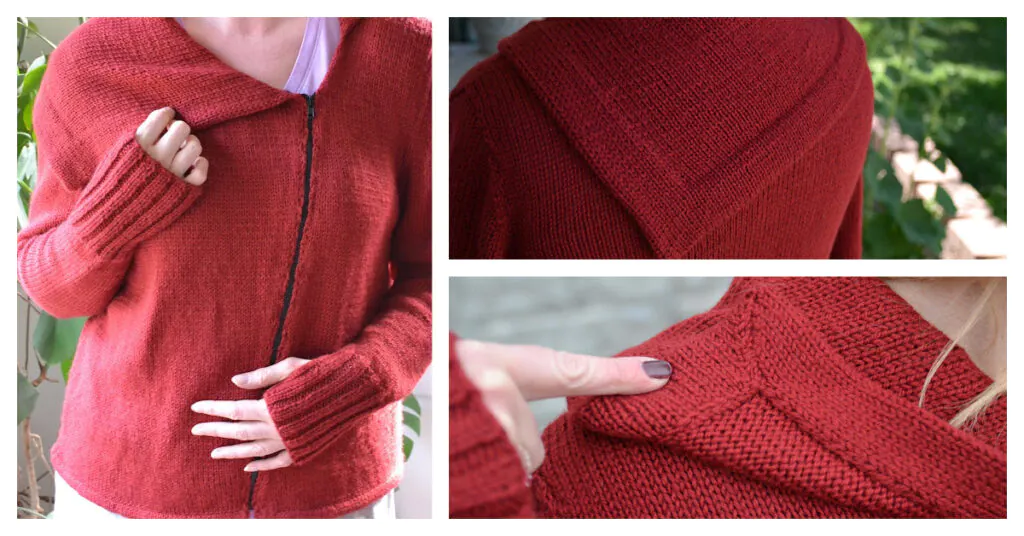
Asymmetry in knitting is all about visual interest without sacrificing comfort. In this jacket, the asymmetry shows up through the angled zipper front and oversized collar, which naturally drapes across the body when worn.
Rather than feeling unbalanced, this design:
Draws the eye vertically
Softens the neckline
Creates a relaxed, intentional silhouette
It’s modern without being trendy — which makes it easy to wear year after year.
What You Will Love About This Pattern
Free knit jacket pattern available on MarlyBird.com
Asymmetrical zipper front for modern styling
Dramatic oversized collar that replaces the need for a scarf
Thumb hole cuffs for cozy, functional details
Structured seams that elevate the finished garment
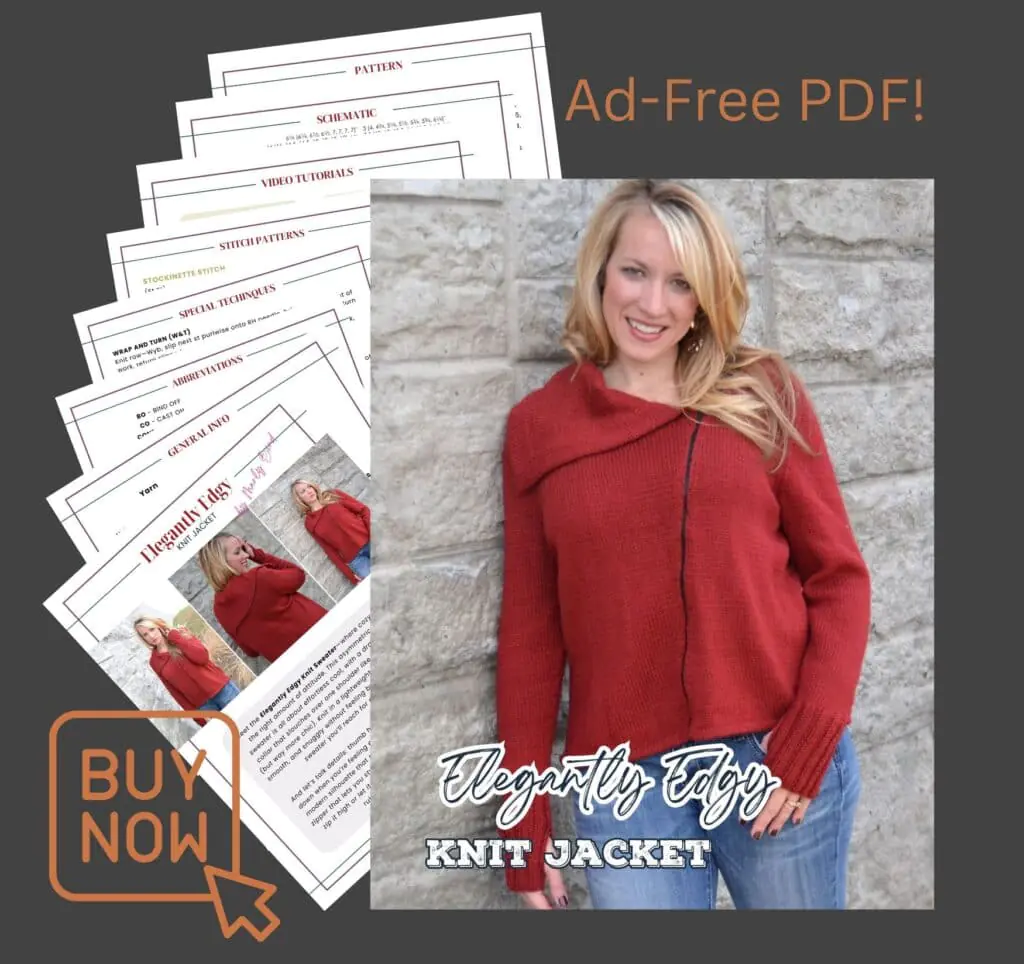
Optional ad-free PDF available for purchase
✨ Designer Tip: This jacket is designed with 2–4 inches of positive ease, giving it a relaxed fit without feeling oversized or sloppy.
“This jacket feels like something you’d find in a boutique — but you made it yourself.”
Affiliate Disclosure:This post contains affiliate links. To learn more please visit my privacy policy here💖
Design, Fit, and Construction Details
The Elegantly Edgy Knit Jacket is worked flat in pieces and seamed, which provides structure and longevity. This construction choice helps the jacket keep its shape while still allowing the fabric to drape beautifully.
Design highlights include:
Stockinette stitch body for clean lines
Shaped shoulders using short rows for better fit
Set-in sleeves for a polished look
Reverse stockinette oversized collar for texture
A zippered front that allows multiple styling options
The result is a garment that feels more like a wardrobe staple than a casual sweater.
Yarn Choice & Substitutions
The original sample was knit in a DK-weight merino blend, chosen for its softness, drape, and stitch definition. This weight gives the jacket warmth without bulk and allows the collar to fall naturally.
When choosing a substitute, look for yarn that is:
DK weight
Smooth enough to highlight clean lines
Drapey rather than stiff
Comfortable for all-day wear
Merino blends, superwash wool, or soft acrylic blends can all work well depending on climate and fiber preference.
Great Substitute Yarns for Dolce Merino
If you’re substituting Dolce Merino, you want yarns that offer softness, drape, and stitch definition — especially for a garment like the Elegantly Edgy Jacket. Here are some excellent alternatives depending on the look and feel you want:
Best for: Luxurious drape and subtle sheen This blend of merino, silk, and cashmere gives a silky hand with rich stitch definition, making it ideal if you want the jacket to feel elevated and refined. It’s a great choice if you’re dressing this piece up or want something special for gifting.
🧵 Rico Design Luxury Merino Supercash DK
Best for: Classic luxury knitwear feel Another upscale choice, this yarn feels soft and substantial while still maintaining great stitch clarity. Use this if you want a timeless, high-end look that still feels cozy and wearable.
🧵 Universal Yarn Bella Tweed
Best for: Rustic, textured aesthetic If you love a bit of character in your fabric, Bella Tweed adds flecks and visual interest without sacrificing drape. It produces a look that’s a little more earthy and artisanal, perfect for casual autumn and winter wear.
🧵 Universal Yarn Fawning
Best for: Softness + warmth without bulk Fawning is incredibly soft and cozy. It’s ideal if comfort and warmth are your top priorities. The fabric will feel gentle against the skin — perfect for layers you’ll wear all day.
Best for: Colorful, blended effects This option brings vibrant melange color transitions and the softness of alpaca. It’s a great choice if you want a statement fabric with visual depth, and the alpaca adds a cozy halo that’s perfect for layering pieces.
When substituting yarn, consider these key points:
Gauge matters: Always swatch to match the recommended gauge in the pattern so your fit stays accurate.
Fiber content affects drape: Wool and merino blends tend to be springy, while alpaca and silk blends can add drape or halo.
Texture impacts stitch definition: Tweeds and melanges add visual texture, which can change how design elements like collars and seams read visually.
✨ Designer Tip: If you love luxury and drape, lean toward silk- or cashmere-blended DKs. If you want everyday wearability and cozy warmth, merino-rich or alpaca-blends are your go-tos.
Special Features That Make This Jacket Stand Out
Asymmetrical zipper closure
Oversized collar that adds drama and warmth
Thumb hole cuffs for practical coziness
Structured seams that enhance fit and durability
These thoughtful details turn a simple knit jacket into a standout piece.
Elegantly Edgy Knit Jacket Pattern Details
SKILL LEVEL
Intermediate
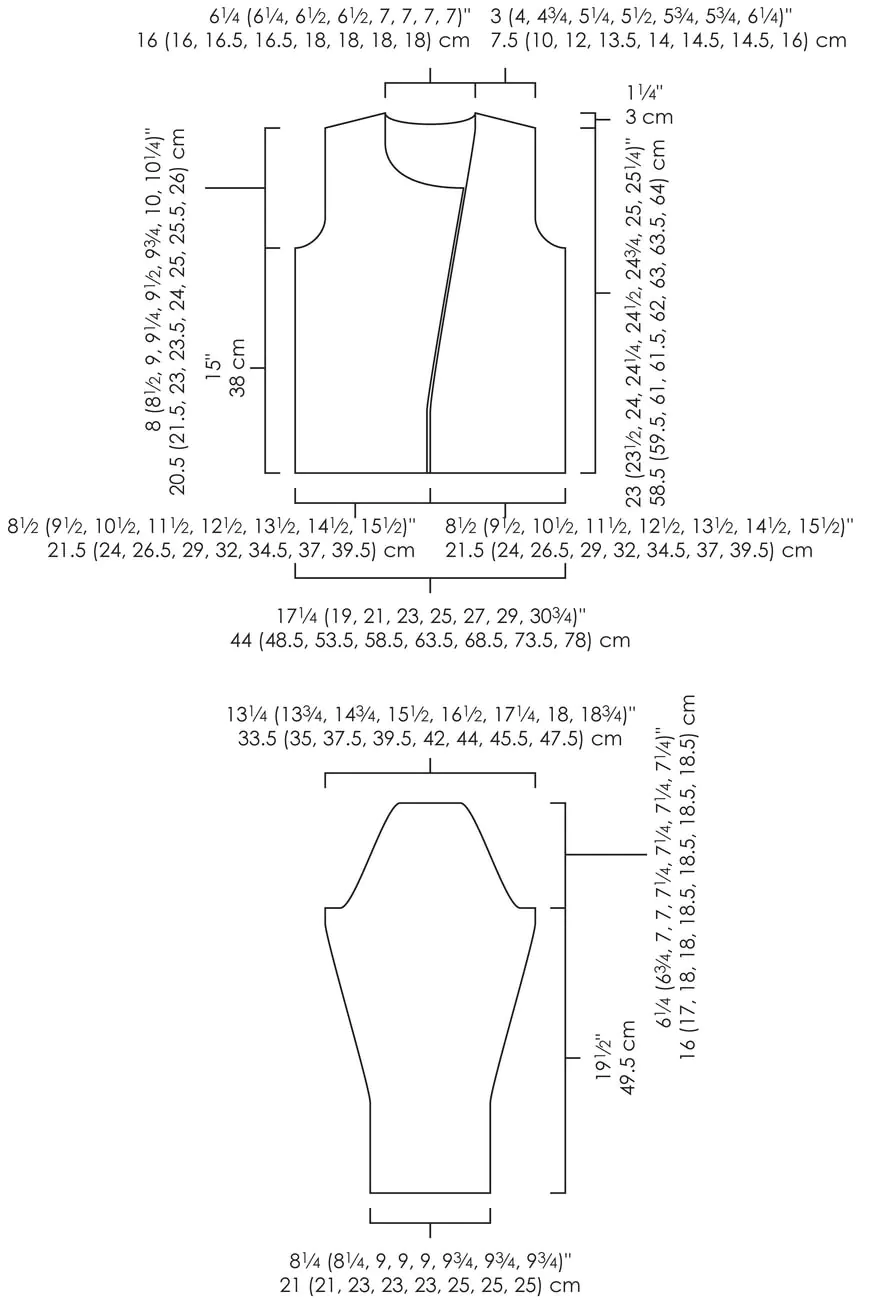
MEASUREMENTS
Finished Measurements Chest: 34¼ (38, 42, 46, 50, 54, 58, 61¾)”; [87 (96.5, 106.5, 117, 127, 137, 147.5, 157) cm] To be worn with positive ease approx. 2 inches
BO – Bind Off CO – Cast On CONT – Continue DEC(’D) – Decrease(d) EOR – Every Other Row INC(’D) – Increase(d) K – Knit K2TOG – Knit 2 Sts Together LH – Left Hand MEAS – Measure(s) P – Purl P2TOG – Purl 2 Sts Together PWISE – Purlwise REP – Repeat RH – Right Hand RS – Right Side ST(S) – Stitch(es) TOG – Together WS – Wrong Side WYB – With Yarn in Back WYF – With Yarn in Front
STITCH PATTERNS
⭐️ BACKWARD LOOP CAST‑ON *Wrap yarn around left thumb from front to back and secure in palm; insert rhn upward through strand on thumb, slip loop to needle, tighten. Rep from * for desired sts.
⭐️ MAKE ONE (M1) Insert LH needle under horizontal strand between st just worked and next st, from the front to the back, knit through the back loop (1 st increased)
⭐️ SLIP SLIP KNIT (SSK) Slip 2 stitches, one at a time, as if to knit. Insert left hand needle into the front of these two stitches and knit them together from this position (1 stitch decreased)
⭐️ SLIP SLIP PUK (SSP) Slip 2 stitches, one at a time, as if to knit, then slip them back onto the left needle without changing their orientation. Purl these 2 stitches together through the back loop – 1 stitch decreased.
SPECIAL TECHNIQUES
WRAP AND TURN (W&T) Knit row—Wyb, slip next st purlwise onto RH needle, bring yarn to front of work, return slipped st to LH needle, bring yarn to back of work, then turn work. Purl row—Wyf slip next st purlwise onto RH needle, bring yarn to back of work, return slipped st to LH needle, bring yarn to front of work, then turn work.
HIDE WRAPS Knit row—Pick up the wrap from the front with the RH needle and knit together with the st it wraps. Purl row—pick up the wrap through back of loop with RH needle and purl together with the st it wraps.
3-NEEDLE BIND OFF Hold both pieces to be joined in your left hand, needles parallel to each other, one in front of the other. Hold a 3rd, empty needle in your right hand. Insert right needle knitwise into the 1st st on both front and back needles, and knit them together. Work the next pair of sts the same way, then pass 1st st on right needle over 2nd st. Continue in this manner until all sts have been bound off.
MATTRESS STITCH With RS of both pieces facing you, pass yarn needle from bottom to top under horizontal strand between first and second sts, pull yarn through. Insert needle into corresponding horizontal strand on the other pc. Cont these steps alternating from one piece to the other.
ZIPPER With RS facing and zipper closed, pin zipper to Fronts with upper edge of zipper aligned with right front neck shaping and so that front edges are touching the outer edges of the zipper teeth, leaving zipper teeth exposed between the fronts. With contrasting sewing thread and RS facing, baste zipper to fronts close to zipper teeth. Turn the work inside out. With matching sewing thread, use a whipstitch to sew the outer edges of the zipper to the WS of the sweater fronts. Turn the work back so the RS is facing, and with matching sewing thread, use small backstitches to secure the knitted fabric close to the zipper teeth. Remove basting thread.
STITCH PATTERNS
STOCKINETTE STITCH (St St) Knit on RS, purl on WS.
REVERSE STOCKINETTE STITCH (Rev St St) Purl on RS, knit on WS.
2 X 2 RIBBING (multiple of 4 sts + 2) Row 1 (RS): Sl 1 pwise wyb, k1, *p2, k2; rep from * to end. Row 2 (WS): Sl 1 pwise wyf, p1, *k2, p2; rep from * to end. Rep Rows 1–2 for 2 x 2 Ribbing.
Read ahead before shaping sections. Front edge shaping overlaps with armhole and neck shaping in this pattern. Reading the full Front instructions before beginning will help you understand how these sections interact.
Pay close attention to RS and WS instructions. This pattern frequently switches between RS and WS shaping, especially during short rows and collar construction. Marking the RS of your fabric is highly recommended.
Short rows are essential to the fit and drape. Take care when working wrap-and-turns and when hiding wraps. Neatly worked wraps will make the collar and shoulders look polished.
Block pieces before assembly. Blocking individual pieces before seaming and zipper installation will improve fit accuracy and make finishing much easier.
Zipper installation is easiest when basted first. Temporarily basting the zipper in place before final sewing helps prevent puckering and ensures proper alignment.
Use stitch markers liberally. Stitch markers can be helpful for tracking armhole decreases, shoulder shaping, and front edge shaping.
SCHEMATIC
GROW
To Unlock Exclusive Subscriber Content click the Box below and join for free by simply adding your email and creating a password! If you are having troubles, clear your cache or reset your password or login to the Grow Publisher Portal.
I’m thrilled to share this amazing pattern with you, many patterns on my blog are absolutely free! I kindly request that you don’t copy and paste or distribute this pattern. Prefer an ad-free experience? Buy a digital PDF pattern for a small fee from one of my online stores for a seamless crafting journey.
I appreciate your support and readership. You are the reason I can keep doing what I love and sharing it with others. So, thank you from the bottom of my yarn-loving heart! Disclosure: This post contains affiliate links, meaning I get a commission if you decide to make a purchase through my links at no cost to you.
ELEGANTLY EDGY KNIT JACKET PATTERN
BACK
With straight needle, CO 88 (98, 108, 118, 128, 138, 148, 158) sts. Work in Stockinette stitch for 7 rows.
Joining Row Fold so WSs are facing each other, *with left-hand needle, pick up corresponding CO stitch, knit this stitch together with next stitch on needle; repeat from * to end.
Continue in Stockinette stitch until piece measures 15″ from fold, ending with a WS row.
ARMHOLE
Row 1 (RS): Bind off 6 (6, 6, 7, 7, 8, 8, 9) stitches at the beginning of the next 2 rows (one at each edge), then bind off 2 stitches at the beginning of the next 2 rows — 72 (82, 92, 100, 110, 118, 128, 136) stitches remain.
Decrease Row (RS): K2, k2tog, knit to last 4 stitches, ssk, k2 — 2 stitches decreased.
Repeat armhole decrease row every other row 3 (3, 3, 5, 8, 11, 15, 17) more times — 64 (74, 84, 88, 92, 94, 96, 100) stitches remain.
Work in Stockinette stitch until armhole measures 8 (8½, 9, 9¼, 9½, 9¾, 10, 10¼)”, ending with a WS row.
SHOULDERS AND NECK
Row 1 (RS): Work 22 (26, 30, 32, 33, 34, 35, 37) stitches, bind off 22 (22, 24, 24, 26, 26, 26, 26) stitches for neck, knit to end.
LEFT SHOULDER
Row 1 (WS): Purl to end.
Short Row 1 (RS): Bind off 5 stitches at neck edge, k13 (17, 20, 21, 22, 23, 24, 25) stitches, wrap and turn; (WS) purl to end.
Short Row 2 (RS): K10 (13, 15, 15, 16, 17, 18, 18) stitches, wrap and turn; (WS) purl to end.
Short Row 3 (RS): K7 (9, 10, 9, 10, 11, 12, 11) stitches, wrap and turn; (WS) purl to end.
Short Row 4 (RS): K3 (4, 5, 5, 5, 6, 6, 6) stitches, wrap and turn; (WS) purl to end.
Next Row (RS): Knit to end, hiding wraps as they appear. Slip left shoulder stitches onto stitch holder or waste yarn. Break yarn.
RIGHT SHOULDER
Rejoin yarn at neck edge.
Short Row 1 (WS): Bind off 5 stitches at neck edge, p13 (17, 20, 21, 22, 23, 24, 25) stitches, wrap and turn; (RS) knit to end.
Short Row 2 (WS): P10 (13, 15, 15, 16, 17, 18, 18) stitches, wrap and turn; (RS) knit to end.
Short Row 3 (WS): P7 (9, 10, 9, 10, 11, 12, 11) stitches, wrap and turn; (RS) knit to end.
Short Row 4 (WS): P3 (4, 5, 5, 5, 6, 6, 6) stitches, wrap and turn; (RS) knit to end.
Next Row (WS): Purl to end, hiding wraps as they appear. Slip right shoulder stitches onto stitch holder or waste yarn. Break yarn.
LEFT FRONT
With straight needle, CO 44 (49, 54, 59, 64, 69, 74, 79) stitches. Work in Stockinette stitch for 7 rows.
Joining Row Fold so WSs are facing each other, *pick up corresponding CO stitch and knit together with next stitch; repeat from * to end.
Work in Stockinette stitch for 4″ [10 cm], ending with a WS row.
FRONT EDGE
✨ Designer Note: Read the following instructions before beginning. Front edge shaping overlaps armhole shaping. Continue working armhole shaping while completing the remaining front edge decreases.
Decrease Row (RS): Knit to last 4 stitches, ssk, k2 — 1 stitch decreased.
Repeat neck decrease row every 8th row 15 (15, 16, 16, 17, 17, 17, 17) more times.
At the same time, when piece measures 15″ from fold, end with a WS row.
ARMHOLE
Row 1 (RS): Bind off 6 (6, 6, 7, 7, 8, 8, 9) stitches, knit to end. Row 2 (WS): Purl to end. Row 3 (RS): Bind off 2 stitches, knit to end. Row 4 (WS): Purl to end.
Decrease Row (RS): K2, k2tog, knit to end — 1 stitch decreased.
Repeat armhole decrease row every other row 3 (3, 3, 5, 8, 11, 15, 17) more times.
Continue working as established until last front edge decrease row is complete — 16 (21, 25, 27, 28, 29, 30, 32) stitches remain.
Work in Stockinette stitch until armhole measures 8 (8½, 9, 9¼, 9½, 9¾, 10, 10¼)”, ending with a RS row.
NECK
Note: The Left Front neckline is shaped entirely by the front edge decreases worked earlier. No additional neck bind-offs are required.
SHOULDER (LEFT FRONT)
Short Row 1 (WS): P13 (17, 20, 21, 22, 23, 24, 25) stitches, wrap and turn; (RS) knit to end.
Short Row 2 (WS): P10 (13, 15, 15, 16, 17, 18, 18) stitches, wrap and turn; (RS) knit to end.
Short Row 3 (WS): P7 (9, 10, 9, 10, 11, 12, 11) stitches, wrap and turn; (RS) knit to end.
Short Row 4 (WS): P3 (4, 5, 5, 5, 6, 6, 6) stitches, wrap and turn; (RS) knit to end.
Next Row (WS): Purl to end, hiding wraps as they appear. Slip left shoulder stitches onto stitch holder or waste yarn. Break yarn.
RIGHT FRONT
With straight needle, CO 44 (49, 54, 59, 64, 69, 74, 79) stitches. Work in Stockinette stitch for 7 rows.
Joining Row Fold so WSs are facing each other, *with left-hand needle, pick up corresponding CO stitch, knit this stitch together with next stitch on needle; repeat from * to end.
Work in Stockinette stitch for 4″ [10 cm], ending with a WS row.
FRONT EDGE
Note: Read the following instructions before beginning. Front edge shaping overlaps armhole shaping.
Increase Row (RS): K2, m1, knit to end — 1 stitch increased.
Repeat neck increase row every 8th row 12 (12, 13, 13, 14, 14, 14, 14) more times.
At the same time, when piece measures 15″ from fold, end with a RS row.
ARMHOLE
Note: Armhole shaping begins on a WS row to mirror Left Front shaping.
Row 1 (WS): Bind off 6 (6, 6, 7, 7, 8, 8, 9) stitches, purl to end.
Row 2 (RS): Knit to end.
Row 3 (WS): Bind off 2 stitches, purl to end.
Decrease Row (RS): Knit to last 4 stitches, ssk, k2 — 1 stitch decreased.
Repeat armhole decrease row every other row 3 (3, 3, 5, 8, 11, 15, 17) more times.
Continue working as established until last front edge increase row is complete — 45 (50, 56, 58, 61, 62, 63, 65) stitches remain after all shaping.
Continue in Stockinette stitch until armhole measures 8 (8½, 9, 9¼, 9½, 9¾, 10, 10¼)” [20.5 (21.5, 23, 23.5, 24, 25, 25.5, 26) cm], ending with a WS row.
SHOULDER (RIGHT FRONT)
Short Row 1 (RS): K13 (17, 20, 21, 22, 23, 24, 25) stitches, wrap and turn; (WS) purl to end.
Short Row 2 (RS): K10 (13, 15, 15, 16, 17, 18, 18) stitches, wrap and turn; (WS) purl to end.
Short Row 3 (RS): K7 (9, 10, 9, 10, 11, 12, 11) stitches, wrap and turn; (WS) purl to end.
Short Row 4 (RS): K3 (4, 5, 5, 5, 6, 6, 6) stitches, wrap and turn; (WS) purl to end.
Next Row (RS): Knit to end, hiding wraps as they appear. Slip right shoulder stitches onto stitch holder or waste yarn. Break yarn.
SLEEVE
Make 2
With straight needle, CO 42 (42, 46, 46, 46, 50, 50, 50) stitches. Work in 2×2 ribbing for 5″, ending with a WS row.
Work in Stockinette stitch for 1″ [2.54 cm], ending with a WS row. Begin increase shaping on the next RS row. Stitch markers may be helpful to track increase rows.
Increase Section
Increase Row (RS): K2, m1, knit to last 2 stitches, m1, k2 — 2 stitches increased.
Repeat the increase row as follows:
Every 8 (8, 6, 6, 6, 6, 6, 4) rows 6 (3, 14, 10, 6, 6, 2, 20) times more; then every 6 (6, 0, 4, 4, 4, 4, 2) rows 6 (10, 0, 6, 12, 12, 18, 2) times — 68 (70, 76, 80, 84, 88, 92, 96) stitches.
Work in Stockinette stitch until sleeve measures 19½” [49.5 cm] from beginning, ending with a WS row.
SHAPE SLEEVE CAP
Read through this entire section before beginning to anticipate bind-offs and decreases.
Row 1 (RS): Bind off 6 (6, 6, 7, 7, 8, 8, 9) stitches at the beginning of the next 2 rows (one at each edge), then bind off 2 stitches at the beginning of the next 2 rows — 52 (54, 60, 62, 66, 68, 72, 74) stitches remain.
Decrease Row (RS): K2, k2tog, knit to last 4 stitches, ssk, k2 — 2 stitches decreased.
Repeat cap decrease row: Every other row 3 (3, 3, 5, 8, 10, 13, 16) more times, then every 4th row 6 (6, 5, 4, 4, 3, 2, 1) times, then every other row 3 (4, 7, 7, 5, 5, 4, 3) times — 26 (26, 28, 28, 30, 30, 32, 32) stitches remain.
Bind off 4 stitches at beginning of next 2 rows, then bind off 3 stitches at beginning of next 2 rows — 12 (12, 14, 14, 16, 16, 18, 18) stitches remain.
Using Mattress Stitch, seam side seams and set in sleeves.
COLLAR
Pick Up & Setup
Place marker into fabric on left front, 3 (3½, 3, 3¼, 2¼, 2½, 2¾, 3)” down neck edge from shoulder seam.
With 24″ circular needle and WS facing, beginning at marker on left front neck edge, pick up and knit:
16 (19, 15, 17, 12, 13, 14, 16) sts to shoulder
34 (34, 36, 36, 38, 38, 38, 38) sts along back neck
17 (19, 16, 17, 12, 13, 15, 16) sts along right front edge to BO sts
31 (31, 33, 33, 35, 35, 35, 35) sts along right front BO sts
— 98 (103, 100, 103, 97, 99, 102, 105) sts.
Facing
Next Row (RS): Use the backwards loop method to CO 8 sts for facing, purl to end — 106 (111, 108, 111, 105, 107, 110, 113) sts.
Next Row (WS): Use the backwards loop method to CO 8 sts for facing, knit to end — 114 (119, 116, 119, 113, 115, 118, 121) sts.
Collar Body
Continue to work back and forth in Reverse Stockinette stitch until collar measures 9″ from pick-up row, ending with a RS row.
Shaping
Decrease Row 1 (WS): K1, ssk, knit to last 3 sts, k2tog, k1 — 2 sts dec’d.
Decrease Row 2 (RS): P1, p2tog, purl to last 3 sts, ssp, p1 — 2 sts dec’d.
Repeat the last 2 rows 7 more times — 82 (87, 84, 87, 81, 83, 86, 89) sts rem.
Bind off all sts.
Assembly & Finishing
Fold piece at center of decreases and neatly sew BO edge to RS.
Fold facing edges to the RS and neatly sew in place.
Using needle and sewing thread, sew on zipper.
Styling & Wearability
This jacket is incredibly versatile and works well across seasons.
Wear it:
Zipped high for a dramatic neckline
Partially zipped for casual layering
Open for a relaxed, effortless look
It pairs beautifully with jeans, leggings, or layered over dresses — making it an easy grab-and-go piece for everyday life.
Why This Jacket Is a Great “First Statement Garment”
If you’ve knit sweaters before and are ready to try something a little more design-forward, this jacket is a fantastic next step. The techniques used — short rows, set-in sleeves, and zipper installation — are introduced in a manageable, well-supported way.
It’s a confidence-building project that feels genuinely special when finished.
This pattern is ideal for knitters who want to expand their garment skills. It includes shaping, seaming, and finishing techniques that translate beautifully to future projects.
FAQ
What skill level is this knit jacket pattern? This pattern is best suited for intermediate knitters who are comfortable with stockinette stitch, shaping, and basic garment construction.
How should this knit jacket fit? The jacket is designed to be worn with approximately 2–4 inches of positive ease for a relaxed, modern fit. The asymmetrical front and oversized collar are meant to drape naturally rather than sit snugly.
Is adding a zipper to a knit jacket difficult? Adding a zipper can feel intimidating, but this pattern includes clear instructions and video support. Basting the zipper first and taking your time helps ensure a polished result.
Is this jacket suitable for layering? Yes. This jacket works well layered over lightweight tops in fall and spring and as an indoor layering piece during colder months.
Can I substitute a different yarn weight? This pattern was designed for DK-weight yarn. Using a different weight will affect fit and drape and may require significant gauge adjustments.
Is there a printable version of the pattern? Yes. An optional ad-free PDF is available for purchase if you prefer a clean, printable format.
Final Thoughts
The Elegantly Edgy Knit Jacket is the kind of project that feels empowering to finish — stylish, wearable, and undeniably handmade. If you’ve been searching for a free knit jacket pattern that feels modern and intentional, this one delivers.
Save this for later, share it with your BiCrafty Bestie, and if you make one, tag #mmmdi and #marlybird so I can admire your work 💖🧶
Marly is a knitwear and crochet designer (and yarn addict) that is here to help you learn how to knit and crochet in a way that's fun and approachable.