
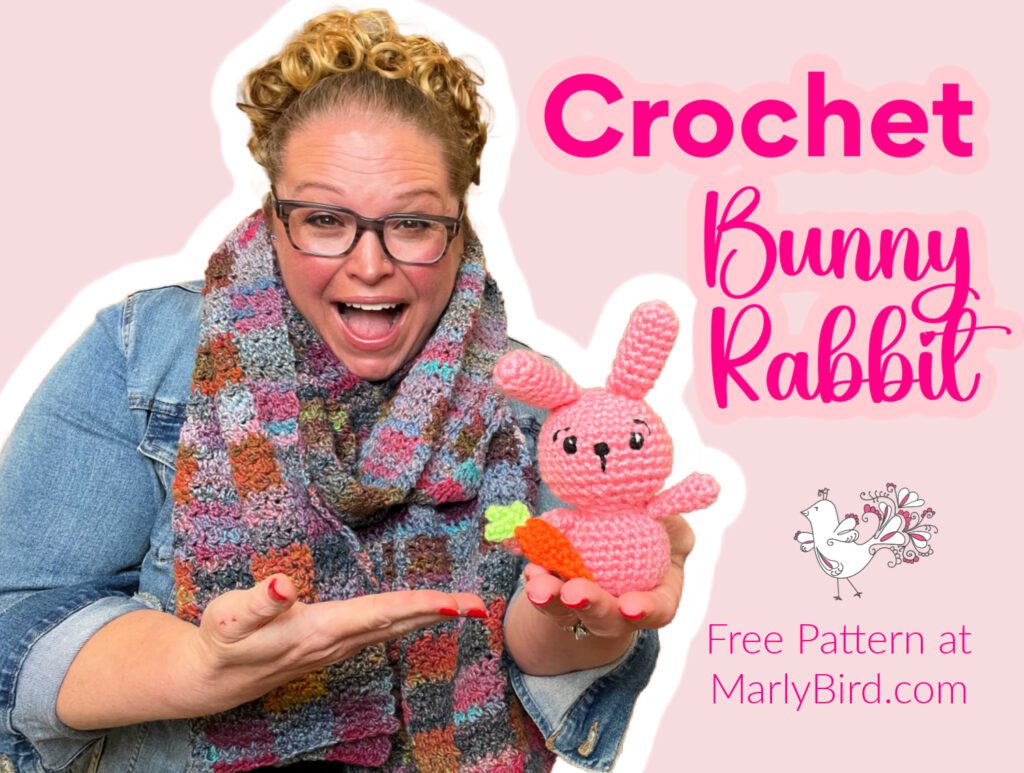
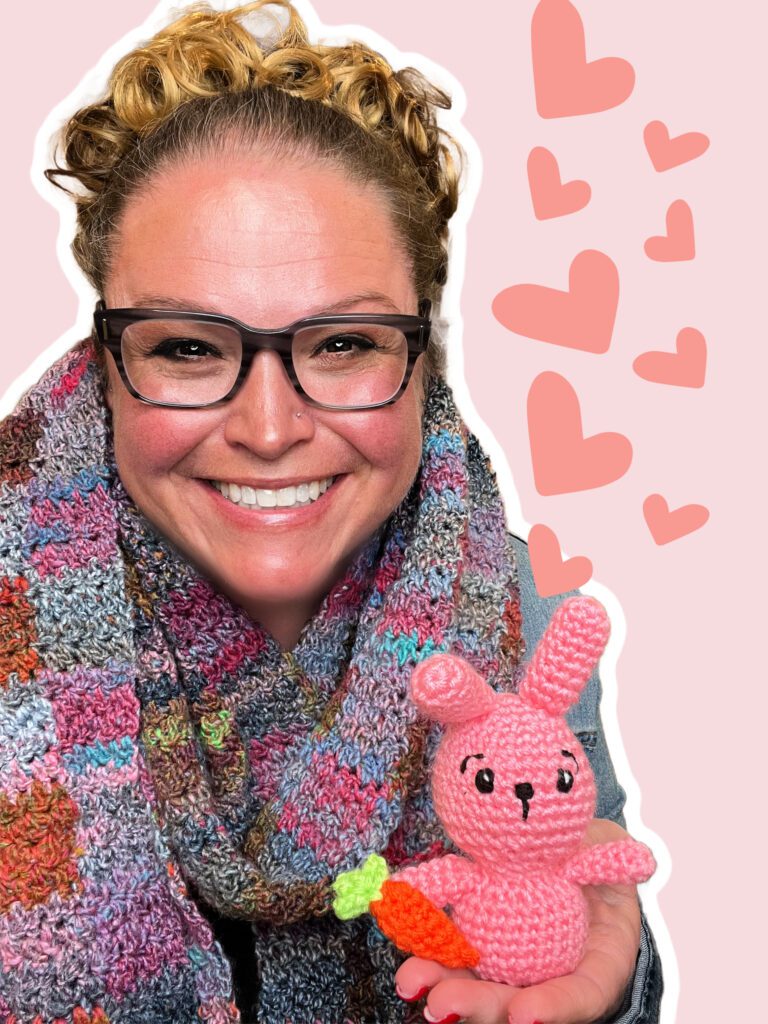
Cutest Crochet Easter Bunny Amigurumi Ever!
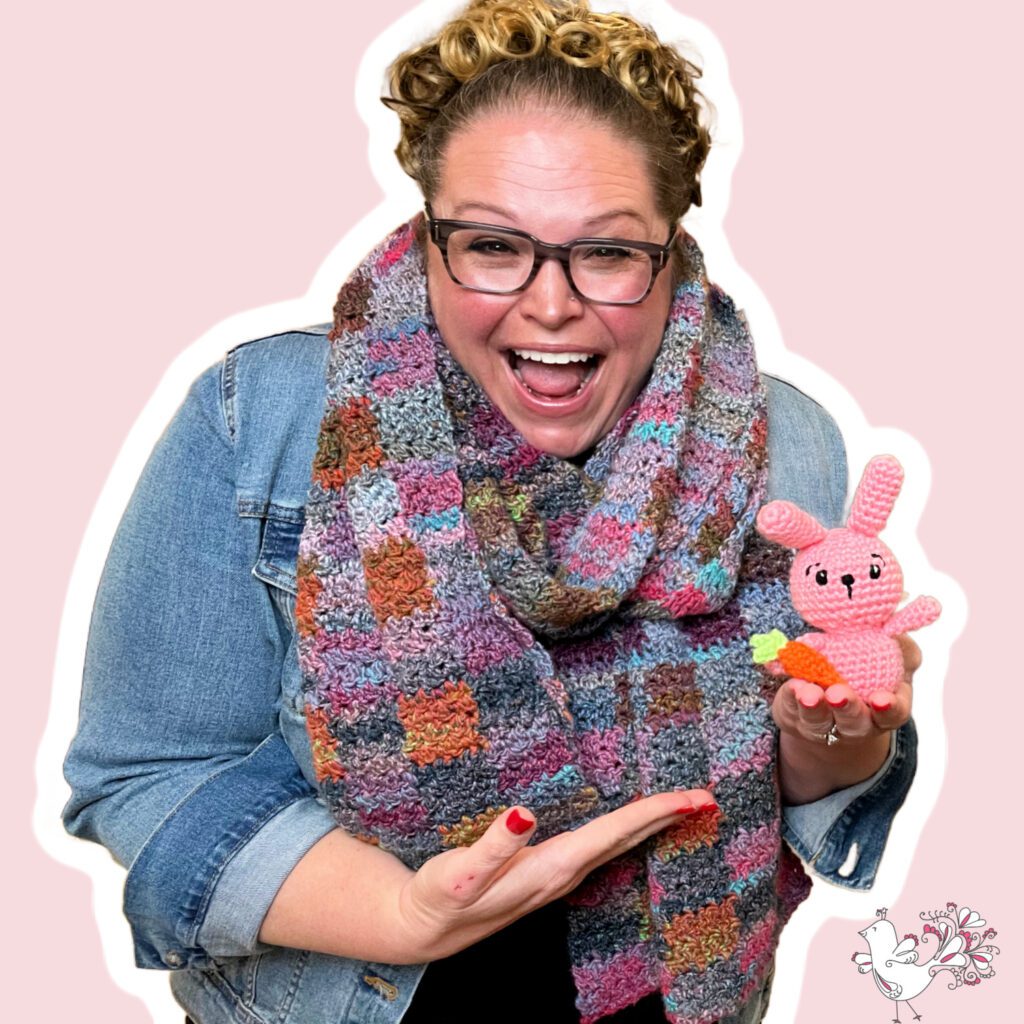
Hey there, friends! I am absolutely bursting with excitement to share with you all the bunny rabbit joy I can bring into your homes this Easter (or any time of year)! Let's talk about crochet Easter bunny stuffies – I mean, come on, how cute are they? Isn't this the most gorgeous crochet Easter bunny amigurumi ever? These little bunnies are adorable, and they make for the perfect spring project that you can snuggle up with, gift to loved ones, and even use as festive decor around your home.
Plus, we have a new free crochet Easter bunny amigurumi pattern for you right here on this blog! The cute crochet bunny rabbit stuffed animal is easy and quick to make for beginner crocheters or more seasoned crocheters! Or, if you are looking for something quick to knit (for all my BiCrafty friends), check out the simple booboo bunny pattern.
It's time to grab your hooks, get those creative juices flowing, and let's hop right into making some crochet Easter bunny magic together! Trust me, you won't be able to resist the charm of these charming little bunnies. So, what are you waiting for? Let's get crafting and spread some handmade happiness this Easter season!
Disclosure: This post contains affiliate links, meaning I get a commission if you decide to purchase through my links at no cost to you.
Picking the Perfect Yarn for Your Crochet Easter Bunny Amigurumi
Choosing the right yarn is super important for your bunny stuffies, but it can be varied as well. You could choose a soft fuzzy yarn, a plush blanket yarn, a smooth worsted weight yarn, a velvet yarn, wool yarn, cotton or cotton blend yarn, or acrylic yarn…the sky's the limit! I will say that most people want their bunny to be cuddly and soft. So, look for yarns that will work with the pattern you choose. That's the easiest way.
But pay attention to the care instructions on the yarn as well, as you want it to be easy to wash.
Oh, and as for colors, you could go with more traditional Easter bunny colors of spring. Think pastel pinks, greens, yellows, and of course, bunny white! Or, nobody is stopping you from choosing bold colors or even speckles. I certainly won't stop you from crocheting a hot pink bunny. Choose colors you love 💕.
Easy-to-Follow Patterns for Crocheters of All Levels
Whether you're a crochet newbie or a pro with the hook, there's a crochet Easter bunny amigurumi pattern out there for you. I've got a list of my favorite patterns that are clear, simple, and so much fun to make. You'll find yourself creating a whole family of bunnies before you know it!
Make Your Bunnies Special with Accessories
Okay, let's talk more about how to set your Easter bunny apart from the rest. Sure, you chose an awesome pattern, but maybe you want to give your crochet bunny its own personality with cute accessories! Think tiny crochet carrots, sweet little bow ties, crochet hearts, or even a mini Easter egg. These small details make your bunnies one-of-a-kind and super special.
Some of the little things I've seen that make the bunny rabbit a little extra are an extra fuzzy tail, long ears, whiskers, eyelashes, or moveable limbs. One of my friends even added magnets to the inside of a crochet heart and the paws of the hands on her bunny so the bunny could hold the heart! It's so darn cute and super clever!
Just a note of caution ⚠️ : if you are making this stuffie for a baby shower or a kit, be sure to use caution. When making stuffed toy accessories, you don't want to accidentally make something that can be a hazard to small kids, so make sure you follow laws for toy products and, of course, use your common sense.
Sharing Your Adorable Creations
Once you've made your adorable bunny stuffies, you've GOT to show them off! Share your creations on social media and use hashtags #mmmdi or #marlybird. It's the perfect way to connect with fellow crocheters and get inspired by each other's work.
Let's Make This Easter Extra Special – Free Little Crochet Bunny Stuffie
Several years ago, I paid a designer friend to design some simple animal amigurumi patterns I could use on my website. Over the years, we've published some of the designs, but I still have maybe 10 more to publish. So today, I'm offering a free crochet Easter bunny amigurumi pattern by Michele Wilcox just for all of you.
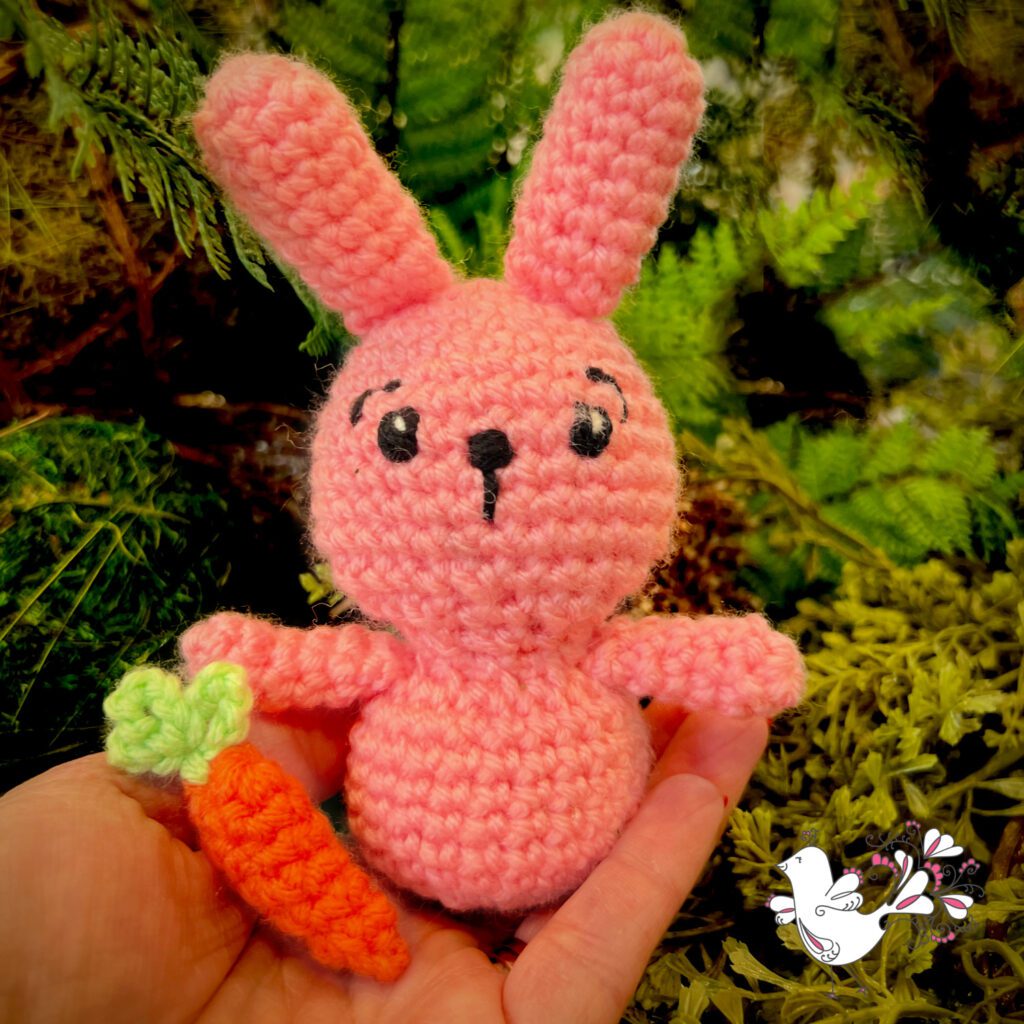
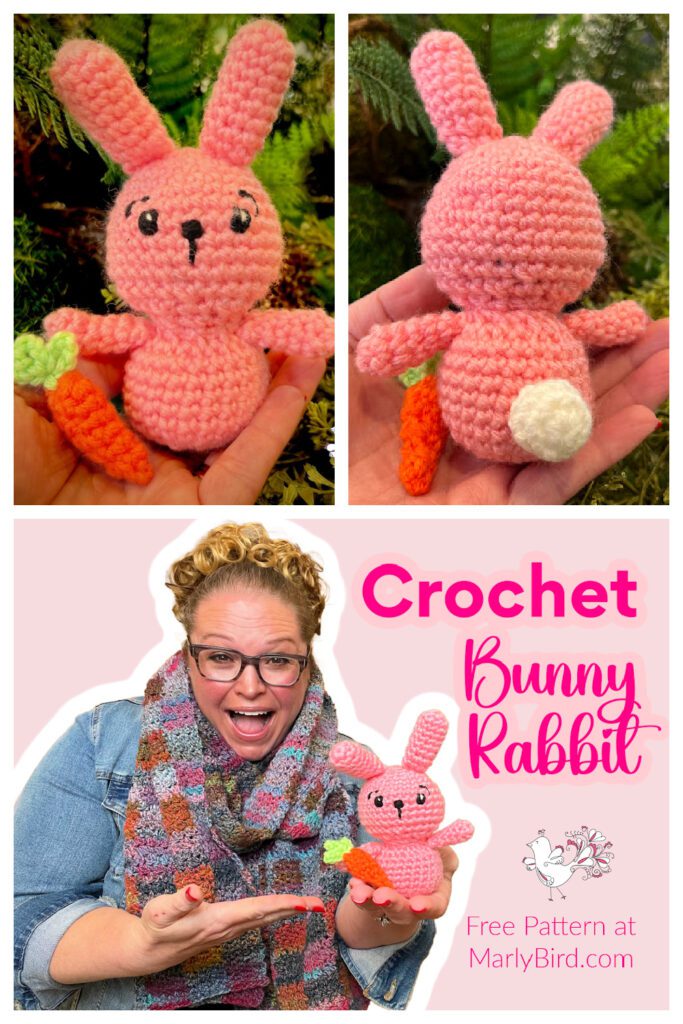
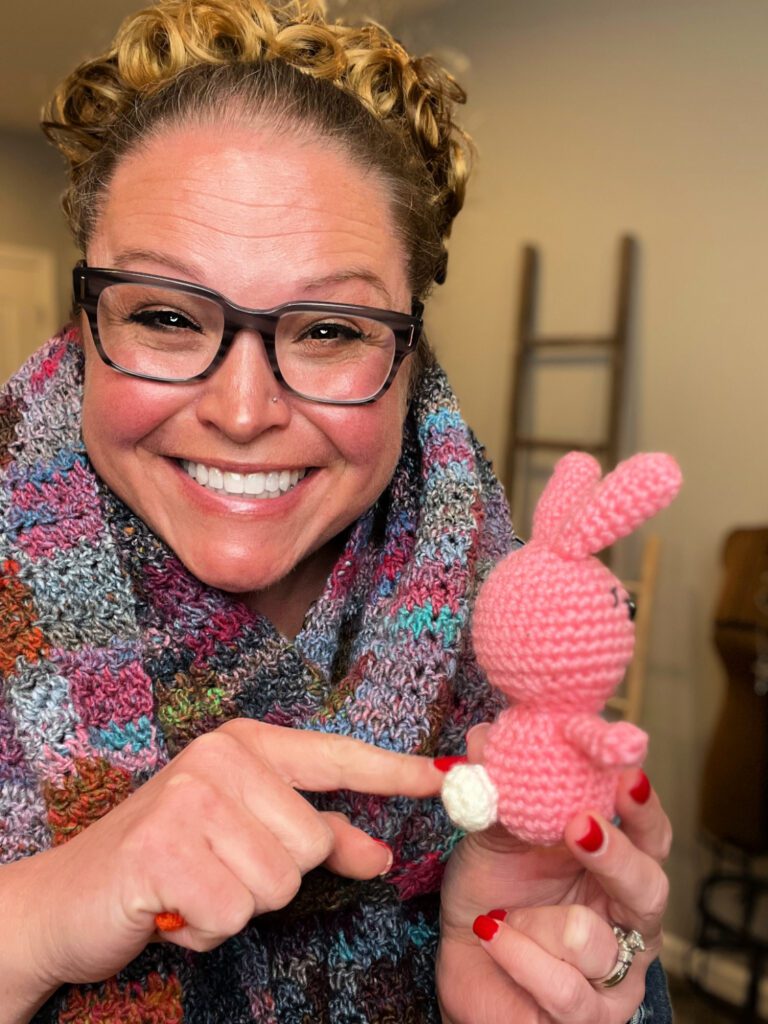
This adorable little bunny rabbit crochet pattern is a super fast project. If you need to crochet bunnies for one or several Easter baskets, this is the crochet rabbit pattern for you, as you can make one in less than 2 hours. Plus, it has a mini crochet carrot accessory to go with it! Trust me, this will work up quickly. It is a fast crochet bunny project, even for a beginner crocheter.
Designed by Michele Wilcox for MarlyBird.com
Skill Level
Adventurous Beginner
Measurements
Finished Measurements
Bunny is 8” [20.5 cm] in head circumference by 5.5” [14 cm] tall.
Gauge
15 sc x 16 rounds = 4” [10 cm] x 4” [10 cm]; use any size hook to obtain the gauge.
Materials
Yarn
WeCrochet, Brava Worsted Mini Ball (100% acrylic, 54 yds / 49 m, 0.9 oz/ 25 g, CYCA# 4 worsted)
Color A: #28423 Cotton Candy, 1 ball
Color B: #28455 White, small amount
Color C: #28440 Orange, small amount
Color D: #28409 Alfalfa, small amount
Color E: #28413 Black, small amount
Crochet Hook
Size G/6 [4.0 mm], or size to obtain gauge (but gauge is not super important for this stuffed animal pattern)
Notions
Stitch Markers, Scissors, Tapestry needle, Polyester Fiberfill
Crochet Abbreviations
Ch – Chain(s)
PM – Place Marker
RS – Right Side
Sc – Single Crochet
Sl st – Slip Stitch
Sp(s) – Space(s)
St(s) – Stitch(es)
WS – Wrong Side
Special Crochet Stitches
⭐️ Single Crochet 2 Together (sc2tog): *Insert hook into indicated stitch, yarn over and pull up a loop; repeat from * in next stitch indicated, yarn over and draw through all 3 loops on hook. (1 decrease)
⭐️ Double Magic loop or Double Adjustable Ring: Wrap yarn around your fingers twice, pull up a loop through the ring created, chain 1. Follow directions for number of stitches for round 1. Pull on yarn end to determine which strand will be closed with yarn end. Pull on that strand to close 2nd strand of ring. Pull on yarn end to close first strand of ring.
Notes
- Bunny Rabbit is worked in pieces and seamed together. Details are added last.
- Body parts are worked in continuous spiral rounds that are not joined at the end of the round.
- Body parts start with a double adjustable ring. You can substitute a chain 2 and sc in the 2nd chain if you wish for the double adjustable ring.
- Using a stitch marker to mark the first stitch of each new round throughout all stuffed animal patterns is helpful, and we suggest doing it for this bunny too.
Crochet Easter Bunny Amigurumi Pattern
Bunny Head
Note: Head is worked from the top of the head at the increasing rounds through the bottom of the head while decreasing.
With A, make a double adjustable ring.
Round 1 (RS): 6 sc in ring, pull ring closed, do not turn–6 sc.
Round 2: 2 sc in each sc around, do not turn– 12 sc.
Round 3: *Sc in next sc, 2 sc in next sc; repeat from * around, do not turn– 18 sc.
Round 4: *2 sc in next sc, sc in next 2 sc; repeat from * around, do not turn– 24 sc
Round 5: Sc in each sc around, do not turn.
Round 6: *Sc in next 3 sc, 2 sc in next sc; repeat from * around, do not turn– 30 sc
Rounds 7-11: Sc in each st around, do not turn.
Round 12: *Sc2tog in front loops only over next 2 sc, sc in next 3 sc; repeat from * around, do not turn– 24 sc.
Round 13: *Sc in next 2 sc, sc2tog in front loops only over next 2 sc; repeat from * around, do not turn– 18 sc.
Round 14: *Sc2tog in front loops only over next 2 sc, sc in next sc; repeat from * around, sl st to first sc, fasten off leaving long tail for seaming– 12 sc.
Stuff head with fiberfill, do not close opening.
Bunny Body
Note: Body is worked from the bottom at the increasing rounds through the top of the body while decreasing.
With A, make a double adjustable ring.
Round 1 (RS): 6 sc in ring, pull ring closed, do not turn–6 sc.
Round 2: 2 sc in each sc around, do not turn– 12 sc.
Round 3: *Sc in next sc, 2 sc in next sc; repeat from * around, do not turn– 18 sc.
Round 4: *2 sc in next sc, sc in next 2 sc; repeat from * around, do not turn– 24 sc
Rounds 5-10: Sc in each sc around, do not turn.
Round 11: *Sc2tog in front loops only over next 2 sc; repeat from * around, sl st to first sc, fasten off leave long tail for seaming– 12 sc.
Stuff body with fiberfill, do not close opening.
Sew head to the body, working through the last rounds of head and body. Seam a second time to make it more sturdy. Using color E, satin stitch eyes and nose on Round X of head. Embroider with a long straight stitch for a mouth line.
Bunny Ears
Make 2
With A, make a double adjustable ring.
Round 1 (RS): 6 sc in ring, pull ring closed, do not turn–6 sc.
Round 2: *Sc in next sc, 2 sc in next sc; repeat from * around, do not turn– 9 sc
Rounds 3-8: Sc in each sc around, do not turn.
Round 9: *Sc2tog in front loops only over next 2 sc, sc in next sc; repeat from * around, sl st to first sc, fasten off leaving long tail for seaming– 6 sc.
Stuff ears lightly with fiberfill. Using the photos as a guide sew the ears to the body.
Arms
Make 2
With A, make a double adjustable ring.
Round 1 (RS): 6 sc in ring, pull ring closed, do not turn–6 sc.
Rounds 2-6: Sc in each sc around, do not turn.
Fasten off leaving a long tail for seaming. Using the photos as a guide and sew the arms to the body.
Bunny Tail
With B, make a double adjustable ring.
Round 1 (RS): 6 sc in ring, pull ring closed, do not turn–6 sc.
Round 2: 2 sc in each sc around, do not turn– 12 sc
Rounds 3-4: Sc in each sc around, do not turn.
Fasten off leaving a long tail for seaming. Stuff tail lightly with fiberfill. Gather stitches in the last round together. Sew tail to body.
Carrot Pattern
With C, make a double adjustable ring.
Round 1 (RS): 6 sc in ring, pull ring closed, do not turn–6 sc.
Round 2: *Sc in next sc, 2 sc in next sc; repeat from * around, do not turn– 9 sc
Rounds 3-7: Sc2tog in front loops only over next 2 sc, sc in each remaining sc around— 4 sc.
Fasten off, leaving a long tail for seaming. Gather stitches in the last round together.
Carrot Top
Join D with sl st to top of carrot, [ch 6, sl st to first sl st] 3 times. Fasten off and weave in ends.
Crocheting these bunnies is not just about making something cute; it's about creating memories and spreading joy. Whether you're making them for your kids, as gifts for friends, or just for fun, these bunnies will surely add an extra dose of cuteness to your Easter.
And remember, I'm here to cheer you on every step of the way! Let's make this Easter one to remember with the sweetest crochet bunny stuffies. They're soft, they're cuddly, and they're waiting for you to bring them to life!
Final Thoughts
We think about making these bunny rabbit amigurumi patterns near Easter, but there's no law saying we can't make one any time of year. Use this cute crochet bunny rabbit stuffed animal pattern and make a bunny for yourself or anyone in your life. Again, this crochet pattern is perfect for all skill levels, and these bunnies will definitely add a pop of spring joy to your home. Don't forget to share your finished bunnies with #mmmdi or #marlybird!
Frequently Asked Questions
What makes a crochet Easter bunny different from a regular amigurumi bunny?
Mostly the styling and color choices! Easter bunnies typically come in pastel colors… soft pinks, lavenders, blues, and creamy whites rather than realistic brown and grey. They often have features that emphasize cuteness over realism… oversized floppy ears, a stitched smile, a fluffy cotton tail. Some Easter bunny patterns include little details like a flower crown, a tiny carrot, or a basket. The construction is the same as any bunny amigurumi, but the aesthetic is specifically designed for that springtime, Easter basket aesthetic.
How long does it take to crochet an Easter bunny stuffie?
A basic Easter bunny amigurumi takes most crocheters 3 to 6 hours… a nice weekend afternoon project. More detailed versions with complex ears, accessories, or multiple pieces to assemble can take longer. The assembly (sewing on ears, arms, tail, and face features) is often the most time-intensive part and the part that gives the bunny its personality. Plan ahead if you're making them as Easter basket gifts… starting a week or two before Easter gives you plenty of time without pressure.
What yarn should I use for Easter bunny stuffies?
Soft, smooth acrylic in pastel colors is the most practical choice… washable, affordable, and available in all those sweet Easter colors. Worsted weight is the most popular for clear stitch definition and easy working. For an extra-fluffy bunny, a small amount of boucle or textured yarn for the fluffy tummy or tail is cute. If you want a more realistic fluffy bunny, loop stitch creates beautiful wool-like fur texture on the body. Machine washable is important if the bunny is destined for an Easter basket or young child.
What are the most important details that make a crocheted bunny look adorable?
The face! Placement and size of the eyes and nose have a huge impact on personality. Ears… floppy ears with a contrasting inner ear color are especially charming. A little nose in pink or dark thread adds character. Proportions matter… oversized head relative to body reads as “cute baby creature” which is what we're going for. A tiny pompom or loop stitch tail finishes the bunny perfectly. Take your time with the face features… pin everything before sewing, step back and look, adjust until it looks right to you.
Can I make Easter bunny stuffies for Easter baskets for babies?
Yes, with appropriate safety modifications! For babies and very young children: embroider eyes rather than using safety eyes (which could be pulled out). No small separate pieces that could detach. No buttons or beads. All seams very firmly closed. Machine washable yarn. Soft, non-scratchy materials. A well-made crocheted Easter bunny for a baby can become a beloved comfort object they carry for years. Make it soft, safe, and sturdy and it will be treasured. The extra care in construction is absolutely worth it.
Categories: Uncategorized


This is exactly what I need in my life right now. Thank you Marly!
Adorable and anyone would love this sweet little bunny!