Crochet Bangle Bracelets
Work your crochet into your every day with these cute crochet bangle bracelets. Grab your favorite cake, ball, hank or skein of fine weight yarn and a few other supplies and you can whip out these bracelets in no time. These make a great addition to your current stack of bracelets or can be a great gift any time of the year.

*This post contains affiliate links. By clicking on one of these links and making a purchase a portion will go to the blog. The price you pay will not change and the small commission I receive helps me to keep bringing you free content and giveaways on the blog. Thank you for your continued support.*
Materials for the Crochet Bangle Bracelet
- 1 cake of Red Heart Croquette yarn
- Size C Crochet Hook
- Beadalon Artistic Wire 14 gauge with crimp connectors
- Beadalon Mighty Crimp Tool
- Beadalon Wire Cutters
- Cotton cord (for tassel)
- Jump ring 10 mm
- Tapestry Needle
- Scissors
- Chain nose pliers (OPTIONAL-used to attach the tassel)
NOTE: Additional beads and pliers are needed if you will be making one of the other versions of the bracelet.

Making Your Own Bangles
Before we get started I wanted to talk to you about how you will start your bangle. For this project you could go out and purchase ready to wear bangles that are plain or you can can make your own.
Our friends at Beadalon have supplied us with some great bangle making materials that don't require a lot of tools. In this tutorial you will see me use the wire crimp connectors and the mighty crimp tool. Both of these were featured in our DIY shawl pin tutorial.
Why are we using 14 gauge wire? We are using this thickness (gauge) of wire because it will hold its shape. Once you have your bracelet together and are wearing it you don't want the shape to get distorted when you wear it. Using 14 gauge is strong enough to hold its shape but malleable enough for us to bend with our hands.
NOTE: When making a bangle bracelet you are NOT concerned with the size of your wrist. Measuring your wrist will not make a bracelet that fits because it won't be able to get over your hand. The widest part of your hand is what will matter the most for sizing.

5 Easy Steps to Make the Crochet Bangle Bracelet
Let's get started making a crochet bangle bracelet together. There are 5 easy steps that we will need to work through to finish our bracelet. Grab your materials and let's get started!
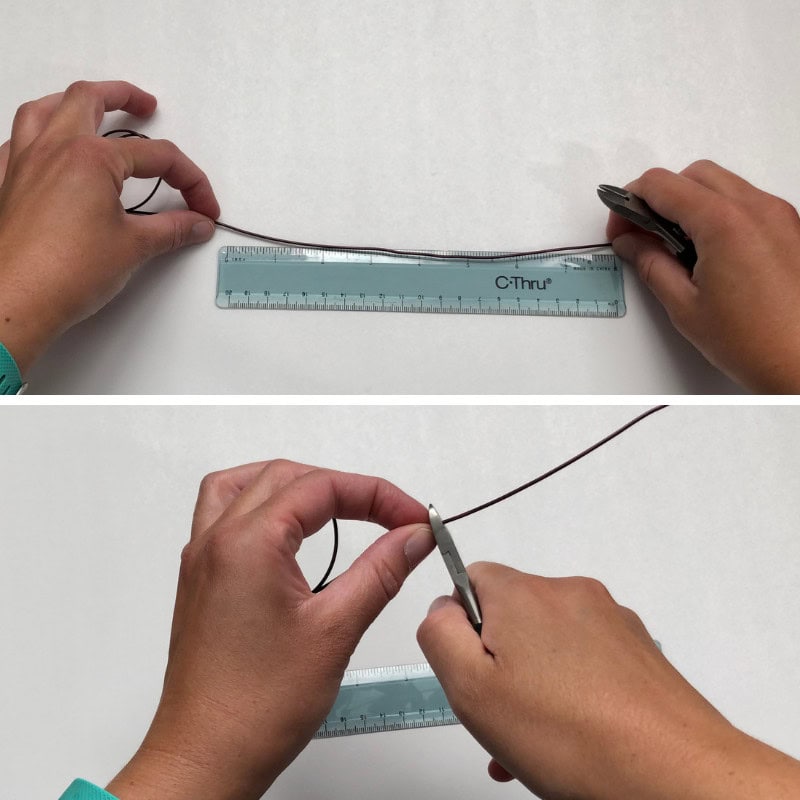
Step 1-Measuring and Cutting the Wire
Making the bangle is the first step to this project. Cutting the wire to length is the first step. Since the wire will be covered you don't need to worry about how straight it is, but I did try to straighten mine with my fingers before cutting.
These bracelets will be ‘one size fits most' because they are a bangle. For the average person (about a 7″ wrist size) you will need an 8 1/4″ length of wire. Add or subtract 1/4″ to increase or decrease the size of your bangle.
Step 2-Forming the Wire
Now that you have your length of wire you will need to get it into the round bangle shape. Typically you would do this by using a bracelet mandrel but you can also use things that you have around the house.
Bracelet mandrels are great if you need to have a perfect shape. Since we are going to be covering the bangle with yarn we don't need to worry as much about that. Forming the shape of my bangle I am using the top of my water bottle.
Gently wrap the wire around something round (a water bottle or can of soup) to give it the shape that you want. NOTE: It will spring back a little bit, that is the nature of wire. Don't worry about this we will correct this in the next step.

Step 3- Connecting the Wire
With the bending finished we can now connect the wire to make the bangle. Talking with a wire worker they would tell you that you would need to solder the two ends to form the bangle. I am here to tell you that there is an easier way!
Beadalon had created these AMAZING jumbo wire crimpers so that we can connect wires together without needing solder and a flame. If you want to see these in action you can check out the FB Live that we did with Beadalon to make DIY Shawl Pins.
Along with the wire, your jumbo wire crimpers will come in the package. Let me show you how to use them. First you will need to line up the crimp with one end of your wire, finding the middle of the crimp and marking the wire at that spot with your finger. This helps you to make sure that you will have both wires equally in the crimp.

Put the crimper on the wire up to your finger. Grab your mighty crimping tool and clamp down on the crimp tube. Be sure to squeeze your crimper as hard as you can to ensure a strong connection.
NOTE: When looking at the mighty crimper you will see that one side is a half circle and the other has a bump. PUT THE BUMP SIDE DOWN (on the inside of the bracelet). Although you won't see this part when we are finished it is good practice to always put the bump side down when using this tool.

After getting one side connected in the crimp tube you will repeat this on the other side. Be sure to push your wire in as far as it can go. Once you are done crimping give the wires a tug to make sure that you got them secure. If it comes out, just stick the wire back into the crimp and crimp it harder.
Step 4-Embellishing your Bangle
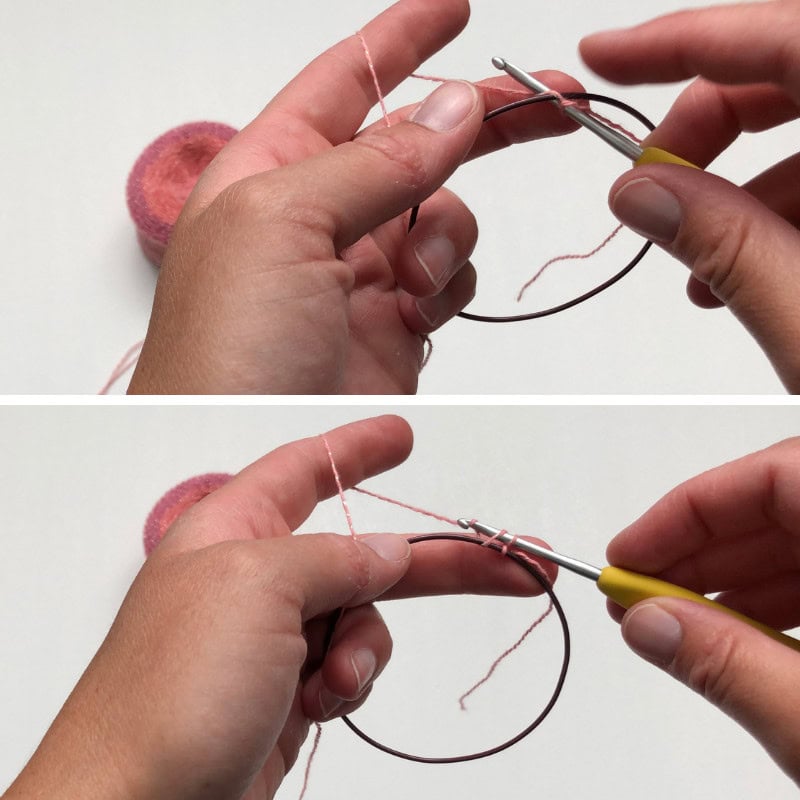
Phew! You got your bangle created! Now the fun part of embellishing it! Grab your yarn (Red Heart Croquette) and your crochet hook and you will be working single crochets around the wire.
Be sure to put your hook under the wire to grab your yarn and then finish the stitch on the top of the wire.
NOTE: As you work push your stitches around the bracelet. This will make sure that you have worked enough stitches. Make the bracelet as full or light as you like. You will have to fiddle with the yarn around the crimp tube as it is a little hard to crochet there.
Want a fuller look? By adding more stitches you can get a twisted look with the stitches spiraling around your wire.
Step 5-Finishing
As with any crochet project you will need to weave in your ends. Carefully weave in your ends in at least two directions to keep the tail from coming out.
Now your crochet bangle bracelet is COMPLETE! I added a tassel to mine using the great tassel tutorial by A Crafty Concept. Following her directions I added my finished tassel to a jump ring and then to the bracelet rather than ear wires.

Crochet Bangle Bracelet Variations
I couldn't just stop with this version of the bracelet! Figuring out a way to hide the crimp was next on my list!
First, I grabbed some large hold beads (from our friends at John Beads) and loaded them onto the wire BEFORE I crimped it shut. Then I worked the bracelet just as written above and as I crochet over the crimp I pulled the beads over my crochet work to cover that area.
Another option is to use some colored wire to wrap around the crimp. You could do this in one spot or in multiple along the way.
In the tutorial we used a fine weight yarn, play around and see what you like with thicker yarns or other variations on the yarn.
NOTE: Anytime you are adding more items (beads or wire) to the bracelet it will make the inside diameter smaller and may be harder to get over your hand. Be sure to test it out and adjust the starting length of your wire to accommodate.

5 Yarn Jewelry Ideas
- Scrap Yarn Bracelet
- DIY Shawl Pin Tutorial
- Beaded Crochet Necklace
- Crochet Beaded Rope (FB LIVE Video)
- Timeless Crochet Earrings
Frequently Asked Questions
What yarn do I need for these bangles?
So here's the thing… for the main tutorial, we're using Red Heart Croquette yarn. It's a fine weight yarn that works up beautifully for these bracelets. But honestly, you can totally play around with different yarns to see what you like!
Do I need to measure my wrist for a bangle?
Honestly, no! When you're making a bangle bracelet, you don't measure your wrist. What matters most is the widest part of your hand, because that's what the bracelet has to fit over.
How do I connect the wire ends to make the bangle shape?
Yes! The easiest way is to use Beadalon's jumbo wire crimpers. They let you connect the wire ends without needing to solder. Just make sure to put the bump side of the crimper down on the inside of the bracelet for a smooth finish.
Can I add beads or other decorations to my bangle?
Oh, absolutely! You can add beads before you crimp the wire, or wrap colored wire around the crimp area to hide it. Just remember that adding more stuff might make the inside diameter smaller, so you may need to adjust your starting wire length.
How do I make the crochet stitches look fuller on the bangle?
Honestly, for a fuller look, just add more stitches! This will make them spiral around your wire for a lovely twisted effect. You might have to fiddle a bit around the crimp tube, but it's totally doable!
Categories: Beading and Jewelry, Crochet, Our Free Patterns