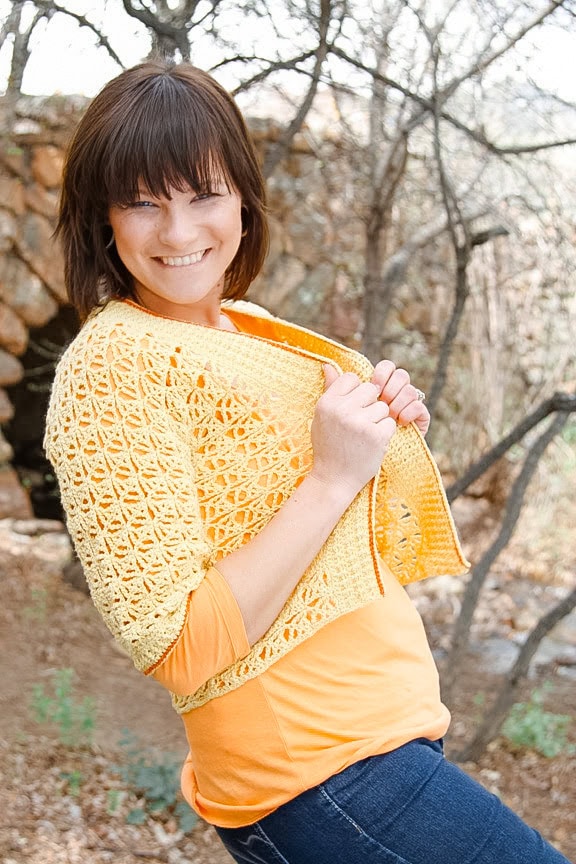
Goldenrod Crochet Cardigan – Free Crochet Cardigan Pattern
The Goldenrod Crochet Cardigan is a free crochet cardigan pattern designed for the transitional-season crocheter. Worked in one main piece with clever shaping, this lace cardigan features lightweight wool/silk yarn, post-stitch textured trim, and a pop of contrast-color chain-stitch embroidery. Available in sizes XS through 5XL, the Goldenrod is that perfect “indoor sweater” for air-conditioned spaces or breezy spring evenings… polished, flattering, and approachable for confident beginners.
Hey, bestie 💛
Looking for a light, drapey crochet cardigan that feels polished but still totally “wear it with jeans and a tee” friendly? The Goldenrod Crochet Cardigan has been one of my most-requested garment patterns for years, and I’m so happy it’s available as a free crochet cardigan pattern on the blog, with an option to grab an ad-free PDF if you like to print, highlight, and toss patterns in your project bag.
This post contains affiliate links. If you purchase through them, I may earn a small commission at no extra cost to you… and it helps keep these free patterns coming straight from my yarn-loving heart to yours. 💛

This lace cardigan is worked in one main piece with clever shaping for the sleeves, then seamed and finished with textured trim and a pop of contrast color. It’s lightweight, flattering on lots of bodies, and one of those “I can’t believe I made this” pieces you’ll want to show off everywhere.
Meet the Goldenrod Crochet Cardigan
The Goldenrod Crochet Cardigan is a long-sleeved, open-front lace cardigan worked in a lightweight wool/silk blend. The fabric has beautiful drape and just enough warmth to be perfect for transitional weather or air-conditioned spaces.
The construction is intentionally straightforward: you start at the back hem, work your way up, grow the sleeves out from the sides, then split for the fronts and shape the neckline. After that, you seam the sides and sleeves and add a cozy collar and sleeve bands with post-stitch texture. A final contrast-color chain-stitch embroidery adds that little “designer detail” that makes people ask where you bought it. 😉
Think of Goldenrod as the cardigan that works just as well with leggings and a tank as it does over a dress for a night out.
🧶 Designer Tip: If you’re someone who overheats easily, this is a great “indoor sweater”… the lace fabric breathes beautifully but still feels like a proper layer.

What You Will Love About This Pattern 💖
Here’s why this pattern has become such a favorite:
- Versatile and layer-friendly – Lightweight lace fabric makes it easy to wear across seasons.
- One-piece main construction – Back, sleeves, and fronts are all worked in one continuous piece before seaming.
- Flattering fit – The lace pattern and gentle positive ease skim the body instead of clinging.
- Size inclusive – Written to fit a wide bust range, with notes about ease and fit.
- Customizable – Easy to lengthen, shorten, or tweak sleeve fit to your liking.
- Advanced-beginner friendly – If you’re comfortable with basic stitches and ready to level up, this is a fantastic “glow-up” cardigan project.
🧶 Designer Tip: If this is your first crocheted garment, breathe. Take it section by section. It’s just stitches in a different shape – you’ve absolutely got this.
Yarn and Substitutions
The original Goldenrod sample uses:
- Elsebeth Lavold Silky Wool – a wool/silk/nylon blend that’s light, slightly rustic, and drapey.
- Main Color: a rich yellow, with a warm contrast color used for surface embroidery on the edges.
This yarn is on the lighter side of DK/fingering and gives the cardigan that airy, wearable feel. When you’re choosing a yarn, you’re mainly looking for:
- A lightweight yarn (fingering or DK depending on how you match gauge)
- Good stitch definition for lace
- Fibers that block well (wool, wool blends, or wool/silk blends are amazing here)
Some yarn types that work well for this style of cardigan:
- Wool or wool/silk blends for cozy drape and great blocking
- Wool/nylon blends if you want durability and less pilling
- Mohair/silk held with a smooth yarn if you like a halo and a softer, fuzzier look
Because this cardigan relies on gauge and drape, always swatch (we’ll talk about that in a minute) and choose a yarn that feels good against your skin – this is a garment you’ll wear a lot.
🧶 Designer Tip: If you’re shopping your stash, pull a few candidates and work mini swatches in the main lace pattern from the instructions, not just plain double crochet. That will tell you the truth about how the yarn behaves in this design.
Is This Crochet Cardigan Right for You?
The Goldenrod is a perfect fit if you’re a confident beginner ready for your first lace cardigan, or a more experienced crocheter looking for a relatively quick garment project. You’ll be right at home with this one if you can chain, single crochet, and double crochet, work simple increases and decreases, seam with a tapestry needle, and block a finished garment.
Because the cardigan is worked in a lightweight wool/silk blend in a lace pattern, it makes up faster than you’d expect from the finished look. Most crocheters finish in 40-55 hours depending on size, and the one-piece construction means you’re only dealing with a handful of seams at the end.
Prefer something cozier? My Sookie Crochet Cardigan is a worsted-weight panel-construction cardigan that’s perfect for fall and winter (sizes XS-5X). Together the Goldenrod and Sookie give you year-round cardigan coverage from one designer. Completely new to crochet? Start with my BiCrafty Bootcamp: Learn to Crochet first.
Goldenrod Crochet Cardigan – Pattern Details
Here’s the quick overview you’ll want before you dive in. Use the full pattern for exact numbers and sizing.
- Skill Level: Advanced beginner / easy intermediate
- Construction: Worked flat in one piece from lower back up, adding sleeves as you go, then split for fronts; seamed at sides and sleeves; collar and sleeve bands added afterward
- Yarn Weight: Lightweight yarn (similar to Silky Wool – check the pattern’s yardage and gauge)
- Hook Size: US F/5 (3.75 mm) or size needed to get gauge
- Sizes: Written to fit a range of bust measurements with about 0–4 inches of positive ease
- Gauge: Worked in the main lace pattern over several repeats and rows; check the pattern for the exact stitch and row counts
The pattern also includes:
- A list of abbreviations and special stitches
- Pattern notes about ease, fit, and construction
- A schematic in the ad-free PDF to help visualize the shape
If you’re a chart lover, the stitch diagram for the lace is available in the ad-free PDF pattern on Ravelry:
https://www.ravelry.com/patterns/library/goldenrod-cardigan
Understanding the Stitches and Techniques
You’ll be using standard US crochet terms. Before you begin, you should be comfortable with:
- Chain (ch)
- Single crochet (sc)
- Double crochet (dc)
- Slip stitch (sl st)
- Working into chains (this is important for the lace pattern)
Goldenrod also introduces (or reviews) taller stitches and shaping:
- Double treble crochet (dtr)
- Double treble crochet two together (dtr2tog) for lace shaping and decreases
- Working a repeating lace pattern over multiple rows
- Simple seaming for sleeves and sides
- Post-stitch texture for the collar and sleeve bands
- Surface crochet / chain stitch embroidery in a contrast color
🧶 Designer Tip: If double trebles make your brain go, “Excuse me, four yarn overs?!” work a few practice swatches before you start the cardigan. Once your hands get the rhythm, the lace repeat feels meditative instead of scary.
For extra support, you can also explore the Learn to Knit & Crochet resources and video tutorials here:
https://marlybird.com/learn-to-knit-crochet/
A Customizable Fit for Every Body
One of my goals with the Goldenrod Crochet Cardigan was to make something that suits a wide range of bodies and styles. The pattern is written with a range of bust measurements and notes about positive ease, but you can also tweak it:
- Want it longer?
Add extra repeats to the back before you work the sleeve increases. Just be sure to mirror those added rows when you work the fronts so everything lines up. - Prefer a shorter, more cropped cardigan?
Work fewer repeats before the sleeves, again keeping the front lengths consistent with the back. - Want a bit more room in the upper arm?
You can gently block the sleeve area for extra ease or add small adjustments in the sleeve section as you gain experience. - Want it to close in front?
You can add hook-and-eye closures at the bust or use pedestal buttons you can move and reposition. The lace fabric has some stretch, so it still looks beautiful even when gently closed.
🧶 Designer Tip: When choosing a size, focus on your upper bust/shoulder measurement and how you like cardigans to hang there. Because it’s open front with some ease, you have a little wiggle room – don’t overthink it.
Gauge, Swatching, and Blocking
I know, I know… swatching isn’t everyone’s favorite, but for a cardigan, it’s non-negotiable if you want a piece that fits the way you imagine.
Here’s what to do:
- Work a swatch in the main pattern stitch, not just plain double crochet.
- Make it big enough to measure several repeats across and several inches tall.
- Block the swatch the way you plan to block the finished cardigan.
- Measure your stitches and rows over the center area (not the edges).
If your gauge is off:
- Too many stitches per 4″ (fabric is tight and small) → go up a hook size.
- Too few stitches per 4″ (fabric is loose and big) → go down a hook size.
Blocking is what makes this lace fabric really open up and drape beautifully. For help deciding between steam blocking and wet blocking, check out this deep-dive post:
Steam Blocking vs Wet Blocking Superwash Yarn (Prism Make-Along Part 10)
https://marlybird.com/blog/steam-blocking-vs-wet-blocking-superwash-yarn-prism-make-along-part-10/
🧶 Designer Tip: Treat your swatch like a tiny science experiment. It’s much easier to adjust one little swatch than to crochet an entire cardigan and then realize it’s “surprise crop top” length.
How the Goldenrod Crochet Cardigan Is Constructed
Here’s a high-level overview so you know what you’re getting into before you start counting chains:
- You begin at the lower back and work in the main lace pattern for a set number of rows.
- Then you increase out on both sides to create the sleeves by adding long chains and working the lace pattern across them.
- After building the sleeves and upper back, you split for the neck opening and work the right front and left front separately from the sleeves inward.
- The main body piece is then seamed along the sides and sleeves to create the cardigan shape.
- Finally, you add:
- A textured collar/neckband worked in rows of double crochet and post stitches
- Matching sleeve bands with the same texture
- A contrast-color surface chain worked along the collar and cuffs for a decorative finish
🧶 Designer Tip: Take a picture of your piece laid flat right before seaming and compare it to the schematic in the PDF. It’s a quick way to check that everything looks right before you commit to seaming.
How to Style Your Goldenrod Crochet Cardigan
Once you’ve woven in the last end and finished blocking, the fun part begins: wearing it. Here are some ideas:
- Casual Cozy
Throw Goldenrod over a simple tee or tank, jeans, and sneakers. Let the lace and color do the talking. - Office Ready
Layer it over a blouse or fitted knit top with tailored pants or a skirt. The lace cardigan instantly dresses things up without feeling stuffy. - Date Night / Out With Friends
Pop it over a solid dress or jumpsuit and add jewelry that echoes the cardigan color. Instant “I planned this outfit” energy. 💃 - Yarn Event Chic
Pair with jeans, boots, and your favorite project bag. Fellow makers will absolutely ask what pattern it is.
🧶 Designer Tip: If you love planning outfits, snap a few mirror selfies with Goldenrod styled different ways and save them in an album on your phone. Next time you’re in a “what do I wear?” mood, just scroll and pick one.


Explore More Free Crochet Cardigan Patterns
If you love crochet cardigans, you’re in wonderful company. Here are more free cardigan patterns here on the blog to explore — together they give you a cardigan for every season, every yarn weight, and every vibe:
- Sookie Crochet Cardigan… cozy worsted-weight panel construction for fall & winter (sizes XS-5X)
- Aurora Lace Crochet Cardigan… another lace cardigan with bold openwork
- You Are Valued Crochet Cocoon Cardigan… soft, wrapping cocoon silhouette
- Amimono Easy One-Piece Kimono Cardigan… simpler one-piece design
Or browse my full library of free knit and crochet patterns for every free pattern on the blog.
Goldenrod Crochet Cardigan – Free Pattern on the Blog
by Marly Bird
MARLYBIRD.COM
DESCRIPTION
The Goldenrod Crochet Cardigan is pure sunshine you can throw on—light, lacy, and just the right amount of flirty for warm spring days and breezy summer nights. With its cropped fit and airy stitch pattern, it layers beautifully over tanks and dresses, adding a soft pop of golden glow without ever feeling heavy or fussy. It’s the kind of cardigan you reach for when you want to feel cute, comfy, and a little bit radiant while you go about your day.
GENERAL INFO
Yarn
Elsebeth Lavold, Silky Wool
50 g / 175 m
45% Wool, 35% Silk, 20% Nylon
Main Color (MC): 091 Yellow Apple
5 (6, 8, 9, 11, 12) balls
Contrast Color (CC): 090 Persimmon
1 ball
Hook
Size US F/5 (3.75 mm) hook
Notions
- Removable stitch markers
- Tapestry needle
- Chenille type needle
- Two – 1″ [2.5 cm] buttons
- 6″ [12.25 cm] of 1/2″ [1.25 cm] grosgrain ribbon
- Sewing thread to match the ribbon
- Sewing Needle
- Basic Blocking Supplies
- Steamer or Steam Iron
- Leather tag (optional)
- Leather rivets (optional)
Gauge
4 pattern stitch repeats and 8 rows =
4.5″ [11.5 cm] x 4.5″ [11.5 cm]
Finished Measurements
To fit bust sizes:
37 (41.5, 46, 50.5, 55, 59.5, 64)”
[94 (105.5, 117, 128.5, 139.5, 151, 162.5) cm]
ABBREVIATIONS
BPDC – back post double crochet
CC – contrasting color
CH – chain
DC – double crochet
DTR – double treble crochet
EST – established
FPDC – front post double crochet
INC – increase
MC – main color
PAT(S) – pattern(s)
RS – right side
SC – single crochet
SL ST – slip stitch
ST(S) – stitch(es)
TR – treble crochet
WS – wrong side
SPECIAL STITCHES
Double Treble Crochet (dtr)
Yarn over hook three times, insert hook into indicated stitch, yarn over and pull up a loop; (yarn over and draw through two loops) four times.
Double Treble Crochet 2 Together (dtr2tog)
[Yarn over hook three times, insert hook into indicated stitch, yarn over and pull up a loop; (yarn over and draw through two loops) three times] twice, yarn over and draw through three loops.
Back Post Double Crochet (bpdc)
Yarn over, insert hook from back to front to back around the post of the stitch indicated, yarn over and pull up a loop; [yarn over and pull through 2 loops on hook] twice.
Front Post Double Crochet (fpdc)
Yarn over, insert hook from front to back to front around the post of the stitch indicated, yarn over and pull up a loop; [yarn over and pull through 2 loops on hook] twice.
PATTERN STITCHES
Main Pattern Stitch
Chain a multiple of 6 chains + 2.
Row 1 (RS):
Sc in second chain from hook (main chain stitches), *ch 7, sc in second chain from hook, ch 1, skip 1 ch, dc in next ch, ch 1, skip 2 ch, dtr in next ch, skip 5 chains from sc on main chain, sc in next ch; repeat from * to end. Turn.
Row 2 (WS):
Ch 5, *sc in first 2 chains of ch-7 from previous row, ch 1, skip 1 ch, dc in next ch, ch 1, skip 2 ch, **dtr in next ch; repeat from * to last sc, ending at ** on last repeat, dtr2tog in next ch and in last sc of previous row. Turn.
Row 3 (RS):
Ch 1, sc in dtr2tog, *ch 7, sc in second ch from hook, ch 1, skip 1 ch, dc in next ch, ch 1, skip 2 ch, dtr in next ch, **sc in tr of previous row; repeat from * to end, ending at ** on last repeat, sc in fifth ch of turning chain. Turn.
Repeat Rows 2 and 3 for Main pattern.
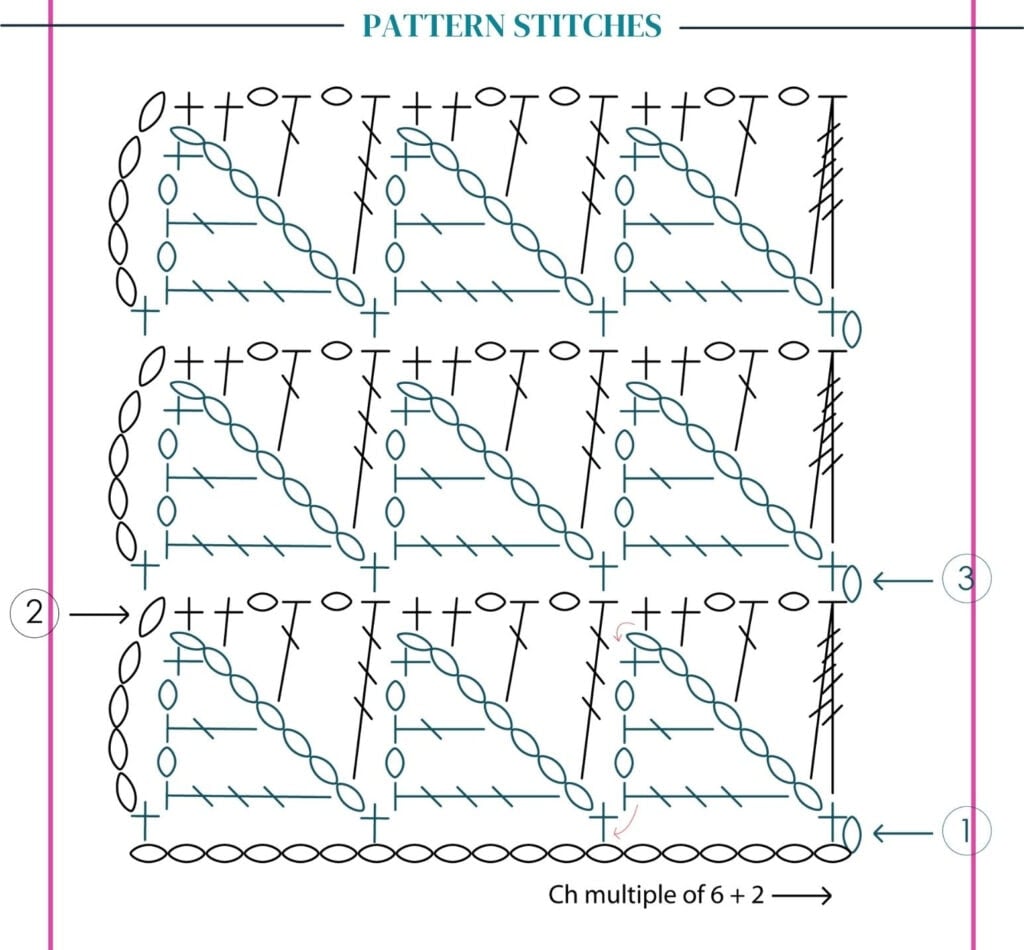
- How to read crochet diagrams [ watch on youtube ]
NOTES
- Instructions are given for smallest size, with larger sizes in parentheses. When only one number is given, it applies to all sizes.
- Gauge should be taken after swatch is washed and blocked. If you take gauge prior to washing and blocking the swatch, you will get an incorrect gauge.
This easy one piece crochet cardigan is worked in one panel that is seamed together to create sleeves and sides. It’s one of my favorite beginner-friendly garment constructions because it’s nearly impossible to mess up!
- Construction: Crocheted from the bottom up starting at the back, adding the sleeves, then added neck and front opeing. You’ll seam along the bottom of the sleeves and along each side.
- Fit: This cardigan is designed for a relaxed, drapey fit with plenty of positive ease. If you prefer a closer fit, choose a smaller size or adjust your hook size for a slightly tighter gauge. But be aware of the size of the neck opening as it can get too large.
- Gauge: Because drape is everything here, make a hanging gauge swatch before starting. Gravity changes how fabric hangs—and we want this cardigan to flow beautifully.
- Yarn Substitution: If you swap yarns, pick something with similar drape and weight. Cotton, bamboo, or linen blends are best for breathable summer cardigans. Acrylic blends work too, but may have less movement.
- Customization: Want a longer/shorter cardigan? Just add remove rows evenly to both the front before the sleeves are added and after the sleeves are decreased on the front.
- Blocking: Light blocking before and after seaming will make your stitches shine and help everything hang just right.
- Finishing Touches: Feel free to add a single crochet border, fringe, or even a belt—make it uniquely yours!
Remember, every maker’s stitch tension is unique. Take your time, check your gauge, and enjoy the relaxing rhythm of this two-seam crochet cardigan pattern. You’ve got this!
SCHEMATIC
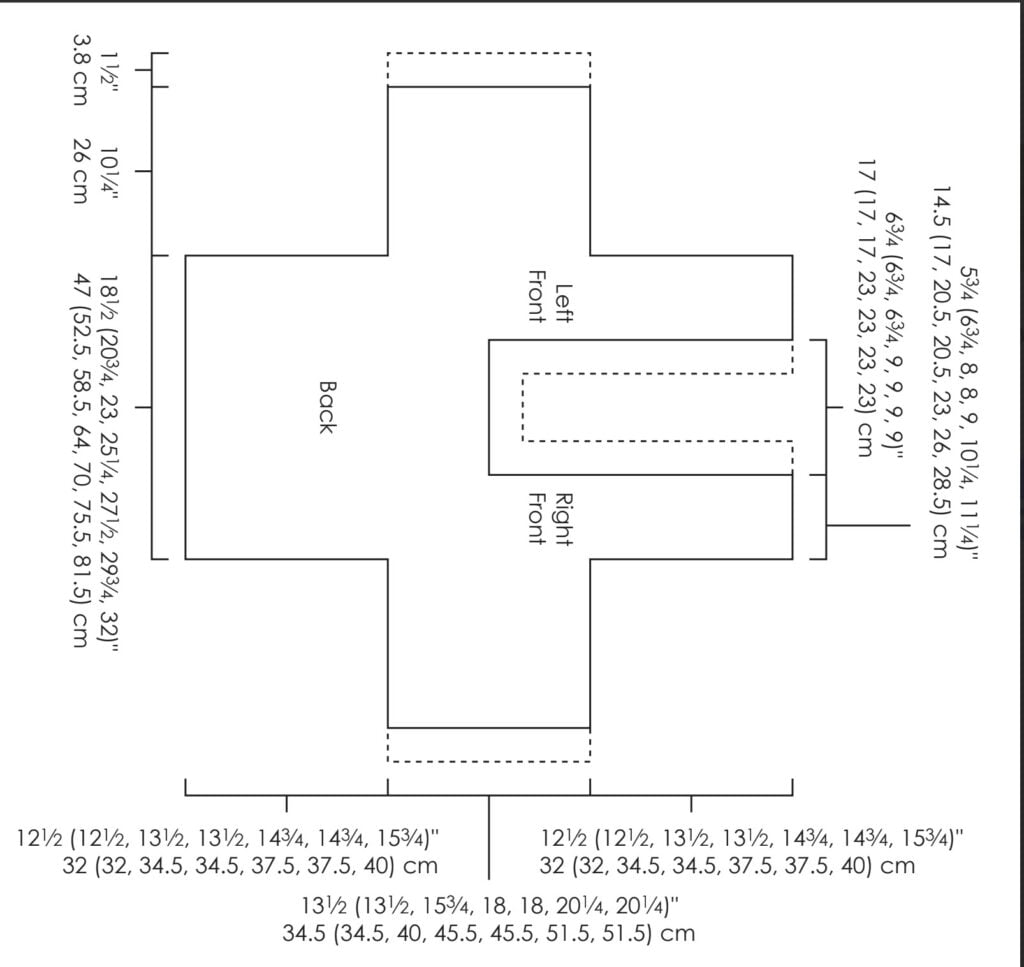
Goldenrod Crochet Cardigan — Pattern Instructions
BACK
With MC, chain 98 (110, 122, 134, 146, 158, 170) and work in Main pattern for
22 (22, 24, 24, 26, 26, 28) rows, ending after Row 2 —
16 (18, 20, 22, 24, 26, 28) pattern stitch repeats.
Increase for Sleeves
Next Row (RS):
Chain 55 for first sleeve, drop loop off hook. Using a separate skein of MC, chain 54 and slip stitch to end of other end of row for second sleeve. Fasten off second skein. Put hook back in the live loop for first sleeve. Work Main pattern Row 1 across chain stitches, then continue to work Main pattern Row 3 across back, then work Main pattern Row 1 across last 54 chains —
34 (36, 38, 40, 42, 44, 46) pattern stitch repeats.
Continue working in Main pattern for
11 (11, 13, 15, 15, 17, 17) more rows, ending after Row 2.
Neck Opening
Next Row (RS):
Work Main pattern Row 3 across
14 (15, 16, 16, 17, 18, 19) repeats for right front, drop loop off hook, skip
6 (6, 6, 8, 8, 8, 8) repeats in center. Join new yarn to first sc of next repeat and work Main pattern Row 3 across remaining
14 (15, 16, 16, 17, 18, 19) repeats for left front.
Place stitch marker in loop on hook and set aside. Put hook back in live loop for right front and continue working right front stitches only.
Right Front Sleeve
Continue working right front stitches for
11 (11, 13, 15, 15, 17, 17) more rows, ending after Row 2. Finish off.
Decrease for Sleeves
Next Row (RS):
Skip 9 repeats, join new yarn with a sc in dtr of next repeat, continue Main pattern Row 3 across remaining
5 (6, 7, 7, 8, 9, 10) repeats.
Continue working for
21 (21, 23, 23, 25, 25, 27) more rows, ending on Row 2. Finish off.
Left Front
Remove stitch marker and put hook back in live loop for left front. Continue working left front stitches for
11 (11, 13, 15, 15, 17, 17) more rows, ending after Row 2.
Decrease for Sleeves
Next Row (RS):
Work Main pattern Row 3 across
5 (6, 7, 7, 8, 9, 10) repeats, turn skipping last 9 repeats.
Continue working for
21 (21, 23, 23, 25, 25, 27) more rows, ending on Row 2. Finish off.
FINISHING
Collar
With RS facing, join MC to lower right front neck edge with a slip stitch, chain 1, work an odd number of single crochets evenly around entire neck to lower left front neck edge. Turn.
Row 1 (WS): Ch 3, dc in each stitch around. Turn.
Row 2 (RS): Ch 3, *bpdc in next stitch, fpdc in next stitch; repeat from * to last stitch, dc in last stitch. Turn.
Repeat Rows 1 and 2 two more times.
Repeat Row 1 once more.
Next row: Ch 1, slip stitch in each stitch. Finish off.
Arm Bands
With RS facing, join MC to edge of sleeve with a slip stitch, chain 1, work an odd number of single crochets across edge of sleeve.
Row 1 (WS): Ch 3, dc in each stitch around. Turn.
Row 2 (RS): Ch 3, *bpdc in first stitch, fpdc in next stitch; repeat from * to last stitch, dc in last stitch. Turn.
Repeat Row 1 once more.
Next row: Ch 1, slip stitch in each stitch. Finish off.
CC Trim
Join CC to RS of collar and work crochet chain stitch embroidery along surface of fabric. Repeat for each arm band. Weave in loose ends.
Block piece to measurements.
With RS facing each other, whip stitch sides together.
Lower Edging
With RS facing, join MC to lower left front trim edge and single crochet evenly around. Finish off.
Ad-Free PDF Pattern
Join our Newsletter
Get Free Crochet & Knitting
Pattern Links & Coupons!

If you prefer a printer-friendly version or just like having your patterns stored in a digital library with no ads or pop-ups, the ad-free PDF is a great option.
The Goldenrod Crochet Cardigan PDF includes:
- Clean, easy-to-read formatting
- The full written pattern for all sizes
- Stitch diagram for the lace pattern
- Schematic to help visualize the garment shape
- All abbreviations and special stitches in one place
You can purchase the PDF here:
🧶 Designer Tip: If you’re the kind of maker who likes to knit or crochet at kids’ practice, on the bus, or in waiting rooms, the PDF pays for itself in fewer “wait, where was I?” moments.
More Crochet Patterns You’ll Love
If Goldenrod has you hooked on crochet garments (in the good way 😏), here are more places to explore:
- Browse all free patterns on the site:
https://marlybird.com/our-free-patterns/ - Explore more crochet learning resources and tutorials:
https://marlybird.com/learn-to-knit-crochet/
You can also look up these crochet cardigan favorites on the blog or in your pattern library:

FAQs: Goldenrod Crochet Cardigan
Can a confident beginner make this?
Yes. If you’re comfortable with basic stitches (ch, sc, dc), reading row-by-row instructions, and doing some simple seaming, this is a fantastic first garment with a bit of spice. The taller stitches and lace pattern are new for many crocheters, but totally doable with patience.
What if my gauge doesn’t match?
Adjust your hook size until your blocked swatch matches the gauge given in the pattern. Because this is a garment, getting close on both stitches and rows is important so the sleeves and body lengths land where you want them.
Can I use a different yarn weight?
Goldenrod is written for a specific lightweight yarn. If you change yarn weight, you’ll be doing some “design math” on the fly. For best results, stick to a yarn that’s similar in thickness and fiber and focus on matching gauge.
Can I make the sleeves shorter?
Yes. You can work fewer rows in the sleeve sections before shaping for the fronts. Just remember that any major change in sleeve length will also affect how much yarn you need.
Is there a video tutorial?
At the time of writing, this pattern does not have its own dedicated step-by-step video. However, many of the stitches and techniques used in Goldenrod are covered in other tutorials on my YouTube channel and on MarlyBird.com. If a dedicated Goldenrod video is added later, you can always update this section with the link.
How can I share my finished Goldenrod Crochet Cardigan?
Please do… I love seeing your makes!
- Tag me on Instagram: @themarlybird
- Use hashtags: #mmmdi and #marlybird
- Share in the Facebook group: “Marly’s Minions: Marly Bird BiCrafty Community” so we can all ooh and ahh over your stitches together 💖

Want to Crochet With Marly’s Community? Join a Marly Bird House Event
One of the best ways to experience my patterns is during a live Marly Bird House event, where I teach a full pattern start-to-finish with real-time support, community encouragement, and the joy of everyone working on the same project together.
My four annual Marly Bird House make-along events:
- 🏈 Game Day Mystery Make-Along (winter)… a cozy pattern released during football season
- 🌸 First Fall (late summer/early fall)… a transitional-weather piece to carry you into layering season
- 🦃 Turkey Trot Mystery Make-Along (November)… the big Thanksgiving-season release (this is where the Sookie Cardigan was born)
- 🏆 Tournament of Stitches (TOS) (spring)… four mystery shawls over 4 weeks, the longest-running Marly event
Each event is a LIVE experience with me teaching, answering questions, and celebrating finished projects. After the event wraps, the full pattern becomes available as a workshop PDF with videos inside Marly Bird House, so you can work through it anytime. Want first access to the next event? Get on the newsletter.
Final Thoughts
The Goldenrod Crochet Cardigan is one of those pieces that looks impressive on the hanger but is surprisingly approachable to make. It’s rhythmic without being boring, wearable without being plain, and it has just enough thoughtful details to make you feel like a crochet rockstar every time you put it on.
So grab your yarn, your hook, and a comfy spot on the couch. Goldenrod is ready for her close-up… and so are you.
And when you finish, you know the drill: tag me @themarlybird and use #GoldenrodCrochetCardigan, #mmmdi, and #marlybird so I can cheer you on and show off your beautiful cardigan to the community. 💛
Favorite & Queue on Ravelry
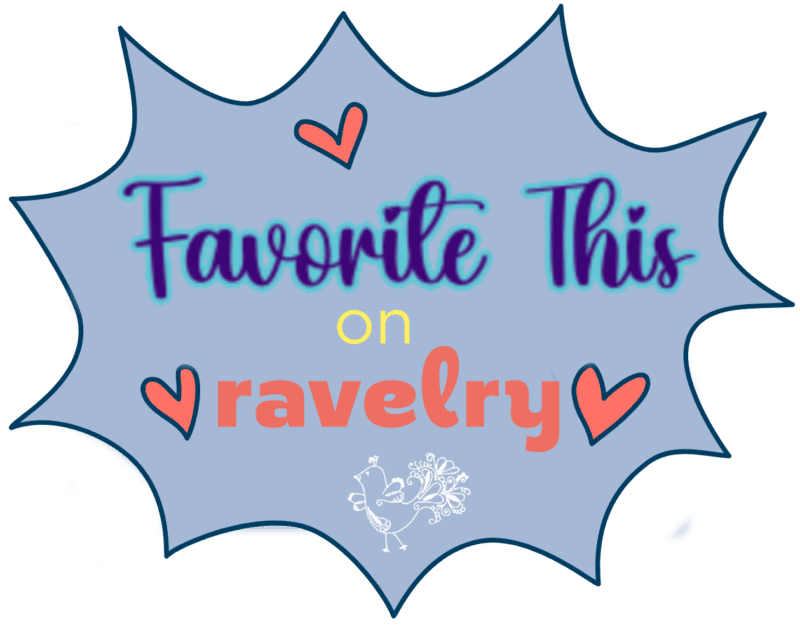
Please favorite and queue the Goldenrod Crochet Cardigan on Ravelry and tag your finished projects #GoldenrodCrochetCardigan. Seeing your color choices and finished photos is my favorite part of the week.
Love, Your BiCrafty Bestie, Marly Bird

❤️ Your BiCrafty Bestie,
Marly Bird

Categories: Crochet, Free Patterns, Marly Bird Premium Patterns, Our Free Patterns, Pattern, Uncategorized