Marly Bird Poncho Crochet-along Section 2
The Marly Bird Poncho Crochet-along is sponsored by Red Heart.
That’s right, it’s that time of year for a crochet-along and boy do I have a good one for you. Welcome to Section 2 for the Marly Bird Popular Poncho Crochet-along. (Get Section 1 here)

Once the CAL is complete the full pattern will be available at RedHeart.com
![]()
Queue it up and Like the Pattern on Ravelry
Find all the details you need for this pattern on the details page here https://marlybird.com/marly-bird-poncho-crochet-along/
eta: many are not looking at the details page for the actual measurements of the poncho so I am adding them to this post for convenience 🙂
Each rectangle piece measures 12¼ (21¼) x 27 (36)” (31 (54) x 68.5 (91.5) cm).
Finished Poncho measures 30 (40)” (76 (101.5) cm) across at widest point and 24¾ (34¾)” (63 (88) cm) in length when laid flat, not including neck or bottom edgings.
THE PATTERN
Below you will find the instructions for SECTION 2 of the Marly Bird Perfect Poncho.
Directions are for size S-M; changes for size L-2X are in parentheses.
THE GAUGE:
24 sts (2 repeats) = 6″ (15.24 cm) in Loopy Chevon. CHECK YOUR GAUGE. Use any size needles to obtain the gauge.
![]()
ABBREVIATIONS:
ch = chain; dc = double crochet; dec = decrease; dec = decrease; dec = decrease; hdc = half double crochet; sc = single crochet; st(s) = stitch (es); tr = treble (triple) crochet; yo = yarn over; [ ] = work directions in brackets the number of times specified; * or ** = repeat whatever follows the * or ** as indicated.
SPECIAL STITCHES
Sc2tog = Single crochet 2 together: [Pull up a loop in next st] twice, yo and draw through all 3 loops on hook.
Dc2tog = Double crochet 2 together: [Yo, pull up a loop in next st, yo and draw through 2 loops] twice, yo and draw through all loops on hook.
Tacking sc = Pull up a loop in next st as for a regular sc, insert hook into ch-10 loop at edge of piece, yo and draw through all loops on hook.
Let’s Begin
LOOPY CHEVRON PANEL
(Foundation is a multiple of 12 sts + 1 )
Ch 49 (85).
![]() Row 1 (setup row, WS): 2 sc in 2nd ch from hook, sc in each of next 3 ch, [sc2tog over next 2 sts] twice, * sc in each of next 3 ch, 2 sc in each of next 2 ch, sc in each of next 3 ch, [sc2tog over next 2 sts] twice; repeat from * to last 4 ch, sc in each of next 3 ch, 2 sc in last ch, turn – 48 (84) sts; 4 (7) repeats
Row 1 (setup row, WS): 2 sc in 2nd ch from hook, sc in each of next 3 ch, [sc2tog over next 2 sts] twice, * sc in each of next 3 ch, 2 sc in each of next 2 ch, sc in each of next 3 ch, [sc2tog over next 2 sts] twice; repeat from * to last 4 ch, sc in each of next 3 ch, 2 sc in last ch, turn – 48 (84) sts; 4 (7) repeats
Row 2 (RS): Ch 3 (counts as 1 dc), dc in first st, dc in each of next 3 sts, [dc2tog over next 2 sts] twice * dc in each of next 3 sts, 2 dc in next st, ch 10, 2 dc in next st, dc in each of next 3 sts, [dc2tog over next 2 sts] twice; repeat from * to last 4 sts, dc in each of next 3 sts, 2 dc in last st, turn.
Row 3: Ch 1, 2 sc in first st, sc in each of next 3 st, sc2tog over next 2 sts, ch 10, sc2tog over next 2 sts, * sc in each of next 3 sts, 2 sc in each of next 2 sts, sc in each of next 3 st, sc2tog over next 2 sts, ch 10, sc2tog over next 2 sts; repeat from * to last 4 sts, sc in each of next 3 sts, 2 sc in last st, turn.
Repeat rows 2 and 3 only until piece measures 26 (35)” (66 (89) cm), ending with a Row 3.
Next row (RS): Ch 3 (counts as 1 dc), dc in first st, dc in each of next 3 sts, [dc2tog over next 2 sts] twice * dc in each of next 3 sts, 2 dc in each of next 2 sts, dc in each of next 3 sts, [dc2tog over next 2 sts] twice; repeat from * to last 4 sts, dc in each of next 3 sts, 2 dc in last st, turn.
Do not fasten off.
Make sure all loops show on RS. Just push through the fabric if need be to get all of them on the RS.
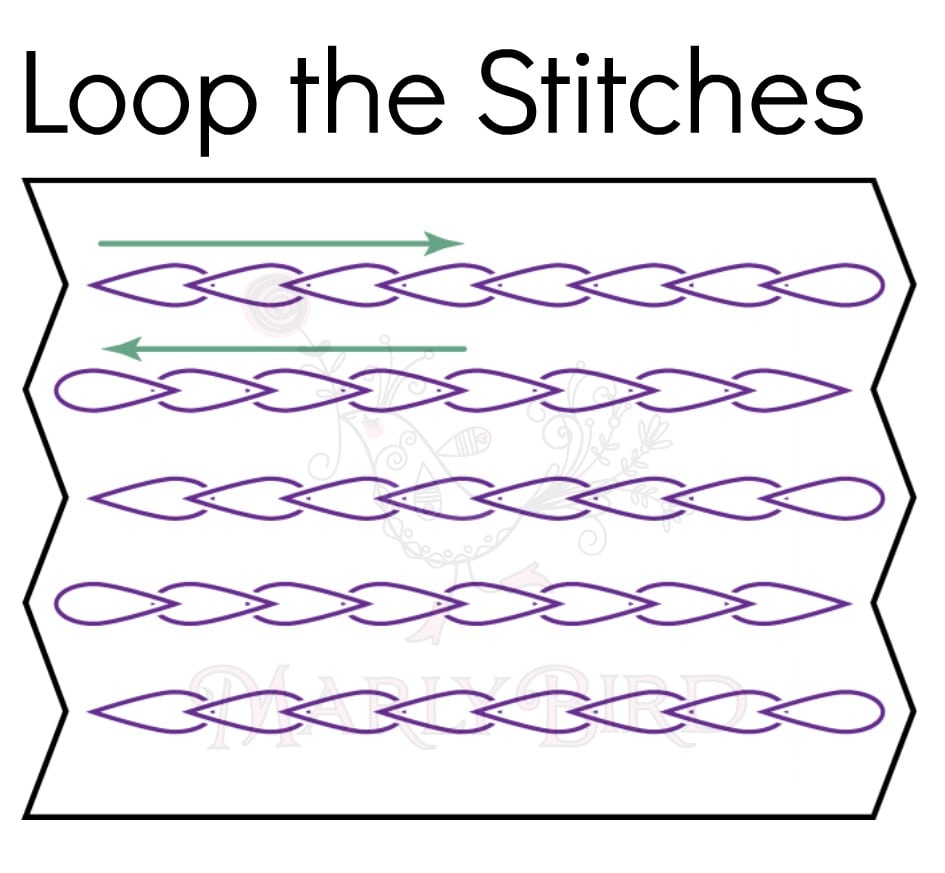
Braid first column of loops by pulling one loop through the next working from top of piece downward. Use a marker to temporarily hold down final loop. Braid second column working from the bottom upward. Continue alternating directions in this manner, working each column of loops in the direction of the corresponding chevron “arrow”. So, braid upward for the chevron peaks, and downward for the chevron valleys.
![]() Final row (WS): Ch 1, * sc in each of next 11 sts, tacking sc (see special stitches) in next st; repeat from * to last 12 sts, sc in each of last 12 sts.
Final row (WS): Ch 1, * sc in each of next 11 sts, tacking sc (see special stitches) in next st; repeat from * to last 12 sts, sc in each of last 12 sts.
Fasten off.
Designer Note: in the video you will see that you have an alternative loopy finish for one edge of the rectangle. Instead of tacking down the loop on the edge that will be at the shoulder, leave them loose and then use it as a button loop once the rectangles are seamed. If you choose to do this, work the next part of the instructions without tacking down the loops.
Rotate piece 180 degrees. With RS facing, join yarn with a slip st at beginning of foundation row and work as follows:
Row 1 (RS): Ch 1, sc in each of next 5 sts, tacking sc in next st, * sc in each of next 11 sts, tacking sc in next st; repeat from * to last 6 sts, sc in each of last 6 sts.
Fasten off.
Chart
Chart as seen in video
![]()
Video
The swatch I made in the video has a chain amount of 25. Then worked the chart pattern through row 5.
I used Red Heart Soft yarn and a J/6 mm hook for the swatch in the video so you could better see the stitches (I hope).
I recommend learning this new stitch pattern with stash yarn first, then do another swatch for the poncho gauge (you want to get gauge using the yarn you will use on your poncho), then begin your poncho with the full number of repeats. Doing it this way will take longer, I know. But it will ensure that you have success.
Homework
Finish section 2 and be ready to start section three on Oct 4, 2016.
Once you finish your section be sure to post pictures to the facebook group as there will be a prize given away from RedHeart.com to one lucky person (who is randomly chosen) that has finished his or her homework during the week of Sept. 27, 2016 – Oct 3, 2016 @ 11:59pm. Goodluck!

OH, One last thing!
Be sure to use the hashtag #MarlyBirdCAL when you post about it on social media
so we can find what you are saying 🙂
![]()
Frequently Asked Questions
What are the finished measurements for the poncho pieces?
Honestly… the rectangles for each piece measure 12¼ (21¼) x 27 (36)” (31 (54) x 68.5 (91.5) cm). The finished poncho itself is about 30 (40)” (76 (101.5) cm) wide and 24¾ (34¾)” (63 (88) cm) long, not counting the edges around the neck or bottom.
How do I get gauge for this pattern?
So here’s the thing… the gauge is 24 stitches (that’s 2 repeats!) for 6 inches (15.24 cm) in the Loopy Chevron stitch. Use any size needles you need to get that gauge… it’s super important for the poncho to turn out right!
What do all those stitch abbreviations mean?
Yes! You’ll see abbreviations like ch for chain, dc for double crochet, hdc for half double crochet, sc for single crochet, and tr for treble crochet. Just remember, \[ \] means to work the directions in the brackets a certain number of times, and \* or \*\* means to repeat what comes next!
Can you tell me more about the Loopy Chevron Stitch?
Oh, that stitch is so fun! It’s made by repeating rows 2 and 3 until your piece is about 26 (35)” (66 (89) cm) long. You’ll end with a Row 3, and then you don’t fasten off… you’ll keep going with the next steps to create those lovely loops!
Where can I find the full pattern once this crochet-along is finished?
Don’t you worry… once the whole crochet-along is done, the complete pattern will be available over on [RedHeart.com](https://www.anrdoezrs.net/links/7691942/type/dlg/https://www.redheart.com/). You can also find all the details for this specific pattern on its details page right here: [https://marlybird.com/marly-bird-poncho-crochet-along/](https://marlybird.com/marly-bird-poncho-crochet-along/)
Categories: Crochet, Make-Alongs, Our Free Patterns, Pattern, YouTube Video Tutorial