
How to Make Removable Stitch Markers
 In a previous video I showed you how to make knitting stitch markers. There are times when you need a removable stitch marker for knitting and for crochet. I put together this video tutorial for you so that you could finish your collection of stitch markers. A removable stitch marker is great to dictate the right and wrong side of your work. It is also a great tool in crochet to hold your last worked stitch so that it doesn’t unravel while you put your project aside.
Read to the bottom of this post to see the video for the removable stitch marker tutorial and the video for knitting stitch markers. Let’s learn how to make a removable stitch marker.
*This post contains affiliate links. By clicking on one of these links and making a purchase a small portion will be given back to the blog, the price you pay is not changed. Thank you for your support of the blog.*
Making your own stitch markers is an ideal way to make something unique to your style. It can be hard to find large stitch markers which is a great reason to make knitting stitch markers. Once you make your own stitch markers for knitting you should also have some for crochet. The technique is the same for both sets of markers. The difference is in the way that you will attach the marker to your project.
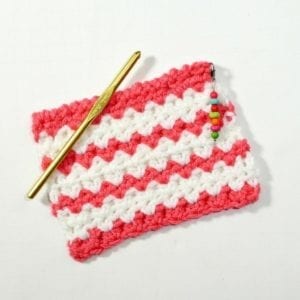
For the removable stitch marker you will use a lobster claw clasp, found in the jewelry aisle of your craft store. The lobster clasp comes in different sizes and colors so that you can customize your marker completely. If you make jewelry, or wear jewelry, you will likely know what a lobster clasp is. This allows you to open and close the marker so that you can move it around as you need it. This is a great option to mark the right and wrong side as well as hold your stitches from unraveling. Be sure to make a variety so that they can each mark something different.
NOTE: I am NOT an expert in beading and I am not claiming that I know everything about the topic. I have put together this tutorial as a novice in beading, making something simple to fit my needs as a knitter. If you are looking for more information on beading or for inspiration you can check out my two friends, who are AMAZING jewelry designers. Jill Wiseman is an amazing designer and has her own online supply store. My other friend, Candie Cooper, is also a very talented designer. She has a Craftsy class to teach you all of the basics of beading. It is a great class that even shows you how to crochet with wire.
 Supplies for Knitting Stitch Markers:
- Beading Mat
- Crimp Tubes
- Beading Wire
- Wire Cutters
- Crimping Pliers
- Lobster Clasps (missing from the picture above, sorry)
- Beads (light in weight)
Video Tutorial-How to Make Removable Stitch Markers:
Video Tutorial-How to Make Knitting Stitch Markers:
Frequently Asked Questions
What are removable stitch markers and why are they useful?
Removable stitch markers are markers that clip onto or through your knitting or crochet fabric rather than sitting on the needle or hook. Unlike ring markers that stay on your needle for the duration, removable markers can be placed on specific stitches to mark spots mid-row, flag pattern repeats in the fabric itself, or track shaping positions. They’re invaluable for amigurumi (marking the beginning of rounds), for complex patterns where you need to mark specific stitches for later reference, and for noting where decreases or increases happened several rows back.
How do you make your own removable stitch markers?
There are several fun DIY approaches! The most classic: a loop of contrasting yarn tied in a slip knot that you slip onto stitches. Safety pins in small sizes clip through fabric easily and cost almost nothing. Paper clips can work in a pinch. More creative options: bent bobby pins, small split rings from a craft store, and plastic loops from bread bags. For a more polished result, commercial jump rings from the jewelry section plus a small bead create beautiful handmade markers. The cost of store-bought markers is low but making your own is satisfying and uses what you already have.
What’s the difference between locking markers and ring markers?
Ring markers are closed loops that sit on your needle or hook and move with your stitches. They mark positions in the current round/row. Locking markers (removable markers) have a hinged opening that allows you to clip them onto specific stitches in already-worked fabric. Ring markers are great for tracking pattern repeats while working. Locking markers are essential for marking specific stitches you’ll need to find again later (like the beginning of decreases, the placement of a seam, or a specific round count in amigurumi). Most crafters use both types!
Can I use yarn scraps as stitch markers?
Yes! A short piece of contrasting yarn tied in a loop through a stitch is a completely functional removable stitch marker. It’s the original DIY solution that’s been used since before commercial stitch markers existed. The only downside is that the yarn can felt into the fabric if you’re using wool, or leave a slight indent in the stitch if left in place for a long time. For short-term marking purposes (like tracking the beginning of each round), yarn scrap markers are perfect and free. For long-term markers (left in the fabric for many rows), commercial clip markers work better.
How many stitch markers do I need in my crafting toolkit?
More than you think! Experienced crafters generally recommend having at least 20-30 ring markers in various sizes, plus a good collection of removable markers. For lace and complex patterns, you might use 10+ markers per project. For amigurumi, you need at least 2-3 removable markers at a time. Having plenty means you can mark generously without rationing them. They’re small and inexpensive… stock up! A well-stocked marker collection is one of those foundational craft supplies that transforms your experience.


Thanks for sharing.
My first time watching your video, and you’re my new favorite! I’m heading over to your YouTube channel right now. Thanks for a well-made tutorial.