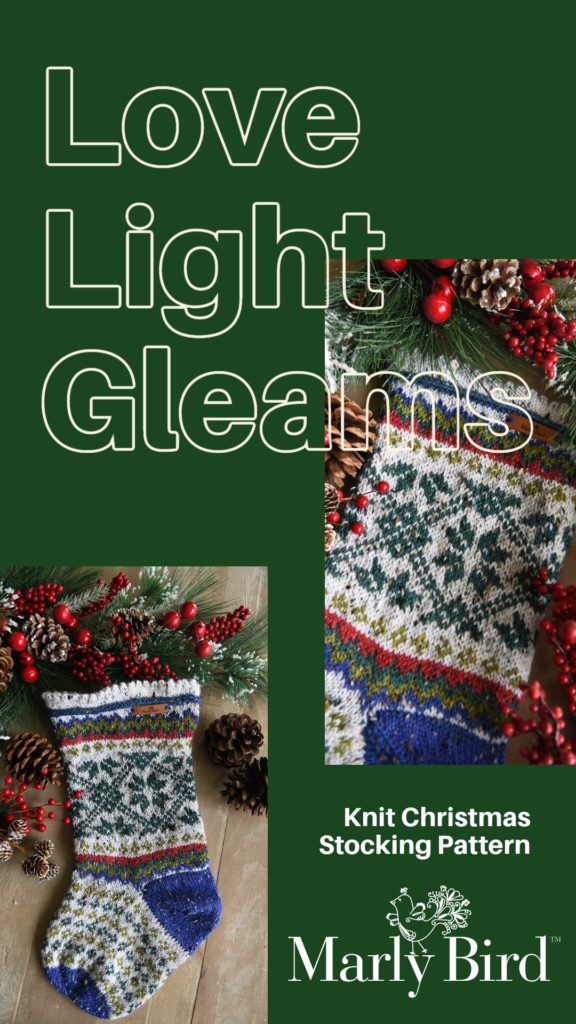
Christmas in July Make-Along || Love Light Gleams Knit Christmas Stocking 3 of 3
Welcome to day one of the Christmas in July Make-along for the Love Light Gleams Knit Christmas Stocking!
This is a 3 day event to make a fantastic heirloom Christmas Stocking that you will LOVE!
Starting Friday Aug. 6, 2021, you will get the first set of instructions for the stocking including a video tutorial.
You can learn all about the details HERE. <–*PSST, IT IS A GOOD IDEA TO BOOKMARK THAT PAGE!

This is a free make-along event! That's right, free knit christmas stocking pattern, free crochet christmas stocking pattern (on BrianaK website), free video tutorials, and a community to show your work >> Click Here << to join Marly's Minions on Facebook!
Everything you need will be added here on the website each day of the event. So bookmark THIS PAGE so you know where to go everyday by noon ET.
Looking for the full pattern all in one place without any ads? We got that for you and more! You can get this pattern and 5 others for one low sale price during the event! It's simple, click the button below for get the pdf now.

Looking for the crochet stocking? You can find it here.
Don't forget that Briana K Designs has made the crochet christmas stocking for this event and has the pattern up on her website. If you are by chance BiCrafty, it is a good idea to check out her pattern too, it is stunning!
Continue the Christmas in July Make-Along || Love Light Gleams Knit Christmas Stocking!
Below you will find the next section of the pattern for the Love Light Gleams Knit Christmas Stocking to finish it up.
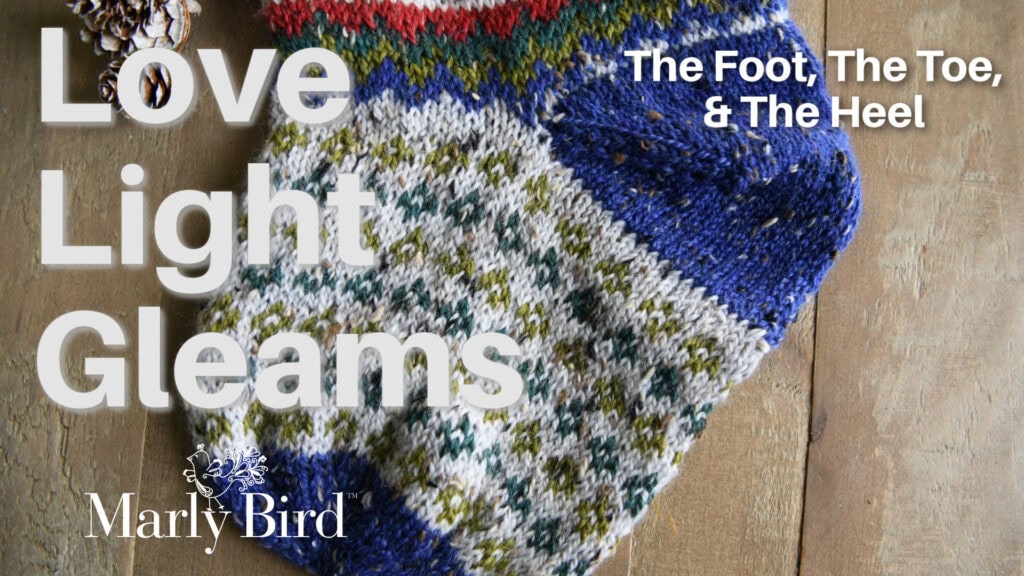
We are nearly done with this fun pattern. Only a few more stitches on the foot, the complete the toe like the top of a hat with simple decreases, and finally, pick up and knit stitches around the heel to work an afterthought heel.
The heel shaping will be very similar to the toe of a sock or the top of a mitten! Super simple and easy to do.
Finish it up with a little kitchener stitch and you will have a great new knit Christmas stocking!
If you are ready I am too.
AFFILIATE DISCLAIMER: This post contains affiliate links. If you use these links to buy something we may earn a commission. XOXO Marly
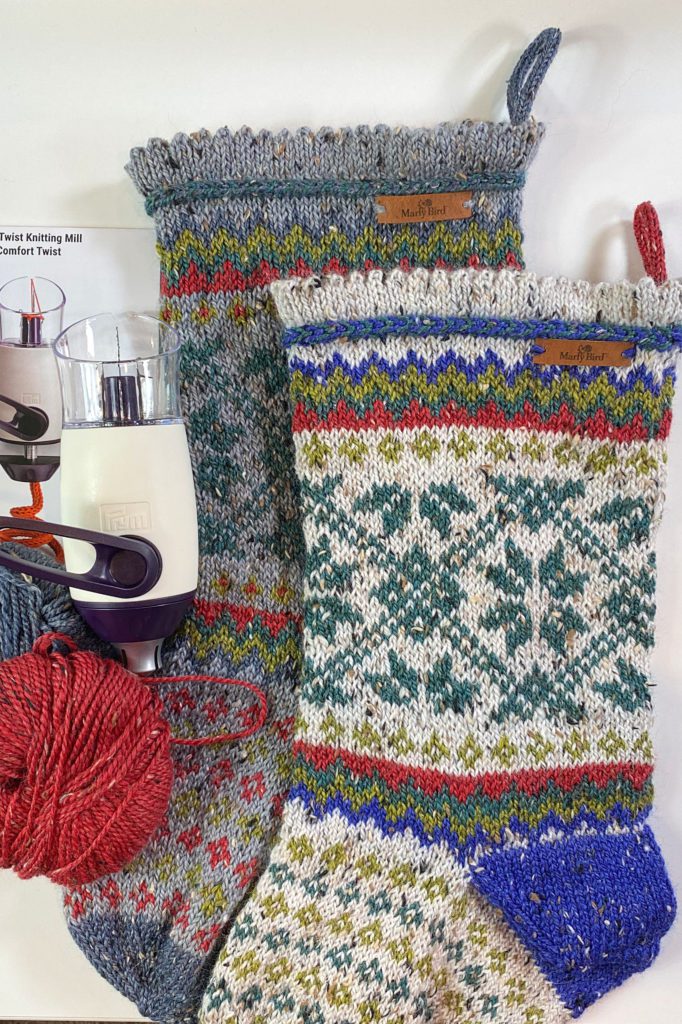
Love Light Gleams Knit Christmas Stocking (continued)
By Marly Bird
MEASUREMENTS
Final Measurements: 16 ½” circumference, 10” cuff to start of heel, 5.5” heel to toe
Gauge: 20 sts 24 rows= 4″ (10 cm) in Stockinette stitch pattern before blocking with larger needles. CHECK YOUR GAUGE. Use any size needles to obtain the gauge
MATERIALS
Yarn: Knit Picks ® City Tweed™ Dk Weight [55% merino wool, 25% superfine alpaca, 20% donegal tweed 50 g/123 yds
- Color A: Snowbank – 2 balls
- Color B: Cobalt – 1 ball
- Color C: Kelp – 1 ball
- Color D: Artichoke – 1 ball
- Color E: Romance – 1 ball
Needles: 4.5mm [US 7] and 5mm [US 8] 16″ (40.5 cm); Set of 5 double pointed needles 4.5mm [US 7]
>> Use Code: MARLYKNITS and get 10% off your order of Signature Needle Arts <<
NOTIONS
Stitch Marker (make your own), Tapestry needle to bury the ends (learn how here), Custom Made Leather Tags (I get these and love them)
ABBREVIATIONS
- A-alt = Use color A for this stitch, and when stocking is finished go back and use duplicate stitch and color E to make that stitch pop.
- K = Knit
- K2tog = Knit Two Together (decrease)
- LHN = Left Hand Needle
- M1 = Make 1 (increase) >> Click Here for Video Help <<
- P = Purl
- SSK = Slip, Slip, Knit (decrease)
SPECIAL STITCHES
Long Tail Cast On >> Click Here for Video Help <<
Latvian Braid >> Click Here for Video Help <<
Jogless Stripes >> Click Here for Video Help <<
Weaving in Floats for Stranded Knitting >> Click Here for Video Help <<
Bury Ends >> Click Here for Video Help <<
Duplicate Stitch >> Click Here for Video Help <<
Kitchener Stitch >> Click Here for Video Help <<NOTES
- The colorwork instructions are offered in three different formats. All forms of instructions are written for 28 stitches, therefore it is necessary to repeat each row of instructions 3 times to complete 1 full round (28 * 3 = 84 sts).
- When the Alt-A color is used, you will be using color A for that stitch as you knit but have the option to do duplicate stitch later to add some POP if you want.
- Cut yarn when color is not used again for more than 3 rounds
- Carry yarn when color is used again in 3 or less rounds.
- Use the tails to close up any holes that might appear at the corner joins of the heel.
PATTERN Day 3
???? As you read through any of the instructions, you will repeat each round 3 times for 1 full round on the stocking. (notice the instructions only represent 28 stitches but you have 84 so naturally, 28*3 will get you around the stocking).
Divide for Heel
With color A, knit then bind off 21, knit to last 21 of round, knit then bind off 21.
Fasten off.
With Color A, cast on 42, knit the remaining 42 stitches of the leg, knit across the 42 cast on stitches, place a marker for the start of the round – 84 sts remain.
Continue in stockinette pattern following the colorwork chart, the colroblock chart, or the written instructions.
Foot
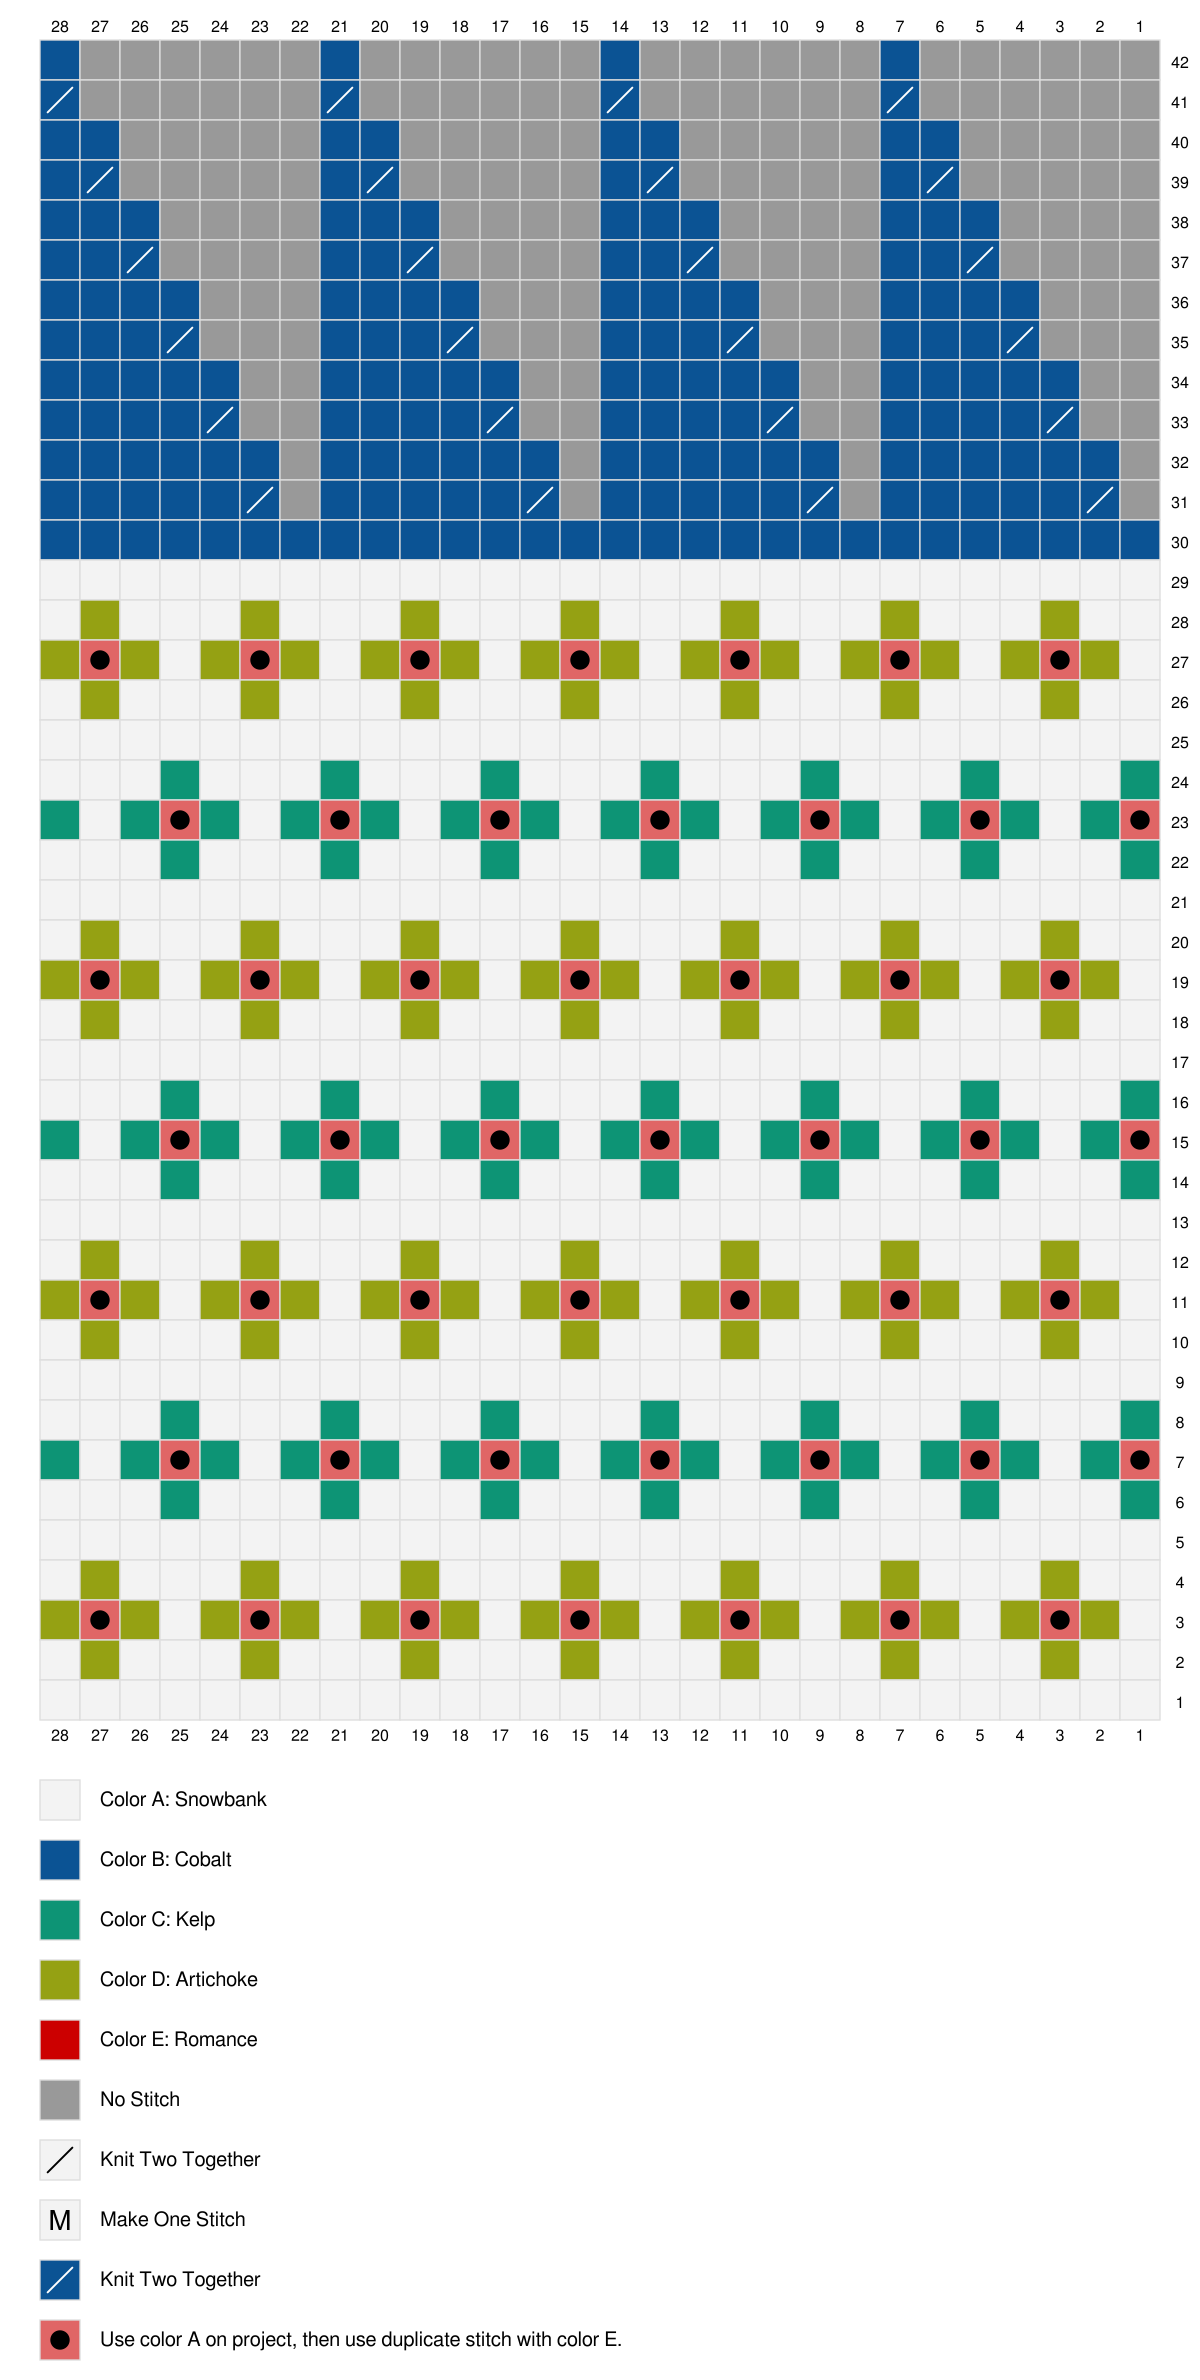
Colorwork Chart
Biggest things to notice on this chart are the change in stitch counts when you start the toe decreases, of course.
Also, the ‘No Stitch' blocks are back in the toe section because of the previously mentioned decreases. Remember, that is simply a place in the chart where nothing happens. You will completely ignore those blocks are there, that is why they are in a forgettable gray color.
Notice that when you repeat the round 3 times you will have the correct number of stitches without those ‘No Stitch' blocks.
Read the colorwork chart from the bottom to the top and always from right to left since you are working in the round.
Looking for the full pattern all in one place without any ads? You can get this pattern and 5 others for one low sale price during the event! It's simple, click the button below for get the pdf now.
Colorblock Chart
This is a new way to present colorwork knitting patterns. Very similar to a paint by number but you will be doing knit by color instead!
Again, Briana and I wanted to make sure you had every tool possible to accomplish this fun pattern. Let us know what you think of the colorblocks 🙂
???? NOTE: the colorblock chart does NOT show the K2tog of the toe. So, on rounds 31-42 so make note of them decreases every other row.
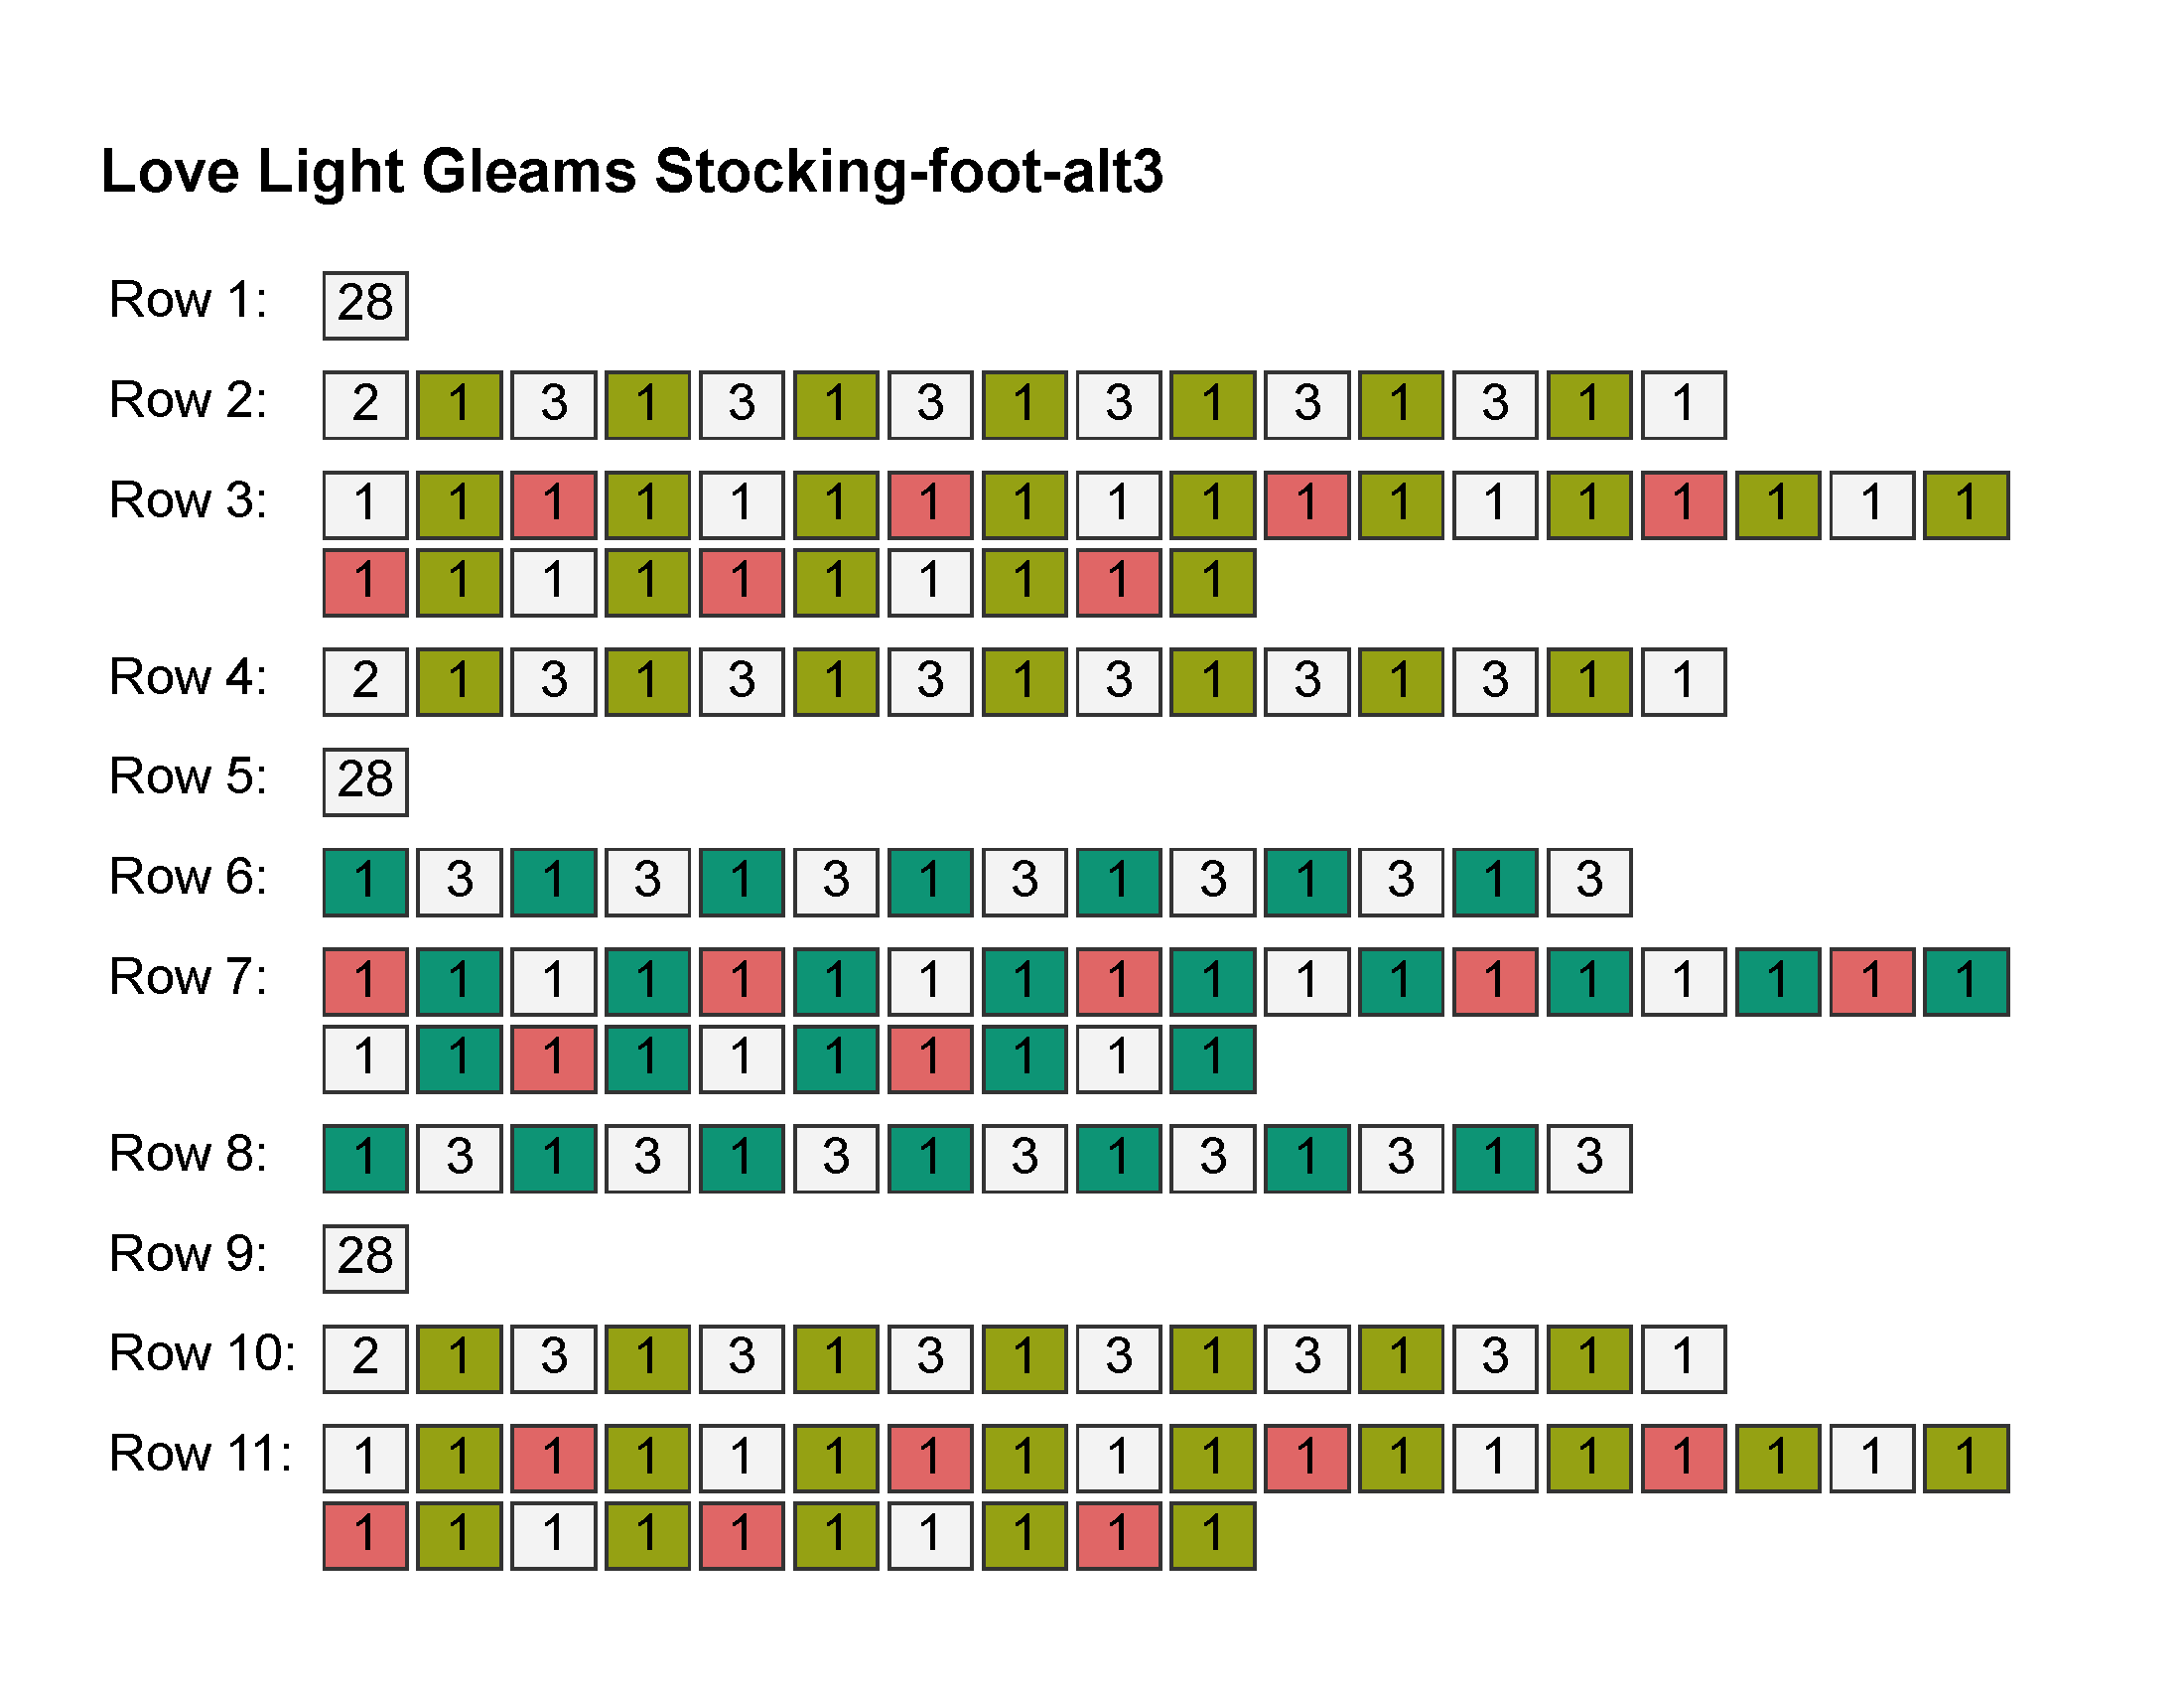
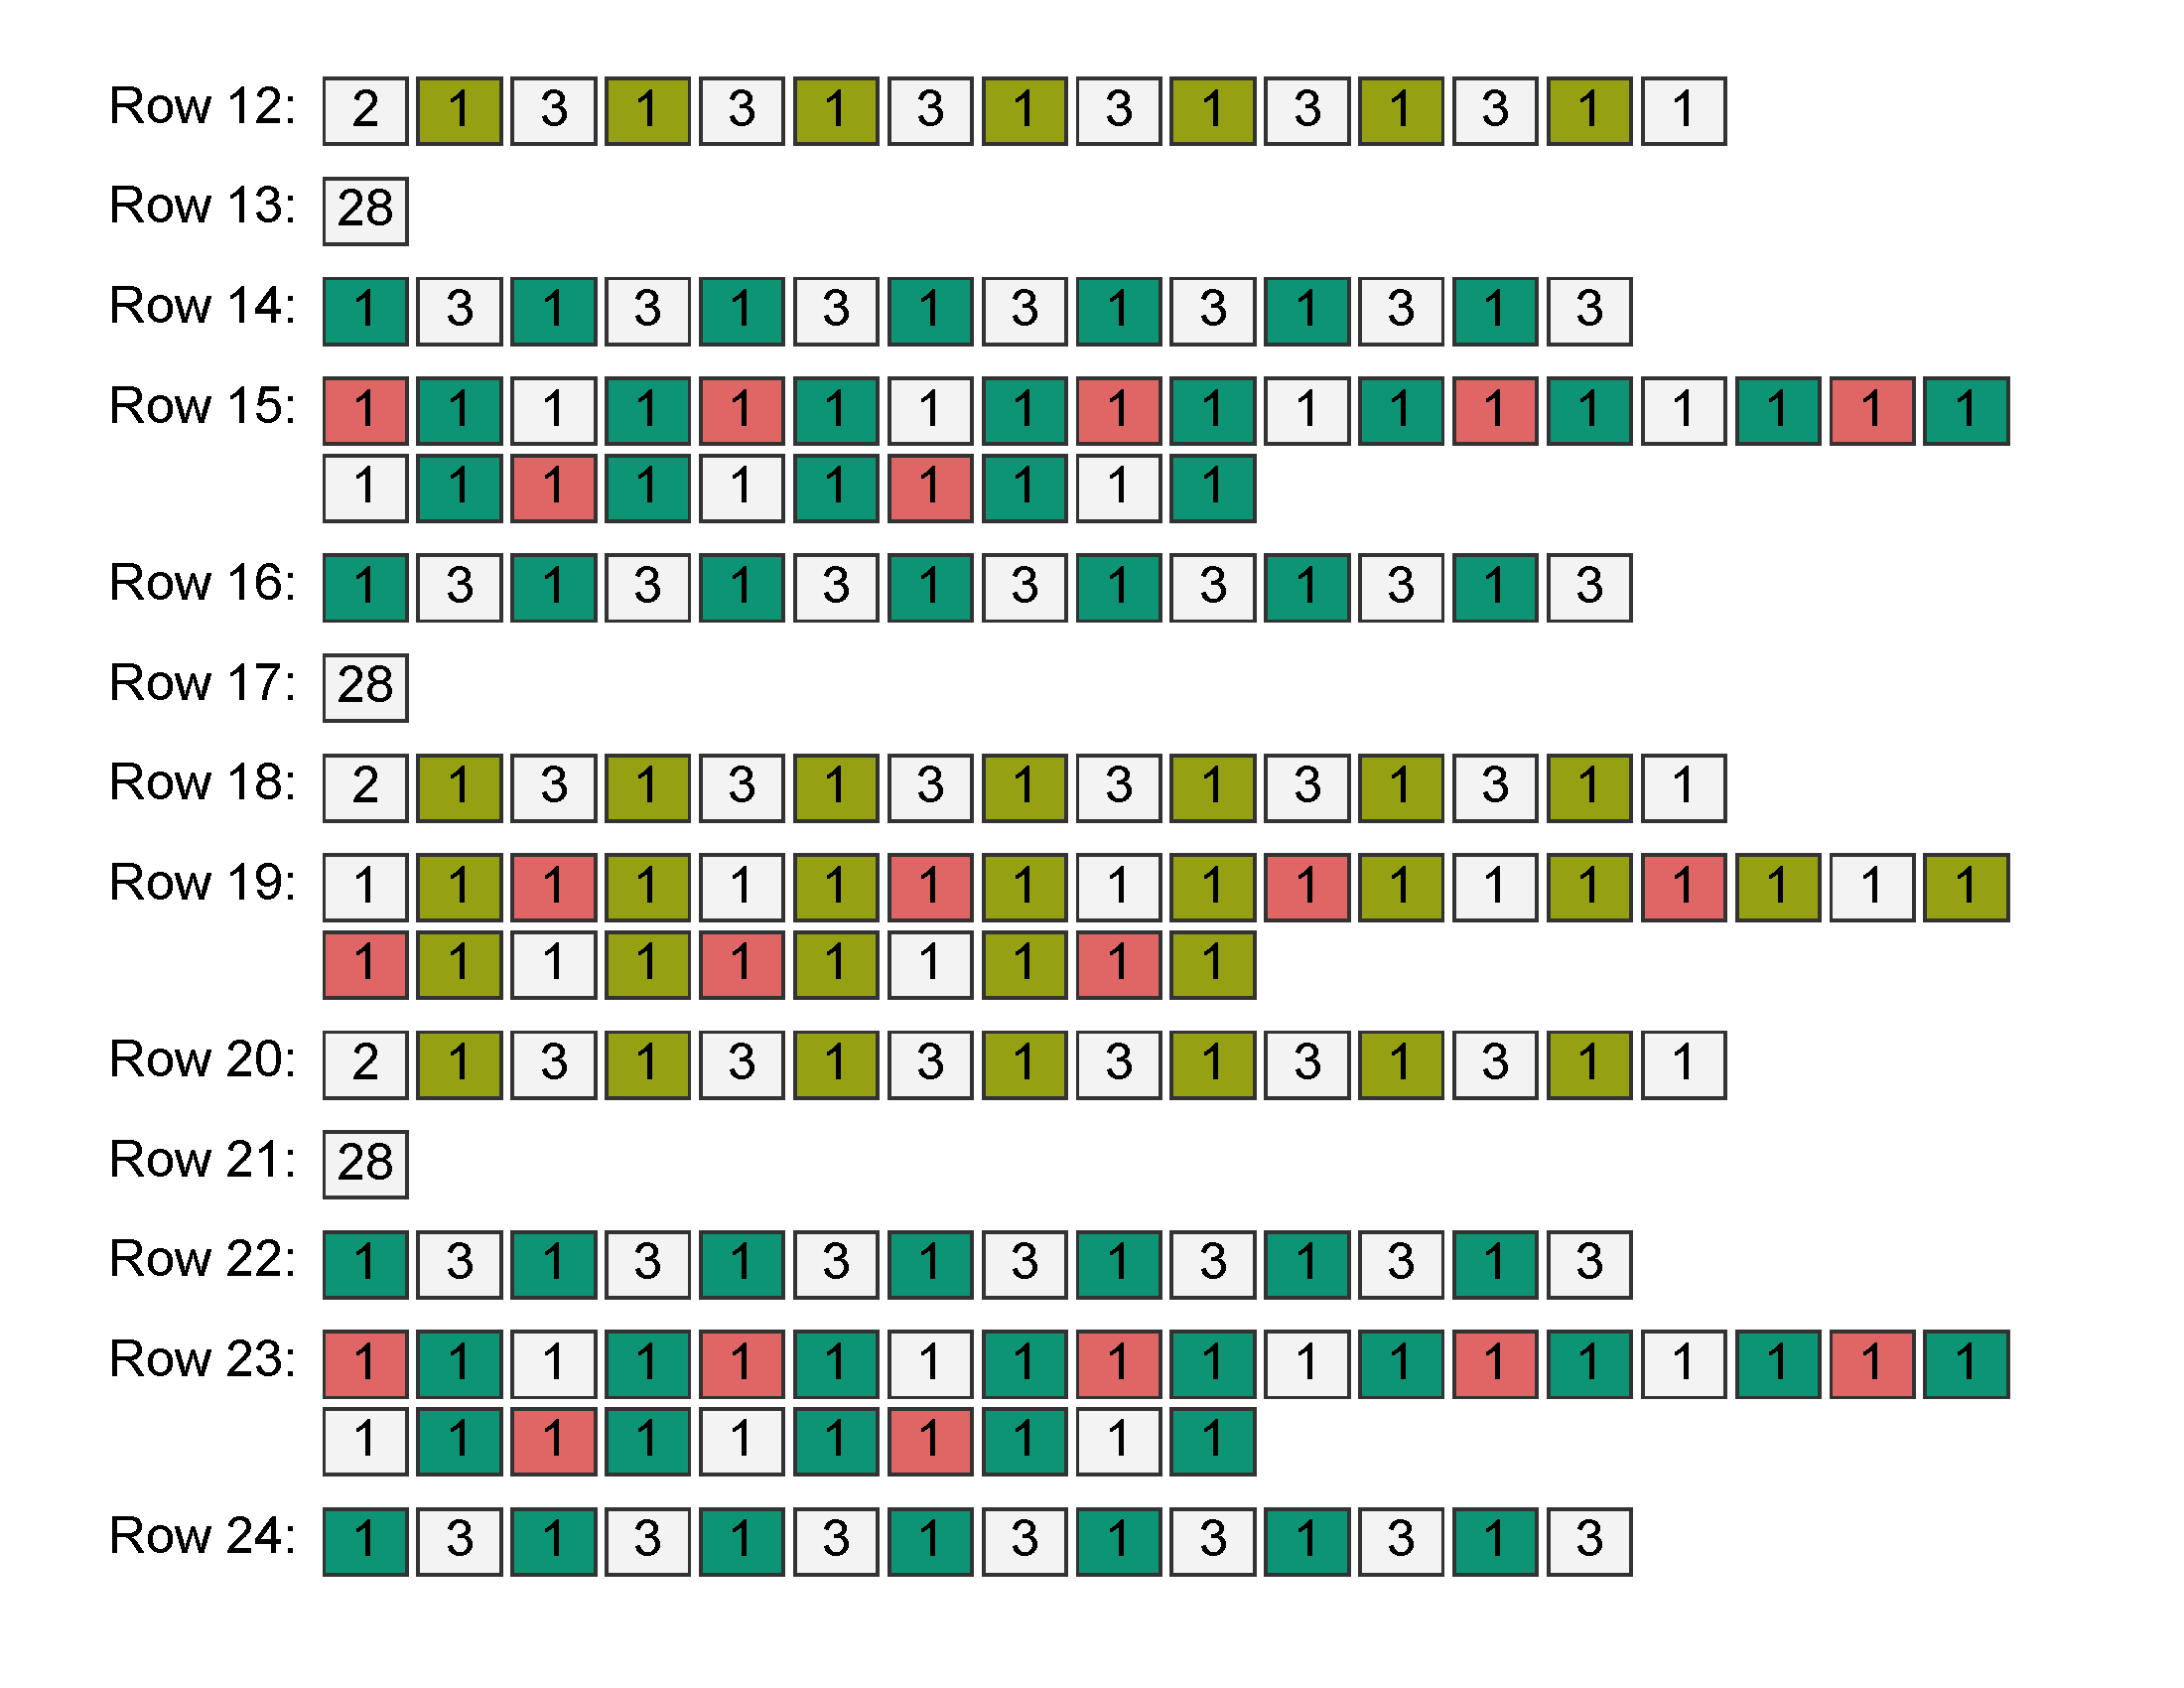

Written Instructions
Love Light Gleams Stocking-foot-alt3
Row 1: (A) x 28
Row 2: (A) x 2, (D), (A) x 3, (D), (A) x 3, (D), (A) x 3, (D), (A) x 3, (D), (A) x 3, (D), (A) x 3, (D), (A)
Row 3: (A), (D), (A-alt), (D), (A), (D), (A-alt), (D), (A), (D), (A-alt), (D), (A), (D), (A-alt), (D), (A), (D), (A-alt), (D), (A), (D), (A-alt), (D), (A), (D), (A-alt), (D)
Row 4: (A) x 2, (D), (A) x 3, (D), (A) x 3, (D), (A) x 3, (D), (A) x 3, (D), (A) x 3, (D), (A) x 3, (D), (A)
Row 5: (A) x 28
Row 6: (C), (A) x 3, (C), (A) x 3, (C), (A) x 3, (C), (A) x 3, (C), (A) x 3, (C), (A) x 3, (C), (A) x 3
Row 7: (A-alt), (C), (A), (C), (A-alt), (C), (A), (C), (A-alt), (C), (A), (C), (A-alt), (C), (A), (C), (A-alt), (C), (A), (C), (A-alt), (C), (A), (C), (A-alt), (C), (A), (C)
Row 8: (C), (A) x 3, (C), (A) x 3, (C), (A) x 3, (C), (A) x 3, (C), (A) x 3, (C), (A) x 3, (C), (A) x 3
Row 9: (A) x 28
Row 10: (A) x 2, (D), (A) x 3, (D), (A) x 3, (D), (A) x 3, (D), (A) x 3, (D), (A) x 3, (D), (A) x 3, (D), (A)
Row 11: (A), (D), (A-alt), (D), (A), (D), (A-alt), (D), (A), (D), (A-alt), (D), (A), (D), (A-alt), (D), (A), (D), (A-alt), (D), (A), (D), (A-alt), (D), (A), (D), (A-alt), (D)
Row 12: (A) x 2, (D), (A) x 3, (D), (A) x 3, (D), (A) x 3, (D), (A) x 3, (D), (A) x 3, (D), (A) x 3, (D), (A)
Row 13: (A) x 28
Row 14: (C), (A) x 3, (C), (A) x 3, (C), (A) x 3, (C), (A) x 3, (C), (A) x 3, (C), (A) x 3, (C), (A) x 3
Row 15: (A-alt), (C), (A), (C), (A-alt), (C), (A), (C), (A-alt), (C), (A), (C), (A-alt), (C), (A), (C), (A-alt), (C), (A), (C), (A-alt), (C), (A), (C), (A-alt), (C), (A), (C)
Row 16: (C), (A) x 3, (C), (A) x 3, (C), (A) x 3, (C), (A) x 3, (C), (A) x 3, (C), (A) x 3, (C), (A) x 3
Row 17: (A) x 28
Row 18: (A) x 2, (D), (A) x 3, (D), (A) x 3, (D), (A) x 3, (D), (A) x 3, (D), (A) x 3, (D), (A) x 3, (D), (A)
Row 19: (A), (D), (A-alt), (D), (A), (D), (A-alt), (D), (A), (D), (A-alt), (D), (A), (D), (A-alt), (D), (A), (D), (A-alt), (D), (A), (D), (A-alt), (D), (A), (D), (A-alt), (D)
Row 20: (A) x 2, (D), (A) x 3, (D), (A) x 3, (D), (A) x 3, (D), (A) x 3, (D), (A) x 3, (D), (A) x 3, (D), (A)
Row 21: (A) x 28
Row 22: (C), (A) x 3, (C), (A) x 3, (C), (A) x 3, (C), (A) x 3, (C), (A) x 3, (C), (A) x 3, (C), (A) x 3
Row 23: (A-alt), (C), (A), (C), (A-alt), (C), (A), (C), (A-alt), (C), (A), (C), (A-alt), (C), (A), (C), (A-alt), (C), (A), (C), (A-alt), (C), (A), (C), (A-alt), (C), (A), (C)
Row 24: (C), (A) x 3, (C), (A) x 3, (C), (A) x 3, (C), (A) x 3, (C), (A) x 3, (C), (A) x 3, (C), (A) x 3
Row 25: (A) x 28
Row 26: (A) x 2, (D), (A) x 3, (D), (A) x 3, (D), (A) x 3, (D), (A) x 3, (D), (A) x 3, (D), (A) x 3, (D), (A)
Row 27: (A), (D), (A-alt), (D), (A), (D), (A-alt), (D), (A), (D), (A-alt), (D), (A), (D), (A-alt), (D), (A), (D), (A-alt), (D), (A), (D), (A-alt), (D), (A), (D), (A-alt), (D)
Row 28: (A) x 2, (D), (A) x 3, (D), (A) x 3, (D), (A) x 3, (D), (A) x 3, (D), (A) x 3, (D), (A) x 3, (D), (A)
Row 29: (A) x 28
Row 30: (B) x 28
Row 31: (k2tog), (B) x 5, (k2tog), (B) x 5, (k2tog), (B) x 5, (k2tog), (B) x 5
Row 32: (B) x 24
Row 33: (k2tog), (B) x 4, (k2tog), (B) x 4, (k2tog), (B) x 4, (k2tog), (B) x 4
Row 34: (B) x 20
Row 35: (k2tog), (B) x 3, (k2tog), (B) x 3, (k2tog), (B) x 3, (k2tog), (B) x 3
Row 36: (B) x 16
Row 37: (k2tog), (B) x 2, (k2tog), (B) x 2, (k2tog), (B) x 2, (k2tog), (B) x 2
Row 38: (B) x 12
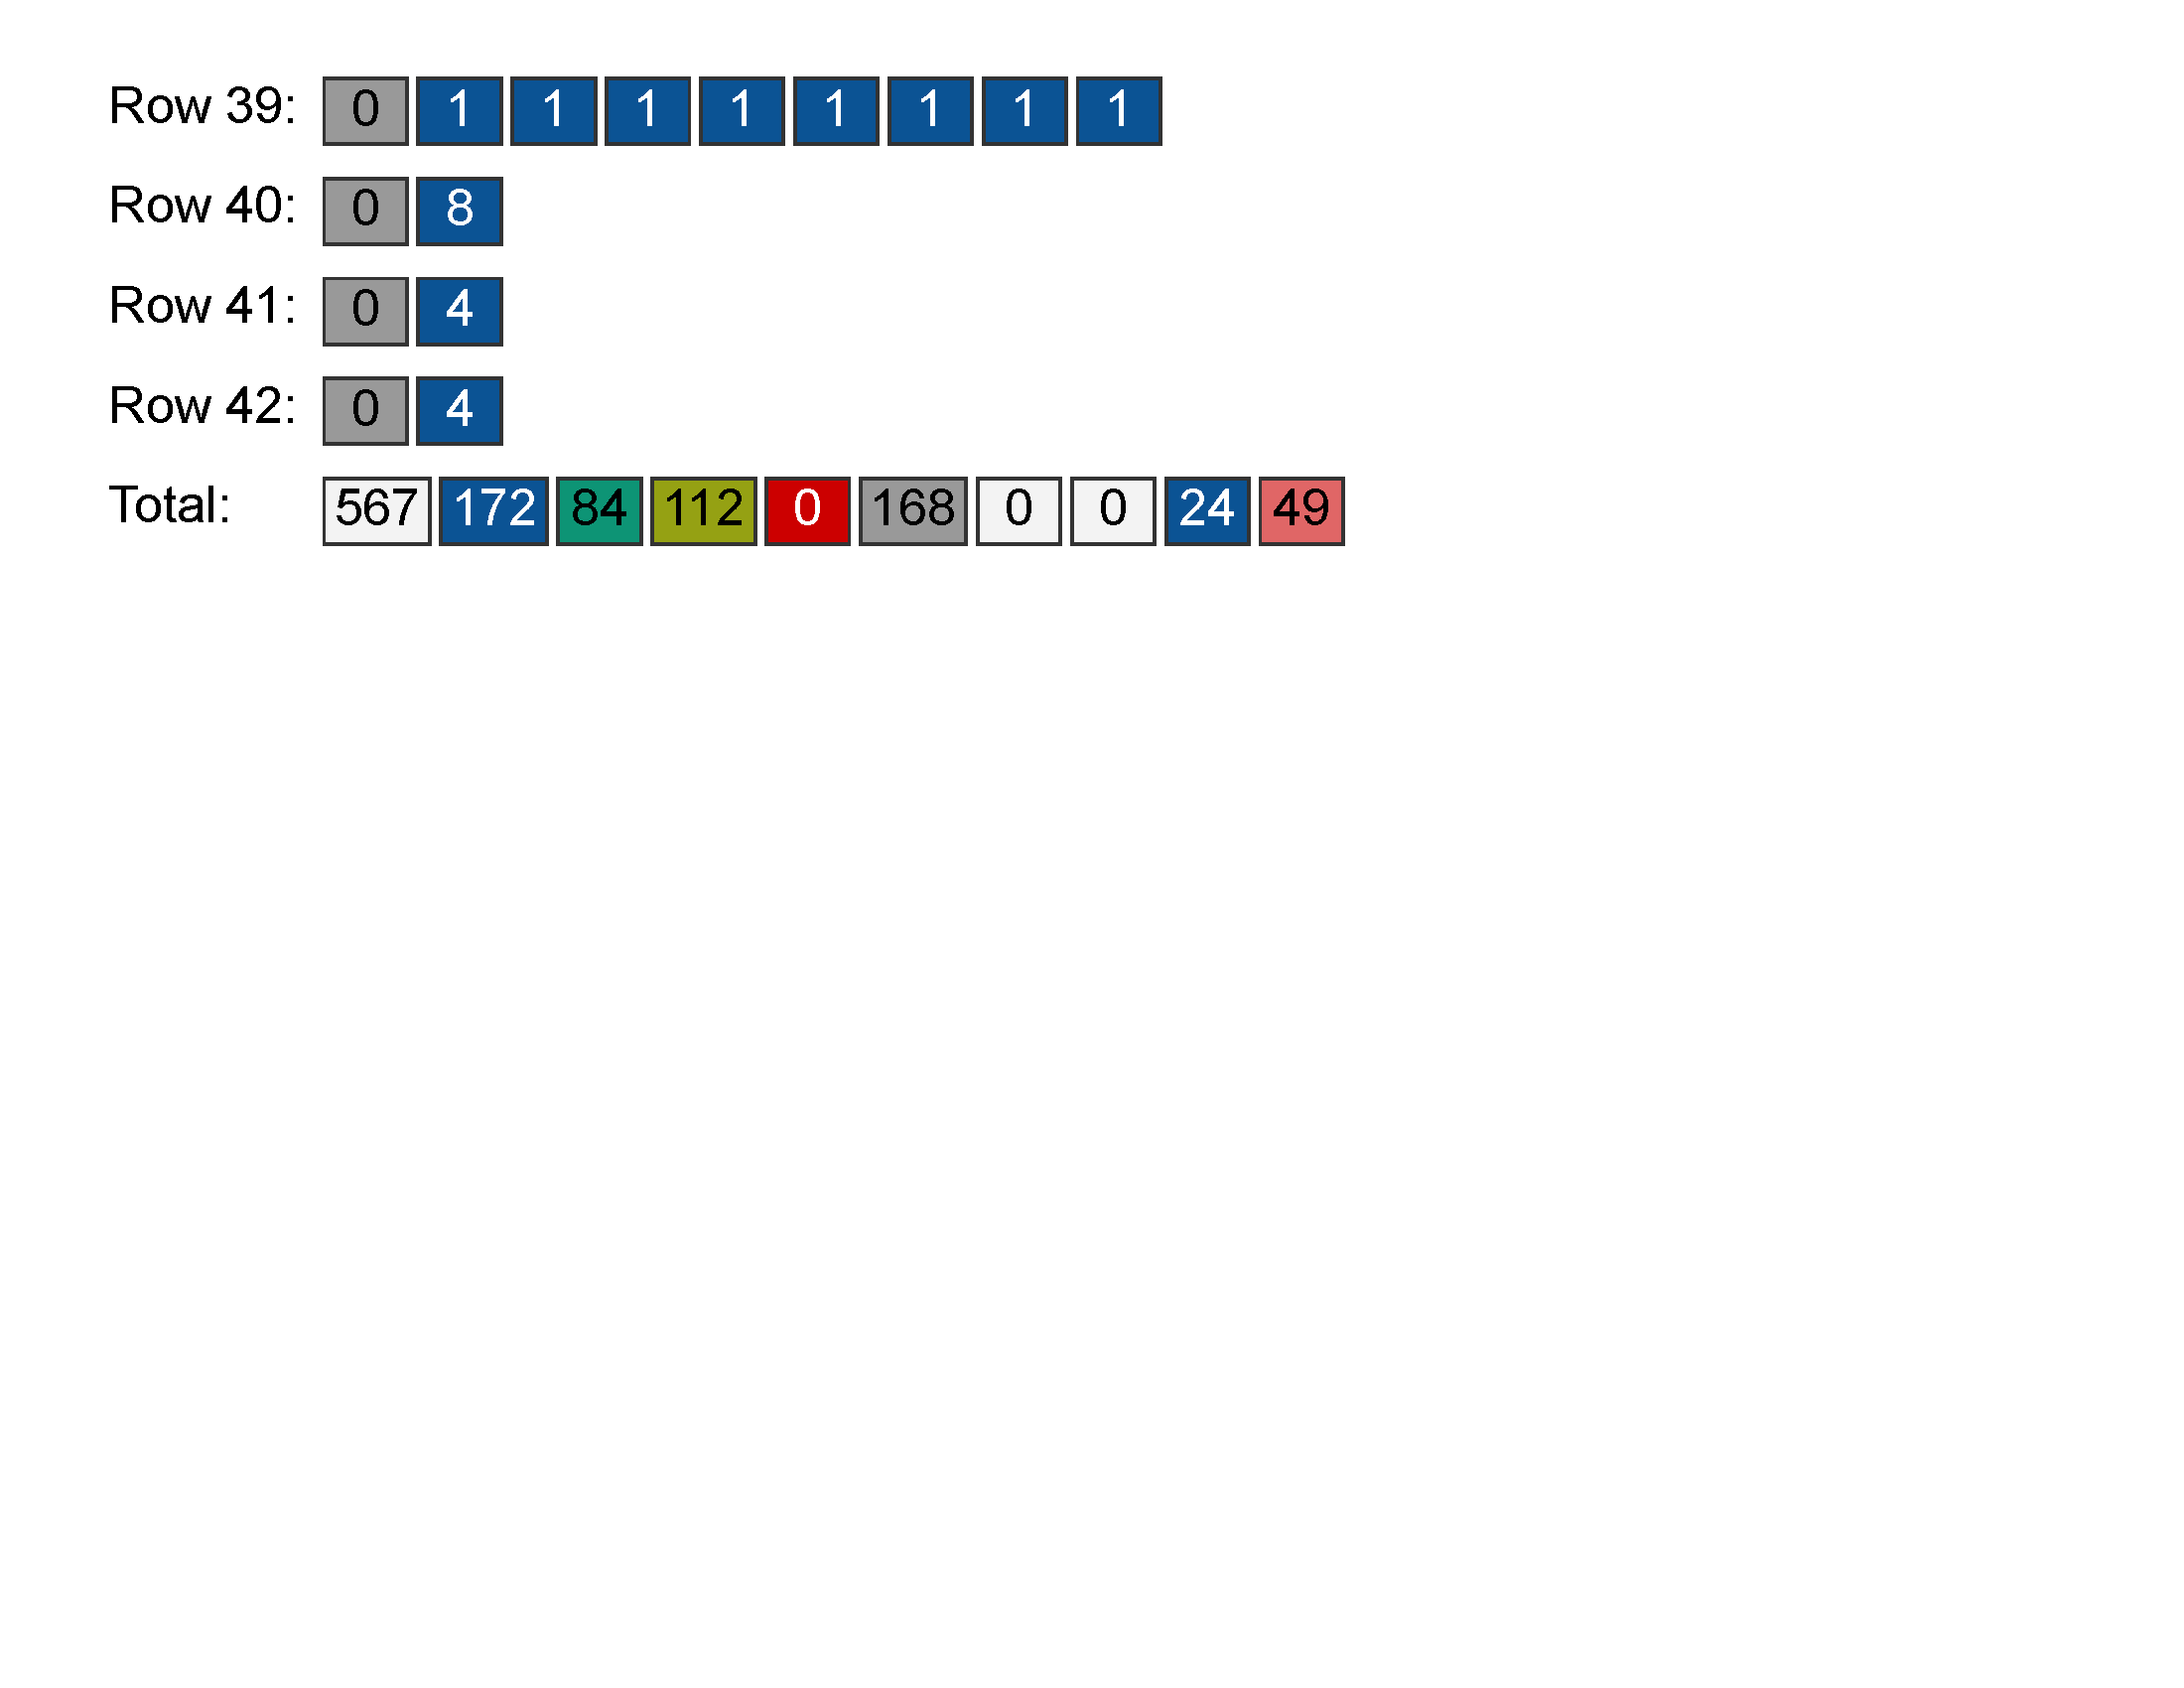
Row 39: (k2tog), (B), (k2tog), (B), (k2tog), (B), (k2tog), (B)
Row 40: (B) x 8
Row 41: (k2tog) x 4
Row 42: (B) x 4
First Finishing
Cut yarn leaving 10” tail. Using a tapestry needle, thread the tail through all the live stitches on the needles as if to knit. Pull snug like a drawstring. Secure the tail to the inside of the stocking.
Heel
With color B, smaller 16” needles, and right side facing, begin at the leg, pick up and knit 42 stitches along heel bind off, pick up and knit 1 stitch at corner [these 43 sts are the back leg stitches referenced later], pick up and knit 42 stitches along foot cast on, pick up and knit 1 stitch at corner [these 43 sts are the foot stitches picked up referenced later], join to work in the round — 86 stitches on needles.
Round 1 (decrease round): *K41, k2tog, pm; repeat from * once — 84 stitches.
Round 2 (decrease round): *K1, k2tog, to until 3 stitches before marker, ssk, k1, slip marker; repeat from * to end of round — 4 stitches decreased.
Round 3: Knit
Repeat rounds 2 and 3 until 21 stitches remain between markers, or until 42 stitches total. Change to smaller double pointed needles when stitches become too snug around 16” circular.
Second Finishing
Position the stitches on two needles with 21 of the stitches from the back leg on one double pointed needle, and 21 stitches from the foot on another double pointed needle.
Graft heel sts together using Kitchener st as follows:
Hold both needles together in your left hand, with wrong sides facing inward.
Cut a long tail from the working yarn (about 4 times the width of the fabric to be joined), and thread tail into yarn needle.
Step 1: Insert yarn needle purlwise into first st on front needle and pull it through, leaving st on the knitting needle.
Step 2: Insert yarn needle knitwise into first st on the back needle and pull it through, leaving st on the knitting needle.
Step 3: Insert yarn needle knitwise into first st on front needle and pull it through, then drop this st off knitting needle.
Step 4: Insert yarn needle purlwise into first st on front needle and pull it through, leaving st on the knitting needle.
Step 5: Insert yarn needle purlwise into first st on the back needle and pull it through, then drop this st off knitting needle.
Step 6: Insert yarn needle knitwise into first st on the back needle and pull it through, leaving st on the knitting needle.
Repeat steps 3-6 only, pausing to pull sts taut and neaten the seam after every couple of inches. Be sure to always pause after a step 6 so as to not lose your place.
When 2 sts remain, work step 3, then step 5, then fasten off.
Weave in all loose ends.
OPTIONAL DUPLICATE STITCH
With Color E, go back and in all the stitches that were done with A-alt, work a duplicate stitch to get a pop of color.
OPTIONAL HANG TAB
Use a strip of leather and a leather punch to create a strap and stitch to the top of
the stocking. Or create in i-cord: https://brianakdesigns.com/how-to-crochet-an-i-
cord/
OR
Add a twisted loop or i-cord to hang the stocking from and attach to the top of the cuff.
Do you like the PRYM tool I used? It is awesome! Enter here for a chance to win one!
*closes Aug. 17, 2021 @ 11:59pm ET
Christmas in July Make-Along || Love Light Gleams Knit Christmas Stocking Video Tutorial
I know not everybody likes to just read a pattern, some of us are very visual learners and need video help to get to where we are going. For that reason, I am offering you the video tutorial for this stocking each step of the way to go along with the free pattern (don't forget you can also purchase the ad-free pdf if you wish and you will get 5 other patterns to go along with it).
I do hope you enjoy the video. If you do, please hit the thumbs up and subscribe to the Marly Bird YouTube Channel!