FREE Crochet Baby Blanket Pattern-Hello Baby Hugs Blanket
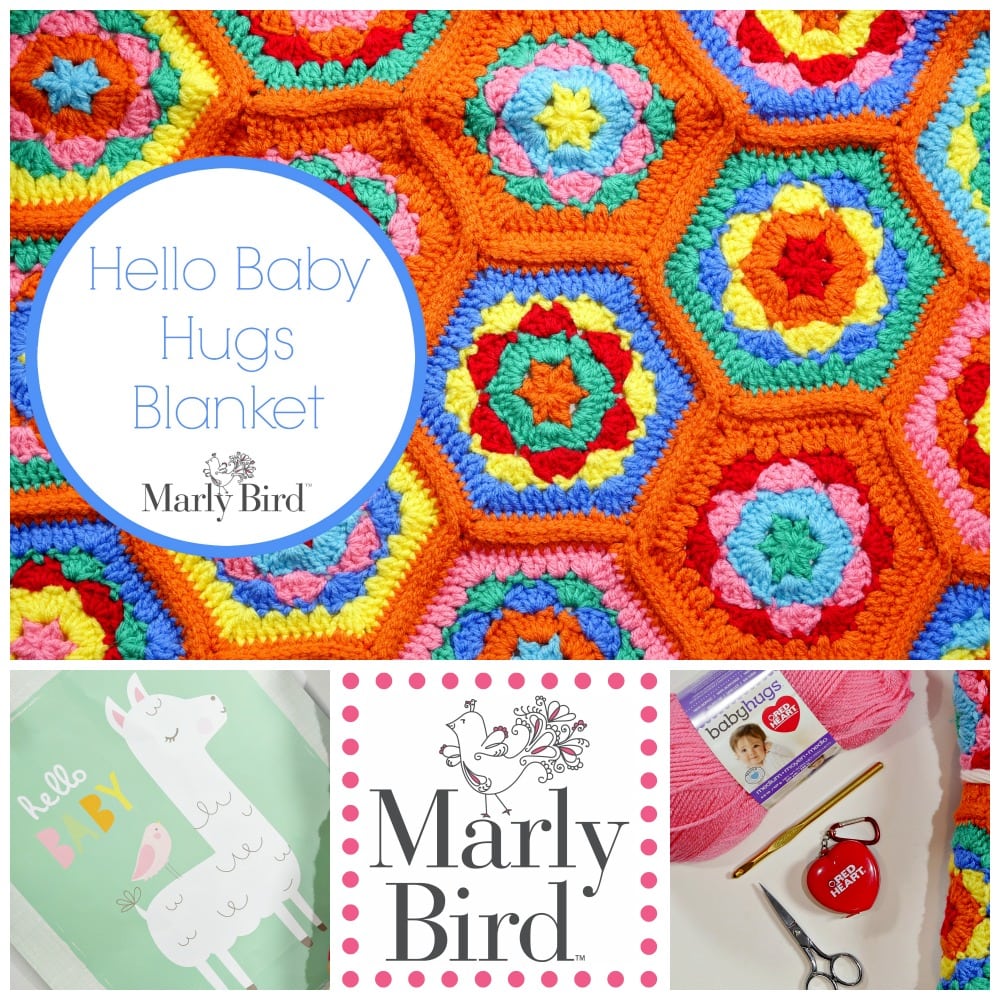
Looking for your next baby shower project? Look no further than the FREE Crochet Baby Blanket Pattern-Hello Baby Hugs Blanket. Designed with Red Heart Baby Hugs you will have a beautiful and baby friendly blanket to gift to the next little one in your life.
*This post contains affiliate links. By clicking one of the links and making a purchase a small portion will go to support the blog. The price that you pay is not changed. Thank you for your support of the blog.*
Queue it up and Like the Pattern on Ravelry
Blanket Materials
Yarn
Red Heart “Baby Hugs”, 100% acrylic, (247 yds/127g),
- 3 balls Orangie (A),
- 1 balls in each
- Aloe (B),
- Bluie (C),
- Ladybug (D),
- Sunny (E),
- Happy (F),
- Sky (G)
Hook
Size US J/10 (6mm) hook or size required for gauge
Notions
FREE Crochet Baby Blanket Pattern-Hello Baby Hugs Blanket Gauge and Measurements
Finished Size: 45 x 48″
Gauge: 1 motif = 7 1/2″ from edge to edge and 8 1/4″ from corner to corner
Abbreviations
beg – beginning
ch – chain
dc – double crochet
DC2tog – double crochet 2 together
hdc – half double crochet
rnd – round
RS – right side
sc – single crochet
sl – slip
sp – space
st(s) – stitch(s)
WS – wrong side
yo – yarn over
FREE Crochet Baby Blanket Pattern-Hello Baby Hugs Blanket Pattern Notes
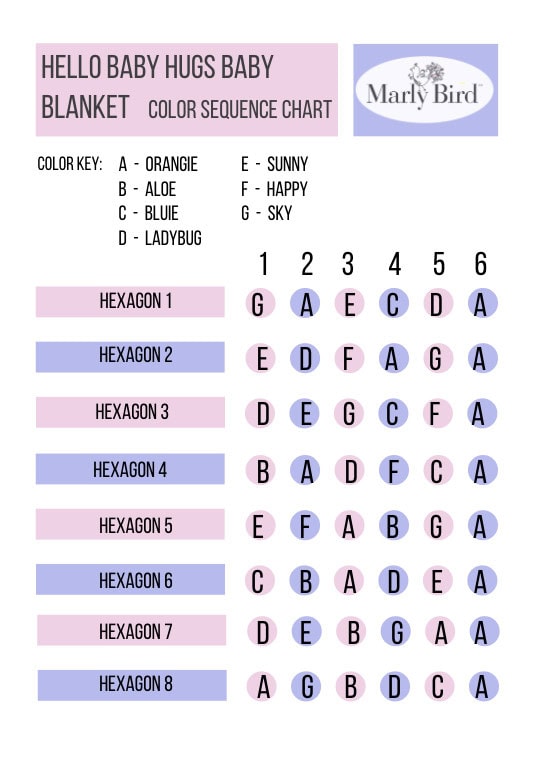
Blanket is made of 38 hexagons each having a unique color sequence. Hexagons are worked separately then assembled and joined. See Color Sequence Chart at bottom of page for color placement.
Special Stitches
Dc2tog (double crochet 2 together): [Yo, pull up a loop in indicated st or sp, yo and draw through 2 loops] twice, yo and draw through all 3 loops on hook.
Shell: 5 dc in indicated st or sp.
Standing dc (standing double crochet): Place slip knot on hook, yarn over, pull up a loop in indicated st or sp, [yarn over, draw through 2 loops] twice.
FREE Crochet Baby Blanket Pattern-Special Techniques (with video links)
Magic ring: Wrap yarn around your left middle finger twice, leaving a 6″ tail. Insert hook under both strands, and pull up a loop. Ch 1, and begin working directly into center of ring. This ring can be tightened later by pulling on the yarn tail.
Crab Stitch: Sc in last st of previous row or rnd, * sc in next st to the RIGHT of last st worked; rep from * to end of row or rnd (reversing normal direction of work).
Hexagon Motif Pattern
Note: full color stitch diagram is available in the ad free PDF for purchase in the Marly Bird Ravelry Store.
Make 38 total hexagons (see color sequence chart below for color order of each motif)
Create a magic ring.
Rnd 1: (Ch 2, dc) in ring (counts as dc2tog), [ch 2, dc2tog] 5 times in ring, ch 2, join with sl st in 2nd of 2 beg ch.
Fasten off.
Rnd 2: Sl st in next ch-2 sp, ch 3 (counts as 1 dc), 5 dc in same sp, 6 dc in each of next 5 ch-2 sps, join with a sl st in 3rd of 3 beg ch.
Fasten off.
Rnd 3: Ch 1, sc in same st as joining sl st, * sk 2 dc, shell in next dc, sk 2 dc, sc in next dc; rep from * 5 more times, sk 2 dc, shell in next dc, join with sl st in first sc.
Fasten off.
Rnd 4: Ch 3 (counts as 1 dc) 4 dc in same st as joining sl st, * ch 1, sk 2 dc, sc in next dc, sk 2 dc, ch 1, shell in next sc; rep from * 5 more times, ch 1, sk 2 dc, sc in next dc, ch 1, join with sl st in 3rd of 3 beg ch.
Fasten off.
Rnd 5: Join yarn with standing dc in center dc of any shell, (2 dc, ch 2, 3 dc) in same st, * [sk next st, 2 dc in next st] twice, sk next st (3 dc, ch 2, 3 dc) in next st; rep from * 4 more times, [sk next st, 2 dc in next st] twice, join with sl st in first dc.
Fasten off.
Rnd 6: Join yarn with standing hdc in any ch-2 sp, ch 2, hdc in same ch-2 sp, * hdc in each st to next ch-2 sp, (hdc, ch 2, hdc) in ch-2 sp; rep from * 4 more times, hdc in each st to end, join with sl st in 2nd of 2 beg ch.
Fasten off.
Finishing
Weave in loose ends to WS of each motif.
Joining Motifs
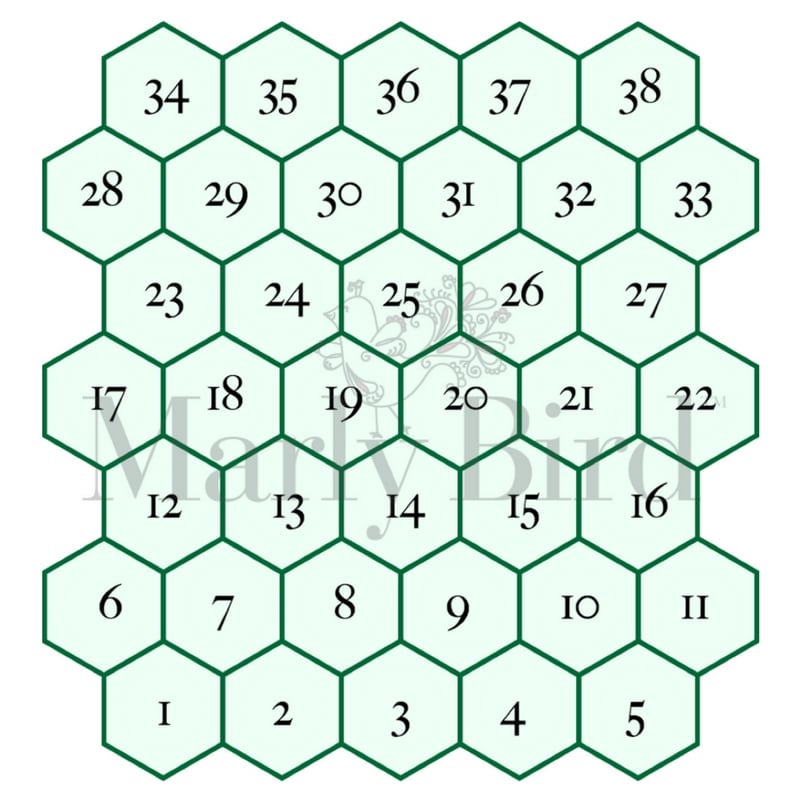
Pin motifs together as shown in layout diagram. (diagram can be found at the bottom of this page)
Join by slip-stitching motifs together on RS with A. (see video at bottom of this page for how to do a slip-stitch join of your motifs)
Border
With RS facing, join A with sl st in any corner, ch 1, work in crab st around, join with sl st in first sc.
Charts and Video Tutorials
Here you will find the order that your hexagons should be placed. You will also find a chart of the colors used in each of the hexagons. The first chart will show you the color sequence for each hexagon based on the sample that was made. Below that you will find a downloadable PDF for a blank color sequence chart. When you are ready to assemble your blanket you can use the chart at the very bottom to see the order that I put them in.
Color Sequence Chart
This first link will take you to the chart you see pictured below. Each line is for one of the motifs that you will need to make. You will then see the colors for each of the rounds that were used in the sample.
Print out this sheet and cross off each round as you go so that you are sure that you have the correct colors.
NOTE: As you work the motifs it is a good idea to mark them in some way so that you know which is your first motif vs. your last. You can really put your motifs in any arrangement that you want but to follow the chart at the bottom you will want to know what motif was made in which order.
Color Sequence Chart: https://marlybird.com/wp-content/uploads/2020/07/Hello-Baby-Hugs-Blanket-Color-Sequence.pdf
If you are’t going to be using the exact colors or yarn that I used that is okay too. I have a second chart just for you where you can fill in your colors and then follow the same rounds. You can always change the order of the colors that you have in your hexagons but remember that it might alter the amount of yarn that you need. The yardage is based on keeping the rounds the same as I have them in the sample.
BLANK Color Sequence Chart: https://marlybird.com/wp-content/uploads/2020/07/BLANK-Hello-Baby-Hugs-Blanket-Color-Sequence-1.pdf
Motif Assembly Chart
Video Tutorial
The slip stitch join can be found starting around 7 minutes 20 seconds into the video below.

