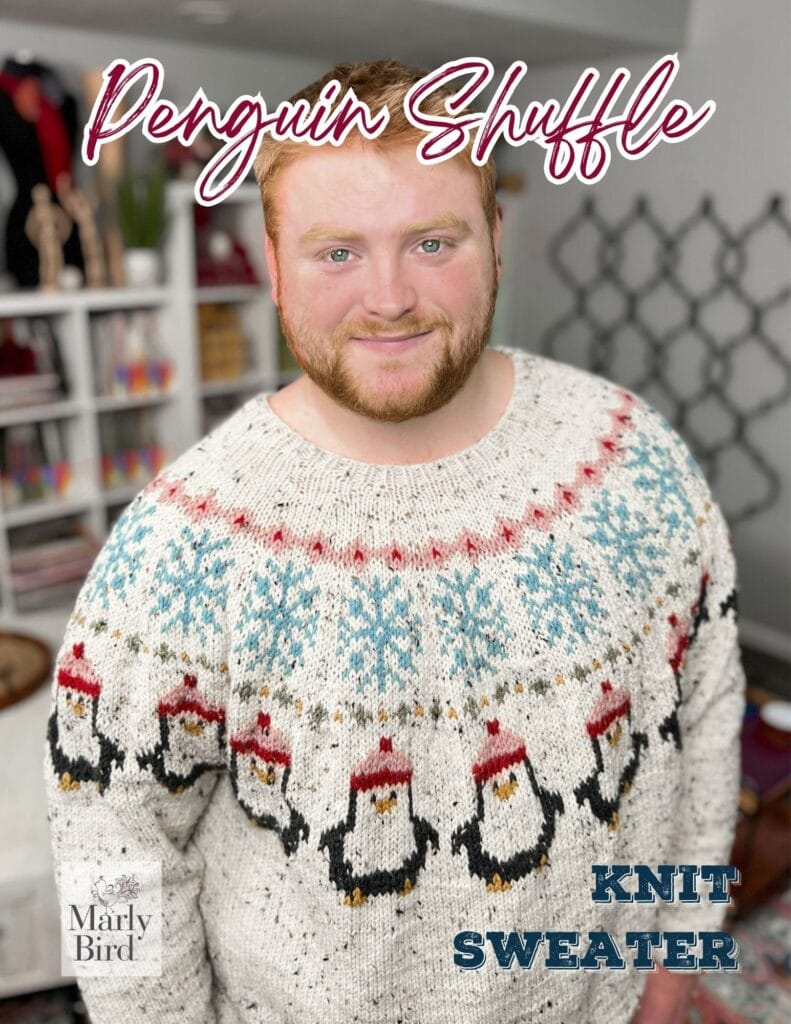
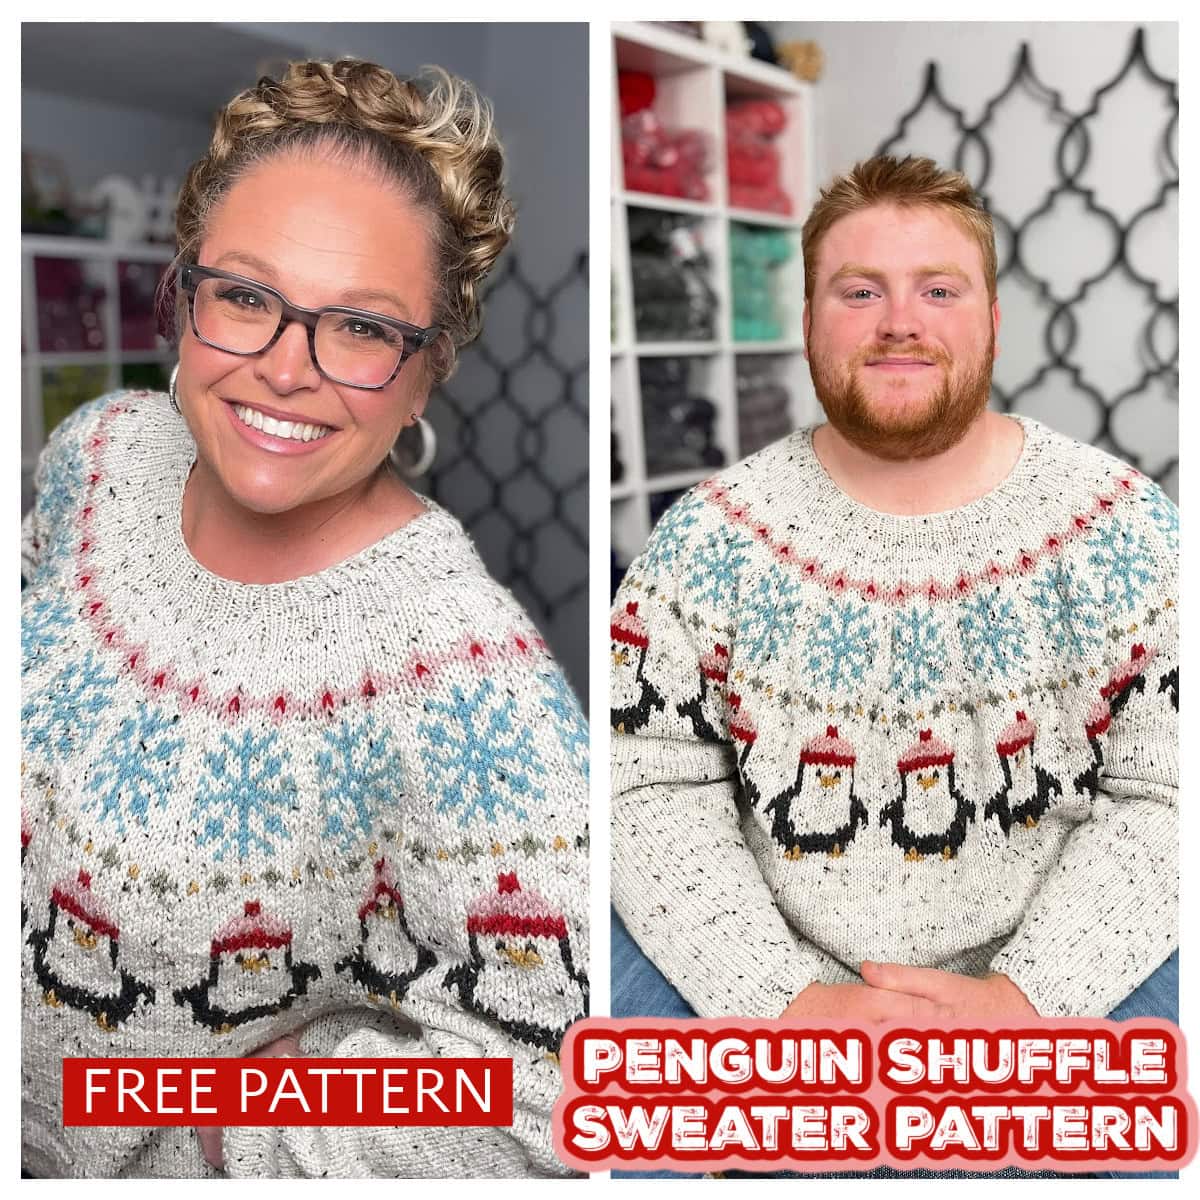
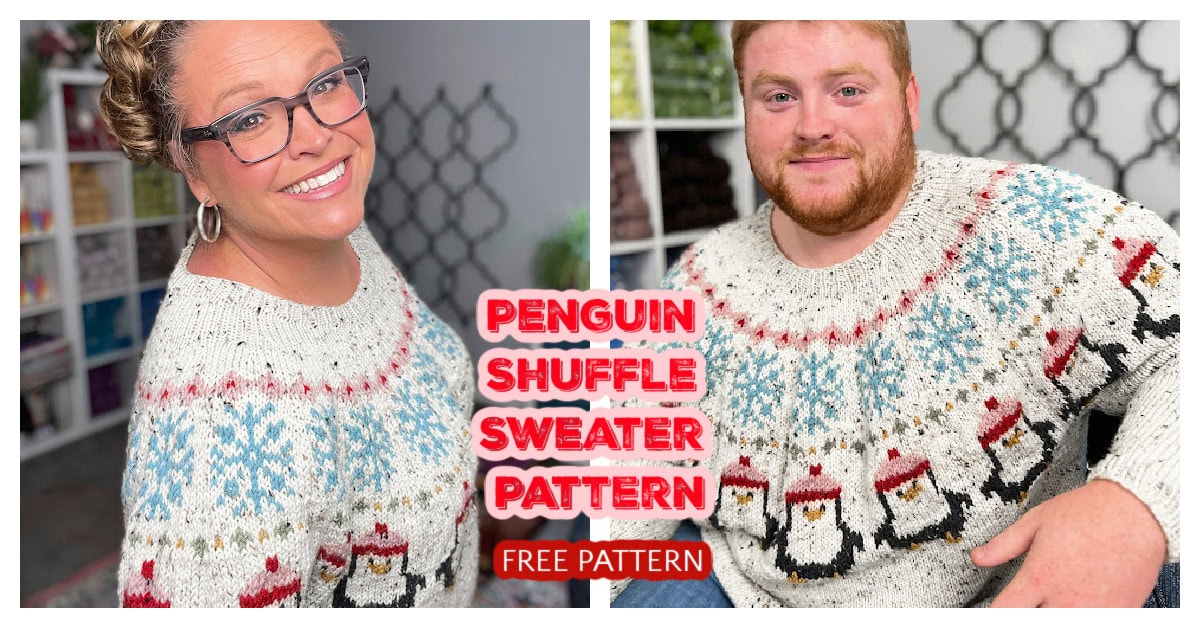
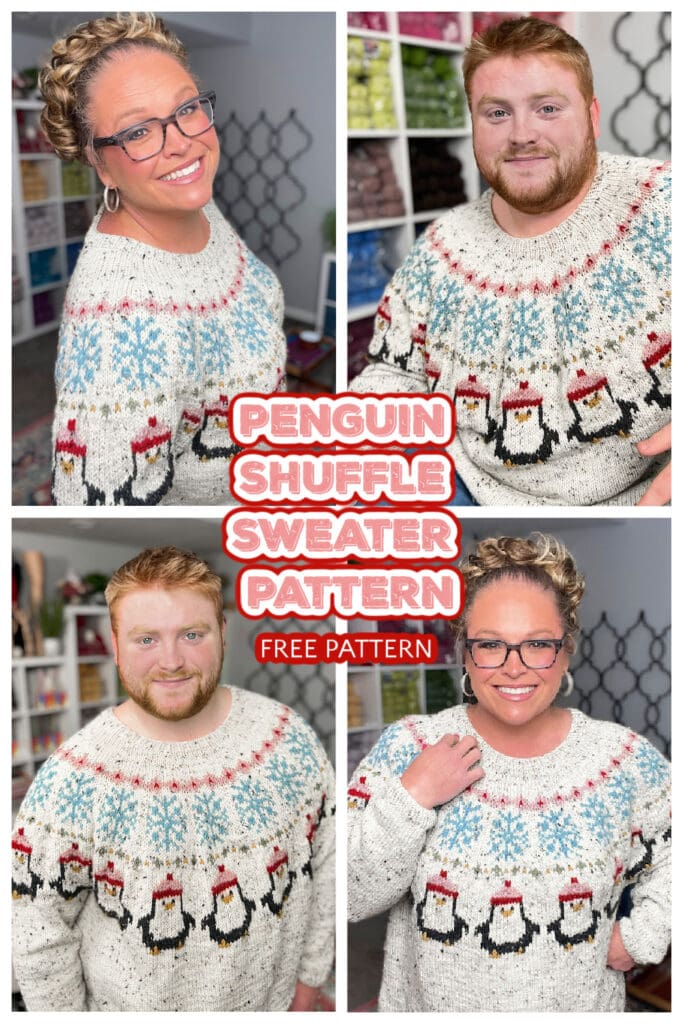
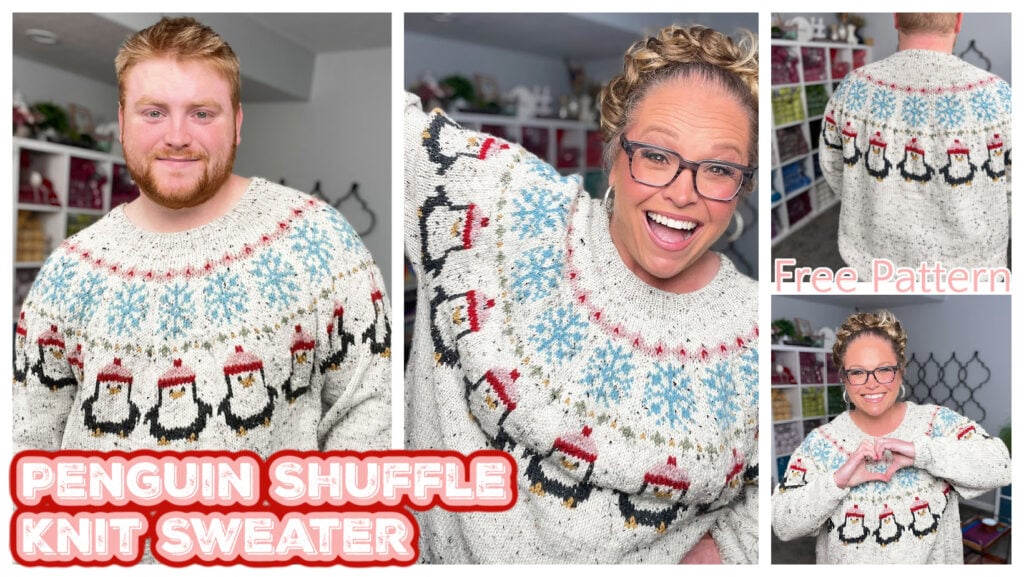
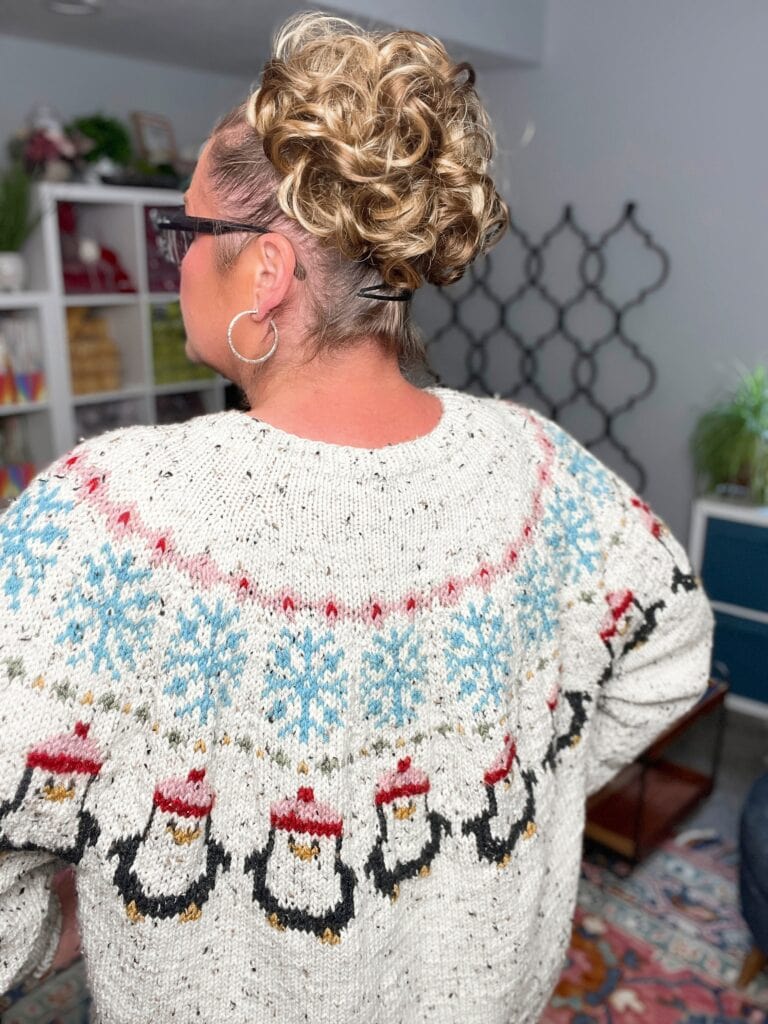
Penguin Shuffle Sweater 🐧 – A Free Knit Yoke Sweater Pattern with Playful Stranded Colorwork
Looking for a festive, feel-good knit sweater pattern with a wink of winter charm?
You’ve just found it, bestie. 💖
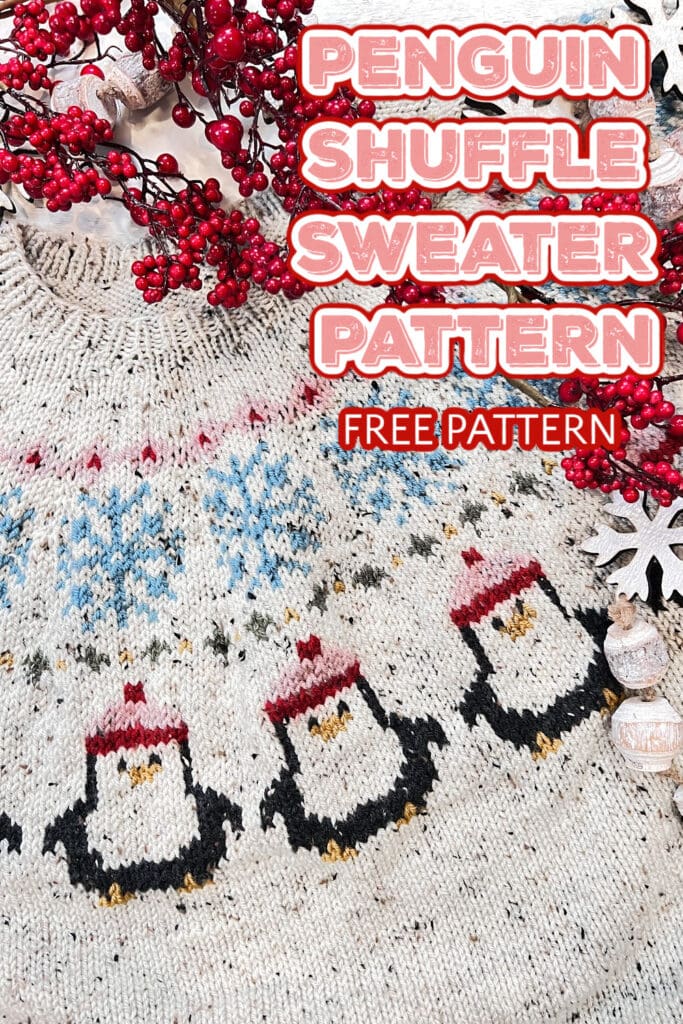
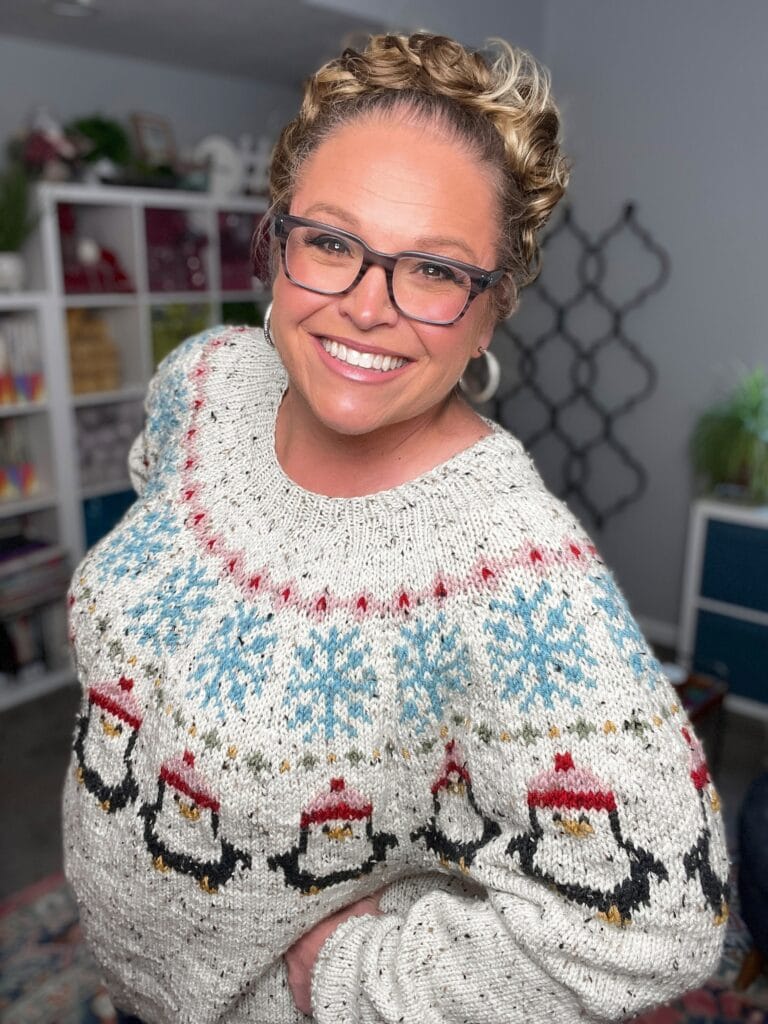
The Penguin Shuffle Sweater is a free stranded colorwork yoke sweater pattern that puts a crew of adorable penguins right where they belong—dancing around your shoulders! This is a top-down, seamless sweater knit in the round using worsted weight yarn and finished with clean ribbing and cozy sleeves. Whether you wear it for holiday photos or just want to rock a penguin parade at your next knitting group meetup, this project is built to waddle into your wardrobe year after year.
Affiliate Disclosure: This post contains affiliate links. To learn more please visit my privacy policy here💖
What You Will Love About This Sweater
- Seamless top-down construction = no piecing or seaming
- Stranded colorwork yoke with penguin motifs that bring instant joy
- Includes 9 sizes from XS-S through 5X+
- Optional German short row shaping for a better neckline fit
- Designed to be gender-inclusive and wearable beyond the holidays
- Paired with detailed tutorials, chart links, and bonus knitting tips
🧵 Penguin Shuffle Sweater Pattern Details
Skill Level: Intermediate
But don’t let that scare you off! If you’re a confident beginner who’s comfortable knitting in the round and working stockinette, you can make this. Most of the body and sleeves are simple stockinette. The stranded yoke is the trickiest bit, but with a little patience and good float management, it’s absolutely doable.
Techniques Used:
- Stranded colorwork (Fair Isle technique)
- German short rows
- Circular knitting in the round
- Ribbing
- Reading and tracking charts
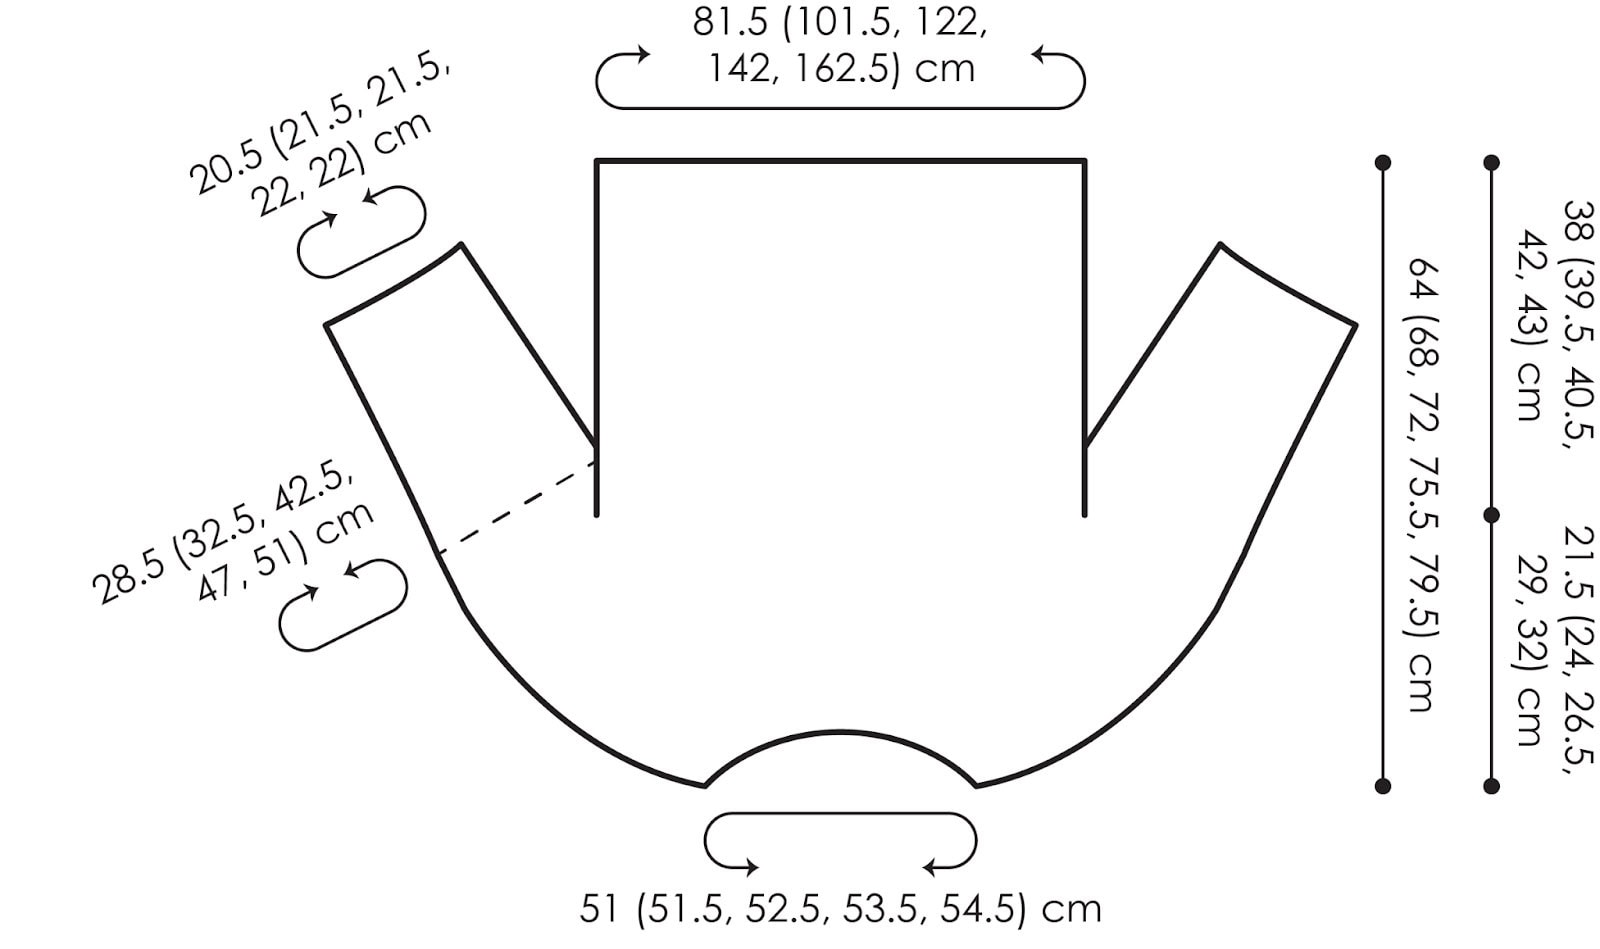
Finished Bust Measurements:
32 (40, 48, 56, 64)” / 81.5 (101.5, 122, 142, 162.5) cm
Length:
25¼ (26¾, 28¼, 29¾, 31¼)”
Need to brush up before starting?
🧶 How to make a colorwork gauge swatch in the round
🧶 How to work German Short Rows
🧶 How to carry floats & tension colorwork
🧶 How to block your finished sweater
🧶 Yarn & Color Tips for Holiday Sweater
This pattern uses Knit Picks Brava Tweed (affiliate), a soft and budget-friendly worsted acrylic/viscose yarn with great bounce and texture.
Yarn Requirements:
- Main Color (Color A – Wren): 4 (5, 6, 7, 8) balls
- Contrast Colors (B–G): 1 ball each
- Rosefinch, Poinsettia, Heron, Wasabi, Goldenrod, Chimney Sweep
🖍️ Need help picking colors that pop?
Check out this guide on How to Choose Colors for a Colorwork Project.
It includes swatching tips and planning advice—even if you’re raiding your stash!

📊 Reading the Charts (and Why They’re Upside Down)
This sweater uses Stitch Fiddle charts for both the yoke and sleeves.
Because the sweater is knit top-down, the charts are intentionally designed to appear upside-down when knitting—this ensures the final penguins are upright when worn. Trust the process! If you’re new to chart reading, here are a few posts to guide you:
Pro Tip: Use Stitch Fiddle’s row tracking and custom color tools to visualize your palette before you cast on!
❄️ Tips for Stranded Colorwork Success
Stranded colorwork is beautiful—but it can be fussy if you don’t handle it well. Here’s what makes this pattern easier to manage:
- No more than 5 stitches between color changes
- Clear chart repeats that help keep your place
- Optional videos and tutorials for floats, tinking, and duplicate stitch
Need more help with colorwork tension and planning?
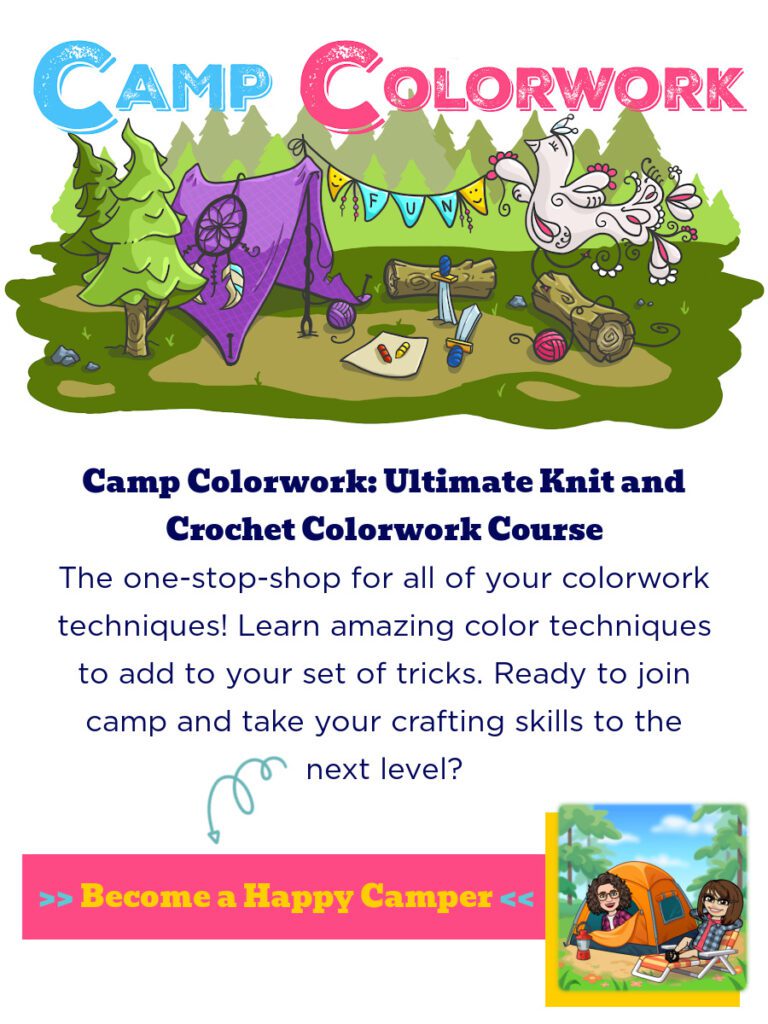
🎓 This is the perfect pattern to pair with my Camp Colorwork Course – where I walk you through everything from carrying floats to customizing charts.
🧶 You’ll become a colorwork champ in no time.
🧤 Construction Overview
✅ Neckline & Yoke
You’ll begin with a few rounds of 1×1 rib, followed by German short rows to shape the back of the neck. The stranded yoke begins shortly after and is the visual star of the sweater. Charts are broken out by size and repeat count.
✅ Separating for Sleeves
Once the yoke is complete, you’ll separate body and sleeves at the underarm and continue knitting in the round for each.
✅ Body
Worked in simple stockinette stitch with the main color. You can adjust the length to your liking before finishing with a ribbed hem.
✅ Sleeves
Sleeves are shaped with strategic decreases and can be shortened or lengthened as needed. The ribbed cuff mirrors the neckline and hem.
✅ Finishing & Blocking
Don’t skip the finishing! This is what turns a “meh” sweater into a masterpiece:
- Weave in all ends
- Wet block carefully to measurements—see this full guide
- Support the garment evenly and avoid overstretching, especially with superwash yarns
🎄 Not Your Average Ugly Christmas Sweater
Ugly Christmas sweaters? Love the idea—hate the execution.
Here at Marly Bird, we don’t do ugly. We do Not So Ugly Sweaters—fun, colorful, festive, and actually wearable long after the tree comes down.
The Penguin Shuffle Sweater fits right in with that vision, offering a whimsical winter vibe with stranded penguins that make people smile without screaming novelty party outfit. It shares the same shaping and construction as the beloved Yule Be Stylin’ Sweater and uses its own unique penguin charts for a fresh take.
Want even more Not So Ugly Sweaters?
🧶 Yule Be Stylin’ – Knit Sweater Make-Along
🧶 Werkshop Wonderland – Crochet Sweater Make-Along
❤️ Not sure about a whole sweater right now? You can always knit or crochet the coordinating cowls:
Both cowl patterns are free on the blog, and if you’re looking for more charts, tutorials, and goodies, the Pattern Upgrade VIP option is still available!
🧶 More Colorwork Patterns You’ll Love
If you enjoyed this one, try another Marly Bird colorwork classic:
- Prism Path Swoncho
- Color Kaleidoscope Poncho
- Kaleidoscope Harmony Hat
- Harmony Hues Hat
- Game Day Cowl
🧠 FAQs
Can beginners make this sweater?
If you’re confident knitting in the round and want to try colorwork for the first time, this is a great next step. The yoke uses stranded colorwork, but the rest is mostly stockinette. Take your time, keep floats loose, and you’ve got this.
Why does the chart look upside down?
Because the sweater is knit from the top down! To make the penguins upright when worn, you’ll knit them upside-down during construction.
Can I substitute yarn?
Yes! Use any worsted-weight yarn with good stitch definition. Choose solids or heathers for best results—avoid high variegation in the colorwork.
Is this sweater just for women?
Nope! The silhouette and styling make this great for all genders.
🧶 Ready to Knit?
The Penguin Shuffle Sweater is available free to read right here on MarlyBird.com. You’ll find the full pattern instructions, all the Stitch Fiddle charts by size, and helpful video tutorials linked throughout.
🧵 Prefer an ad-free PDF version?
The PDF will be available soon in the Marly Bird House, Ravelry, and Etsy. (Links will be added once live.)

Relax & Knit
Upgrade to the Printable PDF
Beautifully formatted to print and relax while knitting. The paid pattern includes:
Penguin Shuffle Knit Sweater Details
Designed by Marly Bird
SKILL LEVEL
Intermediate
MEASUREMENTS
To Fit Size
XS-S (M-L, XL-2X, 3X-4X, 5X+) Sweater shown in XL-2X size.
Finished Measurements
Bust 32 (40, 48, 56, 64)” [81.5 (101.5, 122, 142, 162.5) cm]
Length 25¼ (26¾, 28¼, 29¾, 31¼)” [64 (68, 72, 74.5, 79.5) cm]
Gauge
20 sts and 24 rows = 4″ [10 cm] Stockinette colorwork pattern
MATERIALS
Yarn
Knit Picks, Brava Tweed (97% Premium Acrylic/ 3% Viscose, 218 yds / 200 m, 3.5 oz/ 100 g, CYCA# 4 worsted)
Color A: #29506 Wren, 4 (5, 6, 7, 8) balls
Color B: #29509 Rosefinch, 1 ball
Color C: #61302 Poinsettia, 1 ball
Color D: #29508 Heron, 1 ball
Color E: #61304 Wasabi, 1 ball
Color F: #29511 Goldenrod, 1 ball
Color G: #61308 Chimney Sweep, 1 ball
Needles
U.S. 8 [5 mm] circular knitting needles, 12” [30.5 cm], 16” [40.5 cm], 24” [61 cm], 32” [81 cm], [47” [119 cm] and 60” [152 cm] long needles; set of 4 double pointed needles
Notions
Stitch holders or spare circular needles
ABBREVIATIONS
K – Knit
Kfb – Knit Front and Back (see Special Stitches)
M1 – Make 1 (see Special Stitches)
P – Purl
Pm – Place marker
RS – Right side
Slm – Slip marker
Ssk – Slip, slip, knit (see Special Stitches)
WS – Wrong side
SPECIAL STITCHES
⭐️ M1 (Make 1): With tip of left needle, pick up the horizontal strand between stitches from front to back. Knit this strand through the back leg, twisting it into a loop in the process – 1 stitch increased.
⭐️ Kfb (Knit Front & Back): Knit through front and back of next stitch – 1 stitch increased.
⭐️ Ssk (Slip, Slip, Knit): Slip 2 stitches, one at a time, as if to knit. Insert left hand needle into the front of these two stitches and knit them together from this position (1 stitch decreased)
SPECIAL TECHNIQUES
German Short Rows: Doubling the Stitch
When working German short rows, you’ll often hear the phrase “double the stitch.” This simply means we’re manipulating the working yarn in such a way that the stitch appears to have two strands wrapped over the needle instead of one. This visual cue helps mark your turning point and keeps your short rows looking clean and seamless.
Here’s how to work the turns step-by-step:
💡Turning on the Right Side:
- Knit to the stitch indicated in your pattern.
- Turn your work—now the wrong side is facing.
- With yarn in front, slip 1 stitch purlwise from the left needle to the right needle.
- Pull the yarn over the top of the right needle to the back. This creates the “double stitch” by distorting the slipped stitch.
- Bring the yarn to the front between the needles, ready to work the next purl stitch.
- Work across the row as directed in the pattern, keeping a firm tension for the next few stitches.
💡 Turning on the Wrong Side:
- Purl to the stitch indicated in your pattern.
- Turn your work—now the right side is facing.
- Bring the yarn to the front between the needles.
- With yarn in front, slip 1 stitch purlwise from the left needle to the right needle.
- Pull the yarn over the top of the right needle to the back. Again, this distorts the stitch and creates the doubled look.
- Work across the row as directed in the pattern, keeping a firm tension for the next few stitches.
Repeat these steps wherever the pattern indicates a German short row turn. When you come back to those doubled stitches later, you’ll work them as one stitch—treat both loops together as a single stitch to avoid holes.
CHARTS
Size XS-S yoke wedge: https://www.stitchfiddle.com/c/sgtvue-33nayx
Size M-L yoke wedge: https://www.stitchfiddle.com/c/sgtvy3-8brdy0
Size XL-2X yoke wedge: https://www.stitchfiddle.com/c/sgtvyj-qdf3s
Size 3X-4X yoke wedge: https://www.stitchfiddle.com/c/sgtw07-i5rou2
Size 5+ yoke wedge: https://www.stitchfiddle.com/c/sgtw4l-1kgd3b
XS-S Sleeve Upper Arm: https://www.stitchfiddle.com/c/sh5np6-dj0lbn
M-L Sleeve Upper Arm: https://www.stitchfiddle.com/c/sh5nmk-3ewm4j
XL-2X Sleeve Upper Arm: https://www.stitchfiddle.com/c/sh5nn1-2u7lfm
3X-4X Sleeve Upper Arm: https://www.stitchfiddle.com/c/sh5nnh-2ms08x
5X+ Sleeve Upper Arm: https://www.stitchfiddle.com/c/sh5nob-bs5cep
SCHEMATIC
NOTES
- Directions are for the smallest size; changes for larger sizes are in parentheses. When only one number is given then that number applies to all sizes.
- When working in Fair Isle colorwork technique, carry yarn not in use loosely across WS of work but never over more than 5 sts. When it must pass over more than 5 sts, weave it over and under color in use on next st or at center point of the sts it passes over. The colors are never twisted around one another.
- As more stitches are added to needles, switch to longer needles to accommodate them.
VIDEO TUTORIALS
- Long-Tail Cast-On >> https://www.youtube.com/watch?v=vEGwt4cedLM <<
- Knit Stitch (continental style) >> https://www.youtube.com/watch?v=M3brKFKg5Yc <<
- Purl Stitch (continental style) >> https://www.youtube.com/watch?v=LuDt-8jqh4g <<
- How to Add a Lifeline >> https://youtu.be/FiqYUE_aHAw <<
- How to Tink >> https://youtu.be/c7Gud7k4Y8k <<
- How to Duplicate Stitch >> https://youtu.be/448o66nQWXc <<
- How to Bury Ends >> https://youtu.be/8_NBGUKjO-E <<
- Fair Isle vid >> https://youtu.be/OaJg_hh1VVw <<
- How to Add Stitches for Underarm >> https://youtu.be/cRRJ2plYr_U
- How to do 1×1 ribbing >> https://youtu.be/xx7XFsbEGkE <<
- How to do German Short Rows for Back Neck Shaping >> https://youtu.be/rrJUYF_s0T8 <<
- Gauge Swatch for Colorwork in the Round >> https://youtu.be/7_3ckrqqAMA <<
GROW
To Unlock Exclusive Subscriber Content click the Box below and join for free by simply adding your email and creating a password! If you are having troubles, clear your cache or reset your password or login to the Grow Publisher Portal.
>> Learn More About Grow Here <<
I’m thrilled to share this amazing pattern with you, many patterns on my blog are absolutely free! I kindly request that you don’t copy and paste or distribute this pattern. Prefer an ad-free experience? Buy a digital PDF pattern for a small fee from one of my online stores for a seamless crafting journey.
I appreciate your support and readership. You are the reason I can keep doing what I love and sharing it with others. So, thank you from the bottom of my yarn-loving heart! Disclosure: This post contains affiliate links, meaning I get a commission if you decide to make a purchase through my links at no cost to you.
YULE BE STYLN’ KNIT SWEATER PATTERN
With shorter circular needle, cast on 100 (102, 104, 106, 108) sts.
Join round, being careful to not twist cast-on edge, and mark first st,
Round 1: * K1, p1; repeat from * around.
Repeat this round 5 more times.
Shape Neck
Work back in forth in Stockinette st and German Short Rows as follows:
Row 1 (RS): K25 (25, 26, 26, 27), turn work.
Row 2: GSR double st, p24 (24, 25, 25, 26), slm, p25 (25, 26, 26, 27), turn work.
Row 3: GSR double st, k to marker, slm, k to doubled st, k doubled st, k4, turn work.
Row 4: GSR double st, p to marker, slm, p to doubled st, p doubled st, p4, turn work.
Repeat Rows 3 and 4 four more times.
Count: 10 (12, 12, 14, 14) sts remain unworked at center Front neck, opposite the beginning-of-round marker.
Next Row: Knit to marker.
Begin working in rounds again as follows:
Round 1: K each st around, working each GSR doubled st as 1 st.
Place 10 (8, 6, 4, 2) more markers evenly around needle, being sure to distinguish them from beginning-of-round marker.
Yoke
Round 1 (increase round): K to marker * M1, k to marker; repeat from * to beginning-of-round marker. Do not increase at beginning of round.
Count: 110 sts.
Remove all increase markers.
Round 2: Knit.
Place 5 (10, 25, 25, 25) more markers evenly around needle, being sure to distinguish them from beginning-of-round marker.
Round 3 (increase round): K to marker * M1, k to marker; repeat from * to beginning-of-round marker. Do not increase at beginning of round.
Count: 115 (120, 135, 135, 135) sts.
Round 4: Knit.
Round 5 (increase round): K to marker * M1, k to marker; repeat from * to beginning-of-round marker. Do not increase at beginning of round.
Count: 120 (130, 160, 160, 160) sts.
Round 6: Knit.
For Size XS-S only:
Remove all increase markers.
For Size M-L only:
Next 2 rounds:
Round 1 (increase round): K to marker * M1, k to marker; repeat from * to beginning-of-round marker. Do not increase at beginning of round.
Count: 140 sts.
Round 2: Knit.
Remove all increase markers.
For Last 3 Sizes Only:
Remove all increase markers.
Place 20 more markers evenly around needle, being sure to distinguish them from beginning-of-round marker.
Next 2 rounds:
Round 1 (increase round): K to marker * M1, k to marker; repeat from * to beginning-of-round marker. Do not increase at beginning of round.
Count: x (x, 180, 180, 180) sts.
Round 2: Knit.
Repeat the last 2 rounds x (x, 0, 1, 2) more times.
Count: x (x, 180, 200, 220) sts.
Remove all increase markers.
For All Sizes:
Count: 120 (140, 180, 200, 220) sts.
K 5 sts, then move beginning-of-round marker to current place on needle. This is the new beginning of round.
Begin Yoke Colorwork
Work 46 (48, 52, 56, 58) rounds in colorwork according to the Yoke Wedge chart given for your size, working 12 (14, 18, 20, 22) total repeats (wedges) around, and increasing as shown on chart.
Count: 240 (280, 360, 400, 440) sts.
CHARTS
Size XS-S yoke wedge: https://www.stitchfiddle.com/c/sgtvue-33nayx
Size M-L yoke wedge: https://www.stitchfiddle.com/c/sgtvy3-8brdy0
Size XL-2X yoke wedge: https://www.stitchfiddle.com/c/sgtvyj-qdf3s
Size 3X-4X yoke wedge: https://www.stitchfiddle.com/c/sgtw07-i5rou2
Size 5+ yoke wedge: https://www.stitchfiddle.com/c/sgtw4l-1kgd3b
SEPARATE AT UNDERARM
Next Round: With A, k26 (34, 44, 52, 60), cast on 8 (12, 12, 16, 20) sts for underarm, place next 48 (52, 72, 76, 80) sts on a holder or spare circular needle for Right Sleeve, k72 (88, 108, 124, 140), cast on 8 (12, 12, 16, 20) sts for underarm, place next 48 (52, 72, 76, 80) sts on a holder or spare circular needle for Left Sleeve, k46 (54, 64, 72, 80).
Count: 160 (200, 240, 280, 320) Body sts.
BODY
Continue evenly in Stockinette st with color A only until Body measures 14 (14½, 15, 15½, 16)” [35.5 (37, 38, 39.5, 40.5) cm] from underarm cast-on sts.
Next 6 rounds: * K1, p1; repeat from * around.
Bind off all sts loosely in rib pattern.
SLEEVES
Round 1: With A and RS facing and beginning at center underarm, pick up and k4 (6, 6, 8, 10) sts, k across 48 (52, 72, 76, 80) from Sleeve holder, pick up and k4 (6, 6, 8, 10) sts.
Count: 56 (64, 84, 92, 100) Sleeve sts.
Work 71 shaping rounds according to the Sleeve chart for your size.
Stitch Fiddle Charts
There are the charts for sleeves without any design on them
XS-S Sleeve Upper Arm: https://www.stitchfiddle.com/c/sh5np6-dj0lbn
M-L Sleeve Upper Arm: https://www.stitchfiddle.com/c/sh5nmk-3ewm4j
XL-2X Sleeve Upper Arm: https://www.stitchfiddle.com/c/sh5nn1-2u7lfm
3X-4X Sleeve Upper Arm: https://www.stitchfiddle.com/c/sh5nnh-2ms08x
5X+ Sleeve Upper Arm: https://www.stitchfiddle.com/c/sh5nob-bs5cep
Continue working in Stockinette st with color A only, decreasing 2 sts every 10 (7, 4, 3, 3) rounds as established, until 40 (42, 42, 44, 44) sts remain.
Work 6 more rounds evenly in Stockinette st.
Next 6 rounds: * K1, p1; repeat from * around.
Bind off all sts loosely in rib pattern.
Work other Sleeve the same way
FINISHING
Weave in all loose ends.

Wash and Block Detailed Instructions
Note: Before blocking the sweater, please watch both the steam blocking and the Wash and Block videos. For more information about superwash yarn and blocking click here.
Wet blocking is like sending your yarn on a spa retreat. It’s the process where your yarn unwinds, enjoys a soothing cleanse, and settles gracefully into its final form, allowing its true beauty to flourish.
Here’s how to pamper your knitted creation with a thorough wet block:
- Begin by submerging your piece in a basin or sink filled with water. This is a great moment to add a touch of gentle soap or specialized wool wash—enhanced with lanolin and fiber conditioners—to not only clean but also condition the yarn. (Just remember to rinse well, especially if you aren’t using a no-rinse wash.)
- Remove as much water as you can without stretching or distorting the fibers.
Some helpful techniques include:
- Pressing the piece against the sink to shed excess water.
- Gently squeezing between your hands—just avoid any twisting or wringing.
- 💡 Always support the entire garment when lifting to prevent any part from stretching out of shape.
Carefully lay the piece on a large towel without stretching it. Fold the towels ends over your knitting and roll it up like a burrito to wick away more moisture. Aim for a balance—your piece should be damp, not sopping, and certainly not dry, to avoid any creases.
Place your piece on the blocking board with care.
Align with the grid if your board has one, centering your work for symmetry.
Gently expand your piece to the desired measurements, using your pattern’s schematic and the grid for precision, especially from the neckline width, bottom to the armhole and up to the shoulder.
🚨 USE EXTRA CARE TO AVOID OVERSTRETCHING! As the garment is damp, some yarns like to overstretch or grow and you must be vigilant to avoid this! Trust me, the sample could have been stretched to be larger than a 5xl but I did not allow it to do so.
Secure with pins if necessary, using them sparingly to keep the fabric flat. Smooth the piece with your hands to ensure an even spread.
Now, shape it while it’s damp.
Leave your masterpiece to dry and take this chance to cast on a new project. Drying could take a full day, but if you’re pressed for time, setting up a fan can speed up the process significantly. Do not place the project in direct sunlight as it can discolor the yarn!
Remember, wet blocking is more than a finishing step—it’s an act of transformation, turning your knitted work into an heirloom-quality piece. Now, step back, let the magic happen, and watch as your stitches settle into their new, polished configuration.
💬 Final Thoughts from Marly
The Penguin Shuffle Sweater might be playful, but let’s be honest—it’s also a serious showstopper. From the moment those penguins start waddling around your yoke, you’re guaranteed to get compliments (and maybe even some jealous stares from store-bought sweaters at the holiday party).
Whether you’re knitting it for yourself, a fellow penguin lover, or just because your needles were feeling bored, this pattern is meant to bring joy.
So take your time, block it with care, keep those floats smooth, and don’t forget—there’s no such thing as “too many” penguin sweaters. 🐧💖
I’d love to see your finished project, so be sure to tag me on Instagram @themarlybird and use hashtags #mmmdi and #marlybird when you share. You just might inspire someone else to shuffle into colorwork for the first time!
Now go cast on—those penguins aren’t going to knit themselves. 😉
❤️ Your BiCrafty Bestie,
Marly Bird

Categories: Uncategorized