Marly Bird Crochet-along Section 4
The Marly Bird Poncho Crochet-along is sponsored by Red Heart.
That’s right, it’s that time of year for a crochet-along and boy do I have a good one for you. Welcome to Section 4 for the Marly Bird Popular Poncho Crochet-along. (Get Section 1 here, Section 2 here, Section 3 here)
Once the CAL is complete the full pattern will be available at RedHeart.com
![]()
Queue it up and Like the Pattern on Ravelry
Find all the details you need for this pattern on the details page here https://marlybird.com/marly-bird-poncho-crochet-along/
Each rectangle piece measures 12¼ (21¼) x 27 (36)” (31 (54) x 68.5 (91.5) cm).
Finished Poncho measures 30 (40)” (76 (101.5) cm) across at widest point and 24¾ (34¾)” (63 (88) cm) in length when laid flat, not including neck or bottom edgings.
THE PATTERN
Below you will find the instructions for SECTION 4 of the Marly Bird Popular Poncho.
ABBREVIATIONS:
ch = chain; dc = double crochet; dec = decrease; dec = decrease; dec = decrease; hdc = half double crochet; sc = single crochet; st(s) = stitch (es); tr = treble (triple) crochet; yo = yarn over; [ ] = work directions in brackets the number of times specified; * or ** = repeat whatever follows the * or ** as indicated.
SPECIAL STITCHES
Bpdc = Back post double crochet: Yo, insert hook from the back of the work to front and to back again around the post of indicated st, yo and pull up a loop (3 loops on hook), [yo and draw through 2 loops] twice.
Fpdc = Front post double crochet: Yo, insert hook from the front of the work to back and to front again around the post of indicated st, yo and pull up a loop (3 loops on hook), [yo and draw through 2 loops] twice.
Bpdc2tog = Back post double crochet 2 together: * Yo, insert hook from the back of the work to front and to back again around the post of indicated st, yo and pull up a loop (3 loops on hook), yo and draw through 2 loops; repeat from * once more, yo and draw through all 3 loops on hook.
Fpdc2tog = Front post double crochet 2 together: * Yo, insert hook from the front of the work to back and to front again around the post of indicated st, yo and pull up a loop (3 loops on hook), yo and draw through 2 loops; repeat from * once more, yo and draw through all 3 loops on hook.
Sc2tog = Single crochet 2 together: [Pull up a loop in next st] twice, yo and draw through all 3 loops on hook.
Crab Stitch: Sc in last st of previous row or rnd, * sc in next st to the RIGHT of last st worked; rep from * to end of row or rnd (reversing normal direction of work).
Let’s Begin
FINISHING
Neckline
The time has come for you to make a decision about the neckline of your poncho. There are four different neckline instructions written up for you to choose. Each is a different and unique and will make YOUR poncho PERFECT for you. Take a look at the instructions below.
Designer Note: take a look at how much yarn you have remaining and be conscientious of the neckline you choose. If you choose one that requires a lot of yarn (aka dramatic cowl) you want to make sure you have enough to finish it 🙂
I’ve made the name of each neckline the same color as the ROUND instructions that apply to that edging. Hopefully that will help you know which set of instructions you need to follow.
Designer Note: If you decided to make your panels a bit longer, you may need to work a few extra stitches on the first round of the neck edging. Try to add as few stitches as possible without puckering the fabric or creating large gaps. Keep track of how many extra stitches you added, then place that many markers at top edge, evenly spaced around the neck. On the second row, simply skip all the marked stitches or work a sc2tog to get back to the correct number of sts needed.
If there is a particular stitch you don’t know, remember to take a look at the Special Stitches portion of this pattern.
Simple No Frills Crab Stitch Edge
With right side facing, join yarn with slip st anywhere along neck edge.
Round 1 (right side): Ch 2 (does not count as a st here and throughout), 108 hdc evenly around neck edge, join with slip st in top of beginning ch-2 – 108 hdc.
Round 2 (decrease round): Ch 2, * hdc in each of next 10 sts, hdc2tog over next 2 sts; repeat from * around, join with slip st in top of beginning ch-2 – 99 sts.
Round 3: Ch 1, work in Crab st around, join with slip st in first sc.
Fasten off.
Weave in all tails.
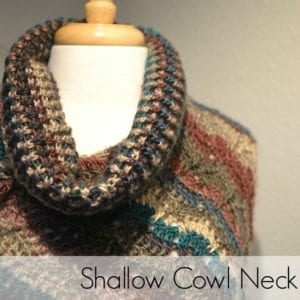
Shallow Cowl Neck
With right side facing, join yarn with slip st anywhere along neck edge.
Round 1 (right side): Ch 2 (does not count as a st here and throughout), 108 dc evenly around neck edge, join with slip st in top of beginning ch-2 – 108 dc.
Round 2: Ch 2, * bpdc around next st, fpdc around next st; repeat from * around, join with slip st in top of beginning ch-2.
Round 3 (dec round): Ch 2, * [bpdc around next st, fpdc around next st] 7 times, bpdc around next st, fpdc2tog over next 2 fpdc skipping the bpdc between them; repeat from * 5 more times, join with slip st in top of beginning ch-2 – 96 sts,
Rounds 4-6: Repeat Round 2.
Optional Decrease Round: take a look at the cowl, if you like the size continue repeating round 2. But, if you are finding that the cowl is too wide at this point, work one more round of decreases on Round 7 as follows: Ch 2, * [bpdc around next st, fpdc around next st] 6 times, bpdc around next st, fpdc2tog over next 2 fpdc skipping the bpdc between them; repeat from * 5 more times, join with slip st in top of beginning ch-2 – 84 sts.
Rounds 7-12: Repeat Round 2.
Rounds 13-16: Ch 1, sc in each st around, join with slip st in first sc.
Fasten off.
Weave in all tails.
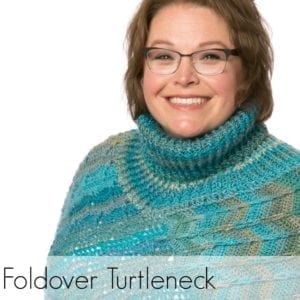
Foldover Turtleneck 
With right side facing, join yarn with slip st anywhere along neck edge.
Round 1 (right side): Ch 2 (does not count as a st here and throughout), 108 dc evenly around neck edge, join with slip st in top of beginning ch-2 – 108 dc.
Round 2: Ch 2, * bpdc around next st, fpdc around next st; repeat from * around, join with slip st in top of beginning ch-2.
Round 3 (dec round): Ch 2, * [bpdc around next st, fpdc around next st] 7 times, bpdc around next st, fpdc2tog over next 2 fpdc skipping the bpdc between them; repeat from * 5 more times, join with slip st in top of beginning ch-2 – 96 sts,
Rounds 4-6: Repeat Round 2.
Round 7 (dec round) Ch 2, * [bpdc around next st, fpdc around next st] 6 times, bpdc around next st, fpdc2tog over next 2 fpdc skipping the bpdc between them; repeat from * 5 more times, join with slip st in top of beginning ch-2 – 84 sts.
Rounds 8-32: Repeat Round 2.
Fasten off.
Weave in all tails.
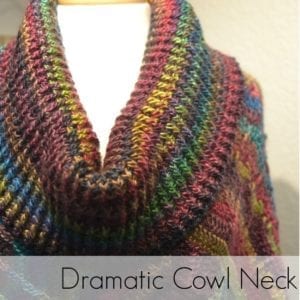
Dramatic Cowl Neck 
With right side facing, join yarn with slip st anywhere along neck edge.
Designer Note: if you choose this neckline be sure that the width of the finished neck on the poncho is not falling off your shoulders! This neckline finish does NOT have any decrease rows to help hold the poncho on your shoulders so it is VERY IMPORTANT that the poncho fits prior to the neckline or it will just fall down your shoulder.
You may need to work a few extra stitches on the first round of the neckline. Try to add as few stitches as possible without puckering the fabric or creating large gaps. Keep track of how many extra stitches you added, then place that many markers at top edge, evenly spaced around the neck. On the second row, simply skip all the marked stitches or work sc2tog to get back to the correct number of stitches needed.
The cowl will overlap the round of single crochet you did to tighten up the neck of the poncho and you should be good.
Round 1 (right side): Ch 2 (does not count as a st here and throughout), 136 dc evenly around neck edge, join with slip st in top of beginning ch-2 – 136 dc.
Round 2: Ch 2, * bpdc around next st, fpdc around next st; repeat from * around, join with slip st in top of beginning ch-2.
Repeat Round 2 only until cowl measures 10″ (25.5 cm).
Fasten off.
Weave in all tails.
Video
Homework
Finish section 4 and be SHOW ME YOUR FINISHED PONCHO!
Once you finish your section be sure to post pictures to the facebook group as there will be a prize given away from RedHeart.com to one lucky person (who is randomly chosen) that has finished his or her homework during the week of Oct 11, 2016 – Oct 18, 2016 @ 11:59pm. Goodluck!
OH, One last thing!
Be sure to use the hashtag #MarlyBirdCAL when you post about it on social media
so we can find what you are saying 🙂
Categories: Crochet, Make-Alongs, Our Free Patterns, Pattern, YouTube Video Tutorial


