How to Knit 1×1 Ribbing in the Round (Knitting Lessons for Crocheters, Lesson 6)
How’s it going Bootcampers? Do you feel like you’re a knitter now? We’ve covered so much in a short time. Therefore, whatever stage you’re at, you should be proud of yourself. This week we’re going to switch gears just a little bit and learn how to knit 1×1 ribbing in the round. (It’s not too late to catch up. Details to join these free lessons here.)
This post may contain affiliate links. I get a percentage of sales from those links. Your price does not increase. Thank you for the support.
IMPORTANT NOTES: You might need to buy new needles for the upcoming weeks, see note below. Also, LIVES are moving from Thursday nights to Wednesdays at lunchtime. Join us on YouTube at 9 am PT / noon ET for those lessons, which are also available there on YouTube anytime after the live.
Get Ready to Knit Your First Hat and Cowl in the Round!
This is another extension of the skills that you’ve already learned in BiCrafty Boot Camp: Knitting Lessons for Crocheters. It reflects a slight change in our original schedule (which has now been updated.) However, mostly we’re still on the same track. I just thought it was a good time for you to learn how to knit in the round and – in a few weeks – how to use DPNs.
So, we’re going to knit a matching cowl and hat set! We’ll start with the cowl because you’re already used to working on your circulars. Then you’ll make a hat to match and have the chance to repeat the same stitch lessons while learning shaping.
Materials: What You Need This Month
NOTE: If you haven’t already then you should purchase your first set of double pointed needles (DPNs). You’ll want to get size 8. You can get a set of 4 or a set of 5. I prefer a set of 5 but get what you can find. Learn more about knitting needles here. The Marly Bird team has been showcasing ChiaoGoo needles for the past month and we love them.
We’re going to switch over to Prym needles for May to give you a different option. Do note, however, that when we get to the hat, we’ll switch to a different brand. That’s because we need 24″ circulars for the cowl but 16″ circulars for the hat. Get what you can afford and what feels best for you.
OPTIONAL: You might also want to get size 7 circular needles if you haven’t already. You can use them during the first week for the brim of the hat. However, it’s not a requirement. Your size 8 needles will also be fine.
General tip: It’s a great idea to have several sets of knitting needles. Yes, even in the same size. Your knit cowl and then your knit hat will be on these same circulars for a few weeks as you learn the skills necessary to complete it. Therefore, you might want a second set of size 8 circular knitting needles that you can practice stitches on. After all, you can’t just take the needles out of the hat and work on something else then go back to the hat like you potentially could in crochet.
YARN: Choose a worsted weight yarn that you’ll enjoy working with for your knit cowl and hat patterns. We’ll continue working with Chic Sheep here at the BiCrafty Boot Camp Team. You’ll need one ball of Chic Sheep for the hat and two balls of Chic Sheep yarn for the cowl.
BiCrafty Bootcamp Recap
Before we dig into this week’s lesson on how to knit 1×1 ribbing in the round, let’s recap what you’ve learned so far:
- As brand new knitters, you learned how to cast on and knit stitch.
- Then you learned how to knit garter stitch and cast off.
- After that, you learned knitting’s other main stitch: purl stitch. That means you were ready to learn stockinette stitch.
- Then you learned how to change colors and bury ends, making a striped stockinette pattern.
- Finally, you learned 2×2 knit ribbing last week.
If you’ve done all of the homework then you’ve made a dishcloth, two mug rugs, and a coffee cup sleeve. We’re going to put all of the Month One skills together to add two new mug rugs, creating a pattern pack of four mug rugs and a coffee sleeve. Wow!
All live videos for BiCrafty Boot Camp are on the Marly Bird YouTube channel.
BiCrafty Bootcamp Month Two: Knitting a Cowl and Hat in the Round
Now we’re going to start a knit cowl. And then we’re going to make the matching knit hat. Here’s what that will look like in the week’s to come:
- This week you’ll learn how to knit 1×1 ribbing in the round. This will create the base of the cowl and later we’ll use it create the brim of the hat.
- You’ll learn how to knit seed stitch in the round.
- You’ll learn at least one more knit stitch pattern in the round (TBD).
- Then you’ll learn knit shaping.
- If you choose to, you’ll learn how to switch from size 7 to size 8 needles. Again, this is optional for the brim of the hat.
- You’ll also learn how to knit with DPNs at the top of the hat.
At the end of the month, you’ll have so many amazing new knitting skills. And yet, you’re definitely ready, because you’ve learned how to knit and purl!

How to Knit 1×1 Ribbing in the Round
You’re learning two new skills this week: how to knit 1×1 ribbing as well as how to knit in the round. One month ago, you might have had no clue about this. But actually, you basically already know how to do both of these things!
How to Knit 1×1 Ribbing
Last week, you learned how to knit 2×2 ribbing. As you learned, this simply means that you knit two, then purl two, knit two, then purl two, all the way across the row. As you might guess, 1×1 knit ribbing simply means that you knit 1, purl 1, knit 1, purl one, all the way across the row. Other than that, it’s the same as what you learned last week.
I like 1×1 ribbing because the knits and purls look fairly similar so you get a very consistent texture with the stretchy rib as compared with a slightly chunkier look on 2×2 ribbing. Plus it’s easier to count/ remember than the K2, P2. WATCH ME KNIT 1X1 RIBBING ON INSTAGRAM. People are saying it’s so soothing just to watch.
You’ll get the opportunity to really put your muscle memory to use with those knit and purl alternating stitches. Also, remember that in last week’s live video we discussed that the purl stitches after the knit stitches can get kind of loose. Just pay attention to that since you’re alternating so frequently. Otherwise, you’ve got this.
Like the 2×2 ribbing, 1×1 ribbing is stretchy yet snug. Therefore, it’s great for hat brims. So, you’re going to start with this to create the brim of a hat that we’ll knit from the bottom up. And we wanted the set to match so this week we’ll use that same stitch for the base of the cowl.
How to Knit in the Round
The second new skill that you’ll learn this week is how to knit in the round. If you’ve been using straight needles like Kathryn has then you’ll need to switch to circulars. You’ll knit more or less as you have been except that you’ll join at the end of the row to create a circular piece. Then you’ll keep knitting around to grow the hat.
How to K1, P1 in the Round
In this video, we cover the basics of knitting in the round, including the materials that you’ll need. Then we show how to join in the round and begin working the K1, P1 for your cowl.
NOTE: During the chat for this video we accidentally gave the European website for ordering Prym knitting needles. The correct website is: https://makesomethingprym.com
Crocheter’s Edge

The skills you’ve already learned as a knitter should make it fairly easy for you to catch on to this week’s new lessons. Moreover, you already know some things as a crocheter that will further help:
- You understand that you’re creating a stretchy fabric for the brim of the hat and the base of the cowl. Different stitches give different stretch. If you’ve crocheted hat brims or sweater cuffs before then you already have a basic understanding of this.
- It’s not as common in crochet as knitting to change hook/needle size during a project. However, it does happen. If you’ve ever done so then you have a general concept of how doing so will affect the growth of the project. If you choose the optional method of using size 7 needles for a snug brim then switching to size 8 needles, then you’ll loosely understand how this sizes up the hat while keeping the brim snug.
- You know how to join in the round in crochet as well as how to crochet in the round. Therefore, you’re ahead of the game when it comes to knitting in the round. The concept is similar. You’ve got this. Most importantly, you know from crocheting in the round how important it is not to twist your chain when joining; you’ll also take care not to twist your cast on when joining knitting in the round.
Knitter’s Tips for Crocheters

You’re starting a new project that’s going to be on your knitting needles for awhile. Therefore, you really need to think about investing in a few different pairs of needles if you haven’t already. You really want to have a set that you practice on as well as a set for the final piece. In fact, we suggest practicing how to knit 1×1 ribbing in the round several times before switching to the needles you’ll use all month. This will become especially important next week. You’ll want to practice seed stitch in the round and get the hang of it before adding that part to your hat. Extra knitting needles become important at this stage of the game.
BiCrafty Bootcamp Knit Cowl Pattern: Part 1, The Base
(❣️BiCrafty Community Cowl Pattern Starts Here and is continued through lesson 10)
Materials:
- Size 8 (5 mm) 24″ circular knitting needles
- Worsted weight yarn
- Stitch markers … Learn How to Make Your Own Stitch Markers Here
- Tapestry needle
Pattern:
Using the long tail cast on, cast on 140, placing a stitch marker every 20 stitches. Use a different color or style of stitch marker to mark the end of the row so you’ll be able to easily identify it. (You’ll also be able to tell because the yarn tail is there but make it even easier on yourself.) Remember: we covered long-tail cast on in Lesson One.
Knit the first round.
K1, P1 all the way around.
Repeat K1, P1 in every round until you have 1″ – 1 1/2″ height for your cowl.
Keep your needles in the work. You’ll continue working on this cowl next week.
Additional Patterns and Patterns You’re Ready For
At this stage of the game you might appreciate these videos:
- Ultimate Fisherman’s Rib Stitch 3 Ways
- 3 Ways to Add a Lifeline to Knitting – a trick for beginner knitters to protect themselves from dropped stitches and other knitting problems
And you might want to try your hands at these knit patterns:
- Sunset Song Knit Cowl Free Pattern, video here. This is a cowl worked in the round. It’s a basketweave stitch but that’s just alternating knits and purls in a new way, so chances are that you can do this now!
- Red Heart Little Sophisticate Cowl. This kids’ cowl worked in the round is a great next project.
- Bernat Knit Placemats. Now that you can knit and purl in the same row, you can do so much!
- Bernat Down the Line Knit Pillow. Alternate a knit row with a K1 P1 row for this easy pillow.
- Twisted Knit Headband. This free patterns uses K1, P1 in rows. Note that you both begin and end with K1, though.
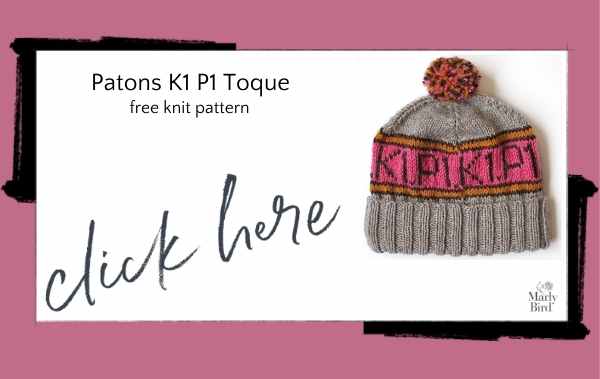
And you’re not ready to knit this, yet, but it’s so perfect given this week’s lesson that I wanted you to see it:




Now that we are knitting wearable items, will you be discussing gauge?