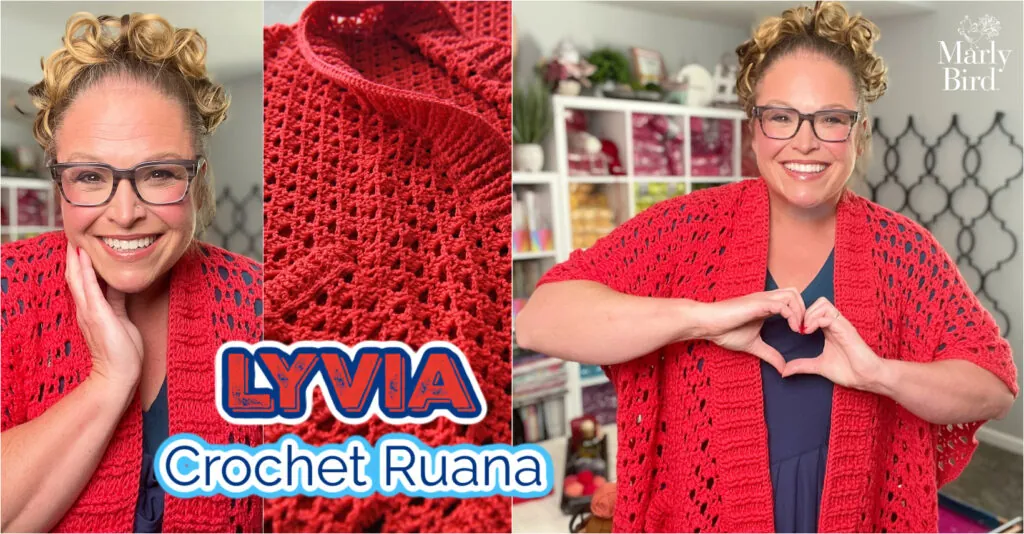
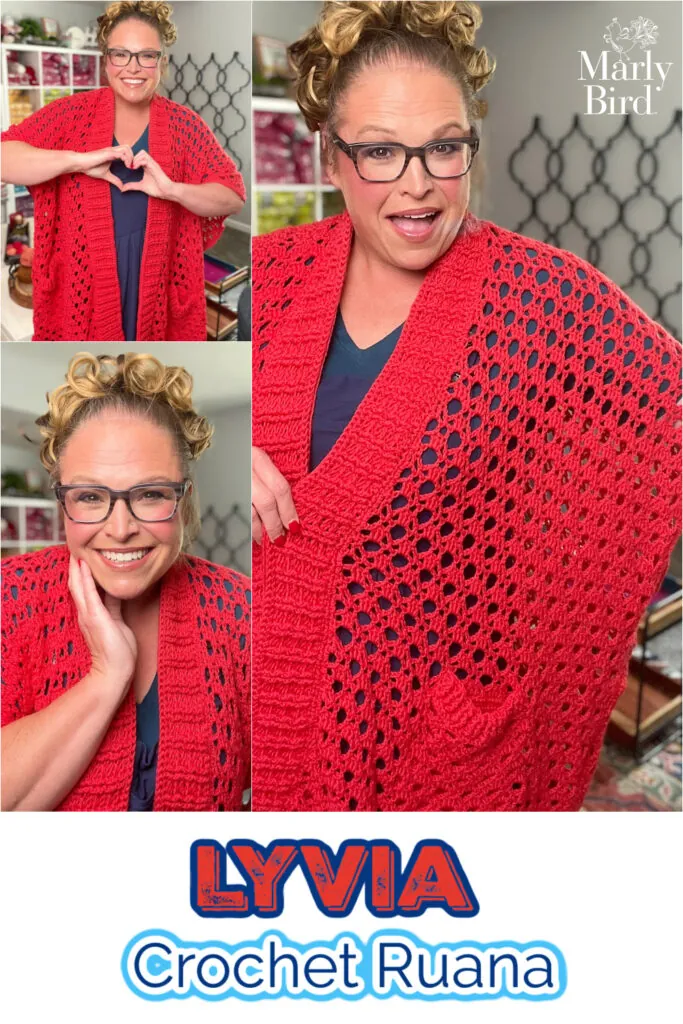
Free Crochet Ruana Pattern – Lyvia Oversized Cardigan with Pockets
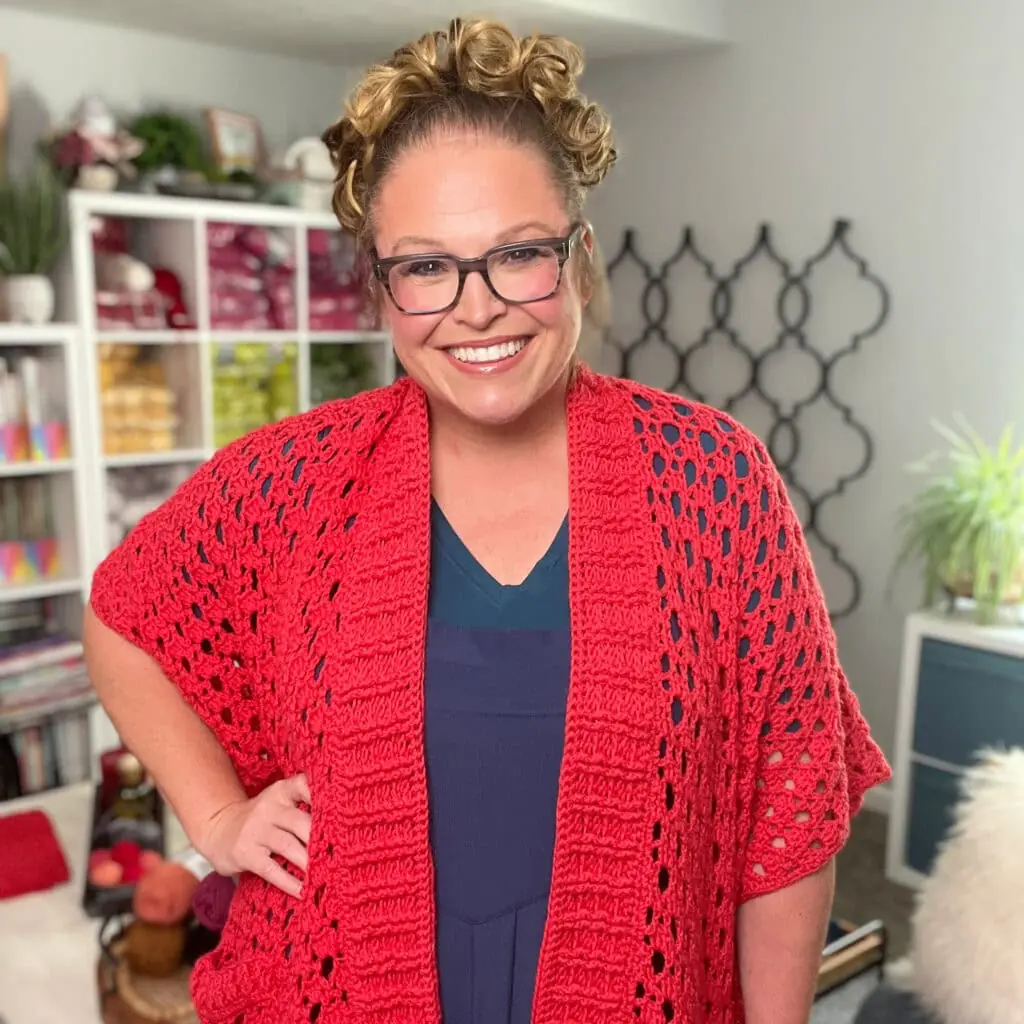
If you love crochet garments that feel cozy, stylish, and effortless, the Lyvia Ruana is about to become a wardrobe favorite ❤️. This free crochet ruana pattern is designed as an oversized, open-front cardigan-style wrap with beautiful texture, relaxed drape, and the kind of comfort you reach for day after day.
And let’s not bury the lead…
✨ It has pockets. ✨
Real ones. Functional ones. The good kind.
Affiliate Disclosure: This post contains affiliate links. To learn more please visit my privacy policy here💖
Quick Pattern Overview
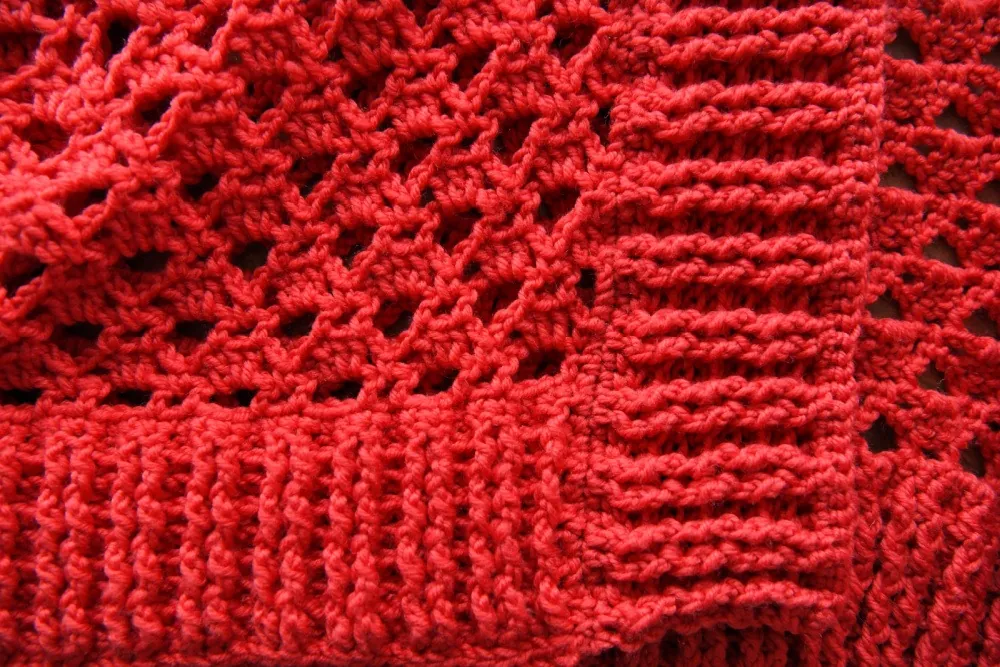
The Lyvia Ruana is a free crochet pattern featuring classic ruana construction with a modern, oversized silhouette. Worked in panels and joined with thoughtful finishing details, this design creates an easy layering piece that feels polished without being fussy.
In this post, you’ll learn:
- What makes a ruana different from a cardigan
- Why oversized ruanas are so wearable
- How pockets are built into the design
- Yarn options that work beautifully for this pattern
- Where to find similar ruana patterns you’ll love
What Is a Crochet Ruana?
A crochet ruana is a wrap-style garment made from rectangular panels that create an open-front shape when worn. Unlike fitted cardigans, ruanas rely on drape rather than shaping, making them incredibly forgiving and comfortable.
The Lyvia Ruana leans into that ease with relaxed arm openings, generous width, and a silhouette that layers beautifully over tees, tanks, and long sleeves.
What You Will Love About This Pattern 💖
- Free crochet ruana pattern
- Oversized, relaxed cardigan-style fit
- Beautiful lace texture paired with structured ribbing
- Built-in pockets (the real MVPs)
- Size-inclusive design: S–XL and 2XL–5XL
- Easy-to-style layering piece
✨ Designer Tip: Ruanas are one of the most wearable crochet garments because they move with your body instead of restricting it.

“This oversized crochet ruana is the kind of layering piece you throw on once — and then wonder how you lived without it.”
About the Design & Fit
The Lyvia Ruana is designed with two flexible size groupings to ensure comfortable wear across a wide range of bodies:
- S–XL: Relaxed, draped fit with generous coverage
- 2XL–5XL: Extra width and length for confident layering
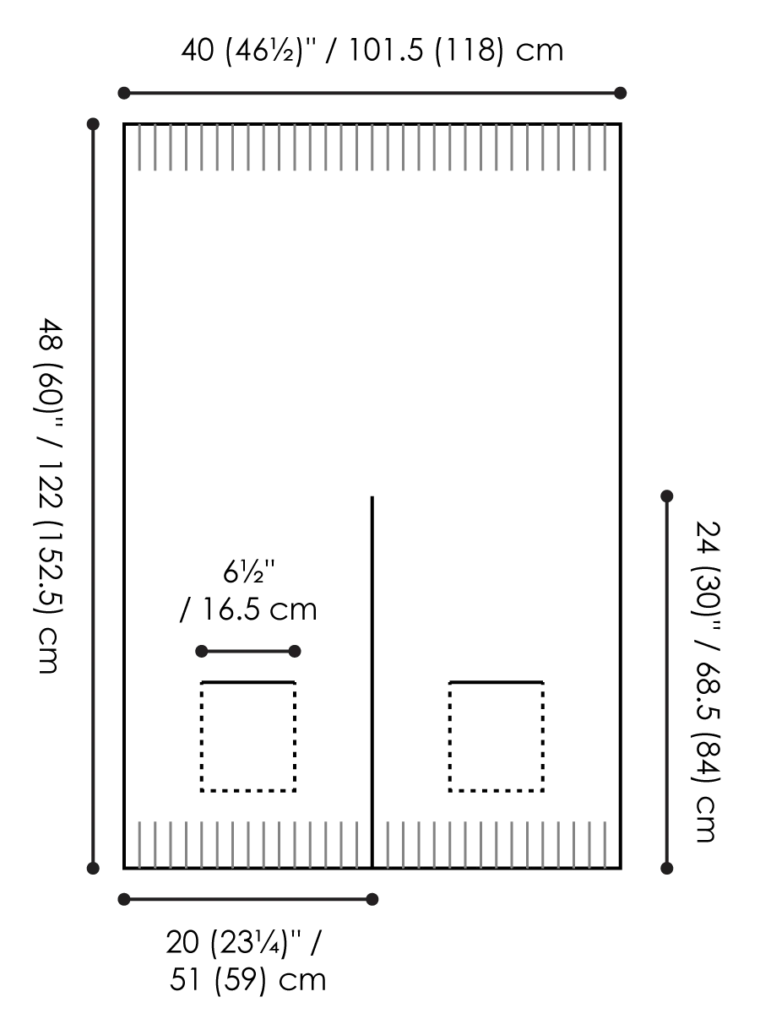
When worn, the ruana measures approximately:
- 40 (46½)” wide
- 24 (30)” long, folded lengthwise
The oversized shape allows the ruana to sit comfortably on the shoulders without slipping or feeling bulky.
Yarn Choice + Substitutions
The Lyvia Ruana sample was made using Red Heart Chic Sheep by Marly Bird, a 100% merino wool yarn known for its softness, warmth, and excellent stitch definition — perfect for textured garments.
If you’d like to substitute yarn, these worsted-weight options work beautifully and maintain the drape and structure of the design:
- Malabrigo Rios
https://tidd.ly/49VZcW1 - Berroco Ultra Wool
https://tidd.ly/4pSjENv - Swish Worsted
https://tidd.ly/4qL6Zxt - Cascade 220 Superwash
https://tidd.ly/4afBG7B - Plymouth Yarn Worsted Merino Superwash
https://tidd.ly/3M2TXMd - Madelinetosh Tosh Vintage
https://tidd.ly/4rgPp3P - Malabrigo Washted
https://tidd.ly/4qC5nWh - Heatherly Worsted
https://tidd.ly/4a7z2Qj - Woodland Tweed
https://tidd.ly/4r7dfPs - Twill Yarn
https://tidd.ly/4pK2CBn
✨ Designer Tip: Choose a yarn with good drape and stitch definition — this allows the lace texture to shine without feeling stiff.
Let’s Talk About the Pockets 🧵
Yes, the Lyvia Ruana includes fully functional pockets — not decorative ones.
They’re integrated into the front of the garment so they sit naturally when worn, without pulling or distorting the fabric. Perfect for warming hands, holding your phone, or stashing cozy essentials.
Once you’ve worn a ruana with pockets, there’s no going back 😉
LYVIA CROCHET RUANA WITH POCKETS PATTERN DETAILS
Designed by Marly Bird
SKILL LEVEL
Intermediate
MEASUREMENTS
To Fit Sizes
S-XL (2XL-5XL)
Note: The smaller size is more of a one-size-fits-all, while the larger size is oversized.
Finished Measurements
Ruana measures 40 (46½)” / 101.5 (118) cm wide and 24 (30)” / 68.5 (84) cm long folded in half lengthwise.
Gauge
4 repeats and 13 rows = 6½” (16.5 cm) in Lace stitch; use any size hook to obtain the gauge.
MATERIALS
Yarn
Red Heart Chic Sheep by Marly Bird (100% Merino Wool, 3.5 /100 g, 200 yd / 183 m)
11 (14) balls: #5254 Sunset
Hook
U.S. H/8 [5mm]
Notions
- Stitch Markers
- Tapestry Needle
- Scissors
- Tape Measure
- Leather tags (Optional)
- Leather rivets (Optional)
ABBREVIATIONS
Approx – Approximate(ly)
Beg – Begin(ning)
Bpdc – Back Post Double Crochet (see Special Stitches)
Ch – Chain(s)
Cont – Continue(ity)
Dc – Double Crochet
Dc2tog – Double Crochet Two Together
Fpdc – Front Post Double Crochet (see Special Stitches)
Hdc – Half Double Crochet
RS – Right Side
Sc – Single Crochet
Sc2tog – Single Crochet Two Together (see Special Stitches)
Sl st – Slip Stitch
Sp(s) – Space(s)
St(s) – Stitch(es)
Tr – Treble Crochet
WS – Wrong Side
Yo – yarn over
SPECIAL STITCHES / TECHNIQUES
⭐️ Back Post Double Crochet (bpdc): Yo, insert hook from back-to front-to-back around post of indicated st and pull up a loop, [yo and draw through 2 loops] twice.
⭐️ Front Post Double Crochet (fpdc): Yo, insert hook from front-to back-to-front around post of indicated st and pull up a loop, [yo and draw through 2 loops] twice.
⭐️ Double Crochet 2 Together (Dc2tog): *Yarn over hook, insert hook into indicated st, yarn over and pull up a loop, yarn over and draw through 2 loops on hook; repeat from * in next st, yarn over and draw through all 3 loops on hook.
⭐️ Linked double crochet (linked dc): Ch a foundation as indicated in pattern.Insert hook in 2nd ch from hook, yo and pull up a loop, insert hook in 3rd ch from hook, yo and pull up a loop, [yo and draw through 2 loops on hook] twice (first linked dc made), * insert hook into horizontal bar (sliding hook from top to bottom of stitch, not to the back of the stitch) of previous linked dc, yo and pull up a loop, insert hook in next ch, yo and pull up a loop, [yo and draw through 2 loops on hook] twice (next linked dc made); repeat from * to end. When working next row, ch 3, then insert hook in 2nd ch from hook and then first st of row to pull up loops for first linked dc.
⭐️ Shallow Post Half-Double Crochet (Shallow Fphdc): Yarn over, insert hook from front to back under the top 2 loops (“v”) of indicated st, then from back to front again through the top 2 loops of next st (not around post of indicated st), yo and pull up a loop, yo and draw through all 3 loops on hook. Note: all shallow post sts are worked in the same manner, using the “v” rather than the actual post.
⭐️ Single Crochet 2 Together (Sc2tog): Insert hook in first of 2 indicated sts and pull up a loop, insert hook in second of 2 indicated sts and pull up a loop, yarn over and draw through all three loops on hook, resulting in 1 stitch.
⭐️ Stacked Double Crochet (Stacked Dc): (Do not ch 1 prior to making the first sc) Sc in first stitch, insert hook in between two legs of the base, yo and pull up a loop, yo and draw through 2 loops on hook.
⭐️ Stacked Treble Crochet (Stacked Tr): (Do not ch 1 prior to making the first sc) Sc in first stitch, * insert hook in between two legs of the base of last sc made, yo and pull up a loop, yo and draw through 2 loops on hook; repeat from * once more.
PATTERN STITCH
LACE STITCH
Ch a multiple of 6 sts plus 2.
Setup row (WS): Hdc in 2nd ch from hook, * hdc in next ch, ch 3, skip 3 foundation ch, hdc in next ch, ch 1, skip next foundation ch; repeat from * to last 6 sts, hdc in next ch, ch 3, skip 3 foundation ch, hdc in each of last 2 sts, turn.
Row 1 (RS): Ch 1, sc in first hdc, * ch 2, 3 dc in next ch-3 sp, ch 2, sc in next ch-1 sp, repeat from * to last ch-3 sp, ch 2, 3 dc in next ch-3 sp, ch 2, sc in last hdc, turn.
Row 2: Stacked tr (see Special Stitches and Video Tutorials), ch 1, skip first sp * hdc in next dc, ch 1, skip next dc, hdc in next dc, ch 3, skip next (sp, sc, sp); repeat from * to last 3 dc, hdc in next dc, ch 1, skip next dc, hdc in next dc, ch 1, tr in last sc, turn.
Row 3: Stacked dc, dc in first ch-1 sp, * ch 2, sc in next ch-1 sp, ch 2, dc in next ch-3 sp; repeat from * to last 2 ch-1 sps, ch 2, sc in next ch-1 sp, ch 2, dc in last ch-1 sp, dc in last tr, turn.
Row 4: Ch 1, hdc in each of first 2 dc, * ch 3, skip next (sp, sc, sp), hdc in next dc, ch 1, skip next dc, hdc in next dc; repeat from * to last 2 sps, ch 3, skip next (sp, sc, sp), hdc in each of last 2 dc, turn.
Repeat Rows 1-4 for Lace Stitch.
STITCH DIAGRAM
The crochet stitch diagram is only available in the ad-free pdf.
SCHEMATIC
VIDEO TUTORIALS
- Back post double crochet: https://www.youtube.com/watch?v=q2GQMEE_0-E
- Front post double crochet: https://www.youtube.com/watch?v=EdyOmRUS-cg
- Linked double crochet: https://www.youtube.com/watch?v=LP1d29Bgv0I
- Shallow post sts: https://www.youtube.com/watch?v=lFv7cLC7_mc
- Stacked double crochet: https://www.youtube.com/watch?v=KI35LQoYbm8
- (For a stacked treble crochet, work the “sc” an additional time)
NOTES
- Sizes are written for the smallest size. If changes are necessary for larger sizes the instructions will be written thus ( ).
- For a petite larger size follow the stitch count for the larger size but row count for the smaller size.
- For a tall smaller size follow the stitch count for the smaller size but the row count for the larger size.
- Work both fronts at the same time with separate balls of yarn (at the same point of color if not using a solid) to ensure matching sides.
GROW
To Unlock Exclusive Subscriber Content click the Box below and join for free by simply adding your email and creating a password! If you are having troubles, clear your cache or reset your password or login to the Grow Publisher Portal.
>> Learn More About Grow Here <<
I’m thrilled to share this amazing pattern with you, many patterns on my blog are absolutely free! I kindly request that you don’t copy and paste or distribute this pattern. Prefer an ad-free experience? Buy a digital PDF pattern for a small fee from one of my online stores for a seamless crafting journey.
I appreciate your support and readership. You are the reason I can keep doing what I love and sharing it with others. So, thank you from the bottom of my yarn-loving heart! Disclosure: This post contains affiliate links, meaning I get a commission if you decide to make a purchase through my links at no cost to you.
LYVIA CROCHET RUANA WITH POCKETS PATTERN
POCKETS
(Make both the same to start)
Ch 31.
Row 1: Work in linked dc across (see Special Stitches and Video Tutorials) – 29 dc.
Row 2: Ch 2, linked dc in each dc across – 29 dc.
Repeat Row 2 until piece measures 8″ (20.5 cm).
Fasten off.
FRONT PANELS
(Make both the same)
Ribbing
Ch 75 (87).
Row 1 (RS): Sc in 2nd ch from hook and in each ch to end, turn – 74 (86) sc.
Row 2: Ch 1, hdc in first st, shallow fphdc (see Special Stitches and Video Tutorials) in each st across, hdc in last st, turn – 74 (86) hdc.
Row 3: Ch 1, hdc in first st, fpdc (see Special Stitches and Video Tutorials) around next st, * bpdc (see Special Stitches and Video Tutorials) around each of next 2 sts, fpdc around each of next 2 sts; repeat from * to last 4 sts, bpdc around each of next 2 sts, fpdc around next st, hdc last st, turn – 74 (86) sts.
Row 4: Ch 1, hdc in first st, bpdc around next st, * fpdc around each of next 2 sts, bpdc around each of next 2 sts; repeat from * to last 4 sts, fpdc around each of next 2 sts, bpdc around next st, hdc last st, turn – 74 (86) sts.
Repeat Rows 3 and 4 only 3 more times.
Body
Row 1 (RS): Ch 1, sc in each st to approx center of row, sc2tog over next 2 sts, sc in each st to end – 73 (85) sts.
Row 2: Ch 1, hdc in first sc, * hdc in next sc, ch 3, skip 3 sc, hdc in next sc, ch 1, skip next sc; repeat from * to last 6 sc, hdc in next sc, ch 3, skip 3 sc, hdc in each of last 2 sc, turn.
Begin Lace Stitch
Work Rows 1-4 of Lace st 5 times – 20 total rows worked.
Join Pocket
Next 4 rows:
Row 1 (joining row, RS): Ch 1, sc in first hdc, * ch 2, 3 dc in next ch-3 sp, ch 2, sc in next ch-1 sp, repeat from * 2 (3) more times, ch 2, 3 dc in next ch-3 sp, ch 2, hold Pocket piece behind Body piece and sc in next ch-1 sp on Body and first dc on Pocket at the same time, then cont as follows across Pocket sts only: * ch 2, skip next dc, dc in next dc, dc2tog across next 2 dc, dc in next dc, ch 2, skip next dc, sc in next dc; repeat from * twice more, ch 2, skip next dc, dc in next dc, dc2tog across next 2 dc, dc in next dc, ch 2, skip next dc, skip 3 ch-1 sps and 4 ch-3 sps on Body piece, sc in next ch-1 sp on Body and last dc on Pocket at the same time, then cont as follows across remaining Body sts: * ch 2, 3 dc in next ch-3 sp, ch 2, sc in next ch-1 sp, repeat from * 2 (3) more times, ch 2, 3 dc in last ch-3 sp, ch 2, sc in last hdc, turn.
Row 2: Stacked tr, ch 1, skip first sp * hdc in next dc, ch 1, skip next dc, hdc in next dc, ch 3, skip next (sp, sc, sp); repeat from * to last 3 dc, hdc in next dc, ch 1, skip next dc, hdc in next dc, ch 1, tr in last sc, turn.
Row 3: Stacked dc, dc in first ch-1 sp, * ch 2, sc in next ch-1 sp, ch 2, dc in next ch-3 sp; repeat from * to last 2 ch-1 sps, ch 2, sc in next ch-1 sp, ch 2, dc in last ch-1 sp, dc in last tr, turn.
Row 4: Ch 1, hdc in each of first 2 dc, * ch 3, skip next (sp, sc, sp), hdc in next dc, ch 1, skip next dc, hdc in next dc; repeat from * to last 2 sps, ch 3, skip next (sp, sc, sp), hdc in each of last 2 dc, turn.
Cont evenly in Lace st for 24 (36) more rows, or 6 (9) Lace st repeats.
Fasten off at end of first panel; keep yarn attached at end of second panel.
BACK
Work across final rows of Front Panels as follows:
Next 4 rows:
Row 1: (joining row, RS): Ch 1, sc in first hdc, * ch 2, 3 dc in next ch-3 sp, ch 2, sc in next ch-1 sp, repeat from * to last ch-3 sp, ch 2, 3 dc in next ch-3 sp, ch 2, sc2tog over last hdc of current Front Panel and first hdc of second Front Panel, repeat from * to * to last ch-3 sp of second Front Panel, , ch 2, 3 dc in next ch-3 sp, ch 2, sc in last hdc, turn – 24 (28) repeats across.
Row 2: Stacked tr, ch 1, skip first sp * hdc in next dc, ch 1, skip next dc, hdc in next dc, ch 3, skip next (sp, sc, sp); repeat from * to last 3 dc, hdc in next dc, ch 1, skip next dc, hdc in next dc, ch 1, tr in last sc, turn.
Row 3: Stacked dc, dc in first ch-1 sp, * ch 2, sc in next ch-1 sp, ch 2, dc in next ch-3 sp; repeat from * to last 2 ch-1 sps, ch 2, sc in next ch-1 sp, ch 2, dc in last ch-1 sp, dc in last tr, turn.
Row 4: Ch 1, hdc in each of first 2 dc, * ch 3, skip next (sp, sc, sp), hdc in next dc, ch 1, skip next dc, hdc in next dc; repeat from * to last 2 sps, ch 3, skip next (sp, sc, sp), hdc in each of last 2 dc, turn.
Cont in Lace st for 44 (56) more rows, or 11 (14) Lace st repeats.
Ribbing
Row 1 (RS): Ch 1, sc in each of first 2 hdc, * 3 sc in next ch-3 sp, sc in next hdc, sc in next ch-1 sp, sc in next hdc; repeat from * to approx center of row, 4 sc in next ch-3 sp, sc in next hdc, sc in next ch-1 sp, sc in next hdc, repeat from * to * to last ch-3 sp, 3 sc in last ch-3 sp, sc in each of 2 last hdc, turn – 148 (172) dc.
Row 2: Ch 1, hdc in each stitch across – 148 (172)
Row 3: Ch 1, hdc in first st, fpdc around next st, * bpdc around each of next 2 sts, fpdc around each of next 2 sts; repeat from * to last 4 sts, bpdc around each of next 2 sts, fpdc around next st, hdc last st, turn – 148 (172) sts.
Row 4: Ch 1, hdc in first st, bpdc around next st, * fpdc around each of next 2 sts, bpdc around each of next 2 sts; repeat from * to last 4 sts, fpdc around each of next 2 sts, bpdc around next st, hdc last st, turn – 148 (172) sts.
Repeat Rows 3 and 4 only 3 more times.
Next Row (RS): Ch 1, shallow bpsc in each stitch to end – 148 (172) sc.
Fasten off.
FINISHING
Side Edging And Seaming
With RS facing, join yarn with sl st to bottom right corner of Body, ch 1, and work 218 (270) sc evenly along side edge of piece to next corner.
Fasten off.
Fold Body in half with WS facing out.
Mark the 15th sc from each edge.
With WS facing, join yarn with sl st in first marked st, ch 1, and hdc in this st.
Remove hook from loop, insert hook in marked st on opposite side and pull open loop though this st.
* Hdc in next st on first side, remove hook from loop, insert hook in next st on opposite side and pull open loop though this st, repeat from * until 10 (12)” [25.5 (30.5) cm] remain unseamed for armhole.
Fasten off.
Work other side the same way.
Collar Edging
With RS facing, join yarn with sl st in bottom st of inner Right Front edge, and work 218 (270) sc around edge to bottom of Left Front.
Next 8 rows: Work same as Rows 2-10 of ribbing at beg of Back Panel.
Next row: Ch 1, shallow bphdc in each stitch to end
Pocket Edging And Seaming
With RS facing, join yarn with sl st to first ch-1 sp at edge of Pocket opening on Body (this is the same ch-1 sp previously used for joining Body to Pocket piece).
Row 1 (RS): Ch 1, sc in same ch-1 sp, * sc in next hdc, 4 sc in next ch-3 sp, sc in next hdc, sc in next ch-1 sp; repeat from * 3 more times, sc once more in same ch-1 sp (this ch-1 sp was also previously used for joining), turn – 30 sc.
Rows 2-5: Work same as Rows 2-5 of ribbing at beg of Front Panels.
Fasten off.
With tapestry needle, whipstitch Pocket piece to WS of Body, and short edges of Pocket trims to RS of Body.
Work other Pocket the same way.
Weave in all loose ends.

Styling the Lyvia Ruana
One of the best things about the Lyvia Ruana is how versatile it is. Wear it:
- Over jeans and a tee for everyday comfort
- Layered with leggings and boots
- Tossed over a dress for a cozy-chic look
- Wrapped up indoors as a stylish alternative to a blanket
It’s the kind of piece that works just as well at home as it does out and about.
If You Love This Shape, Try These Too
If ruana-style garments are already a favorite, you’ll definitely want to explore these popular patterns as well:
- Rockford Crochet Ruana
- Creekside Crochet Ruana
Each offers a different stitch texture while keeping the same easy-to-wear construction.
FAQ – Lyvia Crochet Ruana
Is this crochet ruana pattern free?
Yes! The Lyvia Ruana is a free crochet pattern on MarlyBird.com, with an optional ad-free PDF.
What skill level is this pattern?
This pattern is best for intermediate crocheters or confident beginners comfortable with lace stitches and garment construction.
Can I adjust the length?
Absolutely. The ruana construction makes it easy to customize length.
Are the pockets optional?
They’re part of the design — and trust me, you’ll want them.
Final Thoughts 🧶
The Lyvia Ruana is the perfect blend of comfort, style, and practicality. With its oversized fit, beautiful texture, and yes — pockets — it’s a crochet garment you’ll reach for again and again.
If you make one, be sure to share it and tag me — I love seeing your finished projects ❤️
#mmmdi #marlybird
❤️ Your BiCrafty Bestie,
Marly Bird