
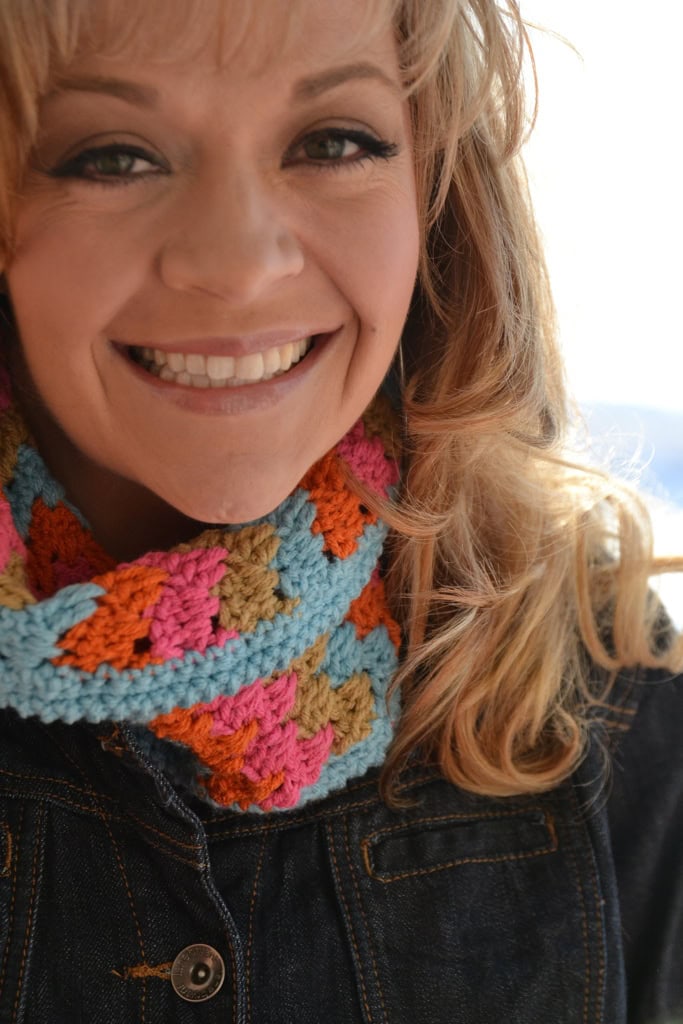
Long Double Crochet Chevron Cowl Free Pattern
I'm bringing your attention to an oldie but goodie today. My Colorado Sunrise Cowl is a crochet chevron cowl free pattern that uses a unique stitch to create the chevron design. I recently mentioned the long double crochet stitch in my 9 Easy, Interesting Crochet Stitches roundup. Working this stitch and alternating sunrise-inspired colors creates a beautiful, vibrant, interesting crochet cowl perfect for chilly spring or summer evenings.
Affiliate Disclosure: This post contains affiliate links. To learn more please visit my privacy policy here💖
Colorado Sunrise Crochet Chevron Cowl – Yarn Colors
I named this pattern the Colorado Sunrise Cowl because the colors I used remind me so much of a Colorado sunrise. But you can easily vary the colors in the cowl to any shades of your own choosing.
I used Red Heart's “With Love” yarn for this project. It comes in many different colors. Choose one that's right for you. I designed this one for my sister, who looks wonderful in these sunrise colors.
The cowl is made with only a portion of the yarn from each 315 yd skein. I used 4 colors for this particular crochet chevron cowl free pattern, but you can use more or fewer colors as you see fit. It's totally up to you! The important thing is to use whichever color you choose for at least two rows to get this fantastic chevron look.
Long Double Crochet Chevron Stitch
The chevron look is accomplished by working the Long Double Crochet Chevron Stitch Pattern. Not sure what that is? No worries—the YouTube tutorial will walk you through each step.
Crochet Chevron Cowl Free Pattern
PATTERN DETAILS
Measurements
Body of piece: 11″ long (folded in half) and 7 1/2″ wide (including trim).
Yarn
The yarn used for this project is a Worsted (CYC size 4)
Red Heart, “With Love” (100% acrylic, 315 yds/170g)
- Color A (CA): Mango
- Color B (CB): Iced Aqua
- Color C (CC): Tan
- Color D (CD): Candy Pink
Great alternative to this yarn is Herrschners Worsted 8 yarn!
Crochet Hook
5.5mm/I
Notions
- Tapestry Needle
- Removable Stitch Markers
Stitches Used (and YouTube Video links to help you learn)
- Chain Stitch
- Single Crochet
- Standing Single Crochet
- Double Crochet
- Crab Stitch (Reverse Single Crochet)
Special Stitch Guide
⭐️ Long Double Crochet (Ldc): Work a double crochet (dc) in the st indicated one row below the previous row worked. This stitch will be worked around the previous row worked.
GROW
To Unlock Exclusive Subscriber Content click the Box below and join for free by simply adding your email and creating a password! If you are having troubles, clear your cache or reset your password or login to the Grow Publisher Portal.
>> Learn More About Grow Here <<
I'm thrilled to share this amazing pattern with you, many patterns on my blog are absolutely free! I kindly request that you don't copy and paste or distribute this pattern. Prefer an ad-free experience? Buy a digital PDF pattern for a small fee from one of my online stores for a seamless crafting journey.
I appreciate your support and readership. You are the reason I can keep doing what I love and sharing it with others. So, thank you from the bottom of my yarn-loving heart! Disclosure: This post contains affiliate links, meaning I get a commission if you decide to make a purchase through my links at no cost to you.
Crochet Chevron Cowl FREE PATTERN
Using CA, chain 24.
Next 2 rows: Ch 3 (counts as first dc), turn; dc in space (sp) before the next 3-dc group [this stitch will be to the right of the next stitch you make], long double crochet (Ldc) in center dc of 3-dc group one row below, dc in same sp before 3-dc group [this stitch will be to the left of the stitch you just made], *skip 3-dc group, dc in sp before next 3-dc, Ldc in in center dc of 3-dc group one row below, dc in same sp before 3-dc group; rep from * across to last 4 dc, skip next 3-dc, dc in last dc.
Change colors: Change color to CA on last stitch of row, leaving the old color hanging. When it's time to rejoin with a new color, float the old color up the side of the work to use it. Then continue in pattern, leaving the _new_ old color hanging (CD). Continue in this established pattern changing colors every 2 rows in the same sequence. Finish with a second row of the CD when you've reached the desired length, and proceed to the finishing instructions. Do not fasten off the last color; you'll use it to seam the cowl. Cut the three other remaining colors leaving a 4-6″ tail. The sample cowl has a total of 6 full 4-color change repeats.
Finishing The Crochet Chevron Cowl Free Pattern
With wrong sides together, join the working edge to the foundation chain with a slip stitch join.
Trim
The trim is worked into the cowl's edge stitches and around the floats to hide them when necessary. Follow the next instructions for each edge of the cowl.
Rnd 1: With CB, join yarn at any point on the cowl's edge with a standing single crochet. Single crochet around the edge of the cowl, working a total of 5 sc's evenly spaced every two rows.
NOTE: If you find that doing fewer single crochets looks better for your cowl that is absolutely fine! As long as you're consistent that's what matters.
TIP: Each color is worked only 2 rows so you can easily keep track of how many single crochets you've completed by only doing 5 in each color section.
When you return to the standing single crochet, join with a slip stitch to finish the round.
Rnd 2: Ch 1, turn; sc in each sc around, join with a slip stitch to the first sc.
Rnd 3: Ch 1, turn; working in the opposite direction, do the crab stitch in each single crochet around. Join with a slip stitch to the first rev. sc. Fasten off.
Repeat the trim instructions for the other edge of the cowl.
Weave in all loose ends.
You Might Also Like:
Frequently Asked Questions
Can I really use any yarn for this cowl?
Honestly… yes! While I used Red Heart’s “With Love” yarn for this Colorado Sunrise Cowl because it has such lovely colors, you can totally switch it up. Just make sure it’s a Worsted (CYC size 4) weight yarn, and remember to use your chosen colors for at least two rows to get that cool chevron look!
What makes this cowl so special… the chevron design?
So here's the thing… it's all about that unique Long Double Crochet Chevron Stitch! It makes the chevron design pop all on its own. If you're not sure how to do it, don't worry… I've got a YouTube tutorial that walks you through it step-by-step.
How long does it take to make this cowl?
Well, the pattern itself isn't super long, and the stitch is pretty straightforward once you get the hang of it. If you’re a seasoned crocheter, you might whip it up in an afternoon… but honestly, taking your time to enjoy the process is the best part!
I’m not a fan of sewing in ends… is there a trick for that?
Yes! When you're changing colors, you can actually “float” the old color yarn up the side of your work to use again later. This way, you only have a long float at each color change that can be hidden with the trim. I show you exactly how to do that in the YouTube video!
What if I want to make this cowl bigger or smaller?
The pattern gives you measurements for the cowl as written, and it’s designed to be about 11 inches long when folded. You can definitely adjust the length by simply adding or subtracting rows following the pattern repeat. Happy crocheting!
Categories: Crochet, Free Patterns, Our Free Patterns, Pattern, YouTube Video Tutorial


Beautiful pattern!
thank you
I love the colors you used. So bright and sassy!! Thank you for sharing the pattern. Love ya’
Happy new year & Best wishes ! Love
Bonne année et bonne santé et que cette année t’inspire beaucoup de nouvelles créations !
Bisous
I want to make the Colorado Sunrise Cowl for an adult. The pattern you demonstrate says for a child. Is there s specific pattern for adult?
The Sunrise Cowl is for an adult. The finished size is 22″ around. In the youtube tutorial for the stitch pattern I do mention that you could use it for a nice kids scarf or something like that but that does not apply to the cowl. I hope that helps.
How many rows to complete cowl?
How many rows are needed to finish the Sunrise Cowl ?
I went back and read the pattern and it clearly states that the cowl should be 11 inches when folded in half. I know this is an easy pattern, but I have a tendency to get confused. When folding the wrong sides together to join, that means to put the two short ends together, stitch across making like a seam, is that right? Then from there do I start working around the floating edges? Do you have a short video showing this step? So sorry to have to keep asking questions.
I would love to make a hat in this stitch. Would you have a patter for that?
Thanks for sharing this beautiful stitch!
xo