Free Bulky Crochet Messy Bun Hat: Chunky Monkey!
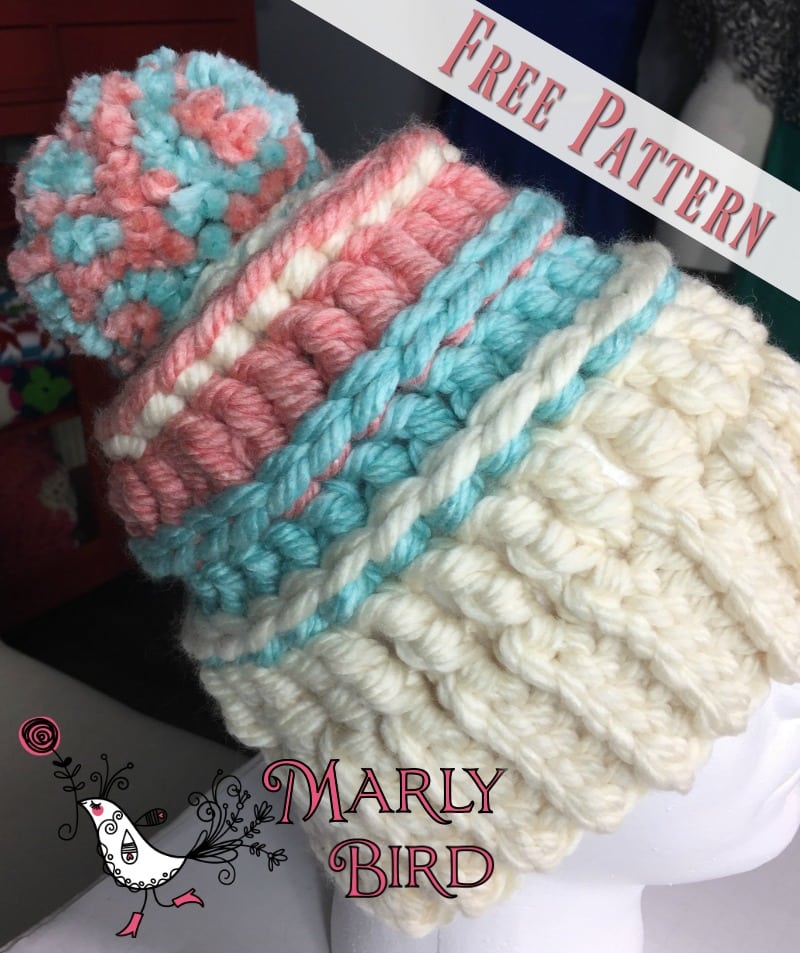
Get a Free Bulky Crochet Messy Bun Hat Pattern today! It’s quick to make, fun to wear, and a perfect last-minute gift! The Chunky Monkey Bulky Hat pattern is the newest accessory off my hook (my daughter named the pattern).
Super Bulky yarn isn’t always my go-to for hats. But since time is speeding by as I make last-minute gifts, I reached for Red Heart Grande yarn. I decided it was going to be a hat. The crazy thing is, today, I went to a department store and saw a lot of super bulky hats for sale. As I was eyeing the hats, a group of teenage girls began to “ooh and ahhh” all about the hats. Three of them walked away to purchase one each. So, I guess there must be a market 🙂
Learn how to make this wonderful hat that only uses 1 ball of each color. The Free Bulky Crochet Messy Bun Hat is not only cute but very quick! It’s a great gift for your loved one. A great addition to your craft fair wares, and an awesome addition to your own wardrobe.
Add to favorites and queue the Free Bulky Crochet Messy Bun Hat Pattern, “Chunky Monkey Bulky Hat“ pattern on Ravelry
**This post includes affiliate links**
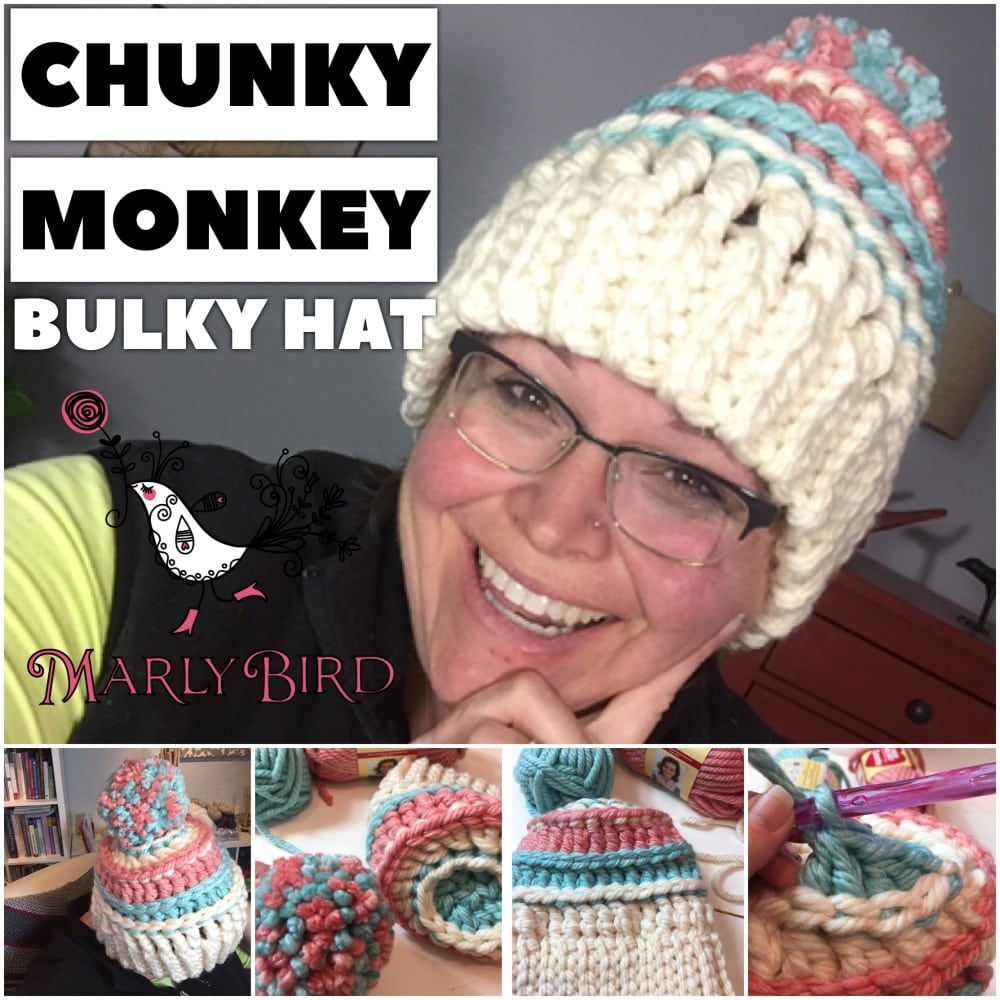 Chunky Monkey Bulky Hat
Pattern Details
Sizes: Adult S (M, L)
Finished Circumference: 20 (22, 24)” [50.8 (55.88, 60.96) cm]
Finished Full Hat Height: 9 1/2″ [24.13 cm]; Messy Bun Height: 8 1/2″ [21.59 cm]
Gauge
5 sts = 2 3/4″ [7 cm] and 8 rows = 4″ [10 cm] in slip stitch ribbing
6 sts and 2 rows = 4″ [10 cm] in treble crochet body
Yarn
[6 Super Bulky] RED HEART® Grande™, Art. E826, available in solid color 5.29 oz (150 g), 46 yds (42 m) skeins.
Solid color hat: 2 (2, 3)balls
2 color hat: 1 (2, 2) balls of color A, 1 (1, 1) ball of color B
3 color hat: 1 ball of each color
Hook
Susan Bates® Crochet Hook: 11.5 mm [US P-15]
Notions
Removable Stitch Markers (Marly uses these)
Finishing Yarn Needles PERFECT for Bulky Yarn
Notes:
- Make all slip stitches on BRIM through back loop only (TBLO).
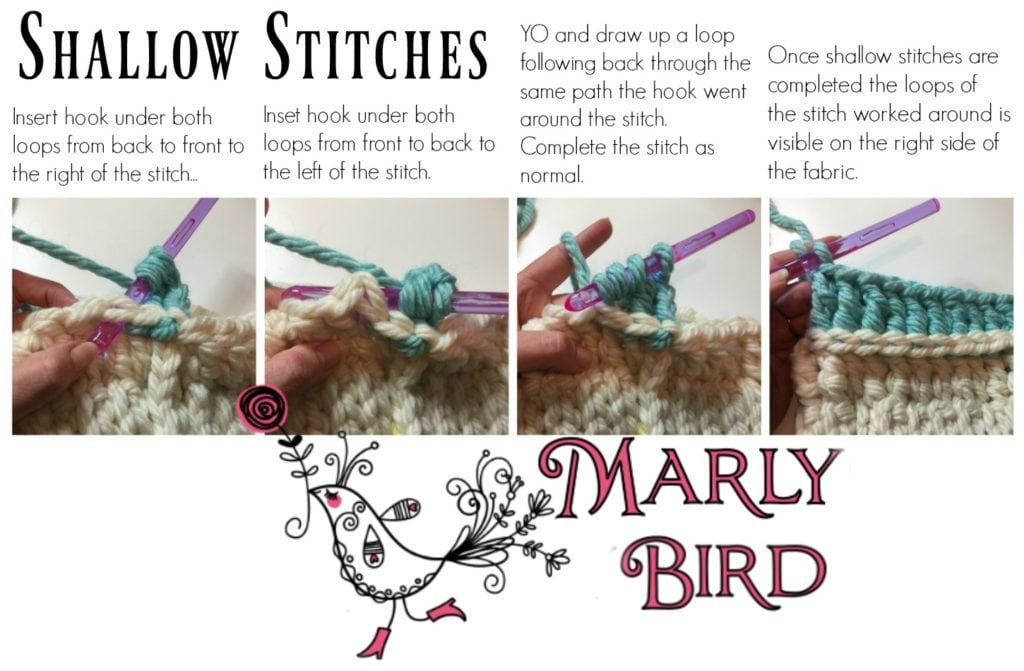
- When going to the body of the hat work SHALLOW post stitches. These are made just like post stitches, but the placement of the stitch is above the post of the stitch below and under the top “v” of the stitch. I highly recommend watching this video on shallow post stitches. Even though the video demonstrates how to do double crochet, you can substitute a treble crochet.
- When changing colors do so in the slip stitch join of the round.
- I did photo tutorials the best way I know how. Hopefully, you will find them helpful.
Stitches Used (and YouTube Video links to help you learn)
- Chain Stitch (ch)
- Slip Stitch (Sl St)
- Slip Stitch Ribbing
- Through Back Loop Only (TBLO)
- Through Front Loop Only (TFLO)
- Double Crochet (DC)
- Treble Crochet (TC)
- Shallow Post Stitches (in treble crochet)
- Shallow Back Post Double Crochet Two Together (BPDC2Tog)
Free Bulky Crochet Messy Bun Hat: Pattern Stitch
Slip Stitch Ribbing
Chain any number of stitches
Row 1: Slip stitch through the back loop only (TBLO) of the 2nd chain from hook and in each chain to the end, ch 1, turn.
Row 2: Slip stitch through TBLO of the sl st of previous row (skipping the ch1), and in each stitch to the end, ch 1, turn.
Repeat row 2 to desired length. Fasten off.
Free Bulky Crochet Messy Bun Hat: Pattern
Brim of hat
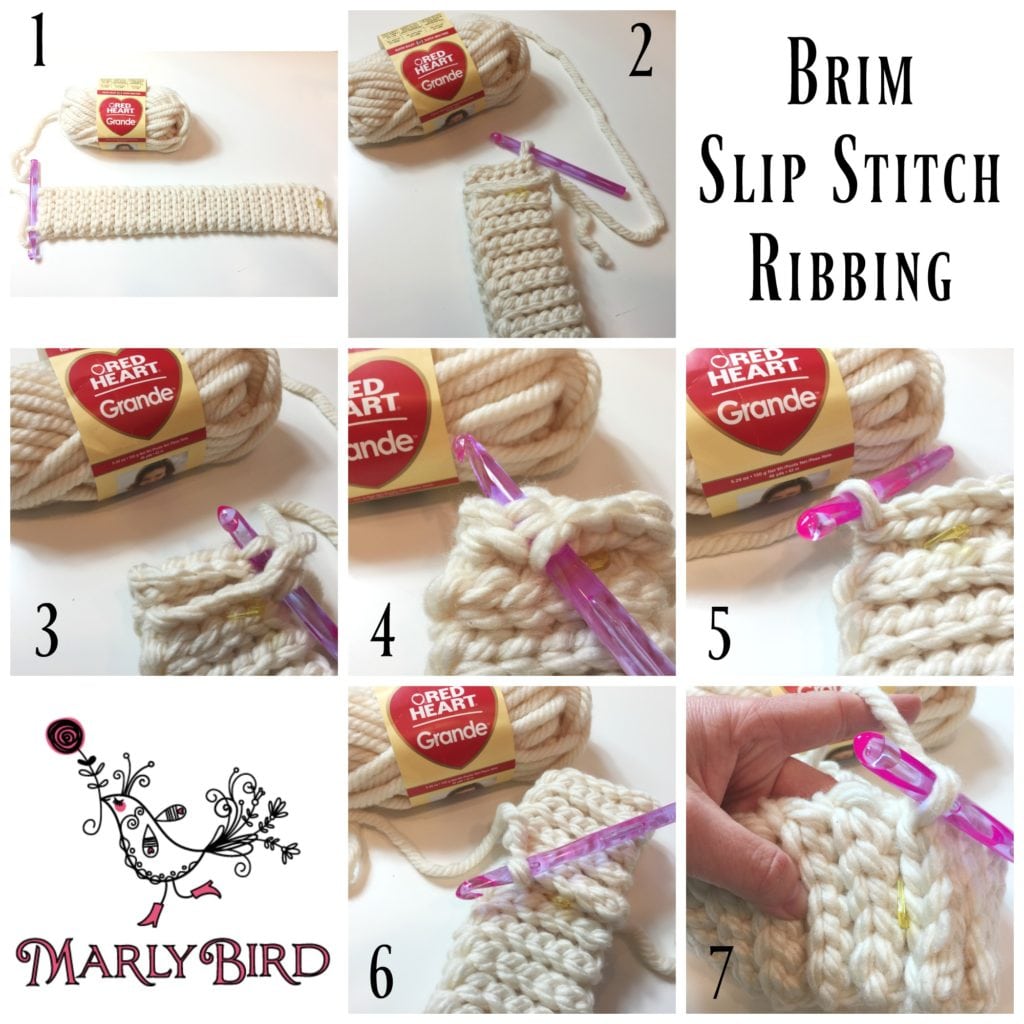
(Refer to image below)
With Color A, chain 6, slip stitch (sl st) in the 2nd chain from hook through back loop only (TBLO) and in each chain to end, place a stitch marker in the stitches to signify the RS of work, ch 1, turn –5 slip stitches.
Row 2: Slip stitch in each stitch TBLO to end of row, ch 1, turn.
Repeat row 2 until brim has 20 (22, 24) ridges and after finishing a Right Side (RS) row. See picture #1, which shows 24 ridges, and the yellow marker indicates it is the RS row.
1st Finishing
Fold piece in half lengthwise, with the first row with the stitch marker in front of the last row completed behind it as in picture #2.
Join together with sl sts working only into the remaining front loops (TFLO) of the foundation chain row and TBLO of the last row as in picture #3.
Continue joining with a sl st in the same manner over all 5 stitches as in pictures #4 and #5.
Picture #6 shows what your work should look like. Do Not Finish. –21 (23, )25 ridges after join.
Rotate the band as in picture #7 and continue the to build the body of the hat into the edge of the slip stitch rows.
Body of Hat
Rnd 1: Ch 3 (counts as Treble Crochet), working along the edge of the brim, * treble crochet (TC) in space to the right of ridge of sl st ribbing, * 3 (3, 4) SHALLOW FPTC around ridge of sl st ribbing, TC in the space to the right of ridge, TC in the space to the left of ridge; repeat from * 3 times, 2 (4, 4) SHALLOW FPTC around ridge of sl st ribbing, join with a sl st to 3rd ch of beginning chain (BCH), DO NOT TURN–26 (28, 30) stitches.
Designer Help
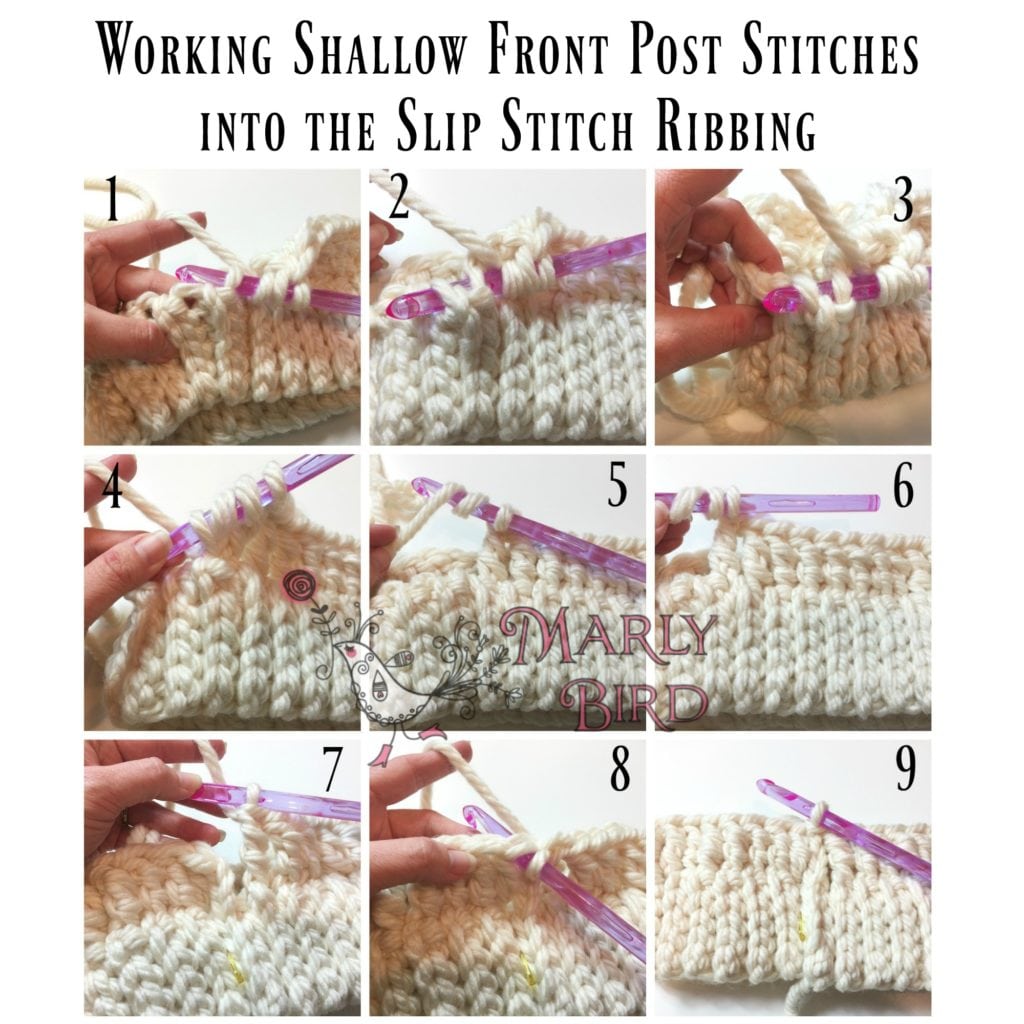
Because I know that Rnd 1 can be VERY confusing I did a picture tutorial to help. The following instructions are for Rnd 1 in a longer format. They reference the image below. DO NOT repeat Rnd 1 if you’ve already done it. I am simply trying to help explain rnd 1 in another way for those who need it:
Ch 3 (this counts as a Treble Crochet) working along the edge of the brim, * treble crochet (TC) in space to the right of ridge of sl st ribbing as in picture #1,
SHALLOW FPTC around ridge of sl st ribbing as in picture #2 and #3, you can see that you insert your hook into the same stitch you just did the TC from front to back, go around the back of the entire ridge of the slip stitch ribbing and bring your hook out through the stitch on the other side of the ridge.
Once you’ve pulled up a loop through that space, complete the treble crochet as in picture #4.
You are now going to do that again 2 (2, 3) more times. So you will have the Beginning Chain, the TC, and 3, (3, 4) SHALLOW FPTC completed.
Now, TC in the space to the right of the next ridge, this is the same space you would be inserting your hook to start a SHALLOW FPTC but you’re only doing a TC, not a shallow post stitch.
Now, TC in the space to the left of the same ridge, this is the same space you would be exiting your hook after going around the ridge to finish the SHALLOW FPTC but you are only doing a TC, not a shallow post stitch.
Designer Note
WHY did we just do those two TC as normal and not post stitches? Well, we need to add stitches to the body of the hat. I found that working TC into the two stitches was less bulky than trying to do two post stitches around one ridge.
It is time to repeat these instructions a total of 3 times as in picture #5 and #6.
Step 1
SHALLOW FPTC around ridge of sl st ribbing as in picture #2 and #3, you can see that you insert your hook into the same stitch you just did the TC from front to back, go around the back of the entire ridge of the slip stitch ribbing and bring your hook out through the stitch on the other side of the ridge.
Once you’ve pulled up a loop through that space, complete the treble crochet as in picture #4.
You are now going to do that again 2 (2, 3) more times. So you will have the Beginning Chain, the TC, and 3, (3, 4) SHALLOW FPTC completed.
Now, TC in the space to the right of the next ridge, this is the same space you would be inserting your hook to start a SHALLOW FPTC but you’re only doing a TC, not a shallow post stitch.
Now, TC in the space to the left of the same ridge, this is the same space you would be exiting your hook after going around the ridge to finish the SHALLOW FPTC but you are only doing a TC, not a shallow post stitch.
Step 2
SHALLOW FPTC around ridge of sl st ribbing as in picture #2 and #3, you can see that you insert your hook into the same stitch you just did the TC from front to back, go around the back of the entire ridge of the slip stitch ribbing and bring your hook out through the stitch on the other side of the ridge.
Once you’ve pulled up a loop through that space, complete the treble crochet as in picture #4.
You are now going to do that again 2 (2, 3) more times. So you will have the Beginning Chain, the TC, and 3, (3, 4) SHALLOW FPTC completed.
Now, TC in the space to the right of the next ridge, this is the same space you would be inserting your hook to start a SHALLOW FPTC but you’re only doing a TC, not a shallow post stitch.
Now, TC in the space to the left of the same ridge, this is the same space you would be exiting your hook after going around the ridge to finish the SHALLOW FPTC but you are only doing a TC, not a shallow post stitch.
Step 3
SHALLOW FPTC around ridge of sl st ribbing as in picture #2 and #3, you can see that you insert your hook into the same stitch you just did the TC from front to back, go around the back of the entire ridge of the slip stitch ribbing and bring your hook out through the stitch on the other side of the ridge.
Once you’ve pulled up a loop through that space, complete the treble crochet as in picture #4.
You are now going to do that again 2 (2, 3) more times. So you will have the Beginning Chain, the TC, and 3, (3, 4) SHALLOW FPTC completed.
Now, TC in the space to the right of the next ridge, this is the same space you would be inserting your hook to start a SHALLOW FPTC but you’re only doing a TC, not a shallow post stitch.
Now, TC in the space to the left of the same ridge, this is the same space you would be exiting your hook after going around the ridge to finish the SHALLOW FPTC but you are only doing a TC, not a shallow post stitch.
Next Steps…
The next part has us do 2 (4, 4) more SHALLOW FPTC around ridge of sl st ribbing. This will take us to the end of the round as in picture #7.
To finish the round, join with a sl st to 3rd ch of beginning chain (BCH) as in picture #8, DO NOT TURN–26 (28, 30) stitches.
Picture #9 shows what the finished round should look like.
Change to next color if desired–if you are changing colors, do so on the slip stitch join.
Rnds 2 and 3: Ch 3 (Counts as a treble crochet), SHALLOW BPDC around each stitch to end, join with a sl st to 3rd ch of BCH. Look at image below if you have trouble or check out this video!
Crown of Hat
Rnd 1 (Decrease Round): Ch 2 (counts as half of a shallow bpdc2tog), bpdc in next stitch (this is the other half of the first shallow bpdc2tog) * SHALLOW BPDC2tog over two stitches; rep from * to end of rnd, join with a slip stitch into the first SHALLOW BPDC2tog. Do Not Turn–13 (14, 15) BPDC2Tog.
—For Free Crochet Messy Bun Hat Pattern — Messy Bun Only– Fasten off leaving long tail.
Messy Bun Hat: Thread the tail of the yarn in a Bent Tip Tapestry Needle or Finishing Yarn Needles PERFECT for Bulky Yarn and weave the tail in on the wrong side of the crochet hat to secure.
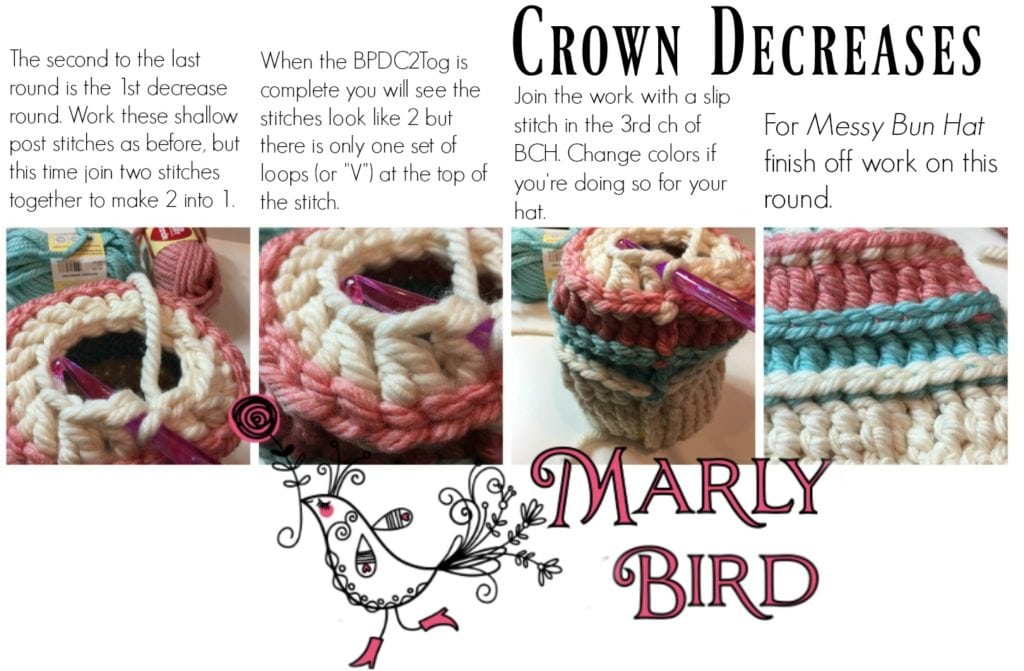 Final Round
For size S and L
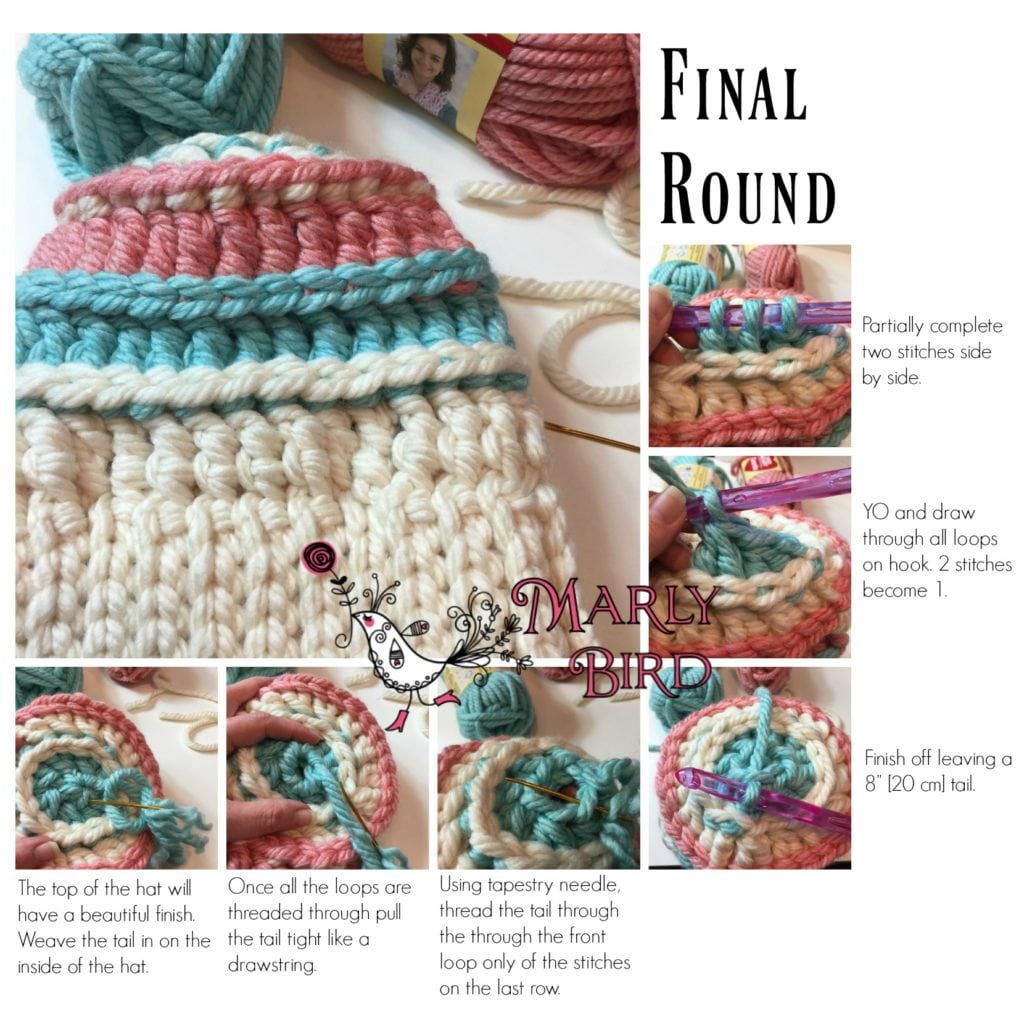
Rnd 2 (Decrease Round): Ch 2 (counts as a shallow BPDC), * SHALLOW BPDC2tog over two stitches; rep from * to end of rnd, join with a slip stitch into the first SHALLOW BPDC2tog.
For size M
Rnd 2 (Decrease Round): Ch 2 (counts as half of a shallow bpdc2tog), bpdc in next stitch (this is the other half of the first shallow bpdc2tog) * SHALLOW BPDC2tog over two stitches; rep from * to end of rnd, join with a slip stitch into the first SHALLOW BPDC2tog.
2nd Finishing
Closed Hat: Thread tail of the yarn in Bent Tip Tapestry Needle or Finishing Yarn Needles PERFECT for Bulky Yarn. Thread needle through FRONT LOOP ONLY of all stitches on last row completed, pull together like drawstring. Push needle to inside of hat, weave tail in on the wrong side of crochet hat to secure.
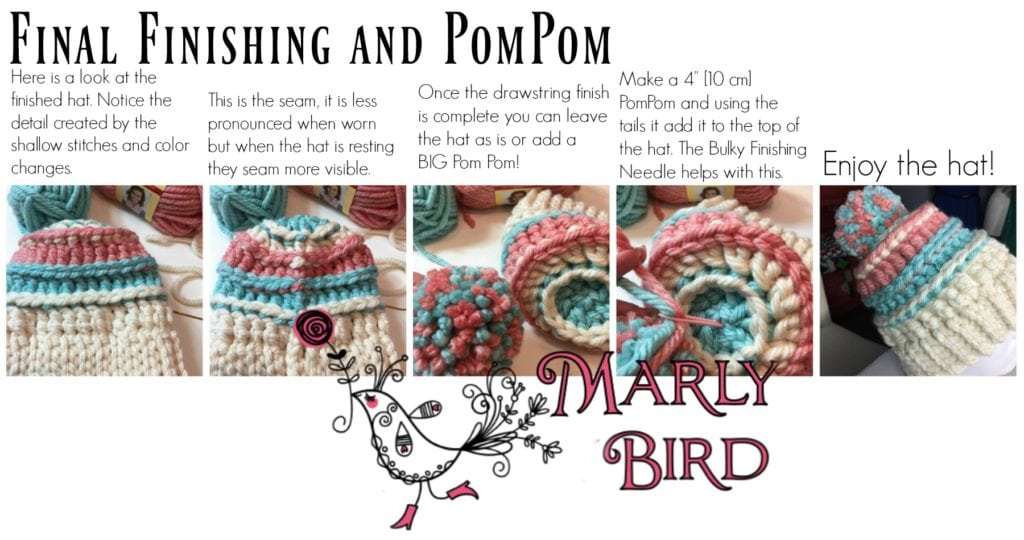
Make a 4″ Pom Pom and sew it to the top of the hat for added fun!
There you have it. A fun and Free Bulky Crochet Messy Bun Hat Pattern that can also be made into a basic hat! Perfect for both men and women. Here are a couple more graphics for you. Use them on your Ravelry Project Page, Facebook Post, Pinterest Link or your blog. Please feel free to use these images but please link back to this page! 🙂 Thank you for your support and I hope you will share your finished projects with me on my facebook page.
Categories: Crochet, Our Free Patterns, Pattern, Uncategorized





Please do a video of row #1. i can do the shallow fptc and shallow bptc but I am really confused where to put these stitches in round one after the brim. I read and reread instructions and I end with too many stitches in round. help