
Crochet Star Stitch Pattern| Easy Photo Tutorial and…
The crochet star stitch forms rows of starburst-like stitches. This crochet stitch pattern is worked over two rows and can be stacked or separated by rows of single crochet, half double crochet, double crochet, or any other stitch you wish to use. Learn how to crochet the star stitch with this easy tutorial (both picture and video) and free pattern.
Crochet star stitch has a beautiful texture and is great for nearly any project such as Christmas Stockings, crochet accessories, baby blankets, and anything else you can think of making. Let's learn how to make this stitch!
First thing to note is that this stitch is also sometimes called the “Marguerite stitch” or the “daisy stitch,” or even a “spiked cluster.” As you come across this other stitches you should be able to use the knowledge from this post to make those stitches.
Step-by-Step Crochet Star Stitch Photo Tutorial
This crochet star stitch photo tutorial is based on an even number of stitches. It takes 2 rows to complete the look of a finished star stitch.
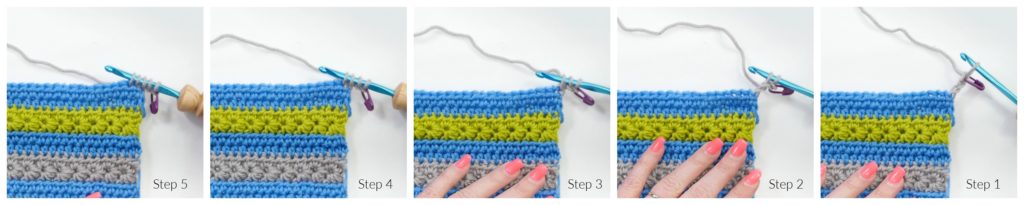
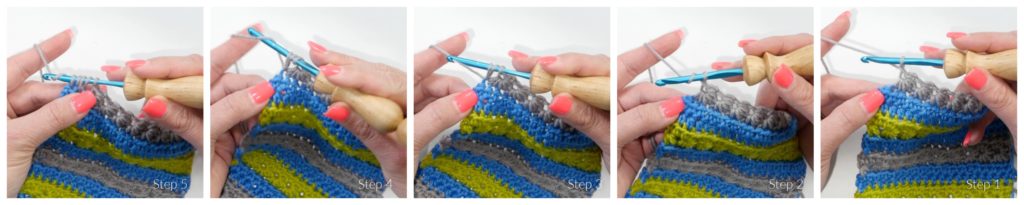
ROW 1 (RS)– The following steps refer to the image below for the First Row of Beginning Crochet Star Stitch – Steps 1-5.
- Step 1: Make an even number of foundation chains + 3. This will give you an even number of stitches but an odd number of crochet star stitches. Begin the crochet star stitch (shown here on already established fabric). Add a stitch marker to the 1st chain from hook.
- Step 2: Insert hook in 2nd chain from hook, yarn over hook, pull up a loop — 2 loops on hook.
- Step 3: Insert hook in 3rd chain from hook, yarn over hook, pull up a loop — 3 loops on hook.
- Step 4: Insert hook in 4th chain from hook (as shown in 1st stitch of row), yarn over hook, pull up a loop — 4 loops on hook.
- Step 5: Insert hook in 5th chain from hook (as shown in 2nd stitch of row), yarn over hook, pull up a loop — 5 loops on hook.
The following steps refer to the image below for the First Row of Beginning Crochet Star Stitch – Steps 6-9
- Step 6: Insert hook in 6th chain from hook (as shown in 3rd stitch of row), yarn over hook, pull up a loop — 6 loops on hook.
- Step 7: Yarn over hook.
- Step 8: Pull yarn over through 6 loops on hook.
- Step 9: Chain 1 (creates the ‘eye' of the star stitch).
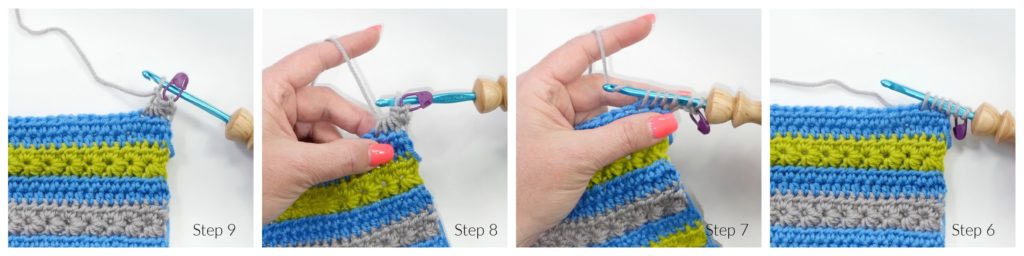
The beginning crochet star is complete. Let's make another star!
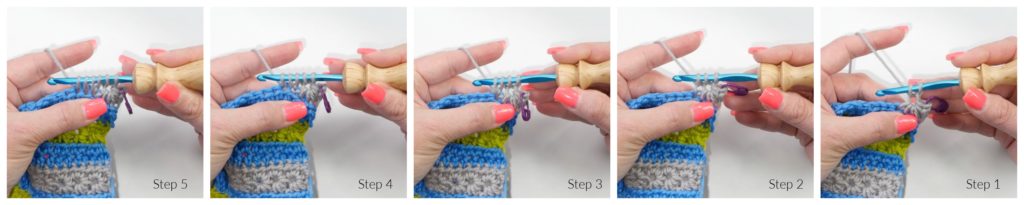
The following steps refer to the image below for the First Row of Crochet Star Stitches – Each Star After Beginning Star Stitch Is Made Steps 1-5
- Step 1: Insert hook in chain 1 space (‘eye' of the star stitch), yarn over, pull up a loop — 2 loops on hook.
- Step 2: Insert hook in the front leg of the last loop pulled up on previous star stitch, yarn over, pull up a loop — 3 loops on hook.
- Step 3: Insert hook in same chain (as shown in same stitch) as the last loop pulled up on previous star stitch, yarn over, pull up a loop — 4 loops on hook.
- Step 4: Insert hook in next chain (as shown in next stitch of row), yarn over hook, pull up a loop — 5 loops on hook.
- Step 5: Insert hook in next chain (as shown in next stitch of row), yarn over hook, pull up a loop — 6 loops on hook.
The following steps refer to the image below for the First Row of Crochet Star Stitches – Each Star After Beginning Star Stitch Is Made Steps 6-8
- Step 6: Yarn over hook.
- Step 7: Pull yarn over through 6 loops on hook.
- Step 8: Chain 1 (creates the ‘eye' of the star stitch).
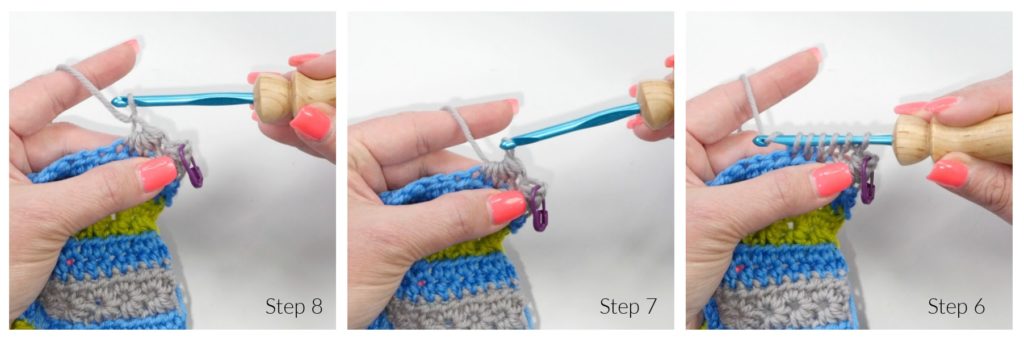
Repeat the last 8 steps to the last chain or stitch of the row.
The following steps refer to the image below for the First Row of Crochet Star Stitches – Last Stitch of Row Steps 1-5
- Step 1: Identify the last stitch of the row
- Step 2: Yarn over hook — 2 loops on hook.
- Step 3: Insert hook in same chain (as shown in same stitch) as the last loop pulled up on previous star stitch, yarn over, pull up a loop — 3 loops on hook.
- Step 4: Yarn over hook — 4 loop on hook.
- Step 5: Insert hook in last chain (as shown in last stitch of row), yarn over hook, pull up a loop — 5 loops on hook — yarn over hook.
- Step 6: Pull last yarn over created on step 5 through all 5 loops on hook — hdc2tog just created. Turn.
First row of the crochet star stitch is finished. Continue to the second row to get a complete crochet star stitch
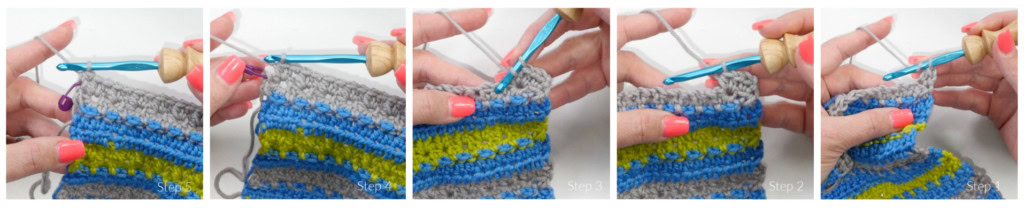
ROW 2 (WS)–The following steps refer to the image below for the Second Row Crochet Star Stitch — Steps 1-5
- Step 1: Chain 2 (does not count as a half double crochet), half double crochet in 1st stitch.
- Step 2: Half double crochet twice into the chain 1 space (the ‘eye' of the star stitch from previous row).
- Step 3: Repeat step 2 in the next chain 1 space (the ‘eye' of the star stitch from previous row) to the last chain 1 space.
- Step 4: Identify the marked chain from step 1 of row 1.
- Step 5: Half double crochet into the marked chain 1 from previous row.
After the 2nd row of the crochet star stitch is complete, you should have the same number of even stitches as you started with and you will have an odd number of star stitches complete.
Use the Crochet Star Stitch In Many Ways
This stitch pattern is a wonderful stitch to use in many projects. Create a solid fabric with an all over star stitch pattern in one color and get a beautiful textural stitch.
Or you can change up the all over star stitch pattern by changing the color of the star stitch rows. This really helps the star stitch POP and makes the pattern shine.
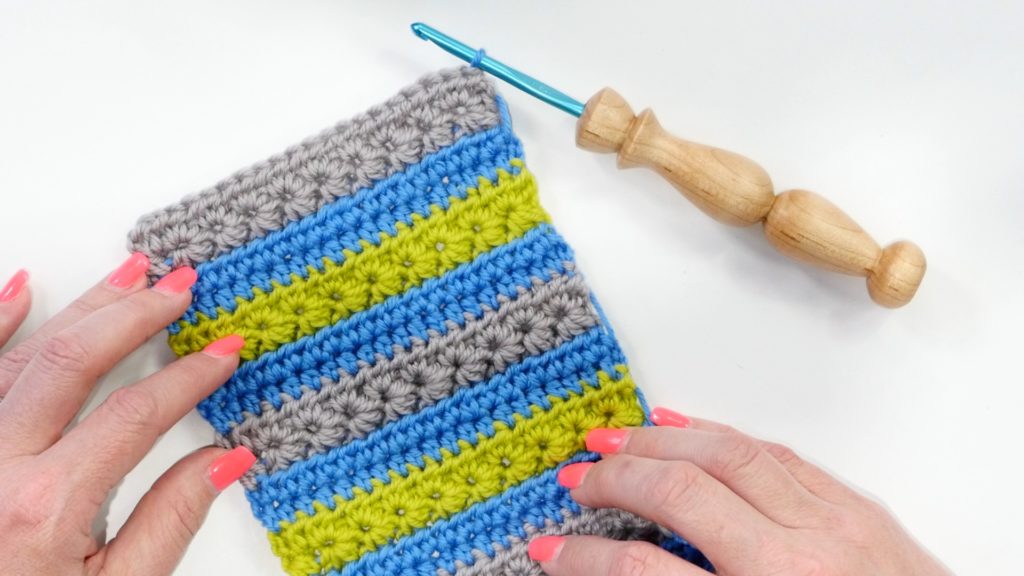
Or you can separate the crochet star stitch rows with single crochets, half double crochets, double crochets, etc. Shown below with 2 rows of half double crochets between each row of crochet star stitch in a separate color.
Frequently Asked Questions
What is the crochet star stitch?
The star stitch creates clusters that look like little stars across the fabric surface! It's worked by drawing up multiple loops through various stitches and previous chains, then closing them all together at the top. The gathered-and-closed cluster creates the star or snowflake shape. The resulting fabric has a beautiful textural surface where each “star” is a distinct, dimensional motif. It's one of those stitches that looks far more complex than it is once you understand the repeat.
Is the star stitch difficult to learn?
It has a learning curve but it's not as hard as it looks! The main technique… drawing up loops through multiple positions and closing them together… is similar to cluster and puff stitches. The specific hook insertion points and the precise number of loops to collect are what you need to learn. The photo and video tutorials in this post make the process much clearer than written instructions alone. Most crafters get the hang of it within their first complete star cluster. After that, the repeat becomes rhythmic and relatively fast.
What projects look best in star stitch?
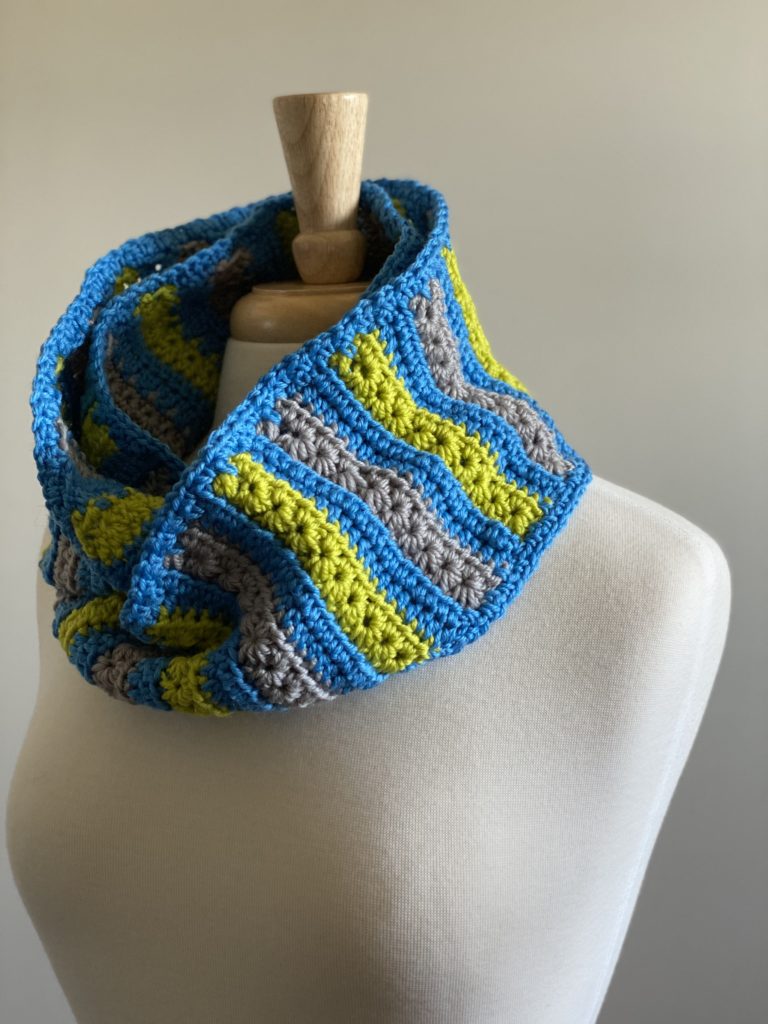
Blankets and throws are the most popular… seeing the all-over star pattern at scale is genuinely beautiful. Scarves and cowls have a gorgeous texture. Pillow covers. Bags. Baby items where the soft, plush-feeling star stitch fabric is both beautiful and comfortable. The star stitch creates a thick, dense fabric (because multiple stitches are gathered into each star) that's particularly warm and substantial… ideal for cold-weather accessories and cozy home goods.
What yarn and colors work best for star stitch?
Solid or semi-solid colors show the star pattern most clearly! The dimensional star shapes are visible primarily through the shadow they cast on the fabric… variegated or heavily textured yarns can make the stars hard to see. Smooth yarn with good stitch definition creates the crispest stars. Single colors in light to medium values (so the shadows of the star texture are visible) give the most dramatic effect. In two colors alternating by row, the star stitch creates a beautiful striped effect where each color appears in alternating rows of stars.
How does star stitch differ from the Catherine's Wheel stitch?
They're related techniques… both use multi-loop gathering to create raised, circular or star-like motifs. Catherine's Wheel is worked differently (in the round or specific row sequences) and creates larger, more distinct wheel-shaped motifs. The star stitch typically creates smaller, denser stars with a slightly different visual scale and texture. Both are beautiful! If you love one, you'll likely want to explore the other. The photo tutorial and video for this star stitch post will show you exactly what makes it distinct from its related stitch cousins.


Thank you. I knew this stitch years ago and forgot how. Beautiful stitch.🤔