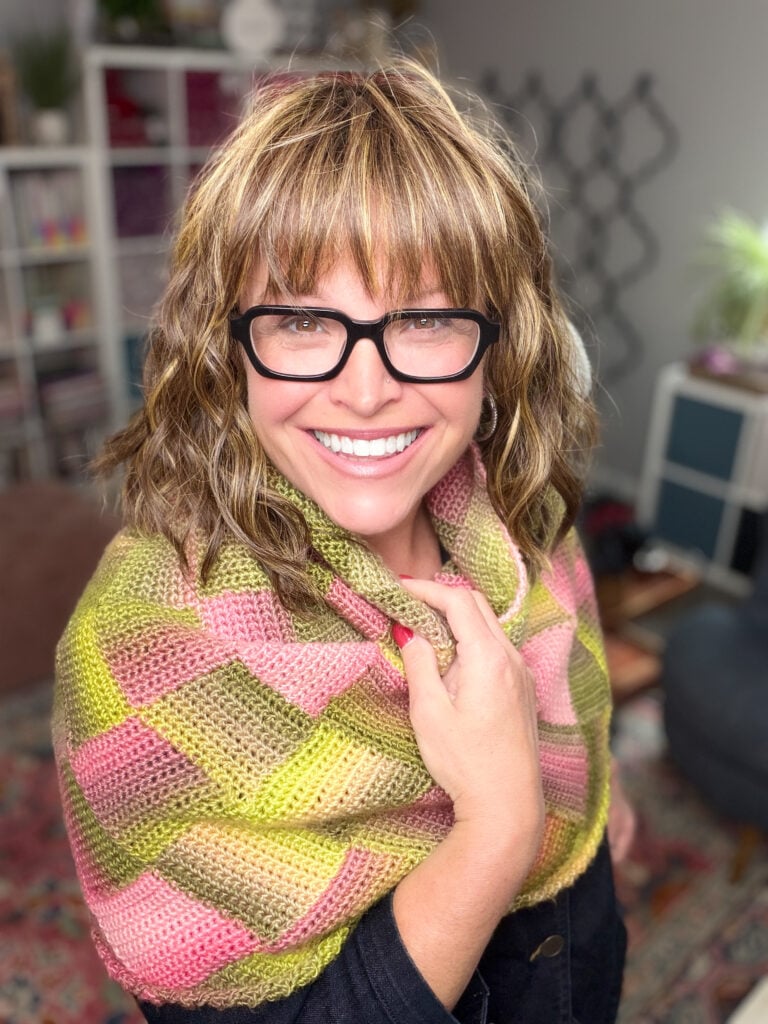
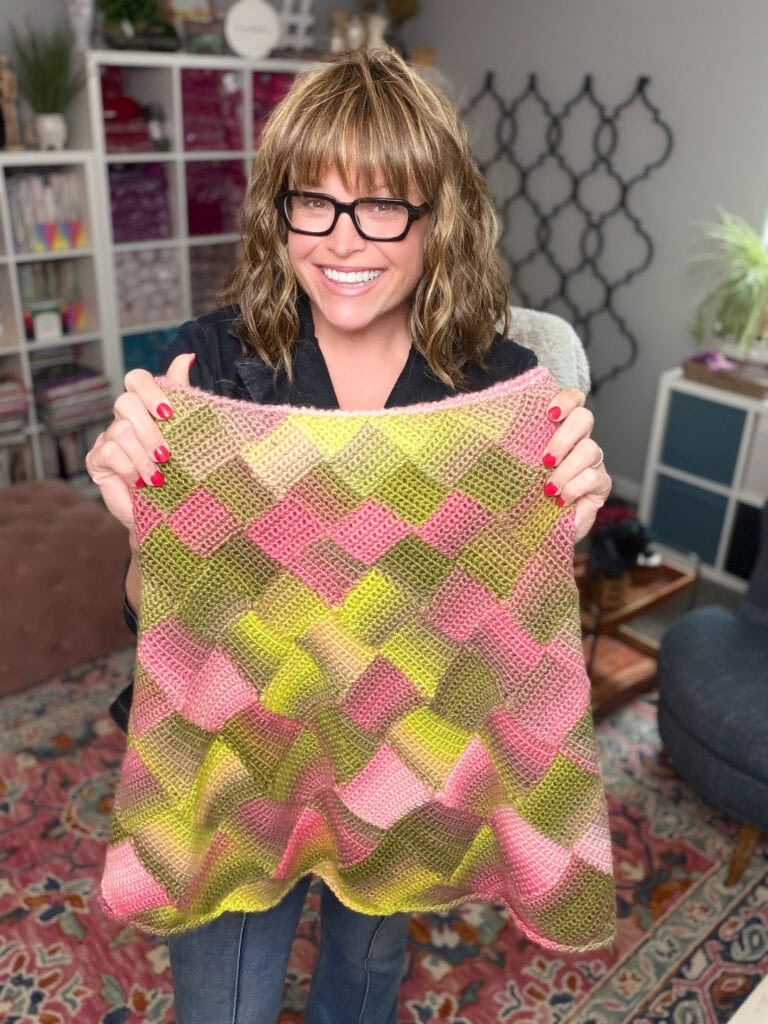
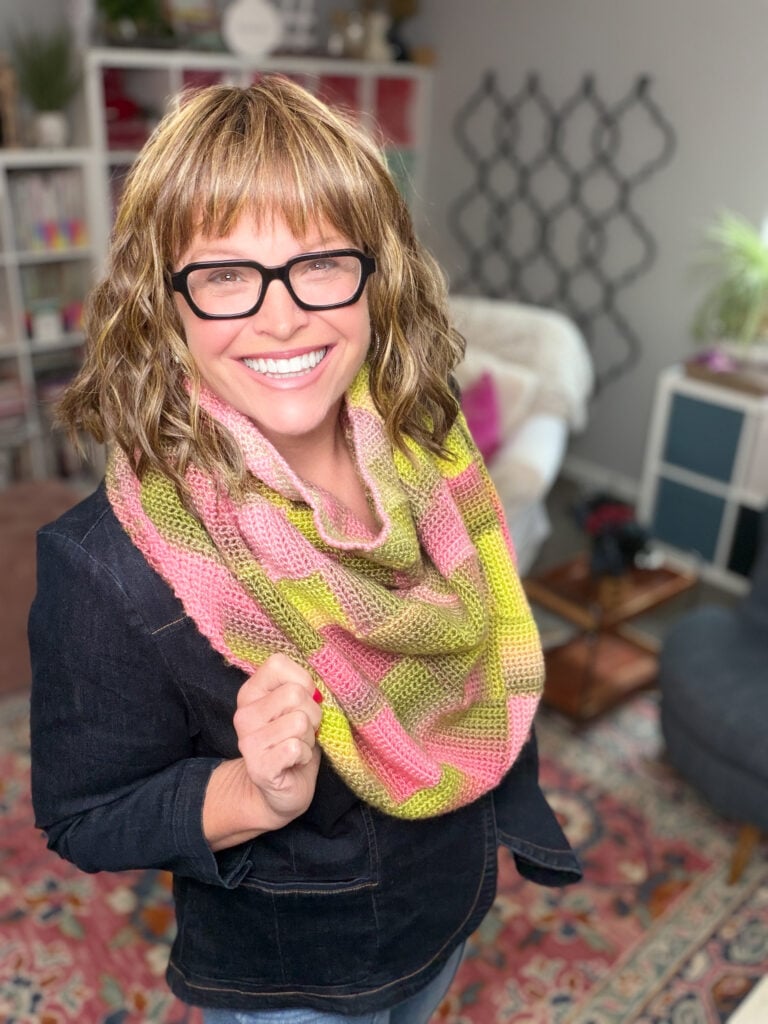
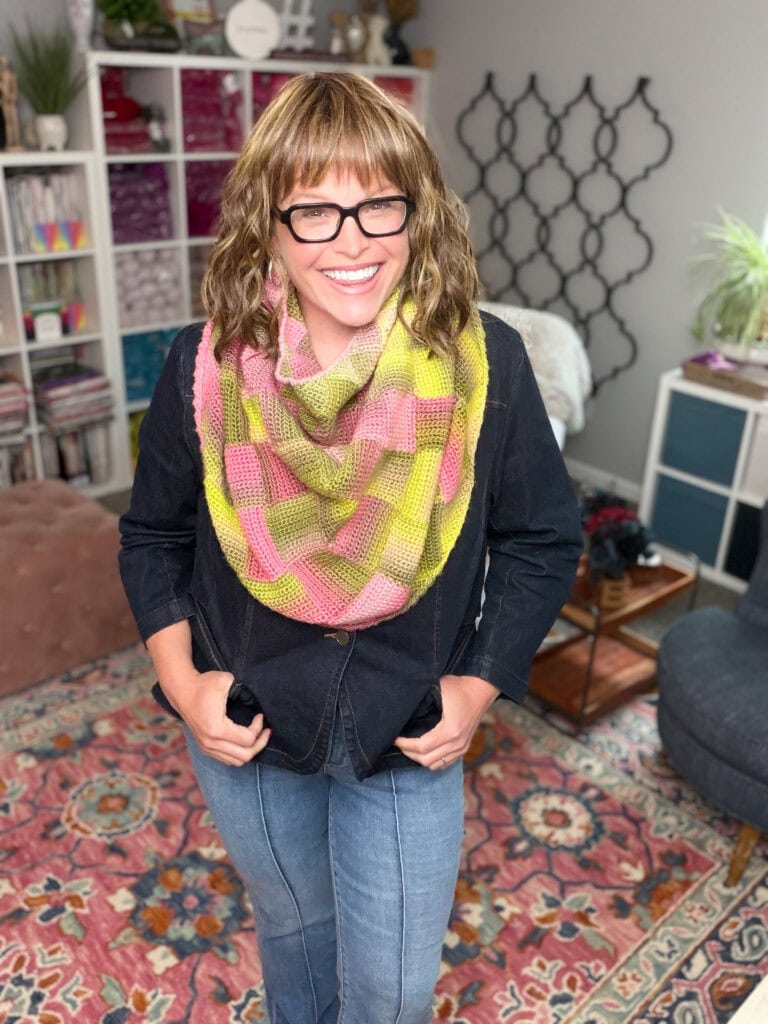
Boysenberry Bramble Cowl: Free Single Crochet Entrelac Pattern
This free crochet entrelac pattern teaches you single crochet entrelac… a beginner-friendly version of the “scary” knit technique you’ve probably heard about. The Boysenberry Bramble Cowl is a smaller, faster project worked in a CYCA #4 worsted gradient cake yarn… finished with a tidy reverse single crochet edge for a polished neckline. Designed by Marly Bird, originally published in 2018 and lovingly refreshed for 2026.
Here’s the thing nobody tells you about entrelac… single crochet entrelac is NOT the scary knit version. It’s NOT Tunisian entrelac either. It’s plain old single crochet… the very first stitch you ever learned… worked in a clever order that builds up interlocking woven blocks. If you can sc, you can do this. The Boysenberry Bramble cowl is the perfect place to start.
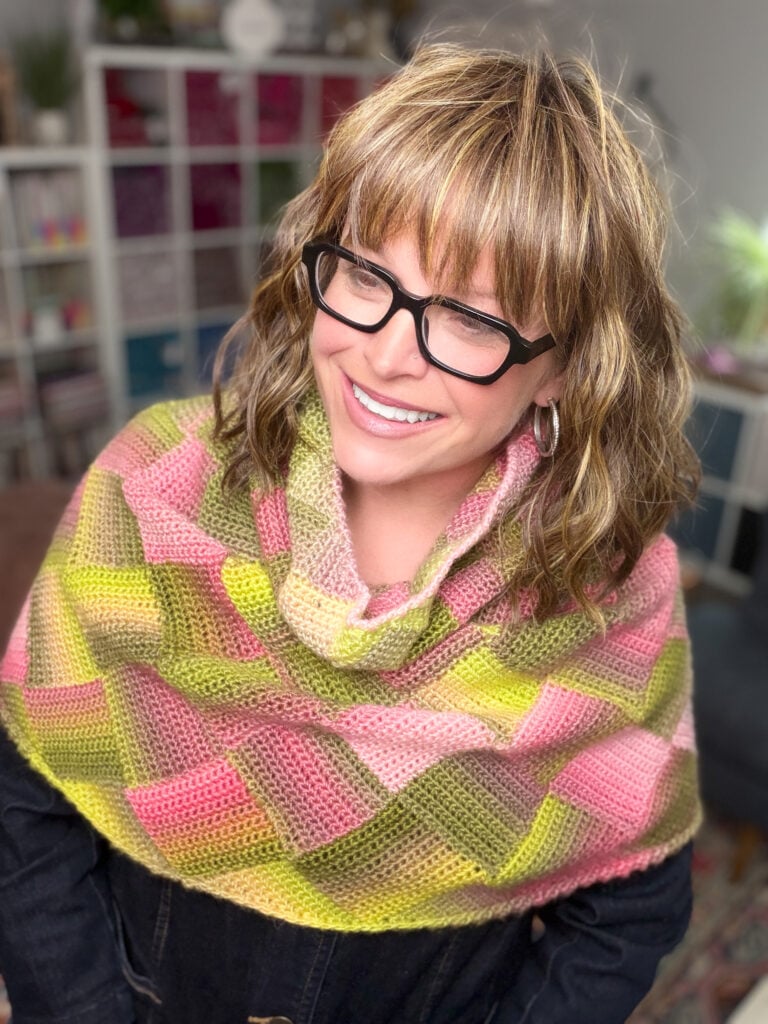
Hey, bestie 💛 If entrelac has been on your “someday when I’m braver” list, today is your day. The Boysenberry Bramble cowl uses one stitch (single crochet), one gorgeous worsted gradient cake yarn, and one set of tier instructions that build on themselves to create a fully-shaped 28½″ neckline cowl with a 46″ bottom flare. It’s the smaller, faster, more wearable cousin of my Pieces of You single crochet entrelac wrap… and a perfect first SC entrelac project before you graduate to the full wrap.
Affiliate disclosure: Some of the links in this post are affiliate links, which means if you click through and purchase, I may earn a small commission at no extra cost to you. I only recommend yarns and tools I’ve used and trust with my yarn-loving heart. Thank you for supporting free patterns on the blog 💛
What You Will Love About This Pattern 💖
✨ Only one stitch. Single crochet, start to finish. No Tunisian hook, no special technique you’ve never tried. If you can chain, single crochet, and slip stitch… you can crochet entrelac. Promise.
🌈 Gradient yarn does the heavy lifting. The Boysenberry Bramble cowl is designed for cake yarn… that magical self-striping yarn that shifts colors all on its own. You get a cowl that looks like you spent hours planning a color sequence… when really, the yarn did it for you while you watched your shows.
🎯 Cowl-sized commitment. The full Pieces of You wrap is gorgeous but takes 35-50 hours. The Boysenberry Bramble cowl is the perfect “learn the technique without committing to a giant wrap” project. Smaller stakes, same beautiful woven look.
📐 Repeatable rhythm. Once you finish Tier 1 (base triangles) and Tier 2 (your first squares), the rest of the cowl follows the same rhythm. It becomes meditative… the kind of project you pick up in the evening and don’t put down.
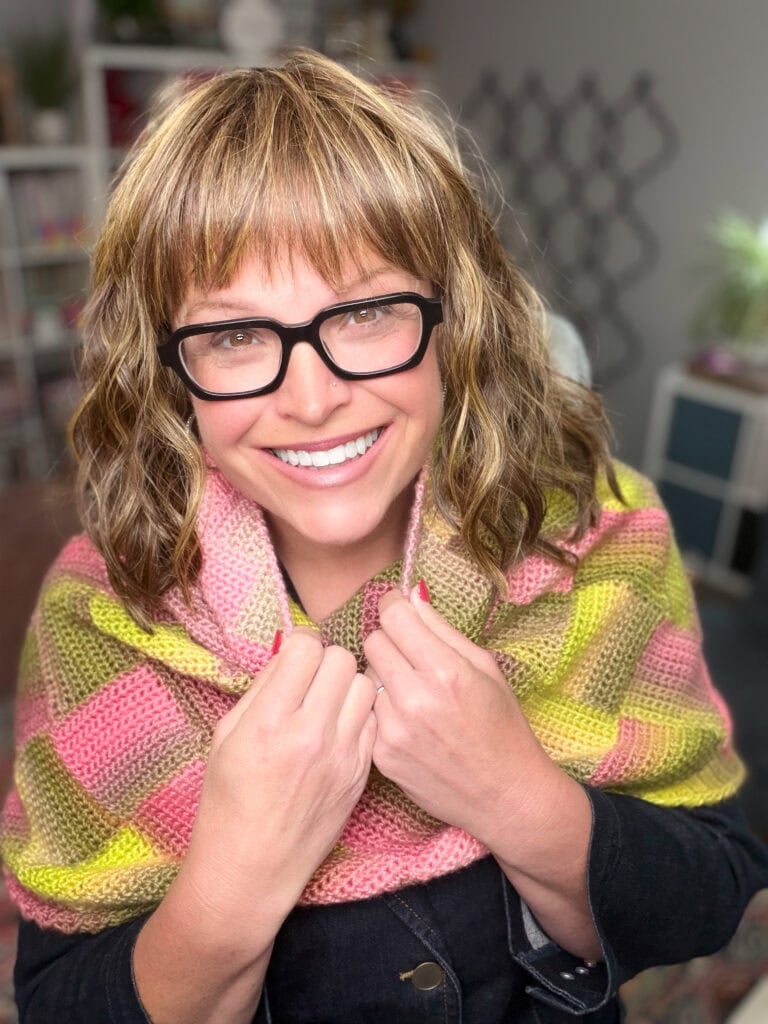
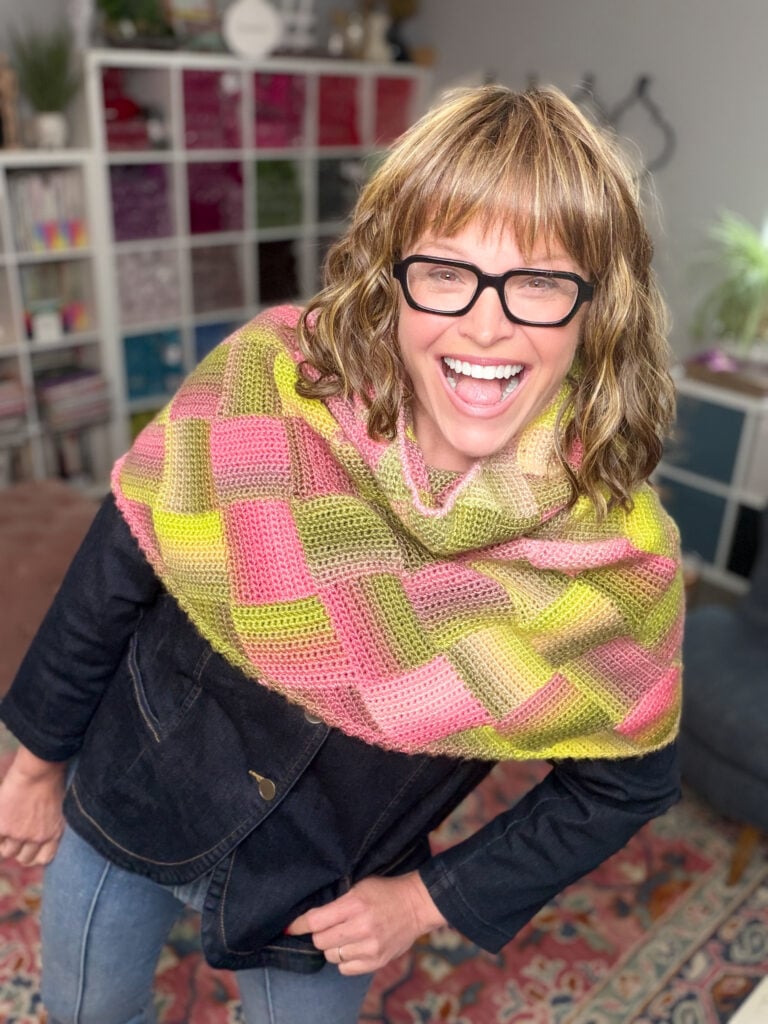
🪡 Tidy, finished neckline. The cowl is shaped (46″ bottom circumference, 28½″ top circumference) for a flattering fit, and finished with a single round of reverse single crochet. That little twisted-rope edge along the top is what makes it look professionally designed instead of homemade.
Quick Pattern Overview
🧶 Skill Level: Intermediate (advanced beginner with patience can absolutely do this)
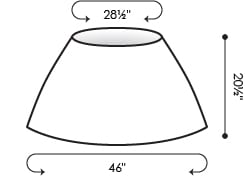
📏 Finished Size: Bottom circumference 46″ / 117 cm; neck circumference 28½″ / 72.5 cm; length 20½″ / 52 cm
📐 Gauge: 15 sc = 3¼″ and 15 sc rows = 2¾″ after blocking
🌈 Yarn: Originally designed for Red Heart Unforgettable (now discontinued); the recommended substitute is Loops & Threads Facets from Michaels. Both are CYCA #4 worsted-weight gradient acrylic, ~270 yd / 100g.
🪝 Hook: Size G-6 (4.25 mm) or size required for gauge
🎨 Construction: Worked flat in tiers of triangles and squares, then seamed at the end. The fabric grows on the bias, building tier by tier from a base of triangles up to a final tier of triangles for a clean straight top edge.
Is This Crochet Cowl Right for You?
This pattern is a beautiful fit if you’ve crocheted a few projects beyond a granny square and you’re ready to try something that looks impressive without actually being hard. You should be comfortable working single crochet, slip stitch, and reading row-by-row instructions. Each square is just sc… but the connection between squares (the sc2tog into the previous tier + slip stitch turn) takes a few rounds of practice before it clicks.
If you’ve been intimidated by entrelac on knitting Instagram or by Tunisian entrelac videos… this is your gateway. SC entrelac is genuinely the most approachable version of the technique that exists. And once you’ve made one cowl, you’ll want to graduate up to the bigger Pieces of You wrap next.
If you’re a brand-new beginner who has never finished a project? Save this for your second or third make. You’ll enjoy it so much more once basic single crochet feels automatic.
Join our Newsletter
Get Free Crochet & Knitting
Pattern Links & Coupons!

What Is Single Crochet Entrelac?
Entrelac is a technique where small geometric shapes (usually squares) are worked one at a time and connected to the previous row of squares as you go. The result is fabric that looks woven, like a basket or a tile floor, even though it’s all one continuous piece worked with one tool.
A single crochet entrelac pattern uses only single crochet stitches plus slip stitches to build those interlocking blocks. There’s no Tunisian hook, no special equipment, and no new stitch to learn. The “magic” is in the order you work the squares… you work into the edges of previous squares to anchor the next row of blocks, which is what creates the woven illusion.
That’s literally the whole secret. Stitches worked into edges of previous squares = interlocking blocks. The fabric does the impressive part for you.
SC Entrelac vs Knit Entrelac vs Tunisian Entrelac
If you’ve Googled “entrelac” before and ended up overwhelmed, here’s why… most of the entrelac content online is one of two intimidating versions. Let me break down all three so you can see exactly where SC entrelac fits.
Knit entrelac. Worked with two knitting needles using a combination of pick-up stitches, short rows, and constant turning. Beautiful, but a real commitment of brain power. Most “entrelac is hard” reputations come from knit entrelac. As somebody who literally wrote a book on How to Knit Entrelac… I promise it’s doable, but it’s a different beast.
Tunisian entrelac. Worked with a Tunisian (Afghan) hook… the long one with a stopper on the end. Tunisian crochet has its own learning curve before you even get to entrelac, and many crocheters never use a Tunisian hook at all.
Single crochet entrelac (this pattern). Worked with a regular crochet hook using single crochet, slip stitch, and sc2tog. The same tools you already own. The same stitches you already know. That’s it. That’s the whole technique. SC entrelac is the friendliest version of entrelac that exists, and it produces a fabric just as beautiful as the other two.
You are just building squares one on top of another. Very similarly to how corner-to-corner crochet is worked… if you’ve made a C2C blanket, you already know the construction logic.
This is the differentiation that matters: when you see “entrelac” in the wild and feel a little flutter of fear… remember, the Boysenberry Bramble cowl is single crochet. Just single crochet. You’re already qualified.
Yarn & Materials
Original Yarn: Red Heart Unforgettable (Discontinued)
The Boysenberry Bramble cowl was originally designed in 2018 using Red Heart Unforgettable in the Sugarcane colorway… a 100% acrylic, worsted-weight gradient cake yarn at 270 yd / 100g.
Heads up… Red Heart Unforgettable has been discontinued and most colorways (including Sugarcane) are no longer in production. You can still find skeins at clearance pricing on Yarnspirations or in destash listings, but it’s not a yarn you’ll want to count on for a fresh project. The good news? There’s a near-perfect substitute that’s actively in production.
Recommended Substitute: Loops & Threads Facets
My #1 swap for Unforgettable is Loops & Threads Facets from Michaels. It’s a worsted-weight gradient acrylic that was made to fill the Unforgettable gap… same weight (CYCA #4), same gradient cake construction, same drape. You’ll need approximately 4 balls for this cowl… check your gauge and yardage on whichever colorway you choose.
Other worsted gradient cake substitutes (backup options): Lion Brand Mandala (worsted gradient, ~590 yd cake… fewer balls needed), Caron Cakes (worsted acrylic/wool blend gradient cake), or any LYS worsted-weight gradient cake yarn at CYCA #4. Just check your total yardage… aim for ~1,000 yd of worsted gradient yarn for the full cowl.
⭐️ Designer Tip… Match your second cake. When you start ball 2, begin from the same color point you started ball 1 at. This keeps the gradient flowing visually instead of jumping mid-cowl. Take 3 minutes to wind off (or pull from the center) until you reach the matching color… it's worth the small bit of waste for a cowl that looks cohesive.
Tools & Notions
- Crochet hook: Size G-6 (4.25 mm) or size required for gauge
- Stitch markers… you’ll use these to mark the last sc of every Row 15 (the corner of each finished square). They’re essential, not optional.
- Bent-tip yarn needle for weaving in ends and seaming
- Blocking mats and pins (or blocking wires)… entrelac fabric blooms beautifully when blocked.
- Wool wash… I love Eucalan for blocking, no rinse needed.
Video Support
Need to see the technique in motion? Watch my single crochet entrelac tutorial on YouTube before you cast on… it walks you through the same connecting stitch (sc2tog into the previous tier + slip stitch turn) used throughout this pattern.
Love the Pattern but Want an Ad-Free PDF?
The full Boysenberry Bramble pattern is right here on the blog for free, forever. But if you’d rather have a clean, printable, ad-free PDF you can take to your reading chair (or to your favorite yarn shop), the formatted PDF with charts is available on Ravelry:
Or sign up for the newsletter below to unlock the in-page Grow version (free… just takes your email) and get future free patterns straight to your inbox.
Join our Newsletter
Get Free Crochet & Knitting
Pattern Links & Coupons!
Boysenberry Bramble — Pattern Details
Skill Level
Intermediate
Finished Measurements
Bottom Circumference 46″ / 117 cm
Neck Circumference 28½″ / 72.5 cm
Length 20½″ / 52 cm
Gauge
15 sc = 3¼″ and 15 sc rows = 2¾″ after blocking. CHECK YOUR GAUGE. Use any size hook to obtain the gauge.
Materials
- Yarn (original): RED HEART® Unforgettable™; 3.5 oz (100 g) ball, 270 yd (247 m), 100% Acrylic; 4 balls #3962 Sugarcane (discontinued… see Loops & Threads Facets above as the recommended substitute)
- Hook: Size G-6 (4.25 mm) or size required for gauge
- Notions: Bent-tip yarn needle, stitch markers
Abbreviations
- ch = chain
- hdc = half double crochet
- ea = each
- linked hdc = linked half double crochet (see Special Stitches)
- rep = repeat
- RS = right side
- sc = single crochet
- sk = skip
- sl st = slip stitch
- sp = space
- st(s) = stitch(es)
- WS = wrong side
- * to * = work directions from * to * the number of times specified or to a specific stitch
Special Stitches
⭐️ Sc2tog: Pull up a loop in each of 2 indicated sts, yo and draw through all 3 loops on hook.
⭐️ Sc3tog: Pull up a loop in each of 3 indicated sts, yo and draw through all 4 loops on hook.
⭐️ Reverse Single Crochet (Crab Stitch): Sc in last st of previous row or round, * sc in next st to the RIGHT of last st; rep from * around (reversing normal direction of round), sl st in 1st sc to connect. Fasten off. This is what gives the finished cowl its tidy, twisted-rope edging at the top.
Stitch Diagram & Layout Charts
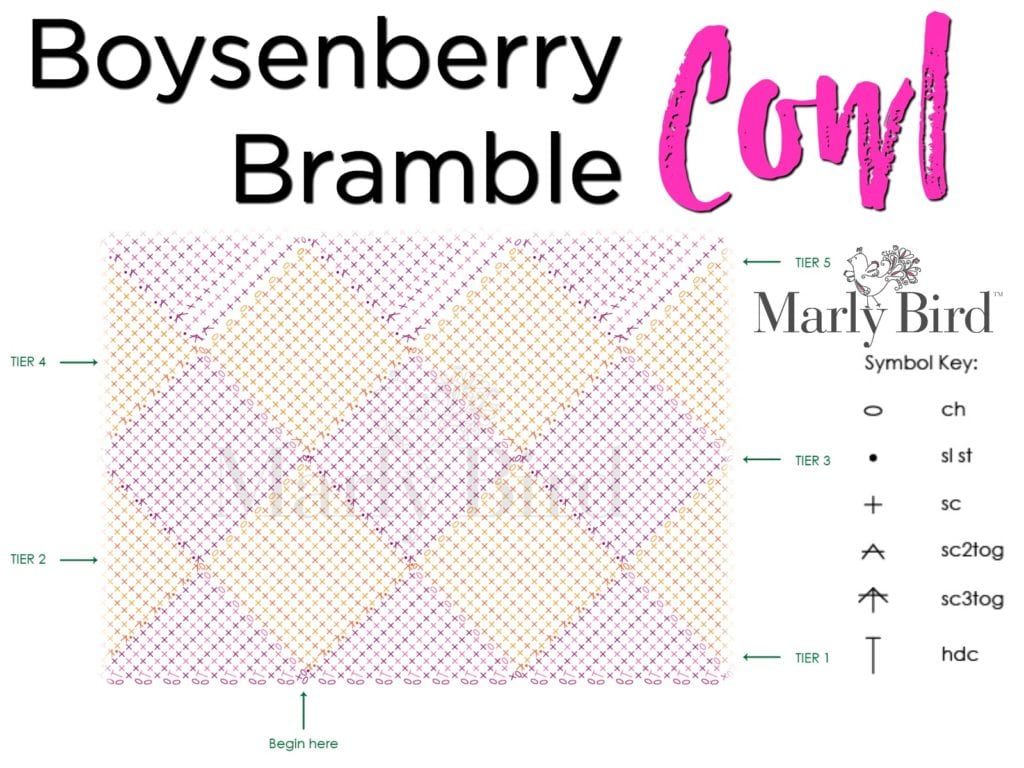


Notes
- Cut yarn and re-join with a sl st in indicated st after each tier of squares or triangles.
- The working direction of each tier is the opposite of the previous tier (this is what makes the squares stack on the bias and creates the woven look).
- If you would like an ad-free PDF that includes a chart for the stitches used, grab it on Ravelry.
⭐️ Designer Tip… The “slip stitch in place of the ch-1 turn”: When you reach the end of a row that connects to the previous tier, you'll work an sc2tog (joining your new square to the previous tier) and then a slip stitch into the next stitch on the previous tier. That slip stitch takes the place of the ch-1 you'd normally do after turning. So when you turn for the next row, do NOT chain 1… the slip stitch already counts as your turning chain. Read this twice. Then read it a third time as you work Square 1 of Tier 2. By Square 2 it will be muscle memory.
GROW
To Unlock Exclusive Subscriber Content click the Box below and join for free by simply adding your email and creating a password! If you are having troubles, clear your cache or reset your password or login to the Grow Publisher Portal.
>> Learn More About Grow Here <<
I'm thrilled to share this amazing pattern with you, many patterns on my blog are absolutely free! I kindly request that you don't copy and paste or distribute this pattern. Prefer an ad-free experience? Buy a digital PDF pattern for a small fee from one of my online stores for a seamless crafting journey.
I appreciate your support and readership. You are the reason I can keep doing what I love and sharing it with others. So, thank you from the bottom of my yarn-loving heart! Disclosure: This post contains affiliate links, meaning I get a commission if you decide to make a purchase through my links at no cost to you.
Boysenberry Bramble — Pattern Instructions
Tier 1
Entrelac builds upon itself on the bias in this pattern. In order to do that we have to begin with a tier of base triangles that we can work off of to make our square blocks on the next tier.
Base Triangle 1
Ch 2.
Row 1 (RS): Sc in 2nd ch from hook and mark this sc — 1 st. Ch 2 (does not count as a st), turn.
Row 2: (Hdc, sc) in sc — 2 sts. Ch 1, turn.
Row 3: Sc in first 2 sts and in next ch — 3 sts. Ch 2, turn.
Row 4: (Hdc, sc) in first st, sc in each of next 2 sts — 4 sts. Ch 1, turn.
Row 5: Sc in first 4 sts and in next ch — 5 sts. Ch 2, turn.
Row 6: (Hdc, sc) in first st, sc in each of next 4 sts — 6 sts. Ch 1, turn.
Row 7: Sc in first 6 sts and in next ch — 7 sts. Ch 2, turn.
Row 8: (Hdc, sc) in first st, sc in each of next 6 sts — 8 sts. Ch 1, turn.
Row 9: Sc in first 8 sts and in next ch — 9 sts. Ch 2, turn.
Row 10: (Hdc, sc) in first st, sc in each of next 8 sts — 10 sts. Ch 1, turn.
Row 11: Sc in first 10 sts and in next ch — 11 sts. Ch 2, turn.
Row 12: (Hdc, sc) in first st, sc in each of next 10 sts — 12 sts. Ch 1, turn.
Row 13: Sc in first 12 sts and in next ch — 13 sts. Ch 2, turn.
Row 14: (Hdc, sc) in first st, sc in each of next 12 sts — 14 sts. Ch 1, turn.
Row 15: Sc in first 14 sts and in next ch, mark last sc made — 15 sts. Ch 1 loosely; do not turn.
Mark RS of triangle to keep track of RS of work.
Tier 2
This tier is built on Base Triangles of Tier 1.
Each square will begin with WS facing.
Join yarn with sl st to top corner of last completed triangle.
Square 1
Row 1 (WS): Working along side edge of triangle, sc in edge st of first 14 rows of triangle, sc2tog over edge st of next row and marked st on next triangle, remove marker, sl st in next st on same triangle — 15 sts. Turn.
Row 2: Sk sl st, sc in each of next 15 sts. Ch 1, turn.
Row 3: Sc in first 14 sts, sc2tog over next sc and next st on adjoining triangle, sl st in next st on same triangle — 15 sts. Turn.
Rows 4-14: Rep the last 2 rows 5 more times, then rep Row 2 only once more.
Row 15: Sc in first 14 sts, sc2tog over next sc and next st on adjoining triangle, mark sc2tog just made. Ch 1 loosely; do not turn.
Squares 2-11
Work same as Square 1.
Fasten off.
Tier 3
This tier is worked evenly, building on Tier 2.
Each square will begin with RS facing.
Join yarn with sl st to top corner of last completed square.
Square 1
Row 1 (RS): Working along side edge of square, sc in edge st of first 14 rows of square, sc2tog over edge st of next row and marked st on next square, remove marker, sl st in next st on same square — 15 sts. Turn.
Row 2: Sk sl st, sc in each of next 15 sts. Ch 1, turn.
Row 3: Sc in first 14 sts, sc2tog over next sc and next st on adjoining square, sl st in next st on same square — 15 sts. Turn.
Rows 4-14: Rep the last 2 rows 5 more times, then rep Row 2 only once more.
Row 15: Sc in first 14 sts, sc2tog over next sc and next st on adjoining square, mark sc2tog just made. Ch 1 loosely; do not turn.
Squares 2-11
Work same as Square 1.
Fasten off.
Tier 4
This is a 1-st decrease tier.
Each square will begin with WS facing.
Join yarn with sl st to top corner of last completed square.
Square 1
Row 1 (WS): Working along side edge of square, sc in edge st of first 12 rows of square, sc2tog over edge sts of next 2 rows, sc2tog over edge st of next row and marked st on next square, remove marker, sl st in next st on same square — 14 sts. Turn.
Row 2: Sk sl st, sc in each of next 14 sts. Ch 1, turn.
Row 3: Sc in first 13 sts, sc2tog over next sc and next st on adjoining square, sl st in next st on same square — 14 sts. Turn.
Rows 4-14: Rep the last 2 rows 5 more times, then rep Row 2 only once more.
Row 15: Sc in first 14 sts, sc2tog over next sc and next st on adjoining square, mark sc2tog just made. Ch 1 loosely; do not turn.
Squares 2-11
Work same as Square 1.
Fasten off.
Tier 5
This is a 1-st and 2-row decrease tier.
Each square will begin with RS facing.
Join yarn with sl st to top corner of last completed square.
Square 1
Row 1 (RS): Working along side edge of square, sc in edge st of first 12 rows of square, sc2tog over edge sts of next 2 rows, sc3tog over edge st of next row, marked st on next square, and next st on same square (this is the one you would have normally worked sl st into), remove marker, sl st in next st on same square — 14 sts. Turn.
Row 2: Sk sl st, sc in each of next 14 sts. Ch 1, turn.
Row 3: Sc in first 12 sts, sc3tog over next 2 sc and next st on adjoining square, sl st in next st on same square — 13 sts. Turn.
Row 4: Sk sl st, sc in each of next 13 sts. Ch 1, turn.
Row 5: Sc in first 12 sts, sc2tog over next sc and next st on adjoining square, sl st in next st on same square — 13 sts. Turn.
Rows 6-12: Rep the last 2 rows 3 more times, then rep Row 2 only once more.
Row 13: Sc in first 12 sts, sc2tog over next sc and next st on adjoining square, mark sc2tog just made. Ch 1 loosely; do not turn.
Squares 2-11
Work same as Square 1.
Fasten off.
Tier 6
This is a 1-st decrease tier.
Each square will begin with WS facing.
Join yarn with sl st to top corner of last completed square.
Square 1
Row 1 (WS): Working along side edge of square, sc in edge st of first 10 rows of square, sc2tog over edge sts of next 2 rows, sc2tog over edge st of next row and marked st on next square, remove marker, sl st in next st on same square — 12 sts. Turn.
Row 2: Sk sl st, sc in each of next 12 sts. Ch 1, turn.
Row 3: Sc in first 11 sts, sc2tog over next sc and next st on adjoining square, sl st in next st on same square — 12 sts. Turn.
Rows 4-12: Rep the last 2 rows 4 more times, then rep Row 2 only once more.
Row 13: Sc in first 12 sts, sc2tog over next sc and next st on adjoining square, mark sc2tog just made. Ch 1 loosely; do not turn.
Squares 2-11
Work same as Square 1.
Fasten off.
Tier 7
This is a 1-st and 2-row decrease tier.
Each square will begin with RS facing.
Join yarn with sl st to top corner of last completed square.
Square 1
Row 1 (RS): Working along side edge of square, sc in edge st of first 10 rows of square, sc2tog over edge sts of next 2 rows, sc3tog over edge st of next row, marked st on next square, and next st on same square (this is the one you would have normally worked sl st into), remove marker, sl st in next st on same square — 12 sts. Turn.
Row 2: Sk sl st, sc in each of next 12 sts. Ch 1, turn.
Row 3: Sc in first 10 sts, sc3tog over next 2 sc and next st on adjoining square, sl st in next st on same square — 11 sts. Turn.
Row 4: Sk sl st, sc in each of next 11 sts. Ch 1, turn.
Row 5: Sc in first 10 sts, sc2tog over next sc and next st on adjoining square, sl st in next st on same square — 11 sts. Turn.
Rows 6-10: Rep the last 2 rows twice more, then rep Row 2 only once more.
Row 11: Sc in first 10 sts, sc2tog over next sc and next st on adjoining square, mark sc2tog just made. Ch 1 loosely; do not turn.
Squares 2-11
Work same as Square 1.
Fasten off.
Tier 8
This is a 1-st decrease tier.
Each square will begin with WS facing.
Join yarn with sl st to top corner of last completed square.
Square 1
Row 1 (WS): Working along side edge of square, sc in edge st of first 8 rows of square, sc2tog over edge sts of next 2 rows, sc2tog over edge st of next row and marked st on next square, remove marker, sl st in next st on same square — 10 sts. Turn.
Row 2: Sk sl st, sc in each of next 10 sts. Ch 1, turn.
Row 3: Sc in first 9 sts, sc2tog over next sc and next st on adjoining square, sl st in next st on same square — 10 sts. Turn.
Rows 4-10: Rep the last 2 rows 3 more times, then rep Row 2 only once more.
Row 11: Sc in first 10 sts, sc2tog over next sc and next st on adjoining square, mark sc2tog just made. Ch 1 loosely; do not turn.
Squares 2-11
Work same as Square 1.
Fasten off.
Tier 9
This is a 1-st and 2-row decrease tier.
Each square will begin with RS facing.
Join yarn with sl st to top corner of last completed square.
Square 1
Row 1 (RS): Working along side edge of square, sc in edge st of first 8 rows of square, sc2tog over edge sts of next 2 rows, sc3tog over edge st of next row, marked st on next square, and next st on same square (this is the one you would have normally worked sl st into), remove marker, sl st in next st on same square — 10 sts. Turn.
Row 2: Sk sl st, sc in each of next 10 sts. Ch 1, turn.
Row 3: Sc in first 8 sts, sc3tog over next 2 sc and next st on adjoining square, sl st in next st on same square — 9 sts. Turn.
Row 4: Sk sl st, sc in each of next 9 sts. Ch 1, turn.
Row 5: Sc in first 8 sts, sc2tog over next sc and next st on adjoining square, sl st in next st on same square — 9 sts. Turn.
Rows 6-8: Rep the last 2 rows once more, then rep Row 4 only once more.
Row 9: Sc in first 8 sts, sc2tog over next sc and next st on adjoining square, mark sc2tog just made. Ch 1 loosely; do not turn.
Squares 2-11
Work same as Square 1.
Fasten off.
Tier 10
This tier is worked evenly.
Each square will begin with WS facing.
Join yarn with sl st to top corner of last completed square.
Square 1
Row 1 (WS): Working along side edge of square, sc in edge st of first 8 rows of square, sc2tog over edge st of next row and marked st on next square, remove marker, sl st in next st on same square — 9 sts. Turn.
Row 2: Sk sl st, sc in each of next 9 sts. Ch 1, turn.
Row 3: Sc in first 8 sts, sc2tog over next sc and next st on adjoining square, sl st in next st on same square — 9 sts. Turn.
Rows 4-8: Rep the last 2 rows twice more, then rep Row 2 only once more.
Row 9: Sc in first 8 sts, sc2tog over next sc and next st on adjoining square, mark sc2tog just made. Ch 1 loosely; do not turn.
Squares 2-11
Work same as Square 1.
Fasten off.
Tiers 11 & 12
Work same as Tier 10, being sure to begin all Tier 11 squares with RS facing, and all Tier 12 squares with WS facing.
Tier 13
This tier is worked in Ending Triangles to make a flat top edge.
Each triangle will begin with RS facing.
Join yarn with sl st to top corner of last completed square.
Ending Triangle 1
Row 1 (RS): Working along side edge of square, sc in edge st of first 8 rows of square, sc2tog over edge st of next row and marked st on next square, remove marker, sl st in next st on same square — 9 sts. Turn.
Row 2: Sk sl st, sc in each of next 7 sts, sc2tog over last 2 sts — 8 sts. Ch 1, turn.
Row 3: Sc2tog over first two sts, sc in each of sc to last sc, sc2tog over next sc and next st on adjoining square, sl st in next st of same square — 7 sts. Turn.
Row 4: Sk sl st, sc in each sc to last 2 sc, sc2tog over last 2 sts — 6 sts. Ch 1, turn.
Rows 5-7: Rep the last 2 rows once more, then Rep row 3 only once more — 3 sts. Ch 1, turn.
Row 8: Sk sl st, sc in next st, sc2tog over last 2 sts — 2 sts. Ch 1, turn.
Row 11: Sc3tog in over next 2 sts and next st on square — 1 st. Ch 1; do not turn.
Ending Triangles 2-11
Work same as Ending Triangle 1. Do not fasten off.
Finishing
Work 1 round in Reverse Single Crochet around top edge.
Fasten off.
Weave in ends.
Block to schematic measurements.
Blocking Tips
Entrelac fabric is the kind of fabric that blooms when it’s blocked. Before blocking, the squares can look a little compressed and the woven effect feels subtle. After blocking, the squares relax open, the diagonal lines between them become crisp, and the whole cowl finally looks like the photos. Do not skip this step.
Wet block (recommended for this cowl):
- Fill a clean sink or basin with cool water and a tiny splash of Eucalan wool wash. Soak the finished cowl for 15-20 minutes… gently press it under the water; do not agitate.
- Drain the water without lifting the cowl (lifting a soaking-wet piece by one corner stretches it permanently). Press out as much water as you can with the cowl still in the basin, then transfer it onto a clean towel.
- Roll the cowl up in the towel like a burrito and press to remove excess water.
- Lay the cowl flat on blocking mats. Pin it to the schematic dimensions: bottom 46″, top 28½″, length 20½″. Use blocking pins along both straight edges and at the bottom corners. Take your time getting the angles even.
- Let it dry completely before unpinning… usually 12-24 hours depending on humidity.
Spray block (faster alternative): Pin the dry cowl to size on your blocking mats, then mist it thoroughly with cool water from a spray bottle until the fabric is damp throughout. Let dry completely. Less dramatic than a full wet block, but still effective.
⭐️ Designer Tip… Pin every corner of every square. If you really want the woven effect to pop, place a pin at each corner of each entrelac square (where four squares meet). It's tedious but the difference is striking. The blocked fabric will show every interlocking block clearly. This is how you get that “did you really make that?” reaction.
Want to Go Deeper Into Crochet Techniques?
If single crochet entrelac sparks something in you… if you finish this cowl and immediately want to learn more crochet techniques that look harder than they are… check out the courses inside Marly Bird House. It’s where I teach the deeper, more technical side of crochet (and knitting) for crafters who want to grow past beginner-level patterns. Plus, members get early access to new free patterns and a private community to share your makes in.
More Crochet Patterns You’ll Love
If you fall in love with single crochet entrelac (and you will), here are more crochet patterns from the blog to add to your queue:
- Pieces of You Single Crochet Entrelac Wrap… the bigger sister to this cowl. Same technique, full 68″ wingspan. Your natural graduation project.
- Free Crochet Corner-to-Corner Patterns Roundup… every C2C pattern on the blog. Same diagonal construction logic, different stitches. The natural cousin to entrelac.
- Spring Fling 2026 Free Pattern Hub… 20 free knit and crochet patterns from my spring 2026 event.
- Sunday Sideline Crochet Cardigan… another easy-elevated crochet make for when you want a wearable garment without the entrelac learning curve.
- Super Simple Crochet Shawl… if you want a faster, even more beginner-friendly crochet shawl to alternate with this cowl.
Favorite & Queue on Ravelry
Save the Boysenberry Bramble cowl to your Ravelry queue so you can come back to it any time:

Frequently Asked Questions
Is single crochet entrelac hard?
Honestly, no… it just looks hard. If you can single crochet, slip stitch, and sc2tog, you have every stitch you need. The trickiest moment is the “slip stitch in place of the ch-1 turn” technique that joins each new square to the previous tier. It takes a few squares before it clicks, but once it does, the rest of the cowl is meditative repetition. Single crochet entrelac is genuinely the friendliest version of entrelac that exists.
What yarn can I substitute for Red Heart Unforgettable?
My #1 substitute is Loops & Threads Facets from Michaels… it’s the same weight, same gradient cake construction, and same drape as Unforgettable. Lion Brand Mandala and Caron Cakes also work beautifully. The key is to stay in worsted weight (CYCA #4) and stick with a self-striping gradient cake yarn so you keep the color-shift effect that makes this cowl look intentional.
Do I need a Tunisian hook for crochet entrelac?
Nope! That’s Tunisian entrelac, which is a different technique. The Boysenberry Bramble cowl uses a regular crochet hook (size G-6 / 4.25 mm) and only single crochet, slip stitch, and sc2tog. No special equipment, no new stitches to learn. If you already crochet, you already own everything you need.
How do I block an entrelac cowl?
Wet block by soaking the finished cowl in cool water with a small amount of no-rinse wool wash for 15-20 minutes. Press out the water (do not lift or wring), roll in a clean towel to remove more moisture, then pin to the finished schematic dimensions on blocking mats. Let dry completely before unpinning. Blocking is essential for entrelac fabric… the squares relax open and the woven effect becomes much more pronounced.
Why does the working direction change every tier?
Great question… that’s actually how entrelac fabric is constructed on the bias. Each tier of squares is worked in the opposite direction from the tier below it (RS facing one tier, WS facing the next). That alternating direction is what stacks the squares diagonally and creates the woven, interlocking-block look. If you worked every tier in the same direction, you’d end up with a flat striped fabric instead of the basket-weave effect.
What weight is Loops & Threads Facets?
Loops & Threads Facets is a CYCA #4 worsted-weight yarn, 100% acrylic, in a gradient cake construction. It’s designed as Michaels’ in-house counterpart to Red Heart Unforgettable, so it slots in as a one-for-one substitute in any pattern that originally called for Unforgettable… including this one.
How much yarn do I need for this cowl?
The original pattern calls for 4 balls of Red Heart Unforgettable (270 yd / 100g each), so plan for approximately 1,000-1,100 yards of CYCA #4 worsted-weight gradient yarn. If you’re using Lion Brand Mandala (which has more yardage per cake at ~590 yd), you’ll need roughly 2 cakes. Always check your gauge before buying so you can adjust yardage if needed.
Can I make this cowl smaller or larger?
Yes… entrelac scales beautifully because the construction is repeatable. To make it smaller, work fewer base triangles in Tier 1 (each base triangle adds about 4″ of bottom circumference). To make it larger, work more base triangles. Just remember that every Tier 2-12 will then have that same number of squares, so plan your yardage accordingly. For a closer-fitting cowl, work fewer triangles; for a more dramatic shoulder-cape effect, add a couple.

Final Thoughts
The Boysenberry Bramble cowl was the pattern I designed back in 2018 to introduce crocheters to single crochet entrelac in a friendly, achievable way… and seven years later, it’s still doing exactly that. If you make it, share it with me using #BoysenberryBrambleCowl. I love seeing your color choices.
And remember… single crochet entrelac is NOT the scary version. It’s the friendly version. You’ve got this 💛
❤️ Your BiCrafty Bestie,
Marly Bird

#mmmdi
Categories: Crochet, Free Patterns, Our Free Patterns, Pattern