Week 4 part 1 Crochet Tournament of Stitches Mystery Make-Along 2019
Your wait has paid off. The Week 4 part 1 Crochet Shawl for the Tournament of Stitches Mystery Make-Along 2019 with Marly Bird instructions are below. Start the TOS today. Grab your crochet hook and yarn and let’s get started.
*This post contains affiliate links. By clicking on one of these links and making a purchase a portion will go to the blog. The price you pay will not change and the small commission I receive helps me to keep brining you free content and giveaways on the blog. Thank you for your continued support.*
Tournament of Stitches Mystery Make-Along:
If you don’t know what the Tournament of Stitches Mystery Make-Along (TOS) is all about, head over to the blog post and learn all the details before getting started.
This week you will notice a couple of surprises. The first is that there is a surprise section 9. The reason for this is because I changed my mind on the trajectory of the shawl after week 2 and decided that instead of increasing sections 6, 7, and 8, I would decrease them and add a section 9. This made the shawl design much better (my testers agreed). So, there is a section 9 but no worries, it is a repeat of section 1 🙂
Another surprise is that there are two parts to week 4. I explain more later in the pattern, but the gist of it is the border for this shawl is dependent on nice straight edges and known measurements. Therefore, I want everybody to (wash and) block your shawls after section 9. I have a video to show you how to do it if you’ve never done it before.
Week 4 part 2 will be released on Sunday March 31, 2019 @ 10am MT and it will include a video! More on that later. Let’s get on with this pattern!
Week Four part 1 Shawl Instructions????????
Materials
Suggested Yarn: Red Heart Chic Sheep by Marly Bird™, 100% washable merino yarn, 186 yds, 3.5 oz. Marly’s sample colors are listed below:
- Velvet (3 balls) MAIN COLOR
- Vineyard (2 balls)
- Regal (2 balls)
- Polo (2 balls)
- Green Tea (1 ball)
Hooks: I/9 (5.5mm), J/10 (6mm) size needed to obtain correct gauge.
Notions: Stitch markers, tapestry needle
Measurements (before blocking)
Section 1: 4.25” wide x 9” tall
Section 2: 7.5” wide x 9” tall
Section 3: 13″ wide x 9″ tall
Section 4: 18” wide x 9” tall
Section 5: 23″ wide x 9″ tall
Section 6: 18″ wide x 9″ tall
Section 7: 13″ wide x 9″ tall
Section 8: 7.5″ wide x 9″ tall
Section 9: 4.25″ wide x 9″ tall <– surprise!!!
Border: This is really not necessary as the border will be filling in the jagged edge of the shawl. Each section will fill in a 5″ wide by 9″ tall edge.
Color Sequence:
The beauty of this pattern is that you get to select which colors you want to use in each section, and each section is bigger than the last so you will use MORE yarn the larger the section number.
Continue in the pattern following the color sequence you already established. If you find you want to change it up, you can totally do that! If you find you want to use only one color or more than 2 colors in a section, totally up to you. Just remember to anticipate the amount of yarn you will need.
Special Stitches/Abbreviations:
⭐️Dtr: yarn over hook 3 times, insert hook into st/sp, yarn over and draw up a loop (5 loops on hook), [yarn over, draw through 2] 4 times.
⭐️Stacked Double Crochet (Stacked Dc): (Do not ch 1 prior to making the first sc) Sc in first stitch/space, insert hook in between two legs of the base, yarn over and pull up a loop, yarn over and draw through 2 loops on hook.
⭐️V-st: (Dc, ch 1, dc) in stitch or space indicated.
Pattern
Section 8– Cameroon
Notes for Section 8: Use two colors in this section and change colors when indicated. I will refer to them as color A and color B.
‼️This section should be the same size as your section 2.
⭐️Maintain the established sequence of “jagged” edge of the shawl on the same side when you work these sections. If you are looking at the RS of the shawl, the “jagged” edge will be on the left side of the fabric if you’re right handed, on the right side of the fabric if you’re left handed.⭐️
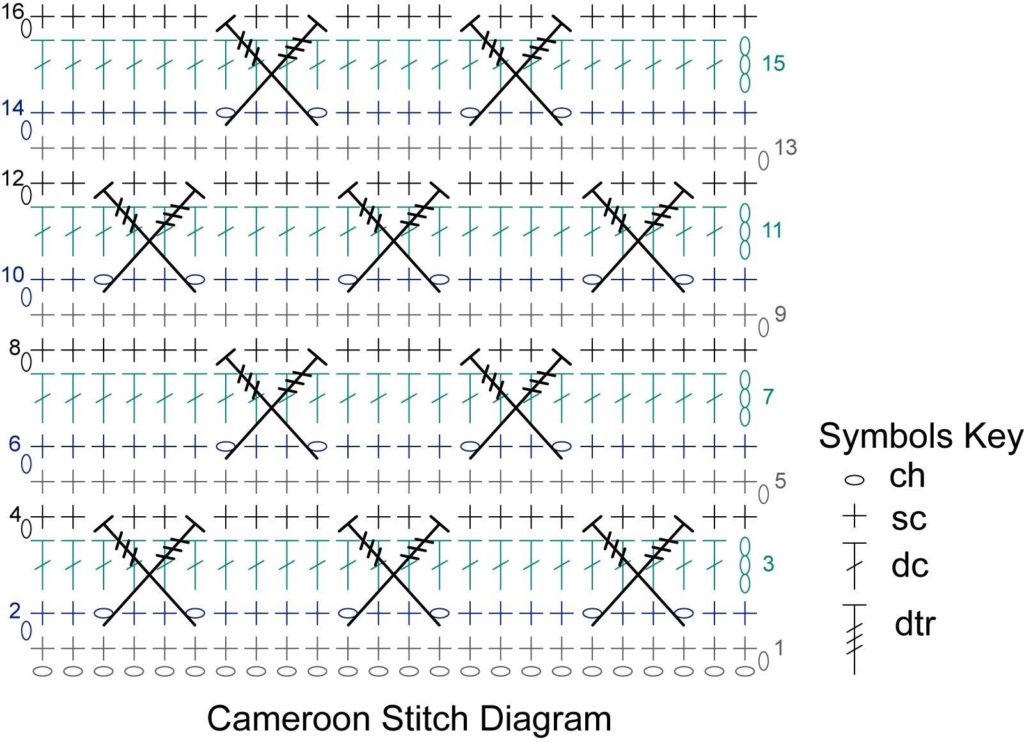
Set-up Row 1 (RS): With Color A, Join yarn with a slip stitch to first dc, ch 1, sc in 1st dc, *ch 3, skip next 3 sts, sc in next dc; rep from * 5 time more, turn — 7 sc, 6 ch-3 spaces.
Row 1 (WS): Ch 1, sc in 1st sc, 2 sc in next ch-3 space, *sc in next sc, 3 sc in next ch-3 space; repeat from * 4 times more, sc in last sc, change to color B, turn — 24 sc.
Row 2 (RS): Ch 1, sc in 1st 2 sc, *ch 1, skip 1 sc, sc in next 2 sc, ch 1, skip 1 sc, sc in next 4 sc; rep from * across to last 2 sc, sc in last 2 sc, turn — 18 sc, 6 ch-1 spaces. <—updated
Row 3 (WS): Ch 3 (counts as dc), dc in each sc and ch across, change to color A, turn — 24 dc.
Row 4 (RS): Ch 1, sc in 1st 2 sc, *skip 3 sc 3 rows below, dtr (see special stitches) in next sc 3 rows below (the stitch just under 2nd ch-sp in front of fabric), sc in next 2 dc, dtr in 1st skip sc 3 rows below (the stitch just under 1st ch-sp in front of prev dtr), sc in next 4 dc; rep from * across to last 2 dc, sc in last 2 dc, turn — 6 dtr.
Row 5 (WS): Ch 1, sc in ea st across, change to color B, turn — 24 sc.
Row 6 (RS): Ch 1, sc in 1st 6 sc, *ch 1, skip 1 sc, sc in next 2 sc, ch 1, skip 1 sc, sc in next 4 sc; rep from * across to last 2 sc, sc in last 2 sc, turn — 20 sc, 4 ch-1 spaces.
Row 7: Ch 3 (counts as dc), dc in each sc and ch across, change to color A, turn — 24 dc.
Row 8: Ch 1, sc in 1st 4 dc, *sc in next 2 dc, skip 3 sc 3 rows below, dtr in next sc 3 rows below (the stitch just under 2nd ch-sp in front of fabric), sc in next 2 dc, dtr in 1st skip sc 3 rows below (the stitch just under 1st ch-sp in front of prev dtr), sc in next 2 dc; rep from * across to last 4 sts, sc in last 4 sts, turn — 4 dtr.
Row 9: Ch 1, sc in ea st across, change to color B, turn.
Rep rows 2–9 to until section measures approx 9”. Best if you end after a row 5 or 9. Fasten off.
SURPRISE Section 9– V-Stitch
Yes there is a surprise section 9 to this shawl! You can use any color you wish for this small section. It is supposed to match the very first section in size 🙂
⭐️Maintain the established sequence of “jagged” edge of the shawl on the same side when you work these sections. If you are looking at the RS of the shawl, the “jagged” edge will be on the left side of the fabric if you’re right handed, on the right side of the fabric if you’re left handed.⭐️
Row 1 (RS): Join yarn with a slip stitch to the first sc, ch 1, hdc in same stitch, and in next 12 sts, turn — 13 sts.
Row 2 (WS): 1 Stacked dc (see special stitches), *skip 1 hdc, V-st (see special stitches) in next hdc; repeat from * to last 2 stitches, skip 1 hdc, dc in last hdc, turn — 5 V-sts.
Row 3 (RS): 1 Stacked dc, * V-st in next ch-1 space; repeat from * to last ch-1 space, dc in last stitch, turn — 5 V-sts.
Rows 4-16: Repeat row 3
Row 17: Ch 2, hdc in first dc, *hdc in next dc, hdc in next ch-1 sp, skip 1 dc; repeat from * to last ch-1 space, hdc in next dc, hdc in last dc — 13 hdc’s.
Fasten off.
First Finishing
Okay, the body of your shawl is complete!! Now we have to do some finishing before we can move on to the border.
Yes, I said finishing. I have broken this week into 2 parts because I want to make sure you all have NO EXCUSE to not (wash and ) block your shawl. It will make the next step so much easier if your edges are all nice and straight and if you know EXACTLY how wide and how long each of the sections are. TRUST ME!
SO…what I want you to do now is weave in all your ends. Then, block your shawl to the measurements listed above (or as close to them as you can get). If you don’t know how to block here is a video to help you out!
Once the shawl is dry, follow the instructions for week 4 part 2. I will provide a link to them here when they are released on Sunday March 31, 2019!
Why must you do this?
The border is going to fill in the jagged edge of the shawl with triangles that are attached similarly to how we do single crochet entrelac. It really isn’t that hard and I am going to do a video to show you how to do it!
Yes, there will be a specific video for week 4 part 2

BUT, to make sure the triangles work, we MUST know how wide and how long the jagged edge sections are on your individual shawl!!!! Yes, I gave you the desired measurements, but I also know that not all of you met those.
No matter what, it is important to me that all of you can achieve the desired finished look. In order to do so, ????????I will be teaching all of you how to do the triangles, ????????give you the numbers needed to make the triangles based on the measurements I gave you, ????????AND for those of you who didn’t get my same measurements I will teach you how to calculate the numbers to make each triangle specific to your shawl .

My plan is this, on Sunday March 31, 2019, at 10 am MT I will go release the instructions for week 4 part 2 along with a video tutorial to show you how to do it.
Sound like a plan?
There is just so much to week 4 for you crocheters that I want to help you out and this is the best way for me to do that.
Have Fun!!!! Share Pictures with us on social media #TournamentOfStitches #MarlyBird

Follow Marly:


