Turkey Trot 2025 | Ridgeway Crochet Cowl | Day 5
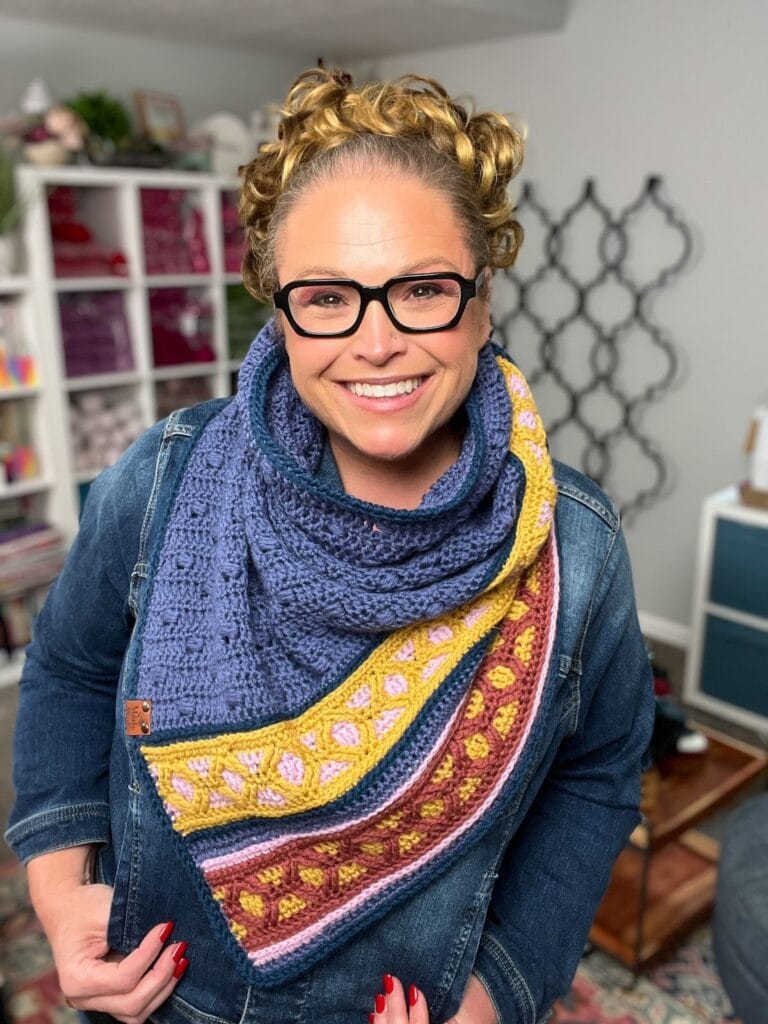
Hey Turkey Trot friends — welcome to Day 5 of the Ridgeway Crochet Cowl, and YESSSS… today is the day your gorgeous triangular shawl becomes a wearable, swooshy, neck-hugging cowl.
You’ve already done the hard, beautiful work: the mosaic section, the main body texture, shaping, edging, blocking (go you!). Now we’re doing the final transformation and finishing rounds that make this piece look so polished and intentional.
If you need to hop back to any earlier day or you’re looking for links to the full event, the Turkey Trot hub post is always your home base:
https://marlybird.com/blog/7th-annual-marly-bird-turkey-trot-make-along-2025/
Turn Your Triangle into a Cozy Cowl! + Final Edging 🎉🧶
Day 5 is the “bring it home” day. Here’s the flow:
- Fold and overlap your triangle to form the neck opening
- Join and crochet the cowl section in the round
- Repeat the cowl rounds to your preferred depth
- Finish with the final edging
- Weave in ends and celebrate
I’ll be adding a video above the pattern (you already have the shortcode in place), so makers can watch the folding + joining step in real time. That little visual moment is so helpful, especially for anyone new to turning a shawl into a cowl.
A Few Friendly Tips Before You Jump In
Keep the Mosaic Section on Top
When you overlap the triangle ends, make sure the mosaic portion is on top of the main body. That placement gives the cowl a “designed on purpose” look, not a “wait where did that go?” vibe.
Aim for a Comfortable Neck Opening
The pattern gives you a suggested circumference range. Use it as a guide, but trust your preferences:
- like a closer fit? overlap a bit more
- want extra drape? overlap a bit less
Pinning before you crochet is a brilliant move — it keeps everything tidy while you join.
Multiple of 8 = Happy Stitch Pattern
Your first round around the neck opening is where you set the stage. Make sure your stitch count is a multiple of 8 so the textured cowl rounds line up beautifully.
No shame in recounting. This is where accuracy saves you from later wrangling.
Day 5 Instructions
Designed by Robyn Chachula for Marlybird.com
SKILL LEVEL
Intermediate
MEASUREMENTS
Finished Measurements
Triangular Shawl is 29.5” [75 cm] wide by 35.5” [90 cm] long,
Cowl is 6” [15 cm] deep.
Gauge
15 sts by 10 rows= 4.25” [11 cm] by 4.5” [11.5 cm] in BLOCKED body stitch pattern; use any size hook to obtain the gauge.
16 sts= 4.5” [11.5 cm] in BLOCKED mosaic stitch pattern
MATERIALS
Crochet Yarn
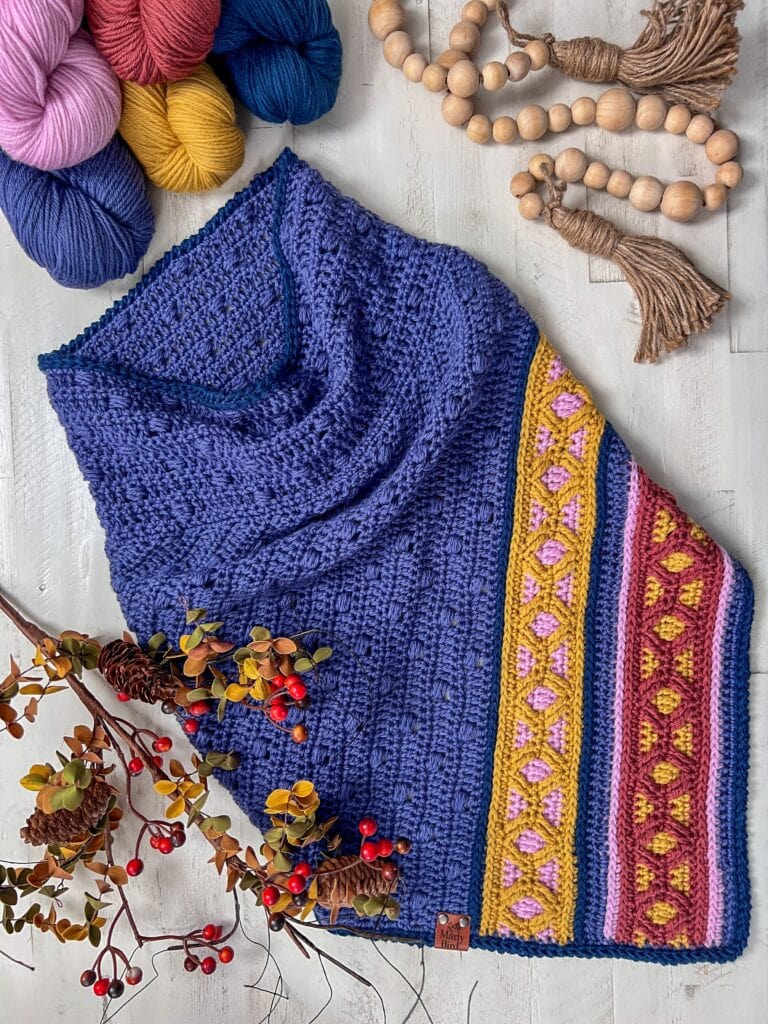
Universal Yarn, Deluxe Worsted (100% wool, 220 yds / 200 m, 3.5 oz/ 100 g, CYCA# 4 worsted)
Color A: #14007 Indigo, 2 hanks
Color B: #12144 Starfish, 25g
Color C: #12281 Clay, 25g
Color D: #12174 Ginseng, 25g
Color E: #12278 Mallard, 35g
Crochet Hook
Size I/9 [5.5 mm]
Notions
- Stitch Markers
- Tapestry Needle
- Scissors
- Tape Measure
- Wet Blocking Supplies (wool wash, towels, blocking mat, rust proof pins)
ABBREVIATIONS
BLO – Back Loop Only
Ch – Chain(s)
Dc – Double Crochet
FP – Front Post
Hdc – Half Double Crochet
PM – Place Marker
RS – Right Side
Sc – Single Crochet
Sl st – Slip Stitch
Sp(s) – Space(s)
St(s) – Stitch(es)
Tch – Turning Chain
Tr – Treble Crochet
WS – Wrong Side
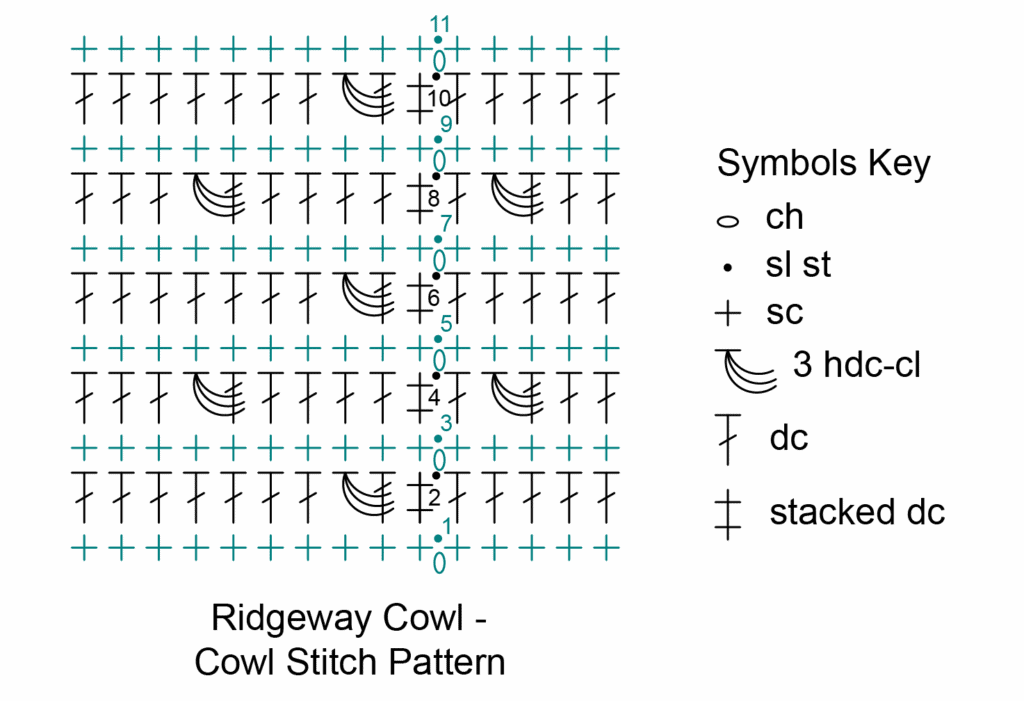
SPECIAL STITCHES
⭐️3 Half Double Crochet Cluster (3 hdc-cl): *Yarn over hook, insert hook around the vertical leg (“the post”) of previous st, yarn over and pull up a loop; repeat from * twice more around same post, yarn over and draw through all 7 loops on hook.
⭐️Double Crochet 2 Together (Dc2tog): *Yarn over hook, insert hook into indicated st, yarn over and pull up a loop, yarn over and draw through 2 loops on hook; repeat from * in next indicated st, yarn over and draw through all 3 loops on hook. (1 st decreased)
⭐️ Foundation Single Crochet (fsc):
First fsc: Ch 2, insert hook into 2nd ch from hook, yarn over and pull up a loop, yarn over and draw through 1 loop on hook (forming a chain), yarn over and draw through 2 loops on hook (forming the single crochet)
Next fsc: Insert hook into base of previous stitch (in the “chain” space), yarn over and pull up a loop, yarn over and draw through 1 loop on hook (forming a chain), yarn over and draw through 2 loops on hook (forming the next single crochet). Repeat directions for desired amount of sts.
⭐️Half Double Crochet 2 Together (Hdc2tog): Yarn over hook, insert hook into indicated st, yarn over and pull up a loop, yarn over hook, insert hook into next indicated st, yarn over and pull up a loop, yarn over and draw through all 4 loops on hook. (1 st decreased)
⭐️Reverse Single Crochet (reverse sc): Also known as a Crab Stitch; working from left to right, insert hook from front to back in next stitch to the right, yarn over and pull up a loop, yarn over and draw through 2 loops on hook.
⭐️ Single Crochet 2 Together (sc2tog): *Insert hook into indicated stitch, yarn over and pull up a loop; repeat from * in next stitch indicated, yarn over and draw through all 3 loops on hook. (1 st decreased)
⭐️ Stacked Double Crochet (Stacked Dc): (Do not ch 1 prior to making the first sc) Sc in first stitch, insert hook in between two legs of the base, yarn over and pull up a loop, yarn over and draw through 2 loops on hook.
⭐️Standing Half Double Crochet 2 Together (Standing Hdc2tog): With slip knot on hook, yarn over hook (use finger to hold yarn over in place), insert hook into indicated st, yarn over and pull up a loop, yarn over hook, insert hook into next indicated st, yarn over and pull up a loop, yarn over and draw through all 4 loops on hook. (1 st decreased)
⭐️Third Loop: Also known as middle or back bar. Horizontal strand located under the top 2 loops.. When working from the WS, the third loop is on the front side of the fabric facing you. When working from the RS, the third loop is on the back side of the fabric away from you.
⭐️Treble Crochet 2 Together (tr2tog): *Yarn over hook twice, insert hook into indicated st, yarn over and pull up a loop, [yarn over and draw through 2 loops on hook] twice; repeat from * in next indicated st, yarn over and draw through all 3 loops on hook. (1 st decreased)
CROCHET STITCH DIAGRAMS
NOTES
- You can substitute chains and single crochets for the set-up row of foundation single crochets
- The triangular shawl portion decreases on one edge only.
- Cowl is worked in turned rounds with the dc rounds on the RS.
- You can substitute joining your new color with a sl st, ch 1, and hdc2tog instead of a standing hdc2tog.
- You can substitute a ch 3 instead of a stacked dc.
VIDEO TIPS
- How to Wind Yarn >> Click Here for Video Help <<
- Foundation Single Crochet >> Click Here for Video Help <<
- How to Bury Ends >> Click Here for Video Help <<
- Stacked Double Crochet >> Click Here for Video Help <<
➡️ Click here to watch on YouTube
RIDGEWAY CROCHET COWL PATTERN
COWL SECTION
Overlap ends of triangle (with mosaic section on top of main body) to form a neck opening about 34-28” [86.5-71 cm] in circumference (along top edge), or to desired cowl neck circumference. Pin ends together.
Round 1 (WS): Join yarn to back of neck on WS with sl st, ch 1 (does not count as a st), working through both fabrics when needed to join ends together, sc in a multiple of 8 evenly around the neck opening, join to first st with sl st, turn.
Round 2: Stacked dc in first sc, dc in next sc, *3 hdc-cl around post of previous dc, skip next sc, dc in next 7 sc; repeat from * around to last 6 sc, 3 hdc-cl around post of previous dc, skip next sc, dc in last 5 sc, sl st to top of stacked dc to join, tun.
Round 3: Ch 1, sc in each st around, sl st to first sc to join, turn.
Round 4: Stacked dc in first sc, dc in next 5 sc, *3 hdc-cl around post of previous dc, skip next sc, dc in next 7 sc; repeat from * around to last 2 sc, 3 hdc-cl around post of previous dc, skip next sc, dc in last sc, sl st to top of stacked dc to join, tun.
Round 5: Ch 1, sc in each st around, sl st to first sc to join, turn.
Repeat Rounds 2-5 to desired length ending on a Round 3 or 5, fasten off.
Edging Round 1 (RS): Join color E with sl st to RS of cowl, sl st in each sc around cowl, do not turn.
Edging Round 2 (RS): Ch 1, reverse sc in each sc around cowl (same sc that sl st are worked in), join to first, fasten off and weave in ends.
Make It Yours: Customize the Cowl Depth
One of the best things about this design is how easy it is to personalize.
As you repeat Rounds 2–5:
- stop at a short, close cowl for lightweight wear
- keep going for a deep, cozy, winter-ready wrap
Just remember to finish on a Round 3 or 5 like the pattern says — it keeps the texture aligned and the edge looking clean.
Final Finishing Checklist
Before you toss this beauty around your neck and strut your stuff:
- weave in every tail securely
- give your edging a quick “lay flat” check
- try it on and admire that drape
Then go show it off. Seriously. This is a “people will ask where you bought it” kind of cowl.
FAQ: Ridgeway Crochet Cowl Day 5
➡️ How tight should I overlap the triangle?
Enough to feel secure around your neck without pulling. Pin and try it on before joining if you’re unsure.
➡️ Why must Round 1 be a multiple of 8?
Because the textured repeat in the cowl section relies on that multiple. It keeps the clusters and spaces lining up smoothly.
➡️ Can I make the cowl longer or shorter?
Absolutely. Repeat Rounds 2–5 until it feels right for you.
➡️ Do I have to do the final reverse sc edging?
Yep — that round is what gives you the clean, stable finishing edge that won’t curl.
➡️ Where do I find the videos again?
They’re embedded above the pattern and linked from the Turkey Trot hub post:
https://marlybird.com/blog/7th-annual-marly-bird-turkey-trot-make-along-2025/
You did it, friend. From triangle to cowl, you stayed with the process, trusted the stitches, and made something seriously special. I hope you’re proud — because this one is a stunner.
— Robyn Chachula, Unicorn Wrangler 🦄