Prism Path Knit Swoncho | Part 3 | Prism Make-Along 2025 Free Pattern
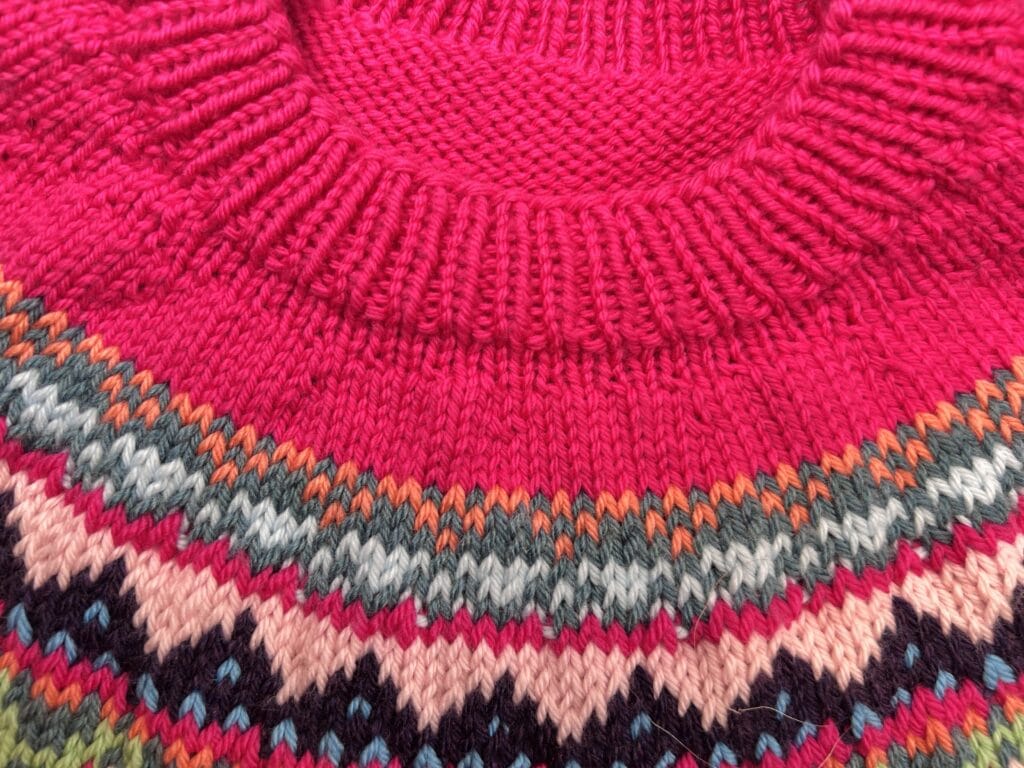
Welcome back, knitters! 🎉 Part 3 of the Prism Make-Along is here, and we’re officially diving into one of the most exciting parts of the project—stranded colorwork! This week, you’ll work through Charts 1 and 2, introducing bursts of color and pattern to your yoke.
Before you get started, I’ve got a few essential tips and reminders that will help your swoncho turn out smooth, stretchy, and stunning—plus details on how the free version works if you’re just joining in.

Affiliate Disclosure: This post contains affiliate links. To learn more please visit my privacy policy here💖
🧪 Let’s Talk Gauge: Swatching for Colorwork
Colorwork gauge is often very different from your solid stockinette gauge—and tighter knitting can lead to puckering and a garment that doesn’t fit like you planned.
Here’s how to swatch for success:
- Work your swatch in the round, just like the yoke of your swoncho
- Knit a small tube or a longer piece on circular needles, carrying your floats in back as you would in the pattern
- Change the needle size as necessary to get a gauge stranded colorwork gauge that will match your plain stockinette stitch gauge
- Block your swatch the same way you’ll block the garment
👉 The goal is to hit your pattern gauge while using stranded colorwork—not just with plain knitting.

🧵 Why a Larger Needle Size for Stranded Colorwork Section?
Many knitters unknowingly knit tighter when working stranded colorwork. That’s because managing two strands adds tension, especially across floats.
❣️Remember: floats do not have “give” or “stretch” like basic knitting.
To help offset that, the pattern calls for a larger needle size for the colorwork sections. Even if you don’t typically notice a gauge change, it’s highly recommended you swatch and check. Especially for a wearable garment like this—fit matters!
🧶 What You’ll Knit in Part 3
You’ll complete two full colorwork charts this week. Here’s what to expect:
- Charts 1 & 2 introduce the bold motifs that bring your yoke to life
- Between the charts, you’ll use kfb (knit front and back) increases
- These were chosen for their fun color blip that is created by the purl bump–I like the way it adds a bit of something extra to the pattern
- The main color will carry through between each chart, creating continuity
✂️ Weave in Your Ends (Yes, Now!)
Color changes = yarn tails. Instead of waiting until the end to deal with them, here’s why it’s better to weave them in as you go:
- It keeps your fabric neat and manageable
- You can use the tails to close any small jog at the beginning of your round
- It avoids the “end-weaving marathon” when you're done
- Highly recommend doing a combination of duplicate stitch to close any gaps and burying in ends to secure the tail
A little extra attention here makes a big difference later!

🧶 New to the Make-Along? Here’s How the Free Version Works
If you’re joining us for the first time—welcome! Here’s a quick overview of how to participate in the free version of the Prism Make-Along:
✨ A new section of the pattern is released every Monday and Thursday in May
✨ Each new part will be added to the blog post right here on MarlyBird.com
✨ Patterns are viewable for free—no download required
✨ Want the direct link in your inbox? Sign up using the form below for updates and the full supply list
📬 Sign up here to stay in the loop and never miss a release!
Looking for Part 2? Click Here.
Scroll down to dive into Part 3 and let's transition from one color stockinette stitches to some fun colorwork. It is like magic! ✨
Prism Path Swoncho
Designed by: Marly Bird
SKILL LEVEL
Intermediate
MEASUREMENTS
To Fit Sizes
Extra-Small/Small/Medium 28-38” [71-96.5 cm] bust
Large/Extra-Large 40-46” [101.5-117 cm] bust
2/3 Extra-Large 48-54” [122-137 cm] bust
4/5 Extra-Large 56-62” [142-157.5 cm] bust
Sample made in size 2 / 3 Extra-Large
Finished Measurements
Bottom Circumference 52½ (59½, 72, 84½)” [133.5 (151, 183, 214.5) cm]
Length 27 (27½, 28, 29)” [68.5 (70, 71, 73.5) cm]
Gauge
18 sts and 24 rounds = 4” [10 cm] in Fair Isle knitting with larger needles.
18 sts and 24 rounds = 4” [10 cm] in Stockinette st with smaller needles.
MATERIALS
Yarn
KnitPicks Swish Worsted (100% Superwash Merino Wool, 110 yds / 100 m, 1.75 oz/ 50 g, CYCA# 4 worsted)
6 (8, 10, 12) balls: Crush (28657) (A)
- 1 ball: Conch (c26068) (B)
- 1 ball: Estuary Heather (c28655) (C)
- 1 ball: Arctic (c28656) (D)
- 1 ball: Frosting (c28658) (E)
- 1 (1, 1, 2) balls: Indigo Heather (c24097) (F)
- 1 ball: Mint Julep (n4128) (G)
- 1 ball: Electric Blue (c26645) (H)
- 1 ball: Lady Slipper (n4127) (I)
- 1 ball: Nutmeg Heather (28652) (J)
Needles
A variety of needle lengths are used to accommodate the number of stitches. Getting interchangeable needle sets is a great option for this project.
- Chiaogoo Shortie Needle Set (US sizes 0-8, up to 14” [35.5 cm] circulars
- Chiaogoo Full Needle Set (US 2-15 [2.75 – 10 mm], with cables to extend up to 40”
- U.S. 8 [5 mm] circular knitting needles, 12” [30.5 cm], 16” [40.5 cm], 24” [61 cm], 32” [81 cm], [47” [119 cm] and 60” [152 cm] long needles;
- U.S. 9 [5.5 mm] circular knitting needles, 24” [61 cm], 32” [81 cm], [47” [119 cm] and 60” [152 cm] long needles, or size required for gauge.
Notions
Removable stitch markers, stitch holders or spare circular needles, tapestry needle.
ABBREVIATIONS
K – Knit
KFB – Knit Front and Back
P – Purl
Pm – Place marker
RS – Right side
slip marker – slip marker
WS – Wrong side
SPECIAL STITCHES
M1 (Make 1): With tip of left needle, pick up the horizontal strand between stitches from front to back. Knit this strand through the back leg, twisting it into a loop in the process – 1 stitch increased.
Kfb (Knit Front & Back): Knit through front and back of next stitch – 1 stitch increased.
Ssk (Slip, Slip, Knit): Slip 2 stitches, one at a time, as if to knit. Insert left hand needle into the front of these two stitches and knit them together from this position (1 stitch decreased)
SPECIAL TECHNIQUES
German Short Rows: Doubling the Stitch
When working German short rows, you’ll often hear the phrase “double the stitch.” This simply means we’re manipulating the working yarn in such a way that the stitch appears to have two strands wrapped over the needle instead of one. This visual cue helps mark your turning point and keeps your short rows looking clean and seamless.
Here’s how to work the turns step-by-step:
💡Turning on the Right Side:
- Knit to the stitch indicated in your pattern.
- Turn your work—now the wrong side is facing.
- With yarn in front, slip 1 stitch purlwise from the left needle to the right needle.
- Pull the yarn over the top of the right needle to the back. This creates the “double stitch” by distorting the slipped stitch.
- Bring the yarn to the front between the needles, ready to work the next purl stitch.
- Work across the row as directed in the pattern, keeping a firm tension for the next few stitches.
.
💡 Turning on the Wrong Side:
- Purl to the stitch indicated in your pattern.
- Turn your work—now the right side is facing.
- Bring the yarn to the front between the needles.
- With yarn in front, slip 1 stitch purlwise from the left needle to the right needle.
- Pull the yarn over the top of the right needle to the back. Again, this distorts the stitch and creates the doubled look.
- Work across the row as directed in the pattern, keeping a firm tension for the next few stitches.
Repeat these steps wherever the pattern indicates a German short row turn. When you come back to those doubled stitches later, you’ll work them as one stitch—treat both loops together as a single stitch to avoid holes.
NOTES
- Directions are for the smallest size; changes for larger sizes are in parentheses. When only one number is given then that number applies to all sizes.
- When working in Fair Isle technique, carry yarn not in use loosely across WS of work but never over more than 5 sts. When it must pass over more than 5 sts, weave it over and under color in use on next st or at center point of the sts it passes over. The colors are never twisted around one another.
- When a color is finished being used in a section, cut it and carry on. Do not carry colors up the inside of work.
- As more stitches are added to needles switch to longer needles to accommodate them.
VIDEO TUTORIALS
- How to do 1×1 ribbing >> https://youtu.be/xx7XFsbEGkE <<
- Long-Tail Cast-On >> https://www.youtube.com/watch?v=vEGwt4cedLM <<
- Knit Stitch (continental style) >> https://www.youtube.com/watch?v=M3brKFKg5Yc <<
- Purl Stitch (continental style) >> https://www.youtube.com/watch?v=LuDt-8jqh4g <<
- How to Add Lifeline >> https://youtu.be/FiqYUE_aHAw <<
- How to Tink >> https://youtu.be/c7Gud7k4Y8k <<
- How to Bury Ends >> https://youtu.be/8_NBGUKjO-E <<
- Fair Isle vid >> https://youtu.be/OaJg_hh1VVw
- How to Add Stitches for Underarm >> https://youtu.be/cRRJ2plYr_U
- How to do German Short Rows for Back Neck Shaping >> https://youtu.be/rrJUYF_s0T8 <<
PRISM PATH KNIT SWONCHO PATTERN – PART 3
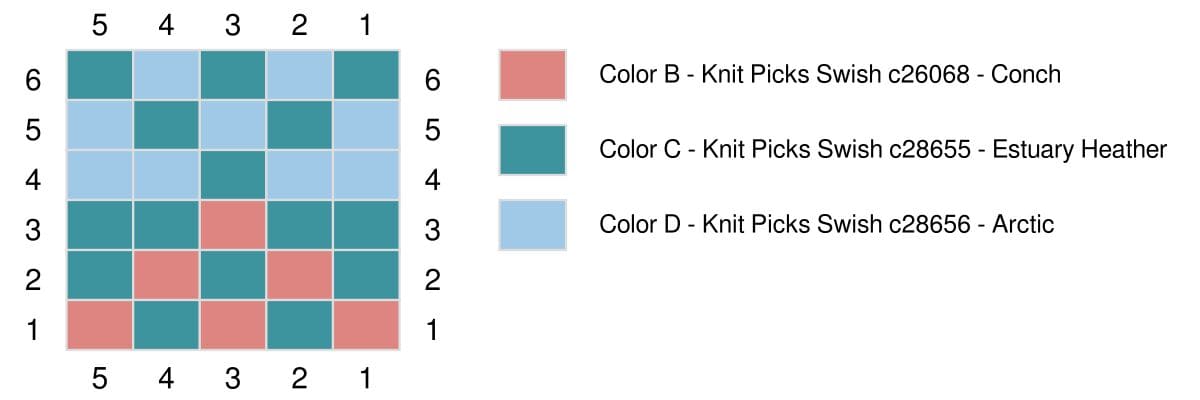
Chart I
Change to the larger needle on longer cables for the colorwork body of the swoncho to maintain the same gauge as the one color stockinette stitch gauge.
For All sizes:
Knit 6 rounds in Chart I, reading rounds from right to left. The 5-st repeat will be worked 26 (28, 32, 36) times around.
Next Round (increase round): With A, * k2, kfb, k2; repeat from * around – 156 (168, 192, 216) sts.
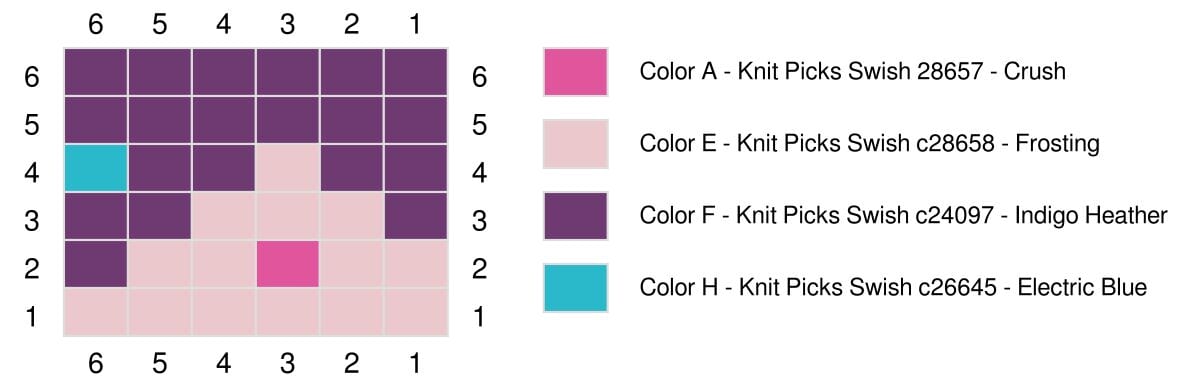
Chart II
Knit 6 rounds of Chart II, reading rounds from right to left, noting 6-st repeat will be worked 26 (28, 32, 36) times around.
Next round (increase round): With A * k4, kfb, k1; repeat from * around – 182 (196, 224, 252) sts.
🎯 Keep Going!
You’re building something vibrant and wearable—and we’re cheering for every stitch. Don’t forget to:
- Share your photos and progress with #PrismMakeAlong and #MarlyBird
- Join the conversation in the BiCrafty Community on Facebook
- Be kind to your yarn, your hands, and your pace—this is about joy, not perfection!
Continue to Part 4: https://marlybird.com/prism-path-knit-swoncho-pattern-part-4/