Game Day Clue 6 || Assembly
Game Day Clue 6 is here! Let’s finish strong! Time to play with beads, jump rings, and chains.

Game Day Clue 6 || Assembly
Designed by Robyn Chachula
SKILL LEVEL
Intermediate
MATERIALS
Yarn
WeCrochet, Curio Size 10 thread (100% mercerized cotton, 721 yds / 659 m, 3.5 oz/ 100 g, CYCA# 0 lace) : 1 ball each of 2 colors (or as many colors as you wish)
Hook
Size Steel Hook US 4 [2.0 mm] note: any hook between 1.5mm- 2.25mm will work, gauge is not critical.
Notions
Tools
- Wire Cutters
- Round Nose Pliers and Flat Nose Nose Pliers
- Large Eye Beading Needle or sewing needle
- Fabric Stiffener (Robyn likes Mod Podge Stiffy, but any will work.)
- Rust-Proof Pins, Parchment Paper, Paper Towels, and Plastic disposable bowl or plate
- Felt Square [or beading mat] (optional)
Beading Supplies
- (3) 14 mm glass beads
- (130) Size 8/0 seed beads
- 20″ [51 cm] chain
- (26) 3mm jump rings
- (6) eye pins
- Toggle Clasp
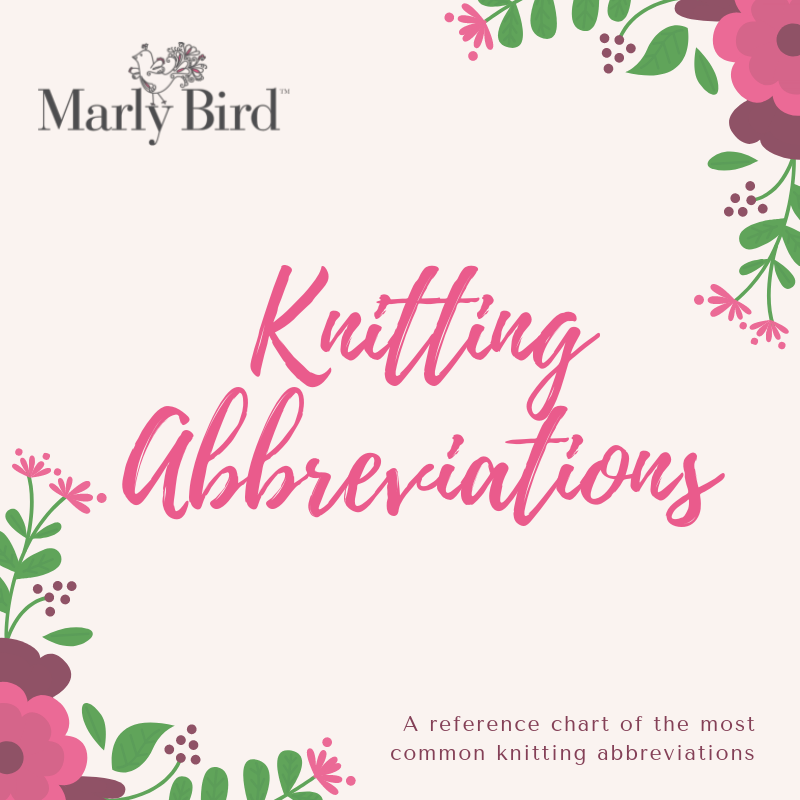
ABBREVIATIONS
Ch – Chain(s)
Dc – Double Crochet
Dtr – Double Treble Crochet
Hdc – Half Double Crochet
RS – Right Side
Sc – Single Crochet
Sl st – Slip Stitch
Sp(s) – Space(s)
St(s) – Stitch(es)
Tch – Turning Chain
Tr – Treble Crochet
WS – Wrong Side
Yo – yarn over
GAME DAY NOTES
- Make as many or as few charms as you desire for your project.
- Each clue in the mystery make-along will be a different charm.
- You do not have to make all the charms to have a complete project. The different charms are to offer you lots of choices and options to make something that you love. Whether that is multiples of 1 charm, 1 of a couple of different charms, or just 1 charm total. Any way you decide to craft with us is perfect!
- If you are new to thread crochet, be patient with yourself. It takes a bit of time to get used to such tiny hooks. Make sure to relax your tension when chaining, or go up a hook if adjusting your tension doesn’t work. All ends and edges will be covered, and blocking will transform all the charms that need any extra love. Be kind to yourself, you got this!
VIDEO TUTORIAL
LAST STEP: ASSEMBLY
ACCENT BEADS
Before laying out your necklace, bracelet, or earrings; let’s make the accent beads into charms. Follow steps below or refer to the video tutorial.
- String bead onto eye pin.
- Using wire cutters, cut eye pin ⅜” [10 mm] to ½” [13 mm] above bead.
- Grip top of eye pin with round nose pliers. Curl eye pin down to create a loop.
- Use needle nose pliers if necessary to close the loop.
LAYOUT
First step is to decide what you want to make with your charms. Although we planned for a necklace with the crochet bead kits, you should follow where your creativity is flowing. If you see a bracelet, pair of earring, or pin; please follow those instincts. Below is how to lay out a necklace, but you can follow similar steps to make any jewelry that you wish.
- Find a necklace that you love the length when you wear it. (If you don’t have a necklace, use your tape measure and mirror to decide the length of the necklace you will like.)
- Lay the necklace (or tape measure) on your table. This will be our guide.
- Start playing with the order of all your crochet and bead charms. Try to keep at least the last 5” [13 cm] on either side of your necklace for the chain. (having charms on the back of your neck get caught in your hair and clothes)
- Crochet bead kit comes with 20” [51 cm] of chain. You can use all of this or only a small amount, choice is yours. As noted above, use at least 10” [25 cm] for the necklace. Note: You can use the chain in any way. If you would like space between your beads and charms you can lay it out with say : bead, chain, charm, chain, bead, chain, charm….etc. You make space in your work by placing tiny chains between the charms. Or have all the beads and charms then the chains, as shown in our examples.
- See video for more layout options and Minions Facebook Group for some inspiration.
CONNECTING
Now comes the fun part!
- Starting with the center of your necklace, start connecting the crochet and bead charms together with some jump rings. Note: When connecting the crochet charms, sometimes you need to use 1 jump ring on each charm to connect. Sometimes you can get away with 1 jump ring for 2 crochet charms. See video for more details.
- Use 2 pliers to hold the jump ring on either side. Twist 1 plier towards you to open. Note: NEVER pull the jump ring open, ALWAY twist! See video for more details.
- Once charms are all connected. Lay on your guide (your necklace or tape measure).
- Measure the length of chain you will need to finish your necklace. Subtract ½” [13 mm] from length. Divide length in two. So say you need 16.5” of length after you connected your charms. Subtract 16.5” – 0.5” (that accounts for the clasp) to get 16”. Divide 16” by 2. That means you will need 8” of chain on either side of your necklace.
- Measure and cut chain to length with wire cutters.
- Connect chains to clasp and charms with the jump rings.
- Try on your jewelry and enjoy!
Don’t forget to post in our Marly’s Minions Facebook Group, so we can ooh and ahh over all your hard work!