Abstractly Chic Shawl Week 4
The Free Crochet Pattern Abstractly Chic Shawl Week 4 is the first set of instructions for this 2018 Marly Bird Crochet-Along sponsored by Red Heart Yarns. Below, you will find the written instructions for this part of the shawl as well as a video tutorial.
Your goal is to finish this weeks instructions so that you are ready to work on next weeks instructions when that part of the pattern is released. Without further chat, here are the instructions…
Queue it up and Like the Pattern on Ravelry
Disclosure: This page may contain affiliate links which help me cover the cost of publishing my blog. Should you choose to make a purchase, at no additional cost to you, I may earn a small percentage of the sale.
Previous weeks instructions are here <click here>
Free Crochet Pattern Abstractly Chic Shawl Week 4
by Marly Bird
Materials
Yarn RED HEART® Chic Sheep by Marly Bird™: 3 balls of #5693 Poolside A, 1 ball each of #5254 Sunset B and #5311 Lace C. [Art. R170 100% Merino Wool available 3.5 oz (100 g), 186 yd (170 m) balls]
Hook H/8 (5mm) or size to obtain gauge.
Notions
- Bent Tip Yarn needle
- Tassel Maker
Measurements
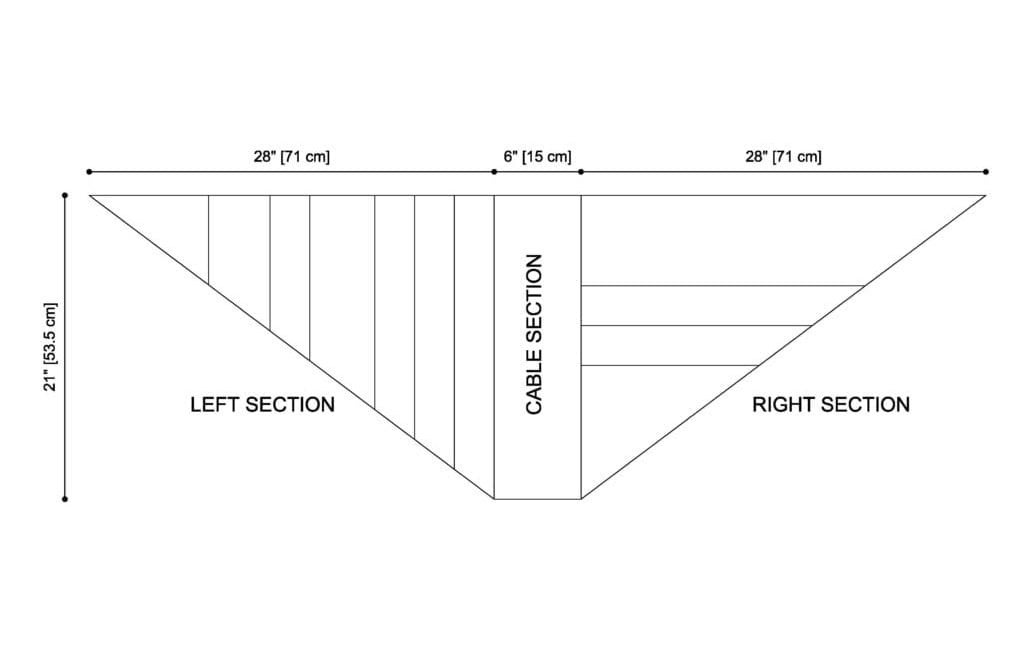
GAUGE: 5 v-sts = 4.5″ (11.5 cm); 9 rows = 4.25” (11 cm) in V-st stitch pattern. 16 sts= 4” (10 cm); 17 rows = 4” (10 cm) in cable stitch pattern. CHECK YOUR GAUGE. Use any size hook to obtain the gauge. <note this is a blocked gauge>
Project measures 62” [157.5 cm] in wingspan, 21” [53.5 cm] in height.
Abbreviations
Special Stitches
Slip Stitch Embroidery: Hold working yarn on backside of fabric, insert hook from front of fabric, yarn over hook on backside of fabric, pull loop through fabric and loop on the hook. When the second slip stitch row overlaps first slip stitch row from the right side to the left side, work the new slip stitch under the old slip stitch. See images to help.
Abstractly Chic Shawl Week 4 Pattern
Previous weeks instructions are here <click here>
First Finishing
Weave in all ends. I suggest using the bury in method taught to us on YouTube by Anne Berk aka Annetarsia.
It is now time to block your shawl to the measurements of the schematic.
Why block the shawl now? I find it easier to work the edging on a piece of fabric that is already blocked. In the video I demonstrate how to steam block Chic Sheep by Marly Bird™ yarn. However, if you decided to use a different yarn you will need to defer to the appropriate blocking method for your yarn.
Here is a link to a video I did to help with blocking acrylic yarn.
https://youtu.be/lJnH4DD75zI
EDGING
With Rs of shawl facing, join A to edge of shawl with a slip stitch.
Round 1: Ch 1, *sc evenly across shawl to corner, 3 sc in corner; repeat from * around, sl st to first sc, do not turn.
Round 2: Ch 1, *sc in each sc to corner, 3 sc in corner; repeat from * around, sl st to first sc. Fasten off.
Slip Stitch Embroidery for Faux Cable Stitch on Center Panel
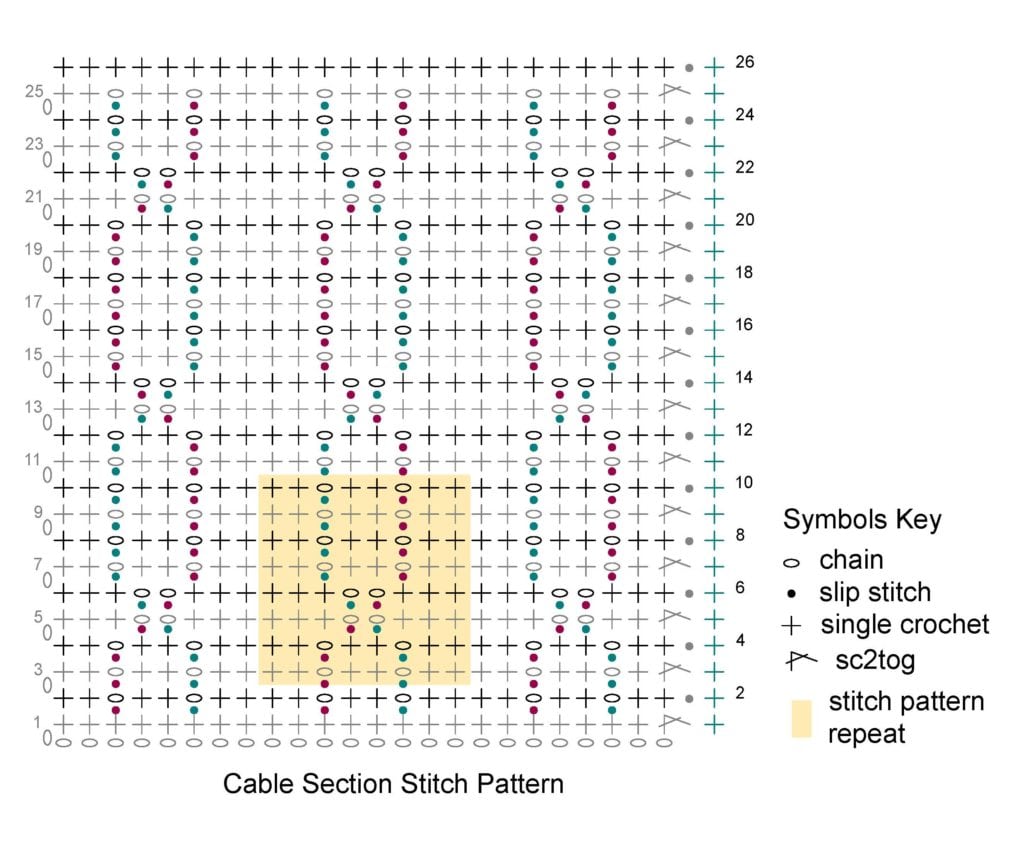
Join C to center cable portion of the shawl at Row 2 in first ch-1 sp. Using chain spaces as a guide, slip stitch embroider up each ch-sp on square.
Fasten off C.
Repeat with a new strand of yarn for each line of chain spaces.
See stitch diagram for location of slip stitches in chain spaces. Follow the blue dots first then the pink dots in the stitch diagram for each strand of yarn.
If you want to make it truly cable like, work the slip stitches of the pink under the slip stitch of the blue every other time the two cross [see special stitches].
Faux Cable Stitch Diagram / Chart for Center Panel
Final Finishing
Weave in any loose ends.
Tassels
These are the official instructions but if you want to watch how I do tassels you can see in the video for week 4
Cut 2 pieces of yarn (this can be any color you choose and will be the yarn that is used to attach the tassel to the shawl and to wrap around the tassel), 12” each, put aside.
Wrap yarn around 6” piece of cardboard 65 times (or for desired amount), cut on one side creating 1 bundle of 65 strands.
Place bundle evenly between one 12” piece of yarn, tie bundle into place (assure strands are even). Fold bundle so that strands are even, tie second 12” piece of yarn around bundle, 1” below knot.
Trim bundle ends to make even. Make 1 more tassel in similar manner. Sew tassels to corners of shawl.
Don’t forget to favorite this pattern on Ravelry and link to it when you make your shawl 🙂
Abstractly Chic Shawl Week 4 Tutorial Video
Right Handed — https://youtu.be/7J4HXU4R_ko
https://youtu.be/7J4HXU4R_ko
Left Handed — https://youtu.be/gskp_YZbvwM
https://youtu.be/gskp_YZbvwM

