Sugar Biscuit Knit Fingerless Mitts Pattern by Marly Bird
Cozy Hands + Eye-Catching Texture = A Win 🧤✨
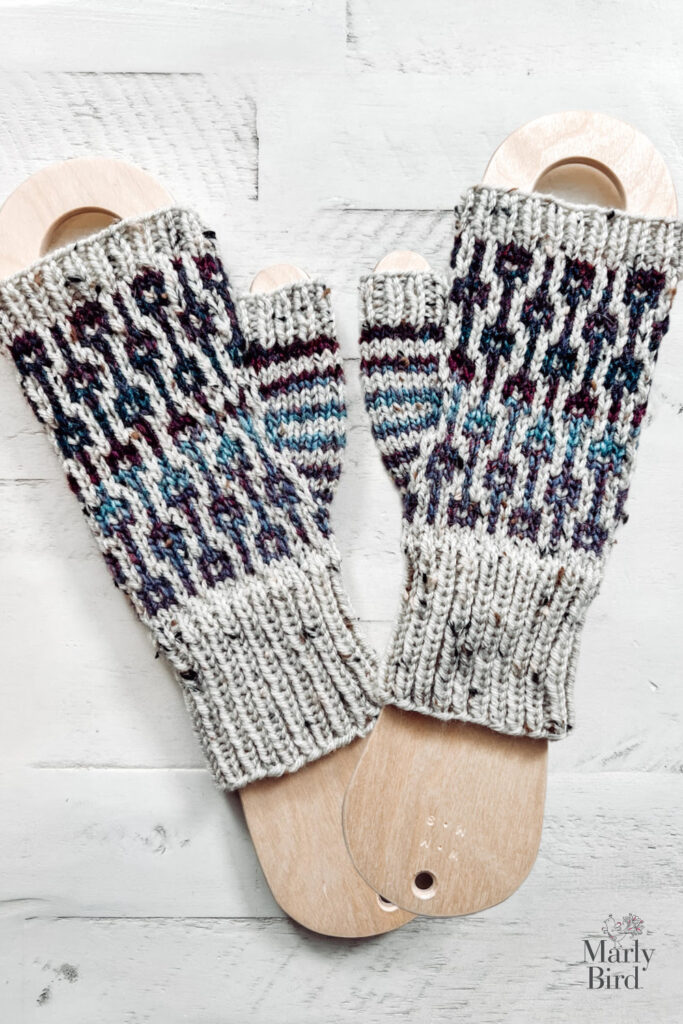
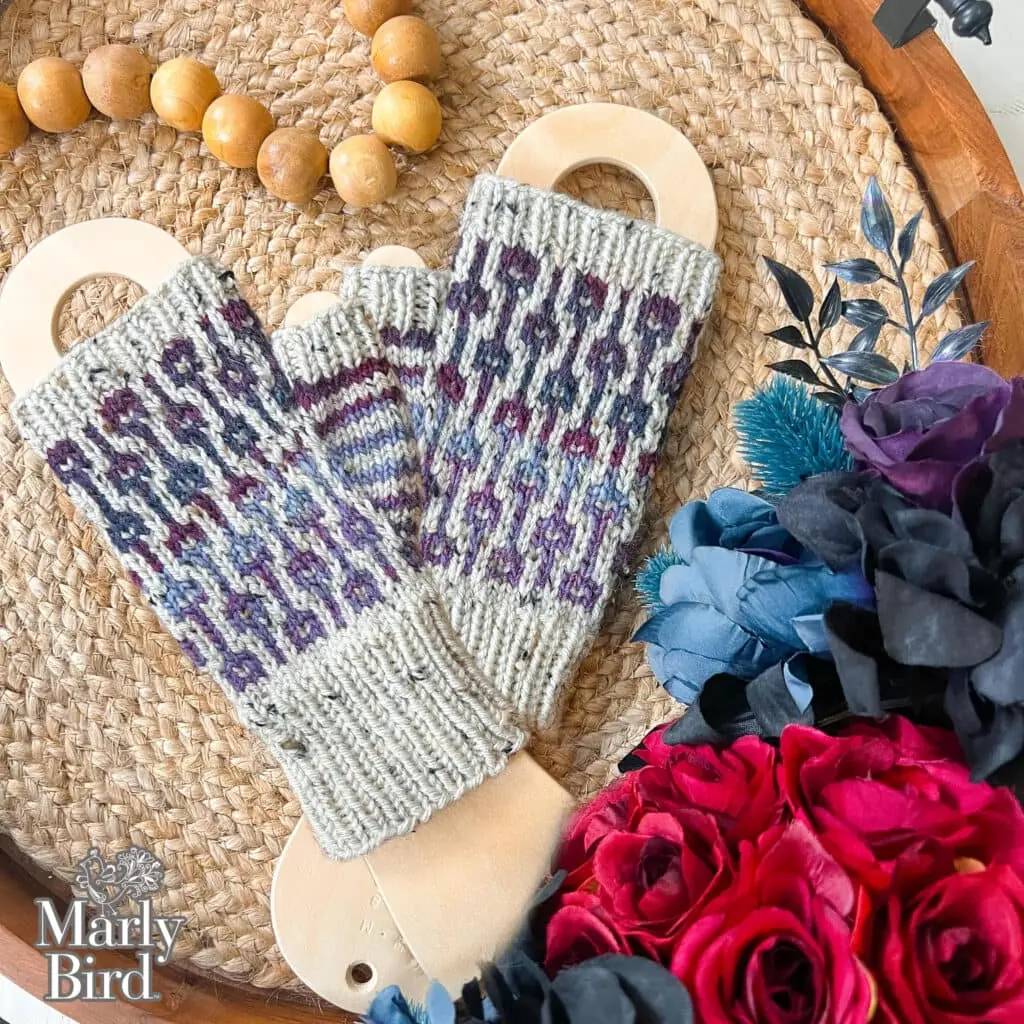
If you love knit accessories that look fancy but don’t require juggling a million yarns at once, you are going to love the Sugar Biscuit Knit Fingerless Mitts. These mitts use mosaic knitting, which means you work with one color per round while slipping stitches to create bold, graphic texture.
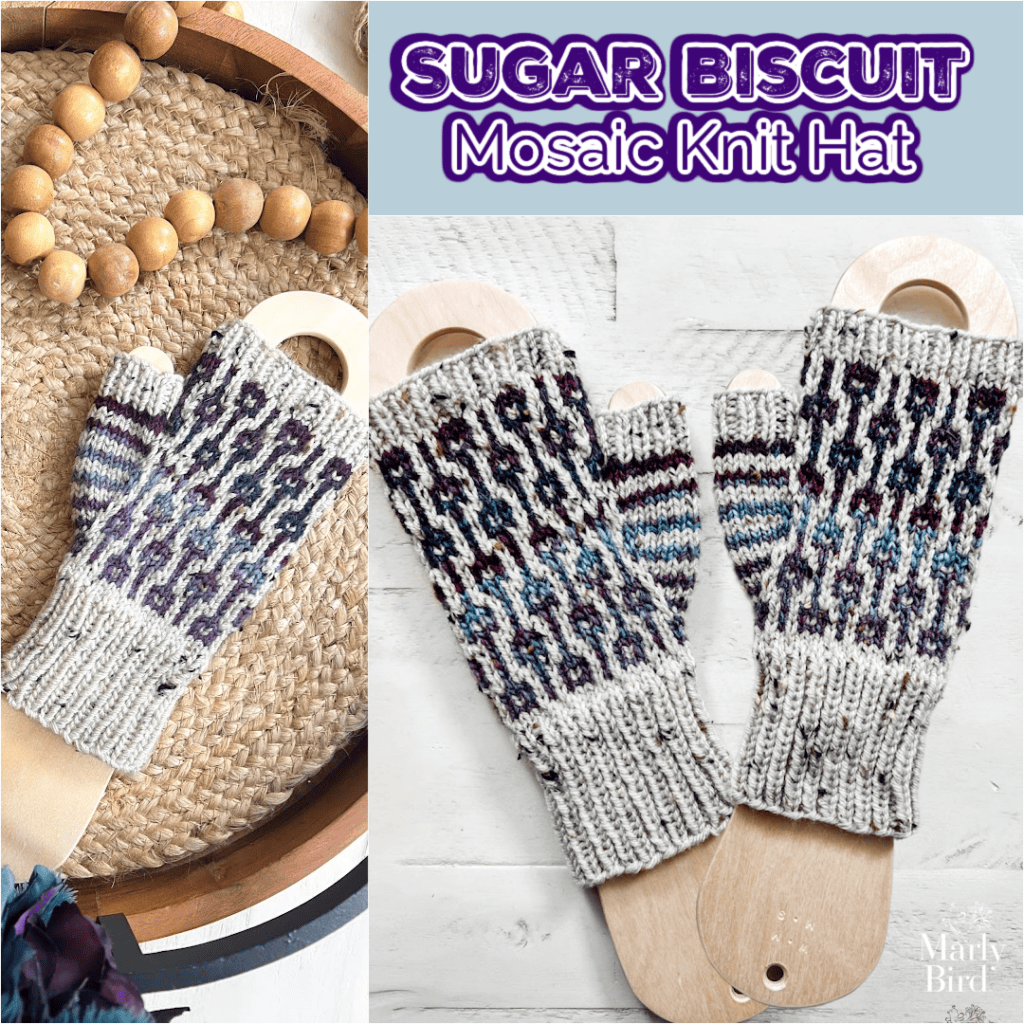
They’re warm without being bulky, stylish without being fussy, and practical for everyday life — texting, driving, coffee-holding, yarn shopping… you know, the essentials 😉
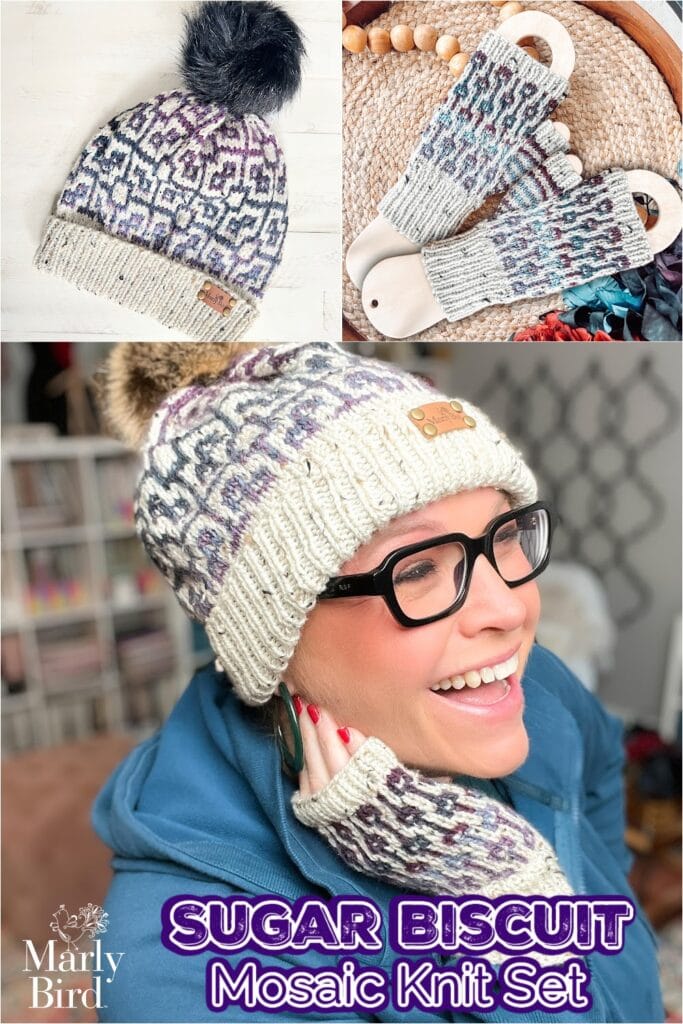
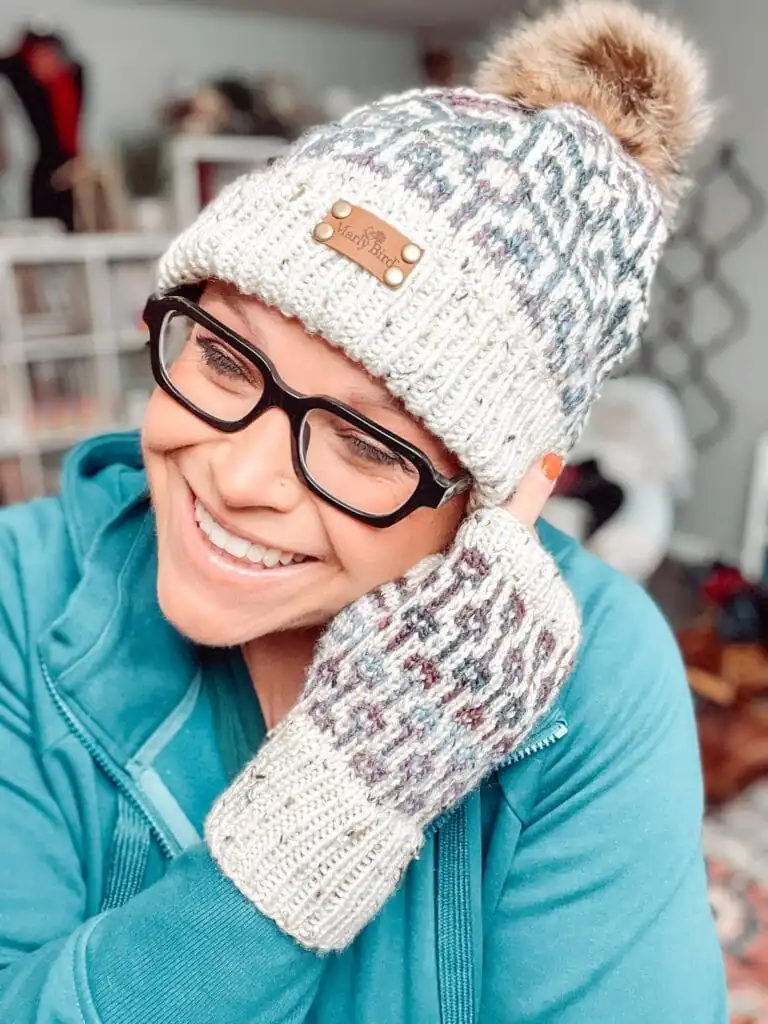
Even better? These fingerless mitts pair perfectly with the Sugar Biscuit Knit Hat, making them an ideal set for gifts or personal wear.
👉 Sister pattern: Sugar Biscuit Knit Hat
What You Will Love About This Pattern
- 🧶 Beautiful mosaic colorwork using simple knit and slip stitches
- 🧤 Fingerless design for warmth and functionality
- 👩🦰👨🦱 Designed to work beautifully for men or women
- 🎁 A fantastic handmade gift option
- 📏 Multiple sizes included
- 🧠 Great introduction to mosaic knitting techniques
What Makes the Sugar Biscuit Mitts Special
These mitts prove that mosaic knitting doesn’t have to be intimidating. The pattern creates a rich, repeating texture that looks complex — but once you get into the rhythm, it becomes wonderfully meditative.
Because you’re only working with one yarn color per round, you avoid tangled floats and frustration while still getting that bold colorwork look. It’s one of my favorite techniques to teach because knitters get a big visual payoff without added stress.
✨ Designer Tip: If you’ve been curious about colorwork but nervous to try stranded knitting, mosaic knitting is the perfect confidence booster.
Sizing, Fit Notes & Comfort
The Sugar Biscuit Knit Fingerless Mitts are designed with a comfortable, flexible fit thanks to ribbed cuffs and thoughtful shaping. The fingerless style keeps hands warm while allowing full use of your fingers — perfect for daily wear, commuting, or working outdoors.
Because gauge matters with mosaic knitting, be sure to knit a gauge swatch to ensure your mitts fit comfortably without feeling tight across the hand.
Yarn Choice: Why This Combo Works So Well 🧶
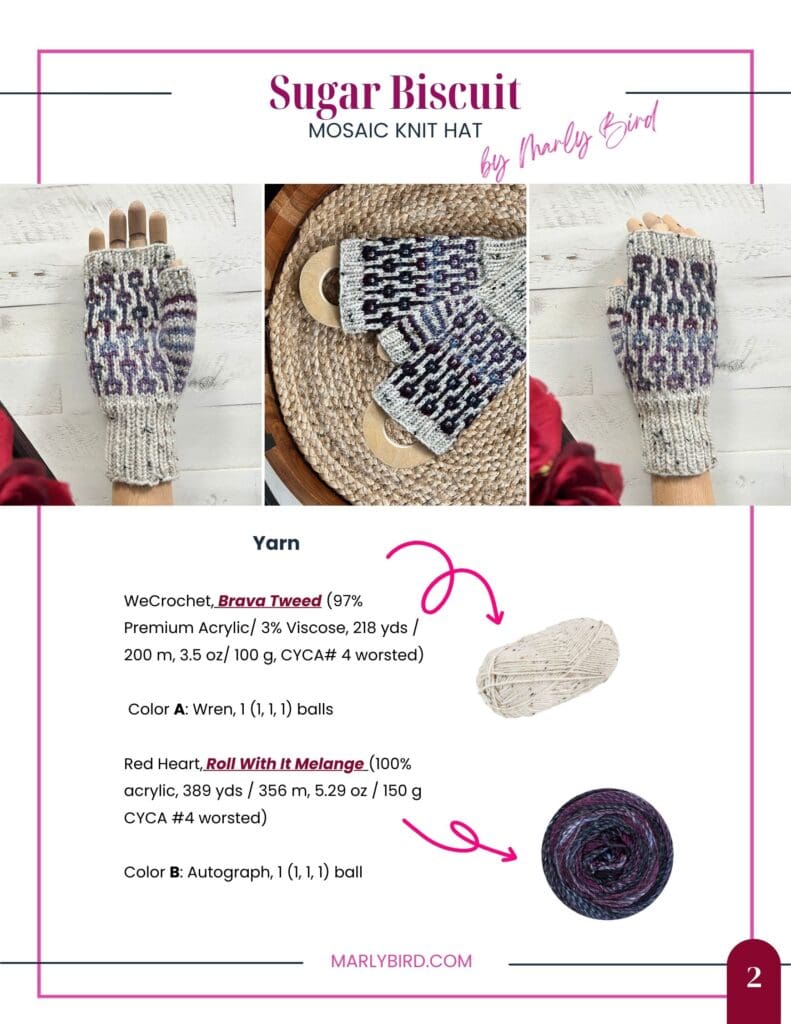
This pattern was designed using two contrasting worsted-weight yarns, which allows the mosaic stitches to really shine.
Featured Yarn Choice
- WeCrochet Brava Tweed (Color A)
A soft, durable acrylic blend with subtle tweed flecks that adds depth without overwhelming the stitch pattern. - Red Heart Roll With It Melange (Color B)
A self-striping yarn that brings gorgeous color variation and visual interest to the mosaic design.
This combination creates texture, contrast, and long-lasting wear — perfect for mitts that will be used often.
Budget-Friendly Yarn Alternatives
If you want to adjust based on price or fiber preference, here are great options:
- Knit Picks Brava Worsted – smooth, affordable, and excellent stitch definition
- Knit Picks Wool of the Andes Worsted – warm, wooly, and classic
- Herrschners Worsted 8 Heathers – budget-friendly with tons of color choices
Choose one solid or lightly tweeded yarn paired with one high-contrast or self-striping yarn for best results.
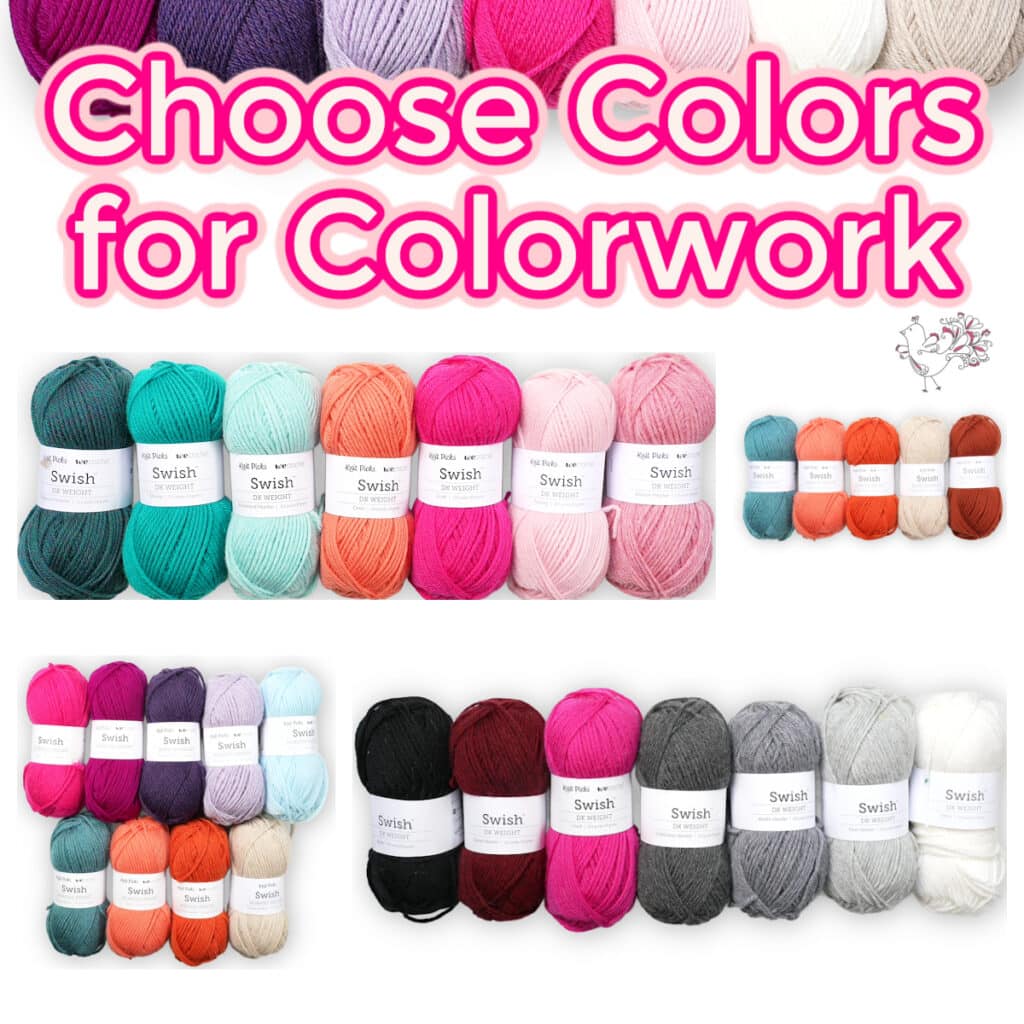
Choosing Colors That Pop 🎨
Mosaic knitting loves contrast. For the Sugar Biscuit Mitts:
- Pair a light + dark combo for crisp definition
- Neutrals with a pop of color make these very gift-able
- Jewel tones photograph beautifully and feel modern
These mitts are a great way to use a special skein you’ve been saving — just let it be the star!
We understand that choosing colors can be tricky. We’ve written a blog post to help you choose colors for all colorwork projects. ➡️ You can check it out here.
Skill-Building You’ll Learn
This pattern helps you practice:
- Mosaic knitting techniques
- Reading simple stitch patterns
- Managing slipped stitches cleanly
- Working in the round with confidence
If you’re newer to mosaic knitting, you’ll walk away with skills you can use in hats, cowls, mitts, and beyond.
Needles & Notions
You’ll use two needle sizes to create structure and comfort:
- Smaller needles for cuffs
- Larger needles for the mosaic body
Double-pointed needles are used in the pattern, but you can absolutely adapt to magic loop if that’s your preferred method.
A Handmade Gift People Actually Wear 🎁
The Sugar Biscuit Knit Fingerless Mitts make a thoughtful gift for:
- Birthdays
- Holidays
- Teachers
- Coworkers
- Knitters-helping-non-knitters situations 😉
They’re quick enough to knit without stress, but polished enough to feel truly special.
SUGAR BISCUIT KNIT MOSAIC FINGERLESS MITTENS DETAILS
Designed by Marly Bird
SKILL LEVEL
Confident Beginner/Intermediate
MEASUREMENTS
To Fit Size
Child (Adult Small- Medium, Adult Large – XLarge)
Sample shown in Adult Small – Medium
Finished Measurements
| To Fit Size | Child | Adult Small – Medium | Adult Large – XLarge |
| Finished Hand Circumference (approx) Inches | 6.5 | 7.5 | 8.5 |
| Finished Hand Circumference cm | 16.5 | 19 | 21.5 |
| Finished Total Length + Cuff Inches | 6 | 9.5 | 10.5 |
| Finished Total Length + Cuff cm | 15 | 24 | 26.5 |
Gauge
22 stitches 36 rounds= 4″ [10 cm] in mosaic stitch pattern [10 cm] with larger needles; use any size needle to obtain the gauge.
MATERIALS
Yarn
WeCrochet, Brava Tweed (97% Premium Acrylic/ 3% Viscose, 218 yds / 200 m, 3.5 oz/ 100 g, CYCA# 4 worsted)
Color A, #653734 Wren, 1 ball
Red Heart, Roll With It Melange (100% acrylic, 389 yds / 356 m, 5.29 oz / 150 g CYCA #4 worsted)
Color B: #Autograph, 1 ball
Needle
U.S. 6 [4 mm] and U.S. 7 [4.5 mm] set of 5 double pointed needles, or size required for gauge.
Notions
- Stitch Markers
- Tapestry Needle
- Scissors
- Tape Measure
- Stitch Saver or Scrap Yarn for Holding Stitches
- Leather tags (Optional)
- Leather rivets (Optional)
ABBREVIATIONS
K – Knit
K2tog – Knit Two Together
M1 – Make One
P – Purl
PM – Place Marker
RS – Right Side
Sl – Slip
Sl-wyib – Slip With Yarn in Back
Sl M — Slip Marker
St(s) – Stitches
WS – Wrong Side
SPECIAL STITCHES
M1 (Make 1 Increase): With tip of left-hand needle, pick up the horizontal strand between stitches from front to back. Knit this strand through the back leg, twisting it into a loop in the process – 1 stitch increased.
SPECIAL TECHNIQUE
⭐️ Backwards Loop Cast-on Method: * Wrap yarn around left thumb from front to back and secure in palm with other fingers. Insert needle upward through strand on thumb. Slip loop from thumb onto needle, pulling yarn to tighten. Repeat from * for desired number of sts.
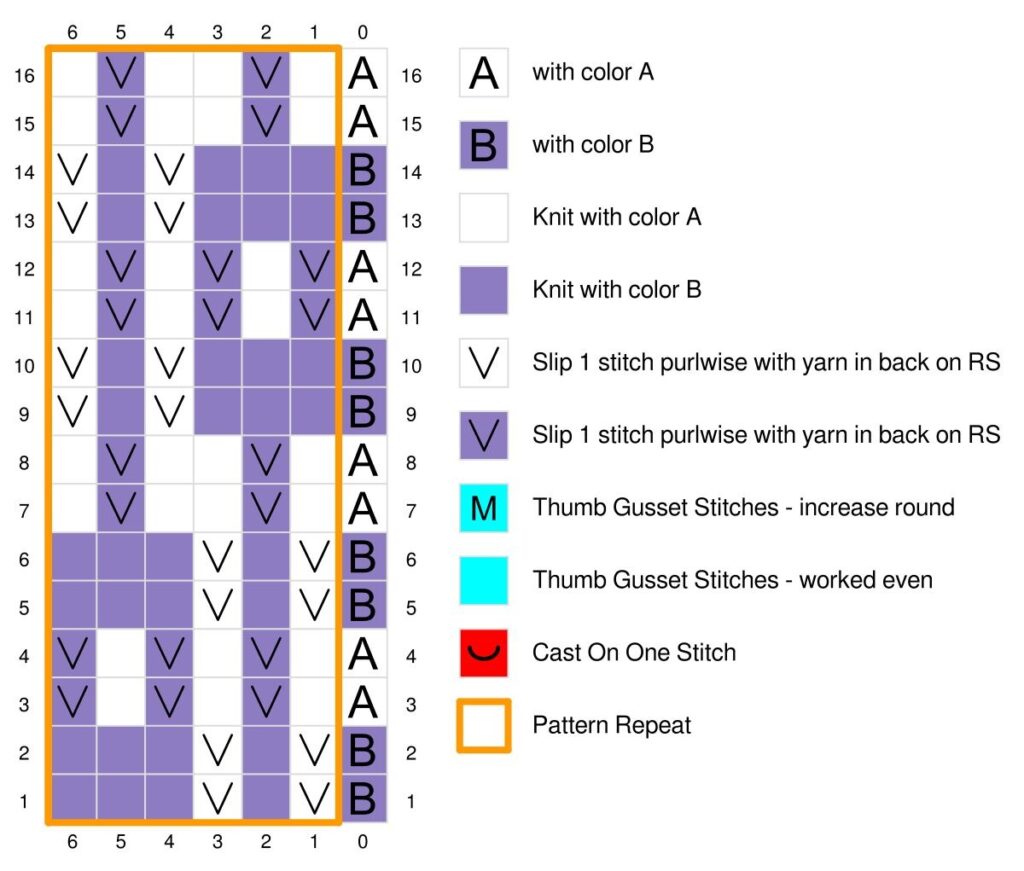
CHART
One Pattern Repeat: Stitch Fiddle Link: https://www.stitchfiddle.com/c/sfbr0y-9j8b8l
You will need these charts for all the various sizes:
- Size Child with Thumb Placement: https://www.stitchfiddle.com/c/sfbqvm-iqu0d7
- Size Adult S-M with Thumb Placement: https://www.stitchfiddle.com/c/sfbqtj-hr6u2d
- Size Adult L-XL with Thumb Placement: https://www.stitchfiddle.com/c/sfbr00-70ak2h
NOTES
- Directions are for size Child; changes for sizes (S-M, L-XL) are in parentheses. When only one number is given then that number applies to all sizes. The hand instructions for each size is written out separately. The cuffs and finishing instructions are written for all the sizes combined.
- Project is made from the bottom cuff to finger cuff.
- When working on the body, place a marker every 6 stitches for the repeat (adding the marker to actual stitch might be necessary with the double pointed needles)
- Slip all stitches as if to purl with yarn in back.
- When slipping stitches be sure to not pull the float too tight or the gauge will get too small.
- Do not cut colors, carry the color up the side.
- Work thumb gusset stitches in two row stripes.
- If you want to be sure you have a safety net as you knit, adding a lifeline to your project every so often will be helpful. Just to make sure you have a point to rip back to if something goes wrong. (video help).
VIDEO TUTORIALS
- No Cuss Cast On to Double Pointed Needles >> Click Here for Video Help <<
- Knit Stitch (continental style) >> Click Here for Video Help <<
- Purl Stitch (continental style) >> Click Here for Video Help <<
- Perfect Ribbing >> Click Here for Video Help <<
- Duplicate Stitch >> Click Here for Video Help <<
- How to Add Lifeline >> Click Here for Video Help <<
- How to Tink >> Click Here for Video Help <<
- Bury Ends >> Click Here for Video Help <<
- Sugar Biscuit Knit Mosaic Fingerless Mittens Video >> Click Here for Video Help <<
GROW
To Unlock Exclusive Subscriber Content click the Box below and join for free by simply adding your email and creating a password! If you are having troubles, clear your cache or reset your password or login to the Grow Publisher Portal.
>> Learn More About Grow Here <<
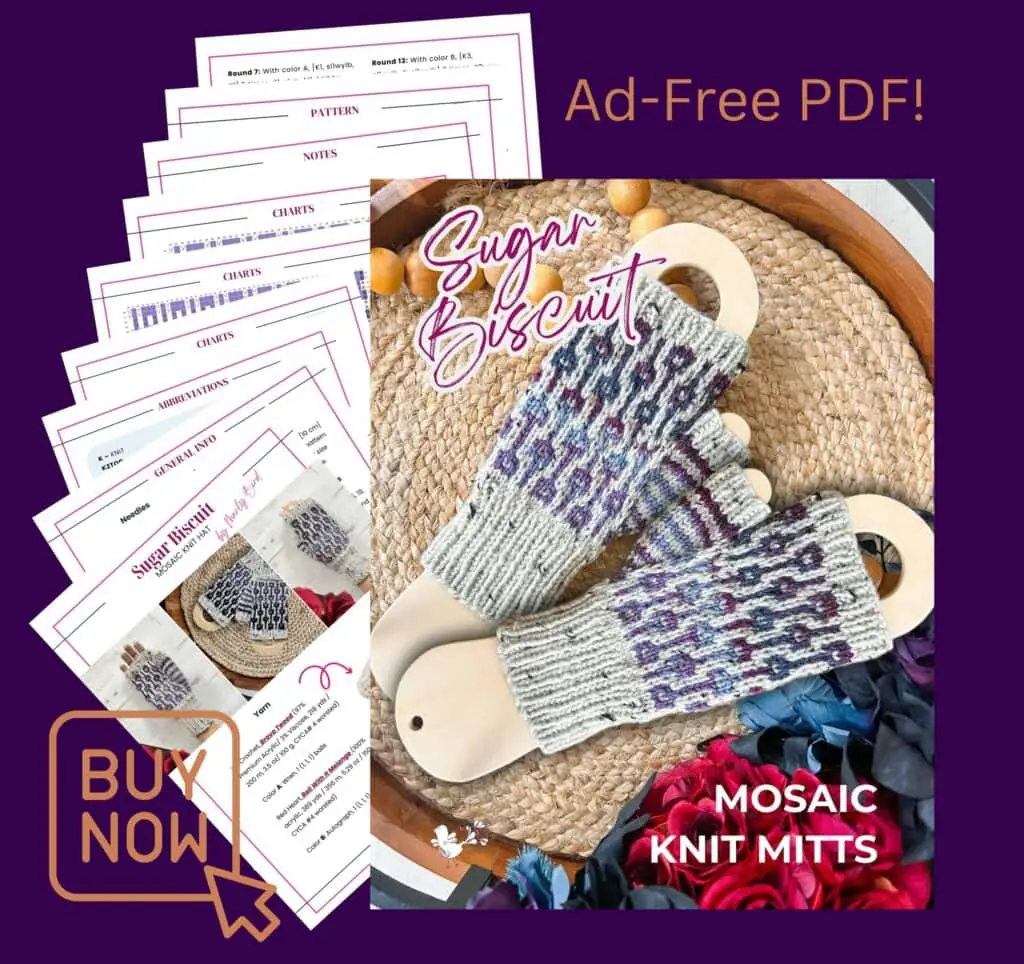
I’m thrilled to share this amazing pattern with you, many patterns on my blog are absolutely free! I kindly request that you don’t copy and paste or distribute this pattern. Prefer an ad-free experience? Buy a digital PDF pattern for a small fee from one of my online stores for a seamless crafting journey.
I appreciate your support and readership. You are the reason I can keep doing what I love and sharing it with others. So, thank you from the bottom of my yarn-loving heart! Disclosure: This post contains affiliate links, meaning I get a commission if you decide to make a purchase through my links at no cost to you.

SUGAR BISCUIT KNIT MOSAIC FINGERLESS MITTENS
CUFF
All Sizes
With smaller double pointed needles and color A, cast on 36, (42, 48) stitches. Join to work in the round.
Round 1: *K1, p1; repeat from * to end of round.
Work in 1×1 ribbing for 2 (3, 3)” [5 (7.5, 7.5) cm].
HAND
With larger double pointed needles, follow the instructions for the size you are making (also see chart for each size)
Child Size
Set-Up Round: With color A, Knit 36.
Round 1: With color B, [sl1wyib, K] 2 times, [K2, sl1wyib, K, sl1wyib, K] 5 times, K2.
Round 2: With color B, [sl1wyib, K] 2 times, [K2, sl1wyib, K, sl1wyib, K] 2 times, place marker, k1, place marker, [K, sl1wyib] 2 times, [K3, sl1wyib, K, sl1wyib] 2 times, K3.
Round 3: With color A, [K1, sl1wyib] 8 times, sl m, M1, knit to marker, M1, sl m, [sl1wyib, K1] 9 times, sl1wyib— 3 thumb stitches between markers.
Round 4: With color A, [K1, sl1wyib] 8 times, sl m, knit to marker, sl m, [sl1wyib, K1] 9 times, sl1wyib.
Round 5: With color B, [sl1wyib, K] 2 times, [K2, sl1wyib, K, sl1wyib, K] 2 times, sl m, M1, knit to marker, M1, sl m, [K, sl1wyib] 2 times, [K3, sl1wyib, K, sl1wyib] 2 times, K3— 5 thumb stitches between markers.
Round 6: With color B, [sl1wyib, K] 2 times, [K2, sl1wyib, K, sl1wyib, K] 2 times, sl m, knit to marker, sl m, [K, sl1wyib] 2 times, [K3, sl1wyib, K, sl1wyib] 2 times, K3.
Round 7: With color A, [K1, sl1wyib, K1] 5 times, K1, sl m, M1, knit to marker, M1, sl m, [K2, sl1wyib] 6 times, K1— 7 thumb stitches between markers.
Round 8: With color A, [K1, sl1wyib, K1] 5 times, K1, sl m, knit to marker, sl m, [K2, sl1wyib] 6 times, K1.
Round 9: With color B, [K3, sl1wyib, K, sl1wyib] 2 times, K3, sl1wyib, sl m, knit to marker, sl m, [sl1wyib, K3, sl1wyib, K] 3 times, sl1wyib.
Round 10: With color B, [K3, sl1wyib, K, sl1wyib] 2 times, K3, sl1wyib, sl m, M1, knit to marker, M1, sl m, [sl1wyib, K3, sl1wyib, K] 3 times, sl1wyib— 9 thumb stitches between markers.
Round 11: With color A, [sl1wyib, K1] 8 times, sl m, knit to marker, sl m, [K1, sl1wyib] 9 times, K1.
Round 12: With color A, [sl1wyib, K1] 8 times, sl m, knit to marker, sl m, [K1, sl1wyib] 9 times, K1.
Round 13: With color B, [K3, sl1wyib, K, sl1wyib] 2 times, K3, sl1wyib, sl m, knit to marker, sl m, [sl1wyib, K3, sl1wyib, K] 3 times, sl1wyib.
Round 14: With color B, [K3, sl1wyib, K, sl1wyib] 2 times, K3, sl1wyib, sl m, M1, knit to marker, M1, sl m, [sl1wyib, K3, sl1wyib, K] 3 times, sl1wyib— 11 thumb stitches between markers.
Round 15: With color A, [K1, sl1wyib, K1] 5 times, K1, sl m, knit to marker, sl m, [K2, sl1wyib] 6 times, K1.
Round 16: With color A, [K1, sl1wyib, K1] 5 times, K1, remove marker, place stitches to next marker on scrap yarn to hold, cast on 1, remove marker, [K2, sl1wyib] 6 times, K1— 36 stitches.
CONTINUE WITH HAND
Round 17: With color B, [sl1wyib, K] 2 times, [K2, sl1wyib, K, sl1wyib, K] 2 times, K, [K3, sl1wyib] 2 times, K, sl1wyib, K2, [K, sl1wyib] 2 times, K3.
Round 18: With color B, [sl1wyib, K] 2 times, [K2, sl1wyib, K, sl1wyib, K] 2 times, K, [K3, sl1wyib] 2 times, K, sl1wyib, K2, [K, sl1wyib] 2 times, K3.
Round 19: With color A, [K1, sl1wyib] 18 times.
Round 20: With color A, [K1, sl1wyib] 18 times.
Round 21: With color B, [sl1wyib, K] 2 times, [K2, sl1wyib, K, sl1wyib, K] 5 times, K2.
Round 22: With color B, [sl1wyib, K] 2 times, [K2, sl1wyib, K, sl1wyib, K] 5 times, K2.
Round 23: With color A, [K1, sl1wyib, K1] 12 times.
Round 24: With color A, [K1, sl1wyib, K1] 12 times.
Round 25: With color B, [K3, sl1wyib, K, sl1wyib] 6 times.
Round 26: With color B, [K3, sl1wyib, K, sl1wyib] 6 times.
Round 27: With color A, [sl1wyib, K1] 18 times.
Round 28: With color A, [sl1wyib, K1] 18 times.
Round 29: With color B, [K3, sl1wyib, K, sl1wyib] 6 times.
Round 30: With color B, [K3, sl1wyib, K, sl1wyib] 6 times.
Cut color B
Proceed to Finger Cuff
Adult Small- Medium
Set-up Rounds 1 and 2: With color A, Knit 42.
Round 1: With color B, *K3, sl1wyib, K, sl1wyib* 7 times.
Round 2: With color B, *K3, sl1wyib, K, sl1wyib* 7 times.
Round 3: With color A, *sl1wyib, K1* 21 times.
Round 4: With color A, *sl1wyib, K1* 21 times.
Round 5: With color B, *K3, sl1wyib, K, sl1wyib* 7 times.
Round 6: With color B, *K3, sl1wyib, K, sl1wyib* 7 times.
THUMB GUSSET
Round 7: With color A, *K1, sl1wyib, K1* 6 times, K1, place marker, k1, place marker, *K2, sl1wyib* 7 times, K1.
Round 8: With color A, *K1, sl1wyib, K1* 6 times, K1, sl m, M1, knit to marker, M1, sl m, *K2, sl1wyib* 7 times, K1— 3 thumb stitches between markers.
Round 9: With color B, *sl1wyib, K* 2 times, *K2, sl1wyib, K, sl1wyib, K* 2 times, K2, sl1wyib, sl m, knit to marker, sl m, *sl1wyib, K3, sl1wyib, K* 3 times, sl1wyib, K3.
Round 10: With color B, *sl1wyib, K* 2 times, *K2, sl1wyib, K, sl1wyib, K* 2 times, K2, sl1wyib, sl m, M1, knit to marker, M1, sl m, *sl1wyib, K3, sl1wyib, K* 3 times, sl1wyib, K3—5 thumb stitches between markers.
Round 11: With color A, *K1, sl1wyib* 9 times, K1, sl m, knit to marker, sl m, *K1, sl1wyib* 11 times.
Round 12: With color A, *K1, sl1wyib* 9 times, K1, sl m, M1, knit to marker, M1, sl m, *K1, sl1wyib* 11 times— 7 thumb stitches between markers.
Round 13: With color B, *sl1wyib, K* 2 times, *K2, sl1wyib, K, sl1wyib, K* 2 times, K2, sl1wyib, sl m, knit to marker, sl m, *sl1wyib, K3, sl1wyib, K* 3 times, sl1wyib, K3.
Round 14: With color B, *sl1wyib, K* 2 times, *K2, sl1wyib, K, sl1wyib, K* 2 times, K2, sl1wyib, sl m, M1, knit to marker, M1, sl m, *sl1wyib, K3, sl1wyib, K* 3 times, sl1wyib, K3— 9 thumb stitches between markers.
Round 15: With color A, *K1, sl1wyib, K1* 6 times, K1, sl m, knit to marker, sl m, *K2, sl1wyib* 7 times, K1.
Round 16: With color A, *K1, sl1wyib, K1* 6 times, K1, sl m, M1, knit to marker, M1, sl m, *K2, sl1wyib* 7 times, K1— 11 thumb stitches between markers.
Round 17: With color B, *K3, sl1wyib, K, sl1wyib* 3 times, K, sl m, knit to marker, sl m, *K, sl1wyib* 2 times, *K3, sl1wyib, K, sl1wyib* 3 times.
Round 18: With color B, *K3, sl1wyib, K, sl1wyib* 3 times, K, sl m, knit to marker, sl m, *K, sl1wyib* 2 times, *K3, sl1wyib, K, sl1wyib* 3 times.
Round 19: With color A, *sl1wyib, K1* 9 times, sl1wyib, sl m, knit to marker, sl m, *sl1wyib, K1* 11 times.
Round 20: With color A, *sl1wyib, K1* 9 times, sl1wyib, sl m, M1, knit to marker, M1, sl m, *sl1wyib, K1* 11 times—13 thumb stitches between markers.
Round 21: With color B, *K3, sl1wyib, K, sl1wyib* 3 times, K, sl m, knit to marker, sl m, *K, sl1wyib* 2 times, *K3, sl1wyib, K, sl1wyib* 3 times.
Round 22: With color B, *K3, sl1wyib, K, sl1wyib* 3 times, K, sl m, knit to marker, sl m, *K, sl1wyib* 2 times, *K3, sl1wyib, K, sl1wyib* 3 times.
Round 23: With color A, *K1, sl1wyib, K1* 6 times, K1, sl m, knit to marker, sl m, *K2, sl1wyib* 7 times, K1.
Round 24: With color A, *K1, sl1wyib, K1* 6 times, K1, sl m, M1, knit to marker, M1, sl m, *K2, sl1wyib* 7 times, K1—15 thumb stitches between markers.
Round 25: With color B, *sl1wyib, K* 2 times, *K2, sl1wyib, K, sl1wyib, K* 2 times, K2, sl1wyib, sl m, knit to marker, sl m, *sl1wyib, K3, sl1wyib, K* 3 times, sl1wyib, K3.
Round 26: With color B, *sl1wyib, K* 2 times, *K2, sl1wyib, K, sl1wyib, K* 2 times, K2, sl1wyib, sl m, knit to marker, sl m, *sl1wyib, K3, sl1wyib, K* 3 times, sl1wyib, K3.
Round 27: With color A, *K1, sl1wyib* 9 times, K1, sl m, knit to marker, sl m, *K1, sl1wyib* 11 times.
Round 28: With color A, *K1, sl1wyib* 9 times, K1, remove marker, place stitches to next marker on scrap yarn to hold, cast on 1, remove marker, *K1, sl1wyib* 11 times.
CONTINUE WITH HAND
Round 29: With color B, *sl1wyib, K* 2 times, *K2, sl1wyib, K, sl1wyib, K* 6 times, K2.
Round 30: With color B, *sl1wyib, K* 2 times, *K2, sl1wyib, K, sl1wyib, K* 6 times, K2.
Round 31: With color A, *K1, sl1wyib, K1* 14 times.
Round 32: With color A, *K1, sl1wyib, K1* 14 times.
Round 33: With color B, K2, *K3, sl1wyib* 2 times, *K, sl1wyib, K4* 2 times, *K, sl1wyib, K3, sl1wyib* 2 times, K, sl1wyib, K5, sl1wyib.
Round 34: With color B, K2, *K3, sl1wyib* 2 times, *K, sl1wyib, K4* 2 times, *K, sl1wyib, K3, sl1wyib* 2 times, K, sl1wyib, K5, sl1wyib.
Round 35: With color A, *sl1wyib, K1* 21 times.
Round 36: With color A, *sl1wyib, K1* 21 times.
Round 37: With color B, *K3, sl1wyib, K, sl1wyib* 7 times.
Round 38: With color B, *K3, sl1wyib, K, sl1wyib* 7 times.
Round 39: With color A, *K1, sl1wyib, K1* 14 times.
Round 40: With color A, *K1, sl1wyib, K1* 14 times.
Round 41: With color B, *sl1wyib, K* 2 times, *K2, sl1wyib, K, sl1wyib, K* 6 times, K2.
Round 42: With color B, *sl1wyib, K* 2 times, *K2, sl1wyib, K, sl1wyib, K* 6 times, K2.
Round 43: With color A, *K1, sl1wyib* 21 times.
Round 44: With color A, *K1, sl1wyib* 21 times.
Round 45: With color B, *sl1wyib, K* 2 times, *K2, sl1wyib, K, sl1wyib, K* 6 times, K2.
Round 46: With color B, *sl1wyib, K* 2 times, *K2, sl1wyib, K, sl1wyib, K* 6 times, K2.
Round 47: With color A, *K1, sl1wyib, K1* 14 times.
Round 48: With color A, *K1, sl1wyib, K1* 14 times.
Round 49: With color B, K2, *K3, sl1wyib* 2 times, *K, sl1wyib, K4* 2 times, *K, sl1wyib, K3, sl1wyib* 2 times, K, sl1wyib, K5, sl1wyib.
Round 50: With color B, K2, *K3, sl1wyib* 2 times, *K, sl1wyib, K4* 2 times, *K, sl1wyib, K3, sl1wyib* 2 times, K, sl1wyib, K5, sl1wyib.
Round 51: With color A, *sl1wyib, K1* 21 times.
Round 52: With color A, *sl1wyib, K1* 21 times.
Round 53: With color B, *K3, sl1wyib, K, sl1wyib* 7 times.
Round 54: With color B, *K3, sl1wyib, K, sl1wyib* 7 times.
Cut color B
Proceed to Finger Cuff
Adult Large-Extra Large
Round 1: With color B, *sl1wyib, K* 2 times, *K2, sl1wyib, K, sl1wyib, K* 7 times, K2.
Round 2: With color B, *sl1wyib, K* 2 times, *K2, sl1wyib, K, sl1wyib, K* 7 times, K2.
Round 3: With color A, *K1, sl1wyib* 24 times.
Round 4: With color A, *K1, sl1wyib* 24 times.
Round 5: With color B, *sl1wyib, K* 2 times, *K2, sl1wyib, K, sl1wyib, K* 7 times, K2.
Round 6: With color B, *sl1wyib, K* 2 times, *K2, sl1wyib, K, sl1wyib, K* 7 times, K2.
Round 7: With color A, *K1, sl1wyib, K1* 16 times.
Round 8: With color A, *K1, sl1wyib, K1* 16 times.
THUMB GUSSET
Round 9: With color B, *K3, sl1wyib, K, sl1wyib* 3 times, K3, sl1wyib, place marker, k1, place marker, *sl1wyib, K3, sl1wyib, K* 4 times, sl1wyib.
Round 10: With color B, *K3, sl1wyib, K, sl1wyib* 3 times, K3, sl1wyib, sl m, M1, knit to marker, M1, sl m, *sl1wyib, K3, sl1wyib, K* 4 times, sl1wyib— 3 thumb stitches between markers.
Round 11: With color A, *sl1wyib, K1* 11 times, sl m, knit to marker, sl m, *K1, sl1wyib* 12 times, K1.
Round 12: With color A, *sl1wyib, K1* 11 times, sl m, M1, knit to marker, M1, sl m, *K1, sl1wyib* 12 times, K1— 5 thumb stitches between markers.
Round 13: With color B, *K3, sl1wyib, K, sl1wyib* 3 times, K3, sl1wyib, sl m, knit to marker, sl m, *sl1wyib, K3, sl1wyib, K* 4 times, sl1wyib.
Round 14: With color B, *K3, sl1wyib, K, sl1wyib* 3 times, K3, sl1wyib, sl m, M1, knit to marker, M1, sl m, *sl1wyib, K3, sl1wyib, K* 4 times, sl1wyib— 7 thumb stitches between markers.
Round 15: With color A, *K1, sl1wyib, K1* 7 times, K1, sl m, knit to marker, sl m, *K2, sl1wyib* 8 times, K1.
Round 16: With color A, *K1, sl1wyib, K1* 7 times, K1, sl m, M1, knit to marker, M1, sl m, *K2, sl1wyib* 8 times, K1— 9 thumb stitches between markers.
Round 17: With color B, *sl1wyib, K* 2 times, *K2, sl1wyib, K, sl1wyib, K* 3 times, sl m, knit to marker, sl m, *K, sl1wyib* 2 times, *K3, sl1wyib, K, sl1wyib* 3 times, K3.
Round 18: With color B, *sl1wyib, K* 2 times, *K2, sl1wyib, K, sl1wyib, K* 3 times, sl m, knit to marker, sl m, *K, sl1wyib* 2 times, *K3, sl1wyib, K, sl1wyib* 3 times, K3.
Round 19: With color A, *K1, sl1wyib* 11 times, sl m, knit to marker, sl m, *sl1wyib, K1* 12 times, sl1wyib.
Round 20: With color A, *K1, sl1wyib* 11 times, sl m, M1, knit to marker, M1, sl m, *sl1wyib, K1* 12 times, sl1wyib— 11 thumb stitches between markers.
Round 21: With color B, *sl1wyib, K* 2 times, *K2, sl1wyib, K, sl1wyib, K* 3 times, sl m, knit to marker, sl m, *K, sl1wyib* 2 times, *K3, sl1wyib, K, sl1wyib* 3 times, K3.
Round 22: With color B, *sl1wyib, K* 2 times, *K2, sl1wyib, K, sl1wyib, K* 3 times, sl m, knit to marker, sl m, *K, sl1wyib* 2 times, *K3, sl1wyib, K, sl1wyib* 3 times, K3.
Round 23: With color A, *K1, sl1wyib, K1* 7 times, K1, sl m, knit to marker, sl m, *K2, sl1wyib* 8 times, K1.
Round 24: With color A, *K1, sl1wyib, K1* 7 times, K1, sl m, M1, knit to marker, M1, sl m, *K2, sl1wyib* 8 times, K1— 13 thumb stitches between markers.
Round 25: With color B, *K3, sl1wyib, K, sl1wyib* 3 times, K3, sl1wyib, sl m, knit to marker, sl m, *sl1wyib, K3, sl1wyib, K* 4 times, sl1wyib.
Round 26: With color B, *K3, sl1wyib, K, sl1wyib* 3 times, K3, sl1wyib, sl m, knit to marker, sl m, *sl1wyib, K3, sl1wyib, K* 4 times, sl1wyib.
Round 27: With color A, *sl1wyib, K1* 11 times, sl m, knit to marker, sl m, *K1, sl1wyib* 12 times, K1.
Round 28: With color A, *sl1wyib, K1* 11 times, sl m, M1, knit to marker, M1, sl m, *K1, sl1wyib* 12 times, K1— 15 thumb stitches between markers.
Round 29: With color B, *K3, sl1wyib, K, sl1wyib* 3 times, K3, sl1wyib, sl m, knit to marker, sl m, *sl1wyib, K3, sl1wyib, K* 4 times, sl1wyib.
Round 30: With color B, *K3, sl1wyib, K, sl1wyib* 3 times, K3, sl1wyib, sl m, knit to marker, sl m, *sl1wyib, K3, sl1wyib, K* 4 times, sl1wyib.
Round 31: With color A, *K1, sl1wyib, K1* 7 times, K1, sl m, knit to marker, sl m, *K2, sl1wyib* 8 times, K1.
Round 32: With color A, *K1, sl1wyib, K1* 7 times, K1, sl m, M1, knit to marker, M1, sl m, *K2, sl1wyib* 8 times, K1— 17 thumb stitches between markers.
Round 33: With color B, *sl1wyib, K* 2 times, K, *K, sl1wyib* 2 times, *K5, sl1wyib* 2 times, K, sl m, knit to marker, sl m, *K3, sl1wyib* 2 times, *K, sl1wyib, K3, sl1wyib* 2 times, K, sl1wyib, K3.
Round 34: With color B, *sl1wyib, K* 2 times, K, *K, sl1wyib* 2 times, *K5, sl1wyib* 2 times, K, remover marker, place stitches to next marker on scrap yarn to hold, cast on 1, remove marker, *K3, sl1wyib* 2 times, *K, sl1wyib, K3, sl1wyib* 2 times, K, sl1wyib, K3.
CONTINUE WITH HAND
Round 35: With color A, *K1, sl1wyib* 24 times.
Round 36: With color A, *K1, sl1wyib* 24 times.
Round 37: With color B, *sl1wyib, K* 2 times, *K2, sl1wyib, K, sl1wyib, K* 7 times, K2.
Round 38: With color B, *sl1wyib, K* 2 times, *K2, sl1wyib, K, sl1wyib, K* 7 times, K2.
Round 39: With color A, *K1, sl1wyib, K1* 16 times.
Round 40: With color A, *K1, sl1wyib, K1* 16 times.
Round 41: With color B, *K3, sl1wyib, K, sl1wyib* 8 times.
Round 42: With color B, *K3, sl1wyib, K, sl1wyib* 8 times.
Round 43: With color A, *sl1wyib, K1* 24 times.
Round 44: With color A, *sl1wyib, K1* 24 times.
Round 45: With color B, *K3, sl1wyib, K, sl1wyib* 8 times.
Round 46: With color B, *K3, sl1wyib, K, sl1wyib* 8 times.
Round 47: With color A, *K1, sl1wyib, K1* 16 times.
Round 48: With color A, *K1, sl1wyib, K1* 16 times.
Round 49: With color B, *sl1wyib, K* 2 times, K, *K, sl1wyib* 2 times, *K5, sl1wyib* 3 times, *K3, sl1wyib, K, sl1wyib* 3 times, K3.
Round 50: With color B, *sl1wyib, K* 2 times, K, *K, sl1wyib* 2 times, *K5, sl1wyib* 3 times, *K3, sl1wyib, K, sl1wyib* 3 times, K3.
Round 51: With color A, *K1, sl1wyib* 24 times.
Round 52: With color A, *K1, sl1wyib* 24 times.
Round 53: With color B, *sl1wyib, K* 2 times, *K2, sl1wyib, K, sl1wyib, K* 7 times, K2.
Round 54: With color B, *sl1wyib, K* 2 times, *K2, sl1wyib, K, sl1wyib, K* 7 times, K2.
Round 55: With color A, *K1, sl1wyib, K1* 16 times.
Round 56: With color A, *K1, sl1wyib, K1* 16 times.
Round 57: With color B, *K3, sl1wyib, K, sl1wyib* 8 times.
Round 58: With color B, *K3, sl1wyib, K, sl1wyib* 8 times.
Round 59: With color A, *sl1wyib, K1* 24 times.
Round 60: With color A, *sl1wyib, K1* 24 times.
Round 61: With color B, *K3, sl1wyib, K, sl1wyib* 8 times.
Round 62: With color B, *K3, sl1wyib, K, sl1wyib* 8 times.
Cut color B
Proceed to Finger Cuff
FINGER CUFF
With smaller double pointed needles
Rounds 1-4: With color A, *K1, P1; repeat from * around.
Bind off in pattern.
THUMB
All Sizes
With smaller double pointed needles
Set-up Round: With color A, place thumb stitches from scrap yarn onto 3 double pointed needles, pick up and knit 1 stitch at cast on. Join to work in the round.
Rounds 1-9: With color A, *K1, P1; repeat from * around.
Bind off in pattern.
FINISHING
Fasten tail securely to wrong side of mitten.
Use tail from Thumb to close any gap or hole at the join with the Duplicate Stitch technique.
Weave in all loose ends.
Love This Pattern? Show It Some Ravelry Love ❤️
If you’re enjoying the Sugar Biscuit Knit Fingerless Mitts, I’d love for you to:
- ⭐ Favorite the pattern on Ravelry
- 🧶 Add it to your queue
- 📸 Share your finished mitts with the community

Seeing your projects is one of my favorite parts of designing!
Make It a Matching Set ✨
Don’t stop at the mitts! Pair them with the coordinating Sugar Biscuit Knit Hat for a complete mosaic knit accessory set.
👉 Sugar Biscuit Knit Hat Pattern
Matching sets are fantastic for gifting — and let’s be honest, for keeping one piece and gifting the other 😄
Love Mosaic Knitting? Try These Patterns 💙
If mosaic stitches make your heart happy, here are a few more designs you might love:
- Anne Mosaic Knit Shawl
https://shop.marlybird.com/products/anne-slip-stitch-mosaic-knit-shawl-pattern-marly-bird - Crazy Stripes Mosaic Knit Shawl (Free Pattern)
https://marlybird.com/free-knitting-patterns/crazy-stripes-shawl/ - NYE Mosaic Knit Cowl
https://marlybird.thrivecart.com/nye-countdown-25-knit/ - Summit Knit Shawl
(Coming soon!) - Falling Leaves Mosaic Knit Hat (Free Pattern)
https://marlybird.com/blog/cozy-up-with-the-falling-leaves-mosaic-knit-hat-free-pattern-mosaic-tips/ - Cocoa Dreams Mosaic Knit Fingerless Mitts
https://marlybird.com/blog/cocoa-dreams-mosaic-knit-fingerless-mittens-free-pattern/ - Dynamic Waves Mosaic Knit Hat
https://marlybird.com/mosaic-knit-hat-pattern-dynamic-wave/ - Pixel Pop Mosaic Knit Hat (Course)
https://marlybird.thrivecart.com/2025-pixel-pop-knit/ - Pixel Pop Mosaic Knit Mittens
https://www.ravelry.com/patterns/library/pixel-pop-knit-mittens
Mosaic knitting is such a powerful technique because you get colorwork impact with calm knitting energy — one color at a time, always.
Frequently Asked Questions About Mosaic Knit Fingerless Mitts
What are mosaic knit fingerless mitts?
Mosaic knit fingerless mitts use slip-stitch mosaic colorwork, a technique that creates bold patterns using only one color per row. The result looks complex, but the knitting itself is very approachable and rhythmic.
Are mosaic knit fingerless mitts good for beginners?
Yes — especially for knitters who are comfortable with knit and purl stitches. Mosaic knitting is often considered one of the easiest ways to learn colorwork because you never work with more than one color at a time.
✨ Designer Tip: If you’re new to colorwork, fingerless mitts are a fantastic place to start because they’re small, fast, and forgiving.
How is mosaic knitting different from stranded colorwork?
In mosaic knitting:
- You work with one color per row
- The second color is created by slipping stitches
- Floats stay short and tidy
This makes mosaic knitting much less intimidating than stranded colorwork, especially for accessories like mitts.
What yarn works best for mosaic knit mittens or fingerless mitts?
Smooth yarns with good stitch definition work best so the slip-stitch pattern really pops. High-contrast colors will highlight the mosaic design, while low-contrast colors create a more subtle, textured look.
Can I use more than two colors in mosaic knit fingerless mitts?
Yes! While each row only uses one color, you can rotate multiple colors throughout the project. This is a great way to:
- Use up scraps
- Create gradient effects
- Customize the look without complicating the knitting
Are mosaic knit fingerless mitts warm enough?
Absolutely. The slip-stitch fabric creates a thicker, denser fabric than standard stockinette, making these mitts cozy and warm while still allowing finger freedom.
How long does it take to knit fingerless mitts like these?
Most knitters can complete a pair of mosaic knit fingerless mitts in a weekend or a few evenings. They’re a quick, satisfying project with a big visual payoff.
Are mosaic knit fingerless mitts good gift projects?
They’re excellent gift projects! Fingerless mitts are:
- Quick to knit
- Easy to size
- Great for fall and winter gifting
They’re especially popular for holiday gifts, teacher gifts, and “just because” knits.
Can I adjust the size of mosaic knit fingerless mitts?
Yes. Most sizing adjustments are made by:
- Changing needle size
- Adjusting yarn weight
- Modifying cuff length
Because mosaic patterns rely on stitch repeats, it’s important to maintain the integrity of the repeat when making changes.
Do mosaic knit mittens require special tools or techniques?
No special tools are required beyond standard knitting needles. Basic skills like knitting in the round, slipping stitches, and simple decreases are all that’s needed.
Where can I learn more about mosaic knitting?
If you fall in love with mosaic knitting (and you probably will 😉), there are lots of ways to expand your skills with hats, cowls, shawls, and more — all using the same one-color-per-row approach.
Final Thoughts 🧶
The Sugar Biscuit Knit Fingerless Mitts are the kind of project that checks all the boxes: fun to knit, beautiful to wear, and impressive without being overwhelming. Whether you’re learning mosaic knitting for the first time or adding another cozy accessory to your handmade wardrobe, these mitts are a satisfying, confidence-boosting knit.
And if you’re already thinking about that matching hat… I fully support that decision 💕
❤️ Your BiCrafty Bestie,
Marly Bird

Categories: Free Patterns, Knitting, Marly Bird Premium Patterns, Our Free Patterns, Pattern